2014 MERCEDES-BENZ S-CLASS COUPE fold seats
[x] Cancel search: fold seatsPage 20 of 413

Restraint system
Display messag e............................ 275
Introduction ..................................... 42
Warning lamp ................................. 306
Warning lamp (function) ................... 43
Rev counter ........................................ 242
Reversing camera
Cleaning instructions ..................... 347
Function/note s............................. 217
Switching on/of f........................... 218
Reversing feature
Side windows ................................... 99
Reversing function
Boot lid ............................................ 94
Roller sunblind ............................... 102
Reversing lamp (display message) .. 281
ROAD SURFACE SCAN ....................... 206
Roller sunblind
Panorama roof ............................... 102
Rear window .................................. 322
Roller sunblind of the panorama
roof
Opening and closing ...................... 103
Operating ....................................... 102
Resetting ....................................... 103
Roof lining and carpets (cleaning
instructions) ...................................... 351
Roof load (maximum) ........................ 408S
Safety Automatic front-passenger front
airbag deactivation system .............. 51
Child restraint systems .................... 61
Children in the vehicle ..................... 60
see Operating safety
Safety system
see Driving safety systems
Seat
Seat backrest display message ..... 297
Seat belt
Correct usage .................................. 45
Seat belts
Adjusting the driver's and front-
passenger seat belt ......................... 47
Cleaning ......................................... 351
Display message ............................ 274 Fastening ......................................... 46
Important safety guidelines ............. 44
Introduction ..................................... 44
Rear seat belt status indicator ......... 48
Releasing ......................................... 47
Warning lamp ................................. 300
Warning lamp (function) ................... 47
Seating
Seating comfort packag e............... 111
Seating comfort package ................. 111
Seats
Active multicontour seat ................ 111
Adjusting (electrically) ................... 108
Adjusting the 4-way lumbar sup-
port ................................................ 111
Adjusting the head restraint .......... 109
Cleaning the cover ......................... 350
Correct driver's seat position ........ 106
EASY-ENTRY/EXIT system ............. 116
Folding the backrests forward/
back ............................................... 110
Important safety notes .................. 107
Seat heating .................................. 111
Seat heating problem .................... 113
Seat ventilation .............................. 113
Seat ventilation problem ................ 114
Storing settings (memory func-
tion) ............................................... 120
Switching seat heating on/of f....... 111
Switching the seat ventilation on/ off .................................................. 113
Section
Wheels and tyres ........................... 376
Selector lever
Cleaning ......................................... 350
see Automatic transmission
Sensors (cleaning instructions) ....... 347
Service
see ASSYST PLUS
Service Centre
see Qualified specialist workshop
Service menu (on-board com-
puter) .................................................. 256
Service products
Brake fluid ..................................... 406
Coolant (engine) ............................ 406
Engine oil ....................................... 405
Fuel ................................................ 403 Index
17
Page 42 of 413
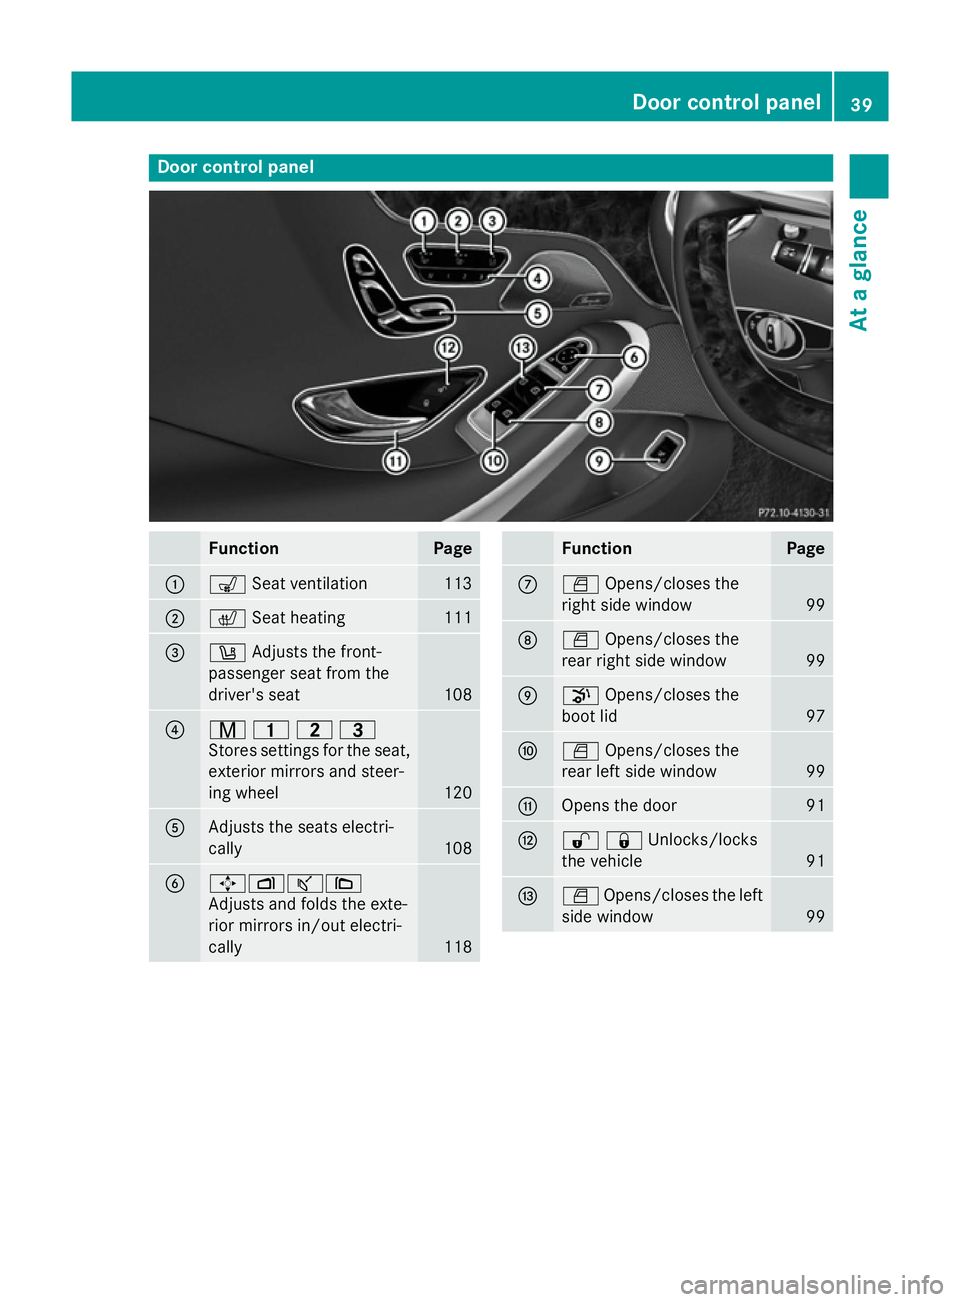
Door control panel
Function Page
:
s
Seat ventilation 113
;
c
Seat heating 111
=
w
Adjusts the front-
passenger seat from the
driver's seat 108
?
r
45=
Stores settings for the seat, exterior mirrors and steer-
ing wheel 120
A
Adjusts the seats electri-
cally
108
B
7Zª\
Adjusts and folds the exte-
rior mirrors in/out electri-
cally 118 Function Page
C
W
Opens/closes the
right side window 99
D
W
Opens/closes the
rear right side window 99
E
p
Opens/closes the
boot lid 97
F
W
Opens/closes the
rear left side window 99
G
Opens the door 91
H
%&Unlocks/locks
the vehicle
91
I
W
Opens/closes the left
side window 99Door control panel
39At a glance
Page 65 of 413
load in an accident. Have the child restraint
securing systems checked in a qualified spe-
cialist workshop before fitting a child restraint
system again.
If it is absolutely necessary to carry a child on
the front-passenger seat, be sure to observe
the information on "Child restraint systems
on the front-passenger seat" (Y page 63).
Observe the warning labels in the vehicle inte-
rior and on the child restraint system.
i It is advisable to use Mercedes-Benz care
products to clean child restraint systems
recommended by Mercedes-Benz. You can obtain information about this at any
Mercedes-Benz Service Centre. ISOFIX child seat securing system
G
WARNING
ISOFIX child restraint systems do not offer
sufficient protective effect for children whose weight is greater than 22 kg who are securedusing the safety belt integrated in the child
restraint system. The child could, for example,not be restrained correctly in the event of an
accident. This poses an increased risk of
injury or even fatal injury.
If the child weighs more than 22 kg, only use
ISOFIX child restraint systems with which the child is also secured with the vehicle seat belt. Also secure the child restraint system with the
Top Tether belt, if available.
When fitting a child restraint system, be sure to observe the manufacturer's installation
instructions and the instructions for correct
use of the child restraint system
(Y page 65).
Before every trip, make sure that the ISOFIX
child restraint system is engaged correctly in both ISOFIX securing rings. ISOFIX securing rings
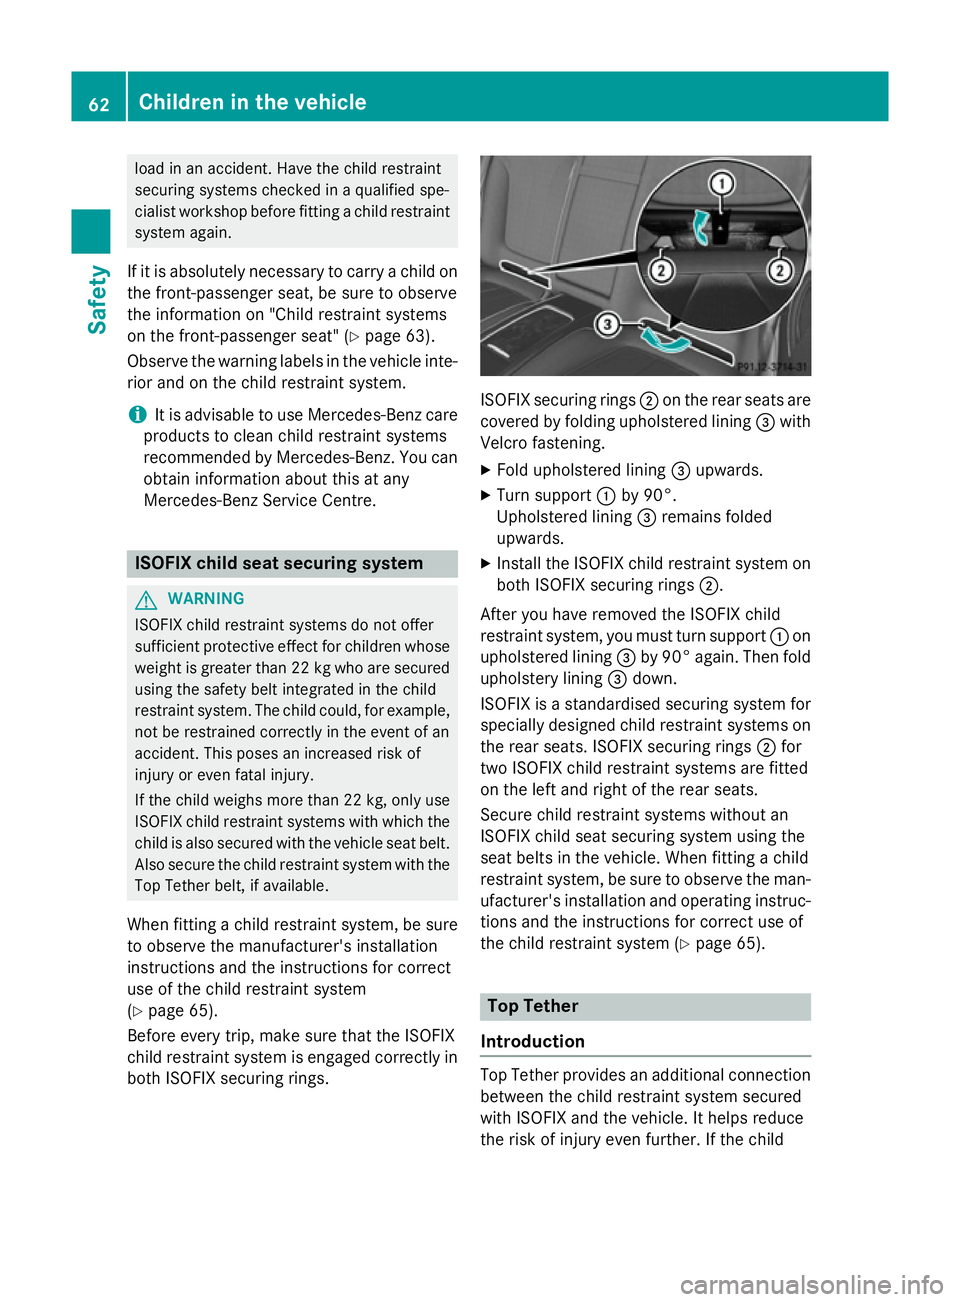
;on the rear seats are
covered by folding upholstered lining =with
Velcro fastening.
X Fold upholstered lining =upwards.
X Turn support :by 90°.
Upholstered lining =remains folded
upwards.
X Install the ISOFIX child restraint system on
both ISOFIX securing rings ;.
After you have removed the ISOFIX child
restraint system, you must turn support :on
upholstered lining =by 90° again. Then fold
upholstery lining =down.
ISOFIX is a standardised securing system for
specially designed child restraint systems on
the rear seats. ISOFIX securing rings ;for
two ISOFIX child restraint systems are fitted
on the left and right of the rear seats.
Secure child restraint systems without an
ISOFIX child seat securing system using the
seat belts in the vehicle. When fitting a child
restraint system, be sure to observe the man- ufacturer's installation and operating instruc-
tions and the instructions for correct use of
the child restraint system (Y page 65). Top Tether
Introduction Top Tether provides an additional connection
between the child restraint system secured
with ISOFIX and the vehicle. It helps reduce
the risk of injury even further. If the child 62
Children in the vehicleSafety
Page 66 of 413
restraint system is fitted with a Top Tether
belt, this should always be used.
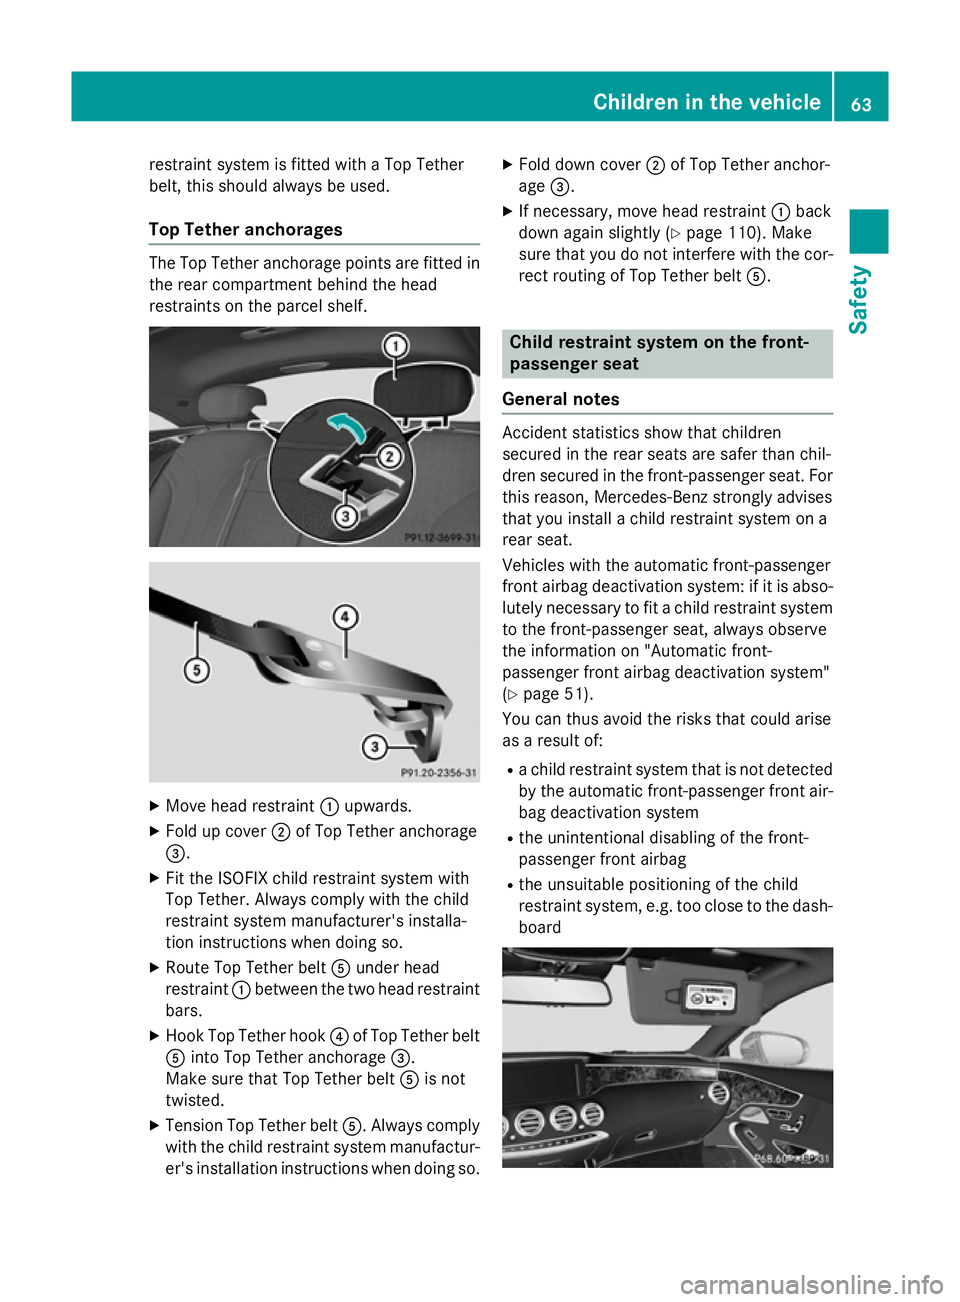
Top Tether anchorages The Top Tether anchorage points are fitted in
the rear compartment behind the head
restraints on the parcel shelf. X
Move head restraint :upwards.
X Fold up cover ;of Top Tether anchorage
=.
X Fit the ISOFIX child restraint system with
Top Tether. Always comply with the child
restraint system manufacturer's installa-
tion instructions when doing so.
X Route Top Tether belt Aunder head
restraint :between the two head restraint
bars.
X Hook Top Tether hook ?of Top Tether belt
A into Top Tether anchorage =.
Make sure that Top Tether belt Ais not
twisted.
X Tension Top Tether belt A. Always comply
with the child restraint system manufactur- er's installation instructions when doing so. X
Fold down cover ;of Top Tether anchor-
age =.
X If necessary, move head restraint :back
down again slightly (Y page 110). Make
sure that you do not interfere with the cor-
rect routing of Top Tether belt A. Child restraint system on the front-
passenger seat
General notes Accident statistics show that children
secured in the rear seats are safer than chil-
dren secured in the front-passenger seat. For
this reason, Mercedes-Benz strongly advises
that you install a child restraint system on a
rear seat.
Vehicles with the automatic front-passenger
front airbag deactivation system: if it is abso- lutely necessary to fit a child restraint system
to the front-passenger seat, always observe
the information on "Automatic front-
passenger front airbag deactivation system"
(Y page 51).
You can thus avoid the risks that could arise
as a result of:
R a child restraint system that is not detected
by the automatic front-passenger front air- bag deactivation system
R the unintentional disabling of the front-
passenger front airbag
R the unsuitable positioning of the child
restraint system, e.g. too close to the dash-
board Children in the vehicle
63Safety Z
Page 113 of 413
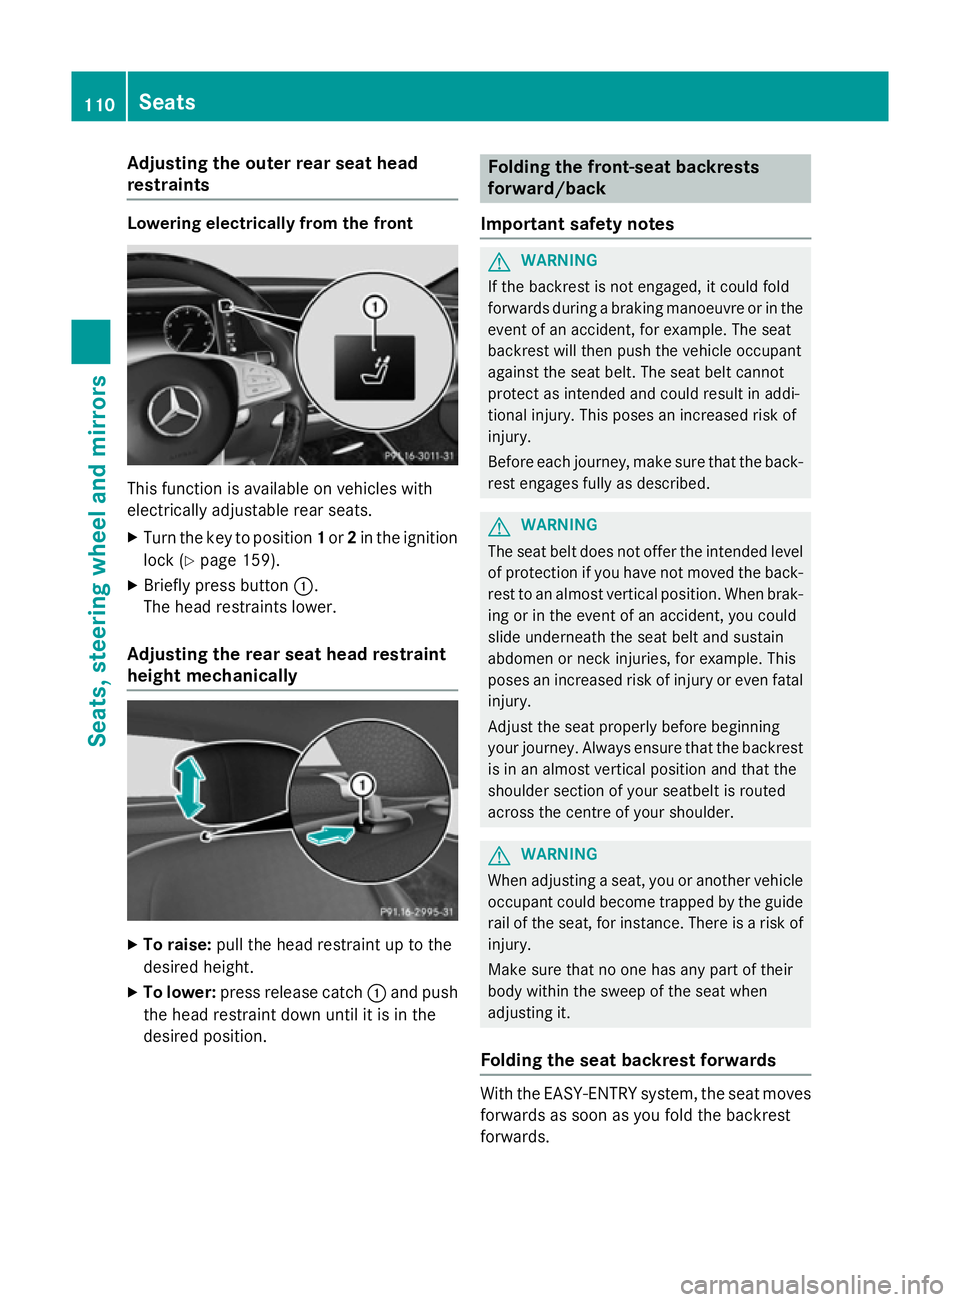
Adjusting the outer rear seat head
restraints Lowering electrically from the front
This function is available on vehicles with
electrically adjustable rear seats.
X Turn the key to position 1or 2in the ignition
lock (Y page 159).
X Briefly press button :.
The head restraints lower.
Adjusting the rear seat head restraint
height mechanically X
To raise: pull the head restraint up to the
desired height.
X To lower: press release catch :and push
the head restraint down until it is in the
desired position. Folding the front-seat backrests
forward/back
Important safety notes G
WARNING
If the backrest is not engaged, it could fold
forwards during a braking manoeuvre or in the event of an accident, for example. The seat
backrest will then push the vehicle occupant
against the seat belt. The seat belt cannot
protect as intended and could result in addi-
tional injury. This poses an increased risk of
injury.
Before each journey, make sure that the back- rest engages fully as described. G
WARNING
The seat belt does not offer the intended level of protection if you have not moved the back-
rest to an almost vertical position. When brak-
ing or in the event of an accident, you could
slide underneath the seat belt and sustain
abdomen or neck injuries, for example. This
poses an increased risk of injury or even fatal injury.
Adjust the seat properly before beginning
your journey. Always ensure that the backrest
is in an almost vertical position and that the
shoulder section of your seatbelt is routed
across the centre of your shoulder. G
WARNING
When adjusting a seat, you or another vehicle occupant could become trapped by the guiderail of the seat, for instance. There is a risk of
injury.
Make sure that no one has any part of their
body within the sweep of the seat when
adjusting it.
Folding the seat backrest forwards With the EASY-ENTRY system, the seat moves
forwards as soon as you fold the backrest
forwards. 110
SeatsSeats
, steering wheel and mirrors
Page 114 of 413
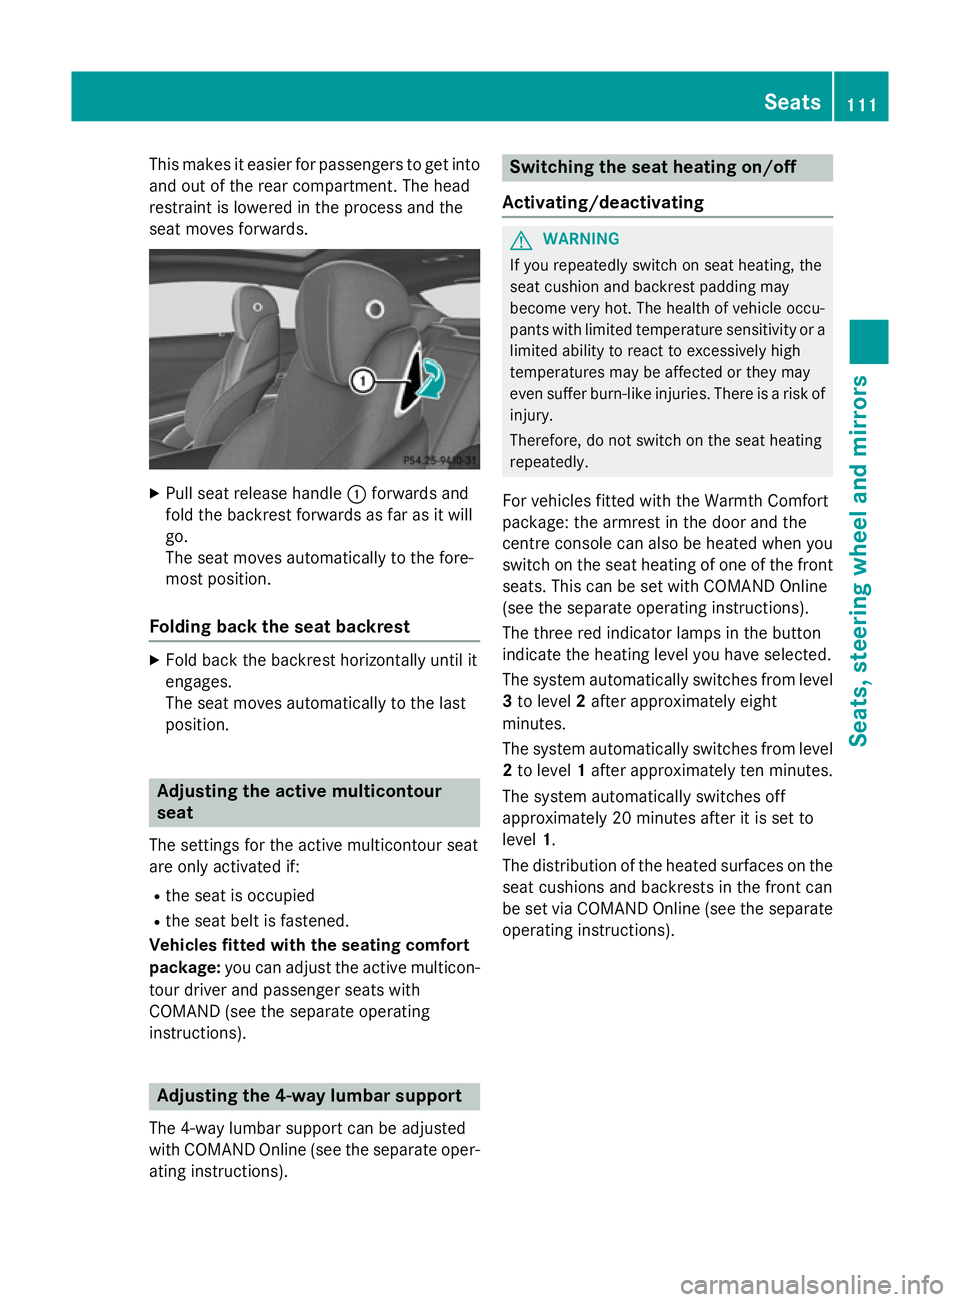
This makes it easier for passengers to get into
and out of the rear compartment. The head
restraint is lowered in the process and the
seat moves forwards. X
Pull seat release handle :forwards and
fold the backrest forwards as far as it will
go.
The seat moves automatically to the fore-
most position.
Folding back the seat backrest X
Fold back the backrest horizontally until it
engages.
The seat moves automatically to the last
position. Adjusting the active multicontour
seat
The settings for the active multicontour seat
are only activated if:
R the seat is occupied
R the seat belt is fastened.
Vehicles fitted with the seating comfort
package: you can adjust the active multicon-
tour driver and passenger seats with
COMAND (see the separate operating
instructions). Adjusting the 4-way lumbar support
The 4-way lumbar support can be adjusted
with COMAND Online (see the separate oper- ating instructions). Switching the seat heating on/off
Activating/deactivating G
WARNING
If you repeatedly switch on seat heating, the
seat cushion and backrest padding may
become very hot. The health of vehicle occu-
pants with limited temperature sensitivity or a limited ability to react to excessively high
temperatures may be affected or they may
even suffer burn-like injuries. There is a risk of
injury.
Therefore, do not switch on the seat heating
repeatedly.
For vehicles fitted with the Warmth Comfort
package: the armrest in the door and the
centre console can also be heated when you
switch on the seat heating of one of the front
seats. This can be set with COMAND Online
(see the separate operating instructions).
The three red indicator lamps in the button
indicate the heating level you have selected.
The system automatically switches from level
3 to level 2after approximately eight
minutes.
The system automatically switches from level
2 to level 1after approximately ten minutes.
The system automatically switches off
approximately 20 minutes after it is set to
level 1.
The distribution of the heated surfaces on the seat cushions and backrests in the front can
be set via COMAND Online (see the separateoperating instructions). Seats
111Seats, steering wheel and mirrors Z
Page 121 of 413
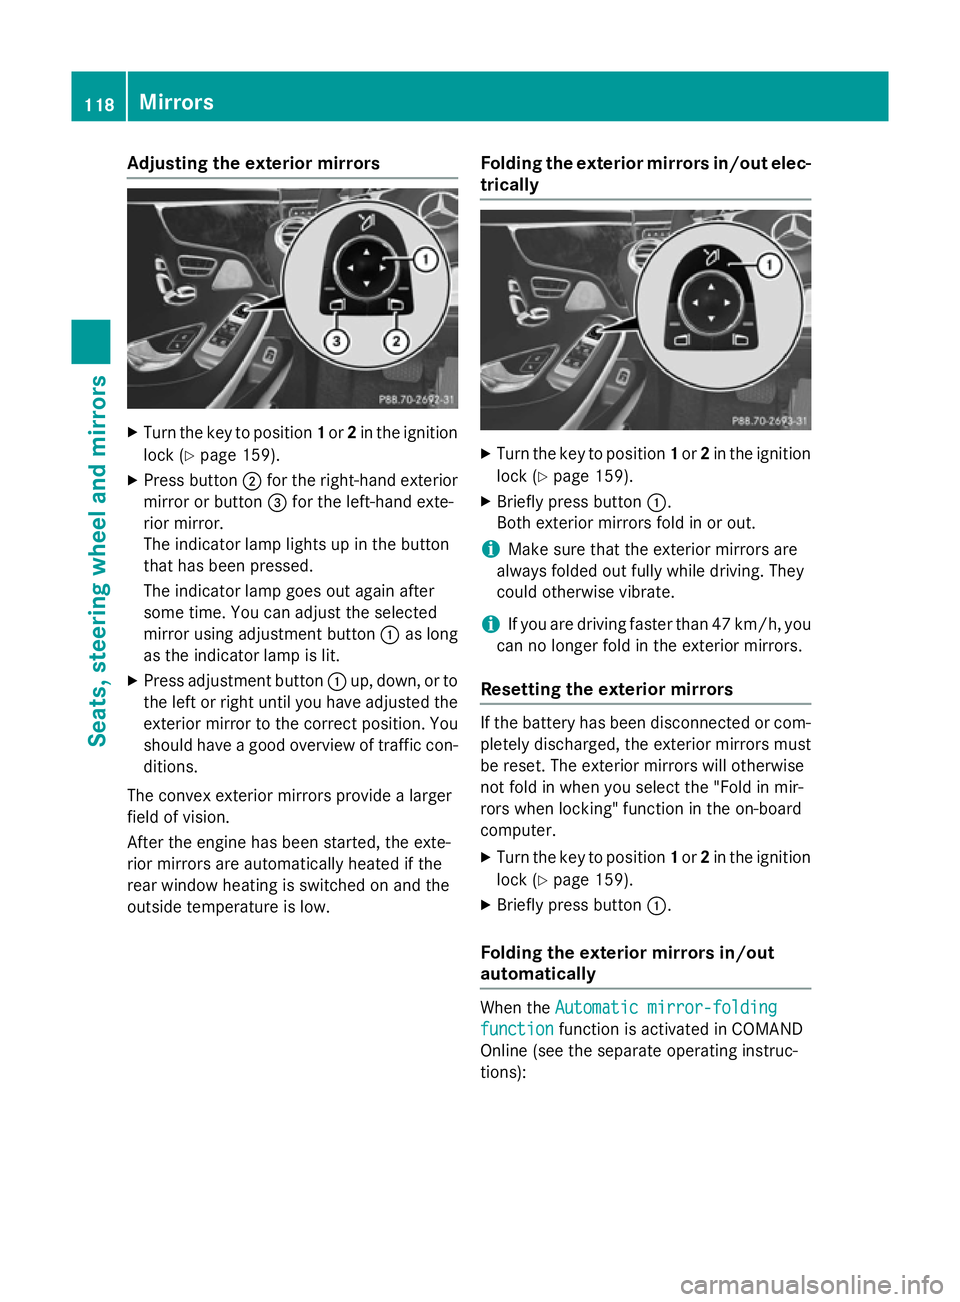
Adjusting the exterior mirrors
X
Turn the key to position 1or 2in the ignition
lock (Y page 159).
X Press button ;for the right-hand exterior
mirror or button =for the left-hand exte-
rior mirror.
The indicator lamp lights up in the button
that has been pressed.
The indicator lamp goes out again after
some time. You can adjust the selected
mirror using adjustment button :as long
as the indicator lamp is lit.
X Press adjustment button :up, down, or to
the left or right until you have adjusted the
exterior mirror to the correct position. You
should have a good overview of traffic con- ditions.
The convex exterior mirrors provide a larger
field of vision.
After the engine has been started, the exte-
rior mirrors are automatically heated if the
rear window heating is switched on and the
outside temperature is low. Folding the exterior mirrors in/out elec-
trically X
Turn the key to position 1or 2in the ignition
lock (Y page 159).
X Briefly press button :.
Both exterior mirrors fold in or out.
i Make sure that the exterior mirrors are
always folded out fully while driving. They
could otherwise vibrate.
i If you are driving faster than 47 km/h, you
can no longer fold in the exterior mirrors.
Resetting the exterior mirrors If the battery has been disconnected or com-
pletely discharged, the exterior mirrors must
be reset. The exterior mirrors will otherwise
not fold in when you select the "Fold in mir-
rors when locking" function in the on-board
computer.
X Turn the key to position 1or 2in the ignition
lock (Y page 159).
X Briefly press button :.
Folding the exterior mirrors in/out
automatically When the
Automatic mirror-folding Automatic mirror-folding
function
function function is activated in COMAND
Online (see the separate operating instruc-
tions): 118
MirrorsSeats
, steering wheel and mirrors
Page 122 of 413
R
the exterior mirrors fold in automatically as
soon as you lock the vehicle from the out-
side
R the exterior mirrors fold out automatically
again as soon as you unlock the vehicle
i If the exterior mirrors have been folded in
manually, they do not fold out.
Exterior mirror pushed out of position If an exterior mirror has been pushed out of
position (forwards or backwards), proceed as
follows:
X Press and hold button :until you hear a
click and the mirror engages audibly into
position (Y page 118).
The mirror housing is engaged again and
you can adjust the exterior mirrors as usual
(Y page 118). Automatic anti-dazzle mirrors
The rear-view mirror and the exterior mirror
on the driver's side automatically go into anti- dazzle mode if the following conditions are
met simultaneously:
R the ignition is switched on.
R incident light from headlamps strikes the
sensor in the rear-view mirror.
The mirrors do not dip if reverse gear is
engaged or if the interior lighting is switched
on. Parking position of the exterior mirror
on the front-passenger side
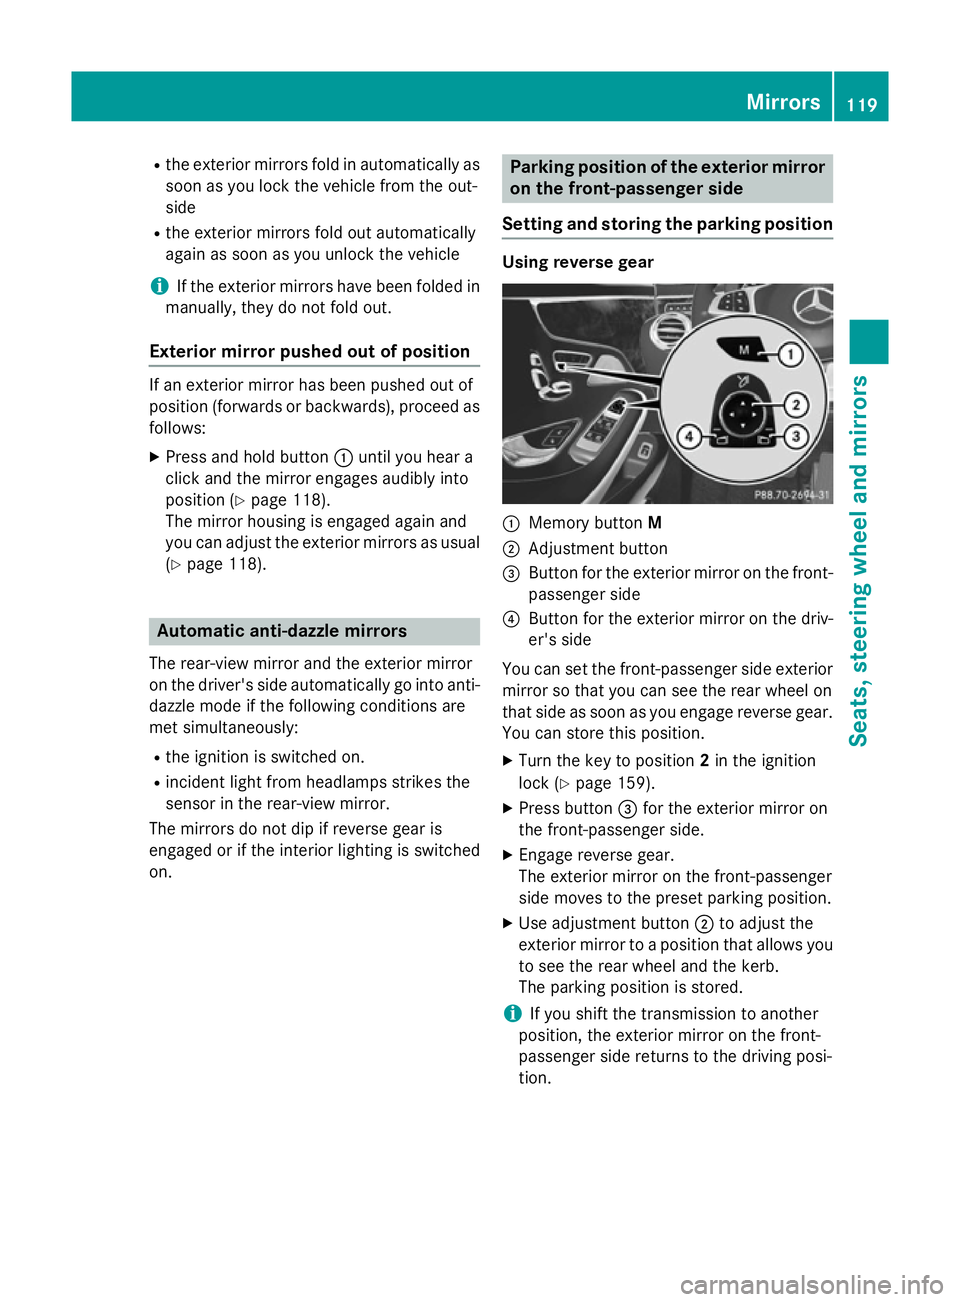
Setting and storing the parking position Using reverse gear
:
Memory button M
; Adjustment button
= Button for the exterior mirror on the front-
passenger side
? Button for the exterior mirror on the driv-
er's side
You can set the front-passenger side exterior
mirror so that you can see the rear wheel on
that side as soon as you engage reverse gear. You can store this position.
X Turn the key to position 2in the ignition
lock (Y page 159).
X Press button =for the exterior mirror on
the front-passenger side.
X Engage reverse gear.
The exterior mirror on the front-passenger
side moves to the preset parking position.
X Use adjustment button ;to adjust the
exterior mirror to a position that allows you
to see the rear wheel and the kerb.
The parking position is stored.
i If you shift the transmission to another
position, the exterior mirror on the front-
passenger side returns to the driving posi-
tion. Mirrors
119Seats, steering wheel and mirrors Z