2014 MERCEDES-BENZ S-CLASS COUPE wheel
[x] Cancel search: wheelPage 124 of 413
R
seat heating: distribution of the heated sec-
tions of the seat cushion and backrest
R driver's side: position of the exterior mir-
rors on the driver's and front-passenger
sides
R position of the head-up display X
Adjust the seat accordingly (Y page 108).
X On the driver's side, adjust the steering
wheel (Y page 114) and the exterior mirrors
(Y page 118).
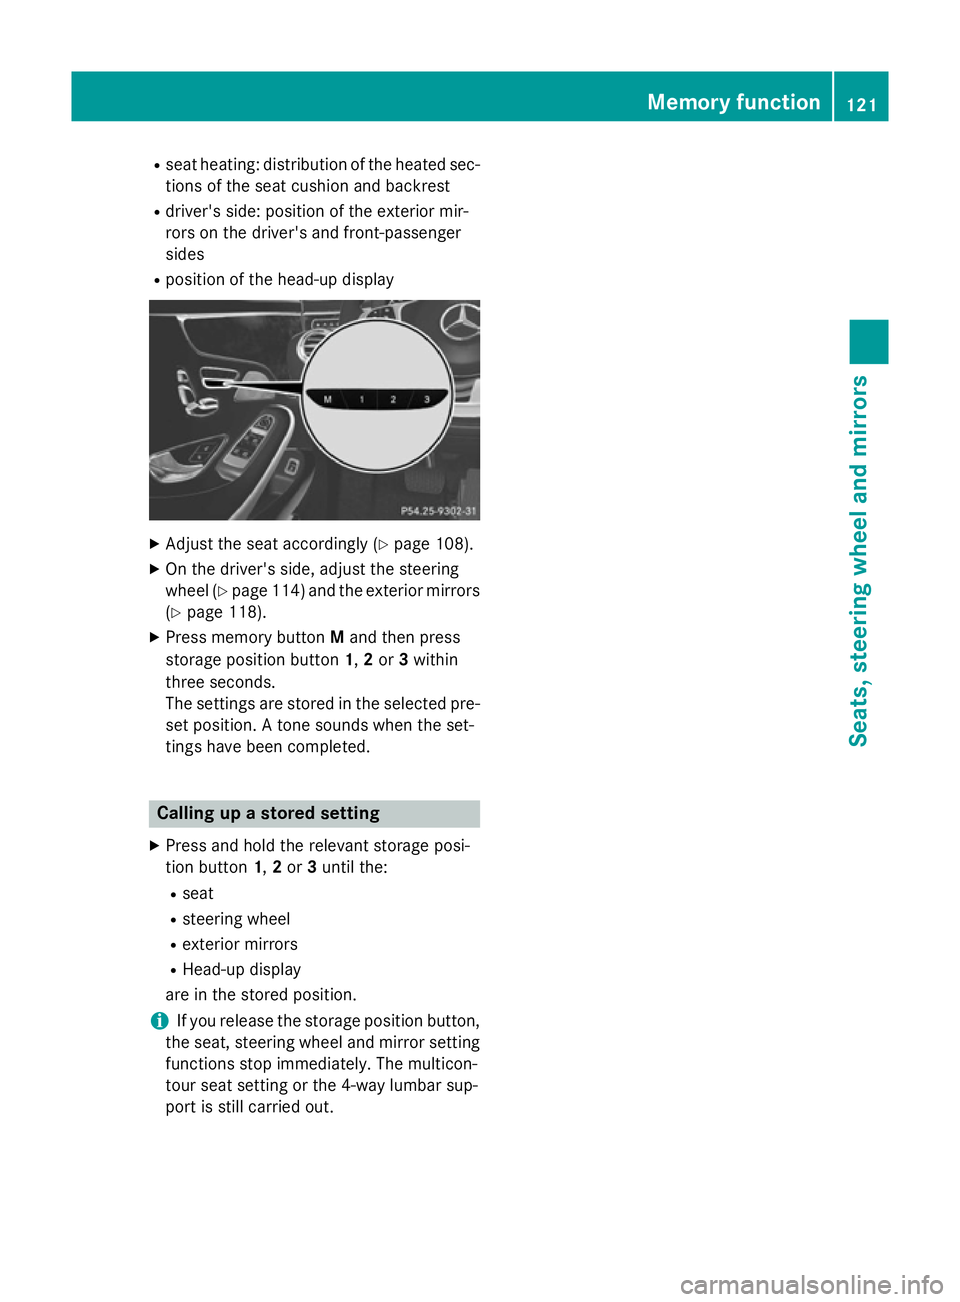
X Press memory button Mand then press
storage position button 1,2or 3within
three seconds.
The settings are stored in the selected pre- set position. A tone sounds when the set-
tings have been completed. Calling up a stored setting
X Press and hold the relevant storage posi-
tion button 1,2or 3until the:
R seat
R steering wheel
R exterior mirrors
R Head-up display
are in the stored position.
i If you release the storage position button,
the seat, steering wheel and mirror setting
functions stop immediately. The multicon-
tour seat setting or the 4-way lumbar sup-
port is still carried out. Memory function
121Seats, steering wheel and mirrors Z
Page 130 of 413
The hazard warning lamps switch on auto-
matically if:
R an airbag is deployed or
R the vehicle decelerates rapidly from a
speed of above 70 km/h and comes to a
standstill
The hazard warning lamps switch off auto-
matically if the vehicle reaches a speed of
above 10 km/ha gain after a full brake appli-
cation.
The hazard warning lamps continue to oper-
ate even if the ignition is switched off. Intelligent Light System
General notes The Intelligent Light System is a system that
adjusts the headlamps automatically to suit
the prevailing driving and weather conditions.
It offers advanced functions for improved illu-
mination of the road surface, e.g. depending
on the vehicle speed or weather conditions.
The system includes the active light function, cornering light function, motorway mode and
extended range foglamps. The system is only active when it is dark.
You can activate or deactivate the "Intelligent
Light System" function using the on-board
computer (Y page 260).
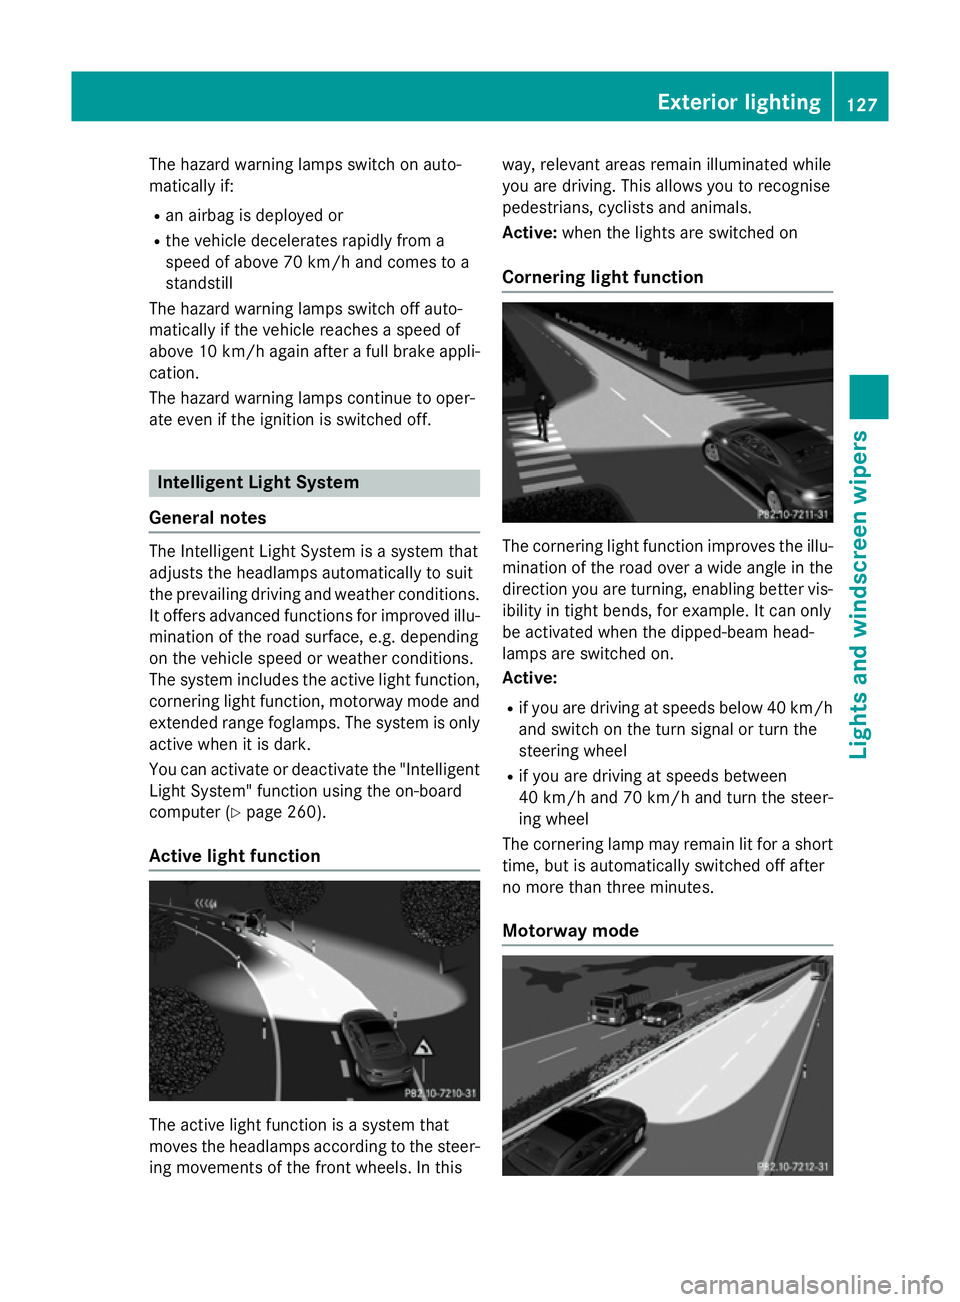
Active light function The active light function is a system that
moves the headlamps according to the steer-
ing movements of the front wheels. In this way, relevant areas remain illuminated while
you are driving. This allows you to recognise
pedestrians, cyclists and animals.
Active:
when the lights are switched on
Cornering light function The cornering light function improves the illu-
mination of the road over a wide angle in the direction you are turning, enabling better vis-
ibility in tight bends, for example. It can only
be activated when the dipped-beam head-
lamps are switched on.
Active:
R if you are driving at speeds below 40 km/h
and switch on the turn signal or turn the
steering wheel
R if you are driving at speeds between
40 km/ha nd 70 km/h and turn the steer-
ing wheel
The cornering lamp may remain lit for a short
time, but is automatically switched off after
no more than three minutes.
Motorway mode Exterior lighting
127Lights andwindscreen wipers Z
Page 152 of 413
When the auxiliary heating is switched on,
make sure that:
R no flammable materials come into contact
with hot vehicle components
R the exhaust gas can escape from the
exhaust pipe unhindered
R the exhaust gas does not come into contact
with flammable materials.
The auxiliary heating and the exhaust gas out-
let are situated behind the right-hand front
wheel.
! Operating the auxiliary heating/ventila-
tion draws on the vehicle battery. After you
have heated or ventilated the vehicle a
maximum of two times, drive for a longer
distance.
Switch the auxiliary heating on regularly once
a month for about ten minutes.
The auxiliary heating heats the air in the vehi-
cle interior to the set temperature. This
occurs without using the heat of the running
engine. The auxiliary heating is operated
directly using the vehicle's fuel. For this rea-
son, the tank content must be at least at
reserve fuel level to ensure that the auxiliary
heating functions.
The auxiliary heating/ventilation automati-
cally adjusts to changes in temperature and
weather conditions. For this reason, the aux- iliary heating could switch from ventilation
mode to heating mode or from heating mode to ventilation mode.
The auxiliary heating switches off when the
engine is switched off. The auxiliary ventila-
tion switches off when you turn the key to key
position 2(Y page 159).
The auxiliary heating switches off automati-
cally after 30 minutes. This time limit can be
altered. To do this, visit a qualified specialist
workshop.
You cannot use the auxiliary ventilation to
cool the vehicle interior to a temperature
lower than the outside temperature. Before switching on X
Turn the key to position 2in the ignition
lock (Y page 159).
X Set the desired temperature using the
w rocker switch on the front control unit
or using COMAND Online (see the separate operating instructions).
If you do not alter the temperature before
switching on the auxiliary heating, the last
temperature setting will be adopted.
Auxiliary heating or ventilation can also be
switched on if the manually set climate con-
trol is activated. Optimum comfort can be
attained when the system is set to automatic
mode. Set the temperature to 22 †.
You can activate or deactivate the auxiliary
heating/ventilation:
R using the rocker switch on the centre con-
sole (Y page 149)
R using the remote control (Y page 150)
The on-board computer can be used to spec- ify up to three departure times, one of which
may be preselected:
R using the remote control (Y page 150)
R using COMAND Online (see the separate
operating instructions)
Switching the auxiliary heating/venti-
lation on/off using the centre console
rocker switch The colours of the indicator lamps on the
rocker switch have the following meanings:
Blue Auxiliary ventilation switched on
Red Auxiliary heating switched on
Yellow Departure time preselected Operating the climate control system
149Climate control Z
Page 158 of 413
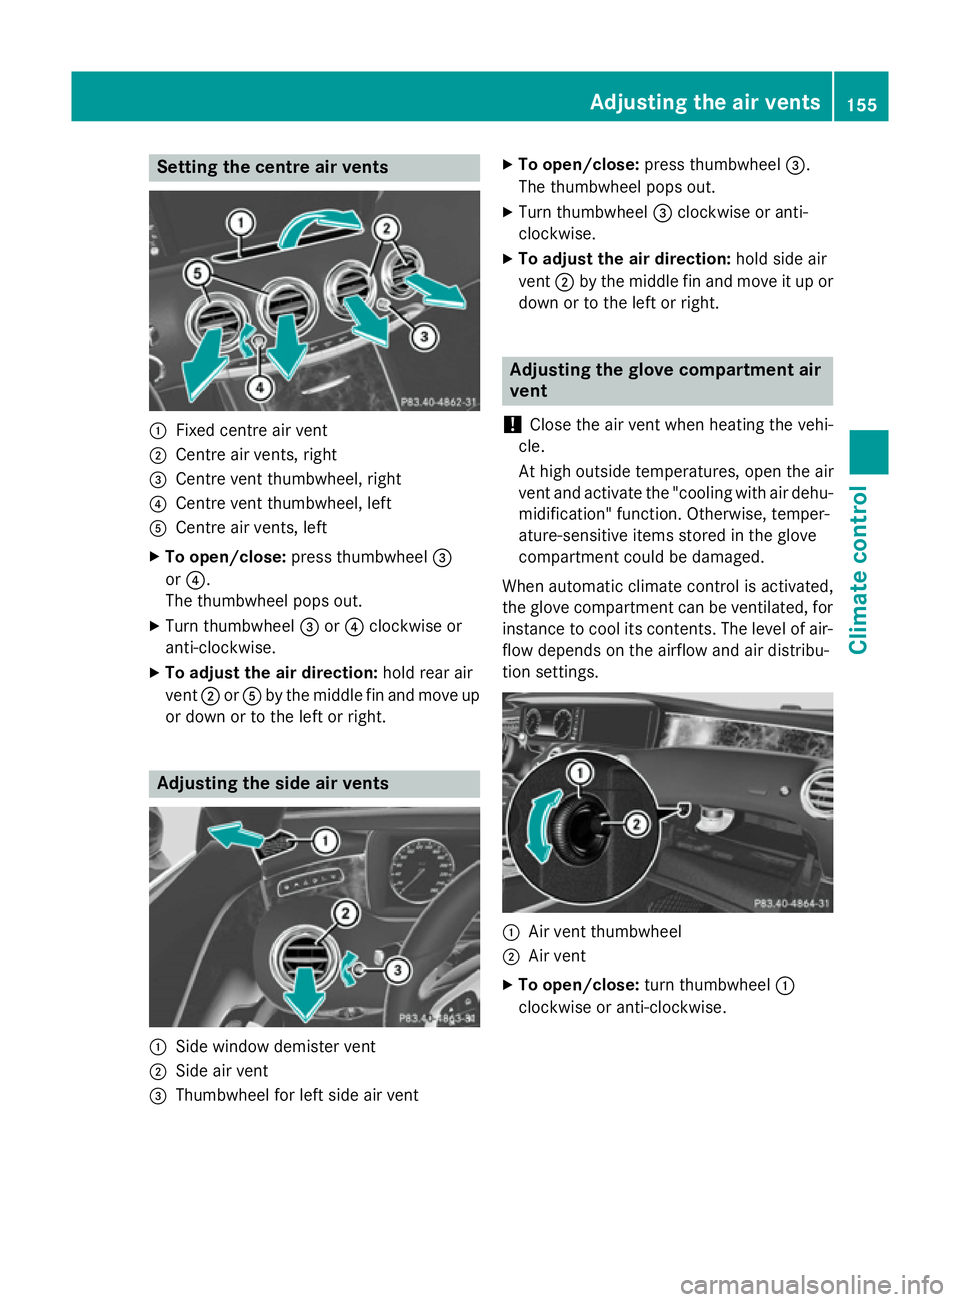
Setting the centre air vents
:
Fixed centre air vent
; Centre air vents, right
= Centre vent thumbwheel, right
? Centre vent thumbwheel, left
A Centre air vents, left
X To open/close: press thumbwheel =
or ?.
The thumbwheel pops out.
X Turn thumbwheel =or? clockwise or
anti-clockwise.
X To adjust the air direction: hold rear air
vent ;orA by the middle fin and move up
or down or to the left or right. Adjusting the side air vents
:
Side window demister vent
; Side air vent
= Thumbwheel for left side air vent X
To open/close: press thumbwheel =.
The thumbwheel pops out.
X Turn thumbwheel =clockwise or anti-
clockwise.
X To adjust the air direction: hold side air
vent ;by the middle fin and move it up or
down or to the left or right. Adjusting the glove compartment air
vent
! Close the air vent when heating the vehi-
cle.
At high outside temperatures, open the air
vent and activate the "cooling with air dehu- midification" function. Otherwise, temper-
ature-sensitive items stored in the glove
compartment could be damaged.
When automatic climate control is activated,
the glove compartment can be ventilated, for
instance to cool its contents. The level of air- flow depends on the airflow and air distribu-
tion settings. :
Air vent thumbwheel
; Air vent
X To open/close: turn thumbwheel :
clockwise or anti-clockwise. Adjusting the air vents
155Climate control Z
Page 159 of 413
Setting the rear-compartment air
vents
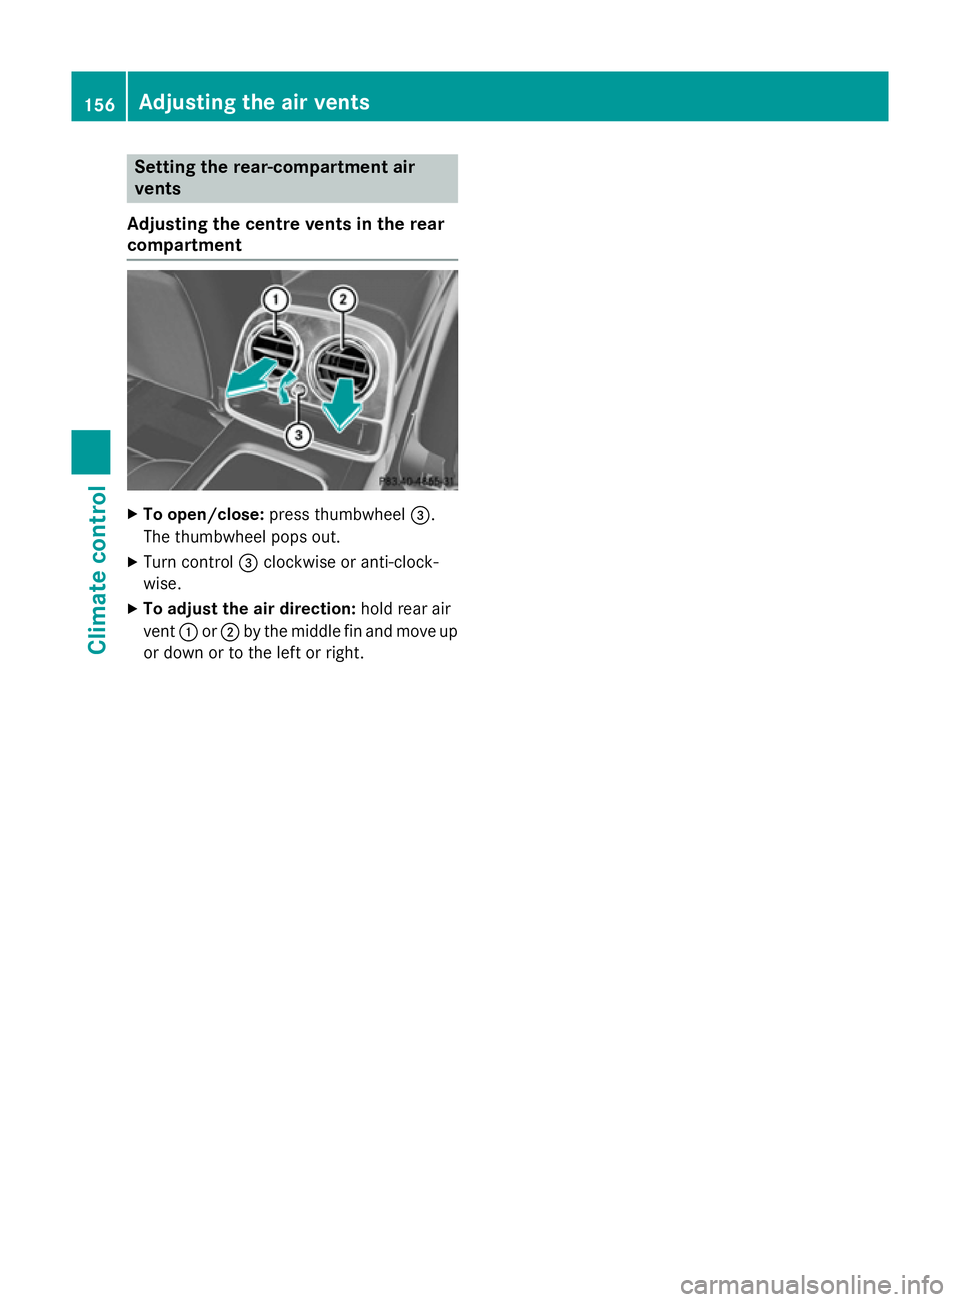
Adjusting the centre vents in the rear
compartment X
To open/close: press thumbwheel =.
The thumbwheel pops out.
X Turn control =clockwise or anti-clock-
wise.
X To adjust the air direction: hold rear air
vent :or; by the middle fin and move up
or down or to the left or right. 156
Adjusting the air ventsClimate control
Page 162 of 413
G
WARNING
Unsuitable footwear can hinder correct usage of the pedals, e.g.:
R shoes with thick soles
R shoes with high heels
R slippers
There is a risk of an accident.
Wear suitable footwear to ensure correct
usage of the pedals. G
WARNING
If you switch off the ignition while driving,
safety-relevant functions are only available
with limitations, or not at all. This could affect, for example, the power steering and the brake
boosting effect. You will require considerably
more effort to steer and brake. There is a risk of an accident.
Do not switch off the ignition while driving. G
WARNING
If the parking brake has not been fully
released when driving, the parking brake can:
R overheat and cause a fire
R lose its hold function.
There is a risk of fire and an accident. Release
the parking brake fully before driving off.
! Warm up the engine quickly. Do not use
the engine's full performance until it has
reached operating temperature.
Only set the automatic transmission to the
respective drive positions when the vehicle
is stationary.
Where possible, avoid spinning the drive
wheels when pulling away on slippery
roads. Otherwise, you could damage the
drive train.
! AMG vehicles:
at low engine oil temper-
atures (below +20 †), the maximum
engine speed is restricted in order to pro-
tect the engine. To protect the engine and
maintain smooth engine operation, avoid driving at full throttle when the engine is
cold. Key positions
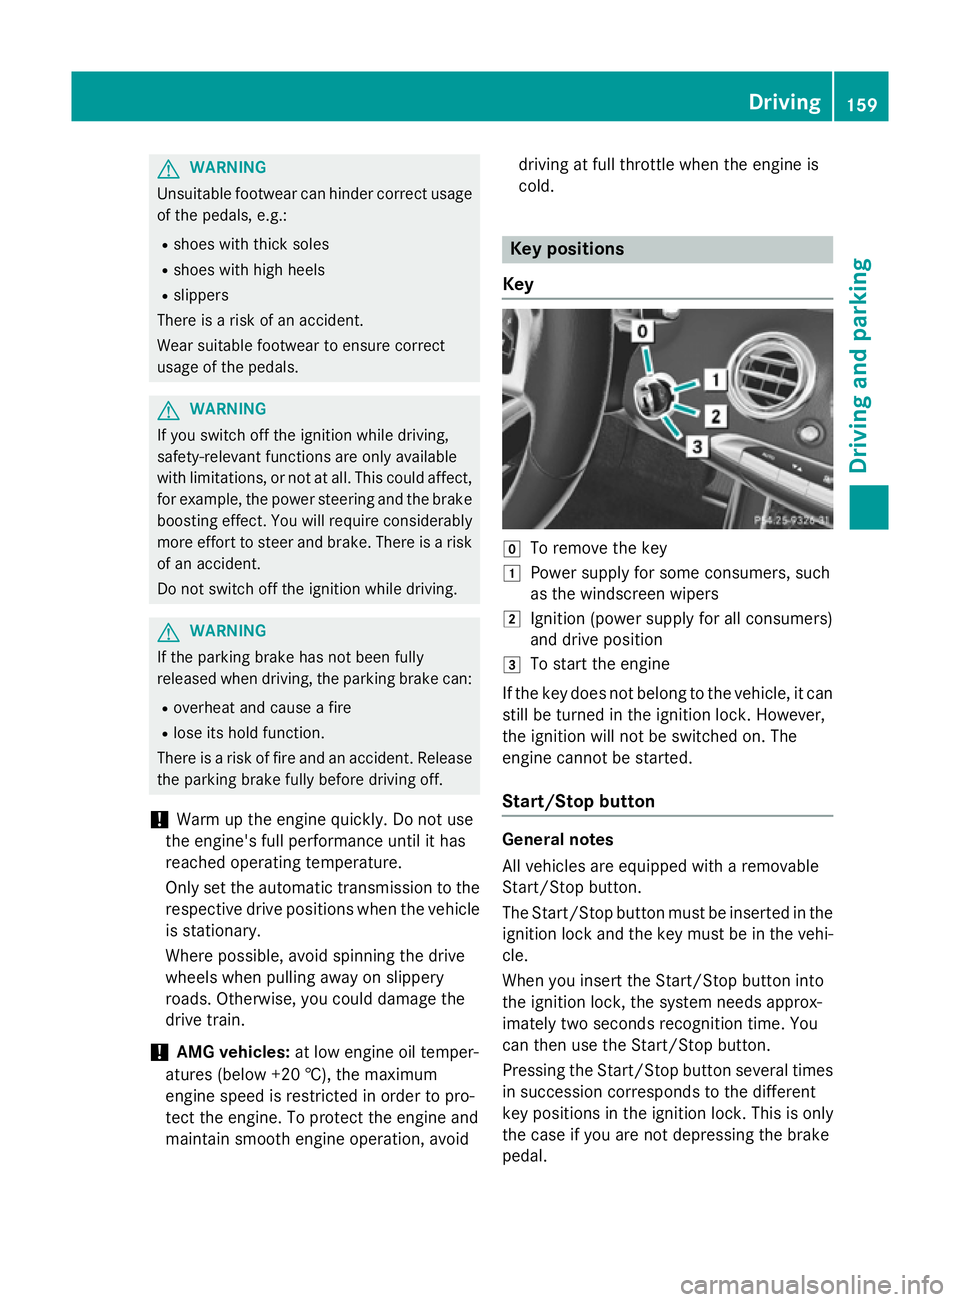
Key g
To remove the key
1 Power supply for some consumers, such
as the windscreen wipers
2 Ignition (power supply for all consumers)
and drive position
3 To start the engine
If the key does not belong to the vehicle, it can still be turned in the ignition lock. However,
the ignition will not be switched on. The
engine cannot be started.
Start/Stop button General notes
All vehicles are equipped with a removable
Start/Stop button.
The Start/Stop button must be inserted in the
ignition lock and the key must be in the vehi-
cle.
When you insert the Start/Stop button into
the ignition lock, the system needs approx-
imately two seconds recognition time. You
can then use the Start/Stop button.
Pressing the Start/Stop button several times in succession corresponds to the different
key positions in the ignition lock. This is only
the case if you are not depressing the brake
pedal. Driving
159Driving and parking Z
Page 174 of 413
Kickdown
Use kickdown for maximum acceleration.
X Depress the accelerator pedal beyond the
pressure point.
The transmission shifts to a lower gear
depending on the engine speed.
X Ease off the accelerator pedal once the
desired speed is reached.
The automatic transmission shifts back up. Program selector button
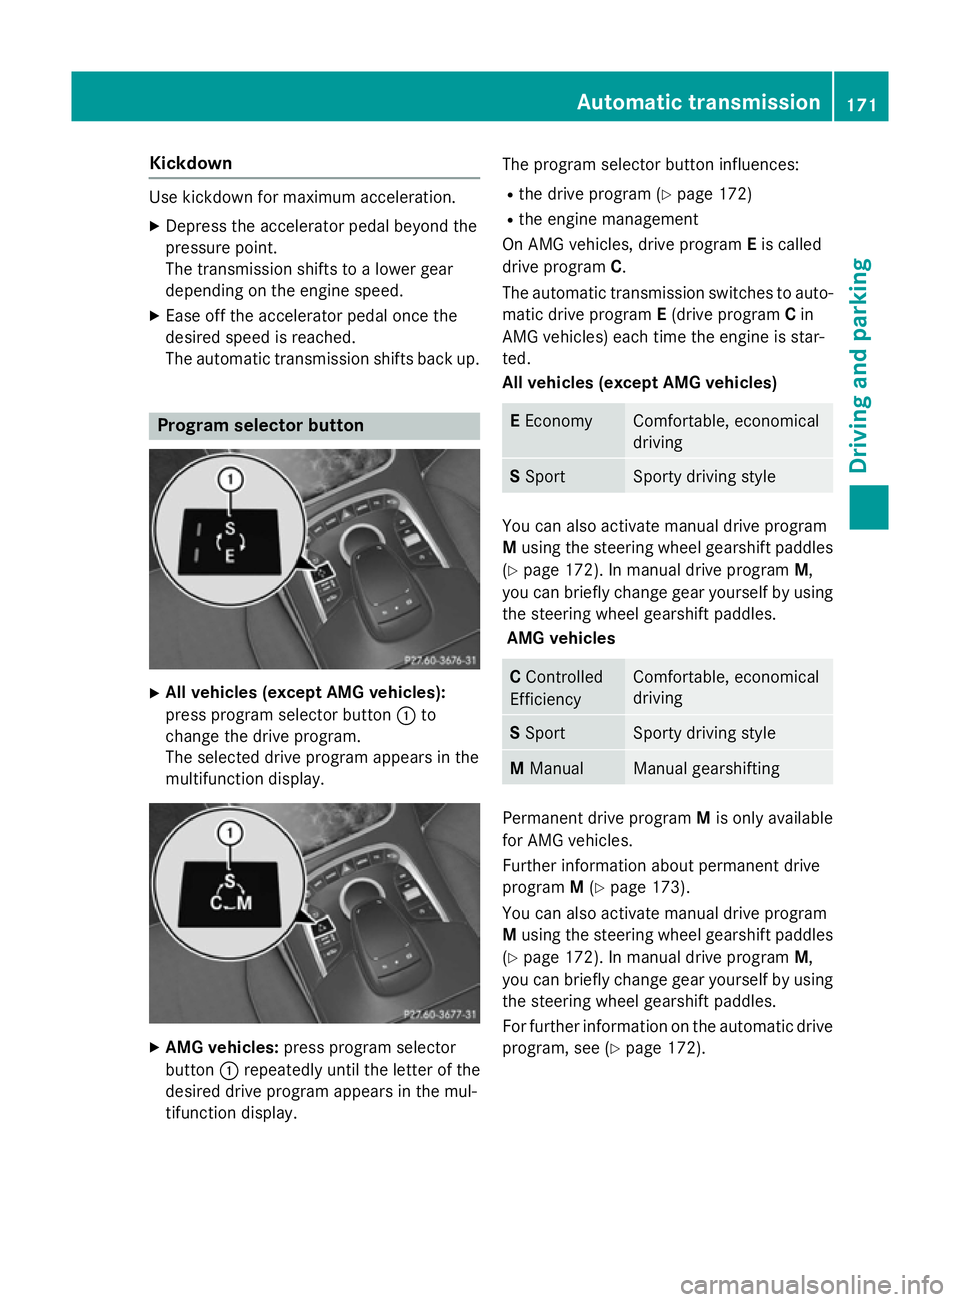
X
All vehicles (except AMG vehicles):
press program selector button :to
change the drive program.
The selected drive program appears in the
multifunction display. X
AMG vehicles: press program selector
button :repeatedly until the letter of the
desired drive program appears in the mul-
tifunction display. The program selector button influences:
R the drive program (Y page 172)
R the engine management
On AMG vehicles, drive program Eis called
drive program C.
The automatic transmission switches to auto-
matic drive program E(drive program Cin
AMG vehicles) each time the engine is star-
ted.
All vehicles (except AMG vehicles) E
Economy Comfortable, economical
driving
S
Sport Sporty driving style
You can also activate manual drive program
M
using the steering wheel gearshift paddles
(Y page 172). In manual drive program M,
you can briefly change gear yourself by using
the steering wheel gearshift paddles.
AMG vehicles C
Controlled
Efficiency Comfortable, economical
driving
S
Sport Sporty driving style
M
Manual Manual gearshifting
Permanent drive program
Mis only available
for AMG vehicles.
Further information about permanent drive
program M(Y page 173).
You can also activate manual drive program
M using the steering wheel gearshift paddles
(Y page 172). In manual drive program M,
you can briefly change gear yourself by using
the steering wheel gearshift paddles.
For further information on the automatic drive program, see (Y page 172). Automatic trans
mission
171Driving an d parking Z
Page 175 of 413
Steering wheel gearshift paddles
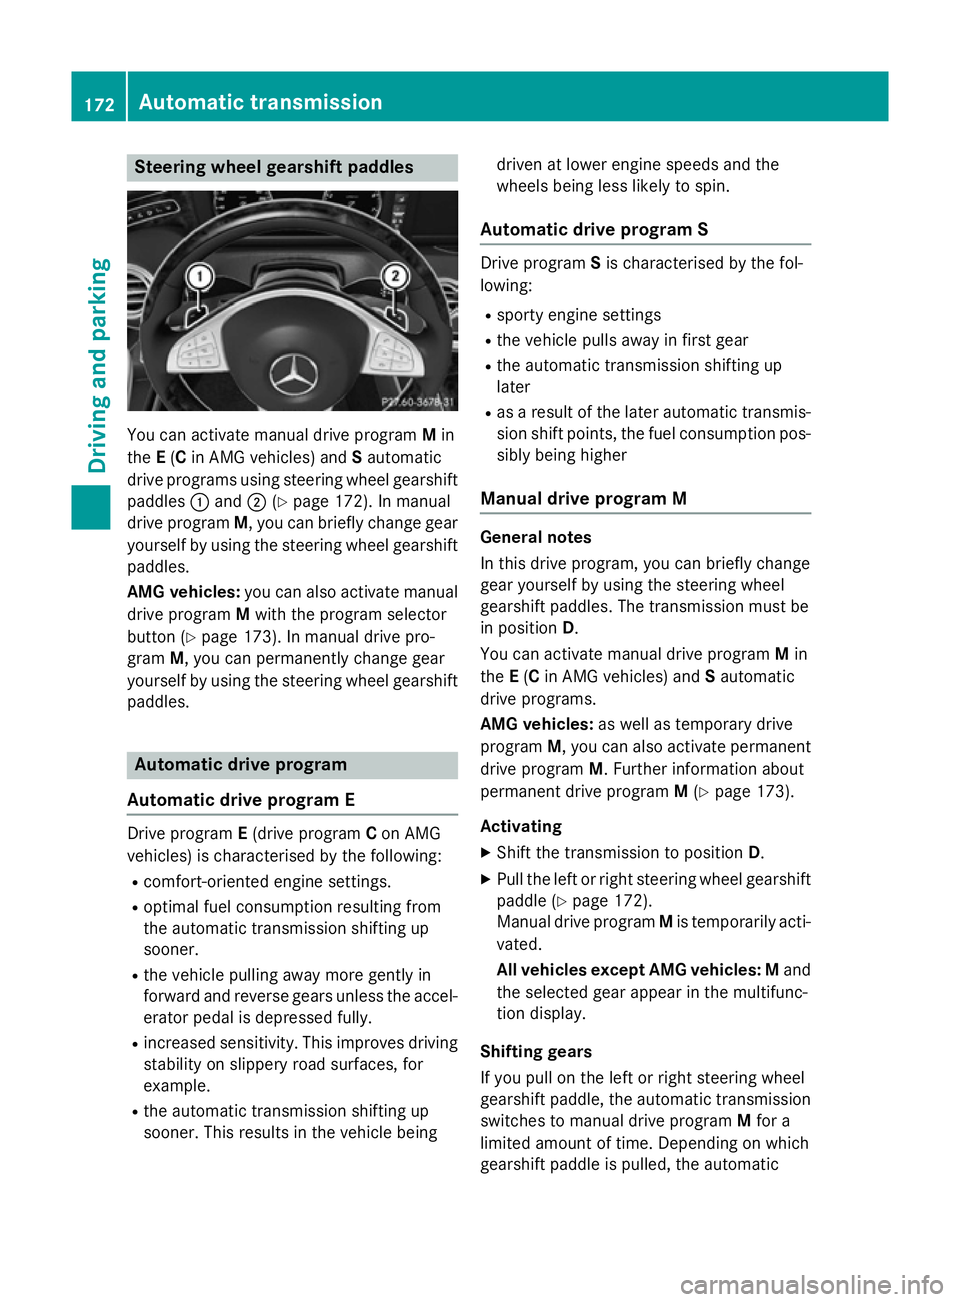
You can activate manual drive program
Min
the E(C in AMG vehicles) and Sautomatic
drive programs using steering wheel gearshift paddles :and ;(Ypage 172). In manual
drive program M, you can briefly change gear
yourself by using the steering wheel gearshift
paddles.
AMG vehicles: you can also activate manual
drive program Mwith the program selector
button (Y page 173). In manual drive pro-
gram M, you can permanently change gear
yourself by using the steering wheel gearshift
paddles. Automatic drive program
Automatic drive program E Drive program
E(drive program Con AMG
vehicles) is characterised by the following:
R comfort-oriented engine settings.
R optimal fuel consumption resulting from
the automatic transmission shifting up
sooner.
R the vehicle pulling away more gently in
forward and reverse gears unless the accel-
erator pedal is depressed fully.
R increased sensitivity. This improves driving
stability on slippery road surfaces, for
example.
R the automatic transmission shifting up
sooner. This results in the vehicle being driven at lower engine speeds and the
wheels being less likely to spin.
Automatic drive program S Drive program
Sis characterised by the fol-
lowing:
R sporty engine settings
R the vehicle pulls away in first gear
R the automatic transmission shifting up
later
R as a result of the later automatic transmis-
sion shift points, the fuel consumption pos- sibly being higher
Manual drive program M General notes
In this drive program, you can briefly change
gear yourself by using the steering wheel
gearshift paddles. The transmission must be
in position
D.
You can activate manual drive program Min
the E(C in AMG vehicles) and Sautomatic
drive programs.
AMG vehicles: as well as temporary drive
program M, you can also activate permanent
drive program M. Further information about
permanent drive program M(Y page 173).
Activating X Shift the transmission to position D.
X Pull the left or right steering wheel gearshift
paddle (Y page 172).
Manual drive program Mis temporarily acti-
vated.
All vehicles except AMG vehicles:M and
the selected gear appear in the multifunc-
tion display.
Shifting gears
If you pull on the left or right steering wheel
gearshift paddle, the automatic transmission
switches to manual drive program Mfor a
limited amount of time. Depending on which
gearshift paddle is pulled, the automatic 172
Automatic transmissionDriving and parking