2014 MERCEDES-BENZ S-CLASS COUPE door lock
[x] Cancel search: door lockPage 103 of 413
G
WARNING
The reversing function does not react:
R to soft, light and thin objects, e.g. small fin-
gers
R while resetting
This means that the reversing feature cannot
prevent someone being trapped in these sit-
uations. There is a risk of injury.
When closing, make sure that no parts of the
body are in the closing area. If someone
becomes trapped, press the switch to open
the side window again. Opening and closing the side win-
dows
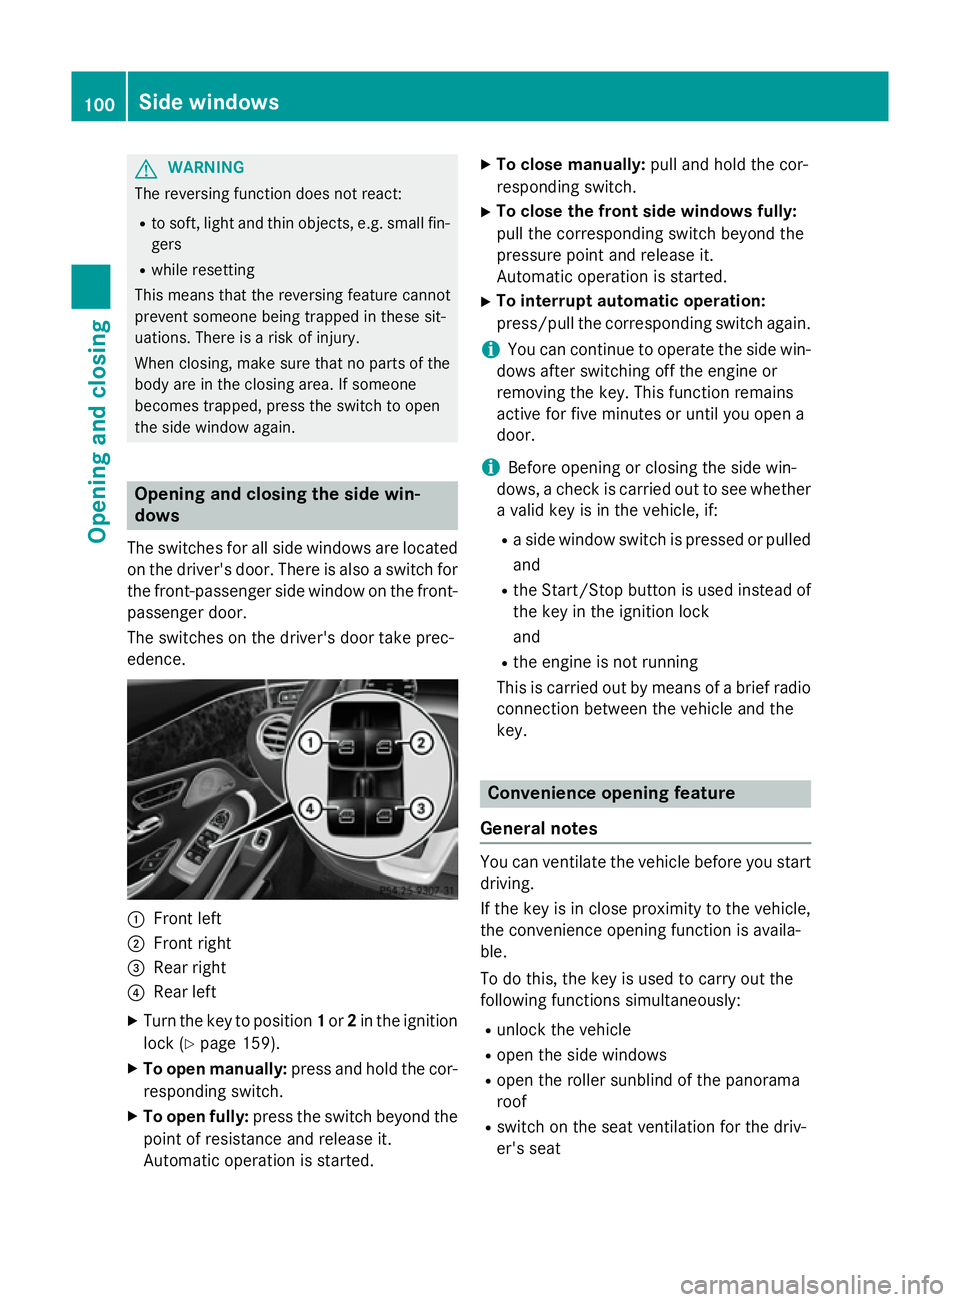
The switches for all side windows are located
on the driver's door. There is also a switch for
the front-passenger side window on the front- passenger door.
The switches on the driver's door take prec-
edence. :
Front left
; Front right
= Rear right
? Rear left
X Turn the key to position 1or 2in the ignition
lock (Y page 159).
X To open manually: press and hold the cor-
responding switch.
X To open fully: press the switch beyond the
point of resistance and release it.
Automatic operation is started. X
To close manually: pull and hold the cor-
responding switch.
X To close the front side windows fully:
pull the corresponding switch beyond the
pressure point and release it.
Automatic operation is started.
X To interrupt automatic operation:
press/pull the corresponding switch again.
i You can continue to operate the side win-
dows after switching off the engine or
removing the key. This function remains
active for five minutes or until you open a
door.
i Before opening or closing the side win-
dows, a check is carried out to see whether a valid key is in the vehicle, if:
R a side window switch is pressed or pulled
and
R the Start/Stop button is used instead of
the key in the ignition lock
and
R the engine is not running
This is carried out by means of a brief radio
connection between the vehicle and the
key. Convenience opening feature
General notes You can ventilate the vehicle before you start
driving.
If the key is in close proximity to the vehicle,
the convenience opening function is availa-
ble.
To do this, the key is used to carry out the
following functions simultaneously:
R unlock the vehicle
R open the side windows
R open the roller sunblind of the panorama
roof
R switch on the seat ventilation for the driv-
er's seat 100
Side windowsOpening and closing
Page 104 of 413
Convenience opening feature
X
Press and hold the %button until the
side windows are in the desired position.
The roller sunblind of the panorama roof
opens.
X To interrupt convenience opening:
release the %button. Convenience closing feature
Important safety notes G
WARNING
When using convenience closing, you could
become trapped within the sweep of the clos- ing window. There is a risk of injury.
Monitor the entire closing procedure when
using convenience closing. When closing,
make sure that no one has any parts of the
body within the closing area.
You can close the side windows and the roller sunblind for the panorama roof after you lock
the vehicle.
i Notes on the automatic reversing feature
for:
R the side windows (Y page 99)
R the roller sunblind (Y page 102)
Using the key X
Press and hold the &button until the
side windows and the roller sunblind of the panorama roof are fully closed.
X Make sure that all the side windows are
closed.
X To interrupt convenience closing:
release the &button.
Using KEYLESS-GO The key must be outside the vehicle. All the
doors must be closed. X
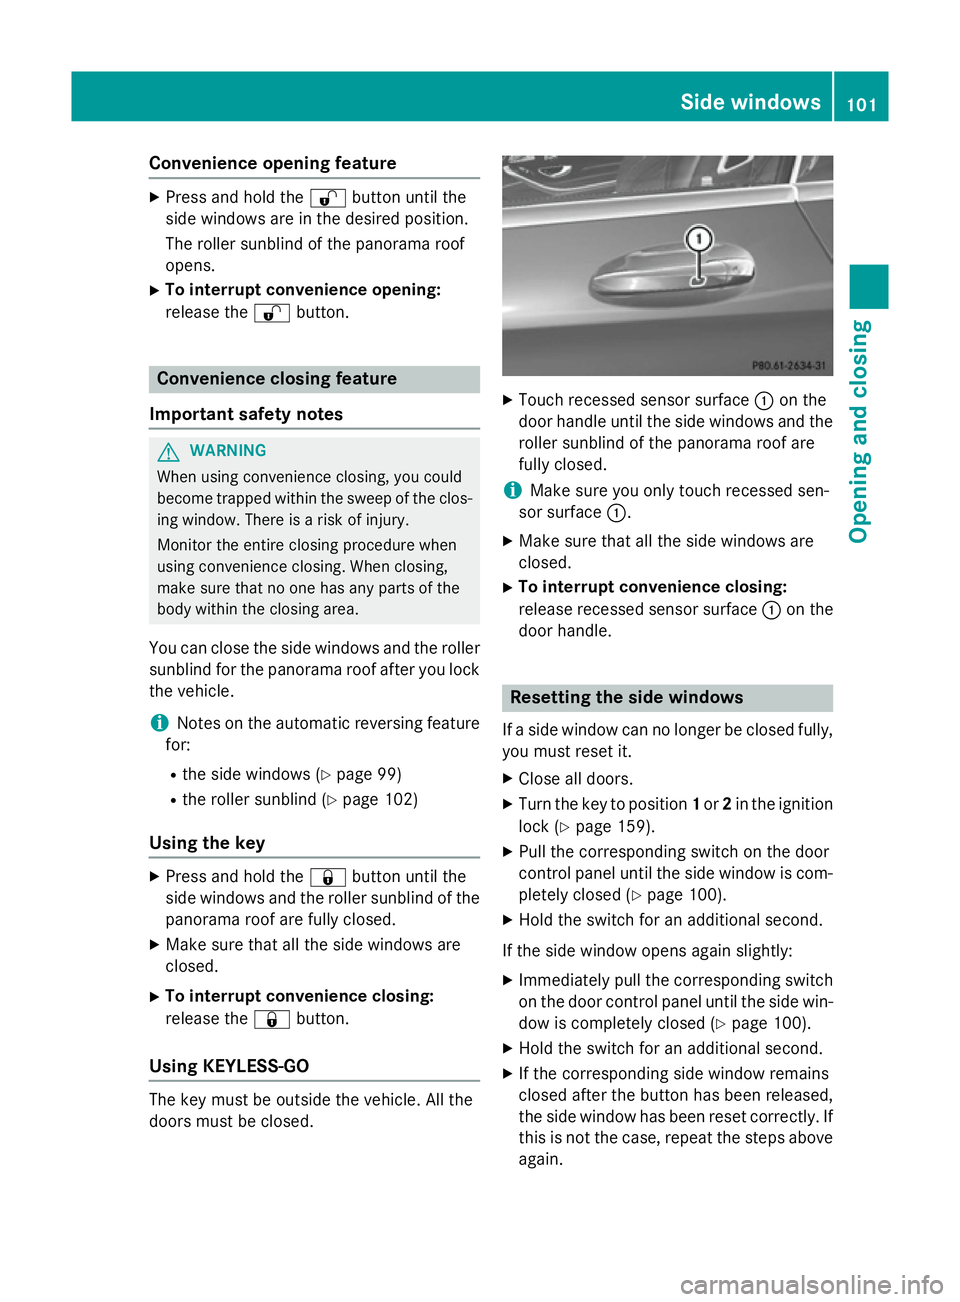
Touch recessed sensor surface :on the
door handle until the side windows and the roller sunblind of the panorama roof are
fully closed.
i Make sure you only touch recessed sen-
sor surface :.
X Make sure that all the side windows are
closed.
X To interrupt convenience closing:
release recessed sensor surface :on the
door handle. Resetting the side windows
If a side window can no longer be closed fully, you must reset it.
X Close all doors.
X Turn the key to position 1or 2in the ignition
lock (Y page 159).
X Pull the corresponding switch on the door
control panel until the side window is com- pletely closed (Y page 100).
X Hold the switch for an additional second.
If the side window opens again slightly: X Immediately pull the corresponding switch
on the door control panel until the side win-
dow is completely closed (Y page 100).
X Hold the switch for an additional second.
X If the corresponding side window remains
closed after the button has been released,
the side window has been reset correctly. If
this is not the case, repeat the steps aboveagain. Side windows
101Opening and closing Z
Page 118 of 413
Steering wheel heating
Activating/deactivating X
Turn the key to position 2in the ignition
lock (Y page 159).
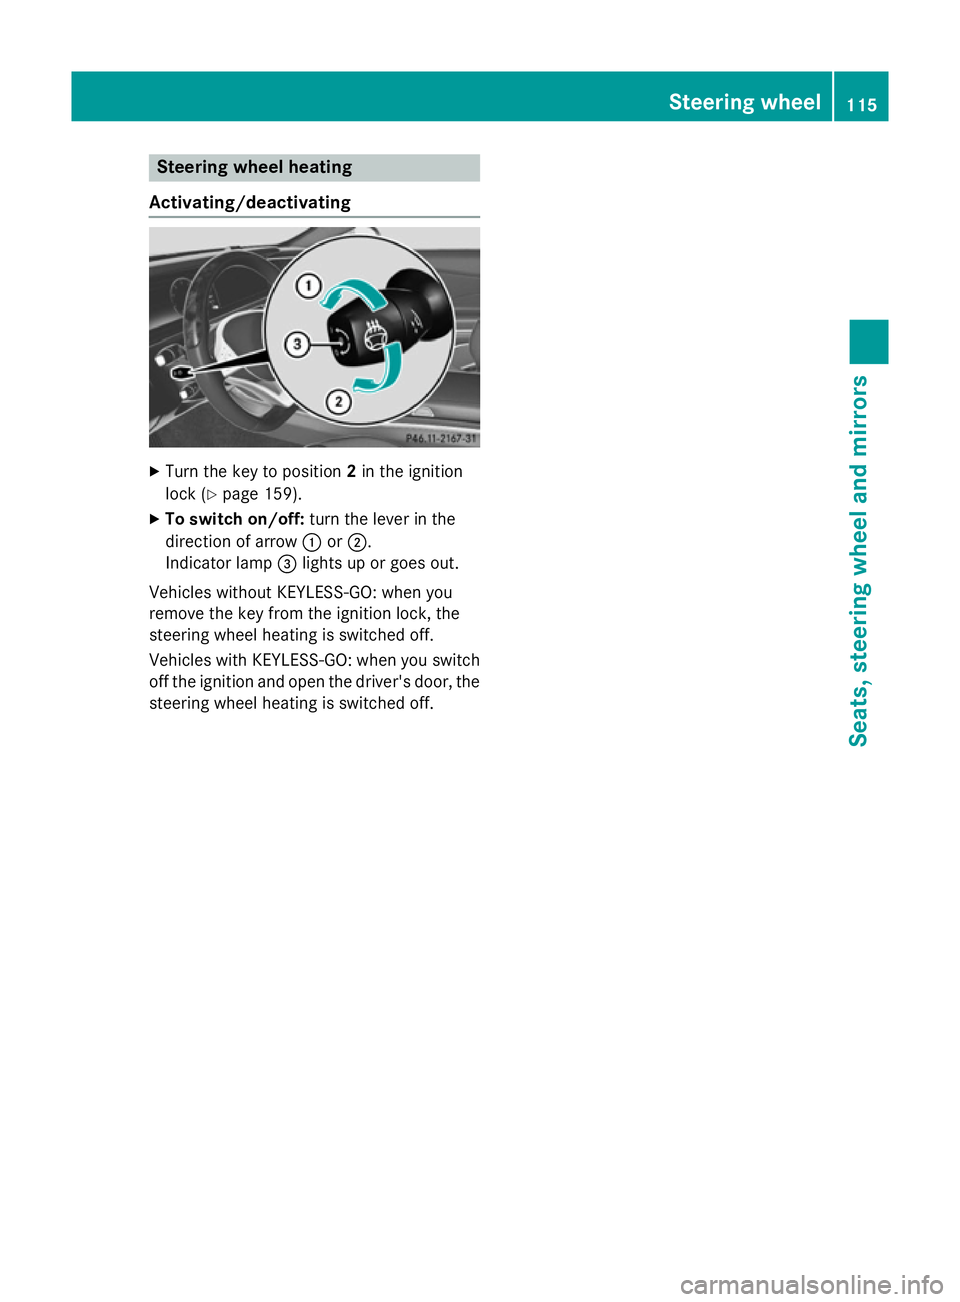
X To switch on/off: turn the lever in the
direction of arrow :or;.
Indicator lamp =lights up or goes out.
Vehicles without KEYLESS-GO: when you
remove the key from the ignition lock, the
steering wheel heating is switched off.
Vehicles with KEYLESS-GO: when you switch
off the ignition and open the driver's door, the steering wheel heating is switched off. Steering wheel
115Seats, steering wheel and mirrors Z
Page 119 of 413

Problems with the steering wheel heating
Problem
Possible causes/consequences and
M
MSolutions The steering wheel
heating has switched
itself off prematurely or
cannot be switched on. The on-board voltage is too low because too many electrical con-
sumers are switched on.
X Switch off electrical consumers that you do not need, such as
the rear window heating or interior lighting. EASY-ENTRY/EXIT feature
Important safety notes G
WARNING
When the EASY-ENTRY/EXIT feature adjusts
the steering wheel and the driver's seat, you
and other vehicle occupants – particularly
children – could become trapped. There is a
risk of injury.
While the EASY-ENTRY/EXIT feature is mak-
ing adjustments, make sure that no one has
any body parts in the sweep of the seat and
the steering wheel.
If there is a risk of becoming trapped by
R the steering wheel: move the steering
wheel adjustment lever.
R the seat: press the switch for seat adjust-
ment.
The adjustment process is stopped.
Press one of the memory function position
switches. The adjustment process is stopped. G
WARNING
If children activate the EASY-ENTRY/EXIT fea- ture, they can become trapped, particularly
when unattended. There is a risk of injury.
When leaving the vehicle, always take the key with you and lock the vehicle. Never leave
children unattended in the vehicle. G
WARNING
If you drive off while the EASY-ENTRY/EXIT
feature is making adjustments, you could lose
control of the vehicle. There is a risk of an
accident. Always wait until the adjustment process is
complete before driving off.
The EASY-ENTRY/EXIT feature makes getting in and out of your vehicle easier.
You can activate and deactivate the EASY-
ENTRY/EXIT feature using COMAND Online
(see the separate operating instructions).
Position of the steering wheel and the
driver's seat when the EASY-ENTRY/
EXIT feature is active The steering wheel tilts upwards and the driv-
er's seat moves backwards if you:
R remove the key from the ignition lock
R with KEYLESS-GO: open the driver's door;
KEYLESS-GO must be in position 1
R with the key: open the driver's door; the
key must be in position 0or 1in the ignition
lock (Y page 159)
R open the driver's door when the ignition is
switched off
i The steering wheel only tilts upwards and
the driver's seat only moves backwards if
the driving position is stored after seat or
steering wheel adjustment (Y page 120).
The last position of the steering wheel or seat is stored if:
R the ignition is switched off
R the setting is stored using the memory
function (Y page 120)
i The steering wheel only moves upwards if
it has not already reached the upper stop. 116
Steering wheelSeats, steering wheel and mirrors
Page 120 of 413

The driver's seat moves backwards unless
it is already in the rearmost position.
Position of the steering wheel and the
driver's seat for driving The steering wheel and the driver's seat are
moved to the previously set position if:
R the driver's door is closed and you insert
the key into the ignition lock
R you close the driver's door when the igni-
tion is switched on
R you press the Start/Stop button once on
vehicles with KEYLESS-GO
i The steering wheel and the driver's seat
only return to the last set position when the
driving position is stored after seat or steer-
ing wheel adjustment (Y page 120).
The last position of the steering wheel or seat is stored if:
R the ignition is switched off
R the setting is stored using the memory
function (Y page 120)
Crash-responsive EASY-EXIT feature If the crash-responsive EASY-EXIT feature is
triggered in an accident, the steering column
will move upwards when the driver's door is
opened or the key is removed from the igni-
tion lock. This makes it easier to exit the vehi- cle and rescue the occupants.
The crash-responsive EASY-EXIT feature is
only operational if the EASY-EXIT/ENTRY fea-
ture is activated in COMAND Online (see the
separate operating instructions). Mirrors
Rear-view mirror
X
Anti-dazzle mode: pivot anti-dazzle
switch :forwards or back. Exterior mirrors
Important safety notes G
WARNING
You could lose control of the vehicle while
driving if you:
R adjust the driver's seat, steering wheel or
mirrors
R fasten the seat belt
There is a risk of an accident.
Adjust the driver's seat, head restraint, steer-
ing wheel and mirrors and fasten your seat
belt before starting the engine. G
WARNING
The exterior mirrors reduce the size of the
image. Objects visible in the mirrors are
closer than they appear. You could misjudge
the distance from road users driving behind
you when changing lanes, for instance. There is a risk of an accident.
You should therefore always look over your
shoulder to determine the actual distance
from road users driving behind you. Mirrors
117Seats, steering wheel and mirrors Z
Page 128 of 413
The exterior lighting (except the side lamps/
parking lamps) switches off automatically if
you:
R remove the key from the ignition lock
R open the driver's door with the key in posi-
tion 0
Automatic headlamp mode G
WARNING
When the light switch is set to Ã, the
dipped-beam headlamps may not be switched on automatically if there is fog, snow or othercauses of poor visibility due to the weather
conditions such as spray. There is a risk of an
accident.
In such situations, turn the light switch to
L.
The automatic headlamp feature is only an
aid. The driver is responsible for the vehicle
lighting at all times.
The daytime driving lights improve the detect- ability of your vehicle during the day.
When the side lamps and dipped-beam head-lamps are switched on, the green T(side
lamps) and L(dipped-beam headlamps)
indicator lamps in the instrument cluster light
up.
à is the preferred light switch setting. The
light setting is automatically selected accord- ing to the brightness of the ambient light
(exception: poor visibility due to weather con-
ditions such as fog, snow or spray):
R key in position 1in the ignition lock: the
side lamps are switched on or off automat- ically depending on the brightness of the
ambient light
R with the engine running: depending on the
ambient light conditions, the daytime driv-
ing lights or the parking and dipped-beam
headlamps are switched on or off automat- ically
X To switch on automatic headlamp
mode: turn the light switch to Ã.Dipped-beam headlamps
When the ignition is switched on and the light
switch is in position L, the side lamps and
dipped-beam headlamps are switched on
even if the light sensor does not sense dark
ambient light conditions. This is advanta-
geous when there is fog or rain.
X To switch on the dipped-beam head-
lamps: turn the key in the ignition lock to
position 2or start the engine.
X Turn the light switch to L.
The green Lindicator lamp in the instru-
ment cluster lights up.
Rear foglamp
The rear foglamp improves the visibility of
your vehicle in heavy fog for the following
traffic. Please observe the country-specific
laws on the use of rear foglamps.
X To switch on the rear foglamp: turn the
key in the ignition lock to position 2or start
the engine.
X Turn the light switch to LorÃ.
X Press the Rbutton.
The yellow Rindicator lamp in the
instrument cluster lights up.
X To switch off the rear foglamp: press the
R button.
The yellow Rindicator lamp in the
instrument cluster goes out.
Side lamps
! If the battery has been excessively dis-
charged, the side lamps or parking lamps
are automatically switched off to enable
the next engine start. Always park your
vehicle safely and sufficiently lit according
to legal standards. Avoid the continuous
use of the Tside lamps for several
hours. If possible, switch on the Xright
or the Wleft parking lamp.
X To switch on: turn the light switch to T.
The green Tindicator lamp in the instru-
ment cluster lights up. Exterior lighting
125Lights and windscreen wipers Z
Page 134 of 413

X
To switch on/off: press the|button.
When the automatic interior lighting con-
trol is activated, the button is flush with the overhead control panel.
The interior lighting automatically switches
on if you:
R unlock the vehicle
R open a door
R remove the key from the ignition lock
The interior lighting is activated for a short
time when the key is removed from the igni-
tion lock. This delayed switch-off can be
adjusted using COMAND Online (see the sep- arate COMAND Online operating instruc-
tions).
Manual interior lighting control :
p Switches the left-hand front reading
lamp on/off
; | Switches the automatic interior
lighting control on/off
= c Switches the front interior lighting
on/off
? u Switches the rear interior lighting
on/off
A p Switches the right-hand front read-
ing lamp on/off
X To switch the front interior lighting on/
off: press the cbutton.
X To switch the rear interior lighting on/
off: press the ubutton.
X To switch the reading lamps on/off:
press the pbutton. Crash-responsive emergency lighting
The interior lighting is activated automatically
if the vehicle is involved in an accident.
X To switch off the crash-responsive
emergency lighting: press the hazard
warning lamp button.
or X Lock and then unlock the vehicle using the
key. Replacing bulbs
The front and rear light clusters of your vehi-
cle are equipped with LED light bulbs. Do not replace the bulbs yourself. Contact a qualifiedspecialist workshop which has the necessaryspecialist knowledge and tools to carry out
the work required.
Lamps are an important aspect of vehicle
safety. You must therefore make sure that
these function correctly at all times. Have the
headlamp setting checked regularly. Windscreen wipers
Switching the windscreen wipers on/
off
! Do not operate the windscreen wipers
when the windscreen is dry, as this could
damage the wiper blades. Moreover, dust
that has collected on the windscreen can
scratch the glass if wiping takes place when the windscreen is dry.
If it is necessary to switch on the wind-
screen wipers in dry weather conditions,
always operate them using washer fluid.
! If the windscreen wipers leave smears on
the windscreen after the vehicle has been
washed in an automatic car wash, this may
be due to wax or other residue. Clean the
windscreen with washer fluid after an auto-
matic car wash. Windscreen wipers
131Lights andwindscreen wipers Z
Page 148 of 413
Problems with the rear window heating
Problem
Possible causes/consequences and
M
MSolutions The rear window heat-
ing has switched off
prematurely or cannot
be activated. The battery has not been sufficiently charged.
X Switch off any consumers that are not required, e.g. reading
lamps, interior lighting or the seat heating.
When the battery is sufficiently charged, the rear window heat-
ing can be activated again. Activating/deactivating air-recircula-
tion mode
General notes You can also temporarily deactivate the flow
of fresh air manually if unpleasant odours are
entering the vehicle from outside. The air
already inside the vehicle will then be recir-
culated.
If you switch on air-recirculation mode, the
windows can mist up more quickly, in partic-
ular at low temperatures. Only use air-recir-
culation mode briefly to prevent the windows misting up.
Activating/deactivating X
Turn the key to position 2in the ignition
lock (Y page 159).
X To activate: press thegrocker switch
up or down.
The indicator lamp in the rocker switch
g lights up.
Air-recirculation mode is automatically acti-
vated at high levels of pollution or at high out- side temperatures. The indicator lamp in the
g rocker switch is not lit when automatic
air-recirculation mode is activated. Outside
air is added after about 30 minutes.
X To deactivate: press thegrocker
switch up or down.
The indicator lamp in the rocker switch
g goes out. Air-recirculation mode is deactivated auto-
matically:
R after approximately five minutes at outside
temperatures below approximately 5 †
R after approximately five minutes if cooling
with air dehumidification is deactivated
R after approximately 30 minutes at outside
temperatures above approximately 5 † if
the cooling with air dehumidification func-
tion is activated Convenience opening/closing using
the air-recirculation button
G
WARNING
When using convenience closing, you could
become trapped within the sweep of the clos- ing window. There is a risk of injury.
Monitor the entire closing procedure when
using convenience closing. When closing,
make sure that no one has any parts of the
body within the closing area. G
WARNING
During convenience opening parts of the body could be drawn in or become trapped
between the side window and window frame.
There is a risk of injury.
When opening, make sure that nobody is
touching the side window. If someone
becomes trapped, press the Wswitch
immediately to open/close the side window
in the door. The side window stops. To con- Operating the climate control system
145Climate control
Z