2014 MERCEDES-BENZ S-CLASS COUPE turn signal
[x] Cancel search: turn signalPage 241 of 413
wheel. In addition, a lane with lane markings
on both sides must be recognised.
In the case of a broken lane marking being
detected, a lane-correcting brake application can only be made if a vehicle has been detec-
ted in the adjacent lane. Oncoming vehicles,
overtaking vehicles and vehicles in adjacent
lanes can be detected.
i A further lane-correcting brake applica-
tion can only occur after your vehicle has
returned to the original lane.
No lane-correcting brake application occurs
if:
R you clearly and actively steer, brake or
accelerate
R you cut the corner on a sharp bend
R you have switched on the turn signal
R a driving safety system intervenes, such as
ESP ®
, PRE-SAFE ®
Brake or Active Blind
Spot Assist
R you have adopted a sporty driving style with
high cornering speeds or high rates of
acceleration
R ESP ®
is deactivated
R the transmission is not in position D
R a loss of tyre pressure or a defective tyre
has been detected and displayed
R an obstacle in the lane in which you are
driving has been detected
Active Lane Keeping Assist may not detect
other road users or traffic situations. An inap- propriate brake application may be interrup-
ted at any time if:
R you steer slightly in the opposite direction
R you switch on the turn signal
R you clearly brake or accelerate
A lane-correcting brake application is inter-
rupted automatically if:
R a driving safety system intervenes, such as
ESP ®
, PRE-SAFE ®
Brake or Active Blind
Spot Assist
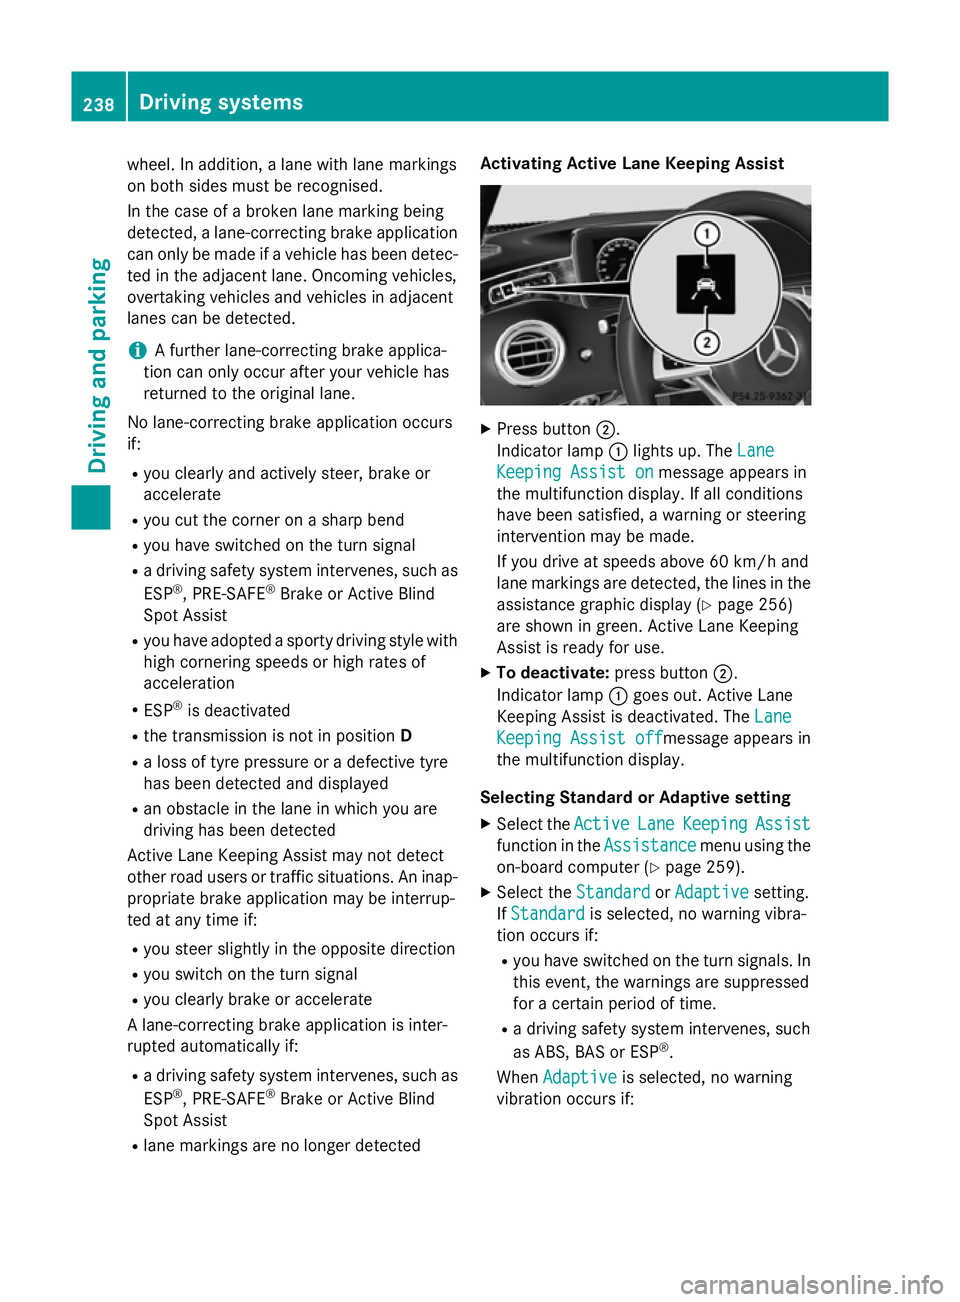
R lane markings are no longer detected Activating Active Lane Keeping Assist
X
Press button ;.
Indicator lamp :lights up. The Lane Lane
Keeping Assist on
Keeping Assist on message appears in
the multifunction display. If all conditions
have been satisfied, a warning or steering
intervention may be made.
If you drive at speeds above 60 km/h and
lane markings are detected, the lines in the assistance graphic display (Y page 256)
are shown in green. Active Lane Keeping
Assist is ready for use.
X To deactivate: press button;.
Indicator lamp :goes out. Active Lane
Keeping Assist is deactivated. The Lane Lane
Keeping Assist off
Keeping Assist off message appears in
the multifunction display.
Selecting Standard or Adaptive setting
X Select the Active
ActiveLane
LaneKeeping
Keeping Assist
Assist
function in the Assistance
Assistancemenu using the
on-board computer (Y page 259).
X Select the Standard
StandardorAdaptive
Adaptive setting.
If Standard
Standard is selected, no warning vibra-
tion occurs if:
R you have switched on the turn signals. In
this event, the warnings are suppressed
for a certain period of time.
R a driving safety system intervenes, such
as ABS, BAS or ESP ®
.
When Adaptive Adaptive is selected, no warning
vibration occurs if: 238
Driving systemsDriving and parking
Page 242 of 413
R
you have switched on the turn signals. In
this event, the warnings are suppressed
for a certain period of time.
R a driving safety system intervenes, such
as ABS, BAS or ESP ®
.
R you accelerate hard, e.g. kickdown.
R you brake hard.
R you steer actively, e.g. swerve to avoid an
obstacle or change lane quickly.
R you cut the corner on a sharp bend.
In order that you are warned only when nec-
essary and in good time if you cross the lane marking, the system recognises certain con-
ditions and warns you accordingly.
The warning vibration occurs earlier if:
R you approach the outer lane marking on a
bend
R the road has very wide lanes, e.g. a motor-
way
R the system recognises solid lane markings
The warning vibration occurs later if:
R the road has narrow lanes
R you cut the corner on a bend Driving syste
ms
239Driving an d parking Z
Page 247 of 413
% Press briefly:
R Back
R In the Radio
Radio/Media Mediamenu: dese-
lects the track or station list or
list of available radio sources/
media
R Hides display messages
R Exits the telephone book/redial
memory % Press and hold:
R Calls up the standard display in
the Trip Trip menu Right control panel
~ R
Rejects or ends a call
R Exits telephone book/redial
memory 6 R
Makes or accepts a call
R Switches to the redial memory W
X R
Adjusts the volume 8 R
Mute ó
Switches on LINGUATRONIC; see
the separate operating instructions Multifunction display
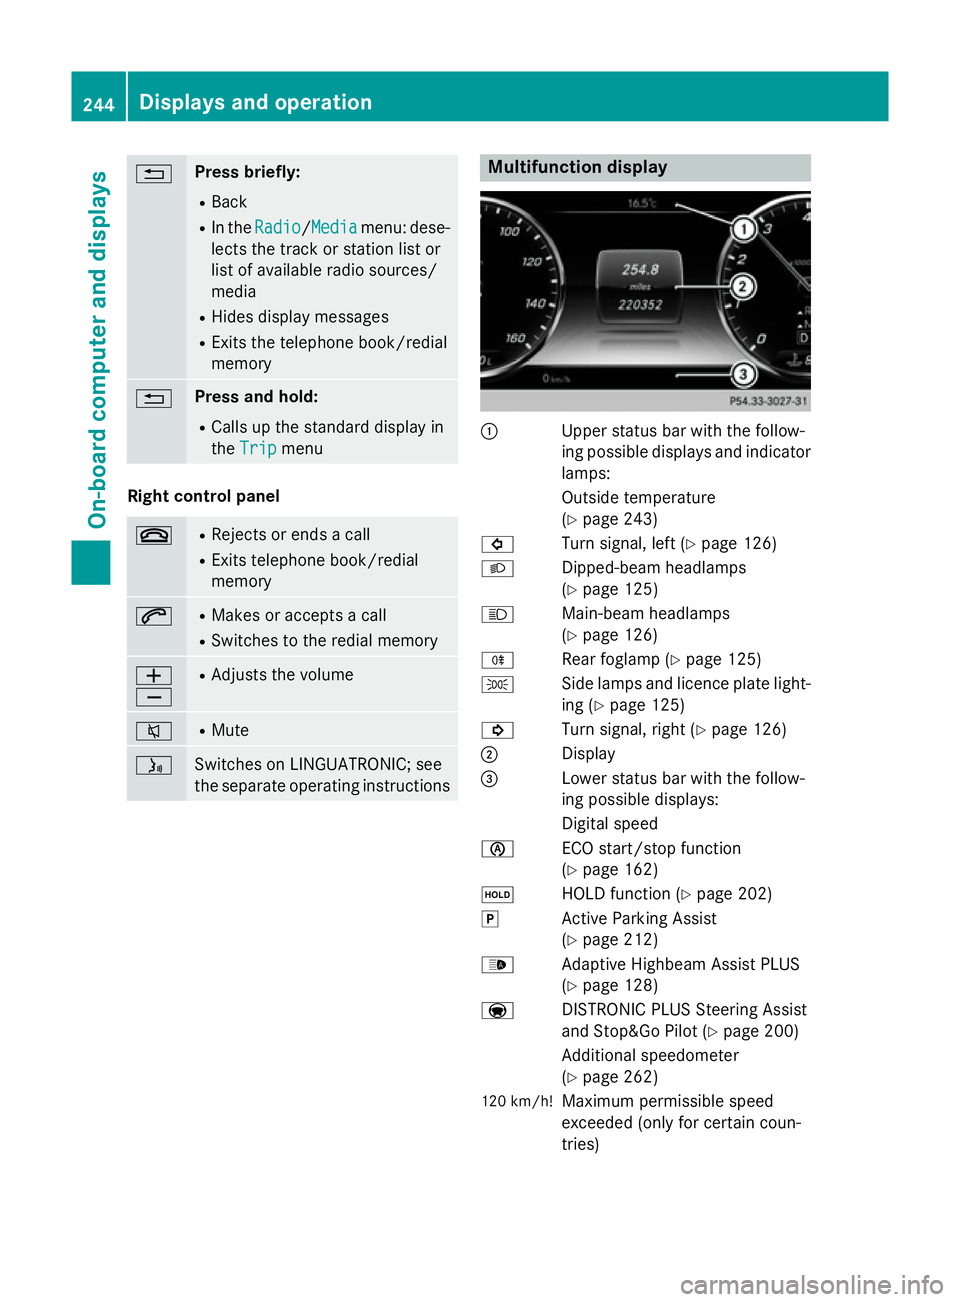
:
Upper status bar with the follow-
ing possible displays and indicator
lamps:
Outside temperature
(Y page 243)
# Turn signal, left (Y page 126)
L Dipped-beam headlamps
(Ypage 125)
K Main-beam headlamps
(Ypage 126)
R Rear foglamp (Y page 125)
T Side lamps and licence plate light-
ing (Y page 125)
! Turn signal, right (Y page 126)
; Display
= Lower status bar with the follow-
ing possible displays:
Digital speed
è ECO start/stop function
(Ypage 162)
ë HOLD function (Y page 202)
j Active Parking Assist
(Ypage 212)
_ Adaptive Highbeam Assist PLUS
(Ypage 128)
a DISTRONIC PLUS Steering Assist
and Stop&Go Pilot (Y page 200)
Additional speedometer
(Y page 262)
120 km/h! Maximum permissible speed
exceeded (only for certain coun-
tries) 244
Displays and operationOn-board computer and displays
Page 282 of 413
Display messages
Possible causes/consequences and
M
MSolutions front-passenger front airbag deactivation system has disa-
bled the front-passenger front airbag (Y
page 52).
R the display messages Front-passenger Front-passengerairbag
airbagenabled
enabled
See
See Owner's
Owner's Manual
ManualorFront-passenger
Front-passenger airbag
airbagdisa‐
disa‐
bled See Owner's Manual
bled See Owner's Manual must not appear in the multi-
function display.
X Wait for a period of at least 60 seconds until the necessary sys-
tem checks have been completed.
X Make sure that the display messages do not appear in the mul-
tifunction display.
If these conditions are met, the front-passenger seat can be occu- pied again. Whether the PASSENGER AIRBAG OFF or ON indicator
lamp remains lit or goes out depends on how the automatic front- passenger front airbag deactivation system classifies the occu-
pant.
If the conditions are not met, the system is not operating correctly.
X Visit a qualified specialist workshop immediately.
For further information on the automatic front-passenger front
airbag deactivation feature, see (Y page 51).Lights
i Display messages about LEDs:
This display message will only appear if all the LEDs have failed. Display messages
Possible causes/consequences and
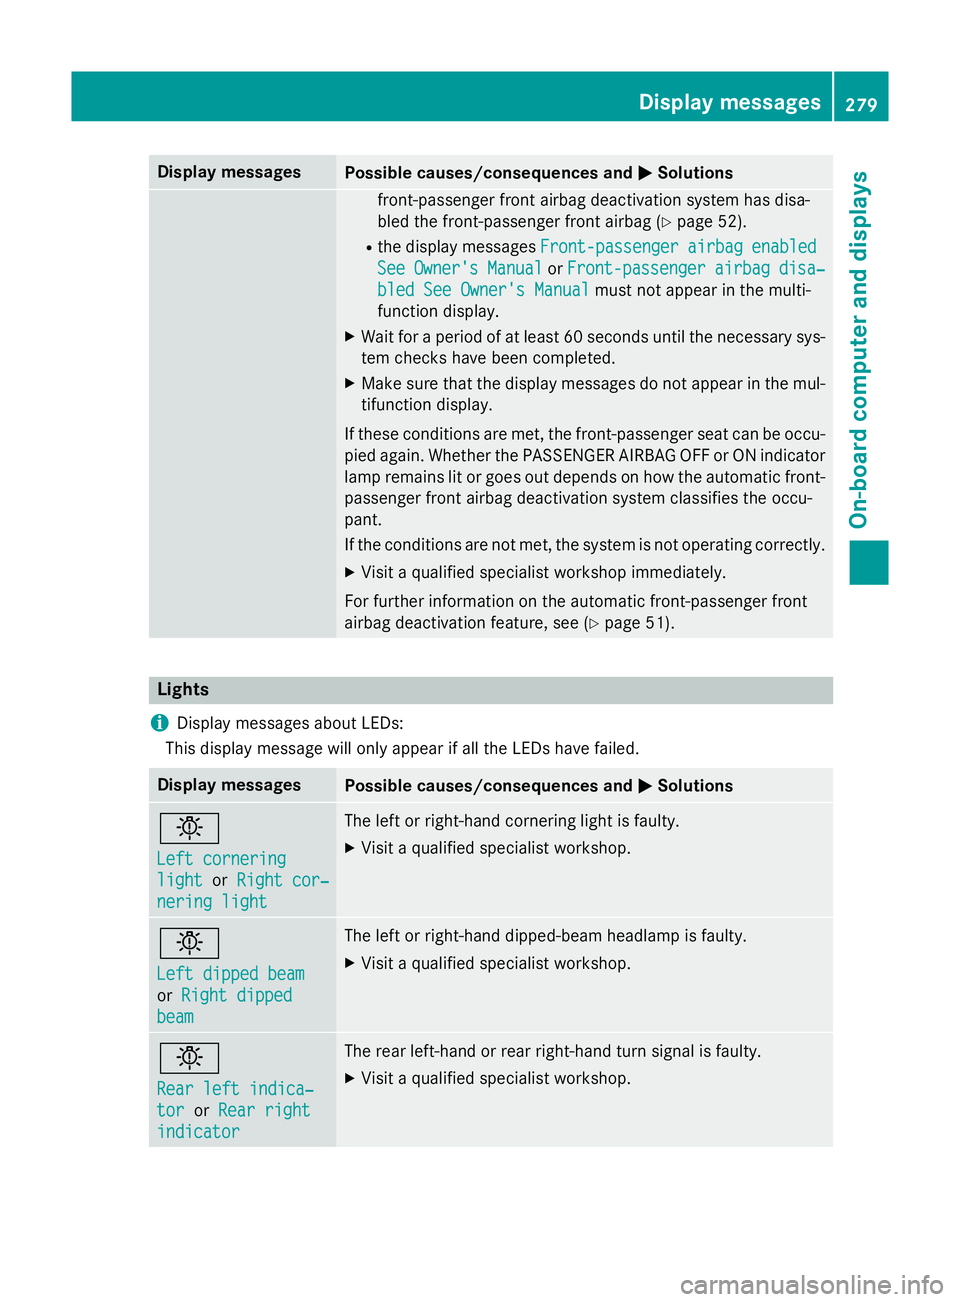
M MSolutions b
Left cornering Left cornering
light light
orRight cor‐
Right cor‐
nering light
nering light The left or right-hand cornering light is faulty.
X Visit a qualified specialist workshop. b
Left dipped beam Left dipped beam
or
Right dipped Right dipped
beam beam The left or right-hand dipped-beam headlamp is faulty.
X Visit a qualified specialist workshop. b
Rear left indica‐ Rear left indica‐
tor tor
orRear right
Rear right
indicator
indicator The rear left-hand or rear right-hand turn signal is faulty.
X Visit a qualified specialist workshop. Display
messages
279On-board computer and displays Z
Page 283 of 413
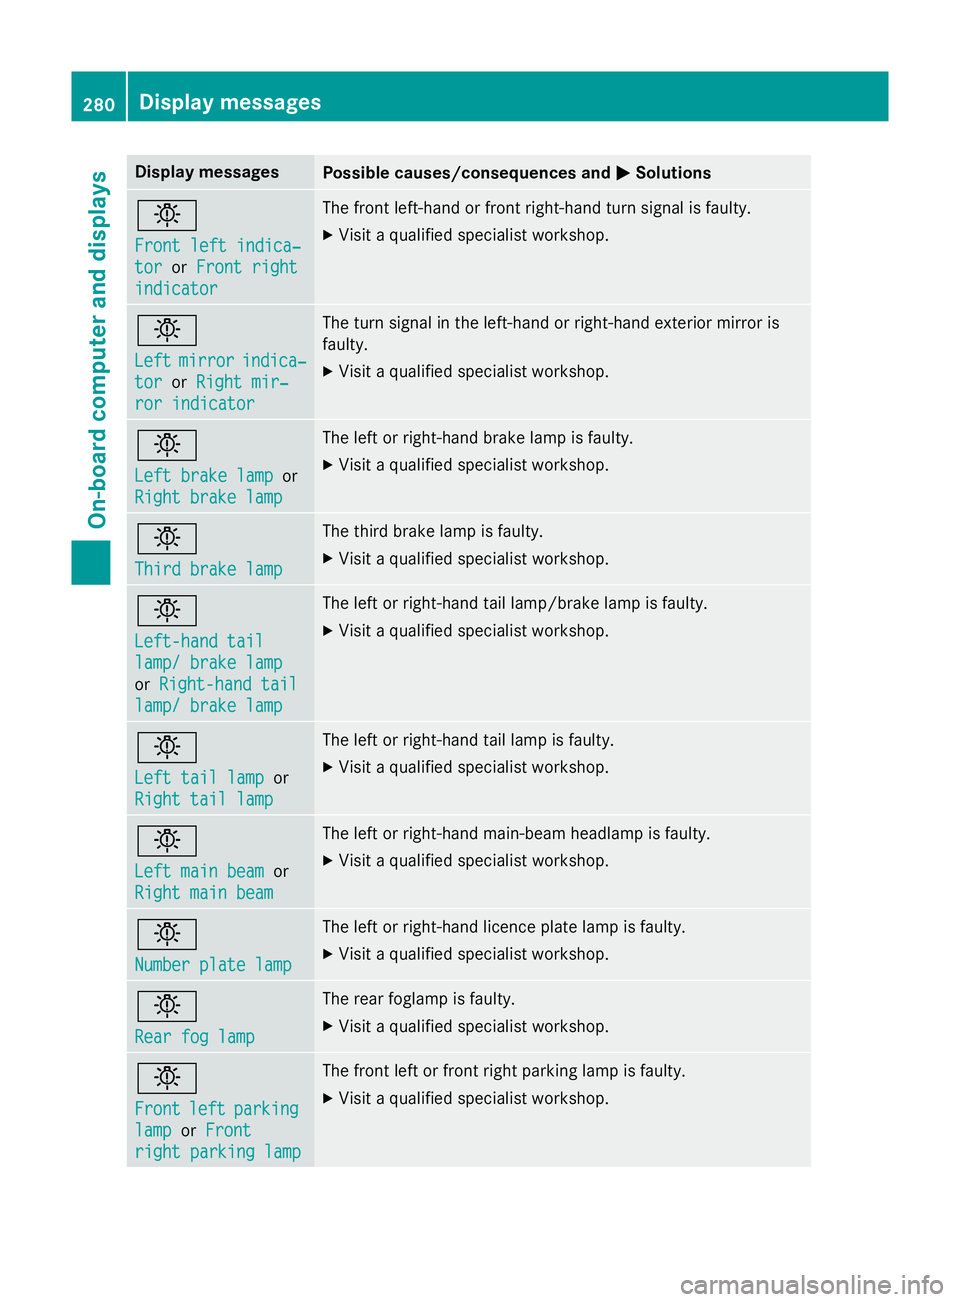
Display messages
Possible causes/consequences and
M
MSolutions b
Front left indica‐ Front left indica‐
tor tor
orFront right
Front right
indicator
indicator The front left-hand or front right-hand turn signal is faulty.
X Visit a qualified specialist workshop. b
Left Left
mirror
mirror indica‐
indica‐
tor
tor orRight mir‐
Right mir‐
ror indicator
ror indicator The turn signal in the left-hand or right-hand exterior mirror is
faulty.
X Visit a qualified specialist workshop. b
Left brake lamp Left brake lamp
or
Right brake lamp
Right brake lamp The left or right-hand brake lamp is faulty.
X Visit a qualified specialist workshop. b
Third brake lamp Third brake lamp The third brake lamp is faulty.
X Visit a qualified specialist workshop. b
Left-hand tail Left-hand tail
lamp/ brake lamp lamp/ brake lamp
or
Right-hand tail Right-hand tail
lamp/ brake lamp
lamp/ brake lamp The left or right-hand tail lamp/brake lamp is faulty.
X Visit a qualified specialist workshop. b
Left tail lamp Left tail lamp
or
Right tail lamp
Right tail lamp The left or right-hand tail lamp is faulty.
X Visit a qualified specialist workshop. b
Left main beam Left main beam
or
Right main beam
Right main beam The left or right-hand main-beam headlamp is faulty.
X Visit a qualified specialist workshop. b
Number plate lamp Number plate lamp The left or right-hand licence plate lamp is faulty.
X Visit a qualified specialist workshop. b
Rear fog lamp Rear fog lamp The rear foglamp is faulty.
X Visit a qualified specialist workshop. b
Front Front
left
leftparking
parking
lamp
lamp orFront
Front
right parking lamp
right parking lamp The front left or front right parking lamp is faulty.
X Visit a qualified specialist workshop. 280
Display
messagesOn-board computer and displays
Page 332 of 413
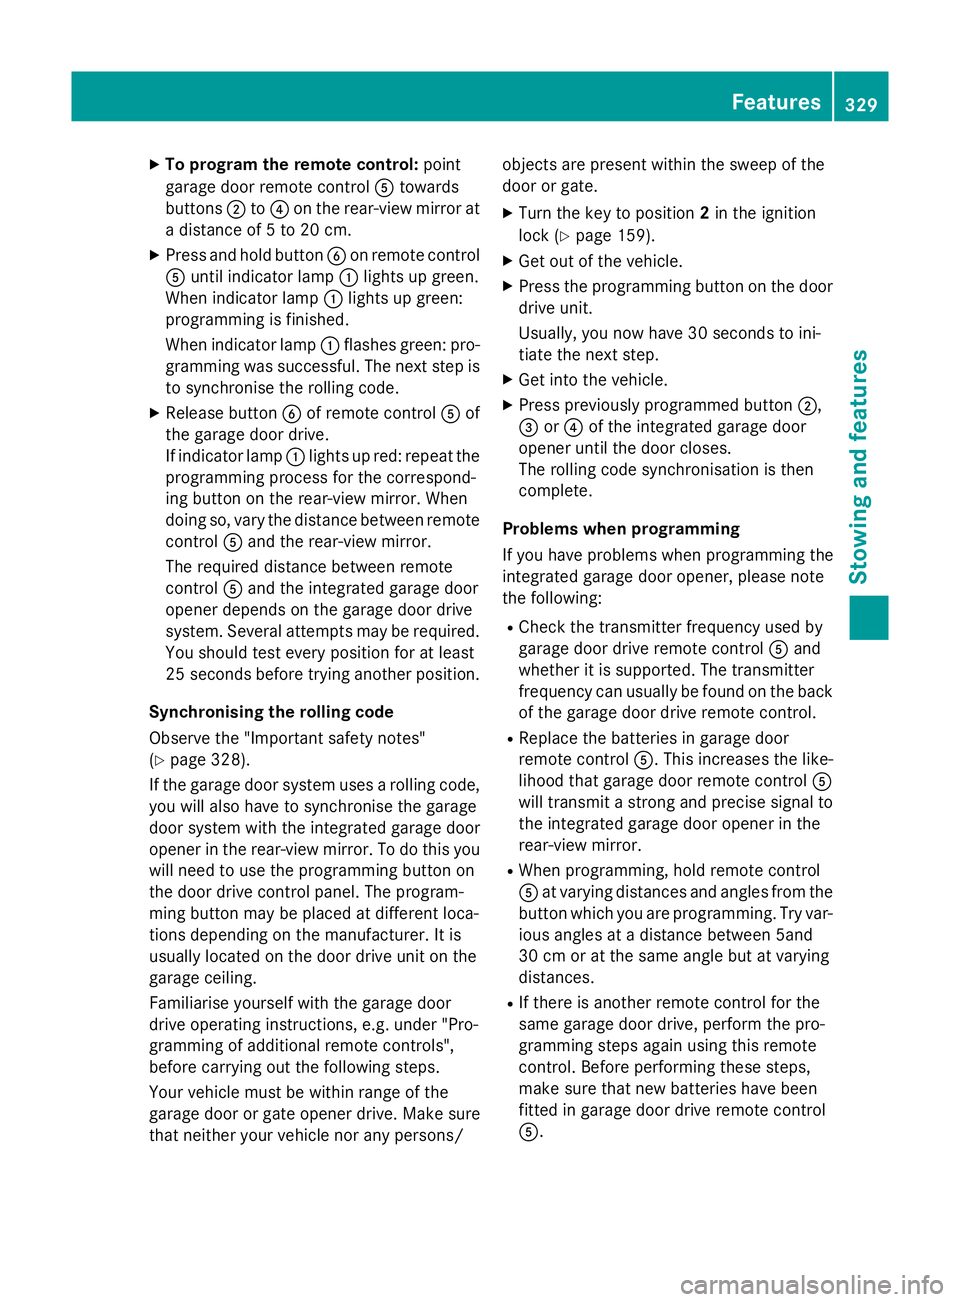
X
To program the remote control: point
garage door remote control Atowards
buttons ;to? on the rear-view mirror at
a distance of 5 to 20 cm.
X Press and hold button Bon remote control
A until indicator lamp :lights up green.
When indicator lamp :lights up green:
programming is finished.
When indicator lamp :flashes green: pro-
gramming was successful. The next step is
to synchronise the rolling code.
X Release button Bof remote control Aof
the garage door drive.
If indicator lamp :lights up red: repeat the
programming process for the correspond-
ing button on the rear-view mirror. When
doing so, vary the distance between remote control Aand the rear-view mirror.
The required distance between remote
control Aand the integrated garage door
opener depends on the garage door drive
system. Several attempts may be required.
You should test every position for at least
25 second sbefore trying another position.
Synchronising the rolling code
Observe the "Important safety notes"
(Y page 328).
If the garage door system uses a rolling code,
you will also have to synchronise the garage
door system with the integrated garage door
opener in the rear-view mirror. To do this you
will need to use the programming button on
the door drive control panel. The program-
ming button may be placed at different loca-
tions depending on the manufacturer. It is
usually located on the door drive unit on the
garage ceiling.
Familiarise yourself with the garage door
drive operating instructions, e.g. under "Pro-
gramming of additional remote controls",
before carrying out the following steps.
Your vehicle must be within range of the
garage door or gate opener drive. Make sure
that neither your vehicle nor any persons/ objects are present within the sweep of the
door or gate.
X Turn the key to position 2in the ignition
lock (Y page 159).
X Get out of the vehicle.
X Press the programming button on the door
drive unit.
Usually, you now have 30 seconds to ini-
tiate the next step.
X Get into the vehicle.
X Press previously programmed button ;,
= or? of the integrated garage door
opener until the door closes.
The rolling code synchronisation is then
complete.
Problems when programming
If you have problems when programming the
integrated garage door opener, please note
the following: R Check the transmitter frequency used by
garage door drive remote control Aand
whether it is supported. The transmitter
frequency can usually be found on the back
of the garage door drive remote control.
R Replace the batteries in garage door
remote control A. This increases the like-
lihood that garage door remote control A
will transmit a strong and precise signal to the integrated garage door opener in the
rear-view mirror.
R When programming, hold remote control
A at varying distances and angles from the
button which you are programming. Try var- ious angles at a distance between 5and
30 cm or at the same angle but at varying
distances.
R If there is another remote control for the
same garage door drive, perform the pro-
gramming steps again using this remote
control. Before performing these steps,
make sure that new batteries have been
fitted in garage door drive remote control
A. Features
329Stowing and features Z
Page 333 of 413
R
Note that some remote controls transmit
only for a limited period (the indicator lamp
on the remote control goes out). Press but-ton Bon remote control Aagain before
transmission ends.
R Align the aerial cable of the garage door
opener unit. This can improve signal recep-
tion/transmission.
Opening or closing the garage door Once programmed, the integrated garage
door opener will assume the function of the
garage door system's remote control. Please
also read the operating instructions for the
garage door system.
X Turn the key to position 2in the ignition
lock (Y page 159).
X Press button ;,=or? which you have
programmed to operate the garage door.
Garage door system with a fixed code: indi-
cator lamp :lights up green.
Garage door system with a rolling code:
indicator lamp :flashes green.
The transmitter will transmit a signal for as
long as the button is pressed. The transmis-
sion is halted after a maximum of ten seconds and indicator lamp :lights up yellow. Press
button ;,=or? again if necessary.
Clearing the memory Make sure that you clear the memory of the
integrated garage door opener before selling
the vehicle.
X Turn the key to position 2in the ignition
lock (Y page 159).
X Press and hold buttons ;and ?.
The indicator lamp initially lights up yellow
and then green.
X Release buttons ;and ?.
The memory of the integrated garage door
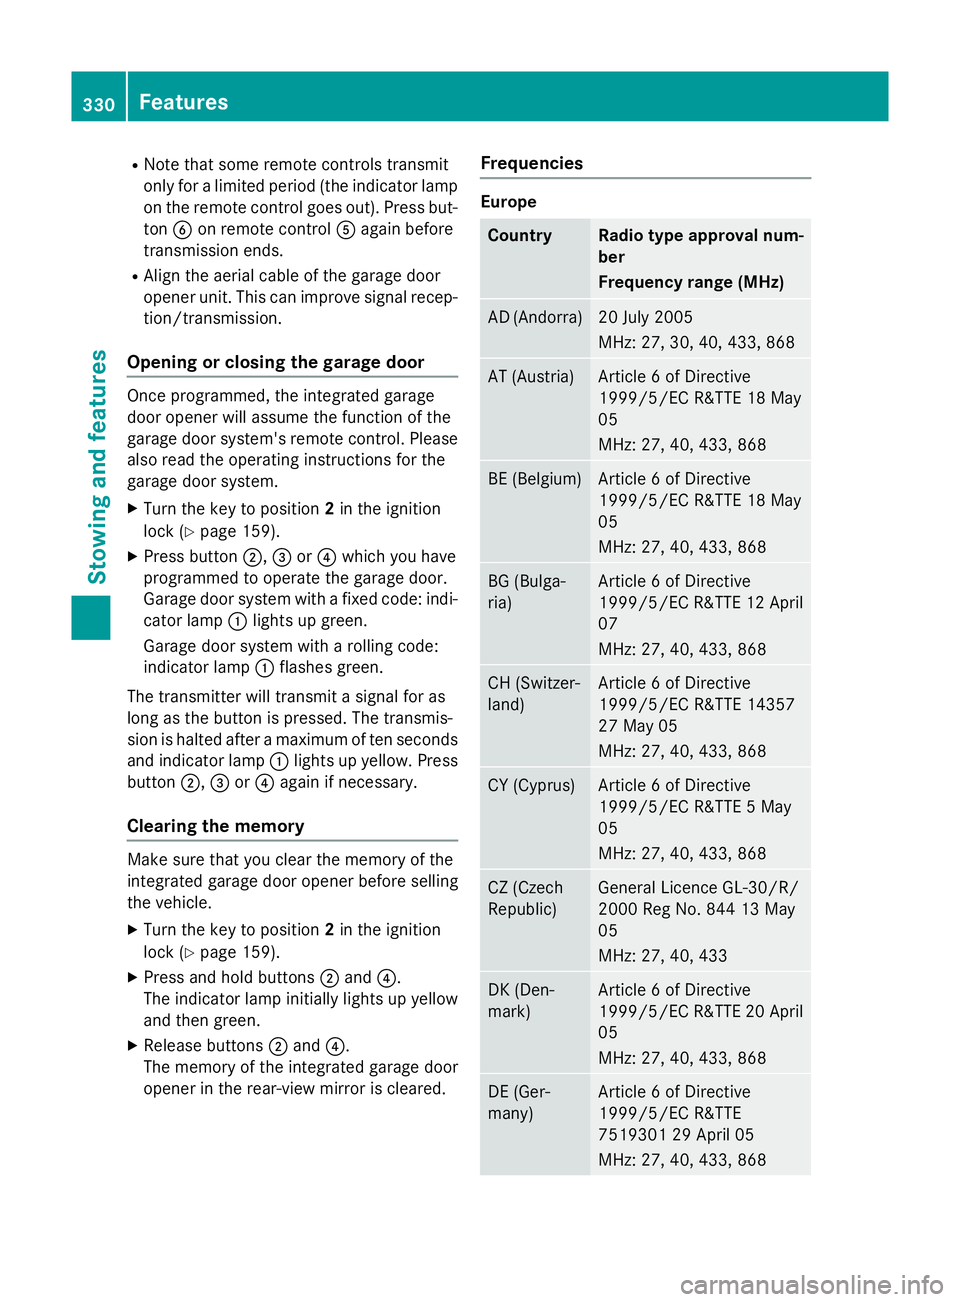
opener in the rear-view mirror is cleared. Frequencies Europe
Country Radio type approval num-
ber
Frequency range (MHz)
AD (Andorra) 20 July 2005
MHz: 27, 30, 40, 433, 868
AT (Austria) Article 6 of Directive
1999/5/EC R&TTE 18 May
05
MHz: 27, 40, 433, 868
BE (Belgium) Article 6 of Directive
1999/5/EC R&TTE 18 May
05
MHz: 27, 40, 433, 868
BG (Bulga-
ria) Article 6 of Directive
1999/5/EC R&TTE 12 April
07
MHz: 27, 40, 433, 868 CH (Switzer-
land) Article 6 of Directive
1999/5/EC R&TTE 14357
27 May 05
MHz: 27, 40, 433, 868
CY (Cyprus) Article 6 of Directive
1999/5/EC R&TTE 5 May
05
MHz: 27, 40, 433, 868
CZ (Czech
Republic) General Licence GL-30/R/
2000 Reg No. 844 13 May
05
MHz: 27, 40, 433
DK (Den-
mark) Article 6 of Directive
1999/5/EC R&TTE 20 April
05
MHz: 27, 40, 433, 868 DE (Ger-
many) Article 6 of Directive
1999/5/EC R&TTE
7519301 29 April 05
MHz: 27, 40, 433, 868330
FeaturesStowing and features
Page 350 of 413
Cleaning the wiper blades
G
WARNING
If the windscreen wipers are set in motion
when cleaning the windscreen or wiper
blades, you could become trapped. There is a danger of injury.
Always switch off the windscreen wipers and
the ignition before cleaning the windscreen orwiper blades.
! Do not pull on the wiper blade. Otherwise,
the wiper blade could be damaged.
! Do not clean wiper blades too often and
do not rub them too hard. Otherwise, the
graphite coating could be damaged. This
could cause wiper noise.
! Hold the wiper arm securely when folding
back. The windscreen could be damaged if
the wiper arm hits against it suddenly.
X Fold the wiper arms away from the wind-
screen.
X Clean the wiper blades carefully using a
damp cloth.
X Fold the windscreen wipers back again
before switching on the ignition.
Cleaning the exterior lighting !
Only use cleaning agents or cleaning
cloths that are suitable for plastic lenses.
Unsuitable cleaning agents or cleaning
cloths could scratch or damage the plastic lenses of the exterior lighting.
X Clean the plastic lenses of the exterior
lighting using a wet sponge and a mild
cleaning agent, e.g. Mercedes-Benz car
shampoo or cleaning cloths.
Mirror turn signals !
Only use cleaning agents or cleaning
cloths that are suitable for plastic lenses.
Unsuitable cleaning agents or cleaning
cloths could scratch or damage the plastic lenses of the mirror turn signals. X
Clean the plastic lenses of the mirror turn
signals in the exterior mirror housing using
a wet sponge and mild cleaning agent, e.g.
Mercedes-Benz car shampoo or cleaning
cloths.
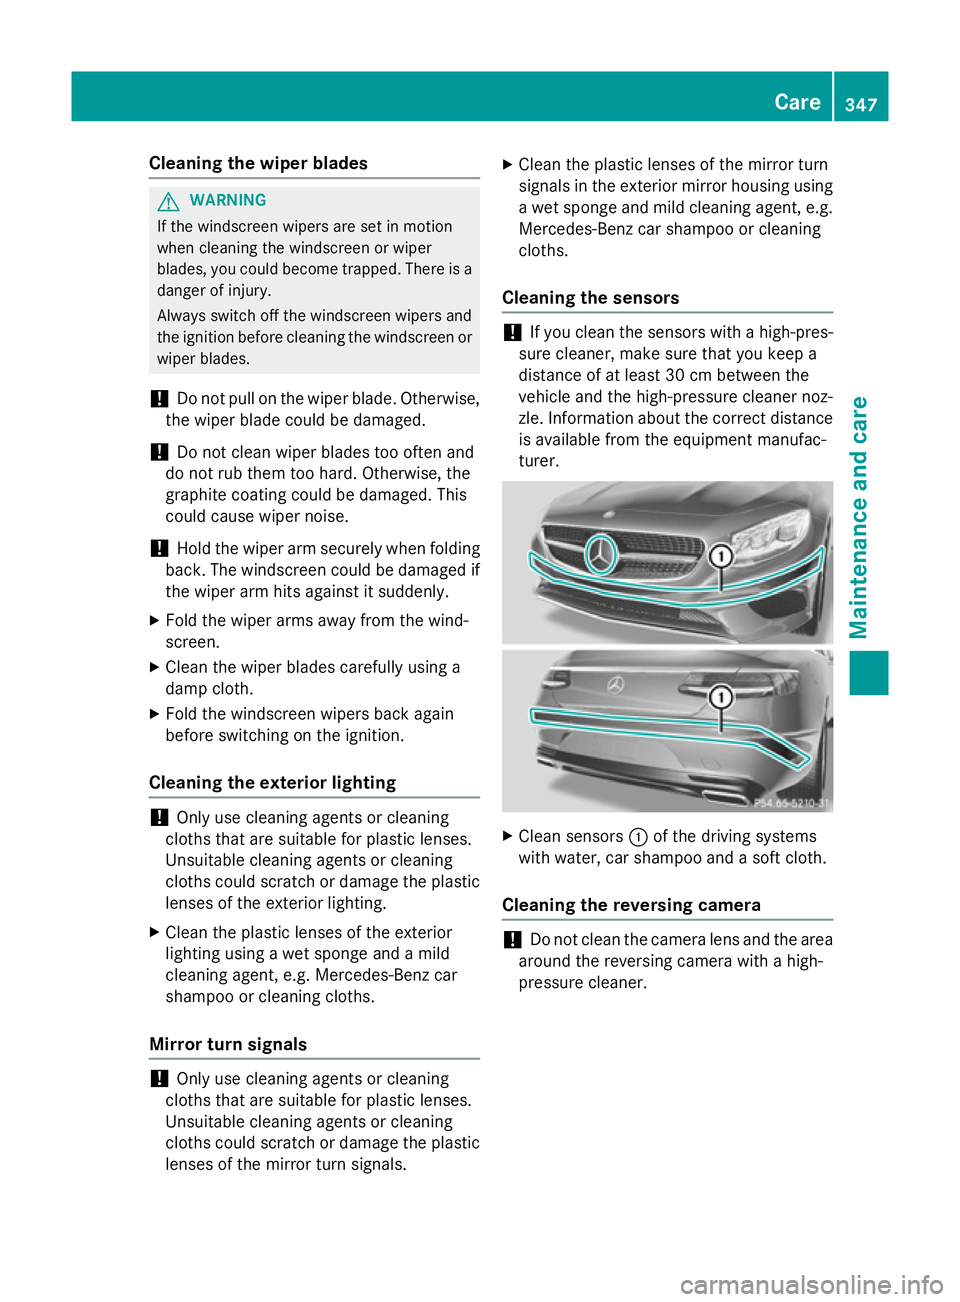
Cleaning the sensors !
If you clean the sensors with a high-pres-
sure cleaner, make sure that you keep a
distance of at least 30 cm between the
vehicle and the high-pressure cleaner noz-
zle. Information about the correct distance is available from the equipment manufac-
turer. X
Clean sensors :of the driving systems
with water, car shampoo and a soft cloth.
Cleaning the reversing camera !
Do not clean the camera lens and the area
around the reversing camera with a high-
pressure cleaner. Care
347Maintenance and care Z