2014 MERCEDES-BENZ S-CLASS COUPE check engine light
[x] Cancel search: check engine lightPage 103 of 413
G
WARNING
The reversing function does not react:
R to soft, light and thin objects, e.g. small fin-
gers
R while resetting
This means that the reversing feature cannot
prevent someone being trapped in these sit-
uations. There is a risk of injury.
When closing, make sure that no parts of the
body are in the closing area. If someone
becomes trapped, press the switch to open
the side window again. Opening and closing the side win-
dows
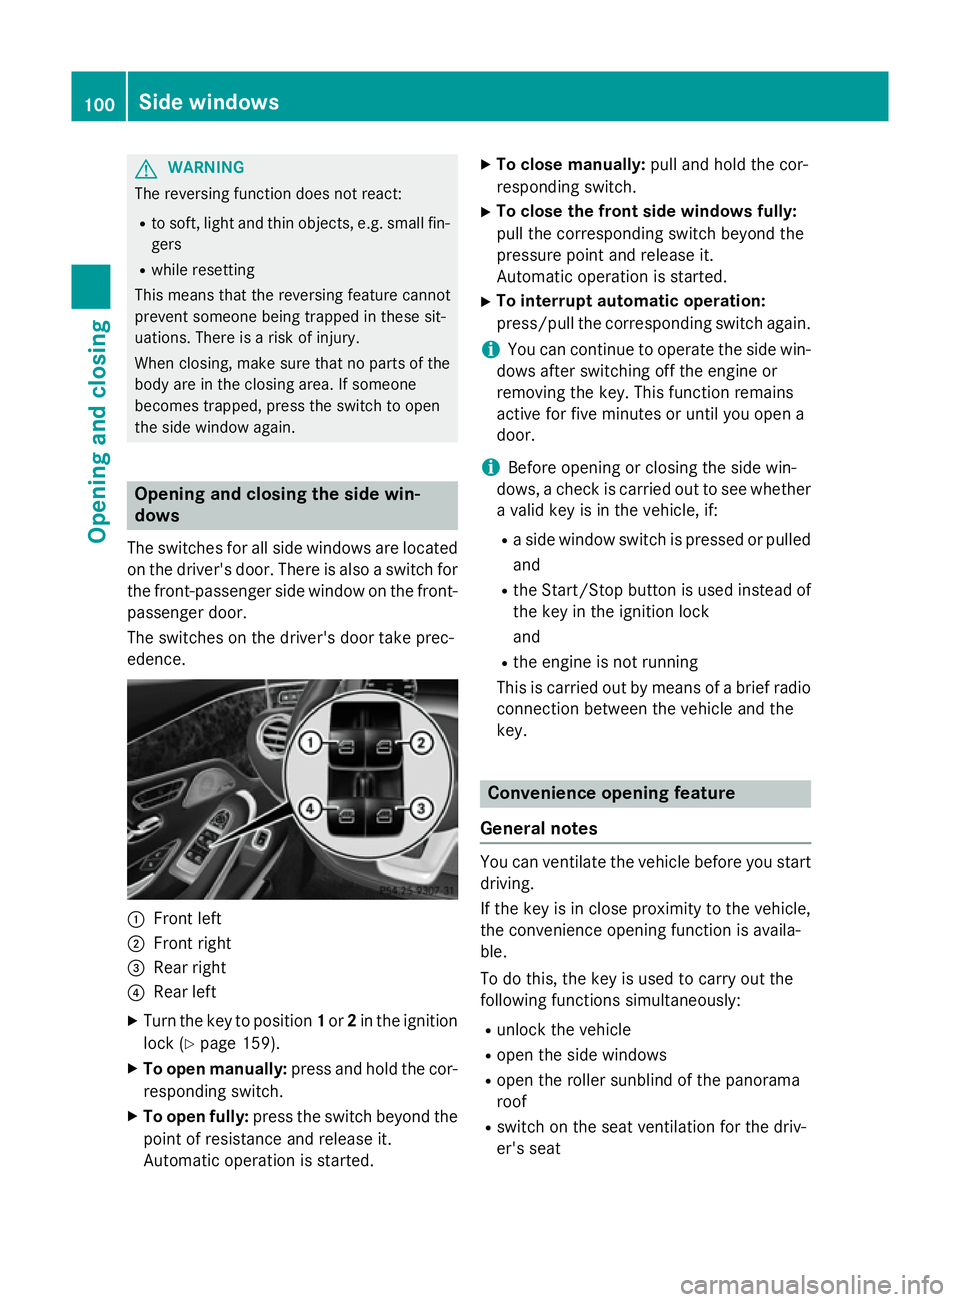
The switches for all side windows are located
on the driver's door. There is also a switch for
the front-passenger side window on the front- passenger door.
The switches on the driver's door take prec-
edence. :
Front left
; Front right
= Rear right
? Rear left
X Turn the key to position 1or 2in the ignition
lock (Y page 159).
X To open manually: press and hold the cor-
responding switch.
X To open fully: press the switch beyond the
point of resistance and release it.
Automatic operation is started. X
To close manually: pull and hold the cor-
responding switch.
X To close the front side windows fully:
pull the corresponding switch beyond the
pressure point and release it.
Automatic operation is started.
X To interrupt automatic operation:
press/pull the corresponding switch again.
i You can continue to operate the side win-
dows after switching off the engine or
removing the key. This function remains
active for five minutes or until you open a
door.
i Before opening or closing the side win-
dows, a check is carried out to see whether a valid key is in the vehicle, if:
R a side window switch is pressed or pulled
and
R the Start/Stop button is used instead of
the key in the ignition lock
and
R the engine is not running
This is carried out by means of a brief radio
connection between the vehicle and the
key. Convenience opening feature
General notes You can ventilate the vehicle before you start
driving.
If the key is in close proximity to the vehicle,
the convenience opening function is availa-
ble.
To do this, the key is used to carry out the
following functions simultaneously:
R unlock the vehicle
R open the side windows
R open the roller sunblind of the panorama
roof
R switch on the seat ventilation for the driv-
er's seat 100
Side windowsOpening and closing
Page 109 of 413
Useful information
i This Owner's Manual describes all mod-
els, series and optional equipment for your
vehicle that were available at the time of
going to press. National variations are pos- sible. Note that your vehicle may not be
equipped with all of the functions descri-
bed. This is also the case for systems and
functions relevant to safety.
i Read the information on qualified special-
ist workshops: (Y page 25). Correct driver's seat position
G
WARNING
You could lose control of the vehicle while
driving if you:
R adjust the driver's seat, steering wheel or
mirrors
R fasten the seat belt
There is a risk of an accident.
Adjust the driver's seat, head restraint, steer-
ing wheel and mirrors and fasten your seat
belt before starting the engine. X
Observe the safety guidelines on seat
adjustment (Y page 107).
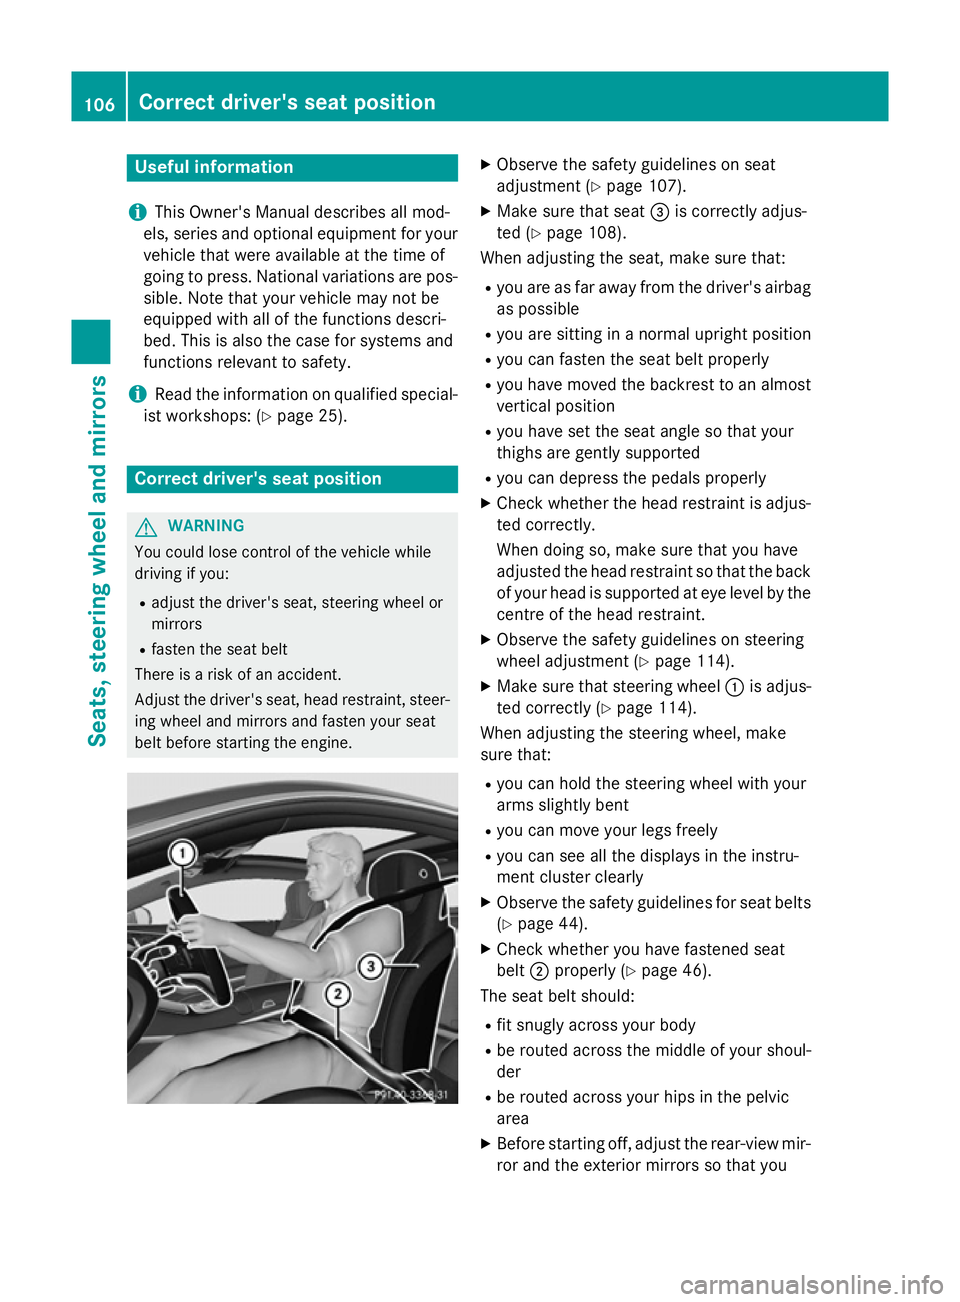
X Make sure that seat =is correctly adjus-
ted (Y page 108).
When adjusting the seat, make sure that:
R you are as far away from the driver's airbag
as possible
R you are sitting in a normal upright position
R you can fasten the seat belt properly
R you have moved the backrest to an almost
vertical position
R you have set the seat angle so that your
thighs are gently supported
R you can depress the pedals properly
X Check whether the head restraint is adjus-
ted correctly.
When doing so, make sure that you have
adjusted the head restraint so that the back
of your head is supported at eye level by the centre of the head restraint.
X Observe the safety guidelines on steering
wheel adjustment (Y page 114).
X Make sure that steering wheel :is adjus-
ted correctly (Y page 114).
When adjusting the steering wheel, make
sure that:
R you can hold the steering wheel with your
arms slightly bent
R you can move your legs freely
R you can see all the displays in the instru-
ment cluster clearly
X Observe the safety guidelines for seat belts
(Y page 44).
X Check whether you have fastened seat
belt ;properly (Y page 46).
The seat belt should:
R fit snugly across your body
R be routed across the middle of your shoul-
der
R be routed across your hips in the pelvic
area
X Before starting off, adjust the rear-view mir-
ror and the exterior mirrors so that you 106
Correct driver's seat positionSeats, steering wheel and mirrors
Page 137 of 413
Problems with the windscreen wipers
Problem
Possible causes/consequences and
M
MSolutions The windscreen wipers
are obstructed Leaves or snow, for example, may be obstructing the windscreen
wiper movement. The wiper motor has been deactivated.
X Switch off the engine using the Start/Stop button and open the
driver's door.
X Remove the cause of the obstruction.
X Switch the windscreen wipers back on. The windscreen wipers
fail completely. The windscreen wiper drive is malfunctioning.
X Select another wiper speed on the combination switch.
X Have the windscreen wipers checked at a qualified specialist
workshop. The wiper motor has been deactivated.
X Switch off the engine using the Start/Stop button and open the
driver's door.
X Remove the cause of the obstruction.
X Switch the windscreen wipers back on. 134
Windscreen wipersLights and windscreen wipers
Page 163 of 413
If you depress the brake pedal and press the
Start/Stop button, the engine starts immedi-
ately.
A check which periodically establishes a radio
connection between the vehicle and the key
determines whether a valid key is in the vehi- cle. This occurs, for example, when starting
the engine.
To start the vehicle without actively using the
key:
R the Start/Stop button must be inserted in
the ignition lock
R the key must be in the vehicle
R the vehicle must not be locked with the key
or KEYLESS-GO (Y page 85)
Do not keep the key:
R with electronic devices, e.g. a mobile
phone or another key
R with metallic objects, e.g. coins or metal
film
R inside metallic objects, e.g. a metal case
This can affect the key's functionality.
If you lock the vehicle with the key's remote
control or with KEYLESS-GO, after a short
time:
R you will not be able to switch on the ignition
with the Start/Stop button
R you will not be able to start the engine with
the Start/Stop button until the vehicle is
unlocked again
If you lock the vehicle centrally using the but- ton on the front door (Y page 91), you can
continue to start the engine with the Start/
Stop button.
The engine can be switched off while the vehi-
cle is in motion by pressing and holding the
Start/Stop button for three seconds. This
function operates independently of the ECO
start/stop automatic engine switch-off func-
tion. Key positions with the Start/Stop button
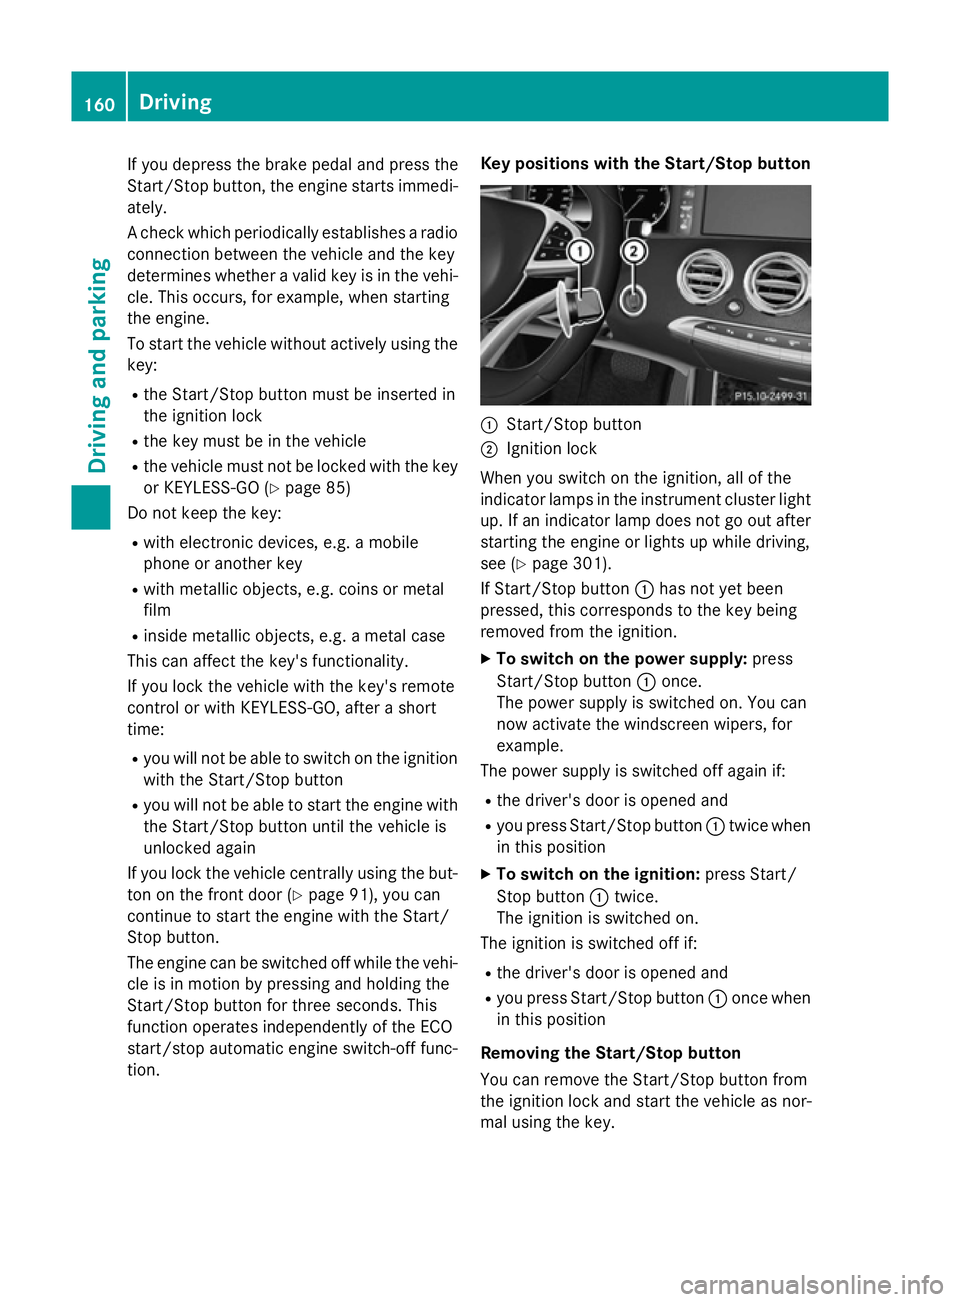
:
Start/Stop button
; Ignition lock
When you switch on the ignition, all of the
indicator lamps in the instrument cluster light up. If an indicator lamp does not go out after
starting the engine or lights up while driving,
see (Y page 301).
If Start/Stop button :has not yet been
pressed, this corresponds to the key being
removed from the ignition.
X To switch on the power supply: press
Start/Stop button :once.
The power supply is switched on. You can
now activate the windscreen wipers, for
example.
The power supply is switched off again if:
R the driver's door is opened and
R you press Start/Stop button :twice when
in this position
X To switch on the ignition: press Start/
Stop button :twice.
The ignition is switched on.
The ignition is switched off if:
R the driver's door is opened and
R you press Start/Stop button :once when
in this position
Removing the Start/Stop button
You can remove the Start/Stop button from
the ignition lock and start the vehicle as nor-
mal using the key. 160
DrivingDriving and parking
Page 183 of 413
Electric parking brake
General notes G
WARNING
If you leave children unattended in the vehi-
cle, they may be able to set the vehicle in
motion if, for example, they:
R release the parking brake
R shift the automatic transmission out of park
position P
R start the engine
In addition, they may operate vehicle equip-
ment and become trapped. There is a risk of
an accident and injury.
When leaving the vehicle, always take the key
with you and lock the vehicle. Never leave
children unattended in the vehicle.
The function of the electric parking brake is
dependent on the on-board voltage. If the on-
board voltage is low or if there is a malfunc-
tion in the system, it may not be possible to
apply the released parking brake.
X If this is the case, only park the vehicle on
level ground and secure it to prevent it from
rolling away.
X Shift the automatic transmission to posi-
tion P.
It may not be possible to release an applied
parking brake if the on-board voltage is low or
if there is a malfunction in the system. Con-
tact a qualified specialist workshop.
The electric parking brake carries out a func-
tion check at regular intervals when the
engine is switched off. Noises that occur are
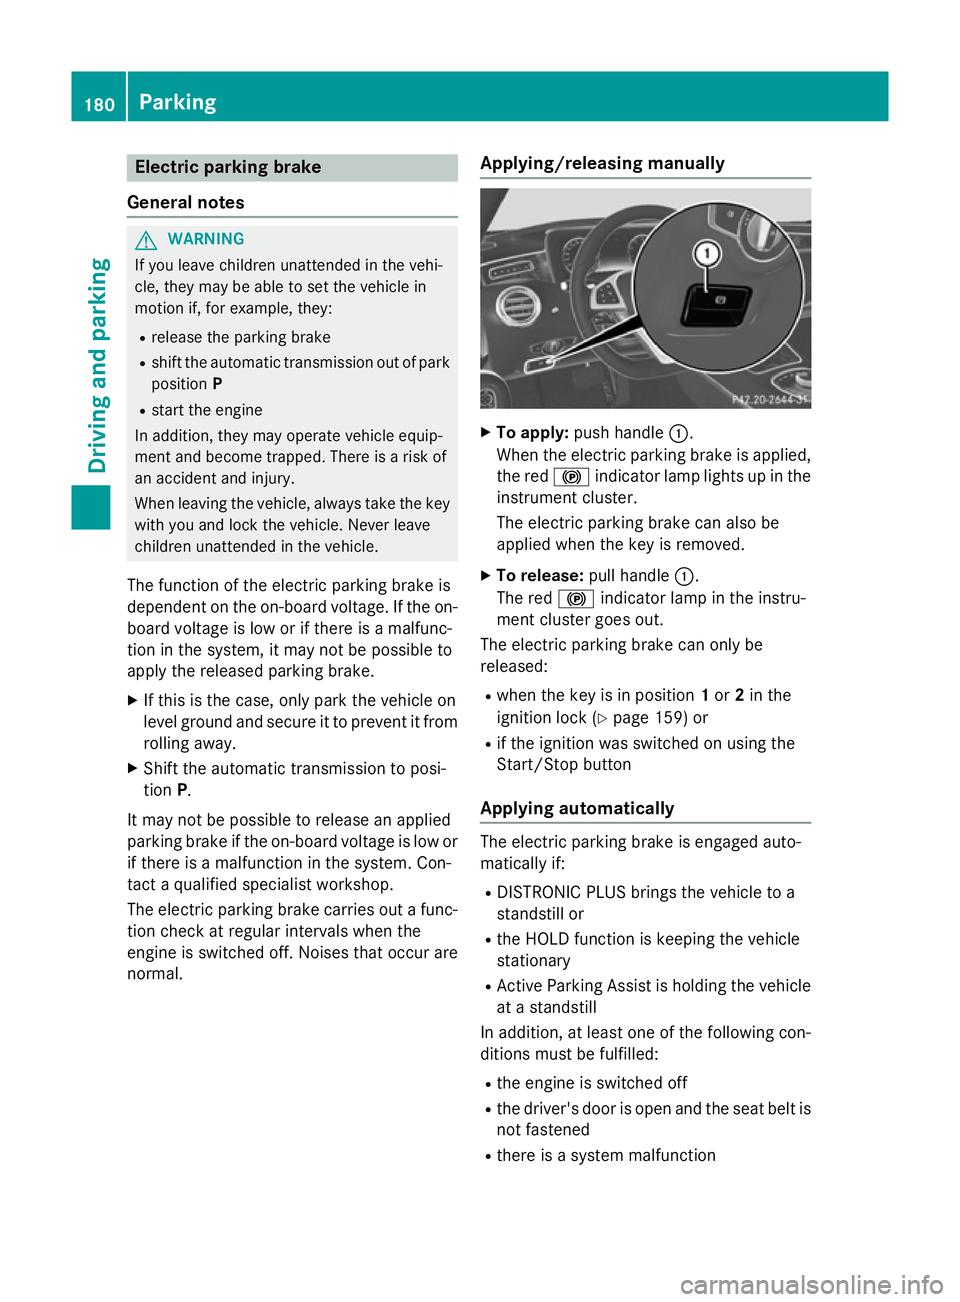
normal. Applying/releasing manually X
To apply: push handle :.
When the electric parking brake is applied, the red !indicator lamp lights up in the
instrument cluster.
The electric parking brake can also be
applied when the key is removed.
X To release: pull handle:.
The red !indicator lamp in the instru-
ment cluster goes out.
The electric parking brake can only be
released:
R when the key is in position 1or 2in the
ignition lock (Y page 159) or
R if the ignition was switched on using the
Start/Stop button
Applying automatically The electric parking brake is engaged auto-
matically if:
R DISTRONIC PLUS brings the vehicle to a
standstill or
R the HOLD function is keeping the vehicle
stationary
R Active Parking Assist is holding the vehicle
at a standstill
In addition, at least one of the following con-
ditions must be fulfilled:
R the engine is switched off
R the driver's door is open and the seat belt is
not fastened
R there is a system malfunction 180
ParkingDriving and parking
Page 220 of 413
shows the
Park Assist cancelled
Park Assist cancelled mes-
sage.
When Active Parking Assist is cancelled, you
must steer and brake again yourself.
If a system malfunction occurs, the vehicle is braked to a standstill. To drive on, depress the
accelerator again. Reversing camera
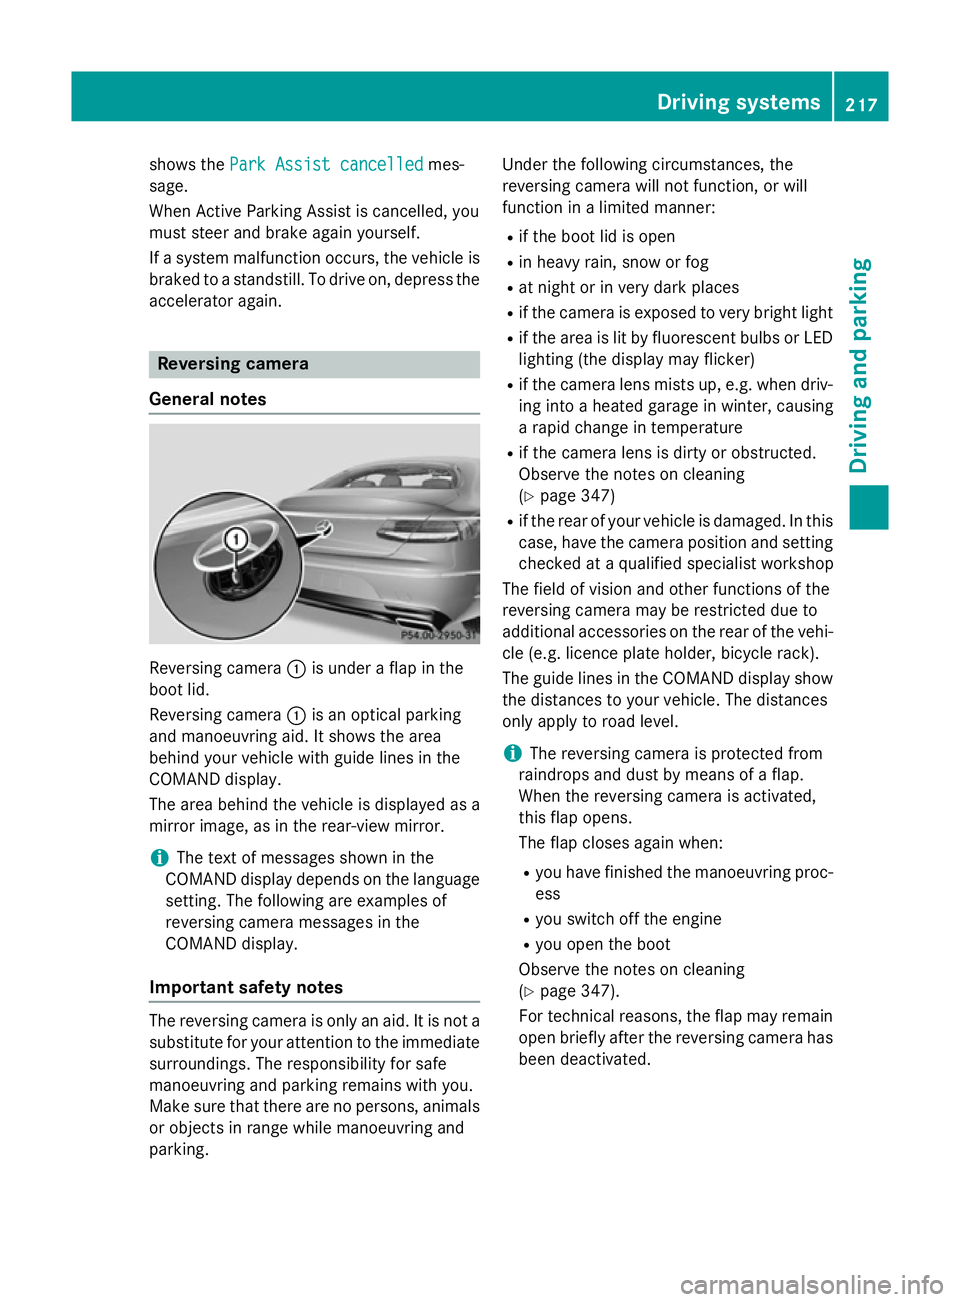
General notes Reversing camera
:is under a flap in the
boot lid.
Reversing camera :is an optical parking
and manoeuvring aid. It shows the area
behind your vehicle with guide lines in the
COMAND display.
The area behind the vehicle is displayed as a
mirror image, as in the rear-view mirror.
i The text of messages shown in the
COMAND display depends on the language setting. The following are examples of
reversing camera messages in the
COMAND display.
Important safety notes The reversing camera is only an aid. It is not a
substitute for your attention to the immediate
surroundings. The responsibility for safe
manoeuvring and parking remains with you.
Make sure that there are no persons, animals
or objects in range while manoeuvring and
parking. Under the following circumstances, the
reversing camera will not function, or will
function in a limited manner:
R if the boot lid is open
R in heavy rain, snow or fog
R at night or in very dark places
R if the camera is exposed to very bright light
R if the area is lit by fluorescent bulbs or LED
lighting (the display may flicker)
R if the camera lens mists up, e.g. when driv-
ing into a heated garage in winter, causing
a rapid change in temperature
R if the camera lens is dirty or obstructed.
Observe the notes on cleaning
(Y page 347)
R if the rear of your vehicle is damaged. In this
case, have the camera position and setting checked at a qualified specialist workshop
The field of vision and other functions of the
reversing camera may be restricted due to
additional accessories on the rear of the vehi-
cle (e.g. licence plate holder, bicycle rack).
The guide lines in the COMAND display show
the distances to your vehicle. The distances
only apply to road level.
i The reversing camera is protected from
raindrops and dust by means of a flap.
When the reversing camera is activated,
this flap opens.
The flap closes again when:
R you have finished the manoeuvring proc-
ess
R you switch off the engine
R you open the boot
Observe the notes on cleaning
(Y page 347).
For technical reasons, the flap may remain
open briefly after the reversing camera has been deactivated. Driving systems
217Driving and parking Z
Page 225 of 413
You are always responsible for safety, and
must always pay attention to your surround-
ings when parking and manoeuvring. This
applies to the areas behind, in front of and
beside the vehicle. You could otherwise
endanger yourself and others.
The 360° camera will not function or will
function only in a limited manner:
R if the doors are open
R if the exterior mirrors are folded in
R if the boot lid is open
R in heavy rain, snow or fog
R at night or in very dark places
R if the cameras are exposed to very bright
light
R if the area is lit by fluorescent bulbs or LED
lighting (the display may flicker)
R if the camera lenses mist up, e.g. when
driving into a heated garage in winter, caus- ing a rapid change in temperature
R if the camera lenses are dirty or covered.
Observe the notes on cleaning
(Y page 347)
R if the vehicle components in which the
cameras are fitted are damaged. In this
event, have the camera position and setting
checked at a qualified specialist workshop.
Do not use the 360° camera in this case. You
could otherwise injure others or damage
objects when parking the vehicle.
The guide lines in the COMAND display show the distances to your vehicle. The distances
only apply to road level.
i The camera in the rear area is protected
from raindrops and dust by means of a flap. This flap opens when the 360° camera is
activated.
The flap closes again when:
R you have finished the manoeuvring proc-
ess
R you switch off the engine
R you open the boot
Observe the notes on cleaning
(Y page 347). For technical reasons, the flap may remain
open briefly after the 360° camera has
been deactivated.
Activation conditions The 360° camera image can be displayed if:
R COMAND Online is switched on (see the
separate operating instructions)
R the 360° camera 360° camera function is switched on.
i If the 360° camera is activated at speeds
above approximately 30 km/h, a warning
message appears.
The warning message disappears if:
R the vehicle's speed falls below approx-
imately 30 km/h. The 360° camera is
then activated.
R the message is confirmed with the %
button.
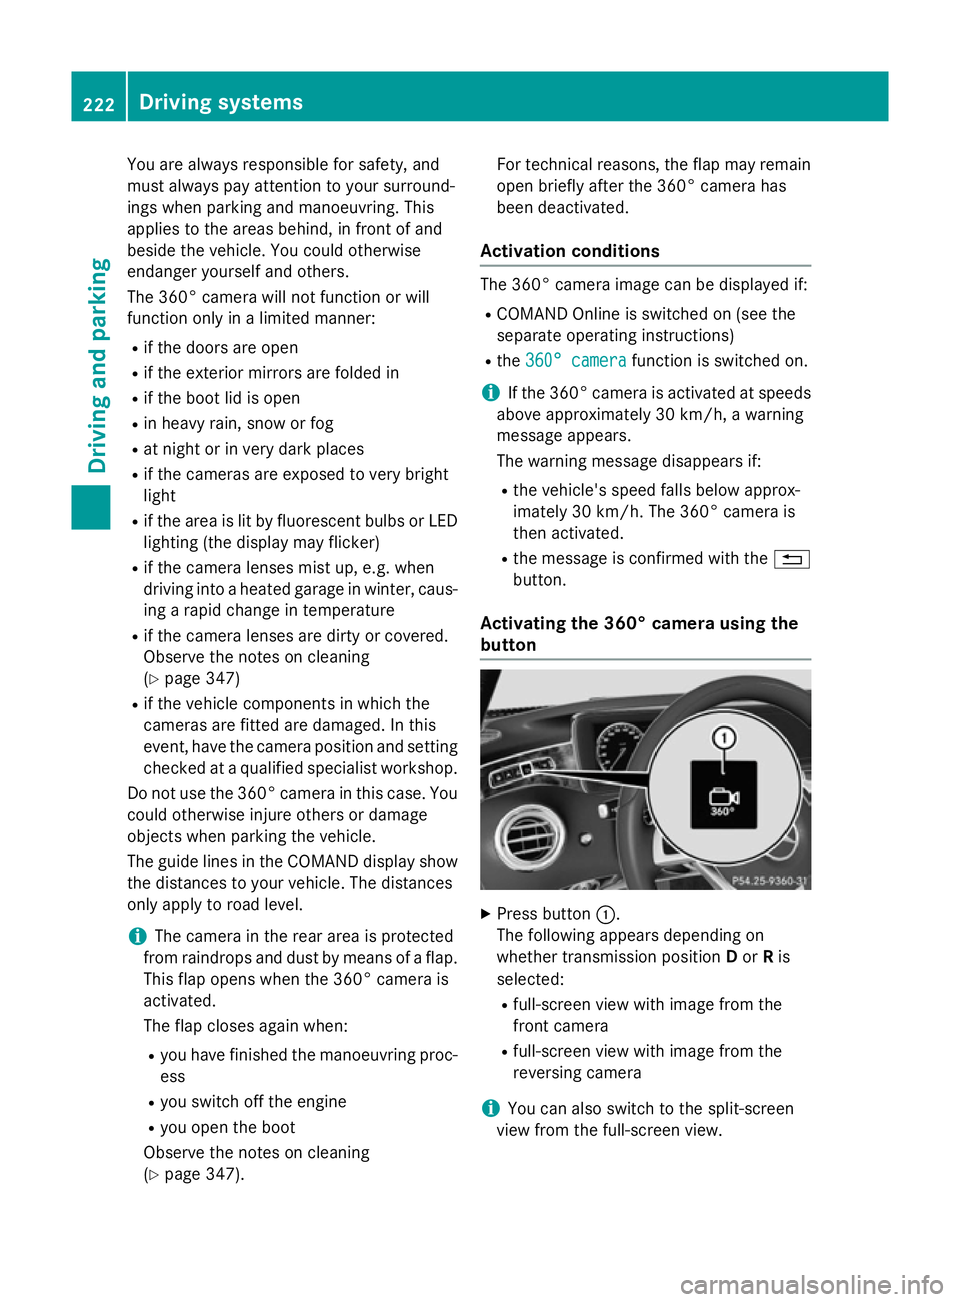
Activating the 360° camera using the
button X
Press button :.
The following appears depending on
whether transmission position Dor Ris
selected:
R full-screen view with image from the
front camera
R full-screen view with image from the
reversing camera
i You can also switch to the split-screen
view from the full-screen view. 222
Driving systemsDriving and parking
Page 234 of 413
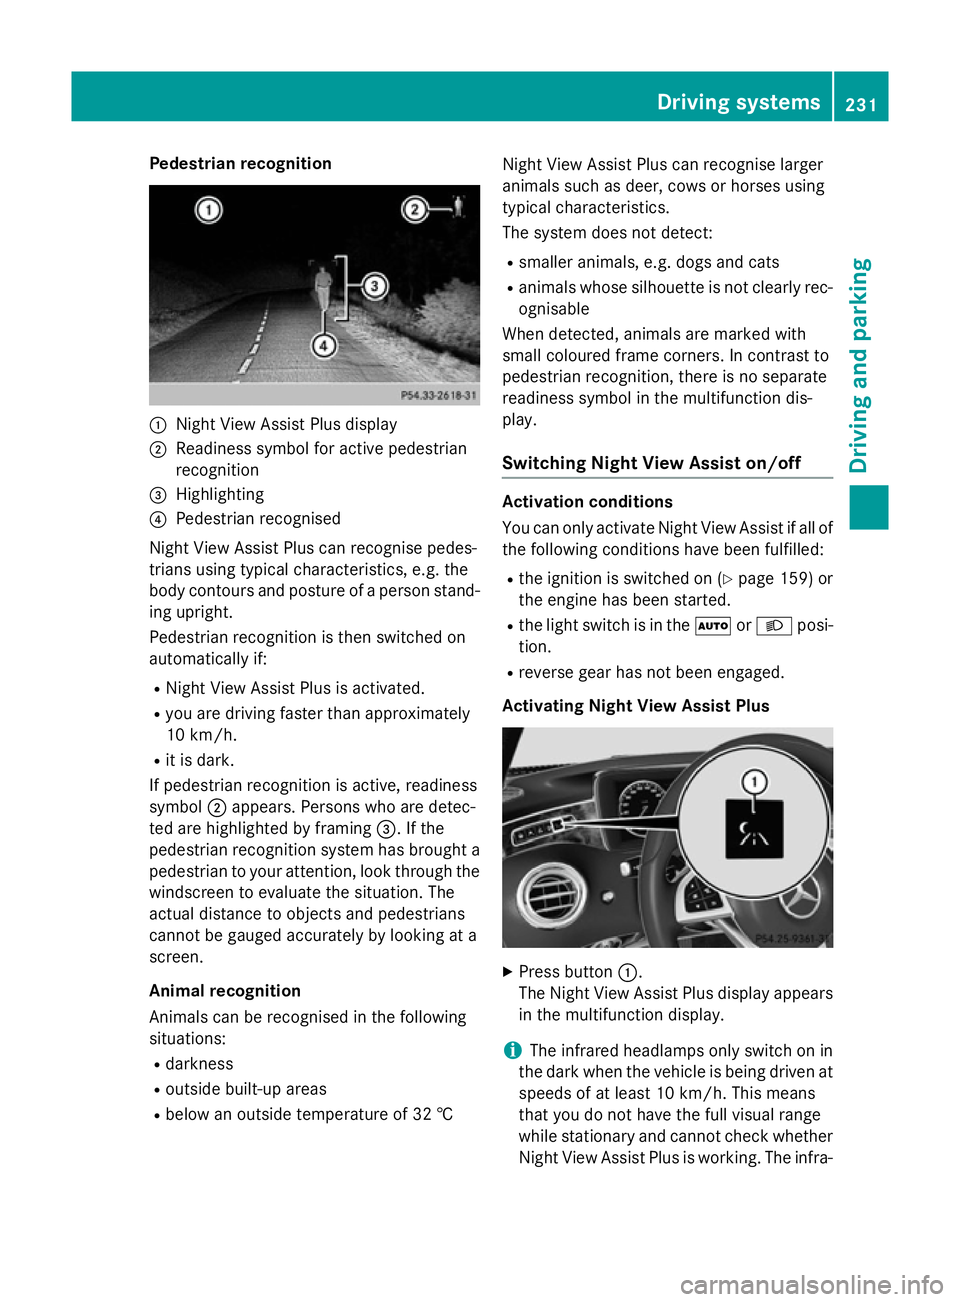
Pedestrian recognition
:
Night View Assist Plus display
; Readiness symbol for active pedestrian
recognition
= Highlighting
? Pedestrian recognised
Night View Assist Plus can recognise pedes-
trians using typical characteristics, e.g. the
body contours and posture of a person stand-
ing upright.
Pedestrian recognition is then switched on
automatically if:
R Night View Assist Plus is activated.
R you are driving faster than approximately
10 km/h.
R it is dark.
If pedestrian recognition is active, readiness
symbol ;appears. Persons who are detec-
ted are highlighted by framing =. If the
pedestrian recognition system has brought a
pedestrian to your attention, look through the windscreen to evaluate the situation. The
actual distance to objects and pedestrians
cannot be gauged accurately by looking at a
screen.
Animal recognition
Animals can be recognised in the following
situations:
R darkness
R outside built-up areas
R below an outside temperature of 32 † Night View Assist Plus can recognise larger
animals such as deer, cows or horses using
typical characteristics.
The system does not detect:
R smaller animals, e.g. dogs and cats
R animals whose silhouette is not clearly rec-
ognisable
When detected, animals are marked with
small coloured frame corners. In contrast to
pedestrian recognition, there is no separate
readiness symbol in the multifunction dis-
play.
Switching Night View Assist on/off Activation conditions
You can only activate Night View Assist if all of
the following conditions have been fulfilled:
R the ignition is switched on (Y page 159) or
the engine has been started.
R the light switch is in the ÃorL posi-
tion.
R reverse gear has not been engaged.
Activating Night View Assist Plus X
Press button :.
The Night View Assist Plus display appears in the multifunction display.
i The infrared headlamps only switch on in
the dark when the vehicle is being driven at speeds of at least 10 km/h. This means
that you do not have the full visual range
while stationary and cannot check whether
Night View Assist Plus is working. The infra- Driving systems
231Driving and parking Z