2014 MERCEDES-BENZ S-CLASS COUPE fuse
[x] Cancel search: fusePage 13 of 413

E
EASY-ENTRY feature Function/notes ............................ .116
EASY-EXIT feature
Crash-responsive ........................... 117
Function/notes ............................ .116
EBD (electronic brake force distri-
bution)
Display message ............................ 269
Function/notes ................................ 77
ECO display
Function/notes ............................ .182
On-board computer ....................... 248
ECO start/stop function
Automatic engine start .................. 164
Automatic engine switch-off .......... 163
Climate control .............................. 139
Deactivating/activating ................. 164
General information ....................... 163
Important safety notes .................. 163
Introduction ................................... 162
Electrical fuses
see Fuses
Electromagnetic compatibility
Declaration of conformity ................ 24
Electronic Stability Program
see ESP ®
(Electronic Stability Program)
Emergency
Automatic measures after an acci-
dent ................................................. 60
Emergency key
Unlocking the driver's door .............. 93
Emergency key element
Function/notes ................................ 87
Inserting .......................................... 87
Locking vehicle ................................ 93
Removing ......................................... 87
Emergency release
Driver's door ................................... .93
Emergency unlocking
Vehicle ............................................ .93
Engine
Display message ............................ 282
ECO start/stop function ................ 162
Engine number .............................. .402
Jump-starting ................................. 364
Running irregularl y......................... 166 Starting problems .......................... 166
Starting the engine with the key .... 161
Starting with the Start/Stop but-
ton ................................................. 162
Stopping ........................................ 179
Switching off with the Start/Stop
button ............................................ 179
Switching off with the vehicle key .. 179
Tow-starting (vehicle) ..................... 370
Warning lamp (engine diagnos-
tics) ............................................... 307
Engine electronics
Notes ............................................. 400
Problem (fault) ............................... 166
Engine oil
Additives ........................................ 406
Checking the oil level ..................... 338
Checking the oil level using the
dipstick .......................................... 338
Checking the oil level using the
on-board computer ........................ 339
Display message ............................ 284
Filling capacity ............................... 405
Notes about oil grade s................... 405
Notes on oil level/consumption .... 338
Temperature (on-board com-
puter) ............................................. 263
Topping up ..................................... 340
Viscosity ........................................ 406
Environmental protection
Returning an end-of-life vehicle ....... 22
ESP ®
(Electronic Stability Pro-
gram)
Activating/deactivating ................... 76
AMG menu (on-board computer) ... 264
Characteristics ................................. 76
Deactivating/activating ................. 257
Display message ............................ 266
ETS/4ETS ........................................ 75
Function/note s................................ 75
General notes .................................. 75
Important safety guidelines ............. 75
Warning lamp ................................. 304
ETS/4ETS (Electronic Traction Sys-
tem) ...................................................... 75
Exhaust
see Exhaust pipe 10
Index
Page 14 of 413
Exhaust pipe
Cleaning ........................................ .348
Exterior lighting
Cleaning ......................................... 347
see Lights
Exterior mirrors
Adjusting ....................................... 118
Anti-dazzle mode (automatic) ....... .119
Folding in/out (automatically) ....... 118
Folding in/out (electrically) ........... 118
Out of position (troubleshooting) ... 119
Parking position ............................. 119
Resetting ....................................... 118
Storing settings (memory func-
tion) ............................................... 120 F
Fault message see Display messages
Features ............................................. 320
Filler cap
see Fuel filler flap
Fire extinguisher ............................... 354
First-aid kit ......................................... 354
Fitting a wheel
Fitting a wheel ............................... 390
Lowering the vehicle ...................... 391
Preparing the vehicle ..................... 386
Raising the vehicl e......................... 387
Removing a whee l.......................... 390
Securing the vehicle against roll-
ing away ........................................ 387
Flat tyre
Changing a wheel/fitting the
spare whee l................................... 385
MOExtended tyre s......................... 356
Preparing the vehicle ..................... 356
TIREFIT kit ...................................... 357
Floormat ............................................. 333
Foglamps (extended range) .............. 128
Frequencies
Garage door opener ....................... 330
Mobile phone ................................. 400
Two-way radio ................................ 400
Front-passenger front airbag deac-
tivation
Display message ............................ 278 Front-passenger front airbag deac-
tivation system
Operation ......................................... 52
Problems ......................................... 56
System self-test ............................... 54
Front-passenger seat
Adjusting from the driver's seat ..... 108
Fuel
Additives ........................................ 404
Consumption information .............. 404
Consumption statistics .................. 248
Displaying the current consump-
tion ................................................ 247
Displaying the rang e...................... 247
E10 ................................................ 403
Fuel gaug e....................................... 32
Grade (petrol) ................................ 403
Important safety notes .................. 403
Problem (malfunction) ................... 178
Refuelling ....................................... 175
Tank content/reserve fue l............. 403
Fuel filler flap
Opening ......................................... 176
Fuel level
Calling up the range (on-board
computer) ...................................... 247
Gaug e.............................................. 32
Fuel tank
Capacity ........................................ 403
Problem (malfunction) ................... 178
Fuses
Allocation chart ............................. 372
Before changing ............................. 371
Dashboard fuse box ....................... 371
Fuse box in the boot ...................... 372
Fuse box in the engine compart-
ment .............................................. 372
Fuse box in the front-passenger
footwell .......................................... 371
Important safety notes .................. 370 G
Garage door opener Clearing the memory ..................... 330
Frequencies ................................... 330
General notes ................................ 328
Important safety notes .................. 328 Index
11
Page 82 of 413
R
a narrow vehicle travelling in front, e.g. a
motorcycle
R a vehicle travelling in front on a different
line
Detection by the camera system is also
impaired in the event of:
R dirt on the camera or if the camera is cov-
ered
R glare on the camera system, e.g. from the
sun being low in the sky
R darkness
R if:
- pedestrians move quickly, e.g. into the
path of the vehicle
- the camera system no longer detects a
pedestrian as a person due to special
clothing or other objects
- a pedestrian is concealed by other
objects
- the typical outline of a person is not dis-
tinguishable from the background
Following damage to the front end of the vehi-
cle, have the radar sensor settings and oper- ation checked at a qualified specialist work-
shop. This also applies to collisions at slow
speeds where there is no visible damage to
the front of the vehicle.
Following damage to the windscreen, have
the configuration and operation of the cam-
era system checked at a qualified specialist
workshop.
Function X
To activate/deactivate: activate or deac-
tivate PRE-SAFE ®
Brake in the on-board
computer (Y page 258).
If the PRE-SAFE ®
Brake is not activated, the
æ symbol appears in the multifunction
display.
This function will issue a warning if:
R at a speed of around 30 km/h or more, the
distance maintained to the vehicle travel-
ling in front is insufficient for several sec-
onds. The
· distance warning lamp then lights
up in the instrument cluster.
R at a speed of approximately 7 km/h or
higher, you very quickly approach a vehicle
in front or a pedestrian.
An intermittent warning tone will then
sound and the ·distance warning lamp
lights up in the instrument cluster.
X Brake immediately to defuse the situation.
or
X Take evasive action provided it is safe to do
so.
i If there is an increased risk of collision,
preventive passenger protection measures
(PRE-SAFE ®
) are activated.
If the risk of collision with the vehicle in front
remains and you do not brake, take evasive
action or accelerate significantly, the vehicle
may perform automatic emergency braking,
up to the point of full brake application. Auto- matic emergency braking is not performed
until immediately prior to an imminent acci-
dent.
You can prevent the intervention of PRE-
SAFE ®
Brake at any time by:
R depressing the accelerator pedal further
R activating kickdown
R releasing the brake pedal
The braking action of PRE-SAFE ®
Brake is
ended automatically if:
R you manoeuvre to avoid the obstacle
R there is no longer a risk of collision
R there is no longer an obstacle detected in
front of your vehicle STEER CONTROL
General notes STEER CONTROL helps you by transmitting a
noticeable steering force to the steering
wheel in the direction required for vehicle
stabilisation. Driving safety systems
79Safety Z
Page 145 of 413
or
X Set the air distribution using COMAND
Online (see the separate operating instruc-
tions).
The indicator lamp in rocker switch Ã
goes out.
In automatic mode, if you adjust the airflow or
air distribution manually, the indicator lamp
on the Ãrocker switch goes out. The func-
tion which has not been changed manually,
however, continues to be controlled automat- ically. When the manually set function
switches back to automatic mode, the indi-
cator lamp on the Ãrocker switch lights
up again. Setting the climate mode
In automatic mode you can select the follow-
ing airflow settings for the driver's and front- passenger areas:
FOCUS high airflow that is set slightly cooler
MEDIUM medium airflow, standard setting
DIFFUSE low airflow that is set slightly warmer and with less of a draught
X To set: set the climate mode using
COMAND Online (see the separate operat- ing instructions). Setting the temperature
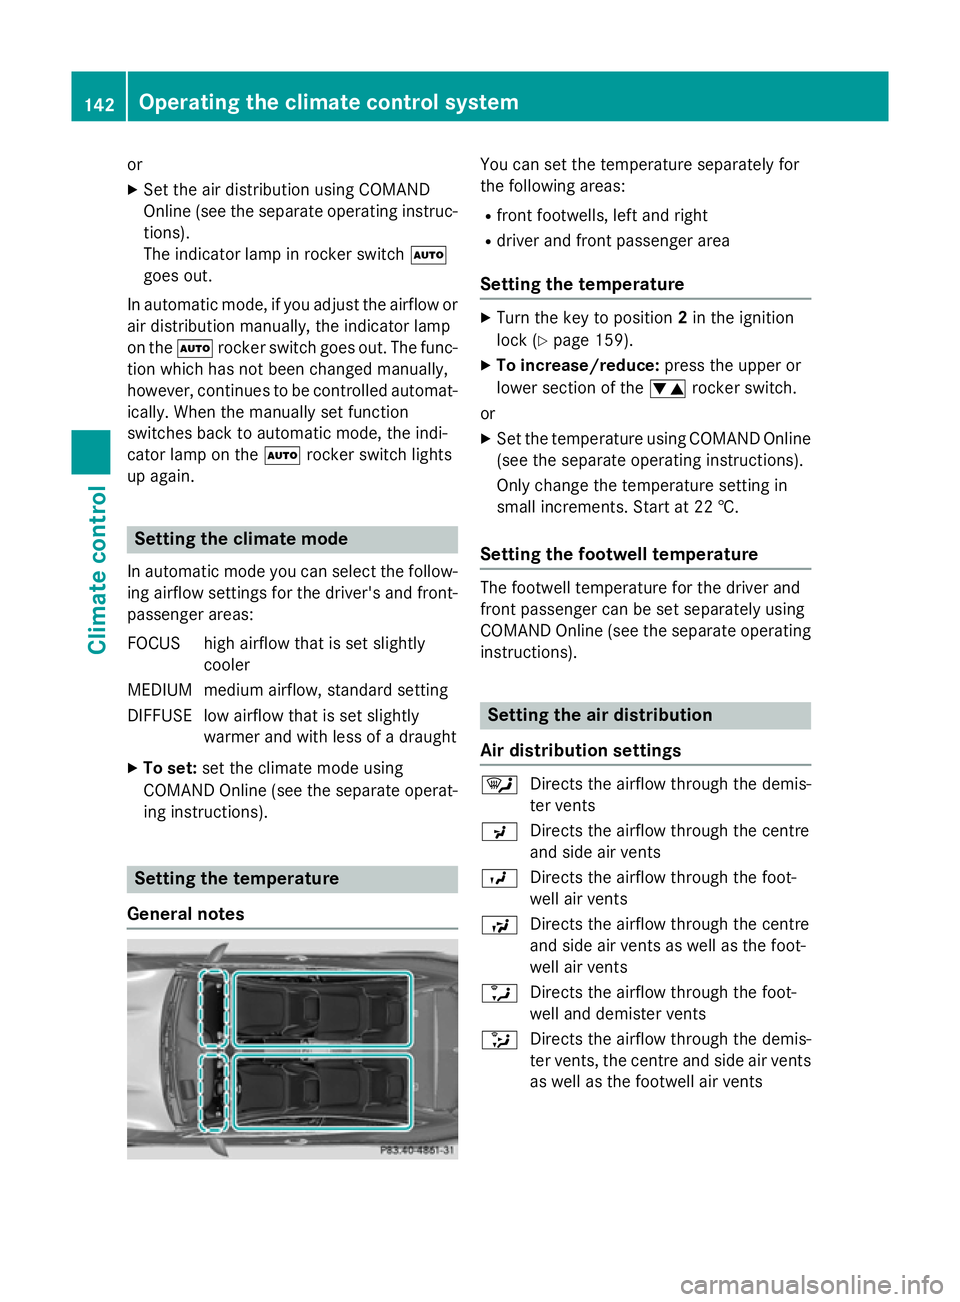
General notes You can set the temperature separately for
the following areas:
R front footwells, left and right
R driver and front passenger area
Setting the temperature X
Turn the key to position 2in the ignition
lock (Y page 159).
X To increase/reduce: press the upper or
lower section of the wrocker switch.
or X Set the temperature using COMAND Online
(see the separate operating instructions).
Only change the temperature setting in
small increments. Start at 22 †.
Setting the footwell temperature The footwell temperature for the driver and
front passenger can be set separately using
COMAND Online (see the separate operating
instructions). Setting the air distribution
Air distribution settings ¯
Directs the airflow through the demis-
ter vents
P Directs the airflow through the centre
and side air vents
O Directs the airflow through the foot-
well air vents
S Directs the airflow through the centre
and side air vents as well as the foot-
well air vents
a Directs the airflow through the foot-
well and demister vents
_ Directs the airflow through the demis-
ter vents, the centre and side air vents
as well as the footwell air vents 142
Operating the climate control systemClimate control
Page 199 of 413
Afterwards, the vehicle accelerates back to
the speed you set.
The system takes into account the fact that
overtaking on the right is not permitted on
motorways or high-speed major roads at
speeds above 80 km/h. The driving speed is
adjusted to the speed of the queue of vehicles
in the adjacent lane to the left.
i Prevention of overtaking on the right
applies to countries where traffic drives on
the right. In countries where traffic drives
on the left, overtaking on the left is preven-
ted accordingly.
Stopping G
WARNING
When leaving the vehicle, even if it is braked
only by DISTRONIC PLUS, it could roll away if:
R there is a malfunction in the system or in
the voltage supply.
R DISTRONIC PLUS has been deactivated
with the cruise control lever, e.g. by a vehi-
cle occupant or from outside the vehicle.
R the electrical system in the engine com-
partment, the battery or the fuses have
been tampered with.
R the battery is disconnected.
R the accelerator pedal has been depressed,
e.g. by a vehicle occupant.
There is a risk of an accident.
If you wish to exit the vehicle, always turn off
DISTRONIC PLUS and secure the vehicle
against rolling away.
For further information on deactivating
DISTRONIC PLUS (Y page 198).
If DISTRONIC PLUS detects that the vehicle in front is stopping, it brakes your vehicle until it is stationary.
Once your vehicle is stationary, it remains
stationary and you do not need to depress the
brake.
After a short period, the vehicle is secured by
the electric parking brake, thus relieving the
service brake. Depending on the specified minimum dis-
tance, your vehicle will come to a standstill at a sufficient distance behind the vehicle in
front. The specified minimum distance is set
using the control on the cruise control lever.
The electric parking brake secures the vehicle
automatically if DISTRONIC PLUS is activated
and:
R the seat belt is unfastened and the driver's
door is open
R the engine is switched off, unless it is auto-
matically switched off by the ECO start/
stop function
R a system fault occurs
R the power supply is insufficient
If a malfunction occurs, then the transmission may also be shifted into position Pautomat-
ically.
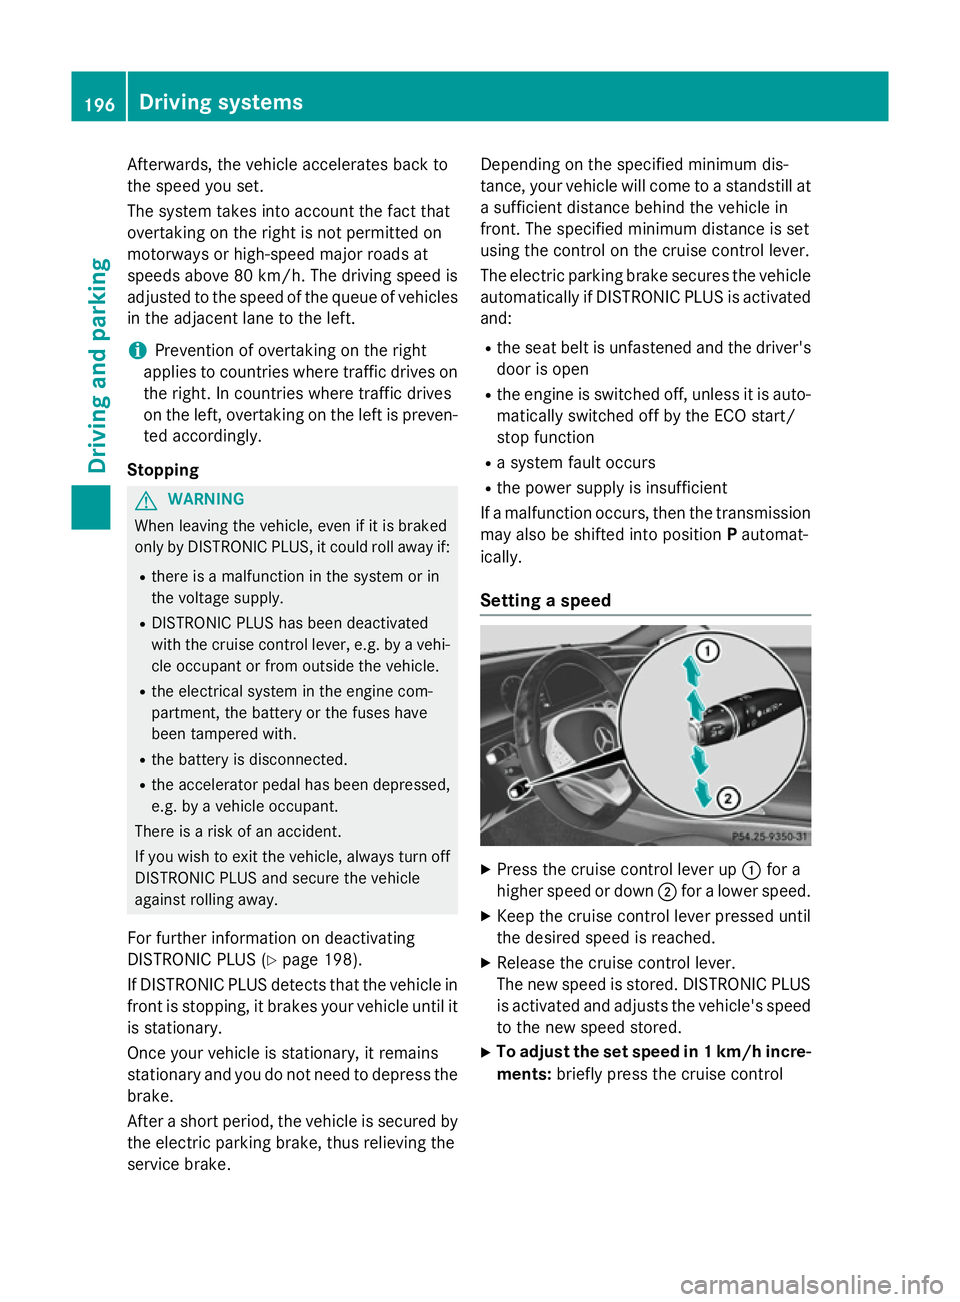
Setting a speed X
Press the cruise control lever up :for a
higher speed or down ;for a lower speed.
X Keep the cruise control lever pressed until
the desired speed is reached.
X Release the cruise control lever.
The new speed is stored. DISTRONIC PLUS
is activated and adjusts the vehicle's speed to the new speed stored.
X To adjust the set speed in 1 km/h incre-
ments: briefly press the cruise control 196
Driving systemsDriving an
d parking
Page 206 of 413
Important safety notes
G
WARNING
When leaving the vehicle, it can still roll away despite being braked by the HOLD function if:
R there is a malfunction in the system or in
the voltage supply
R the HOLD function is deactivated by the
accelerator pedal being depressed, e.g. by
a vehicle occupant
R the electrical system in the engine com-
partment, the battery or the fuses are tam-
pered with
R the battery is disconnected
There is a risk of an accident.
Before leaving the vehicle, always deactivate
the HOLD function and secure the vehicle
from rolling away.
Further information on deactivating the HOLD function (Y page 203).
! If DISTRONIC PLUS or the HOLD function
is activated, the vehicle brakes automati-
cally in certain situations. To prevent dam-
age to the vehicle, deactivate DISTRONIC
PLUS and the HOLD function in the follow-
ing or other similar situations:
R when towing the vehicle
R in the car wash
Activation conditions You can activate the HOLD function if all of
the following conditions are fulfilled:
R the vehicle is stationary
R the engine is running or if it has been auto-
matically switched off by the ECO start/
stop function
R the driver's door is closed or your seat belt
is fastened
R the electric parking brake is released
R the transmission is in position D,Ror N
R DISTRONIC PLUS is deactivated Activating the HOLD function
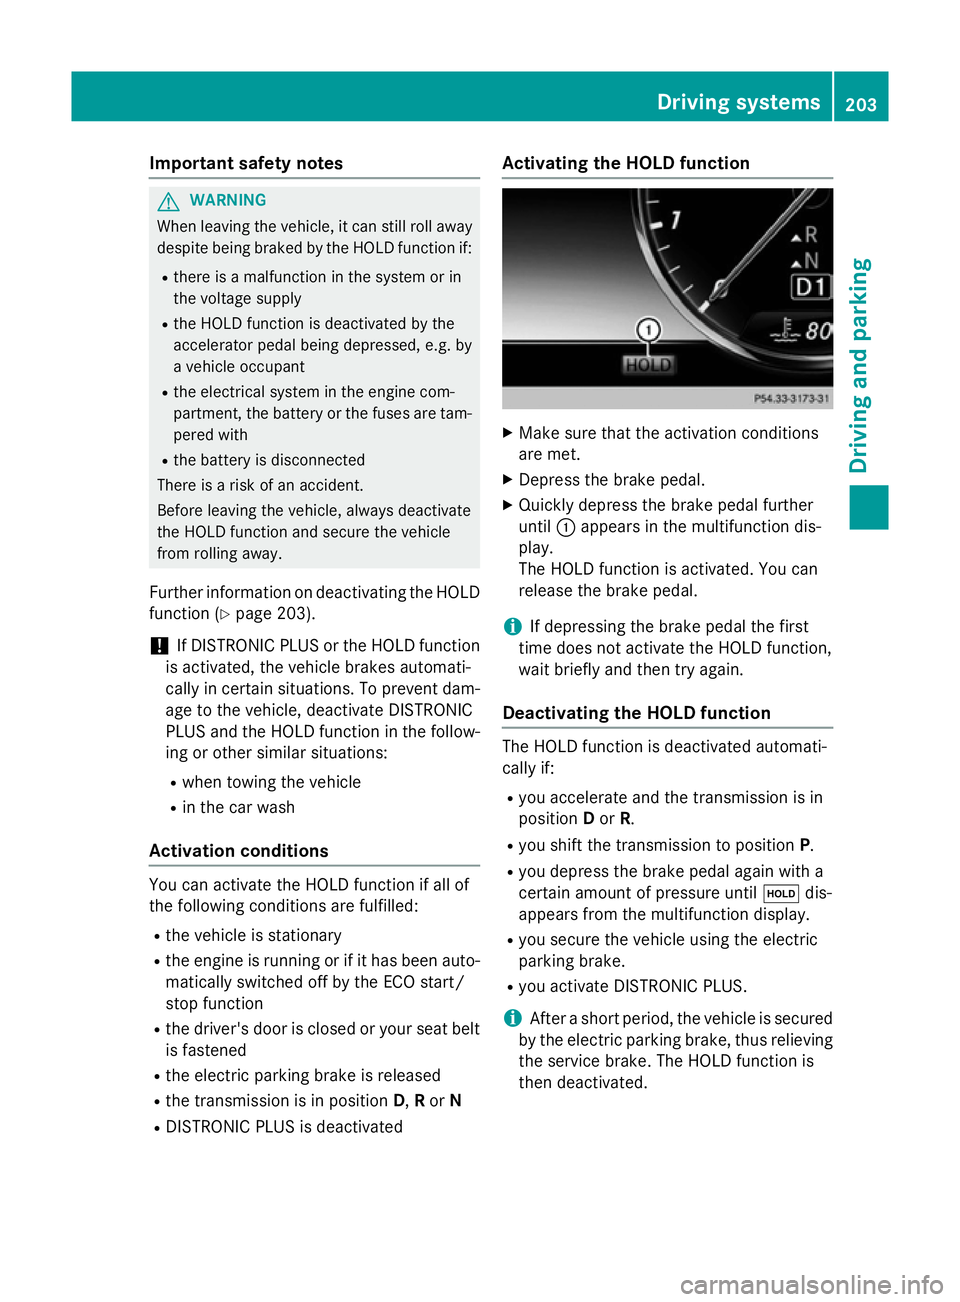
X
Make sure that the activation conditions
are met.
X Depress the brake pedal.
X Quickly depress the brake pedal further
until :appears in the multifunction dis-
play.
The HOLD function is activated. You can
release the brake pedal.
i If depressing the brake pedal the first
time does not activate the HOLD function,
wait briefly and then try again.
Deactivating the HOLD function The HOLD function is deactivated automati-
cally if:
R you accelerate and the transmission is in
position Dor R.
R you shift the transmission to position P.
R you depress the brake pedal again with a
certain amount of pressure until ëdis-
appears from the multifunction display.
R you secure the vehicle using the electric
parking brake.
R you activate DISTRONIC PLUS.
i After a short period, the vehicle is secured
by the electric parking brake, thus relieving
the service brake. The HOLD function is
then deactivated. Driving systems
203Driving and parking Z
Page 217 of 413
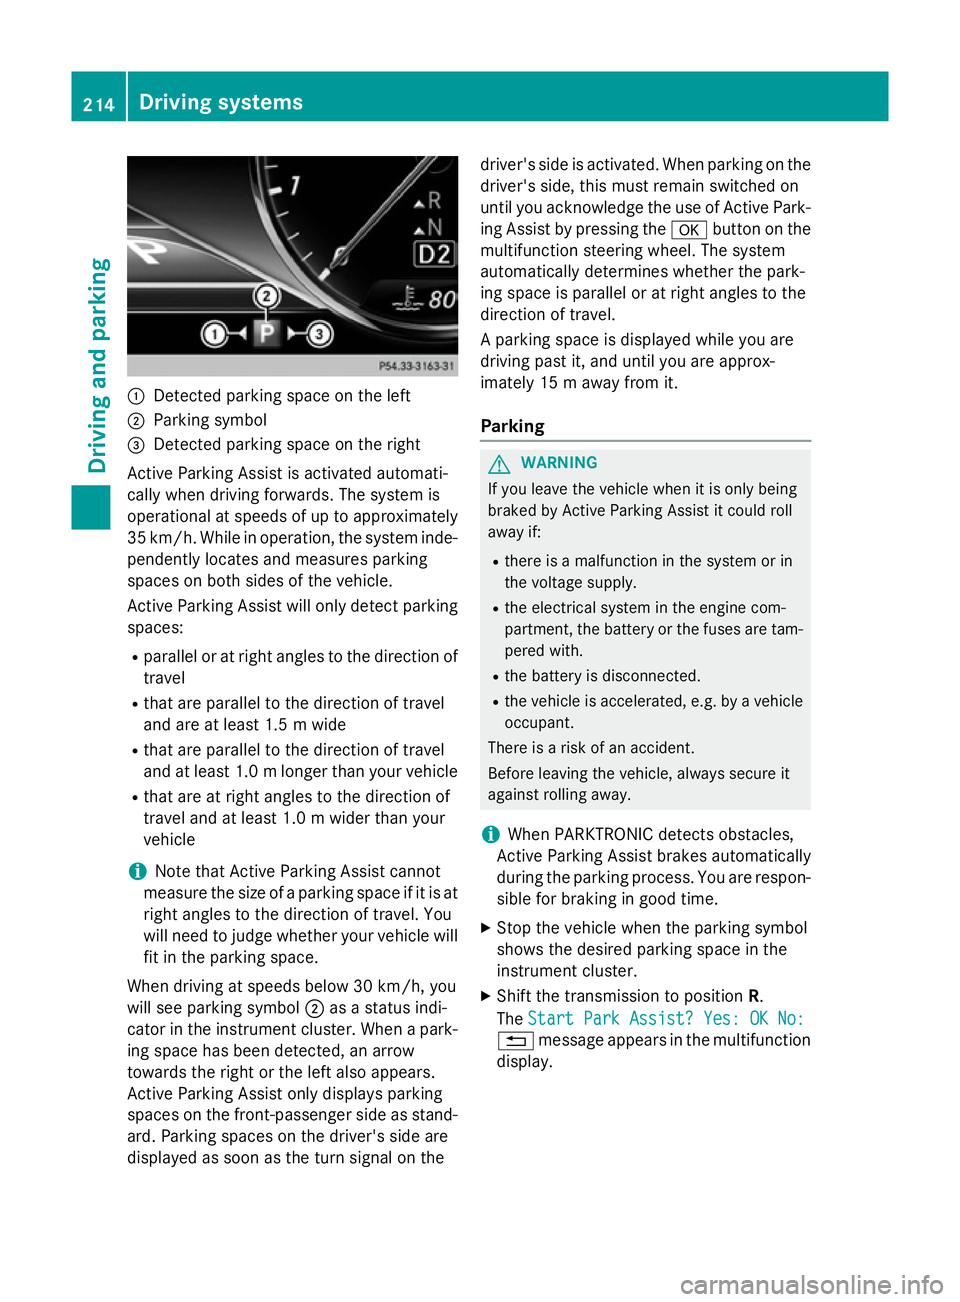
:
Detected parking space on the left
; Parking symbol
= Detected parking space on the right
Active Parking Assist is activated automati-
cally when driving forwards. The system is
operational at speeds of up to approximately
35 km/h. While in operation, the system inde- pendently locates and measures parking
spaces on both sides of the vehicle.
Active Parking Assist will only detect parkingspaces:
R parallel or at right angles to the direction of
travel
R that are parallel to the direction of travel
and are at least 1.5 m wide
R that are parallel to the direction of travel
and at least 1.0 mlonger than your vehicle
R that are at right angles to the direction of
travel and at least 1.0 m wider than your
vehicle
i Note that Active Parking Assist cannot
measure the size of a parking space if it is at
right angles to the direction of travel. You
will need to judge whether your vehicle will
fit in the parking space.
When driving at speeds below 30 km/h, you
will see parking symbol ;as a status indi-
cator in the instrument cluster. When a park- ing space has been detected, an arrow
towards the right or the left also appears.
Active Parking Assist only displays parking
spaces on the front-passenger side as stand-
ard. Parking spaces on the driver's side are
displayed as soon as the turn signal on the driver's side is activated. When parking on the
driver's side, this must remain switched on
until you acknowledge the use of Active Park- ing Assist by pressing the abutton on the
multifunction steering wheel. The system
automatically determines whether the park-
ing space is parallel or at right angles to the
direction of travel.
A parking space is displayed while you are
driving past it, and until you are approx-
imately 15 m away from it.
Parking G
WARNING
If you leave the vehicle when it is only being
braked by Active Parking Assist it could roll
away if:
R there is a malfunction in the system or in
the voltage supply.
R the electrical system in the engine com-
partment, the battery or the fuses are tam-
pered with.
R the battery is disconnected.
R the vehicle is accelerated, e.g. by a vehicle
occupant.
There is a risk of an accident.
Before leaving the vehicle, always secure it
against rolling away.
i When PARKTRONIC detects obstacles,
Active Parking Assist brakes automatically
during the parking process. You are respon-
sible for braking in good time.
X Stop the vehicle when the parking symbol
shows the desired parking space in the
instrument cluster.
X Shift the transmission to position R.
The Start Park Assist? Yes: OK No:
Start Park Assist? Yes: OK No:
% message appears in the multifunction
display. 214
Driving syste
msDriving and parking
Page 356 of 413
Useful information
............................354
Where will I find...? ...........................354
Flat tyre ............................................. 356
Battery (vehicle) ................................ 360
Jump-starting .................................... 364
Towing and tow-starting ..................367
Electrical fuses ................................. 370 353Breakdown assistance