2014 MERCEDES-BENZ S-CLASS COUPE clock
[x] Cancel search: clockPage 96 of 413
X
To power close a door: push the door into
the lock up to the first detent position.
Power closing will pull the door fully closed.
X To power close the boot lid: lightly push
the boot lid closed.
The power closing function pulls the boot
lid closed. Unlocking the driver's door (emer-
gency key element)
If the vehicle can no longer be locked or
unlocked with the key or KEYLESS-GO, use
the emergency key element.
X Take the emergency key element out of the
key (Y page 87). X
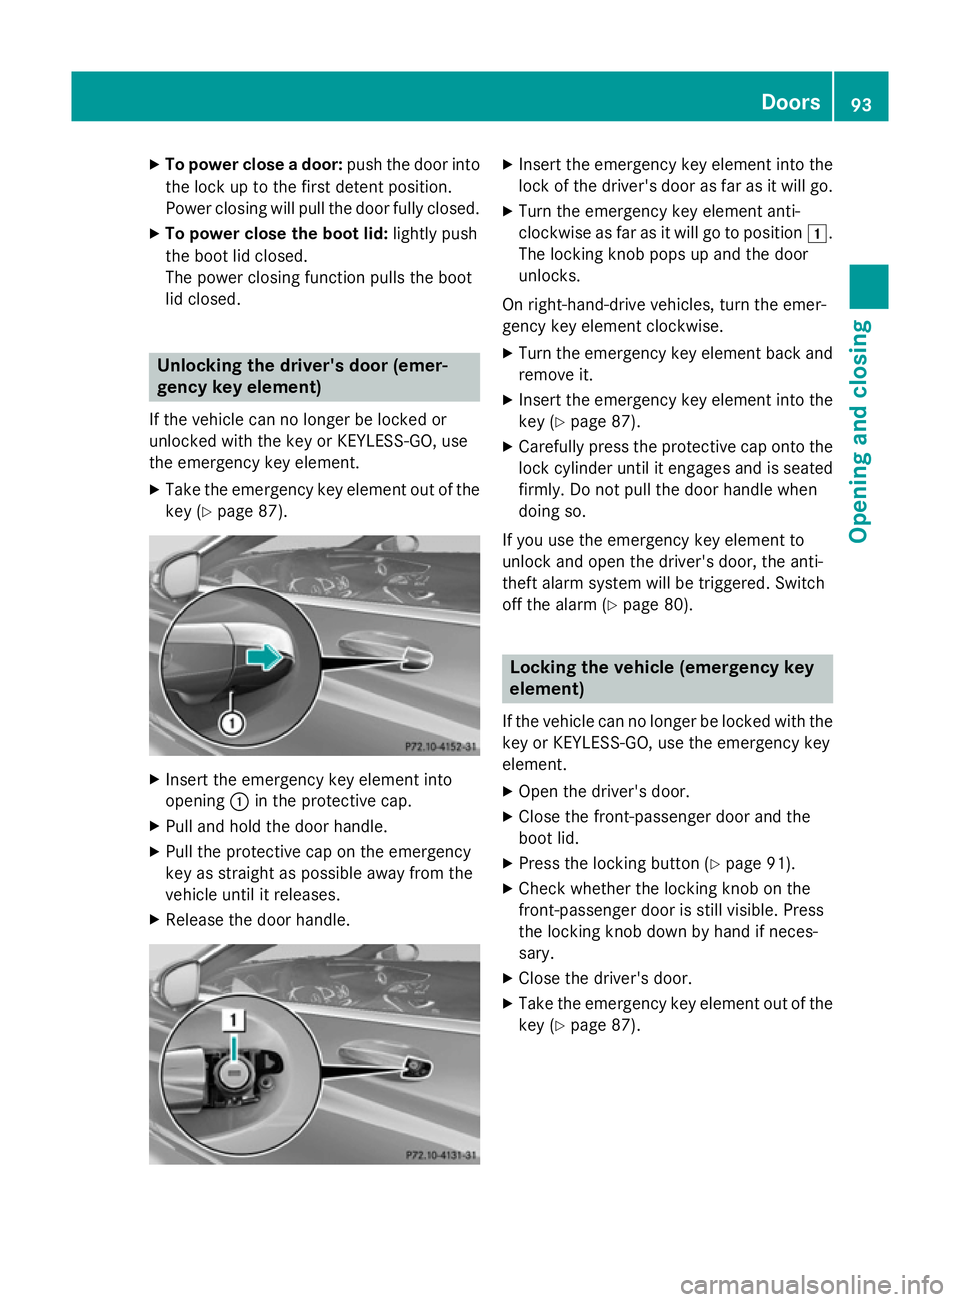
Insert the emergency key element into
opening :in the protective cap.
X Pull and hold the door handle.
X Pull the protective cap on the emergency
key as straight as possible away from the
vehicle until it releases.
X Release the door handle. X
Insert the emergency key element into the
lock of the driver's door as far as it will go.
X Turn the emergency key element anti-
clockwise as far as it will go to position 1.
The locking knob pops up and the door
unlocks.
On right-hand-drive vehicles, turn the emer-
gency key element clockwise.
X Turn the emergency key element back and
remove it.
X Insert the emergency key element into the
key (Y page 87).
X Carefully press the protective cap onto the
lock cylinder until it engages and is seated firmly. Do not pull the door handle when
doing so.
If you use the emergency key element to
unlock and open the driver's door, the anti-
theft alarm system will be triggered. Switch
off the alarm (Y page 80). Locking the vehicle (emergency key
element)
If the vehicle can no longer be locked with the key or KEYLESS-GO, use the emergency key
element.
X Open the driver's door.
X Close the front-passenger door and the
boot lid.
X Press the locking button (Y page 91).
X Check whether the locking knob on the
front-passenger door is still visible. Press
the locking knob down by hand if neces-
sary.
X Close the driver's door.
X Take the emergency key element out of the
key (Y page 87). Doors
93Opening and closing Z
Page 97 of 413
X
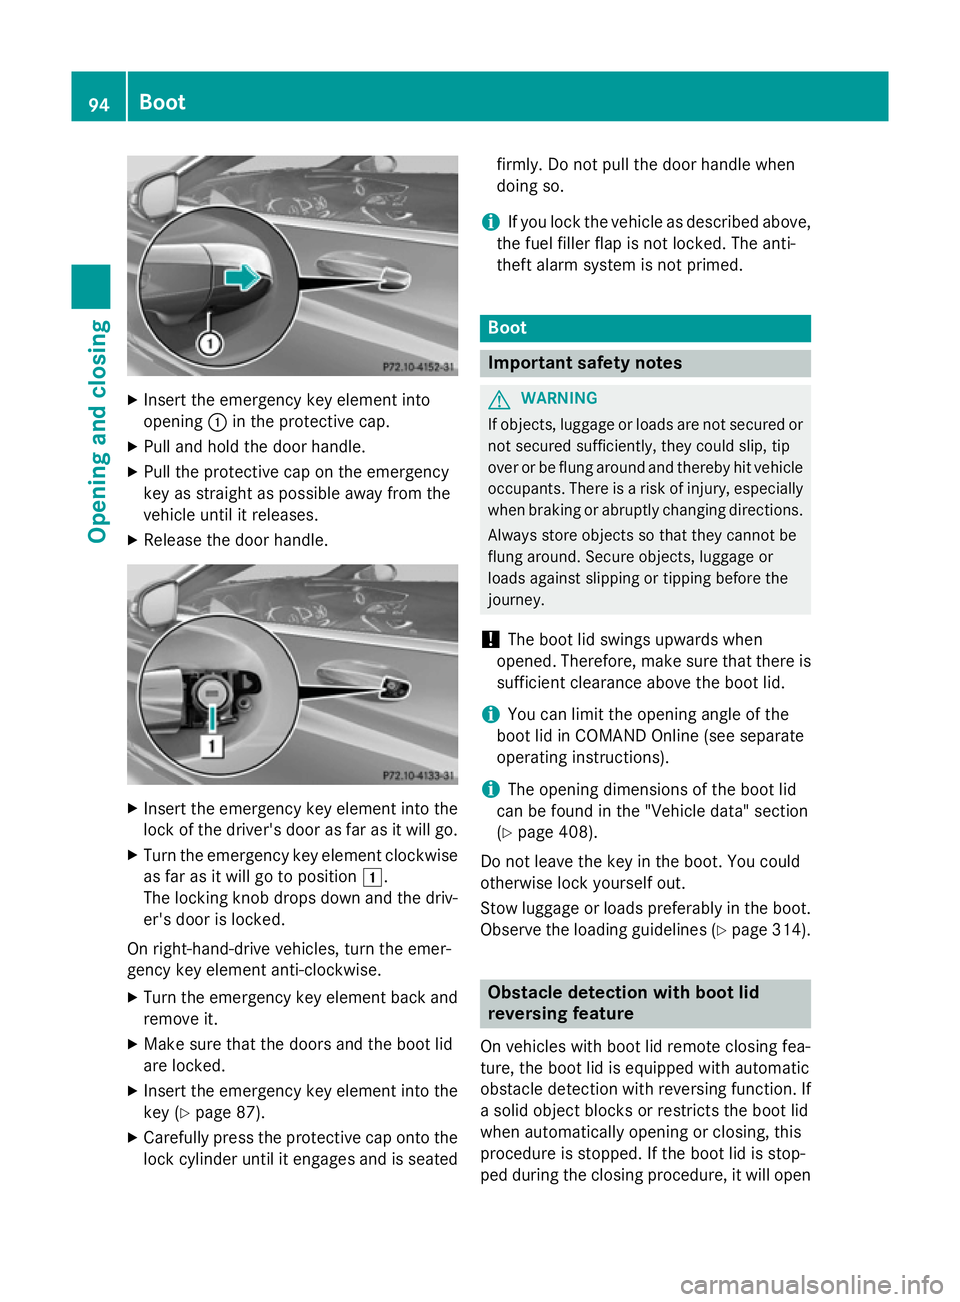
Insert the emergency key element into
opening :in the protective cap.
X Pull and hold the door handle.
X Pull the protective cap on the emergency
key as straight as possible away from the
vehicle until it releases.
X Release the door handle. X
Insert the emergency key element into the
lock of the driver's door as far as it will go.
X Turn the emergency key element clockwise
as far as it will go to position 1.
The locking knob drops down and the driv- er's door is locked.
On right-hand-drive vehicles, turn the emer-
gency key element anti-clockwise.
X Turn the emergency key element back and
remove it.
X Make sure that the doors and the boot lid
are locked.
X Insert the emergency key element into the
key (Y page 87).
X Carefully press the protective cap onto the
lock cylinder until it engages and is seated firmly. Do not pull the door handle when
doing so.
i If you lock the vehicle as described above,
the fuel filler flap is not locked. The anti-
theft alarm system is not primed. Boot
Important safety notes
G
WARNING
If objects, luggage or loads are not secured or not secured sufficiently, they could slip, tip
over or be flung around and thereby hit vehicle
occupants. There is a risk of injury, especially when braking or abruptly changing directions.
Always store objects so that they cannot be
flung around. Secure objects, luggage or
loads against slipping or tipping before the
journey.
! The boot lid swings upwards when
opened. Therefore, make sure that there is sufficient clearance above the boot lid.
i You can limit the opening angle of the
boot lid in COMAND Online (see separate
operating instructions).
i The opening dimensions of the boot lid
can be found in the "Vehicle data" section
(Y page 408).
Do not leave the key in the boot. You could
otherwise lock yourself out.
Stow luggage or loads preferably in the boot.
Observe the loading guidelines (Y page 314). Obstacle detection with boot lid
reversing feature
On vehicles with boot lid remote closing fea-
ture, the boot lid is equipped with automatic
obstacle detection with reversing function. If
a solid object blocks or restricts the boot lid
when automatically opening or closing, this
procedure is stopped. If the boot lid is stop-
ped during the closing procedure, it will open 94
BootOpening and closing
Page 102 of 413
X
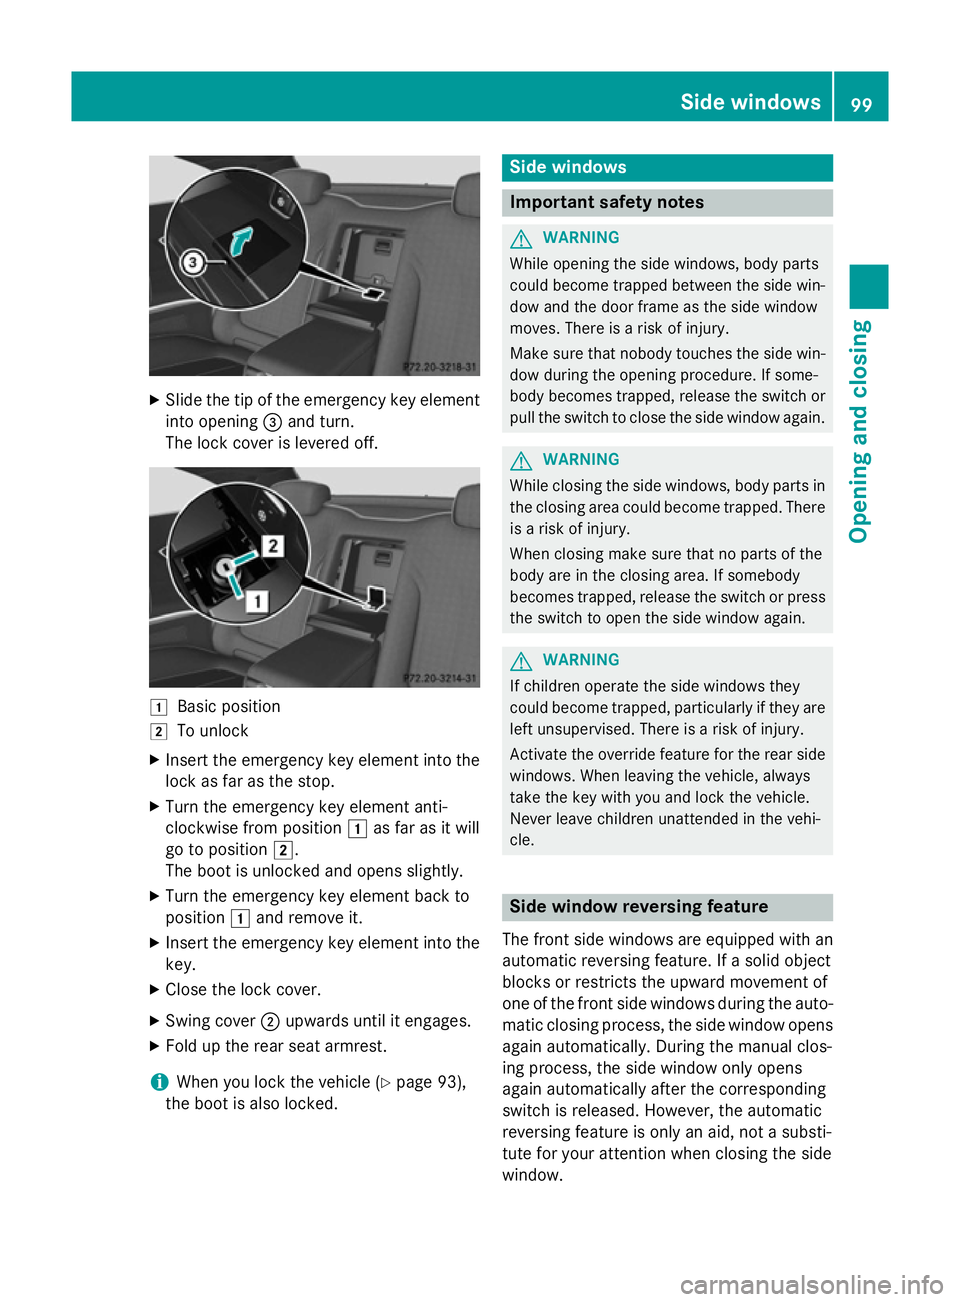
Slide the tip of the emergency key element
into opening =and turn.
The lock cover is levered off. 1
Basic position
2 To unlock
X Insert the emergency key element into the
lock as far as the stop.
X Turn the emergency key element anti-
clockwise from position 1as far as it will
go to position 2.
The boot is unlocked and opens slightly.
X Turn the emergency key element back to
position 1and remove it.
X Insert the emergency key element into the
key.
X Close the lock cover.
X Swing cover ;upwards until it engages.
X Fold up the rear seat armrest.
i When you lock the vehicle (Y
page 93),
the boot is also locked. Side windows
Important safety notes
G
WARNING
While opening the side windows, body parts
could become trapped between the side win- dow and the door frame as the side window
moves. There is a risk of injury.
Make sure that nobody touches the side win-
dow during the opening procedure. If some-
body becomes trapped, release the switch or pull the switch to close the side window again. G
WARNING
While closing the side windows, body parts in the closing area could become trapped. There is a risk of injury.
When closing make sure that no parts of the
body are in the closing area. If somebody
becomes trapped, release the switch or press
the switch to open the side window again. G
WARNING
If children operate the side windows they
could become trapped, particularly if they are left unsupervised. There is a risk of injury.
Activate the override feature for the rear side
windows. When leaving the vehicle, always
take the key with you and lock the vehicle.
Never leave children unattended in the vehi-
cle. Side window reversing feature
The front side windows are equipped with an
automatic reversing feature. If a solid object
blocks or restricts the upward movement of
one of the front side windows during the auto- matic closing process, the side window opens again automatically. During the manual clos-
ing process, the side window only opens
again automatically after the corresponding
switch is released. However, the automatic
reversing feature is only an aid, not a substi-
tute for your attention when closing the side
window. Side windows
99Opening and closing Z
Page 158 of 413
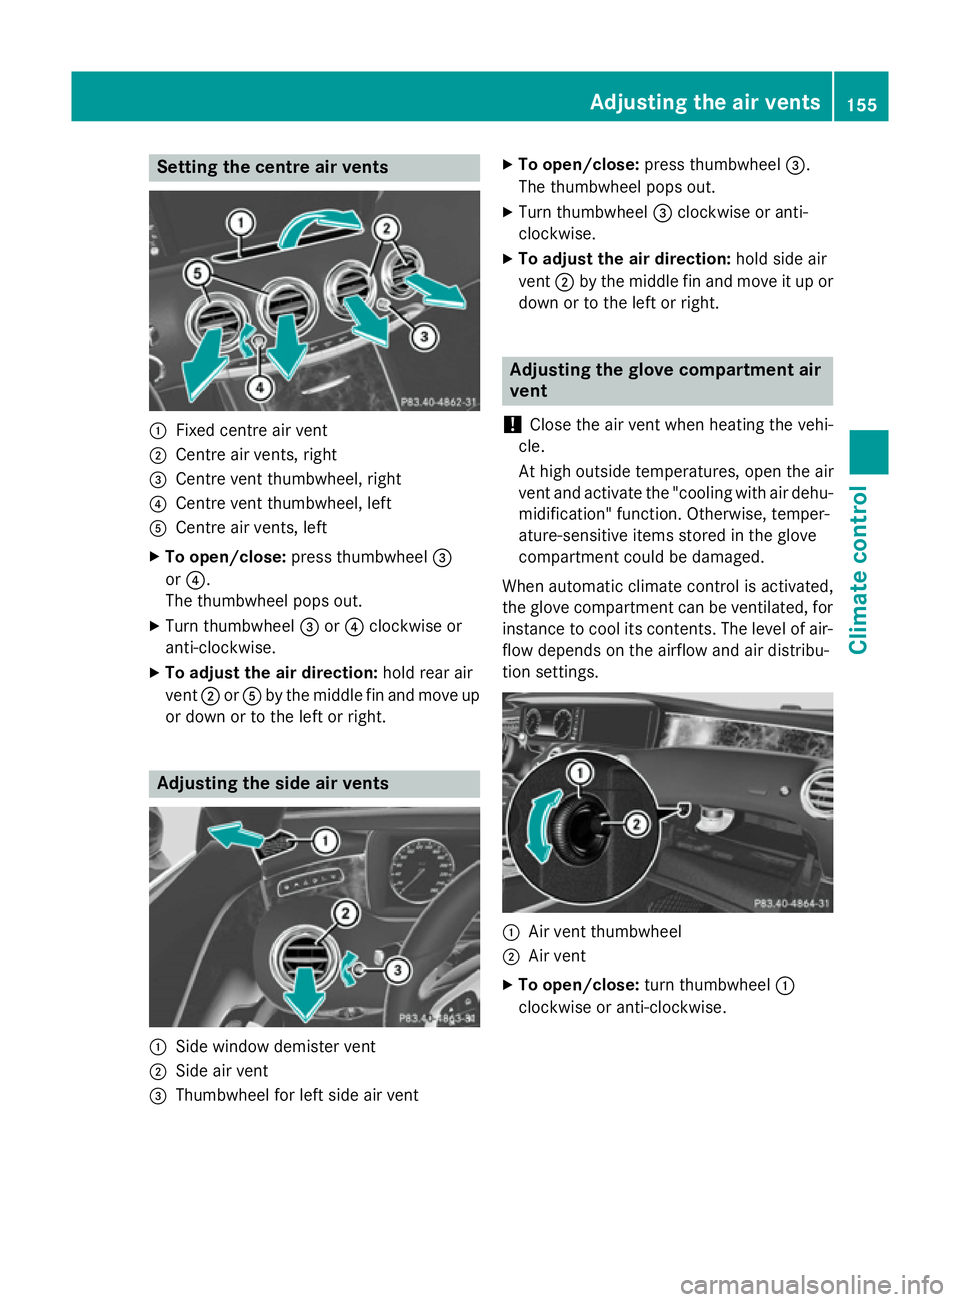
Setting the centre air vents
:
Fixed centre air vent
; Centre air vents, right
= Centre vent thumbwheel, right
? Centre vent thumbwheel, left
A Centre air vents, left
X To open/close: press thumbwheel =
or ?.
The thumbwheel pops out.
X Turn thumbwheel =or? clockwise or
anti-clockwise.
X To adjust the air direction: hold rear air
vent ;orA by the middle fin and move up
or down or to the left or right. Adjusting the side air vents
:
Side window demister vent
; Side air vent
= Thumbwheel for left side air vent X
To open/close: press thumbwheel =.
The thumbwheel pops out.
X Turn thumbwheel =clockwise or anti-
clockwise.
X To adjust the air direction: hold side air
vent ;by the middle fin and move it up or
down or to the left or right. Adjusting the glove compartment air
vent
! Close the air vent when heating the vehi-
cle.
At high outside temperatures, open the air
vent and activate the "cooling with air dehu- midification" function. Otherwise, temper-
ature-sensitive items stored in the glove
compartment could be damaged.
When automatic climate control is activated,
the glove compartment can be ventilated, for
instance to cool its contents. The level of air- flow depends on the airflow and air distribu-
tion settings. :
Air vent thumbwheel
; Air vent
X To open/close: turn thumbwheel :
clockwise or anti-clockwise. Adjusting the air vents
155Climate control Z
Page 159 of 413
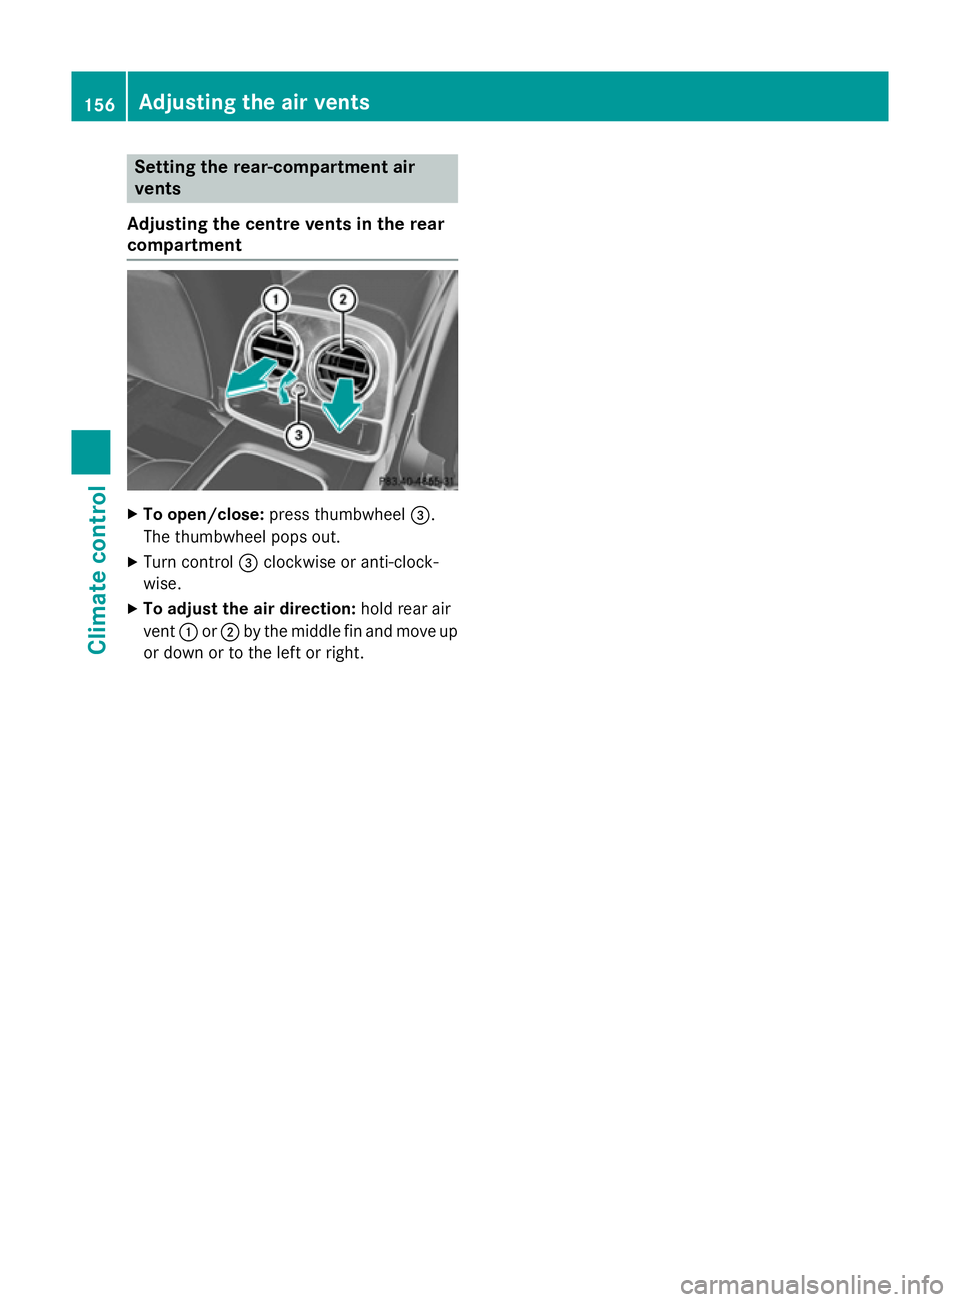
Setting the rear-compartment air
vents
Adjusting the centre vents in the rear
compartment X
To open/close: press thumbwheel =.
The thumbwheel pops out.
X Turn control =clockwise or anti-clock-
wise.
X To adjust the air direction: hold rear air
vent :or; by the middle fin and move up
or down or to the left or right. 156
Adjusting the air ventsClimate control
Page 180 of 413
X
Turn the fuel filler cap anti-clockwise and
remove it.
X Insert the fuel filler cap into the holder on
the inside of fuel filler flap ;.
X Completely insert the filler neck of the fuel
pump nozzle into the tank, hook in place
and refuel.
X Only fill the tank until the pump nozzle
switches off.
i Do not add any more fuel after the pump
stops filling for the first time. Otherwise,
fuel may leak out.
Closing the fuel filler flap X
Replace the cap on the filler neck and turn
clockwise until it engages audibly.
X Close the fuel filler flap.
i Close the fuel filler flap before locking the
vehicle. Refuelling
177Driving and parking Z
Page 318 of 413
R
Close lockable stowage compartments
while driving.
R Stow and secure objects that are heavy,
hard, pointy, sharp-edged, fragile or too
large in the boot.
Observe the loading guidelines (Y page 314).
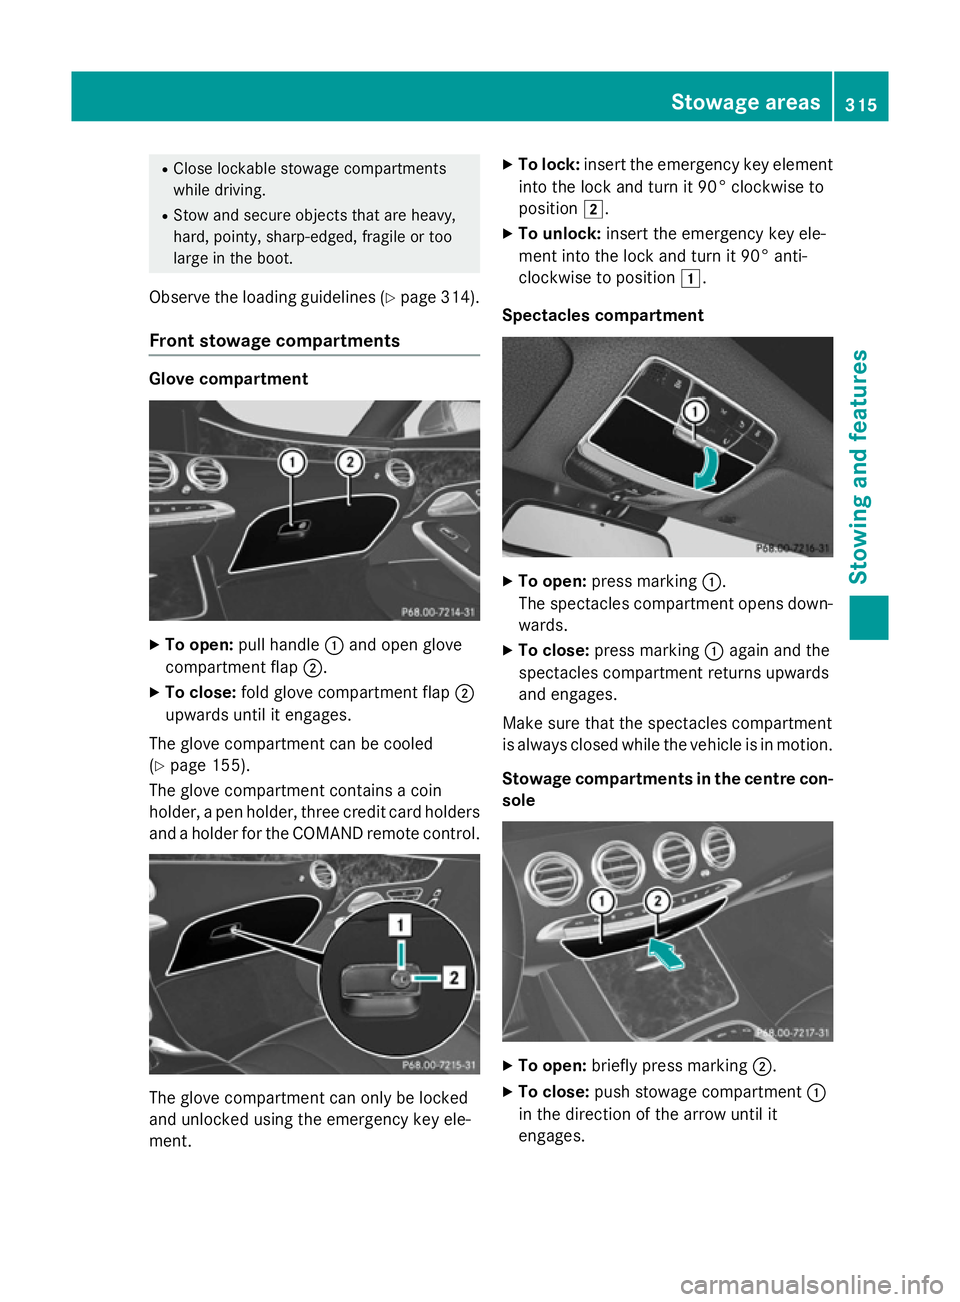
Front stowage compartments Glove compartment
X
To open: pull handle :and open glove
compartment flap ;.
X To close: fold glove compartment flap ;
upwards until it engages.
The glove compartment can be cooled
(Y page 155).
The glove compartment contains a coin
holder, a pen holder, three credit card holders
and a holder for the COMAND remote control. The glove compartment can only be locked
and unlocked using the emergency key ele-
ment. X
To lock: insert the emergency key element
into the lock and turn it 90° clockwise to
position 2.
X To unlock: insert the emergency key ele-
ment into the lock and turn it 90° anti-
clockwise to position 1.
Spectacles compartment X
To open: press marking :.
The spectacles compartment opens down- wards.
X To close: press marking :again and the
spectacles compartment returns upwards
and engages.
Make sure that the spectacles compartment
is always closed while the vehicle is in motion.
Stowage compartments in the centre con-
sole X
To open: briefly press marking ;.
X To close: push stowage compartment :
in the direction of the arrow until it
engages. Stowage areas
315Stowing and features Z
Page 328 of 413
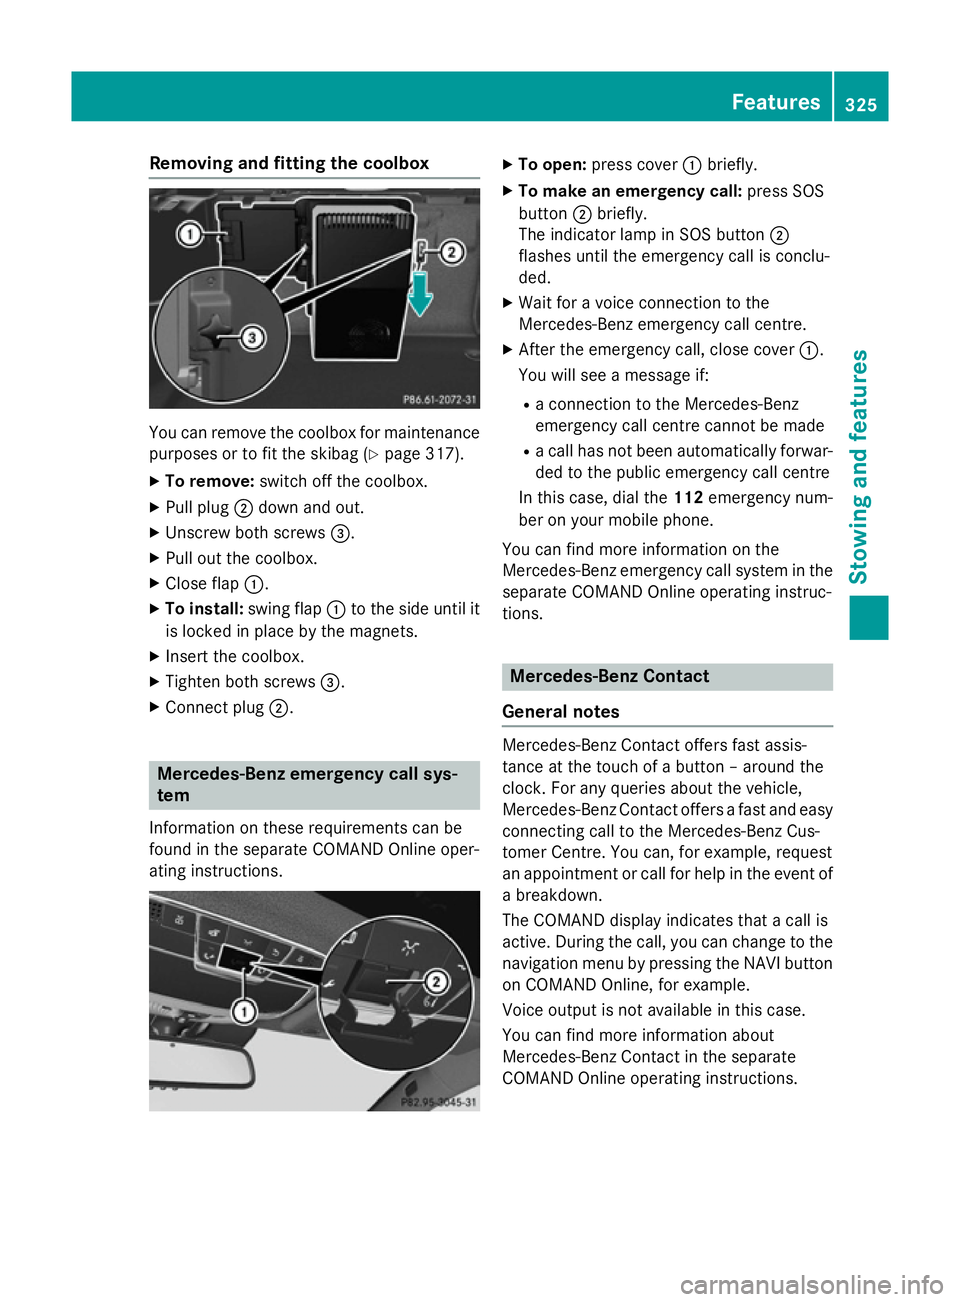
Removing and fitting the coolbox
You can remove the coolbox for maintenance
purposes or to fit the skibag (Y page 317).
X To remove: switch off the coolbox.
X Pull plug ;down and out.
X Unscrew both screws =.
X Pull out the coolbox.
X Close flap :.
X To install: swing flap:to the side until it
is locked in place by the magnets.
X Insert the coolbox.
X Tighten both screws =.
X Connect plug ;. Mercedes-Benz emergency call sys-
tem
Information on these requirements can be
found in the separate COMAND Online oper-
ating instructions. X
To open: press cover :briefly.
X To make an emergency call: press SOS
button ;briefly.
The indicator lamp in SOS button ;
flashes until the emergency call is conclu-
ded.
X Wait for a voice connection to the
Mercedes-Benz emergency call centre.
X After the emergency call, close cover :.
You will see a message if:
R a connection to the Mercedes-Benz
emergency call centre cannot be made
R a call has not been automatically forwar-
ded to the public emergency call centre
In this case, dial the 112emergency num-
ber on your mobile phone.
You can find more information on the
Mercedes-Benz emergency call system in the separate COMAND Online operating instruc-
tions. Mercedes-Benz Contact
General notes Mercedes-Benz Contact offers fast assis-
tance at the touch of a button – around the
clock. For any queries about the vehicle,
Mercedes-Benz Contact offers a fast and easy
connecting call to the Mercedes-Benz Cus-
tomer Centre. You can, for example, request
an appointment or call for help in the event of a breakdown.
The COMAND display indicates that a call is
active. During the call, you can change to the
navigation menu by pressing the NAVI button
on COMAND Online, for example.
Voice output is not available in this case.
You can find more information about
Mercedes-Benz Contact in the separate
COMAND Online operating instructions. Features
325Stowing and features Z