2014 MERCEDES-BENZ GLK-CLASS SUV start stop button
[x] Cancel search: start stop buttonPage 80 of 384

and the fuel filler flap are unlocked when the
vehicle is unlocked. This is useful if you
frequently travel on your own.
X To change the setting: press and hold
down the %and& buttons
simultaneously for approximately six
seconds until the battery check lamp
(Y page 79) flashes twice.
i If the setting of the locking system is
changed within the signal range of the
vehicle, pressing the &or% button:
R locks or
R unlocks the vehicle
The SmartKey now functions as follows:
X To unlock the driver's door: press the
% button once.
X To unlock centrally: press the%
button twice.
X To lock centrally: press the&button.
The KEYLESS-GO function is changed as
follows:
X To unlock the driver's door: touch the
inner surface of the door handle on the
driver's door.
X To unlock centrally: touch the inner
surface of the door handle on the front-
passenger door or the rear door.
X To lock centrally: touch the outer sensor
surface on one of the door handles
(Y page 77).
X To restore the factory settings: press
and hold down the %and& buttons
simultaneously for approximately six
seconds until the battery check lamp
flashes twice. Mechanical key
General notes If the vehicle can no longer be locked or
unlocked with the SmartKey or the KEYLESS-
GO key, use the mechanical key. If you use the mechanical key to unlock and
open the driver's door, the anti-theft alarm
system will be triggered (
Ypage 74).
X To end the alarm: insert the SmartKey into
the ignition lock.
i With KEYLESS-GO: remove the Start/
Stop button from the ignition lock
beforehand.
If you unlock the vehicle using the mechanical
key, the fuel filler flap will not be unlocked
automatically.
Removing the mechanical key X
Push release catch :in the direction of
the arrow and at the same time remove
mechanical key ;from the SmartKey. SmartKey battery
Important safety notes Mercedes-Benz recommends that you have
the batteries replaced at a qualified specialist
workshop.
G
WARNING
Batteries contain toxic and corrosive
substances. If batteries are swallowed, it can
result in severe health problems. There is a
risk of fatal injury.
Keep batteries out of the reach of children. If
a battery is swallowed, seek medical attention
immediately. 78
SmartKeyOpening and closing
Page 92 of 384
X
Turn the SmartKey to position 1or 2in the
ignition lock.
X To open: press the corresponding switch.
X To close: pull the corresponding switch.
i If you press the switch beyond the point
of resistance, an automatic opening/
closing process is started in the
corresponding direction. You can stop
automatic operation by operating the
switch again.
i You can continue to operate the side
windows after you switch off the engine or
remove the SmartKey. This function is
available for up to five minutes or until the
driver's or front-passenger door is opened. Convenience opening
You can ventilate the vehicle before you start
driving. To do this, the SmartKey is used to
carry out the following functions
simultaneously:
R unlock the vehicle
R open the side windows
R open the panorama roof with power tilt/
sliding panel and the roller sunblinds
i The convenience opening feature can
only be operated using the SmartKey. The
SmartKey must be close to the driver's
door handle.
X Point the tip of the SmartKey at the driver's
door handle.
X Press and hold the %button until the
side windows and the panorama roof with
power tilt/sliding panel are in the desired
position.
If the roller sunblinds of the panorama roof
with power tilt/sliding panel are closed, the
roller sunblinds are opened first. X
Press and hold the %button again until
the panorama roof with power tilt/sliding
panel is in the desired position.
X To interrupt convenience opening:
release the %button. Convenience closing feature
General notes When you lock the vehicle, you can
simultaneously:
R
close the side windows
R close the panorama roof with power tilt/
sliding panel
On vehicles with a panorama roof with power
tilt/sliding panel, you can then close the
roller sunblinds. G
WARNING
When the convenience closing feature is
operating, parts of the body could become
trapped in the closing area of the side window
and the sliding sunroof. There is a risk of
injury.
Observe the complete closing procedure
when the convenience closing feature is
operating. Make sure that no body parts are
in close proximity during the closing
procedure.
Proceed as follows if someone is trapped:
With the SmartKey:
R release the &button.
R press and hold the %button until the
side windows and the sliding sunroof or the
panorama roof with power tilt/sliding
panel open again.
Using KEYLESS-GO:
R release the sensor surface on the door
handle.
R pull the door handle immediately and hold
it. 90
Side windowsOpening and closing
Page 96 of 384
the roller sunblind and the frame or sliding
sunroof. There is a risk of injury.
When opening or closing make sure that no
parts of the body are in the sweep of the roller
sunblind.
If somebody becomes trapped:
R release the switch immediately, or
R during automatic operation, push the
switch briefly in any direction
The opening or closing procedure will be
stopped.
Roller sunblind reversing feature The roller sunblinds are equipped with an
automatic reversing feature. If an object
blocks or restricts the roller sunblind during
the closing process, the roller sunblind opens
again automatically. However, the automatic
reversing feature is only an aid and does not
relieve you of the responsibility of paying
attention when closing the roller sunblinds. G
WARNING
The reversing feature does not react:
R to soft, light and thin objects, e.g. small
fingers
R when closing the roller sunblind again
manually immediately after automatic
reversing
This means that the reversing feature cannot
prevent someone being trapped in these
situations. There is a risk of injury.
When closing make sure that no parts of the
body are in the sweep of the roller sunblind.
If somebody becomes trapped:
R release the switch immediately, or
R during automatic operation, push the
switch briefly in any direction
The closing process is stopped. Opening and closing
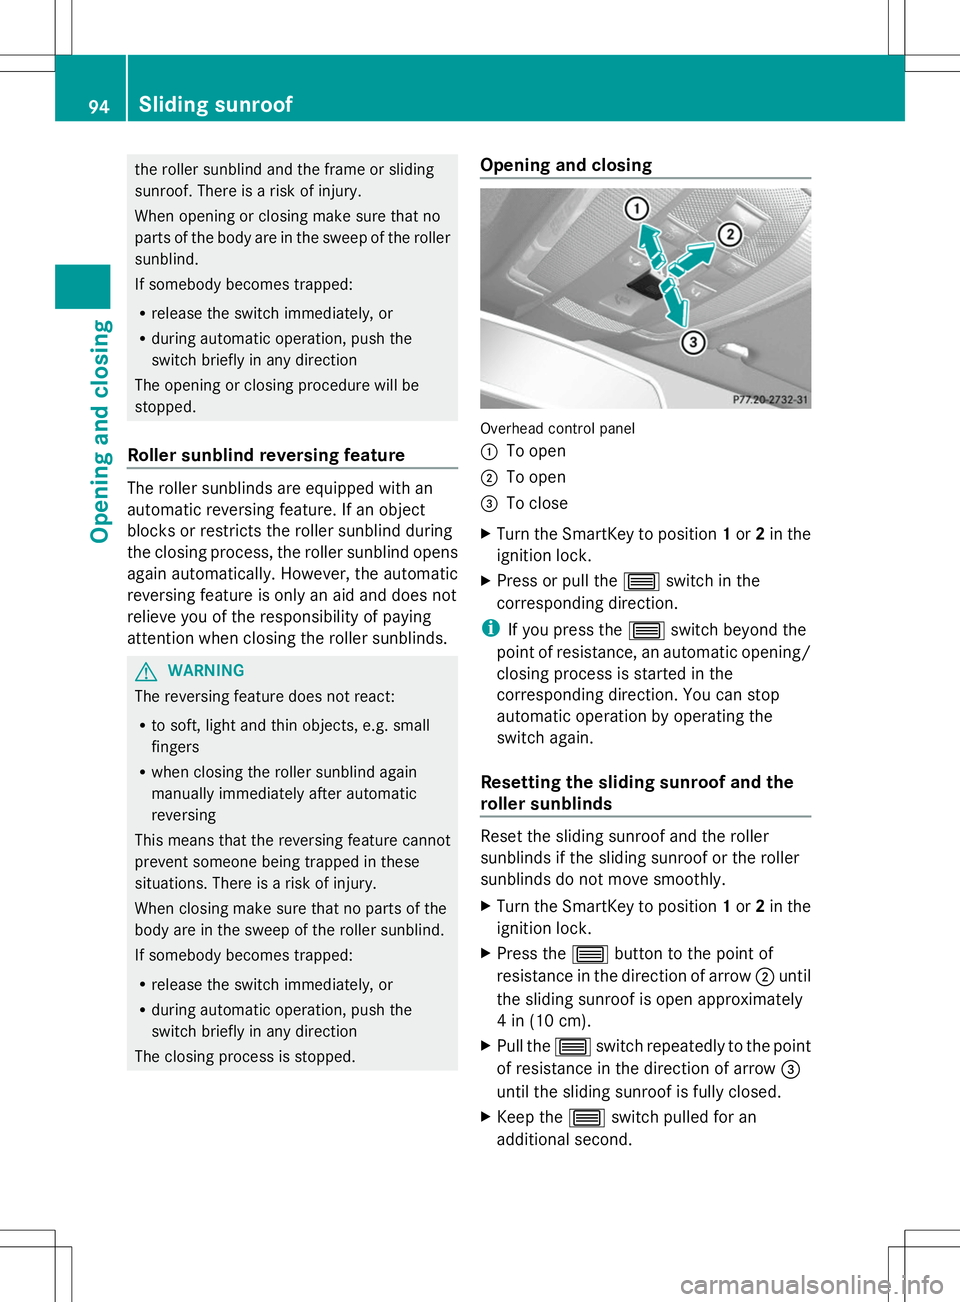
Overhead control panel
:
To open
; To open
= To close
X Turn the SmartKey to position 1or 2in the
ignition lock.
X Press or pull the 3switch in the
corresponding direction.
i If you press the 3switch beyond the
point of resistance, an automatic opening/
closing process is started in the
corresponding direction. You can stop
automatic operation by operating the
switch again.
Resetting the sliding sunroof and the
roller sunblinds Reset the sliding sunroof and the roller
sunblinds if the sliding sunroof or the roller
sunblinds do not move smoothly.
X
Turn the SmartKey to position 1or 2in the
ignition lock.
X Press the 3button to the point of
resistance in the direction of arrow ;until
the sliding sunroof is open approximately
4 in (10 cm).
X Pull the 3switch repeatedly to the point
of resistance in the direction of arrow =
until the sliding sunroof is fully closed.
X Keep the 3switch pulled for an
additional second. 94
Sliding sunroofOpening and closing
Page 107 of 384

Adjusting the steering wheel
electrically
:
To adjust the steering wheel height
; To adjust the steering wheel position
(fore-and-aft adjustment)
The steering wheel can also be adjusted when
the SmartKey is removed from the ignition
lock.
i Further related subjects:
R EASY-ENTRY/EXIT feature
(Y page 105)
R Storing settings (Y page 109) EASY-ENTRY/EXIT feature
Important safety notes G
WARNING
When the EASY-ENTRY/EXIT feature adjusts
the steering wheel, you and other vehicle
occupants – particularly children – could
become trapped. There is a risk of injury.
While the EASY-ENTRY/EXIT feature is
making adjustments, make sure that no one
has any body parts in the sweep of the
steering wheel.
If somebody becomes trapped:
R press one of the memory function position
buttons, or
R move the switch for steering wheel
adjustment in the opposite direction to that
in which the steering wheel is moving.
The adjustment process is stopped. G
WARNING
If you drive off while the EASY-ENTRY/EXIT
feature is making adjustments, you could lose
control of the vehicle. There is a risk of an
accident.
Always wait until the adjustment process is
complete before driving off.
The EASY-ENTRY/EXIT feature makes getting
in and out of your vehicle easier.
You can activate and deactivate the EASY-
ENTRY/EXIT feature in the on-board
computer (Y page 233).
Position of the steering wheel when the
EASY-ENTRY/EXIT feature is active The steering wheel swings upwards when
you:
R
remove the SmartKey from the ignition lock
R open the driver's door with KEYLESS-GO in
position 1
R open the driver's door and the SmartKey is
in position 0or 1in the ignition lock
i The steering wheel only moves upwards if
it has not already reached the upper end
stop.
Position of the steering wheel for
driving The steering wheel is moved to the last
selected position when:
R
the driver's door is closed
R you insert the SmartKey into the ignition
lock
or
R you press the Start/Stop button once on
vehicles with KEYLESS-GO
When you close the driver's door with the
ignition switched on, the steering wheel is
also automatically moved to the previously
set position.
The last position of the steering wheel is
stored when you switch off the ignition or Steering wheel
105Seats, steering wheel and mirrors Z
Page 126 of 384
Never fold a windshield wiper arm without
a wiper blade back onto the windshield/
rear window.
Hold the windshield wiper arm firmly when
you change the wiper blade. If you release
the wiper arm without a wiper blade and it
falls onto the windshield/rear window, the
windshield/rear window may be damaged
by the force of the impact.
Mercedes-Benz recommends that you have
the wiper blades changed at a qualified
specialist workshop.
! To avoid damaging the wiper blades,
make sure that you touch only the wiper
arm of the wiper.
Changing the windshield wiper blades Moving the wiper blades to a vertical
position
!
Before changing the wiper blades, always
set the wiper arms to a vertical position
using the combination switch. There is
otherwise a risk of damaging the hood.
Vehicles without KEYLESS-GO
X Turn the SmartKey to position 1or 2in the
ignition lock.
X Set the windshield wipers to
position °.
X When the wiper arms have reached a
vertical position, turn the SmartKey to
position 0and remove it from the ignition
lock.
Vehicles with KEYLESS-GO
X Switch off the engine.
X Remove your foot from the brake pedal.
X Set the windshield wipers to
position °.
X Press the Start/Stop button repeatedly
until the windshield wipers start.
X When the wiper arms have reached a
vertical position, press the Start/Stop
button. Removing the wiper blades
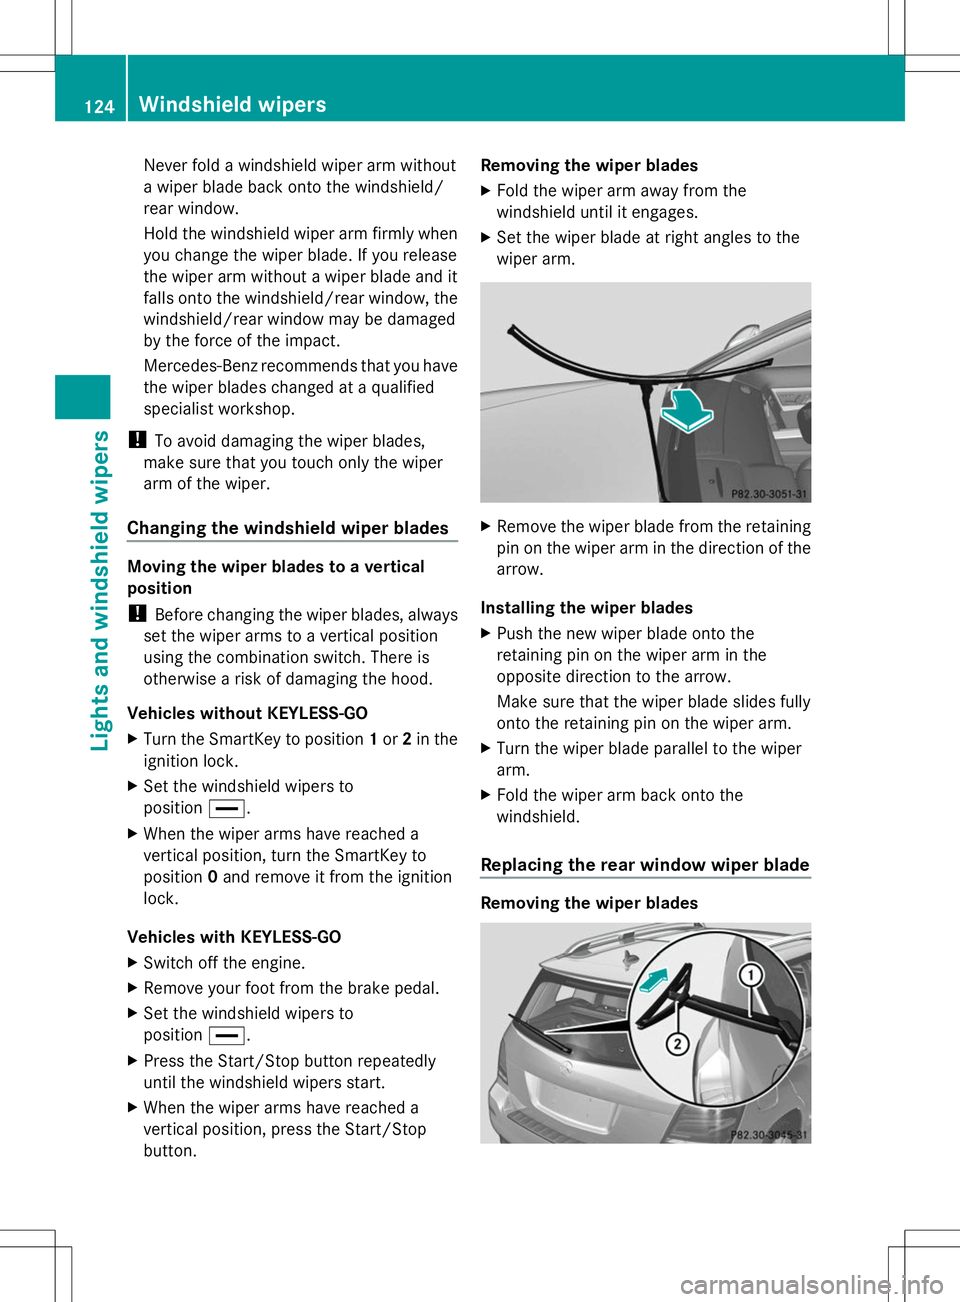
X
Fold the wiper arm away from the
windshield until it engages.
X Set the wiper blade at right angles to the
wiper arm. X
Remove the wiper blade from the retaining
pin on the wiper arm in the direction of the
arrow.
Installing the wiper blades
X Push the new wiper blade onto the
retaining pin on the wiper arm in the
opposite direction to the arrow.
Make sure that the wiper blade slides fully
onto the retaining pin on the wiper arm.
X Turn the wiper blade parallel to the wiper
arm.
X Fold the wiper arm back onto the
windshield.
Replacing the rear window wiper blade Removing the wiper blades124
Windshield wipersLights and windshield wipers
Page 128 of 384

Problems with the windshield wipers
Problem Possible causes/consequences and
M
MSolutions The windshield wipers
are jammed. Leaves or snow, for example, may be obstructing the windshield
wiper movement. The wiper motor has been deactivated.
X
For safety reasons, you should remove the SmartKey from the
ignition lock.
or
X Switch off the engine using the Start/Stop button and open the
driver's door.
X Remove the cause of the obstruction.
X Switch the windshield wipers back on. The windshield wipers
fail completely. The windshield wiper drive is malfunctioning.
X
Select another wiper speed on the combination switch.
X Have the windshield wipers checked at a qualified specialist
workshop. The windshield washer
fluid from the spray
nozzles no longer hits
the center of the
windshield. The spray nozzles are misaligned.
X
Have the spray nozzles adjusted at a qualified specialist
workshop. 126
Windshield wipersLights and windshield wipers
Page 132 of 384
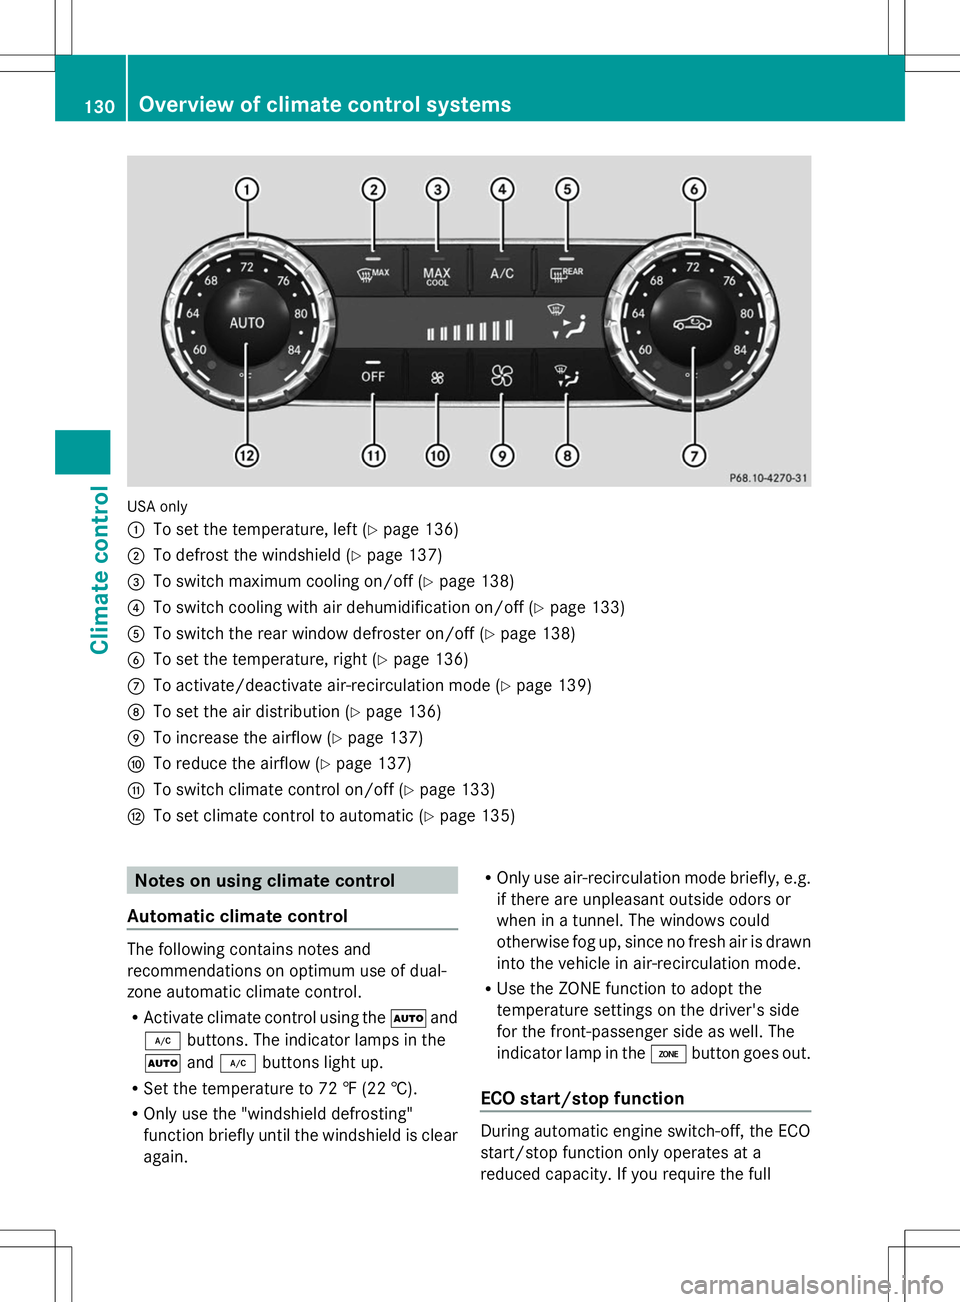
USA only
:
To set the temperature, left (Y page 136)
; To defrost the windshield (Y page 137)
= To switch maximum cooling on/off (Y page 138)
? To switch cooling with air dehumidification on/off (Y page 133)
A To switch the rear window defroster on/off (Y page 138)
B To set the temperature, right (Y page 136)
C To activate/deactivate air-recirculation mode (Y page 139)
D To set the air distribution (Y page 136)
E To increase the airflow (Y page 137)
F To reduce the airflow (Y page 137)
G To switch climate control on/off (Y page 133)
H To set climate control to automatic (Y page 135)Notes on using climate control
Automatic climate control The following contains notes and
recommendations on optimum use of dual-
zone automatic climate control.
R Activate climate control using the Ãand
¿ buttons. The indicator lamps in the
à and¿ buttons light up.
R Set the temperature to 72 ‡ (22 †).
R Only use the "windshield defrosting"
function briefly until the windshield is clear
again. R
Only use air-recirculation mode briefly, e.g.
if there are unpleasant outside odors or
when in a tunnel. The windows could
otherwise fog up, since no fresh air is drawn
into the vehicle in air-recirculation mode.
R Use the ZONE function to adopt the
temperature settings on the driver's side
for the front-passenger side as well. The
indicator lamp in the ábutton goes out.
ECO start/stop function During automatic engine switch-off, the ECO
start/stop function only operates at a
reduced capacity. If you require the full130
Overview of climate control systemsClimate control
Page 133 of 384
climate control output, you can switch off the
ECO start/stop function by pressing the ECO
button (Y page 150). Overview of climate control systems
131Climate control