2014 MERCEDES-BENZ GLK-CLASS SUV fold seats
[x] Cancel search: fold seatsPage 18 of 384

Seat belts
Adjusting the driver's and front-
passenger seat belt .........................58
Adjusting the height ......................... 58
Belt force limiters ............................ 60
center rear-compartment sea t......... 59
Cleaning ......................................... 312
Correct usage .................................. 56
Emergency Tensioning Devices ....... .60
Fastening ......................................... 58
Important safety guidelines .............56
Releasing ......................................... 59
Safety guidelines ............................. 43
Switching belt adjustment on/off
(on-board computer) ......................233
Warning lamp ................................. 261
Warning lamp (function) ................... 59
Seats
Adjusting (electrically) ...................100
Adjusting lumbar support ..............102
Adjusting the 4-way lumbar
support .......................................... 103
Adjusting the head restraint ..........101
Cleaning the cover .........................311
Correct driver's seat position ........... 98
Folding the backrest (rear
compartment) forwards/back .......276
Folding the rear bench seat
forwards/back ............................... 276
Important safety notes ....................99
Seat heating problem ....................104
Storing settings (memory function) 109
Switching seat heating on/off .......103
Sensors (cleaning instructions) .......309
Service menu (on-board computer) .230
Service products Brake fluid ..................................... 372
Coolant (engine) ............................ 372
DEF special additives .....................370
Engine oil ....................................... 371
Fuel ................................................ 367
Important safety notes ..................367
Refrigerant (air-conditioning
system) .......................................... 374
Washer fluid .................................. .373
Settings
Factory (on-board computer) .........234
On-board computer .......................230Setting the air distribution
...............136
Setting the airflow ............................137
Side impact air bag .............................47
Side marker lamp (display
message) ............................................ 245
Side windows Cleaning ......................................... 308
Convenience closing feature ............90
Convenience opening feature ..........90
Important safety information ...........88
Opening/closing .............................. 89
Problem (malfunction) .....................92
Resetting ......................................... 91
Sliding sunroof
see Panorama roof with power
tilt/sliding panel
SmartKey
Changing the battery .......................79
Changing the programming .............77
Checking the battery .......................79
Convenience closing feature ............90
Convenience opening feature ..........90
Display message ............................ 260
Door central locking/unlocking .......76
Important safety notes ....................76
Loss ................................................. 80
Mechanical key ................................ 78
Positions (ignition lock) .................145
Problem (malfunction) .....................80
Starting the engine ........................147
Snow chains ...................................... 333
Sockets Center console .............................. 284
General notes ................................ 284
Rear compartment .........................285
Spare wheel
Storage location ............................ 362
Stowing .......................................... 363
Specialist workshop ............................ 27
Special seat belt retractor .................. 64
Speed, controlling see Cruise control
Speedometer
Digital ............................................ 224
In the Instrument cluster .................33
Segments ...................................... 221
Selecting the unit of measurement 230
see Instrument cluster 16
Index
Page 41 of 384

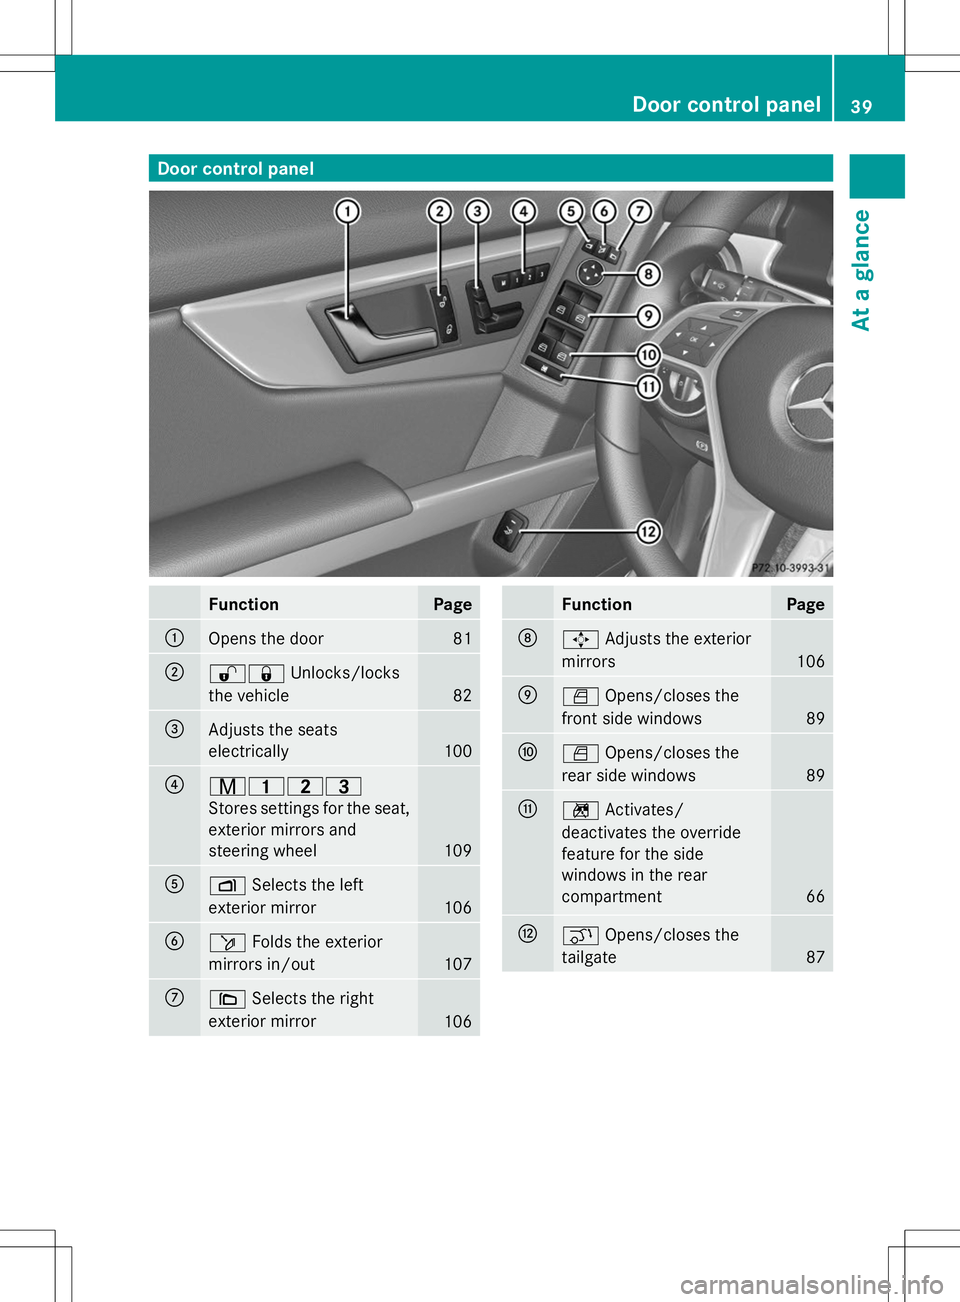
Door control panel
Function Page
:
Opens the door 81
;
%&
Unlocks/locks
the vehicle 82
=
Adjusts the seats
electrically 100
?
r45=
Stores settings for the seat,
exterior mirrors and
steering wheel 109
A
Z
Selects the left
exterior mirror 106
B
ö
Folds the exterior
mirrors in/out 107
C
\
Selects the right
exterior mirror 106 Function Page
D
7
Adjusts the exterior
mirrors 106
E
W
Opens/closes the
front side windows 89
F
W
Opens/closes the
rear side windows 89
G
n
Activates/
deactivates the override
feature for the side
windows in the rear
compartment 66
H
q
Opens/closes the
tailgate 87Door cont
rol panel
39At a glance
Page 67 of 384

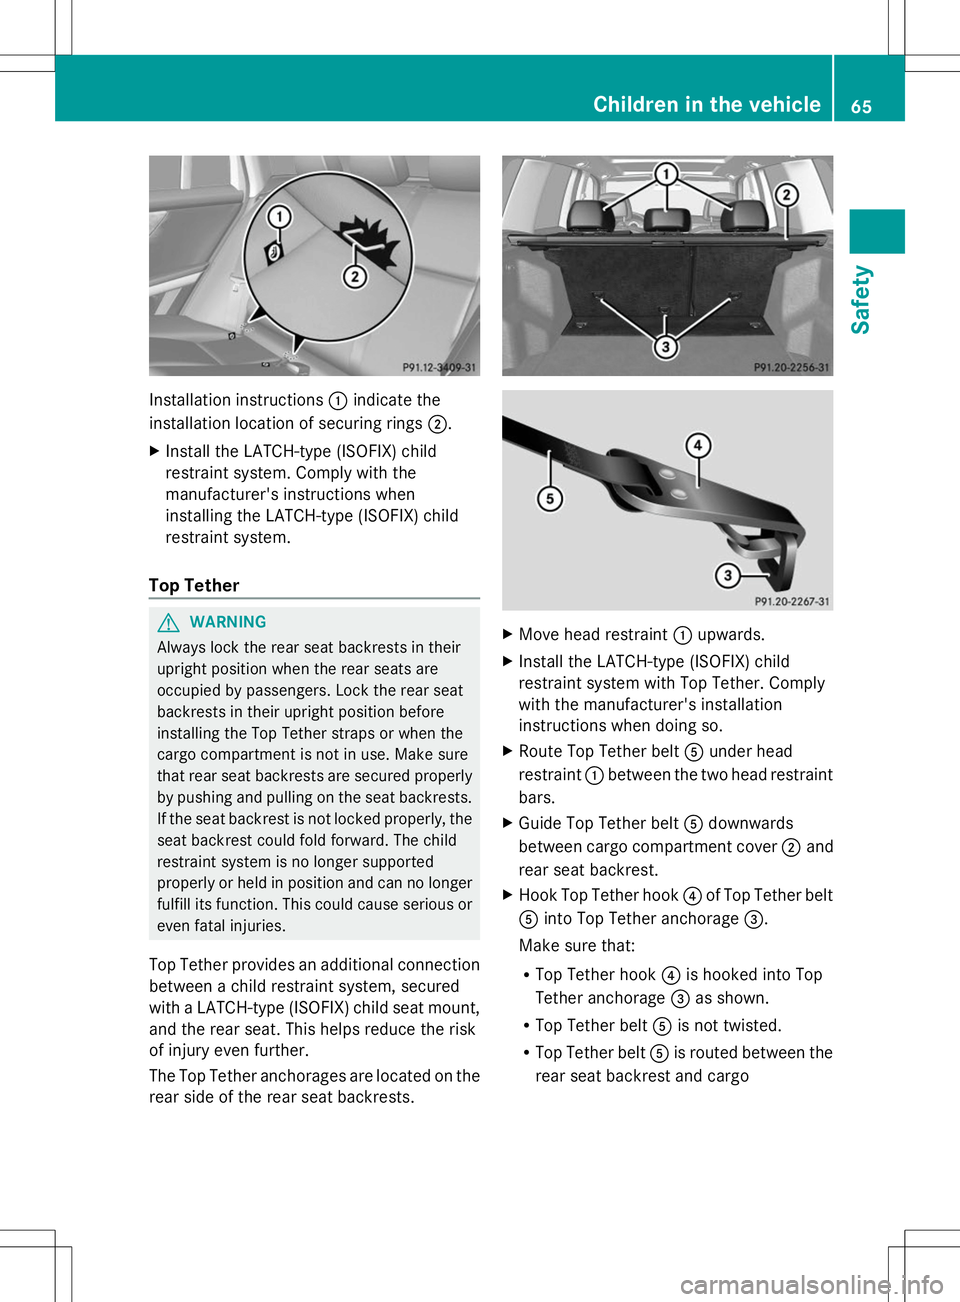
Installation instructions
:indicate the
installation location of securing rings 2.
X Install the LATCH-type (ISOFIX) child
restraint system. Comply with the
manufacturer's instructions when
installing the LATCH-type (ISOFIX) child
restraint system.
Top Tether G
WARNING
Always lock the rear seat backrests in their
upright position when the rear seats are
occupied by passengers. Lock the rear seat
backrests in their upright position before
installing the Top Tether straps or when the
cargo compartment is not in use. Make sure
that rear seat backrests are secured properly
by pushing and pulling on the seat backrests.
If the seat backrest is not locked properly, the
seat backrest could fold forward. The child
restraint system is no longer supported
properly or held in position and can no longer
fulfill its function. This could cause serious or
even fatal injuries.
Top Tether provides an additional connection
between a child restraint system, secured
with a LATCH-type (ISOFIX) child seat mount,
and the rear seat. This helps reduce the risk
of injury even further.
The Top Tether anchorages are located on the
rear side of the rear seat backrests. X
Move head restraint :upwards.
X Install the LATCH-type (ISOFIX) child
restraint system with Top Tether. Comply
with the manufacturer's installation
instructions when doing so.
X Route Top Tether belt Aunder head
restraint :between the two head restraint
bars.
X Guide Top Tether belt Adownwards
between cargo compartment cover ;and
rear seat backrest.
X Hook Top Tether hook ?of Top Tether belt
A into Top Tether anchorage =.
Make sure that:
R Top Tether hook ?is hooked into Top
Tether anchorage =as shown.
R Top Tether belt Ais not twisted.
R Top Tether belt Ais routed between the
rear seat backrest and cargo Children in the vehicle
65Safety Z
Page 102 of 384

!
To avoid damage to the seats and the seat
heating, observe the following information:
R keep liquids from spilling on the seats. If
liquid is spilled on the seats, dry them as
soon as possible.
R if the seat covers are damp or wet, do not
switch on the seat heating. The seat
heating should also not be used to dry
the seats.
R clean the seat covers as recommended;
see the "Interior care" section.
R do not transport heavy loads on the
seats. Do not place sharp objects on the
seat cushions, e.g. knives, nails or tools.
The seats should only be occupied by
passengers, if possible.
R when the seat heating is in operation, do
not cover the seats with insulating
materials, e.g. blankets, coats, bags,
seat covers, child seats or booster seats.
! Make sure that there are no objects in the
footwell or behind the seats when resetting
the seats. There is a risk that the seats
and/or the objects could be damaged.
i The rear-compartment head restraints
can be removed (Y page 102).
For more information, contact a qualified
specialist workshop.
i Further related subjects:
R Cargo compartment enlargement
(folding down the rear bench seat)
(Y page 276) Adjusting the seats
i Vehicles without Memory function: the
seats can be adjusted within three minutes
of a front door being opened. The time period starts over again if, within
these three minutes, you:
R
open or close a front door
R insert the SmartKey into the ignition lock
or remove it from the ignition lock
R switch the ignition on or off
If the SmartKey is in position 2in the
ignition lock, the seats can be adjusted at
any time.
Depending on the equipment, the seat
adjustment buttons are either located on the
side of the seat or on the door control panel. :
Seat cushion angle
; Seat height
= Seat fore-and-aft adjustment
? Backrest angle :
Seat cushion angle
; Seat height
= Seat fore-and-aft adjustment
? Backrest angle
A Head restraint height 4
4 For vehicles with memory function only. 100
SeatsSeats, steering wheel and mirrors
Page 109 of 384

Folding the exterior mirrors in or out
electrically This function is only available in vehicles for
Canada.
X
Make sure that the SmartKey is in position
1or 2in the ignition lock.
X Briefly press button :.
Both exterior mirrors fold in or out.
i Make sure that the exterior mirrors are
always folded out fully while driving. They
could otherwise vibrate.
i If you are driving faster than
9 mph(15 km/h ),you can no longer fold in
the exterior mirrors.
Setting the exterior mirrors This function is only available in vehicles for
Canada.
If the battery has been disconnected or
completely discharged, the exterior mirrors
must be reset. The exterior mirrors will
otherwise not fold in when you select the
"Fold in mirrors when locking" function in the
on-board computer (Y page 234).
X Make sure that the SmartKey is in
position 1in the ignition lock.
X Briefly press button :. Folding the exterior mirrors in or out
automatically This function is only available in vehicles for
Canada.
If the "Fold in mirrors when locking" function
is activated in the on-board computer
(Y
page 234):
R the exterior mirrors fold in automatically as
soon as you lock the vehicle from the
outside.
R the exterior mirrors fold out again
automatically as soon as you unlock the
vehicle and then open the driver's or front-
passenger door.
i If the exterior mirrors have been folded in
manually, they do not fold out.
Exterior mirror pushed out of position If an exterior mirror has been pushed out of
position, proceed as follows:
X
Vehicles without electrically folding
exterior mirrors: move the exterior mirror
into the correct position manually.
X Vehicles with electrically folding
exterior mirrors 6
: press and hold mirror-
folding button until you hear a click
followed by an impact sound.
(Y page 107)
The mirror housing is engaged again and
you can adjust the exterior mirrors as usual
(Y page 106). Automatic anti-glare mirrors
The rear-view mirror and the exterior mirror
on the driver's side automatically go into anti-
glare mode if the following conditions are met
simultaneously:
R the ignition is switched on and
R incident light from headlamps strikes the
sensor in the rear-view mirror.
6 Only for Canada. Mir
rors
107Seats, ste ering wheel and mirrors Z
Page 282 of 384

X
Open both Velcro fasteners and remove the
cargo net.
X Unroll and unfold the cargo net.
The upper and lower guide rods must
engage audibly.
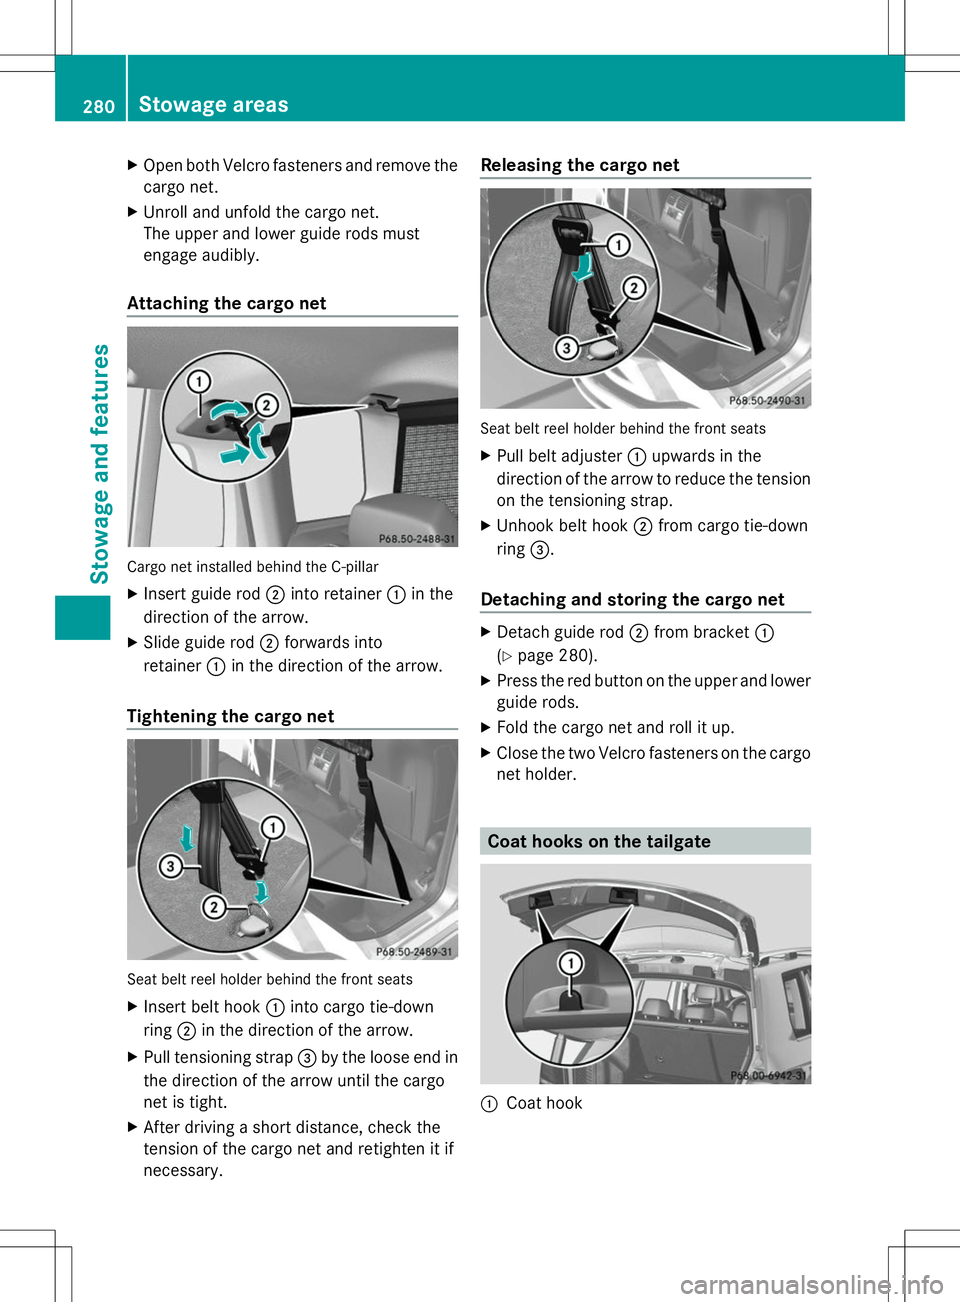
Attaching the cargo net Cargo net installed behind the C-pillar
X
Insert guide rod ;into retainer :in the
direction of the arrow.
X Slide guide rod ;forwards into
retainer :in the direction of the arrow.
Tightening the cargo net Seat belt reel holder behind the front seats
X Insert belt hook :into cargo tie-down
ring ;in the direction of the arrow.
X Pull tensioning strap =by the loose end in
the direction of the arrow until the cargo
net is tight.
X After driving a short distance, check the
tension of the cargo net and retighten it if
necessary. Releasing the cargo net
Seat belt reel holder behind the front seats
X
Pull belt adjuster :upwards in the
direction of the arrow to reduce the tension
on the tensioning strap.
X Unhook belt hook ;from cargo tie-down
ring =.
Detaching and storing the cargo net X
Detach guide rod ;from bracket :
(Y page 280).
X Press the red button on the upper and lower
guide rods.
X Fold the cargo net and roll it up.
X Close the two Velcro fasteners on the cargo
net holder. Coat hooks on the tailgate
:
Coat hook 280
Stowage areasStowage and features