2014 MERCEDES-BENZ GL-Class Compartment
[x] Cancel search: CompartmentPage 41 of 462

Overhead control panel
Function Page
:
p
Switches the left-
hand reading lamp on/off 135
;
c
Switches the front
interior lighting on 136
=
u
Switches the rear
interior lighting on/off 136
?
|
Switches the front
interior lighting/automatic
interior lighting control off 136
A
p
Switches the right-
hand reading lamp on/off 135
B
2
Opens/closes the
sliding sunroof 99
3
Opens/closes the
panorama roof with power
tilt/sliding panel with roller
sunblinds 100 Function Page
C
Eyeglasses compartment 342
D
F
Roadside Assistance
call button (mbrace
system) 358
E
G
SOS button (mbrace
system) 356
F
ï
MB Info call button
(mbrace system) 358
G
Rear-view mirror 122
H
Buttons for the garage door
opener
367
I
Microphone for mbrace
(emergency call system),
telephone and the Voice
Control System
1 1
The Voice Control System is only available in combination with COMAND. Observe the additional operating
instructions. Overhead control panel
39At a glance
Page 42 of 462

Door control panel
Function Page
:
Opens the door 87
;
%&Unlocks/locks
the vehicle
87
=
r
45 =
Stores settings for the seat,
exterior mirrors and
steering wheel (memory
function) 125
?
Adjusts the seats 107
A
7Zö\
Adjusts and folds the
exterior mirrors in/out
electrically
122 Function Page
B
W
Opens/closes the
side windows 94
C
q
Opens/closes the
tailgate 92
D
±
Opens/closes the
hinged power side windows 94
E
n
Activates/
deactivates the override
feature for the side
windows in the rear
compartment 6640
Door control panelAt a glance
Page 66 of 462

Securing rings for the outer seats in the second row
Securing rings for the third row of seats
Installation indicator :shows the
installation location of securing rings ;.
Securing rings ;for two LATCH-type
(ISOFIX) child restraint systems are installed
on the left and right:
R on the rear seat backrests of the outer
seats in the second row
R on the backrests of the seats in the third
row of seats
Before installing a LATCH-type (ISOFIX) child
restraint system in the second row:
X Move the rear seat backrests in the second
row to an upright position (Y page 111).
X Install the LATCH-type (ISOFIX) child
restraint system on both LATCH-type
(ISOFIX) securing rings ;. Comply with the
child restrain system manufacturer's
instructions when installing the LATCH-
type (ISOFIX) child restraint system.
Non-LATCH-type (ISOFIX) child seats may
also be used and can be installed using the vehicle's seat belt system. Install the child
seat according to the manufacturer's
instructions.
Top Tether Top Tether anchorages
G
WARNING
If the rear seat backrests are not locked, they
could fold forwards in the event of an
accident, heavy braking or sudden changes of
direction. As a result, child restraint systems
cannot perform their intended protective
function. Rear seat backrests that are not
locked can also cause additional injuries, e.g.
in the event of an accident. This poses an
increased risk of injury or even fatal injury.
Always lock rear seat backrests after
installing a Top Tether belt. Observe the lock
verification indicator. Adjust the rear seat
backrests so that they are positioned
vertically.
Top Tether provides an additional connection
between the LATCH-type (ISOFIX) child
restraint system secured with LATCH-type
(ISOFIX) and the rear seat. This helps reduce
the risk of injury even further. If the LATCH-
type (ISOFIX) child restraint system is
equipped with Top Tether, this should always
be used.
The Top Tether anchorages for the second
row of seats are installed on the rear of the
rear seat backrests. For the third row of seats,
use the cargo tie-down rings in the cargo
compartment floor.
If the rear seat backrest is not engaged and
locked, this will be shown in the multifunction
display in the instrument cluster. 64
Children in the vehicleSafety
Page 67 of 462

X
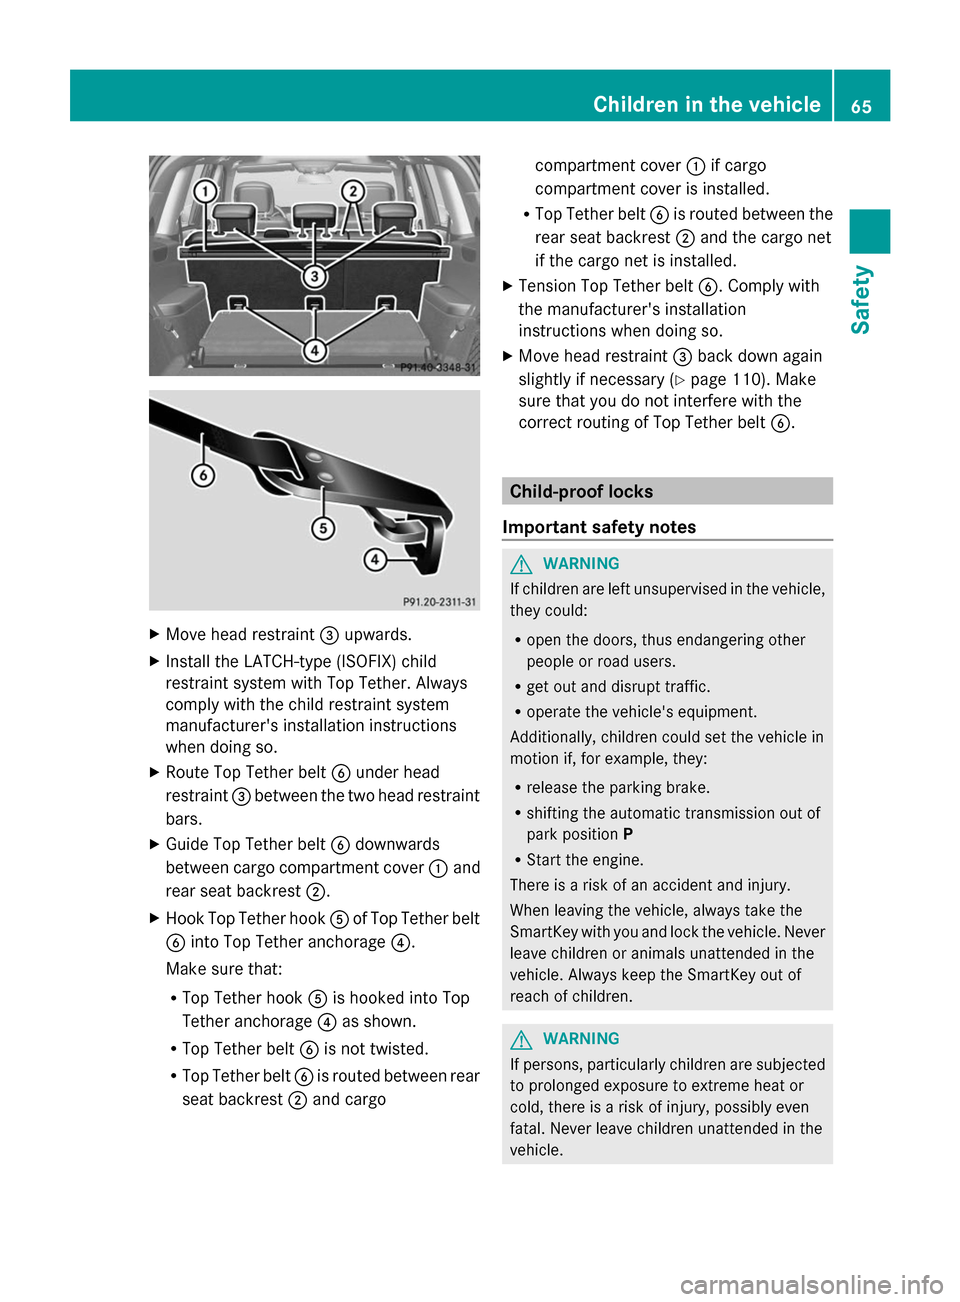
Move head restraint =upwards.
X Install the LATCH-type (ISOFIX) child
restraint system with Top Tether. Always
comply with the child restraint system
manufacturer's installation instructions
when doing so.
X Route Top Tether belt Bunder head
restraint =between the two head restraint
bars.
X Guide Top Tether belt Bdownwards
between cargo compartment cover :and
rear seat backrest ;.
X Hook Top Tether hook Aof Top Tether belt
B into Top Tether anchorage ?.
Make sure that:
R Top Tether hook Ais hooked into Top
Tether anchorage ?as shown.
R Top Tether belt Bis not twisted.
R Top Tether belt Bis routed between rear
seat backrest ;and cargo compartment cover
:if cargo
compartment cover is installed.
R Top Tether belt Bis routed between the
rear seat backrest ;and the cargo net
if the cargo net is installed.
X Tension Top Tether belt B. Comply with
the manufacturer's installation
instructions when doing so.
X Move head restraint =back down again
slightly if necessary (Y page 110). Make
sure that you do not interfere with the
correct routing of Top Tether belt B. Child-proof locks
Important safety notes G
WARNING
If children are left unsupervised in the vehicle,
they could:
R open the doors, thus endangering other
people or road users.
R get out and disrupt traffic.
R operate the vehicle's equipment.
Additionally, children could set the vehicle in
motion if, for example, they:
R release the parking brake.
R shifting the automatic transmission out of
park position P
R Start the engine.
There is a risk of an accident and injury.
When leaving the vehicle, always take the
SmartKey with you and lock the vehicle. Never
leave children or animals unattended in the
vehicle. Always keep the SmartKey out of
reach of children. G
WARNING
If persons, particularly children are subjected
to prolonged exposure to extreme heat or
cold, there is a risk of injury, possibly even
fatal. Never leave children unattended in the
vehicle. Children in the vehicle
65Safety Z
Page 68 of 462

G
WARNING
If children are traveling in the vehicle, they
could:
R open doors, thus endangering other people
or road users
R exit the vehicle and be caught by oncoming
traffic
R operate vehicle equipment and become
trapped
There is a risk of an accident and injury.
Always activate the child-proof locks and
override feature if children are traveling in the
vehicle. When leaving the vehicle, always take
the key with you and lock the vehicle. Never
leave children unattended in the vehicle.
You can activate the following child-proof
locks:
R rear doors (Y page 66)
R rear side windows (Y page 66)
Child-proof locks for the rear doors G
WARNING
Children could open a rear door from inside
the vehicle. This could result in serious
injuries or an accident. Therefore, when
children ride in the rear always secure the rear
doors with the child-proof locks. You secure each door individually with the
child-proof locks on the rear doors. A door
secured with a child-proof lock cannot be
opened from inside the vehicle. When the vehicle is unlocked, the door can be opened
from the outside.
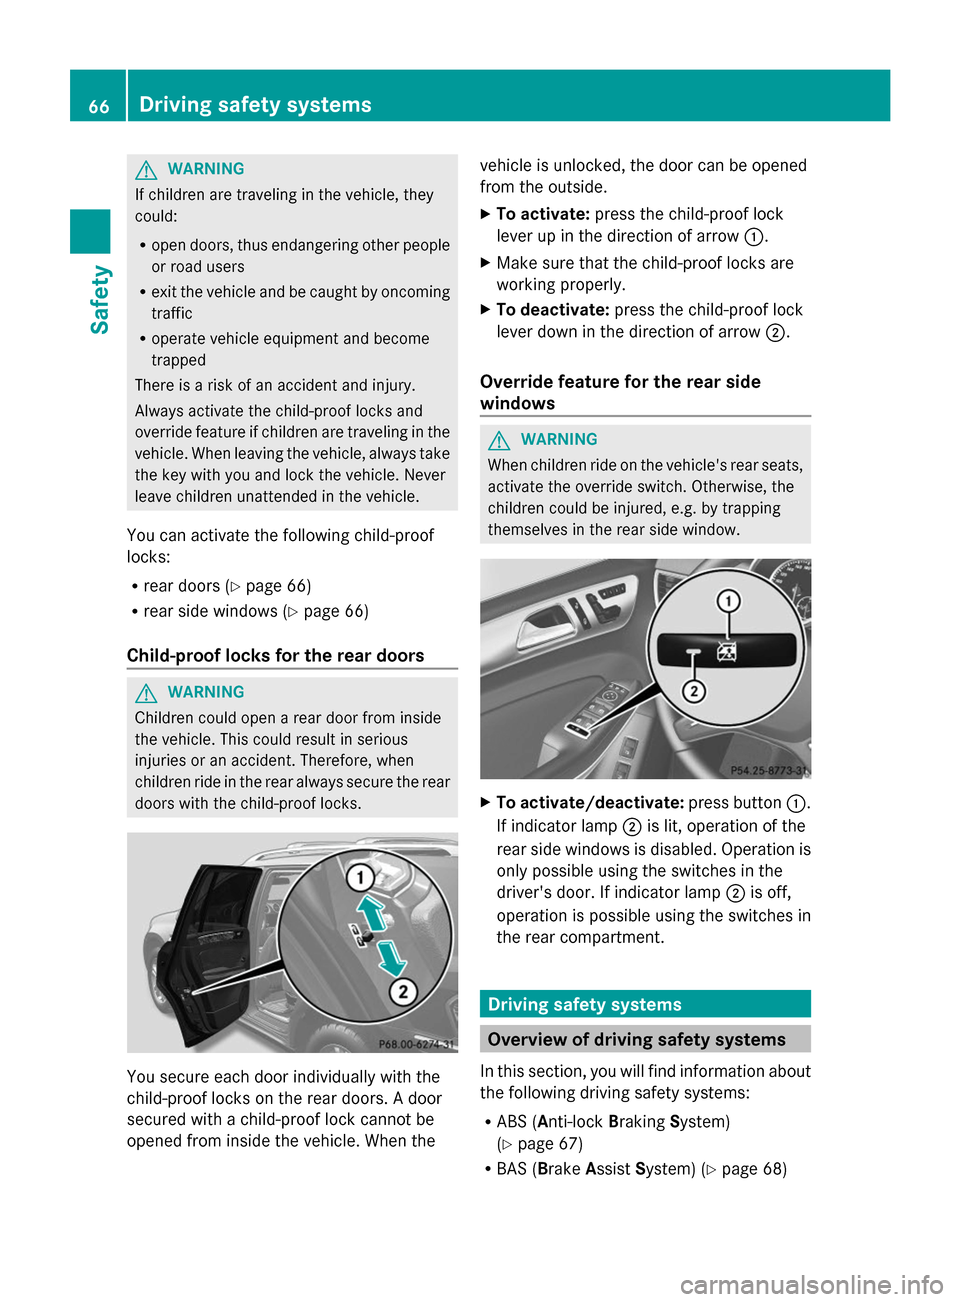
X
To activate: press the child-proof lock
lever up in the direction of arrow :.
X Make sure that the child-proof locks are
working properly.
X To deactivate: press the child-proof lock
lever down in the direction of arrow ;.
Override feature for the rear side
windows G
WARNING
When children ride on the vehicle's rear seats,
activate the override switch. Otherwise, the
children could be injured, e.g. by trapping
themselves in the rear side window. X
To activate/deactivate: press button:.
If indicator lamp ;is lit, operation of the
rear side windows is disabled. Operation is
only possible using the switches in the
driver's door. If indicator lamp ;is off,
operation is possible using the switches in
the rear compartment. Driving safety systems
Overview of driving safety systems
In this section, you will find information about
the following driving safety systems:
R ABS ( Anti-lock BrakingSystem)
(Y page 67)
R BAS ( Brake Assist System) (Y page 68) 66
Driving safety systemsSafety
Page 81 of 462

Useful information
..............................80
SmartKey ............................................. 80
Doors .................................................... 86
Cargo compartment ............................89
Side windows ...................................... 93
Sliding sunroof .................................... 98 79Opening and closing
Page 83 of 462

X
To unlock centrally: press button=.
If you do not open the vehicle within
approximately 40 seconds of unlocking:
R the vehicle is locked again.
R the theft deterrent locking system is
armed again.
X To lock centrally: press button:.
The SmartKey centrally locks/unlocks:
R the doors
R the tailgate
R the fuel filler flap
The turn signals flash once when unlocking
and three times when locking.
You can also set an audible signal to confirm
that the vehicle has been locked. The audible
signal can be activated and deactivated using
the on-board computer (Y page 285).
When it is dark, the surround lighting also
comes on if it is activated in the on-board
computer (Y page 284). KEYLESS-GO
General notes Bear in mind that the engine can be started
by any of the vehicle occupants if there is a
KEYLESS-GO key in the vehicle.
Locking/unlocking centrally You can start, lock or unlock the vehicle using
KEYLESS-GO. To do this, you only need carry
the SmartKey with you. You can combine the
functions of KEYLESS-GO with those of a
conventional SmartKey. Unlock the vehicle
by using KEYLESS-GO, for instance, and lock
it using the &button on the SmartKey.
When locking or unlocking with KEYLESS-GO,
the distance between the SmartKey and the
corresponding door handle must not be
greater than 3 ft (1 m). KEYLESS-GO checks whether a valid
SmartKey is in the vehicle by periodically
establishing a radio connection between the
vehicle and the SmartKey. This happens:
R
when the external door handles are
touched
R when starting the engine
R while the vehicle is in motion X
To unlock the vehicle: touch the inner
surface of the door handle.
X To lock the vehicle: touch sensor
surface :.
X Convenience closing feature: touch
recessed sensor surface ;for an
extended period.
Further information on the convenience
closing feature (Y page 95).
If you pull on the handle of the tailgate, only
the cargo compartment of the vehicle is
unlocked. Changing the settings of the locking
system
You can change the settings of the locking
system. This means that only the driver's door
and the fuel filler flap are unlocked when the
vehicle is unlocked. This is useful if you
frequently travel on your own.
X To change the setting: press and hold
down the %and& buttons
simultaneously for approximately six SmartKey
81Opening and closing Z
Page 84 of 462

seconds until the battery check lamp
flashes twice (Y
page 83).
i If the setting of the locking system is
changed within the signal range of the
vehicle, pressing the &or% button:
R locks or
R unlocks the vehicle
The SmartKey now functions as follows:
X To unlock the driver's door: press the
% button once.
X To unlock centrally: press the%
button twice.
X To lock centrally: press the&button.
The KEYLESS-GO function is changed as
follows:
X To unlock the driver's door: touch the
inner surface of the door handle on the
driver's door.
X To unlock centrally: touch the inner
surface of the door handle on the front-
passenger door or the rear door.
X To lock centrally: touch the outer sensor
surface on one of the door handles
(Y page 81).
X To restore the factory settings: press
and hold down the %and& buttons
simultaneously for approximately six
seconds until the battery check lamp
flashes twice (Y page 83). Mechanical key
General notes If the vehicle can no longer be locked or
unlocked with the SmartKey, use the
mechanical key.
If you use the mechanical key to unlock and
open the driver's door, the anti-theft alarm
system will be triggered (Y page 77).There are several ways to turn off the alarm:
X
To deactivate the alarm with the
SmartKey: press the%or& button
on the SmartKey.
or
X Insert the SmartKey into the ignition lock.
or
X To deactivate the alarm with KEYLESS-
GO: press the Start/Stop button in the
ignition lock. The SmartKey must be in the
vehicle.
or
X Lock or unlock the vehicle using KEYLESS-
GO. The SmartKey must be outside the
vehicle.
If you unlock the vehicle using the mechanical
key, the fuel filler flap will not be unlocked
automatically.
X To unlock the fuel filler flap: insert the
SmartKey into the ignition lock.
Removing the mechanical key X
Push release catch :in the direction of
the arrow and at the same time remove
mechanical key ;from the SmartKey.
For further information about:
R unlocking the driver's door (Y page 88)
R unlocking the cargo compartment
(Y page 93)
R locking the vehicle (Y page 88)82
SmartKeyOpening and closing