2014 MERCEDES-BENZ GL-Class Compartment
[x] Cancel search: CompartmentPage 159 of 462

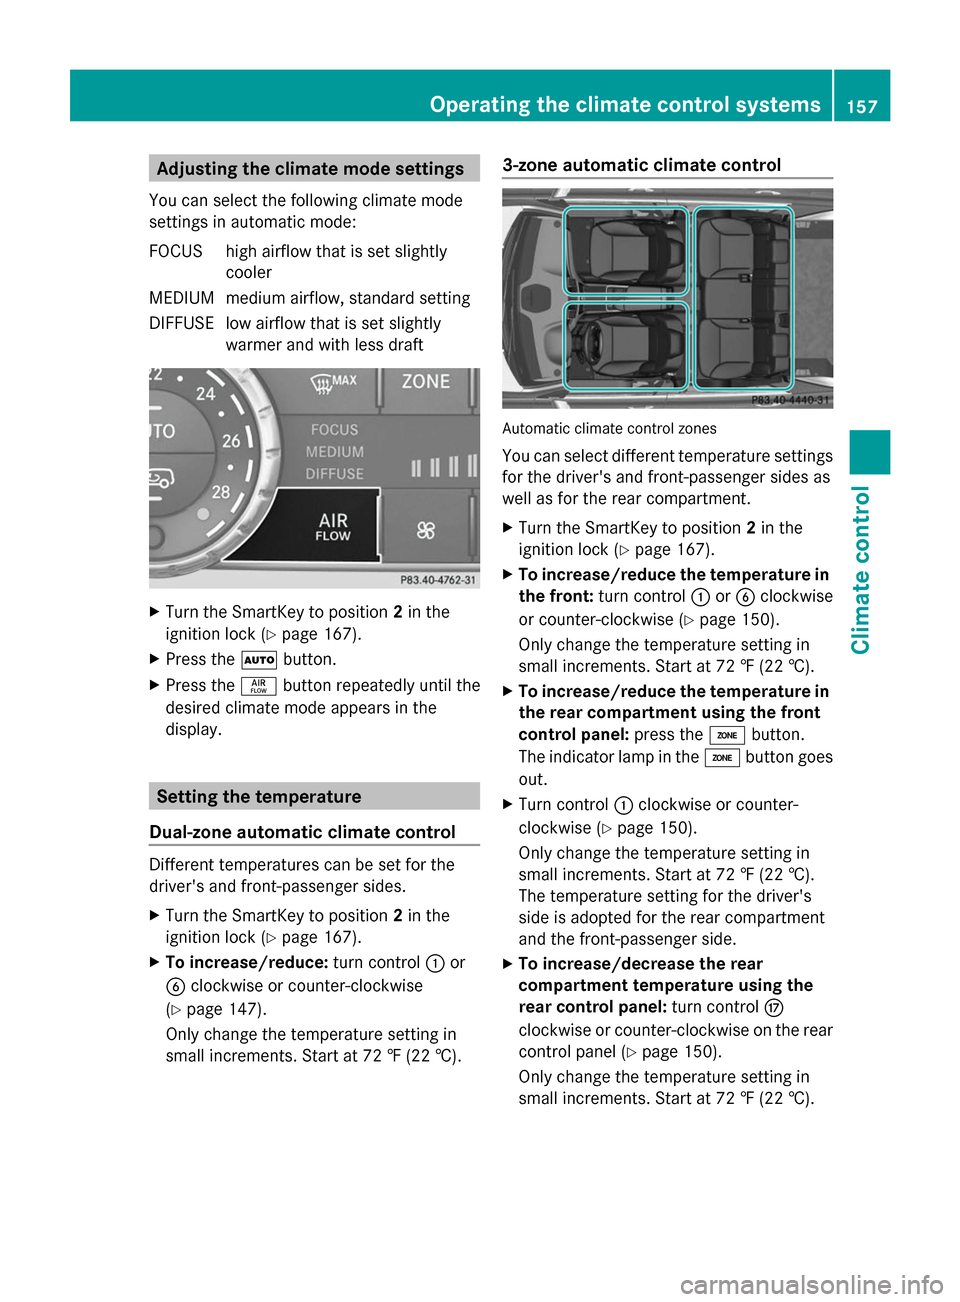
Adjusting the climate mode settings
You can select the following climate mode
settings in automatic mode:
FOCUS high airflow that is set slightly cooler
MEDIUM medium airflow, standard setting
DIFFUS Elow airflow that is set slightly
warmer and with less draft X
Turn the SmartKey to position 2in the
ignition lock (Y page 167).
X Press the Ãbutton.
X Press the ñbutton repeatedly until the
desired climate mode appears in the
display. Setting the temperature
Dual-zone automatic climate control Different temperatures can be set for the
driver's and front-passenger sides.
X
Turn the SmartKey to position 2in the
ignition lock (Y page 167).
X To increase/reduce: turn control:or
B clockwise or counter-clockwise
(Y page 147).
Only change the temperature setting in
small increments. Start at 72 ‡ (22 †). 3-zone automatic climate control
Automatic climate control zones
You can select different temperature settings
for the driver's and front-passenger sides as
well as for the rear compartment.
X
Turn the SmartKey to position 2in the
ignition lock (Y page 167).
X To increase/reduce the temperature in
the front: turn control :orB clockwise
or counter-clockwise (Y page 150).
Only change the temperature setting in
small increments. Start at 72 ‡ (22 †).
X To increase/reduce the temperature in
the rear compartment using the front
control panel: press theábutton.
The indicator lamp in the ábutton goes
out.
X Turn control :clockwise or counter-
clockwise (Y page 150).
Only change the temperature setting in
small increments. Start at 72 ‡ (22 †).
The temperature setting for the driver's
side is adopted for the rear compartment
and the front-passenger side.
X To increase/decrease the rear
compartment temperature using the
rear control panel: turn controlM
clockwise or counter-clockwise on the rear
control panel (Y page 150).
Only change the temperature setting in
small increments. Start at 72 ‡ (22 †). Operating the climate control systems
157Climate control
Page 160 of 462

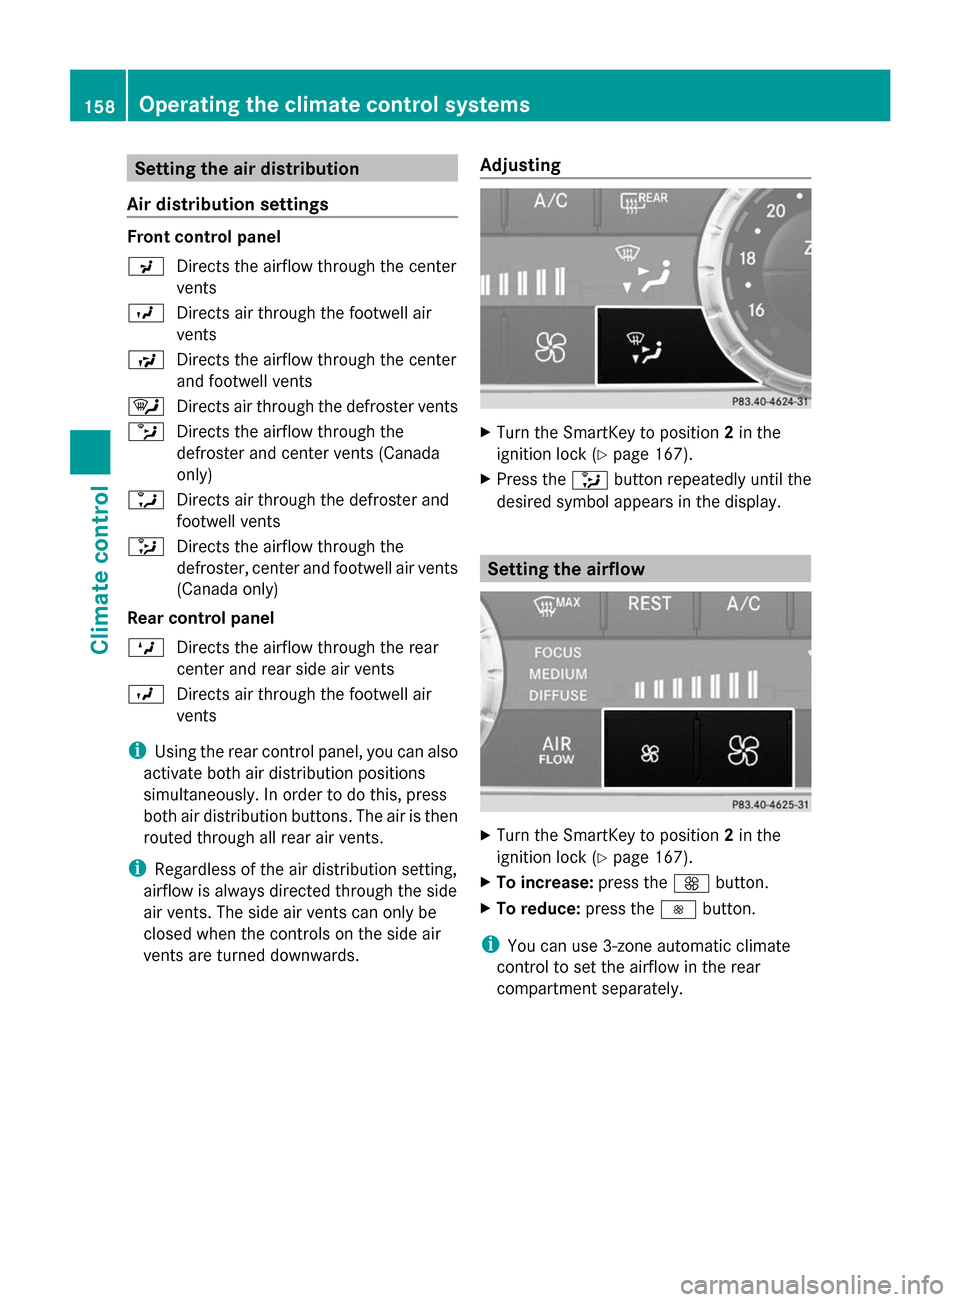
Setting the air distribution
Air distribution settings Front control panel
P
Directs the airflow through the center
vents
O Directs air through the footwell air
vents
S Directs the airflow through the center
and footwell vents
¯ Directs air through the defroster vents
b Directs the airflow through the
defroster and center vents (Canada
only)
a Directs air through the defroster and
footwell vents
_ Directs the airflow through the
defroster, center and footwell air vents
(Canada only)
Rear control panel
M Directs the airflow through the rear
center and rear side air vents
O Directs air through the footwell air
vents
i Using the rear control panel, you can also
activate both air distribution positions
simultaneously. In order to do this, press
both air distribution buttons. The air is then
routed through all rear air vents.
i Regardless of the air distribution setting,
airflow is always directed through the side
air vents. The side air vents can only be
closed when the controls on the side air
vents are turned downwards. Adjusting X
Turn the SmartKey to position 2in the
ignition lock (Y page 167).
X Press the _button repeatedly until the
desired symbol appears in the display. Setting the airflow
X
Turn the SmartKey to position 2in the
ignition lock (Y page 167).
X To increase: press theKbutton.
X To reduce: press theIbutton.
i You can use 3-zone automatic climate
control to set the airflow in the rear
compartment separately. 158
Operating the climate control systemsClimate control
Page 161 of 462

Switching the ZONE function on/off
X
To switch on: press theábutton.
The indicator lamp above the ábutton
lights up.
Dual-zone automatic climate control: the
temperature setting for the driver's side is
not adopted for the front-passenger side.
3-zone automatic climate control: the
temperature setting for the driver's side is
not adopted for the front-passenger side
and the rear compartment.
X To switch off: press theábutton.
The indicator lamp above the ábutton
goes out.
Dual-zone automatic climate control: the
temperature setting for the driver's side is
adopted for the front-passenger side.
3-zone automatic climate control: the
temperature setting for the driver's side is
adopted for the front-passenger side and
the rear compartment. Defrosting the windshield
You can use this function to defrost the
windshield or to defrost the inside of the
windshield and the side windows.
Switch off the "Windshield defrosting"
function as soon as the windshield is clear
again. X
Turn the SmartKey to position 2in the
ignition lock (Y page 167).
X To activate: press the¬button.
The indicator lamp in the ¬button lights
up.
The climate control system switches to the
following functions:
R high airflow
R high temperature
R air distribution to the windshield and
front side windows
R air-recirculation mode off
X To deactivate: press the¬button.
The indicator lamp in the ¬button goes
out. The previously selected settings are
restored. Air-recirculation mode remains
deactivated.
or
X Press the Ãbutton.
The indicator lamp in the ¬button goes
out. Airflow and air distribution are set to
automatic mode.
or
X Turn controls :orB clockwise or
counter-clockwise:
Dual-zone automatic climate control
(Y page 147)
3-zone automatic climate control
(Y page 150)
or
X Press the KorI button. MAX COOL maximum cooling
The MAX COOL function is only available in
vehicles for the USA. Operating the climate control systems
159Climate control
Page 164 of 462

the engine has been switched off. The heating
time depends on the set interior temperature.
Switching on/off X
To activate: press theÌ/Á button.
The indicator lamp in the Ì/Á
button lights up.
i The blower will run at a low speed
regardless of the airflow setting.
i If you activate the residual heat function
at high temperatures, only the ventilation
will be activated. The blower runs at
medium speed.
X To deactivate: press theÌ/Á
button.
The indicator lamp in the Ì/Á
button goes out.
Residual heat is deactivated automatically:
R after approximately 30 minutes
R when the ignition is switched on
R if the battery voltage drops Setting the air vents
Important safety notes
G
WARNING
Very hot or very cold air can flow from the air
vents. This could result in burns or frostbite in
the immediate vicinity of the air vents. There
is a risk of injury.
Make sure that all vehicle occupants always
maintain a sufficient distance to the air outlets. If necessary, redirect the airflow to
another area of the vehicle interior.
In order to ensure the direct flow of fresh air
through the air vents into the vehicle interior,
please observe the following notes:
R keep the air inlet grille on the hood and in
the engine compartment on the front-
passenger side free of blockages, such as
ice, snow or leaves.
R never cover the air vents or air intake grilles
in the vehicle interior.
i For virtually draft-free ventilation, adjust
the sliders of the air vents to the center
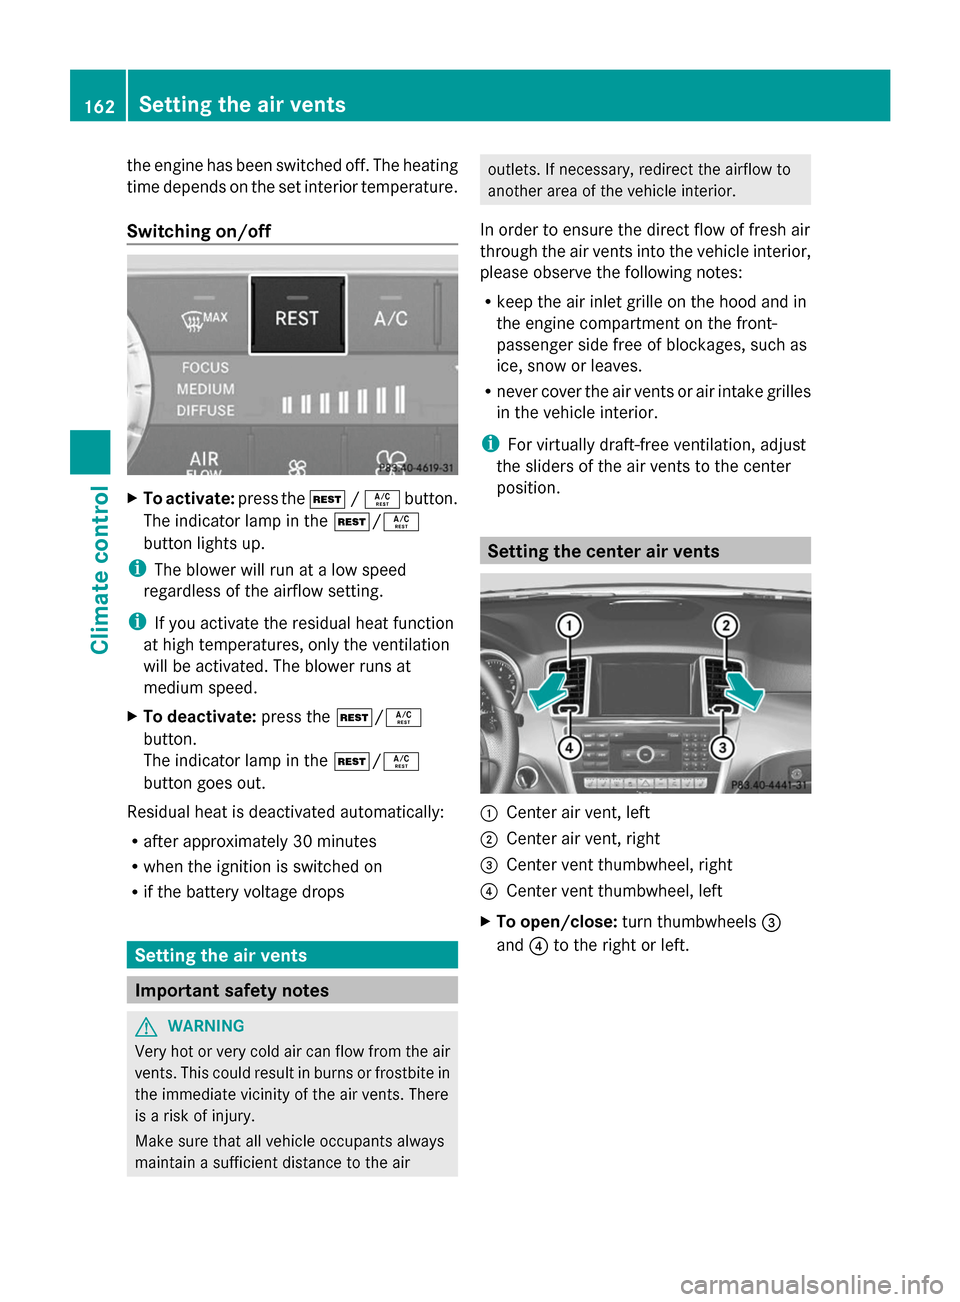
position. Setting the center air vents
:
Center air vent, left
; Center air vent, right
= Center vent thumbwheel, right
? Center vent thumbwheel, left
X To open/close: turn thumbwheels =
and ?to the right or left. 162
Setting the air ventsClimate control
Page 165 of 462

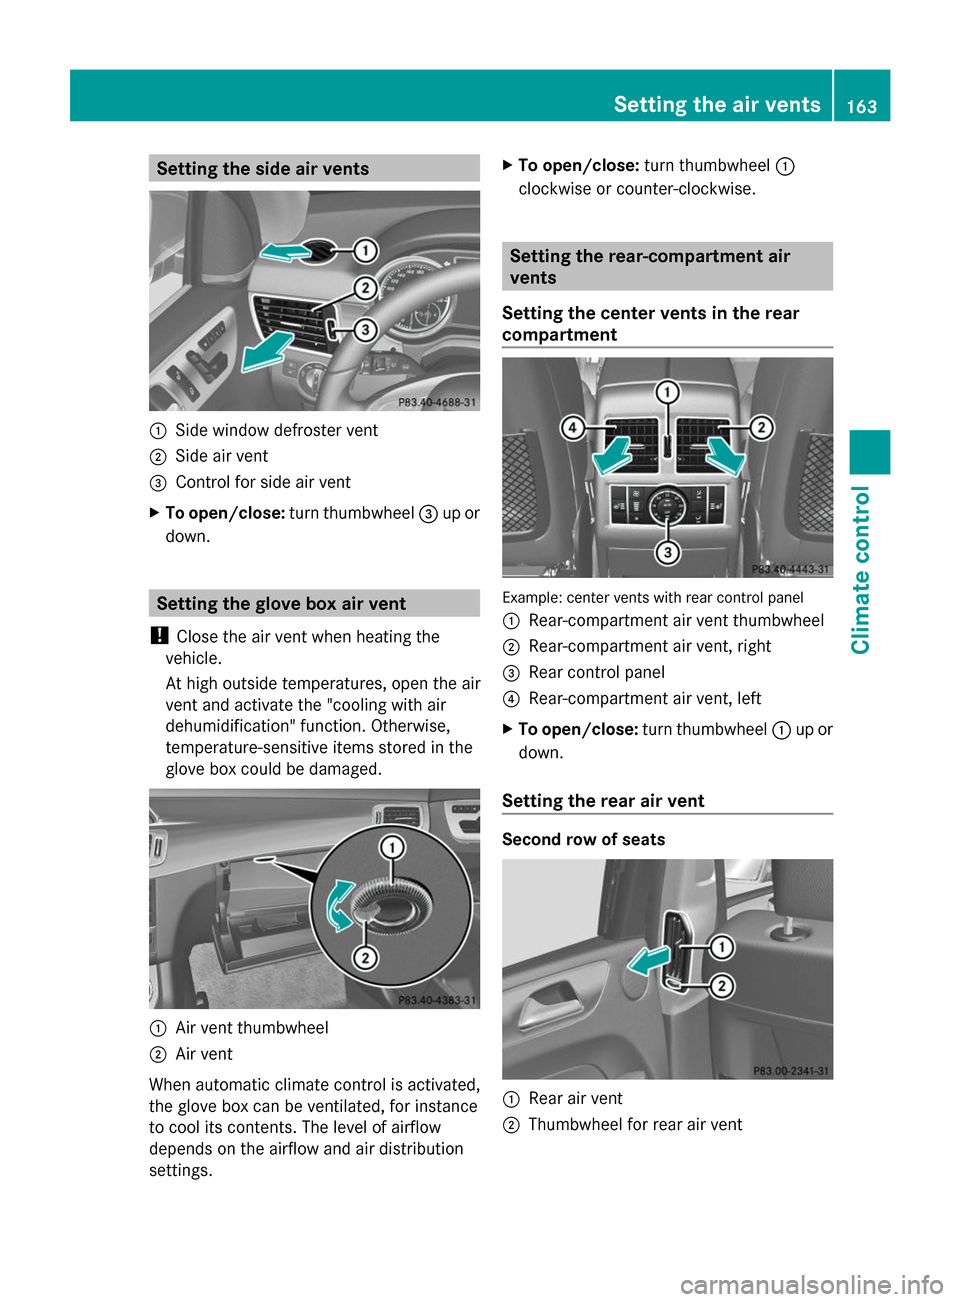
Setting the side air vents
:
Side window defroster vent
; Side air vent
= Control for side air vent
X To open/close: turn thumbwheel =up or
down. Setting the glove box air vent
! Close the air vent when heating the
vehicle.
At high outside temperatures, open the air
vent and activate the "cooling with air
dehumidification" function. Otherwise,
temperature-sensitive items stored in the
glove box could be damaged. :
Air vent thumbwheel
; Air vent
When automatic climate control is activated,
the glove box can be ventilated, for instance
to cool its contents. The level of airflow
depends on the airflow and air distribution
settings. X
To open/close: turn thumbwheel :
clockwise or counter-clockwise. Setting the rear-compartment air
vents
Setting the center vents in the rear
compartment Example: center vents with rear control panel
:
Rear-compartment air vent thumbwheel
; Rear-compartment air vent, right
= Rear control panel
? Rear-compartment air vent, left
X To open/close: turn thumbwheel :up or
down.
Setting the rear air vent Second row of seats
:
Rear air vent
; Thumbwheel for rear air vent Setting the air vents
163Climate control Z
Page 171 of 462

Start/Stop button
=
USA only
? Canada only Starting the engine
Important safety notes G
WARNING
If children are left unsupervised in the vehicle,
they could:
R open the doors, thus endangering other
people or road users.
R get out and disrupt traffic.
R operate the vehicle's equipment.
Additionally, children could set the vehicle in
motion if, for example, they:
R release the parking brake.
R shifting the automatic transmission out of
park position P
R Start the engine.
There is a risk of an accident and injury.
When leaving the vehicle, always take the
SmartKey with you and lock the vehicle. Never
leave children or animals unattended in the
vehicle. Always keep the SmartKey out of
reach of children. G
WARNING
Combustion engines emit poisonous exhaust
gases such as carbon monoxide. Inhaling
these exhaust gases leads to poisoning. There
is a risk of fatal injury. Therefore never leave the engine running in enclosed spaces
without sufficient ventilation.
G
WARNING
Flammable materials introduced through
environmental influence or by animals can
ignite if in contact with the exhaust system or
parts of the engine that heat up. There is a risk
of fire.
Carry out regular checks to make sure that
there are no flammable foreign materials in
the engine compartment or in the exhaust
system.
i Vehicles with a gasoline engine: the
catalytic converter is preheated for up
30 seconds after a cold start. The sound of
the engine may change during this time.
Automatic transmission X
Shift the transmission to position P
(Y page 173).
The transmission position display in the
multifunction display shows P
(Y page 173).
i You can also start the engine when the
transmission is in position N.
Starting procedure with the SmartKey X
To start a gasoline engine: turn the
SmartKey to position 3in the ignition lock
(Y page 167) and release it as soon as the
engine is running.
X To start a diesel engine: turn the
SmartKey to position 2in the ignition lock
(Y page 167).
The % preglow indicator lamp in the
instrument cluster lights up.
X When the %preglow indicator lamp
goes out, turn the SmartKey to position 3
(Y page 167) and release it as soon as the
engine is running.
i You can start the engine without preglow
if the engine is warm. Driving
169Driving and parking Z
Page 197 of 462

Mercedes-Benz recommends that you only
have brake pads/linings installed on your
vehicle which have been approved for
Mercedes-Benz vehicles or which correspond
to an equivalent quality standard. Brake
pads/linings which have not been approved
for Mercedes-Benz vehicles or which are not
of an equivalent quality could affect your
vehicle's operating safety.
Mercedes-Benz recommends that you only
use brake fluid that has been specially
approved for your vehicle by Mercedes-Benz,
or which corresponds to an equivalent quality
standard. Brake fluid which has not been
approved for Mercedes-Benz vehicles or
which is not of an equivalent quality could
affect your vehicle's operating safety.
High-performance brake system for
AMG vehicles The high-performance brake system is
designed for heavy loads. This may lead to
noise when braking. This will depend on:
R Speed
R Braking force
R Environmental conditions, such as
temperature and humidity
The wear of individual components of the
brake system, such as the brake pads/linings
or brake discs, depends on the individual
driving style and operating conditions.
For this reason, it is impossible to state a
mileage that will be valid under all
circumstances. An aggressive driving style
will lead to high wear. You can obtain further
information about this from your authorized
Mercedes-Benz Center.
New and replaced brake pads and discs only
reach their optimum braking effect after
several hundred kilometers of driving.
Compensate for this by applying greater force
to the brake pedal. Keep this in mind, and
adapt your driving and braking accordingly
during this break-in period. Excessive heavy braking results in
correspondingly high brake wear. Observe
the
# brake wear warning lamp in the
instrument cluster and note any brake status
messages in the multifunction display.
Especially for high performance driving, it is
important to maintain and have the brake
system checked regularly. Driving on wet roads
Hydroplaning If water has accumulated to a certain depth
on the road surface, there is a danger of
hydroplaning occurring, even if:
R
you drive at low speeds.
R the tires have adequate tread depth.
For this reason, in the event of heavy rain or
in conditions in which hydroplaning may
occur, you must drive in the following
manner:
R lower your speed.
R avoid ruts.
R brake carefully.
Driving on flooded roads !
Do not drive through flooded areas.
Check the depth of any water before driving
through it. Drive slowly through standing
water. Otherwise, water may enter the
vehicle interior or the engine compartment.
This can damage the electronic
components in the engine or the automatic
transmission. Water can also be drawn in
by the engine's air suction nozzles and this
can cause engine damage.
i Vehicles with the AIRMATIC package:
set the raised level before driving through
standing water.
Off-road fording !
Under no circumstances should you
accelerate before entering the water. The Driving tips
195Driving and parking Z
Page 210 of 462

Stopping
G
WARNING
When leaving the vehicle, even if it is braked
only by DISTRONIC PLUS, it could roll away if:
R there is a malfunction in the system or in
the voltage supply.
R DISTRONIC PLUS has been deactivated
with the cruise control lever, e.g. by a
vehicle occupant or from outside the
vehicle.
R the electrical system in the engine
compartment, the battery or the fuses have
been tampered with.
R the battery is disconnected.
R the accelerator pedal has been depressed,
e.g. by a vehicle occupant.
There is a risk of an accident.
If you wish to exit the vehicle, always turn off
DISTRONIC PLUS and secure the vehicle
against rolling away.
If DISTRONIC PLUS detects that the vehicle
in front is stopping, it brakes your vehicle until
it is stationary.
Once your vehicle is stationary, it remains
stationary and you do not need to depress the
brake.
After a time, the electric parking brake
secures the vehicle and relieves the service
brake.
Depending on the specified minimum
distance, your vehicle will come to a standstill
at a sufficient distance behind the vehicle in
front. The specified minimum distance is set
using the control on the cruise control lever.
The electric parking brake automatically
secures the vehicle if DISTRONIC PLUS is
activated and:
R the driver's door is open and the driver's
seat belt is unfastened.
R the engine is switched off, unless it is
automatically switched off by the ECO
start/stop function. R
a system malfunction occurs.
R the power supply is not sufficient.
On steep uphill or downhill inclines or if there
is a malfunction, the transmission may also
automatically be shifted into position P.
Setting a speed Keep in mind that it may take a brief moment
until the vehicle has accelerated or braked to
the speed set.
X Press the cruise control lever up :for a
higher speed or down ;for a lower speed.
X To adjust the set speed in 1 mph
increments (1 km/h increments): briefly
press the cruise control lever up :or
down ;to the pressure point.
Every time the cruise control lever is
pressed up :or down ;the last speed
stored is increased or reduced.
X To adjust the set speed in 5 mph
increments (10 km/h increments):
briefly press the cruise control lever
up : or down ;to the pressure point.
Every time the cruise control lever is
pressed up :or down ;, the last speed
stored is increased or reduced.
i If you accelerate to overtake, DISTRONIC
PLUS adjusts the vehicle's speed to the last
speed stored after you have finished
overtaking. 208
Driving systemsDriving and parking