2014 MERCEDES-BENZ G-CLASS SUV sunroof
[x] Cancel search: sunroofPage 17 of 272

Display message
............................ 144
Emergency Tensioning Devices ....... .52
Fastening ......................................... 49
Fastening, front ............................... 50
Fastening in the rear, center ............50
Important safety guidelines .............47
Releasing ......................................... 51
Special seat belt retractor ...............55
Switching belt adjustment on/off
(on-board computer) ......................144
Warning lamp ................................. 158
Warning lamp (function) ................... 52
Seat heating
Indicator lamp (malfunction) ............79
Seats
Adjusting (electrically) .....................78
Adjusting the 4-way lumbar
support ............................................ 78
Adjusting the head restraint ............78
Cleaning the cover .........................210
Correct driver's seat position ........... 76
Important safety notes ....................76
Multicontour seat ............................ 78
Storing settings (memory function) .. 79
Switching seat heating on/off .........78
Switching seat ventilation on/off ....78
Sensors (cleaning instructions) 206, 209
Service interval display Displaying a service message (on-
board computer) ............................ 205
Service menu (on-board computer) .144
Service products Brake fluid ..................................... 261
Coolant (engine) ............................ 262
Engine oil ....................................... 261
Fuel ................................................ 258
Important safety notes ..................258
Notes ............................................. 258
Refrigerant (air-conditioning
system) .......................................... 261
Washer fluid .................................. .263
Setting a speed limit
see SPEEDTRONIC
Settings
Factory (on-board computer) .........144
Menu overview .............................. 174
On-board computer .......................144
Setting the air distribution .................94Setting the airflow
.............................. 94
Setting the date/time format see also Digital Operator's Manual 170
Setting the language
see also Digital Operator's Manual 170
Setting the time
see also Digital Operator's Manual 170
SETUP (on-board computer) .............144
Shift ranges ....................................... 101
Side marker lamp (display
message) ............................................ 144
Side marker lamps (changing bulbs) .86
Side windows Cleaning ......................................... 206
Important safety information ...........71
Opening/closing .............................. 71
Opening/closing (all) .......................71
Opening/closing (front) ...................71
Overview .......................................... 71
Troubleshooting ............................... 71
SIRIUS services
see also Digital Operator's Manual 170
Ski rack .............................................. 189
Sliding sunroof Important safety notes ....................71
Opening/closing .............................. 72
Operating manually ..........................72
SmartKey
Changing the battery .......................68
Changing the programming .............67
Checking the battery .......................68
Convenience opening feature ..........71
Display message ............................ 144
Door central locking/unlocking .......66
Important safety notes ....................66
Loss ................................................. 69
Malfunction ...................................... 69
Mechanical key ................................ 67
Overview .......................................... 66
Problem (malfunction) .....................69
Starting the engine ..........................98
SMS
see also Digital Operator's Manual 170
Snow chains ...................................... 230 Index
15
Page 19 of 272

TELEAID
Call priority .................................... 193
Emergency call .............................. 190
Important safety notes ..................189
MB info call button ........................192
Roadside Assistance button ..........191
Self-test ......................................... 190
System .......................................... 190
Telephone
Accepting a call ............................. 144
Display message ............................ 144
Number from the phone book ....... .144
Redialing ........................................ 144
Rejecting/ending a call .................144
see also Digital Operator's Manual 170
Telephone compartment ..................185
Temperature Coolant .......................................... 142
Coolant (on-board computer) ......... 144
Engine oil (on-board computer) ...... 144
Outside temperature ..................... .142
Theft deterrent systems
ATA (Anti-Theft Alarm system) .........64
Immobilizer ...................................... 63
Tilt/sliding sunroof
see Sliding sunroof
Time
see separate operating instructions
Timing (RACETIMER) .........................144
Tire pressure Calling up (on-board computer) .....234
Checking manually ........................234
Display message .................... 144, 155
Maximum ....................................... 233
Notes ............................................. 232
Recommended ............................... 230
Table (single tires) .........................231
Tire pressure monitoring system
Checking the tire pressure
electronically ................................. 236
Function/notes ............................. 234
Restarting ...................................... 236
Warning lamp ................................. 167
Warning message .......................... 236
Tires
Aspect ratio (definition) .................248
Average weight of the vehicle
occupants (definition) ....................247Bar (definition)
............................... 247
Changing a wheel .......................... 249
Characteristics .............................. 246
Checking ........................................ 229
Definition of terms .........................247
Direction of rotatio n...................... 250
Display message .................... 144, 155
Distribution of the vehicle
occupants (definition) ....................249
DOT, Tire Identification Number
(TIN) .............................................. .246
DOT (Department of
Transportation) (definition) ............247
GAWR (Gross Axle Weight Rating)
(definition) ..................................... 247
GTW (Gross Trailer Weight)
(definition) ..................................... 247
GVW (Gross Vehicle Weight)
(definition) ..................................... 247
GVWR (Gross Vehicle Weight
Rating) (definition) .........................248
Important safety notes ..................228
Increased vehicle weight due to
optional equipment (definition) ......247
Kilopascal (kPa) (definition) ...........248
Labeling (overview )........................ 243
Load bearing index (definition) ......249
Load index ..................................... 245
Load index (definition) ...................248
M+S tires ....................................... 230
Maximum loaded vehicle weight
(definition) ..................................... 248
Maximum load on a tire (definition) 248
Maximum permissible tire
pressure (definition) ....................... 248
Maximum tire loa d......................... 246
Maximum tire load (definition) .......248
Optional equipment weight
(definition) ..................................... 249
PSI (pounds per square inch)
(definition) ..................................... 248
Replacing ....................................... 249
Service life ..................................... 230
Sidewall (definition) .......................249
Speed rating (definition) ................247
Storing ........................................... 250
Structure and characteristics
(definition) ..................................... 247 Index
17
Page 38 of 272

Overhead control panel
Function Page
:
p
Switches the left-
hand reading lamp on/off 84
;
c
Switches the front
interior lighting on 84
=
u
Switches the rear
interior lighting on/off 84
?
|
Switches the front
interior lighting/automatic
interior lighting control off 84
A
p
Switches the right-
hand reading lamp on/off 84
B
¡
Opens/closes the
sliding sunroof 72
C
F
Roadside Assistance
call button (mbrace
system) 191 Function Page
D
G
SOS button (mbrace
system) 190
E
ï
MB Info call button
(mbrace system) 192
F
Rear-view mirror 79
G
Buttons for the garage door
opener
189
H
Microphone for mbrace
(emergency call system),
telephone and the Voice
Control System
1 ~
1
The Voice Control System is only available in combination with COMAND. Observe the additional operating
instructions. 36
Overhead control panelAt a glance
Page 67 of 272

Useful information
..............................66
SmartKey ............................................. 66
Doors .................................................... 69
Rear door ............................................. 70
Side windows ...................................... 71
Sliding sunroof .................................... 71 65Opening and closing
Page 73 of 272

X
Press release button :and pull door
handle ;.
X Open the rear door. Closing
X Push the rear door closed from outside the
vehicle.
X If necessary, lock the vehicle with the
& button on the SmartKey. Side windows
Important safety notes
G
WARNING
While opening the side windows, body parts
in the closing area could become trapped.
There is a risk of injury.
Make sure that no body parts are in close
proximity during the closing procedure. If
somebody becomes trapped, release the
switch or press the switch to open the side
window again. G
WARNING
While opening the side windows, body parts
could become trapped between the side
window and the door frame as the side
window moves. There is a risk of injury.
Make sure that nobody touches the side
window during the opening procedure. If
somebody becomes trapped, release the
switch or pull the switch to close the side
window again. Information in the Digital Operator's
Manual
In the Digital Operator's Manual you will find
information on the following topics:
R Opening and closing the side windows
R Opening and closing all side windows Problems with the side windows
G
WARNING
Closing the side windows with increased force
or without the anti-entrapment feature could
lead to serious or even fatal injury. Make sure
that nobody can become trapped when
closing the side windows.
Problem: a side window cannot be closed
because objects are trapped between the
side window and the door frame.
X Remove the objects.
X Close the side window.
Problem: a side window cannot be closed
and you cannot see the cause.
If a side window is obstructed during closing
and reopens again slightly:
X Immediately after the window blocks, pull
the corresponding switch again until the
side window has closed.
If a side window is obstructed again during
closing and reopens again slightly:
X Immediately after the window blocks, pull
the corresponding switch again until the
side window has closed.
i If a side window no longer opens or closes
due to a malfunction, contact a qualified
specialist workshop. Sliding sunroof
Important safety notes
! Only open the sliding sunroof if it is free
of snow and ice. Otherwise, malfunctions
may occur.
Do not allow anything to protrude from the
sliding sunroof. Otherwise, the seals could
be damaged.
! If the sliding sunroof still cannot be
opened or closed as a result of a
malfunction, contact a qualified specialist
workshop. Sliding sunroof
71Opening and closing Z
Page 74 of 272

!
The weather can change abruptly. It could
start to rain or snow. Make sure that the
sliding sunroof is closed when you leave the
vehicle. The vehicle electronics can be
damaged if water enters the vehicle
interior.
i Resonance noises can occur in addition
to the usual airflow noises when the sliding
sunroof is open. They are caused by minor
pressure fluctuations in the vehicle interior.
Change the position of the sliding sunroof
or open a side window slightly to reduce or
eliminate these noises. Opening and closing the sliding
sunroof
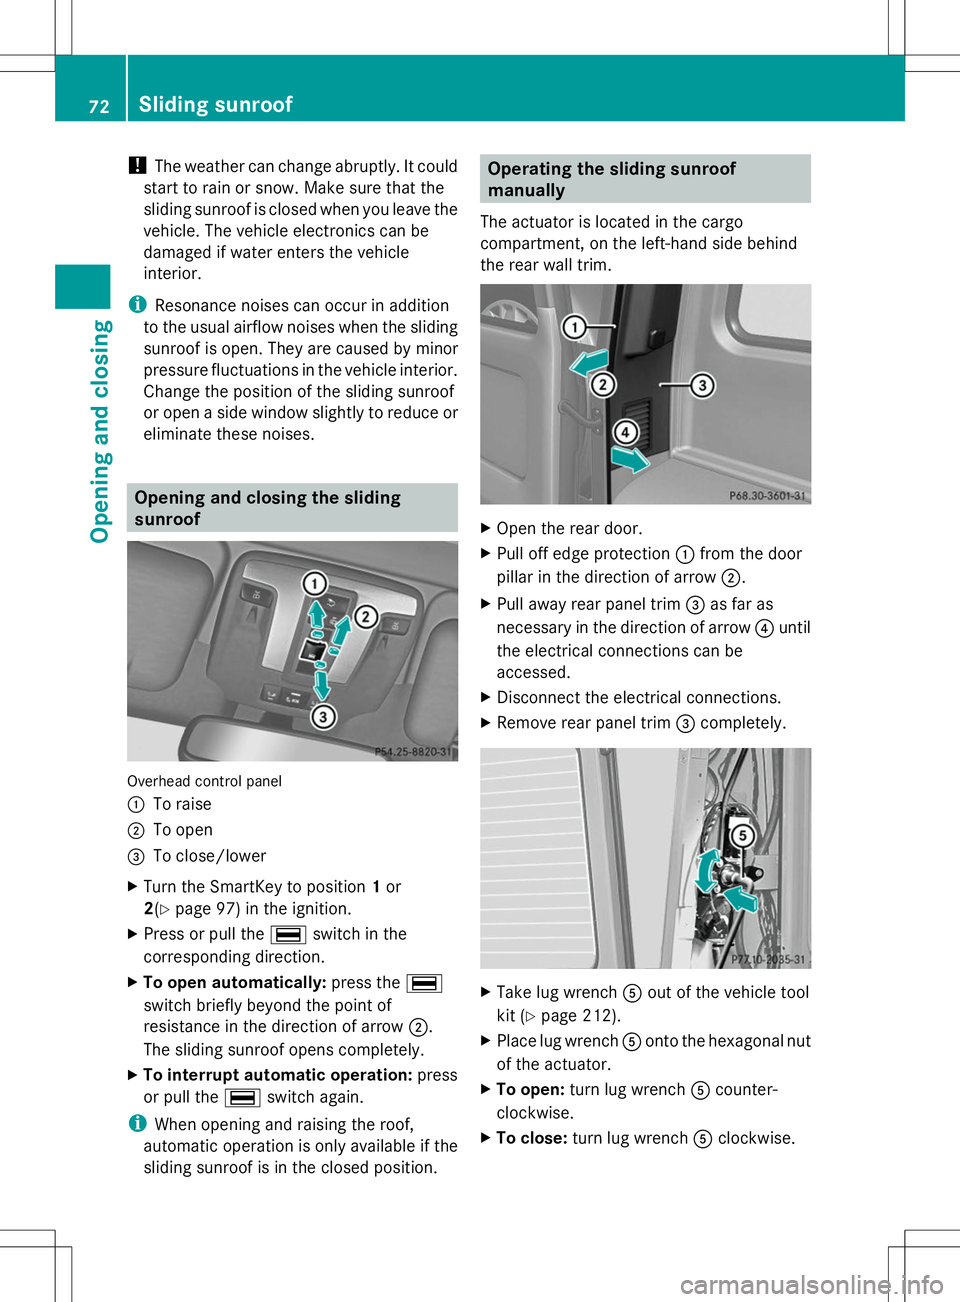
Overhead control panel
:
To raise
; To open
= To close/lower
X Turn the SmartKey to position 1or
2(Y page 97) in the ignition.
X Press or pull the ¡switch in the
corresponding direction.
X To open automatically: press the¡
switch briefly beyond the point of
resistance in the direction of arrow ;.
The sliding sunroof opens completely.
X To interrupt automatic operation: press
or pull the ¡switch again.
i When opening and raising the roof,
automatic operation is only available if the
sliding sunroof is in the closed position. Operating the sliding sunroof
manually
The actuator is located in the cargo
compartment, on the left-hand side behind
the rear wall trim. X
Open the rear door.
X Pull off edge protection :from the door
pillar in the direction of arrow ;.
X Pull away rear panel trim =as far as
necessary in the direction of arrow ?until
the electrical connections can be
accessed.
X Disconnect the electrical connections.
X Remove rear panel trim =completely. X
Take lug wrench Aout of the vehicle tool
kit (Y page 212).
X Place lug wrench Aonto the hexagonal nut
of the actuator.
X To open: turn lug wrench Acounter-
clockwise.
X To close: turn lug wrench Aclockwise. 72
Sliding sunroofOpening and closing
Page 94 of 272

Useful information
i This Operator's Manual describes all
models and all standard and optional
equipment of your vehicle available at the
time of publication of the Operator's
Manual. Country-specific differences are
possible. Please note that your vehicle may
not be equipped with all features
described. This also applies to safety-
related systems and functions.
i Read the information on qualified
specialist workshops: (Y page 27).Overview of climate control systems
Important safety notes
G
WARNING
Severe conditions (e.g. strong air pollution)
may require replacement of the filter before
its scheduled replacement interval. A clogged
filter will reduce the air volume to the interior
and the windows could fog up, impairing
visibility and endangering you and others.
Have a blocked filter replaced at a Mercedes-
Benz Center as soon as possible.
Observe the settings recommended on the
following pages. The windows could
otherwise fog up. This could prevent you from
observing the traffic conditions, thereby
causing an accident.
Dual-zone automatic climate control
regulates the temperature and the humidity
in the vehicle interior and filters undesirable
substances from the air.
Automatic climate control is only operational
when the engine is running. Optimum
operation is only achieved if you drive with the
side windows and sliding sunroof closed.
The climatic comfort deteriorates whilst the
sliding sunroof is open. The automatic climate
control cannot maintain the set temperature
with the sliding sunroof open. You have to
adjust the climate control manually. i
The residual heat function can only be
activated or deactivated with the ignition
switched off.
i Ventilate the vehicle for a brief period
during warm weather, e.g. using the
convenience opening feature (Y page 71).
This will speed up the cooling process and
the desired vehicle interior temperature
will be reached more quickly.
i The integrated filter can filter out most
particles of dust, and completely filters out
pollen. A clogged filter reduces the amount
of air supplied to the vehicle interior. For
this reason, you should always observe the
interval for replacing the filter, which is
specified in the Maintenance Booklet. As it
depends on environmental conditions, e.g.
heavy air pollution, the interval may be
shorter than stated in the Maintenance
Booklet. 92
Overview of climate control systemsClimate control
Page 209 of 272

washed. The exterior mirrors could
otherwise be damaged.
! Make sure that the automatic
transmission is in position Nwhen washing
your vehicle in a tow-through car wash. The
vehicle could be damaged if the
transmission is in another position.
! Make sure that:
R the side windows and sliding sunroof are
closed completely.
R the blower for the ventilation/heating is
switched off (airflow control is turned to
position 0/theÃandÁ buttons
are switched off).
R the windshield wiper switch is at position
0.
The vehicle could otherwise be damaged.
You can wash the vehicle in an automatic car
wash from the very start.
If the vehicle is very dirty, pre-wash it before
cleaning it in an automatic car wash.
After using an automatic car wash, wipe off
wax from the windshield and the wiper
blades. This will prevent smears and reduce
wiping noises caused by residue on the
windshield.
Washing by hand In some countries, washing by hand is only
allowed at specially equipped washing bays.
Observe the legal requirements in all
countries concerned.
When using the vehicle in winter, remove all
traces of road salt deposits carefully and as
soon as possible.
When washing the vehicle underbody, also
clean the inside of the wheels.
X Do not use hot water and do not wash the
vehicle in direct sunlight.
X Use a soft sponge to clean.
X Use a mild cleaning agent, such as a car
shampoo approved by Mercedes-Benz. X
Thoroughly hose down the vehicle with a
gentle jet of water.
X Do not point the water jet directly towards
the air inlets.
X Use plenty of water and rinse out the
sponge frequently.
X Rinse the vehicle with clean water and dry
thoroughly with a chamois.
X Do not let the cleaning agent dry on the
paintwork.
Power washers G
WARNING
The water jet from a circular jet nozzle (dirt
blasters) can cause invisible exterior damage
to the tires or chassis components.
Components damaged in this way may fail
unexpectedly. There is a risk of an accident.
Do not use power washers with circular jet
nozzles to clean the vehicle. Have damaged
tires or chassis components replaced
immediately.
! Always maintain a distance of at least
11.8 in (30 cm) between the vehicle and the
power washer nozzle. Information about
the correct distance is available from the
equipment manufacturer.
Move the power washer nozzle around
when cleaning your vehicle.
Do not aim directly at any of the following:
R tires
R door gaps, roof gaps, joints, etc.
R electrical components
R battery
R connectors
R lights
R seals
R trim
R ventilation slots
Damaged seals or electrical components
can lead to leaks or failures. Care
207Maintenance and care Z