2014 MERCEDES-BENZ G-CLASS SUV lights
[x] Cancel search: lightsPage 88 of 272

free cloth or only touch the base of the bulb
when installing.
Only use bulbs of the correct type.
If the new bulb still does not light up, consult
a qualified specialist workshop.
Bulbs and lamps are an important aspect of
vehicle safety. You must therefore make sure
that these function correctly at all times.
Have the headlamp setting checked regularly. Overview: changing bulbs/bulb types
Front bulbs You can replace the following bulbs. The bulb
type can be found in the legend. :
Turn signal lamp: 1156 NA
; Side marker lamp: T 4 W
= Cornering light function with fog lamp
function: H11 55 W (except AMG vehicles)
Rear bulbs You can replace the following bulbs. The bulb
type can be found in the legend. :
Tail lamp/standing lamp: W 5 W
; Brake lamp/tail lamp: P 21/5 W
= Turn signal lamp: PY 21 W
? Side marker lamp: T 4 W
A Backup lamp: P 21 W
B Rear fog lamp: P 21 W Changing the front bulbs
Side marker lamps !
Do not fasten the screws too tightly. You
could otherwise damage the lens. Front side marker lamp (example)
The bulbs of the front and rear side marker
lamps are changed in the same way.
X
Switch off the lights.
X Unscrew screws :.
X Remove housing ;.86
Replacing bulbsLights and windshield wipers
Page 89 of 272

X
Remove dust cover =.
X Push the catch to the side and pull the bulb
holder with the bulb out of housing ;.X
Lightly press bulb ?, turn it counter-
clockwise and pull it out.
X Insert the new bulb and, applying slight
pressure, turn it clockwise until it engages.
X Insert the bulb holder into housing ;.
X Attach dust cover =.
X Insert housing ;.
X Replace and tighten screws :.Windshield wipers
Switching the windshield wipers on/
off G
WARNING
The windshield will no longer be wiped
properly if the wiper blades are worn. This
could prevent you from observing the traffic
conditions, thereby causing an accident. Replace the wiper blades twice a year, ideally
in spring and fall.
Combination switch
1
$ Windshield wipers off
2 Ä Intermittent wipe, low (rain sensor
set to low sensitivity)
3 Å Intermittent wipe, high (rain sensor
set to high sensitivity)
4 ° Continuous wipe, slow
5 ¯ Continuous wipe, fast
B í Single wipe
C î To wipe with washer fluid
X Switch on the ignition.
X Turn the combination switch to the
corresponding position.
In the ÄorÅ position, the appropriate
wiping frequency is set automatically
according to the intensity of the rain. In
the Å position, the rain sensor is more
sensitive than in the Äposition, causing
the windshield wipers to wipe more
frequently. Windshield wipers
87Lights and windshield wipers Z
Page 90 of 272

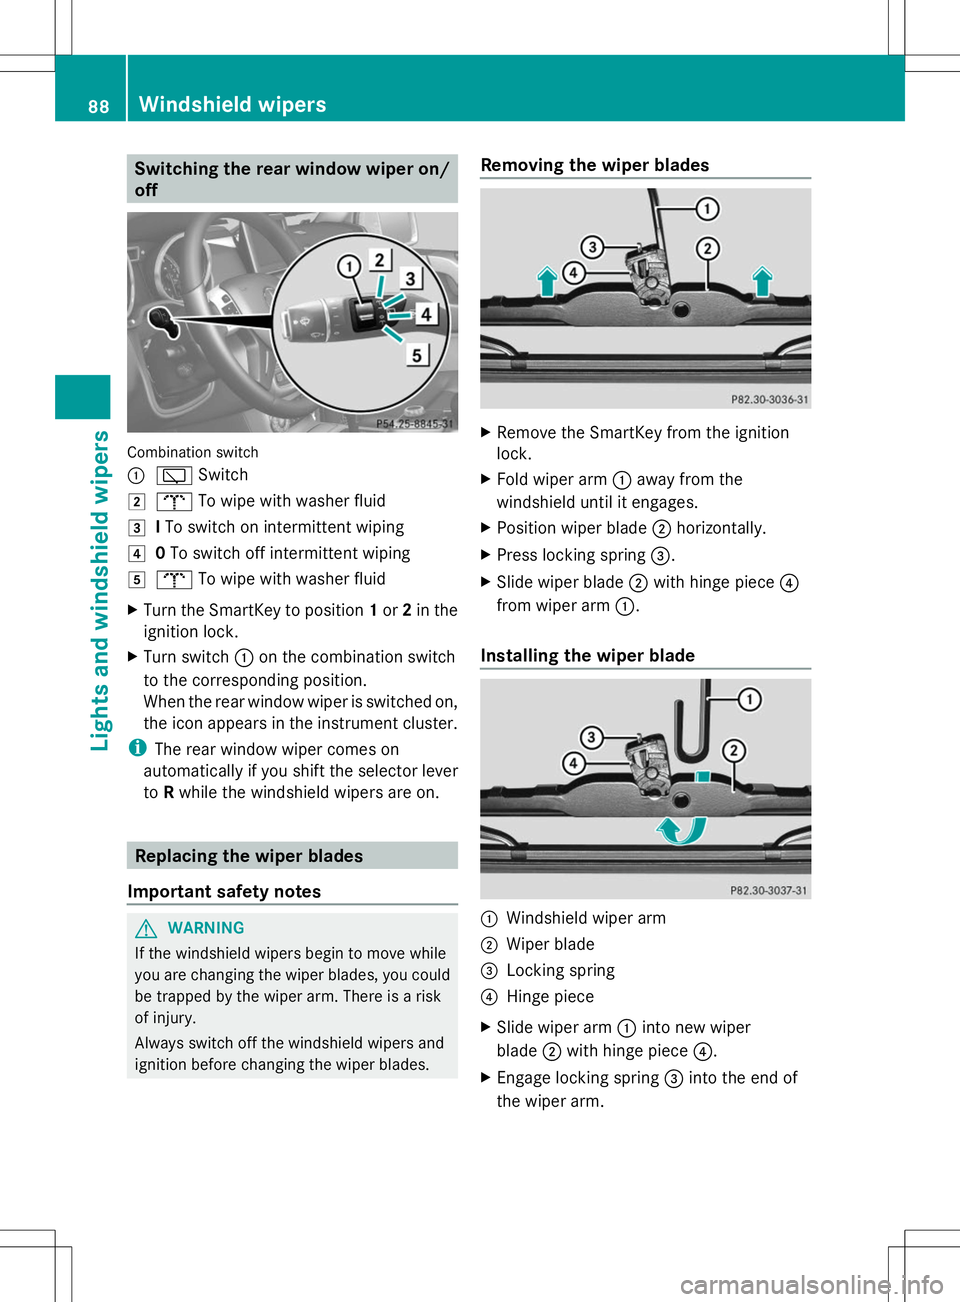
Switching the rear window wiper on/
off Combination switch
:
è Switch
2 b To wipe with washer fluid
3 ITo switch on intermittent wiping
4 0To switch off intermittent wiping
5 b To wipe with washer fluid
X Turn the SmartKey to position 1or 2in the
ignition lock.
X Turn switch :on the combination switch
to the corresponding position.
When the rear window wiper is switched on,
the icon appears in the instrument cluster.
i The rear window wiper comes on
automatically if you shift the selector lever
to Rwhile the windshield wipers are on. Replacing the wiper blades
Important safety notes G
WARNING
If the windshield wipers begin to move while
you are changing the wiper blades, you could
be trapped by the wiper arm. There is a risk
of injury.
Always switch off the windshield wipers and
ignition before changing the wiper blades. Removing the wiper blades
X
Remove the SmartKey from the ignition
lock.
X Fold wiper arm :away from the
windshield until it engages.
X Position wiper blade ;horizontally.
X Press locking spring =.
X Slide wiper blade ;with hinge piece ?
from wiper arm :.
Installing the wiper blade :
Windshield wiper arm
; Wiper blade
= Locking spring
? Hinge piece
X Slide wiper arm :into new wiper
blade ;with hinge piece ?.
X Engage locking spring =into the end of
the wiper arm. 88
Windshield wipersLights and windshield wipers
Page 91 of 272

X
Make sure that wiper blade ;is seated
correctly.
X Fold wiper arm :back onto the
windshield. Problems with the windshield wipers
You can find information about this in the
Digital Operator's Manual. Windshield wipers
89Lights and windshield wipers Z
Page 99 of 272

Make sure that all objects in the vehicle are
stowed correctly, and that they cannot enter
the driver's footwell. Install the floormats
securely and as specified in order to ensure
sufficient clearance for the pedals. Do not use
loose floormats. G
WARNING
Unsuitable footwear can hinder correct usage
of the pedals, e.g.:
R shoes with thick soles
R shoes with high heels
R slippers
There is a risk of an accident.
Wear suitable footwear to ensure correct
usage of the pedals. G
WARNING
If you switch off the ignition while driving,
safety-relevant functions are only available
with limitations, or not at all. This could affect,
for example, the power steering and the brake
boosting effect. You will require considerably
more effort to steer and brake. There is a risk
of an accident.
Do not switch off the ignition while driving. G
WARNING
If the parking brake has not been fully
released when driving, the parking brake can:
R overheat and cause a fire
R lose its hold function.
There is a risk of fire and an accident. Release
the parking brake fully before driving off.
! Warm up the engine quickly. Do not use
the engine's full performance until it has
reached operating temperature.
Only shift the automatic transmission to
the desired drive position when the vehicle
is stationary.
Where possible, avoid spinning the drive
wheels when pulling away on slippery
roads. You could otherwise damage the
drive train. !
Avoid high engine speeds when the
engine is cold. The engine's service life
could otherwise be significantly shortened.
Do not use the engine's full performance
until it has reached operating temperature.
! AMG vehicles: at low engine oil
temperatures below 68 ‡ (+20 †), the
maximum engine speed is restricted in
order to protect the engine. To protect the
engine and maintain smooth engine
operation, avoid driving at full throttle when
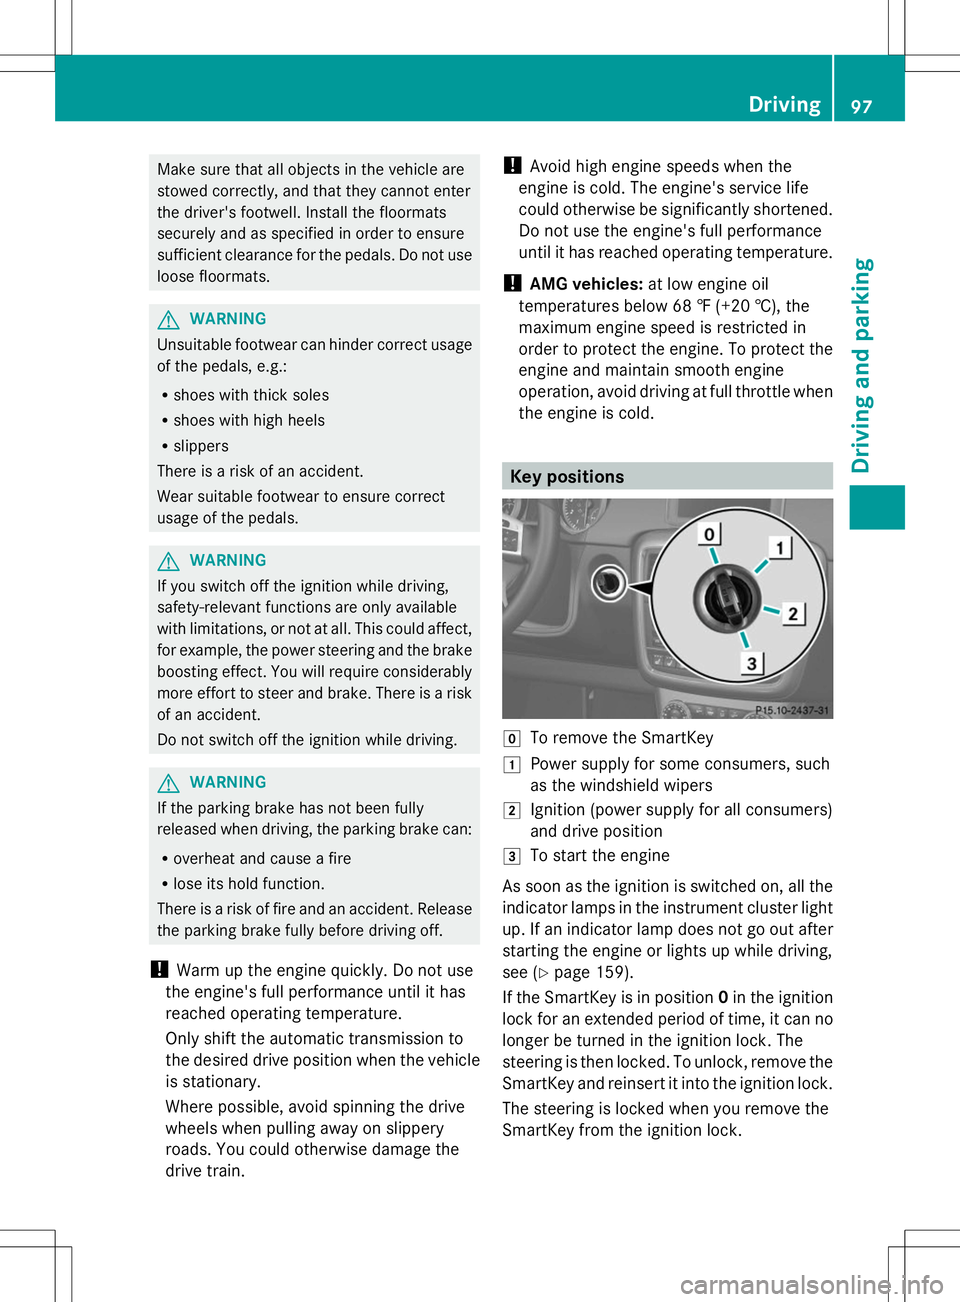
the engine is cold. Key positions
g
To remove the SmartKey
1 Power supply for some consumers, such
as the windshield wipers
2 Ignition (power supply for all consumers)
and drive position
3 To start the engine
As soon as the ignition is switched on, all the
indicator lamps in the instrument cluster light
up. If an indicator lamp does not go out after
starting the engine or lights up while driving,
see (Y page 159).
If the SmartKey is in position 0in the ignition
lock for an extended period of time, it can no
longer be turned in the ignition lock. The
steering is then locked. To unlock, remove the
SmartKey and reinsert it into the ignition lock.
The steering is locked when you remove the
SmartKey from the ignition lock. Driving
97Driving and parking Z
Page 110 of 272

Off-road driving
Important safety notes G
WARNING
Do not load items on the basic carrier bars. It
may cause instability during some maneuvers
which could result in an accident.
Drive slowly in unknown terrain. This will
make it easier to recognize unexpected
obstacles and avoid damage to the vehicle.
To help avoid the vehicle rolling over, never
turn it around on steep inclines. If the vehicle
cannot complete the attempted climb, back it
down in reverse gear.
Do not drive along the side of a slope. The
vehicle might otherwise rollover. If in doing so
the vehicle begins to show a tendency to roll,
immediately steer into a line of gravity
(straight up or downhill).
Never let the vehicle roll backwards in idle.
You may lose control of the vehicle if you use
only the service brake. For information on
driving downhill, see "Driving downhill".
When driving off-road, sand, mud and water,
possibly mixed with oil, for example, could get
into the brakes. This could result in a reduced
braking effect or in total brake failure and also
in increased wear and tear. The braking
characteristics change depending on the
material ingressing the brakes. Clean the
brakes after driving off-road. If you detect a
reduced braking effect or grinding noises,
have the brake system checked in a qualified
specialist workshop as soon as possible.
Adapt your driving style to the different
braking characteristics.
Driving off-road increases the likelihood of
damage to the vehicle, which, in turn, can lead
to failure of the mechanical assembly or
systems. Adapt your driving style to suit the
terrain conditions. Drive carefully. Have
damage to the vehicle rectified immediately
at a qualified specialist workshop. Checklist before driving off-road !
If the engine oil warning lamp lights up
while the vehicle is in motion, stop the
vehicle in a safe place as soon as possible.
Check the engine oil level. The engine oil
warning lamp warning must not be ignored.
Continuing the journey while the symbol is
displayed could lead to engine damage.
X Engine oil level: check the engine oil level
and add oil if necessary.
Only then does the engine receive enough
oil when the vehicle is standing on a steep
incline.
X Tire-changing tool kit: check that the jack
is working and make sure you have the lug
wrench, a robust tow cable and a folding
spade in the vehicle.
X Wheels and tires: check the tire tread
depth and tire pressure.
X Check for damage and remove any foreign
objects, e.g. small stones, from the
wheels/tires.
X Replace any missing valve caps.
X Replace dented or damaged wheels.
X Carry a sound spare wheel.
Checklist after driving off-road Driving over rough terrain places greater
demands on your vehicle than driving on
normal roads. After driving off-road, check
the vehicle. This allows you to detect damage
promptly and reduce the risk of an accident
to yourself and other road users.
X Shift the transfer case to HIGH
RANGE(Y page 130).
X Disengage the differential locks
(Y page 134).
X Clean the headlamps and rear lights and
check for damage.
X Clean the front and rear license plates.
X Clean the wheels and tires with a water jet
and remove any foreign objects. 108
Driving tipsDriving and parking
Page 114 of 272

Deactivating cruise control
There are several ways to deactivate cruise
control:
X Briefly press the cruise control lever
forwards B.
or
X Brake.
or
X Briefly press the cruise control lever in the
direction of arrow A.
Variable SPEEDTRONIC is selected. LIM
indicator lamp ;in the cruise control lever
lights up.
Cruise control is automatically deactivated if:
R you apply the parking brake
R you are driving at less than 20 mph
(30 km/h)
R ESP ®
intervenes or you deactivate ESP ®
R you shift the transmission to position N
while driving
i The last speed stored is cleared when you
switch off the engine. SPEEDTRONIC
Important safety notes G
WARNING
If you rest your foot on the brake pedal while
driving, the braking system can overheat. This
increases the stopping distance and can even
cause the braking system to fail. There is a
risk of an accident.
Never use the brake pedal as a footrest. Never
depress the brake pedal and the accelerator
pedal at the same time.
! Depressing the brake pedal constantly
results in excessive and premature wear to
the brake pads.
If you fail to adapt your driving style,
SPEEDTRONIC can neither reduce the risk of
accident nor override the laws of physics. SPEEDTRONIC cannot take account of road,
weather and traffic conditions.
SPEEDTRONIC is only an aid. You are
responsible for the distance to the vehicle in
front, for vehicle speed, for braking in good
time and for staying in lane. Only engage
SPEEDTRONIC when the current road,
weather and traffic conditions permit it to be
done safely. Drive carefully and maintain a
suitable distance to the vehicle in front.
General notes
SPEEDTRONIC brakes automatically so that
you do not exceed the set speed. On long and
steep downhill gradients, especially if the
vehicle is laden or towing a trailer, you must
select shift range
1,2or 3in good time. By
doing so, you will make use of the braking
effect of the engine, which relieves the load
on the brake system and prevents the brakes
from overheating and wearing too quickly. If
you need additional braking, depress the
brake pedal repeatedly rather than
continuously.
i The speed indicated in the speedometer
may differ slightly from the limit speed
stored.
Cruise control lever :
To store the current speed or a higher
speed
; LIM indicator lamp
= To call up the last speed stored
? To store the current speed or a lower
speed 112
Driving syste
msDriving and parking
Page 115 of 272

A
To switch between cruise control and
variable SPEEDTRONIC
B To deactivate variable SPEEDTRONIC
You can operate cruise control and variable
SPEEDTRONIC with the cruise control lever.
The LIM indicator lamp on the cruise control
lever indicates which system you have
selected:
R LIM indicator lamp off: cruise control is
selected.
R LIM indicator lamp on: variable
SPEEDTRONIC is selected.
You can use the cruise control lever to limit
the speed to any speed above 30 km/hw hile
the engine is running.
Selecting variable SPEEDTRONIC If you fail to adapt your driving style,
SPEEDTRONIC can neither reduce the risk of
accident nor override the laws of physics.
SPEEDTRONIC cannot take account of road,
weather and traffic conditions.
SPEEDTRONIC is only an aid. You are
responsible for the distance to the vehicle in
front, for vehicle speed, for braking in good
time and for staying in lane. Only engage
SPEEDTRONIC when the current road,
weather and traffic conditions permit it to be
done safely. Drive carefully and maintain a
suitable distance to the vehicle in front.
X Check whether LIM indicator lamp ;is on.
If it is on, variable SPEEDTRONIC is already
selected.
If it is not, press the cruise control lever in
the direction of arrow A.
LIM indicator lamp ;in the cruise control
lever lights up. Variable SPEEDTRONIC is
selected.
Storing the current speed You can use the cruise control lever to limit
the speed to any speed above 18 mph while
the engine is running. X
Briefly press the cruise control lever
up : or down ?.
The current speed is stored and shown in
the multifunction display.
i On downhill gradients, the speed can be
exceeded despite variable SPEEDTRONIC.
In this case, you will hear a warning tone
and the Limit Exceeded Limit Exceeded message will
appear in the multifunction display. If
necessary, apply the brakes yourself.
Calling up the last speed stored Calling up the last speed stored
If you fail to adapt your driving style,
SPEEDTRONIC can neither reduce the risk of
accident nor override the laws of physics.
SPEEDTRONIC cannot take account of road,
weather and traffic conditions.
SPEEDTRONIC is only an aid. You are
responsible for the distance to the vehicle in
front, for vehicle speed, for braking in good
time and for staying in your lane. Only engage
SPEEDTRONIC when the current road,
weather and traffic conditions permit it to be
done safely. Drive carefully and maintain a
suitable distance to the vehicle in front.
X
Briefly pull the cruise control lever towards
you =.
i If you call up the stored speed and your
current speed is higher, you will hear a
warning tone. The Limit Exceeded Limit Exceeded
message appears in the multifunction
display.
i If no speed is stored, variable
SPEEDTRONIC stores the current speed
and maintains it. Driving systems
113Driving and parking Z