2014 MERCEDES-BENZ E-SEDAN belt
[x] Cancel search: beltPage 278 of 430

Display messages Possible causes/consequences and
M
MSolutions Blind Spot Assist
Blind Spot Assist
Currently Currently
Unavailable See Unavailable See
Operator's Operator's
Manual Manual
orActiveActive
Blind Spot Assist
Blind Spot Assist
Currently Currently
Unavailable See Unavailable See
Operator's Manual Operator's Manual Blind Spot Assist or Active Blind Spot Assist is temporarily
inoperative. Possible causes are:
R
the sensors are dirty.
R function is impaired due to heavy rain or snow.
R the radar sensor system is outside the operating temperature
range.
R the radar sensor system is temporarily inoperative, e.g. due to
electromagnetic radiation emitted by nearby TV or radio
stations or other sources of electromagnetic radiation.
The yellow 9indicator lamps also light up in the exterior
mirrors.
When the causes stated above no longer apply, the display
message disappears.
Blind Spot Assist or Active Blind Spot Assist is operational again.
If the display message does not disappear:
X Pull over and stop the vehicle safely as soon as possible, paying
attention to road and traffic conditions.
X Secure the vehicle against rolling away ( Ypage 182).
X Clean the sensors (Y page 346).
X Restart the engine. Blind Spot Assist Blind Spot Assist
Inoperative Inoperative
orActivActiv
e Blind Spot
e Blind Spot
Assist Inoperative Assist Inoperative Blind Spot Assist or Active Blind Spot Assist is defective.
The yellow
9indicator lamps also light up in the exterior
mirrors.
X Visit a qualified specialist workshop. Park Assist Park Assist
Canceled Canceled The driver's door is open and the driver's seat belt has not been
fastened.
X
Repeat the parking process with the seat belt fastened and the
driver's door closed. You have inadvertently touched the multifunction steering wheel
while steering intervention was active.
X
While steering intervention is active, make sure that the
multifunction steering wheel is not touched unintentionally. The vehicle has started to skid and ESP
®
has intervened.
X Use Active Parking Assist again later (Y page 212).276
Display
messagesOn-board computer and displays
ProCarManuals.com
Page 287 of 430
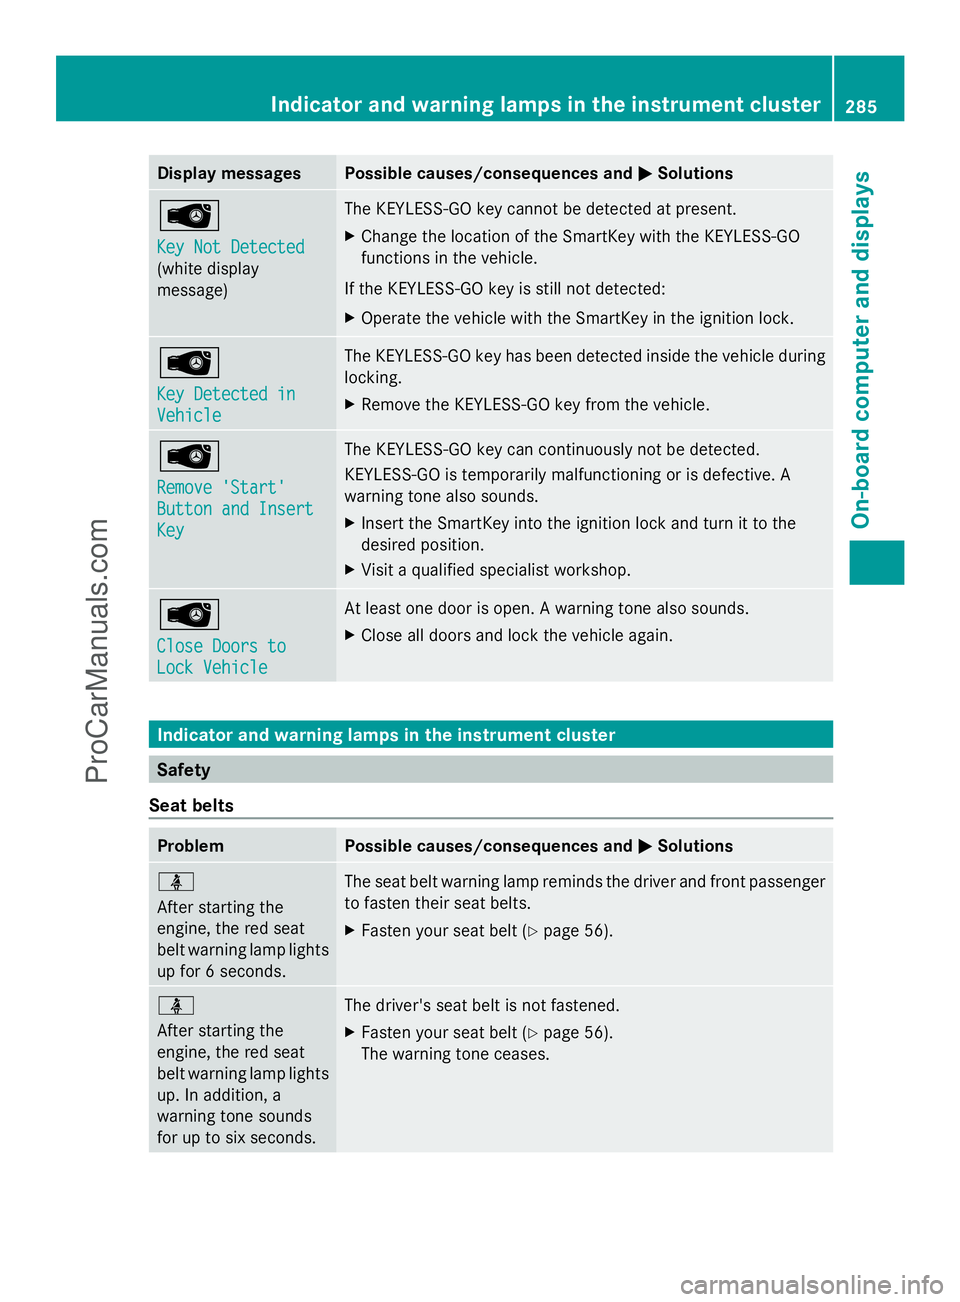
Display messages Possible causes/consequences and
M
MSolutions Â
Key Not Detected Key Not Detected
(white display
message) The KEYLESS-GO key cannot be detected at present.
X
Change the location of the SmartKey with the KEYLESS-GO
functions in the vehicle.
If the KEYLESS-GO key is still not detected:
X Operate the vehicle with the SmartKey in the ignition lock. Â
Key Detected in Key Detected in
Vehicle Vehicle The KEYLESS-GO key has been detected inside the vehicle during
locking.
X
Remove the KEYLESS-GO key from the vehicle. Â
Remove 'Start' Remove 'Start'
Button and Insert Button and Insert
Key Key The KEYLESS-GO key can continuously not be detected.
KEYLESS-GO is temporarily malfunctioning or is defective. A
warning tone also sounds.
X
Insert the SmartKey into the ignition lock and turn it to the
desired position.
X Visit a qualified specialist workshop. Â
Close Doors to Close Doors to
Lock Vehicle Lock Vehicle At least one door is open. A warning tone also sounds.
X
Close all doors and lock the vehicle again. Indicator and warning lamps in the instrument cluster
Safety
Seat belts Problem Possible causes/consequences and
M MSolutions ü
After starting the
engine, the red seat
belt warning lamp lights
up for 6 seconds.
The seat belt warning lamp reminds the driver and front passenger
to fasten their seat belts.
X
Fasten your seat belt (Y page 56).ü
After starting the
engine, the red seat
belt warning lamp lights
up. In addition, a
warning tone sounds
for up to six seconds.
The driver's seat belt is not fastened.
X
Fasten your seat belt (Y page 56).
The warning tone ceases. Indicator and warning lamps in the inst
rumentcluster
285On-board computer and displays Z
ProCarManuals.com
Page 288 of 430
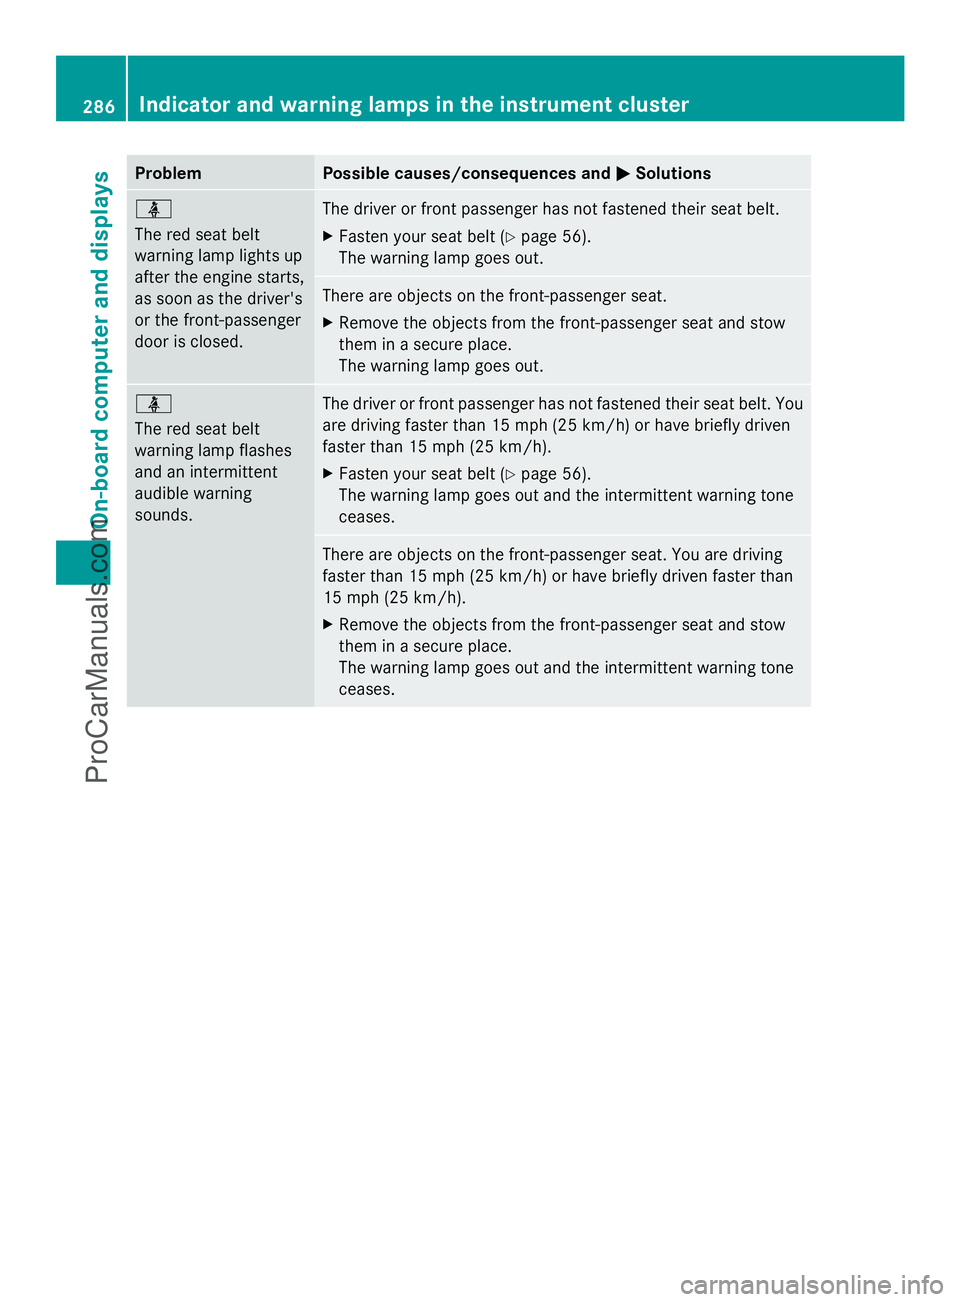
Problem Possible causes/consequences and
M
MSolutions ü
The red seat belt
warning lamp lights up
after the engine starts,
as soon as the driver's
or the front-passenger
door is closed.
The driver or front passenger has not fastened their seat belt.
X
Fasten your seat belt (Y page 56).
The warning lamp goes out. There are objects on the front-passenger seat.
X
Remove the objects from the front-passenger seat and stow
them in a secure place.
The warning lamp goes out. ü
The red seat belt
warning lamp flashes
and an intermittent
audible warning
sounds.
The driver or front passenger has not fastened their seat belt. You
are driving faster than 15 mph (25 km/h) or have briefly driven
faster than 15 mph (25 km/h).
X
Fasten your seat belt (Y page 56).
The warning lamp goes out and the intermittent warning tone
ceases. There are objects on the front-passenger seat. You are driving
faster than 15 mph (25 km/h) or have briefly driven faster than
15 mph (25 km/h).
X
Remove the objects from the front-passenger seat and stow
them in a secure place.
The warning lamp goes out and the intermittent warning tone
ceases. 286
Indicator and warning lamps in the instrument clusterOn-board computer and displays
ProCarManuals.com
Page 305 of 430
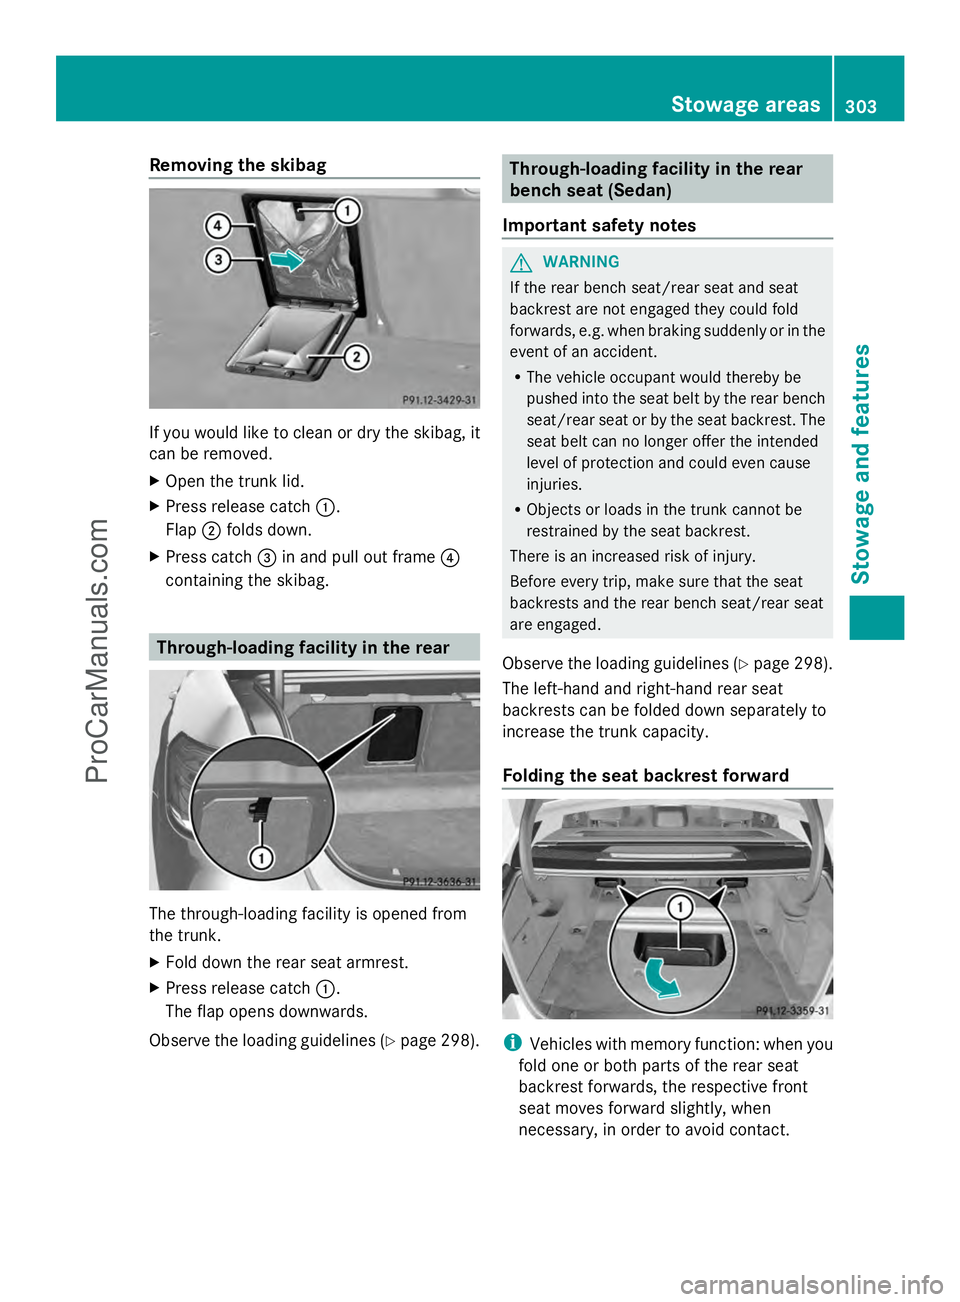
Removing the skibag
If you would like to clean or dry the skibag, it
can be removed.
X Open the trunk lid.
X Press release catch :.
Flap ;folds down.
X Press catch =in and pull out frame ?
containing the skibag. Through-loading facility in the rear
The through-loading facility is opened from
the trunk.
X Fold down the rear seat armrest.
X Press release catch :.
The flap opens downwards.
Observe the loading guidelines (Y page 298). Through-loading facility in the rear
bench seat (Sedan)
Important safety notes G
WARNING
If the rear bench seat/rear seat and seat
backrest are not engaged they could fold
forwards, e.g. when braking suddenly or in the
event of an accident.
R The vehicle occupant would thereby be
pushed into the seat belt by the rear bench
seat/rear seat or by the seat backrest. The
seat belt can no longer offer the intended
level of protection and could even cause
injuries.
R Objects or loads in the trunk cannot be
restrained by the seat backrest.
There is an increased risk of injury.
Before every trip, make sure that the seat
backrests and the rear bench seat/rear seat
are engaged.
Observe the loading guidelines (Y page 298).
The left-hand and right-hand rear seat
backrests can be folded down separately to
increase the trunk capacity.
Folding the seat backrest forward i
Vehicles with memory function: when you
fold one or both parts of the rear seat
backrest forwards, the respective front
seat moves forward slightly, when
necessary, in order to avoid contact. Stowage areas
303Stowage and features Z
ProCarManuals.com
Page 306 of 430
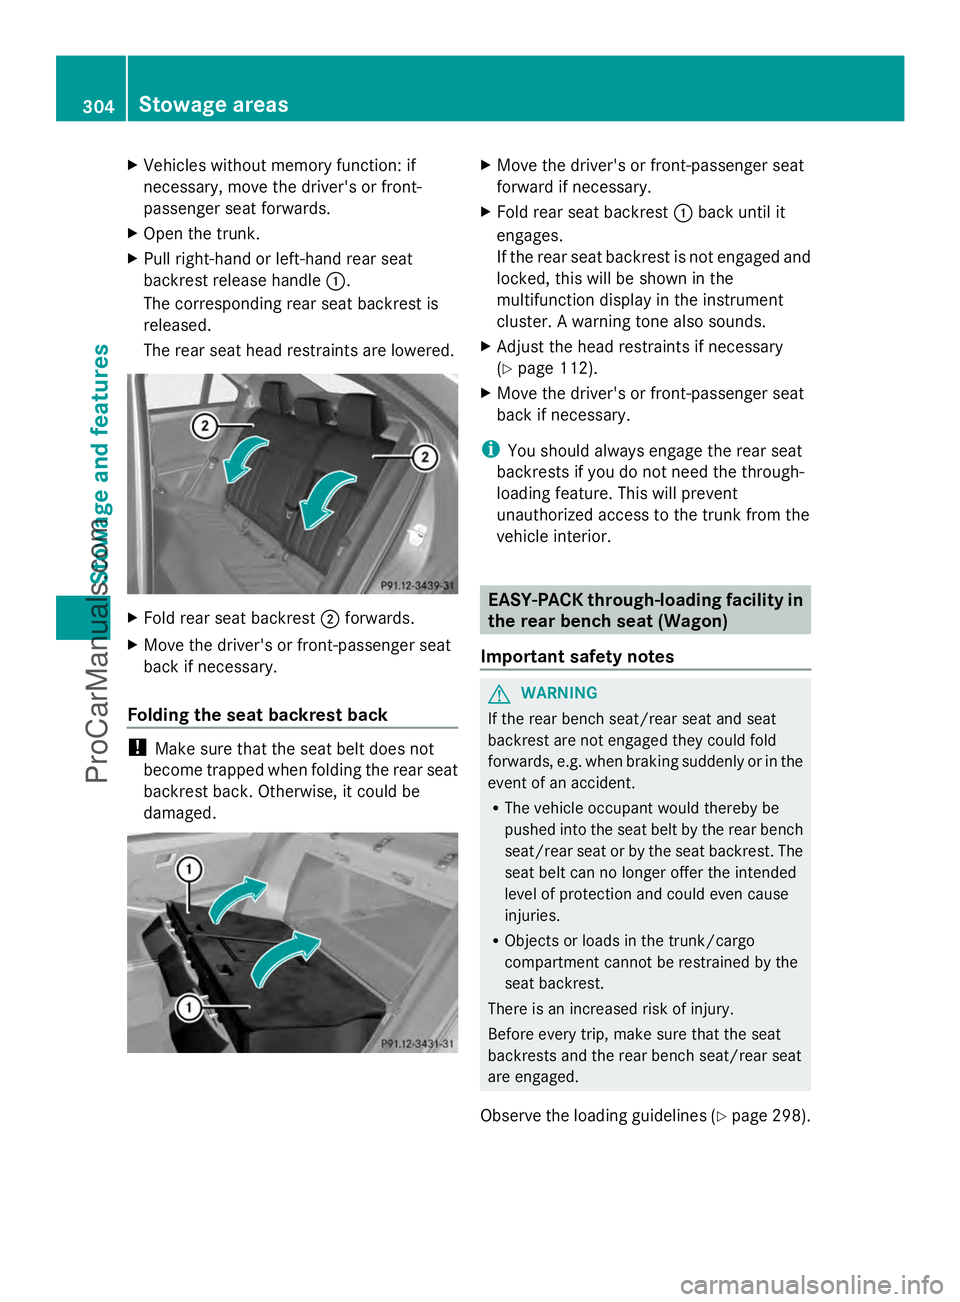
X
Vehicles without memory function: if
necessary, move the driver's or front-
passenger seat forwards.
X Open the trunk.
X Pull right-hand or left-hand rear seat
backrest release handle :.
The corresponding rear seat backrest is
released.
The rear seat head restraints are lowered. X
Fold rear seat backrest ;forwards.
X Move the driver's or front-passenger seat
back if necessary.
Folding the seat backrest back !
Make sure that the seat belt does not
become trapped when folding the rear seat
backrest back. Otherwise, it could be
damaged. X
Move the driver's or front-passenger seat
forward if necessary.
X Fold rear seat backrest :back until it
engages.
If the rear seat backrest is not engaged and
locked, this will be shown in the
multifunction display in the instrument
cluster. A warning tone also sounds.
X Adjust the head restraints if necessary
(Y page 112).
X Move the driver's or front-passenger seat
back if necessary.
i You should always engage the rear seat
backrests if you do not need the through-
loading feature. This will prevent
unauthorized access to the trunk from the
vehicle interior. EASY-PACK through-loading facility in
the rear bench seat (Wagon)
Important safety notes G
WARNING
If the rear bench seat/rear seat and seat
backrest are not engaged they could fold
forwards, e.g. when braking suddenly or in the
event of an accident.
R The vehicle occupant would thereby be
pushed into the seat belt by the rear bench
seat/rear seat or by the seat backrest. The
seat belt can no longer offer the intended
level of protection and could even cause
injuries.
R Objects or loads in the trunk/cargo
compartment cannot be restrained by the
seat backrest.
There is an increased risk of injury.
Before every trip, make sure that the seat
backrests and the rear bench seat/rear seat
are engaged.
Observe the loading guidelines (Y page 298).304
Stowage areasStowage and features
ProCarManuals.com
Page 307 of 430
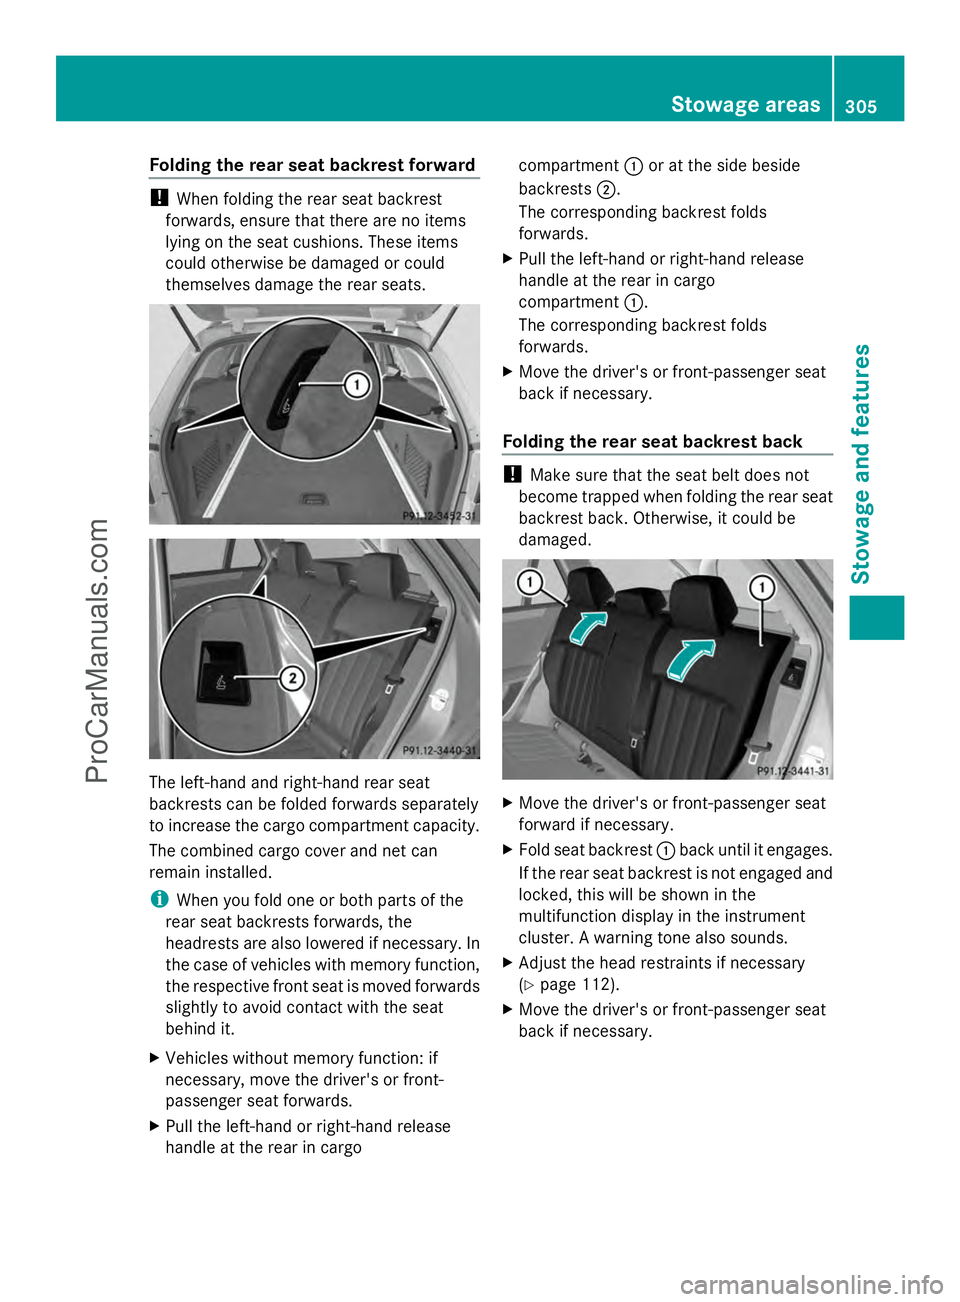
Folding the rear seat backrest forward
!
When folding the rear seat backrest
forwards, ensure that there are no items
lying on the seat cushions. These items
could otherwise be damaged or could
themselves damage the rear seats. The left-hand and right-hand rear seat
backrests can be folded forwards separately
to increase the cargo compartment capacity.
The combined cargo cover and net can
remain installed.
i When you fold one or both parts of the
rear seat backrests forwards, the
headrests are also lowered if necessary. In
the case of vehicles with memory function,
the respective front seat is moved forwards
slightly to avoid contact with the seat
behind it.
X Vehicles without memory function: if
necessary, move the driver's or front-
passenger seat forwards.
X Pull the left-hand or right-hand release
handle at the rear in cargo compartment
:or at the side beside
backrests ;.
The corresponding backrest folds
forwards.
X Pull the left-hand or right-hand release
handle at the rear in cargo
compartment :.
The corresponding backrest folds
forwards.
X Move the driver's or front-passenger seat
back if necessary.
Folding the rear seat backrest back !
Make sure that the seat belt does not
become trapped when folding the rear seat
backrest back. Otherwise, it could be
damaged. X
Move the driver's or front-passenger seat
forward if necessary.
X Fold seat backrest :back until it engages.
If the rear seat backrest is not engaged and
locked, this will be shown in the
multifunction display in the instrument
cluster. A warning tone also sounds.
X Adjust the head restraints if necessary
(Y page 112).
X Move the driver's or front-passenger seat
back if necessary. Stowage areas
305Stowage and featu res Z
ProCarManuals.com
Page 350 of 430
Cleaning genuine wood and trim
elements !
Do not use solvent-based cleaning agents
such as tar remover, wheel cleaners,
polishes or waxes. There is otherwise a risk
of damaging the surface.
! Do not use chrome polish on trim pieces.
The trim pieces have a chrome look but are
mostly made of anodized aluminum and
can lose their shine if chrome polish is
used. Use a damp, lint-free cloth instead
when cleaning the trim pieces.
If the chrome-plated trim pieces are very
dirty, you can use a chrome polish. If you
are unsure as to whether the trim pieces
are chrome-plated or not, consult an
authorized Mercedes-Benz Center.
X Wipe the wooden trim and trim pieces with
a damp, lint-free cloth, e.g. a microfiber
cloth.
X Heavy soiling: use car care and cleaning
products recommended and approved by
Mercedes-Benz.
Cleaning the seat covers General notes
!
Do not use microfiber cloths to clean
genuine leather, artificial leather or
Alcantara® covers. If used often, these can
damage the cover.
i Note that regular care is essential to
ensure that the appearance and comfort of
the covers is retained over time.
Genuine leather seat covers
Leather is a natural product.
It exhibits natural surface characteristics, for
example:
R Differences in the texture
R Signs of stretching and marking
R Slight nuances of color
These are characteristics of leather and not
material defects. !
To retain the natural appearance of the
leather, observe the following cleaning
instructions:
R Clean genuine leather covers carefully
with a damp cloth and then wipe the
covers down with a dry cloth.
R Make sure that the leather does not
become soaked. It may otherwise
become rough and cracked.
R Only use leather care agents that have
been tested and approved by Mercedes-
Benz. You can obtain these from a
qualified specialist workshop.
Seat covers of other materials
! Observe the following when cleaning:
R Clean artificial leather covers with a cloth
moistened with a solution containing
1% detergent (e.g. dish washing liquid).
R Clean cloth covers with a microfiber
cloth moistened with a solution
containing 1% detergent (e.g. dish
washing liquid). Rub carefully and always
wipe entire seat sections to avoid leaving
visible lines. Leave the seat to dry
afterwards. Cleaning results depend on
the type of dirt and how long it has been
there.
R Clean Alcantara® covers with a damp
cloth. Make sure that you wipe entire
seat sections to avoid leaving visible
lines.
Cleaning the seat belts G
WARNING
Seat belts can become severely weakened if
bleached or dyed. This could cause the seat
belts to tear or fail, for instance, in the event
of an accident. This poses an increased risk
of injury or fatal injury.
Never bleach or dye the seat belts.
! Do not clean the seat belts using chemical
cleaning agents. Do not dry the seat belts 348
CareMaintenance and care
ProCarManuals.com
Page 365 of 430
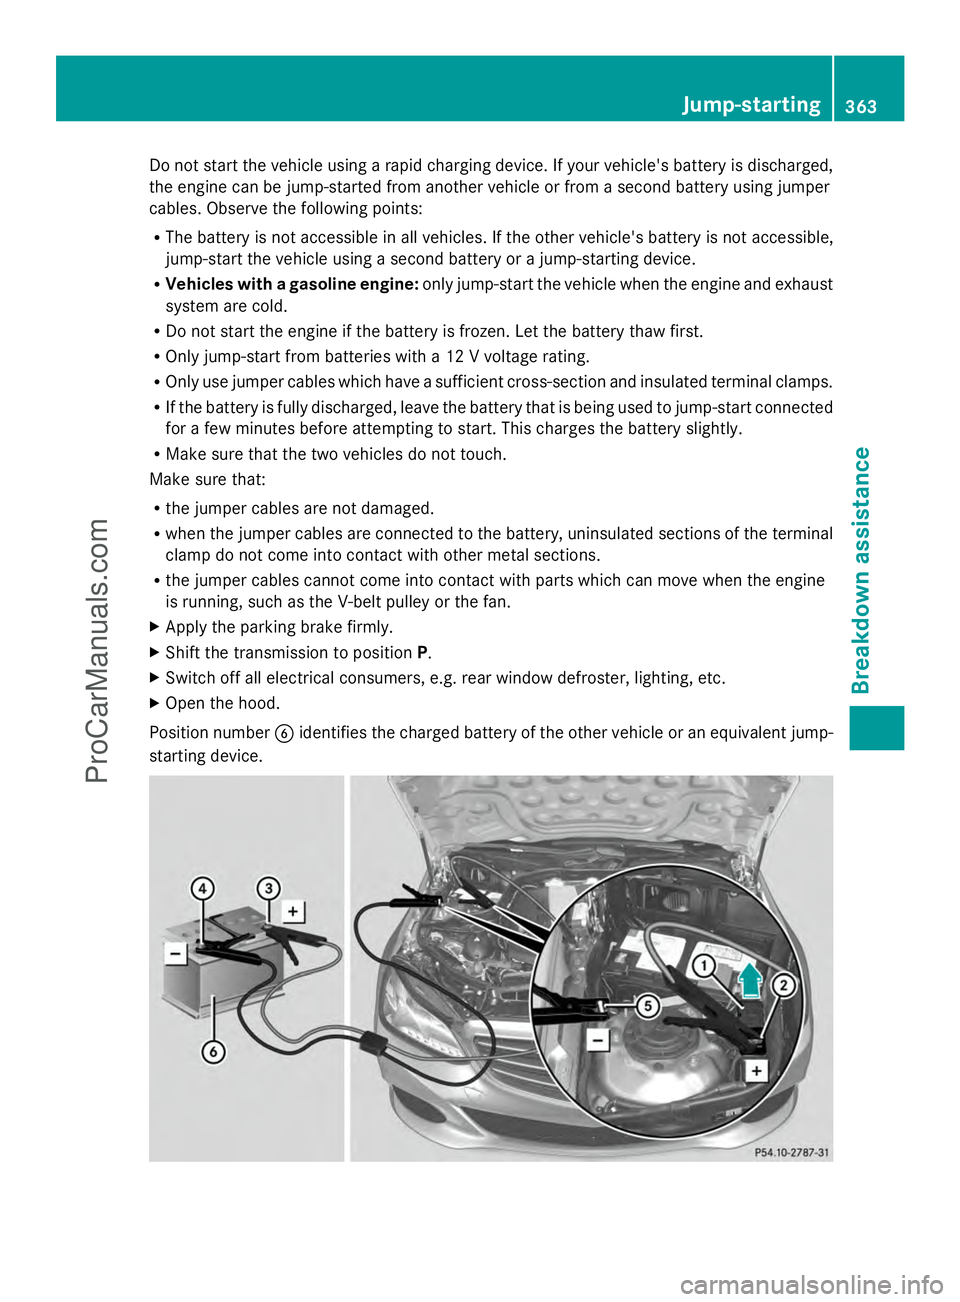
Do not start the vehicle using a rapid charging device. If your vehicle's battery is discharged,
the engine can be jump-started from another vehicle or from a second battery using jumper
cables. Observe the following points:
R The battery is not accessible in all vehicles. If the other vehicle's battery is not accessible,
jump-start the vehicle using a second battery or a jump-starting device.
R Vehicles with a gasoline engine: only jump-start the vehicle when the engine and exhaust
system are cold.
R Do not start the engine if the battery is frozen. Let the battery thaw first.
R Only jump-start from batteries with a 12 V voltage rating.
R Only use jumper cables which have a sufficient cross-section and insulated terminal clamps.
R If the battery is fully discharged, leave the battery that is being used to jump-start connected
for a few minutes before attempting to start. This charges the battery slightly.
R Make sure that the two vehicles do not touch.
Make sure that:
R the jumper cables are not damaged.
R when the jumper cables are connected to the battery, uninsulated sections of the terminal
clamp do not come into contact with other metal sections.
R the jumper cables cannot come into contact with parts which can move when the engine
is running, such as the V-belt pulley or the fan.
X Apply the parking brake firmly.
X Shift the transmission to position P.
X Switch off all electrical consumers, e.g. rear window defroster, lighting, etc.
X Open the hood.
Position number Bidentifies the charged battery of the other vehicle or an equivalent jump-
starting device. Jump-starting
363Breakdown assistance Z
ProCarManuals.com