2014 MERCEDES-BENZ E-SEDAN tailgate
[x] Cancel search: tailgatePage 100 of 430
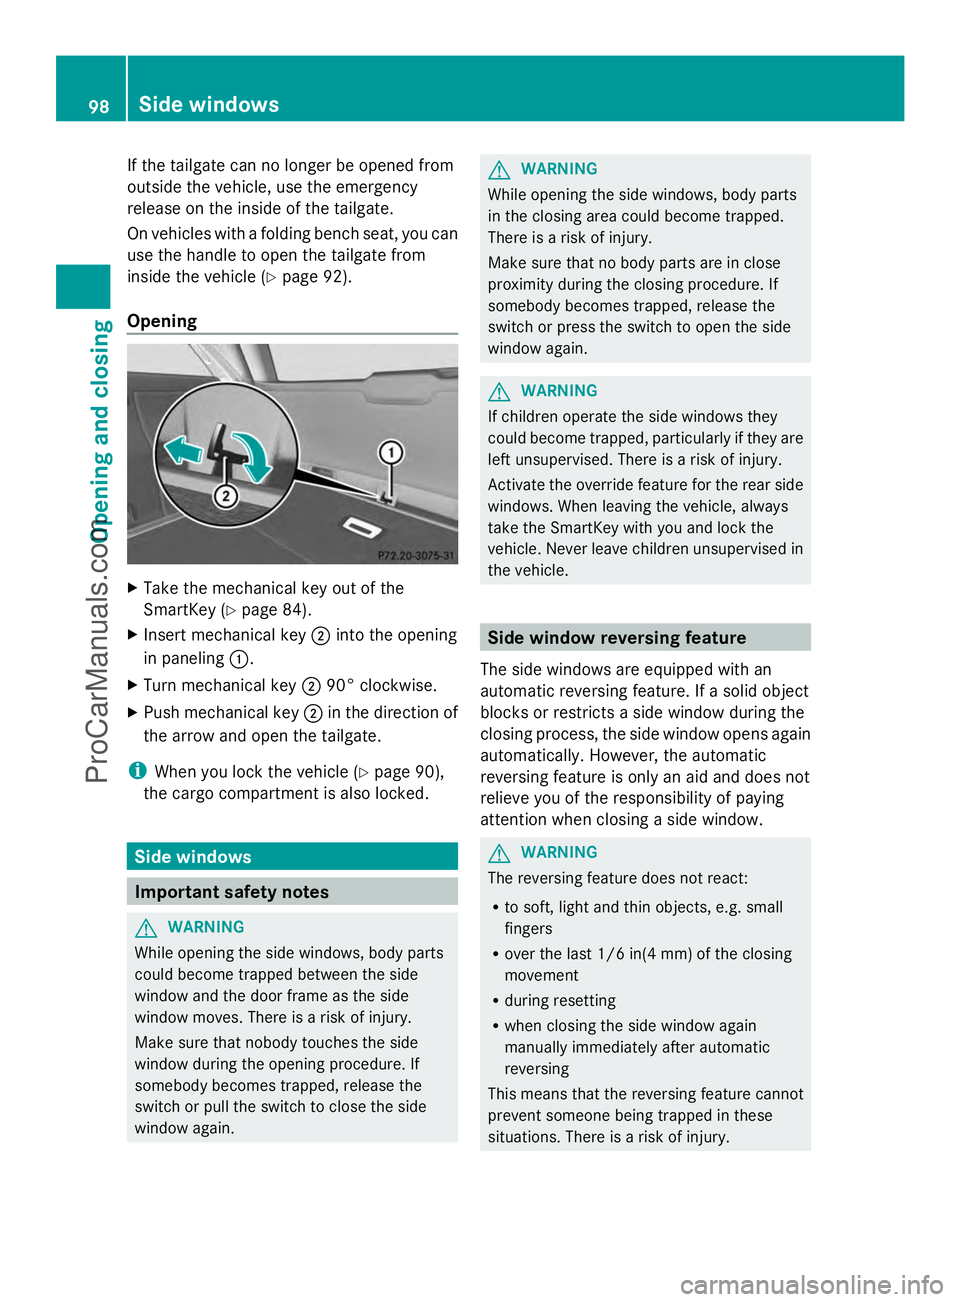
If the tailgate can no longer be opened from
outside the vehicle, use the emergency
release on the inside of the tailgate.
On vehicles with a folding bench seat, you can
use the handle to open the tailgate from
inside the vehicle (Y page 92).
Opening X
Take the mechanical key out of the
SmartKey (Y page 84).
X Insert mechanical key ;into the opening
in paneling :.
X Turn mechanical key ;90° clockwise.
X Push mechanical key ;in the direction of
the arrow and open the tailgate.
i When you lock the vehicle (Y page 90),
the cargo compartment is also locked. Side windows
Important safety notes
G
WARNING
While opening the side windows, body parts
could become trapped between the side
window and the door frame as the side
window moves. There is a risk of injury.
Make sure that nobody touches the side
window during the opening procedure. If
somebody becomes trapped, release the
switch or pull the switch to close the side
window again. G
WARNING
While opening the side windows, body parts
in the closing area could become trapped.
There is a risk of injury.
Make sure that no body parts are in close
proximity during the closing procedure. If
somebody becomes trapped, release the
switch or press the switch to open the side
window again. G
WARNING
If children operate the side windows they
could become trapped, particularly if they are
left unsupervised. There is a risk of injury.
Activate the override feature for the rear side
windows. When leaving the vehicle, always
take the SmartKey with you and lock the
vehicle. Never leave children unsupervised in
the vehicle. Side window reversing feature
The side windows are equipped with an
automatic reversing feature. If a solid object
blocks or restricts a side window during the
closing process, the side window opens again
automatically. However, the automatic
reversing feature is only an aid and does not
relieve you of the responsibility of paying
attention when closing a side window. G
WARNING
The reversing feature does not react:
R to soft, light and thin objects, e.g. small
fingers
R over the last 1/6 in(4 mm) of the closing
movement
R during resetting
R when closing the side window again
manually immediately after automatic
reversing
This means that the reversing feature cannot
prevent someone being trapped in these
situations. There is a risk of injury. 98
Side windowsOpening and closing
ProCarManuals.com
Page 141 of 430
3
Å Intermittent wipe, high (rain sensor
set to high sensitivity)
4 ° Continuous wipe, slow
5 ¯ Continuous wipe, fast
B í Single wipe/î To wipe the
windshield using washer fluid
X Switch on the ignition.
X Turn the combination switch to the
corresponding position.
In the ÄorÅ position, the appropriate
wiping frequency is set automatically
according to the intensity of the rain. In
the Å position, the rain sensor is more
sensitive than in the Äposition, causing
the windshield wipers to wipe more
frequently.
If the wiper blades are worn, the windshield
will no longer be wiped properly. This could
prevent you from observing the traffic
conditions. Replace the wiper blades twice a
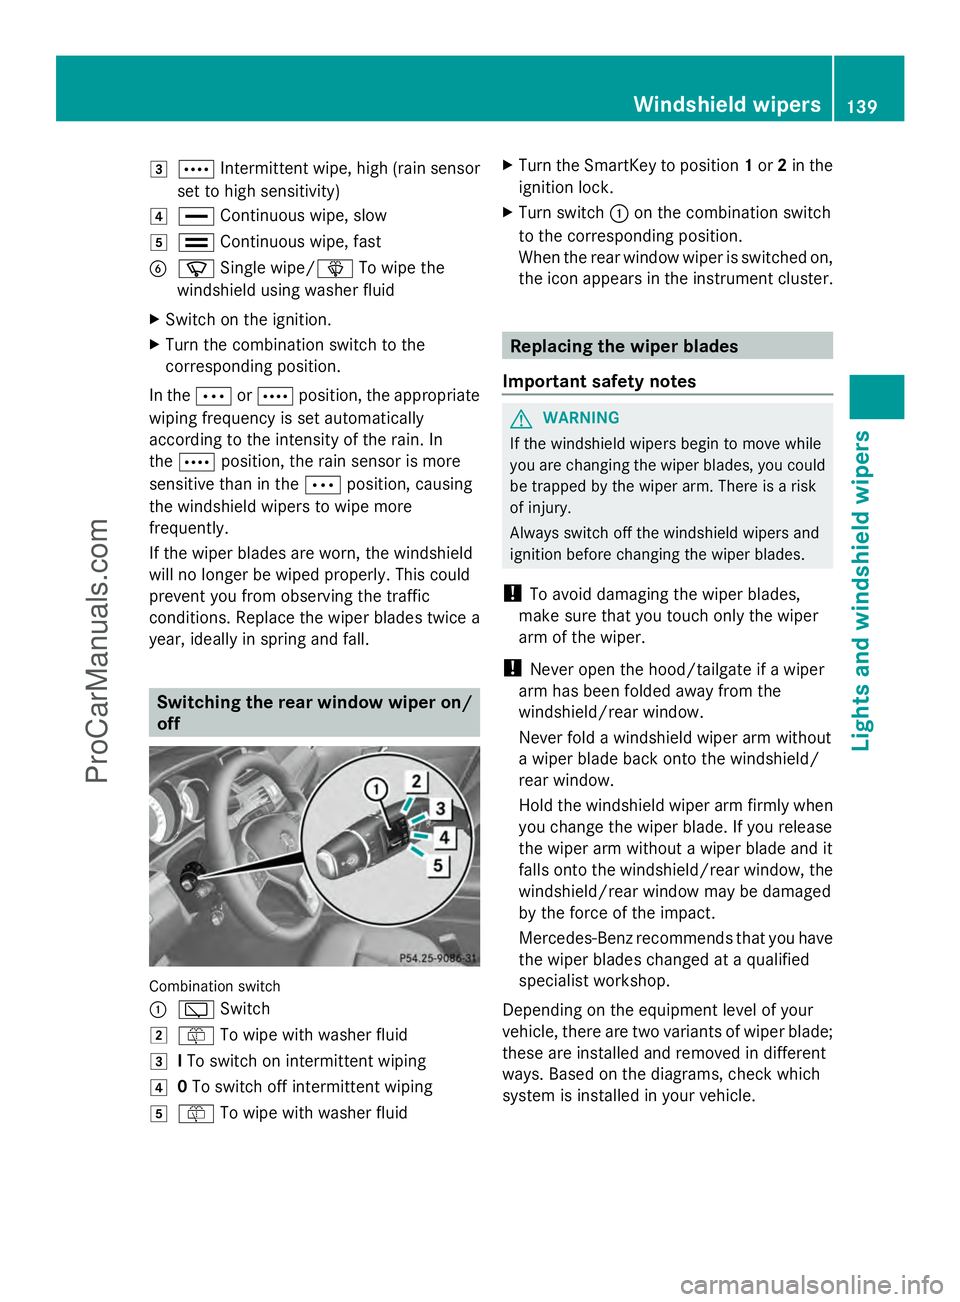
year, ideally in spring and fall. Switching the rear window wiper on/
off
Combination switch
:
è Switch
2 ô To wipe with washer fluid
3 ITo switch on intermittent wiping
4 0To switch off intermittent wiping
5 ô To wipe with washer fluid X
Turn the SmartKey to position 1or 2in the
ignition lock.
X Turn switch :on the combination switch
to the corresponding position.
When the rear window wiper is switched on,
the icon appears in the instrument cluster. Replacing the wiper blades
Important safety notes G
WARNING
If the windshield wipers begin to move while
you are changing the wiper blades, you could
be trapped by the wiper arm. There is a risk
of injury.
Always switch off the windshield wipers and
ignition before changing the wiper blades.
! To avoid damaging the wiper blades,
make sure that you touch only the wiper
arm of the wiper.
! Never open the hood/tailgate if a wiper
arm has been folded away from the
windshield/rear window.
Never fold a windshield wiper arm without
a wiper blade back onto the windshield/
rear window.
Hold the windshield wiper arm firmly when
you change the wiper blade. If you release
the wiper arm without a wiper blade and it
falls onto the windshield/rear window, the
windshield/rear window may be damaged
by the force of the impact.
Mercedes-Benz recommends that you have
the wiper blades changed at a qualified
specialist workshop.
Depending on the equipment level of your
vehicle, there are two variants of wiper blade;
these are installed and removed in different
ways. Based on the diagrams, check which
system is installed in your vehicle. Windshield wipers
139Lights and windshield wipers Z
ProCarManuals.com
Page 180 of 430
X
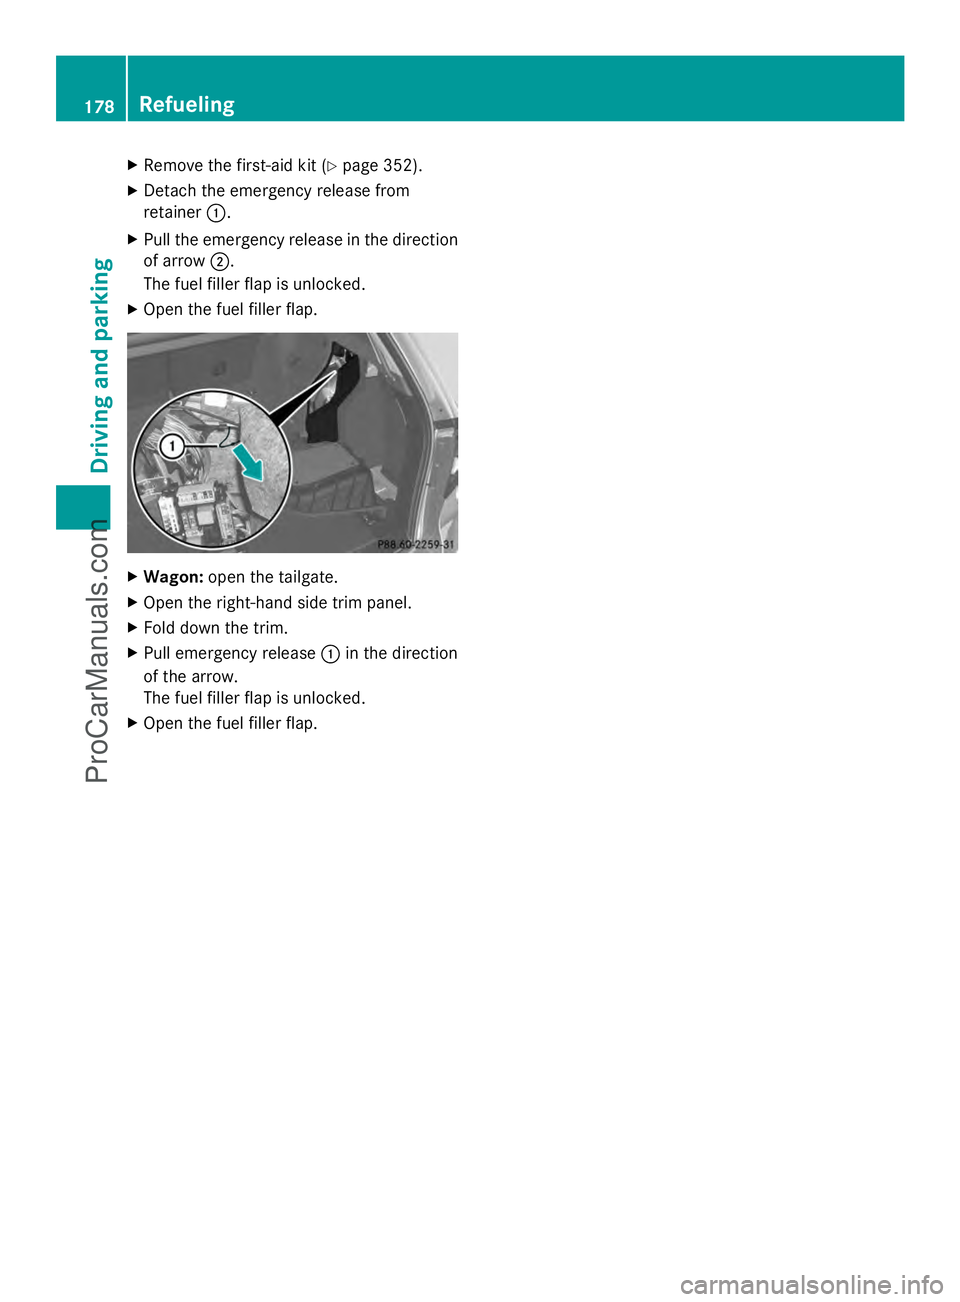
Remove the first-aid kit (Y page 352).
X Detach the emergency release from
retainer :.
X Pull the emergency release in the direction
of arrow ;.
The fuel filler flap is unlocked.
X Open the fuel filler flap. X
Wagon: open the tailgate.
X Open the right-hand side trim panel.
X Fold down the trim.
X Pull emergency release :in the direction
of the arrow.
The fuel filler flap is unlocked.
X Open the fuel filler flap. 178
RefuelingDriving and pa
rking
ProCarManuals.com
Page 181 of 430
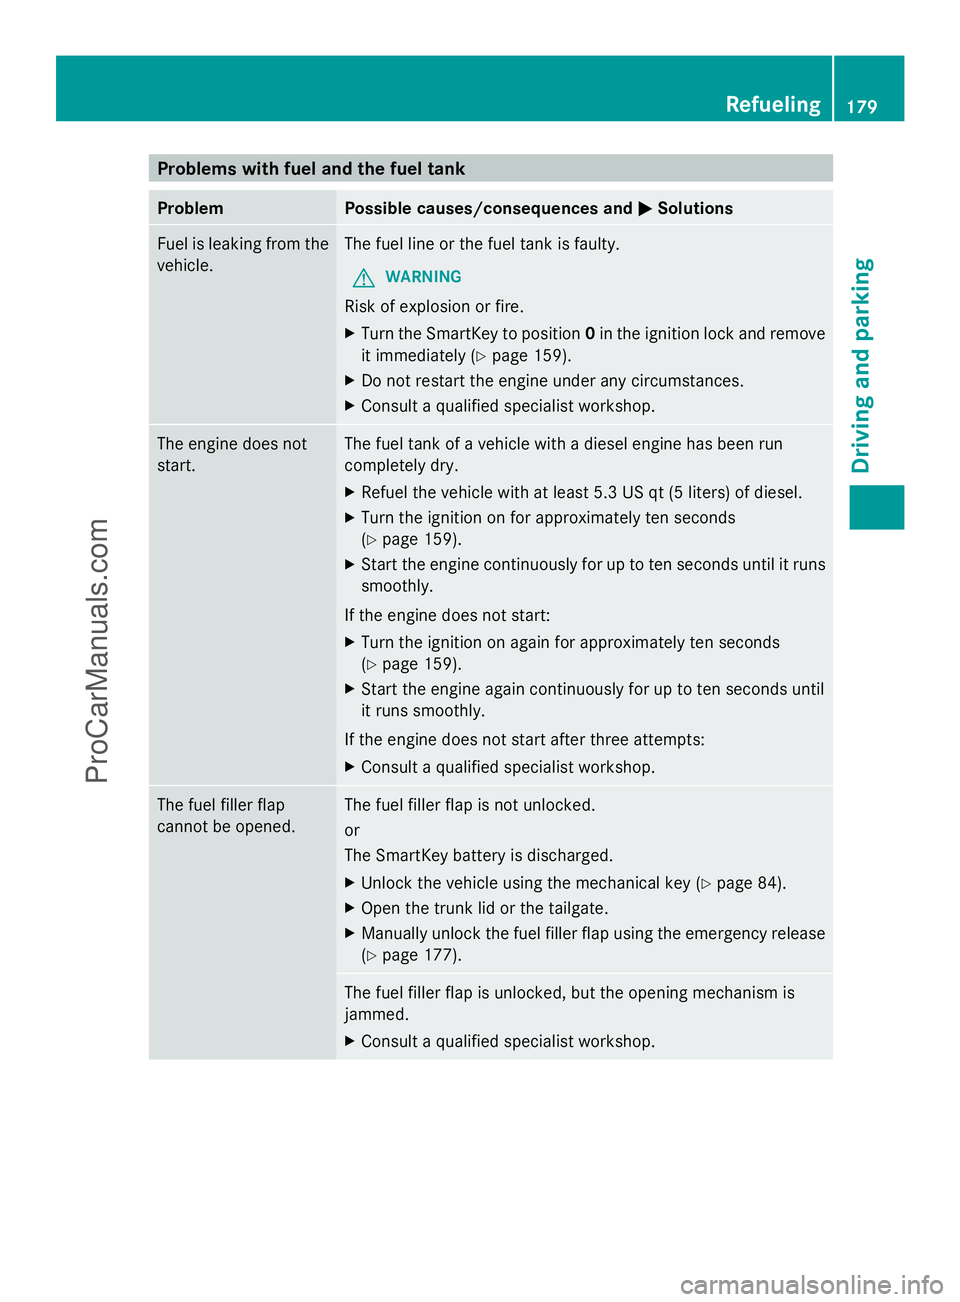
Problems with fuel and the fuel tank
Problem Possible causes/consequences and
M
MSolutions Fuel is leaking from the
vehicle. The fuel line or the fuel tank is faulty.
G WARNING
Risk of explosion or fire.
X Turn the SmartKey to position 0in the ignition lock and remove
it immediately (Y page 159).
X Do not restart the engine under any circumstances.
X Consult a qualified specialist workshop. The engine does not
start. The fuel tank of a vehicle with a diesel engine has been run
completely dry.
X
Refuel the vehicle with at least 5.3 US qt (5 liters) of diesel.
X Turn the ignition on for approximately ten seconds
(Y page 159).
X Start the engine continuously for up to ten seconds until it runs
smoothly.
If the engine does not start:
X Turn the ignition on again for approximately ten seconds
(Y page 159).
X Start the engine again continuously for up to ten seconds until
it runs smoothly.
If the engine does not start after three attempts:
X Consult a qualified specialist workshop. The fuel filler flap
cannot be opened. The fuel filler flap is not unlocked.
or
The SmartKey battery is discharged.
X
Unlock the vehicle using the mechanical key (Y page 84).
X Open the trunk lid or the tailgate.
X Manually unlock the fuel filler flap using the emergency release
(Y page 177). The fuel filler flap is unlocked, but the opening mechanism is
jammed.
X
Consult a qualified specialist workshop. Refueling
179Driving and parking Z
ProCarManuals.com
Page 210 of 430
lowers; with an increase in temperature,
the vehicle level rises.
Changing the rear axle ride height
This function is only available for the E 63
AMG 4MATIC.
The vehicle level at the rear axle depends on
the selected suspension tuning and the
vehicle speed.
The vehicle level at the rear axle changes
during the journey depending on the selected
suspension tuning:
R Comfort: +0.4 in (+10 mm)
R Sport + and Sport: -0.6 in (-15 mm)
When switching from Comfort to Sport or
Sport +, the rear axle lowers by approximately
1.0 in (25 mm). When switching from Sport
or Sport + to Comfort, the rear axle raises by
approximately 1.0 in (25 mm). This level
change also takes place when the vehicle is
stationary.
If you drive faster than 105 mph (170 km/h),
the rear axle ride height is set to a medium
level. This increases driving safety and
reduces air resistance. If you then drive at
speeds below 93 mph (150 km/h), the rear
axle ride height is readjusted to the selected
suspension tuning.
Load compensation
The vehicle can compensate differences in
the vehicle level by raising or lowering the
rear axle. This is the case, for example, if
people get out or if luggage is being loaded.
Load compensation takes place if:
R a door or the trunk lid/tailgate is opened
R the parked vehicle is unlocked
For larger level changes, the engine must be
running. 4MATIC (permanent four-wheel drive)
If you fail to adapt your driving style, 4MATIC
can neither reduce the risk of accident nor
override the laws of physics. 4MATIC cannot take account of road, weather and traffic
conditions. 4MATIC is only an aid. You are
responsible for the distance to the vehicle in
front, for vehicle speed, for braking in good
time and for staying in your lane.
If a drive wheel spins due to insufficient grip:
R
Only depress the accelerator pedal as far
as necessary when pulling away.
R Accelerate less when driving.
! Never tow the vehicle with one axle
raised. This may damage the transfer case.
Damage of this sort is not covered by the
Mercedes-Benz Limited Warranty. All
wheels must remain either on the ground
or be fully raised. Observe the instructions
for towing the vehicle with all wheels in full
contact with the ground.
i In wintry driving conditions, the maximum
effect of 4MATIC can only be achieved if
you use winter tires (M+S tires), with snow
chains if necessary.
4MATIC ensures that all four wheels are
permanently driven. Together with ESP ®
, it
improves the traction of your vehicle
whenever a drive wheel spins due to
insufficient grip. PARKTRONIC
Important safety notes PARKTRONIC is an electronic parking aid with
ultrasonic sensors. It indicates visually and
audibly the distance between your vehicle
and an object.
PARKTRONIC is only an aid. It is not a
replacement for your attention to your
immediate surroundings. You are always
responsible for safe maneuvering, parking
and exiting a parking space. When
maneuvering, parking or pulling out of a
parking space, make sure that there are no
persons, animals or objects in the area in
which you are maneuvering. 208
Driving systemsDriving and parking
ProCarManuals.com
Page 219 of 430
Rear view camera
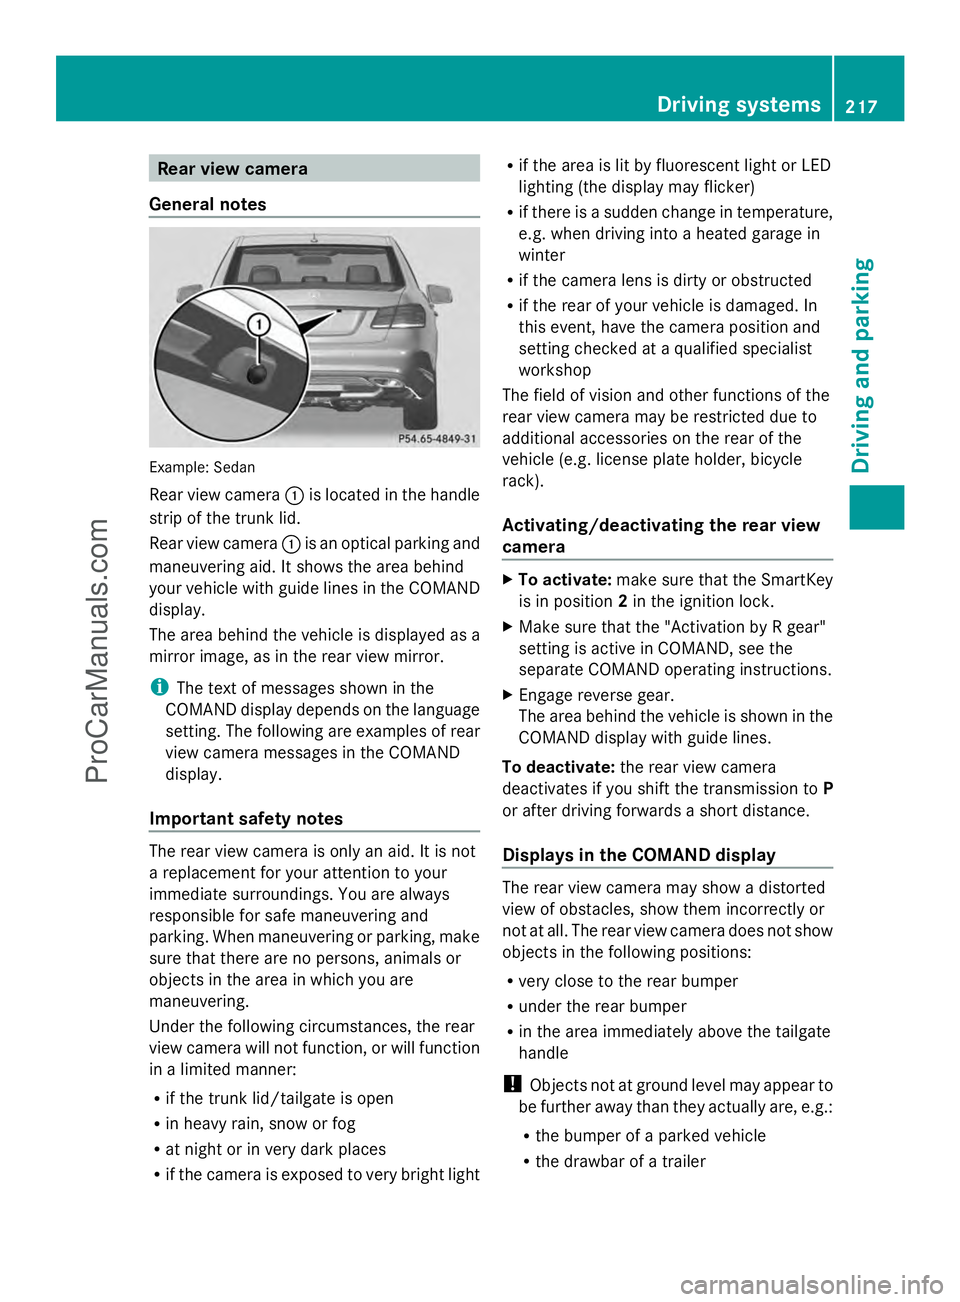
General notes Example: Sedan
Rear view camera
:is located in the handle
strip of the trunk lid.
Rear view camera :is an optical parking and
maneuvering aid. It shows the area behind
your vehicle with guide lines in the COMAND
display.
The area behind the vehicle is displayed as a
mirror image, as in the rear view mirror.
i The text of messages shown in the
COMAND display depends on the language
setting. The following are examples of rear
view camera messages in the COMAND
display.
Important safety notes The rear view camera is only an aid. It is not
a replacement for your attention to your
immediate surroundings. You are always
responsible for safe maneuvering and
parking. When maneuvering or parking, make
sure that there are no persons, animals or
objects in the area in which you are
maneuvering.
Under the following circumstances, the rear
view camera will not function, or will function
in a limited manner:
R if the trunk lid/tailgate is open
R in heavy rain, snow or fog
R at night or in very dark places
R if the camera is exposed to very bright light R
if the area is lit by fluorescent light or LED
lighting (the display may flicker)
R if there is a sudden change in temperature,
e.g. when driving into a heated garage in
winter
R if the camera lens is dirty or obstructed
R if the rear of your vehicle is damaged. In
this event, have the camera position and
setting checked at a qualified specialist
workshop
The field of vision and other functions of the
rear view camera may be restricted due to
additional accessories on the rear of the
vehicle (e.g. license plate holder, bicycle
rack).
Activating/deactivating the rear view
camera X
To activate: make sure that the SmartKey
is in position 2in the ignition lock.
X Make sure that the "Activation by R gear"
setting is active in COMAND, see the
separate COMAND operating instructions.
X Engage reverse gear.
The area behind the vehicle is shown in the
COMAND display with guide lines.
To deactivate: the rear view camera
deactivates if you shift the transmission to P
or after driving forwards a short distance.
Displays in the COMAND display The rear view camera may show a distorted
view of obstacles, show them incorrectly or
not at all. The rear view camera does not show
objects in the following positions:
R
very close to the rear bumper
R under the rear bumper
R in the area immediately above the tailgate
handle
! Objects not at ground level may appear to
be further away than they actually are, e.g.:
R the bumper of a parked vehicle
R the drawbar of a trailer Driving systems
217Driving and parking Z
ProCarManuals.com
Page 224 of 430
X
Make sure that the SmartKey is in position
2 in the ignition lock.
X Make sure that the Activation by R
Activation by R
gear
gear setting is active in COMAND, see the
separate COMAND operating instructions.
X To show the 360° camera image: engage
reverse gear.
The area behind the vehicle is shown in the
COMAND display in split-screen mode. You
see the top view of the vehicle and the
image from the rear view camera.
Selecting the split-screen and full
screen displays X
To switch between split screen views:
switch to the line with the vehicle icons by
sliding ZVthe COMAND controller.
X Turn cVd the COMAND controller and
select one of the vehicle symbols.
X To switch to full screen mode: select
Full Screen
Full Screen by turningcVdthe
COMAND controller and press Wto
confirm.
i The full screen option is only available in
the following views:
R Top view with picture from the rear view
camera
R Top view with picture from the front
camera
Displays in the COMAND display Important safety notes
The camera system may show a distorted
view of obstacles, show them incorrectly or
not at all. Obstacles are not shown by the
system in the following locations:
R under the front and rear bumpers
R very close to the front and rear bumpers
R in the area immediately above the tailgate
handle/trunk lid handle R
very close to the exterior mirrors
R in the transitional areas between the
various cameras in the virtual top view
! Objects not at ground level may appear to
be further away than they actually are, e.g.:
R the bumper of a parked vehicle
R the drawbar of a trailer
R the ball coupling of a trailer tow hitch
R the rear section of an HGV
R a slanted post
Use the guidelines only for orientation.
Approach objects no further than the
bottom-most guideline.
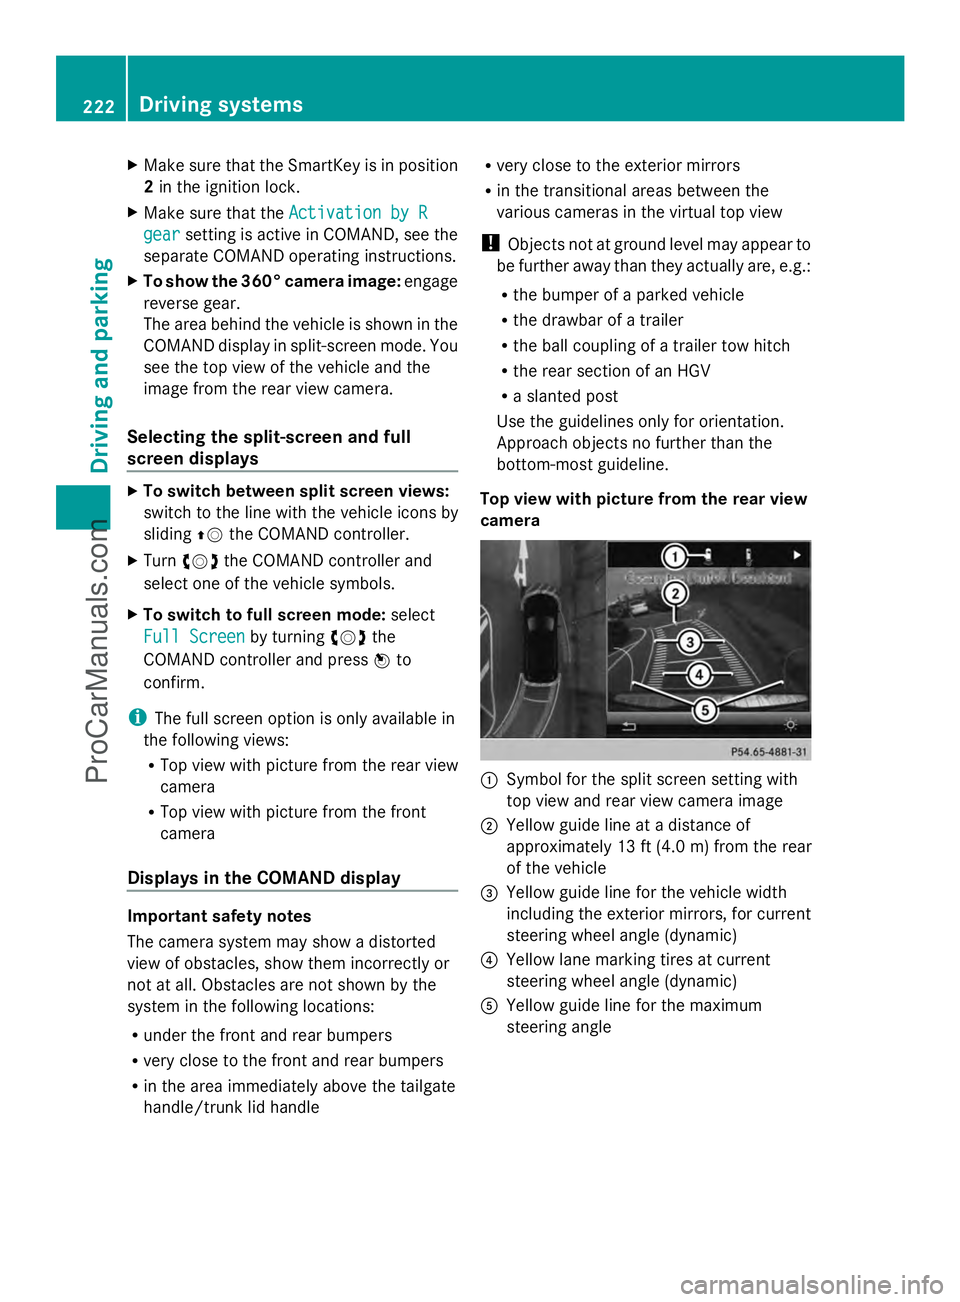
Top view with picture from the rear view
camera :
Symbol for the split screen setting with
top view and rear view camera image
; Yellow guide line at a distance of
approximately 13 ft (4.0 m) from the rear
of the vehicle
= Yellow guide line for the vehicle width
including the exterior mirrors, for current
steering wheel angle (dynamic)
? Yellow lane marking tires at current
steering wheel angle (dynamic)
A Yellow guide line for the maximum
steering angle 222
Driving systemsDriving and parking
ProCarManuals.com
Page 253 of 430
X
Press ato confirm.
X Press the :or9 button to set the
color to SOLAR
SOLAR ,NEUTRAL
NEUTRAL orPOLAR
POLAR .
X Press the aor% button to save the
setting.
Activating/deactivating surround
lighting and exterior lighting delayed
switch-off
X Press the =or; button on the
steering wheel to select the Sett.
Sett. menu.
X Press the :or9 button to select the
Lights
Lights submenu.
X Press ato confirm.
X Press :or9 to select the
Surround Lighting Surround Lighting function.
If the Surround Lighting
Surround Lighting function is
activated, the light cone and the area
around the vehicle are displayed in orange
in the multifunction display.
X Press the abutton to save the setting.
Deactivating delayed switch-off of the
exterior lighting temporarily:
X Before leaving the vehicle, turn the
SmartKey to position 0in the ignition lock.
X Turn the SmartKey to position 2in the
ignition lock.
The exterior lighting delayed switch-off is
deactivated.
Delayed switch-off of the exterior lighting is
reactivated the next time you start the
engine.
If you have activated the Surround
Surround
Lighting Lighting function and the light switch is set
to Ã, the following functions are activated
when it is dark:
R surround lighting: the exterior lighting
remains lit for 40 seconds after unlocking
with the SmartKey. If you start the engine,
the surround lighting is switched off and
automatic headlamp mode is activated
(Y page 129).
R exterior lighting delayed switch-off: the
exterior lighting remains lit for 60 seconds after the engine is switched off.
If you close all the doors and the trunk lid/
tailgate, the exterior lighting goes off after
5 seconds.
i Depending on your vehicle's equipment,
when the surround lighting and delayed
switch-off exterior lighting are on, the
following light up:
R Parking lamps
R Low-beam headlamps
R Daytime running lamps
R Side marker lamps
R Surround lighting in the exterior mirrors
Activating/deactivating the interior
lighting delayed switch-off
If you activate the Light. Delay
Light. Delay function,
the interior lighting remains on for
20 seconds after you remove the key from the
ignition lock.
X Press the =or; button on the
steering wheel to select the Sett.
Sett. menu.
X Press the :or9 button to select the
Lights Lights submenu.
X Press ato confirm.
X Press the :or9 button to select the
Light. Delay
Light. Delay function.
If the Light. Delay
Light. Delay function has been
switched on, the vehicle interior is
displayed in orange in the multifunction
display.
X Press the abutton to save the setting.
Vehicle Activating/deactivating the automatic
door locking mechanism
X
Press the =or; button on the
steering wheel to select the Sett.
Sett. menu.
X Press :or9 to select the Vehicle Vehicle
submenu.
X Press ato confirm. Menus and submenus
251On-board computer and displays Z
ProCarManuals.com