2014 MERCEDES-BENZ E-SEDAN run flat
[x] Cancel search: run flatPage 356 of 430
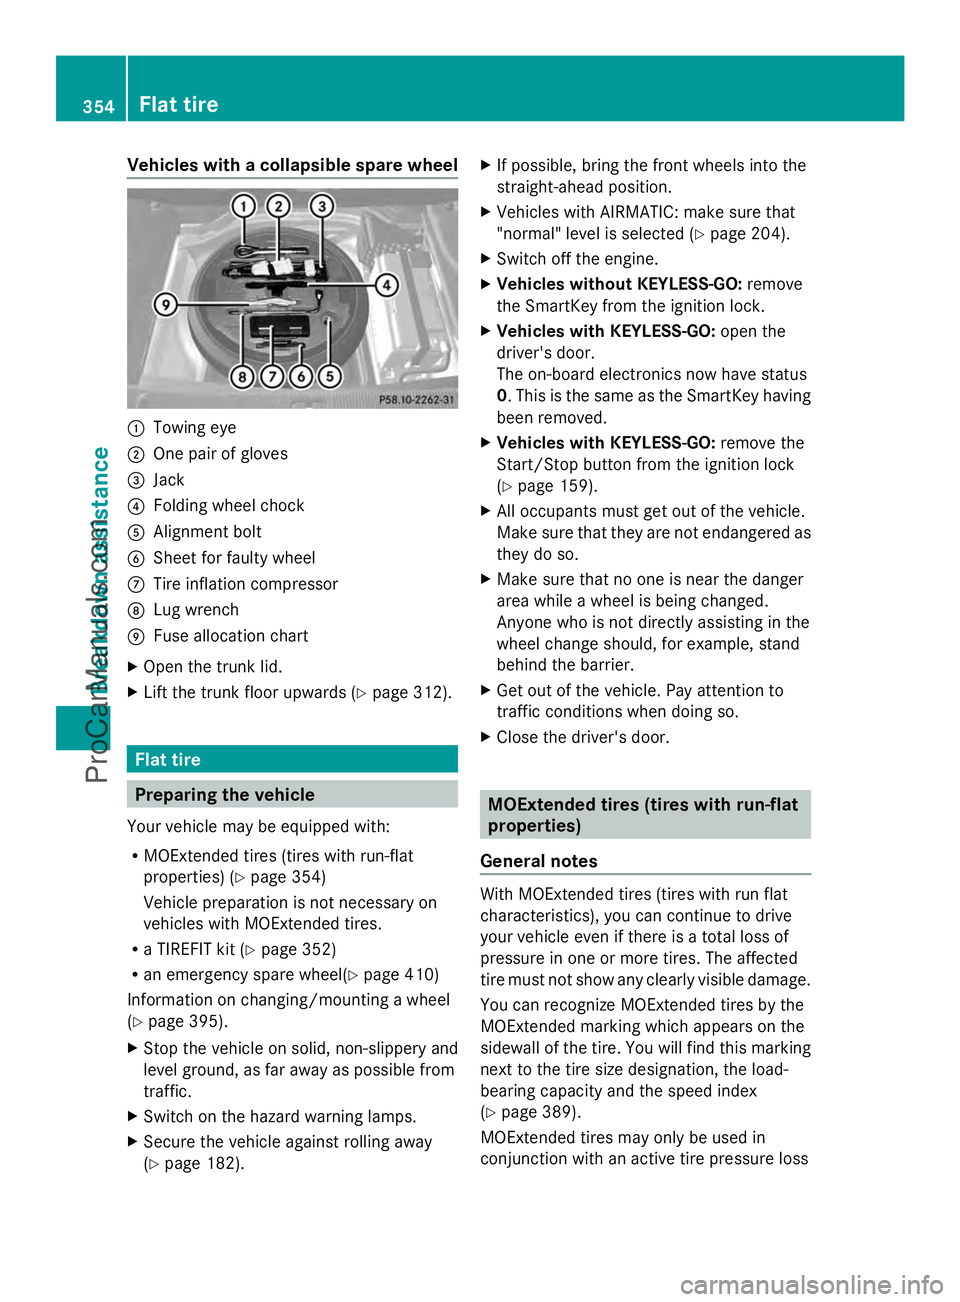
Vehicles with a collapsible spare wheel
:
Towing eye
; One pair of gloves
= Jack
? Folding wheel chock
A Alignment bolt
B Sheet for faulty wheel
C Tire inflation compressor
D Lug wrench
E Fuse allocation chart
X Open the trunk lid.
X Lift the trunk floor upwards (Y page 312).Flat tire
Preparing the vehicle
Your vehicle may be equipped with:
R MOExtended tires (tires with run-flat
properties) (Y page 354)
Vehicle preparation is not necessary on
vehicles with MOExtended tires.
R a TIREFIT kit (Y page 352)
R an emergency spare wheel(Y page 410)
Information on changing/mounting a wheel
(Y page 395).
X Stop the vehicle on solid, non-slippery and
level ground, as far away as possible from
traffic.
X Switch on the hazard warning lamps.
X Secure the vehicle against rolling away
(Y page 182). X
If possible, bring the front wheels into the
straight-ahead position.
X Vehicles with AIRMATIC: make sure that
"normal" level is selected (Y page 204).
X Switch off the engine.
X Vehicles without KEYLESS-GO: remove
the SmartKey from the ignition lock.
X Vehicles with KEYLESS-GO: open the
driver's door.
The on-board electronics now have status
0. This is the same as the SmartKey having
been removed.
X Vehicles with KEYLESS-GO: remove the
Start/Stop button from the ignition lock
(Y page 159).
X All occupants must get out of the vehicle.
Make sure that they are not endangered as
they do so.
X Make sure that no one is near the danger
area while a wheel is being changed.
Anyone who is not directly assisting in the
wheel change should, for example, stand
behind the barrier.
X Get out of the vehicle. Pay attention to
traffic conditions when doing so.
X Close the driver's door. MOExtended tires (tires with run-flat
properties)
General notes With MOExtended tires (tires with run flat
characteristics), you can continue to drive
your vehicle even if there is a total loss of
pressure in one or more tires. The affected
tire must not show any clearly visible damage.
You can recognize MOExtended tires by the
MOExtended marking which appears on the
sidewall of the tire. You will find this marking
next to the tire size designation, the load-
bearing capacity and the speed index
(Y page 389).
MOExtended tires may only be used in
conjunction with an active tire pressure loss 354
Flat tireBreakdo
wn assis tance
ProCarManuals.com
Page 357 of 430
warning system or with an active tire pressure
monitor.
If the pressure loss warning message
appears in the multifunction display:
R Observe the instructions in the display
messages ( Ypage 280).
R Check the tire for damage.
R If driving on, observe the following notes.
The maximum driving distance is
approximately 50 miles (80 km) when the
vehicle is partially laden and approximately
18 miles (30 km) when the vehicle is fully
laden.
In addition to the vehicle load, the driving
distance possible depends upon:
R speed
R road condition
R outside temperature
The driving distance possible in run-flat mode
may be reduced by extreme driving
conditions/maneuvers, or it can be increased
through a moderate style of driving.
The maximum permissible distance which
can be driven in run-flat mode is counted from
the moment the tire pressure loss warning
appears in the multifunction display.
You must not exceed a maximum speed of
50 mph (80 km/h).
i When replacing one or all tires, make sure
that you use only tires:
R of the size specified for the vehicle and
R marked "MOExtended"
If a tire has gone flat and cannot be
replaced with a MOExtended tire, a
standard tire may be used as a temporary
measure. Make sure that you use the
proper size and type (summer or winter
tire).
i Vehicles equipped with MOExtended tires
are not equipped with a TIREFIT kit at the
factory. It is therefore recommended that
you additionally equip your vehicle with a
TIREFIT kit if you mount tires that do not feature run-flat properties, e.g. winter tires.
A TIREFIT kit may be obtained from a
qualified specialist workshop.
Important safety notes G
WARNING
When driving in emergency mode, the driving
characteristics deteriorate, e.g. when
cornering, accelerating quickly and when
braking. There is a risk of an accident.
Do not exceed the stated maximum speed.
Avoid abrupt steering and driving maneuvers,
and driving over obstacles (curbs, potholes,
off-road). This applies in particular to a laden
vehicle.
Stop driving in emergency mode if:
R you hear banging noises.
R the vehicle starts to shake.
R you see smoke and smell rubber.
R ESP ®
is intervening constantly.
R there are tears in the sidewalls of the tire.
After driving in emergency mode, have the
wheel rims checked at a qualified specialist
workshop with regard to their further use. The
defective tire must be replaced in every case. TIREFIT kit
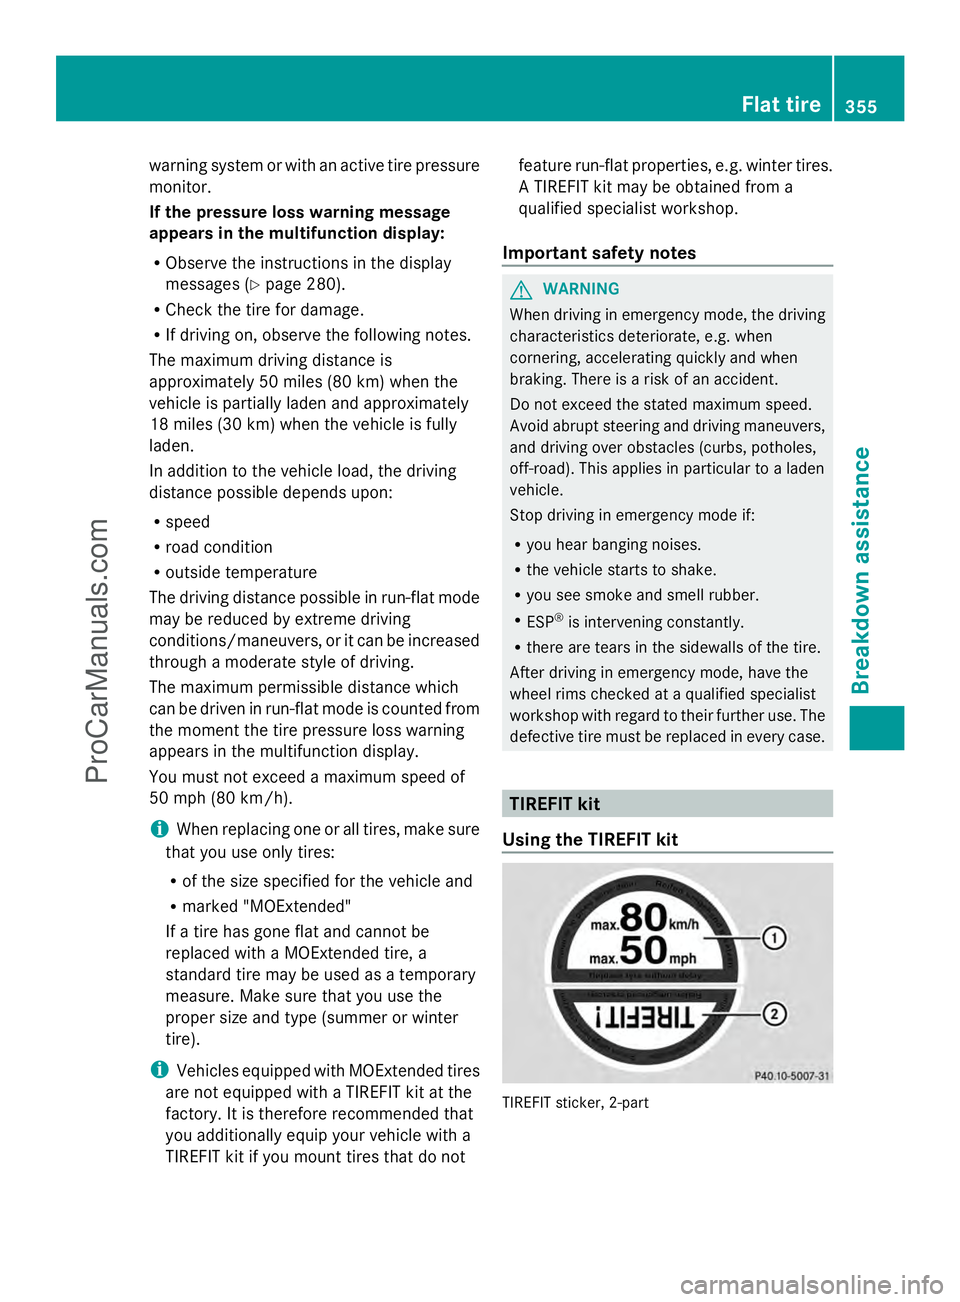
Using the TIREFIT kit TIREFIT sticker, 2-part Flat tire
355Breakdown assistance Z
ProCarManuals.com
Page 358 of 430
X
Do not remove any foreign objects which
have penetrated the tire, e.g. screws or
nails.
X Remove the tire sealant bottle, the
accompanying TIREFIT sticker and the tire
inflation compressor from the stowage well
underneath the trunk floor/cargo
compartment floor (Y page 352).
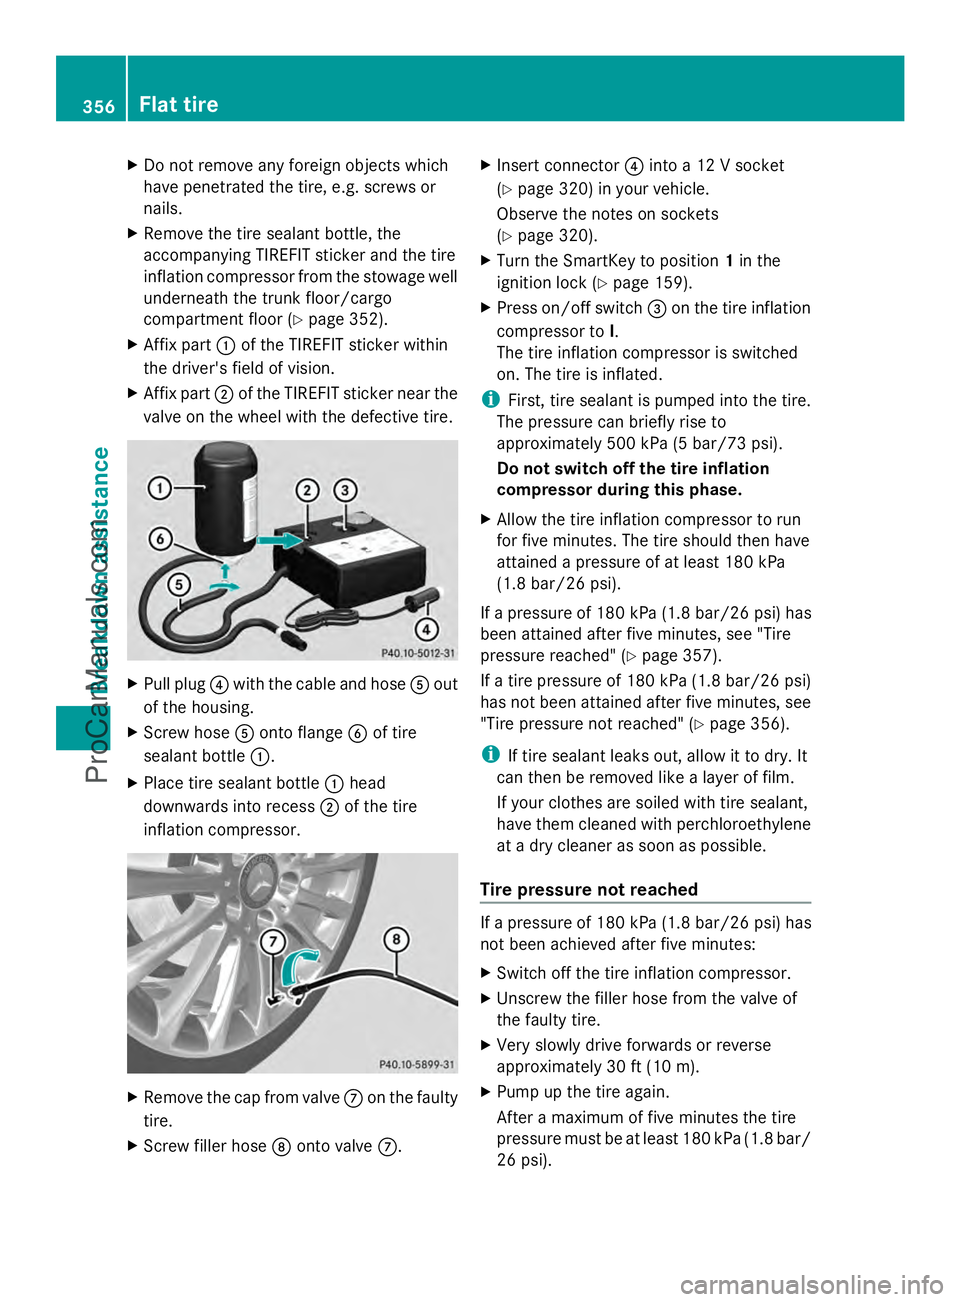
X Affix part :of the TIREFIT sticker within
the driver's field of vision.
X Affix part ;of the TIREFIT sticker near the
valve on the wheel with the defective tire. X
Pull plug ?with the cable and hose Aout
of the housing.
X Screw hose Aonto flange Bof tire
sealant bottle :.
X Place tire sealant bottle :head
downwards into recess ;of the tire
inflation compressor. X
Remove the cap from valve Con the faulty
tire.
X Screw filler hose Donto valve C. X
Insert connector ?into a 12 V socket
(Y page 320) in your vehicle.
Observe the notes on sockets
(Y page 320).
X Turn the SmartKey to position 1in the
ignition lock ( Ypage 159).
X Press on/off switch =on the tire inflation
compressor to I.
The tire inflation compressor is switched
on. The tire is inflated.
i First, tire sealant is pumped into the tire.
The pressure can briefly rise to
approximately 500 kPa (5 bar/73 psi).
Do not switch off the tire inflation
compressor during this phase.
X Allow the tire inflation compressor to run
for five minutes. The tire should then have
attained a pressure of at least 180 kPa
(1.8 bar/26 psi).
If a pressure of 180 kPa (1.8 ba r/26 psi) has
been attained after five minutes, see "Tire
pressure reached" (Y page 357).
If a tire pressure of 180 kPa (1.8 ba r/26 psi)
has not been attained after five minutes, see
"Tire pressure not reached" (Y page 356).
i If tire sealant leaks out, allow it to dry. It
can then be removed like a layer of film.
If your clothes are soiled with tire sealant,
have them cleaned with perchloroethylene
at a dry cleaner as soon as possible.
Tire pressure not reached If a pressure of 180 kPa
(1.8 ba r/26 psi) has
not been achieved after five minutes:
X Switch off the tire inflation compressor.
X Unscrew the filler hose from the valve of
the faulty tire.
X Very slowly drive forwards or reverse
approximately 30 ft (10 m).
X Pump up the tire again.
After a maximum of five minutes the tire
pressure must be at least 180 kPa (1.8 bar/
26 psi). 356
Flat tireBreakdown assistance
ProCarManuals.com
Page 370 of 430
The fuses are located in various fuse boxes:
R Fuse box in the engine compartment on the
left-hand side of the vehicle, when viewed
in the direction of travel
R Fuse box in the trunk/cargo compartment
on the right-hand side of the vehicle, when
viewed in the direction of travel
The fuse allocation chart is located in the
vehicle tool kit in the stowage compartment
under the trunk/cargo compartment floor
(Y page 352). Fuse box in the engine compartment
Observe the important safety notes
(Y page 367) G
WARNING
When the hood is open and the windshield
wipers are set in motion, you can be injured
by the wiper linkage. There is a risk of injury.
Always switch off the windshield wipers and
the ignition before opening the hood.
! Make sure that no moisture can enter the
fuse box when the cover is open.
! When closing the cover, make sure that it
is lying correctly on the fuse box. Moisture
seeping in or dirt could otherwise impair
the operation of the fuses.
X Make sure that the windshield wipers are
turned off.
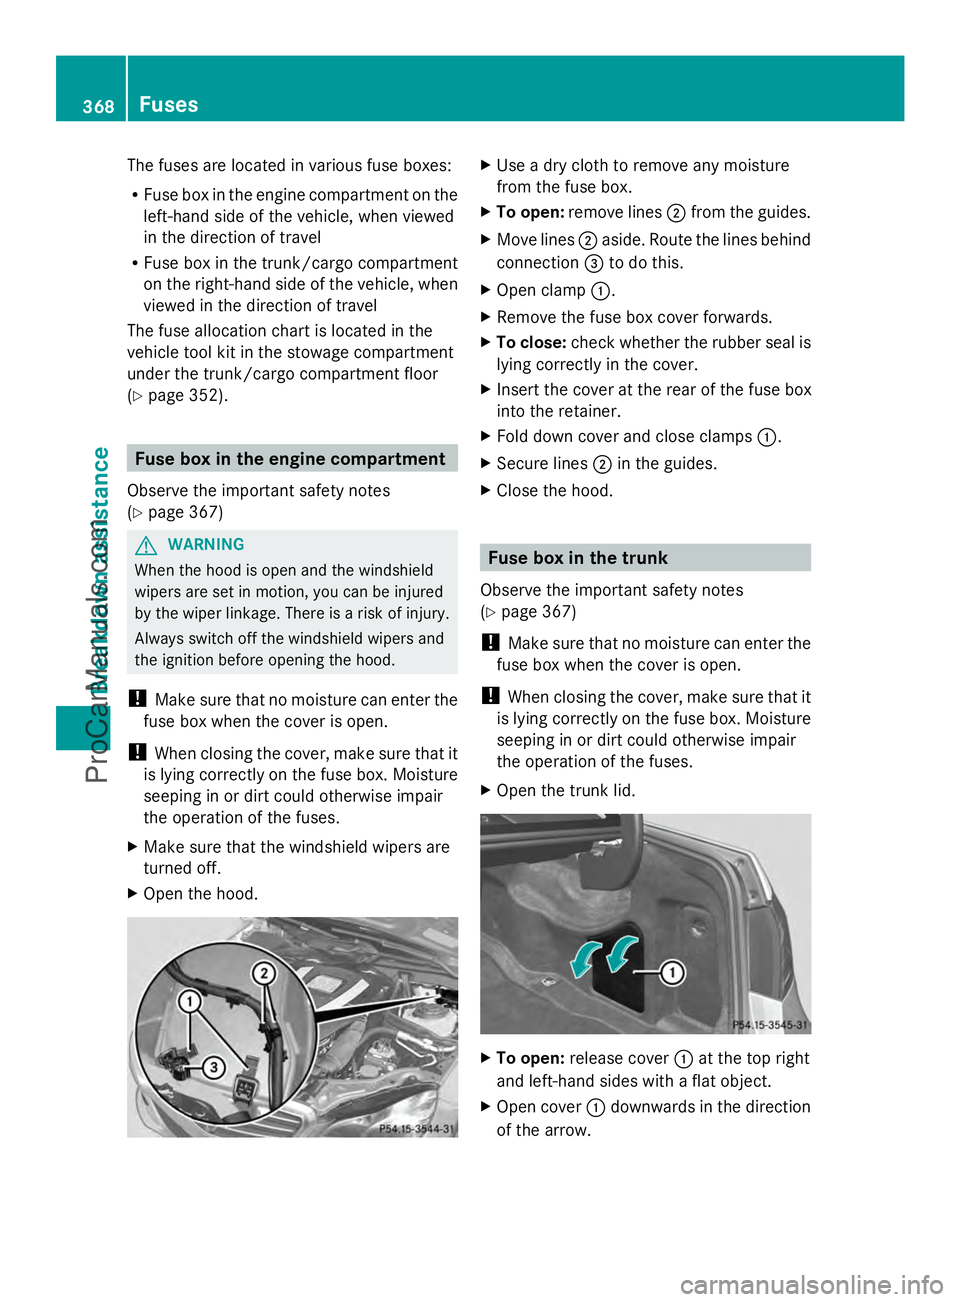
X Open the hood. X
Use a dry cloth to remove any moisture
from the fuse box.
X To open: remove lines ;from the guides.
X Move lines ;aside. Route the lines behind
connection =to do this.
X Open clamp :.
X Remove the fuse box cover forwards.
X To close: check whether the rubber seal is
lying correctly in the cover.
X Insert the cover at the rear of the fuse box
into the retainer.
X Fold down cover and close clamps :.
X Secure lines ;in the guides.
X Close the hood. Fuse box in the trunk
Observe the important safety notes
(Y page 367)
! Make sure that no moisture can enter the
fuse box when the cover is open.
! When closing the cover, make sure that it
is lying correctly on the fuse box. Moisture
seeping in or dirt could otherwise impair
the operation of the fuses.
X Open the trunk lid. X
To open: release cover :at the top right
and left-hand sides with a flat object.
X Open cover :downwards in the direction
of the arrow. 368
FusesBreakdown assistance
ProCarManuals.com
Page 374 of 430
Useful information
i This Operator's Manual describes all
models and all standard and optional
equipment of your vehicle available at the
time of publication of the Operator's
Manual. Country-specific differences are
possible. Please note that your vehicle may
not be equipped with all features
described. This also applies to safety-
related systems and functions.
i Read the information on qualified
specialist workshops: (Y page 26).Important safety notes
G
WARNING
If wheels and tires of the wrong size are used,
the wheel brakes or suspension components
may be damaged. There is a risk of an
accident.
Always replace wheels and tires with those
that fulfill the specifications of the original
part.
When replacing wheels, make sure to use the
correct:
R designation
R model
When replacing tires, make sure to use the
correct:
R designation
R manufacturer
R model G
WARNING
A flat tire severely impairs the driving,
steering and braking characteristics of the
vehicle. There is a risk of accident.
Tires without run-flat characteristics:
R do not drive with a flat tire.
R immediately replace the flat tire with your
emergency spare wheel or spare wheel, or
consult a qualified specialist workshop. Tires with run-flat characteristics:
R
pay attention to the information and
warning notices on MOExtended tires (tires
with run-flat characteristics).
Accessories that are not approved for your
vehicle by Mercedes-Benz or are not being
used correctly can impair the operating
safety.
Before purchasing and using non-approved
accessories, visit a qualified specialist
workshop and ask about:
R suitability
R legal stipulations
R factory recommendations
Information on the dimensions and types of
wheels and tires for your vehicle can be found
in the "Wheel/tire combinations" section
(Y page 400).
Information on air pressure for the tires on
your vehicle can be found:
R on the vehicle's Tire and Loading
Information placard on the B-pillar
(Y page 383)
R on the tire pressure label on the fuel filler
flap (Y page 176)
R under "Tire pressure" (Y page 376) Operation
Information on driving
If the vehicle is heavily loaded, check the tire
pressures and correct them if necessary.
While driving, pay attention to vibrations,
noises and unusual handling characteristics,
e.g. pulling to one side. This may indicate that
the wheels or tires are damaged. If you
suspect that a tire is defective, reduce your
speed immediately. Stop the vehicle as soon
as possible to check the wheels and tires for
damage. Hidden tire damage could also be
causing the unusual handling characteristics.
If you find no signs of damage, have the tires 372
OperationWheels and tires
ProCarManuals.com
Page 376 of 430
Bar indicator
:for tread wear is integrated
into the tire tread.
Treadwear indicators (TWI) are required by
law. Six indicators are positioned on the tire
tread. They are visible once a tread depth of
approximately áin (1.6 mm) has been
reached. If this is the case, the tire is so worn
that it must be replaced. Selecting, mounting and replacing
tires
R Only mount tires and wheels of the same
type and make.
Exception: it is permissible to install a
different type or make in the event of a flat
tire. Observe the "MOExtended tires (tires
with run-flat characteristics" section
(Y page 354).
R Only mount tires of the correct size onto
the wheels.
R Break in new tires at moderate speeds for
the first 60 miles (100 km). They only reach
their full performance after this distance.
R Do not drive with tires which have too little
tread depth, as this significantly reduces
the traction on wet roads (hydroplaning).
R Replace the tires after six years at the
latest, regardless of wear.
Observe the notes on the emergency spare
wheel (Y page 410). MOExtended tires (tires with run-flat
properties)
With MOExtended tires (tires with run flat
characteristics), you can continue to drive
your vehicle even if there is a total loss of
pressure in one or more tires.
MOExtended tires may only be used in
conjunction with an active tire pressure loss
warning system or with an active tire pressure
monitor and on wheels specifically tested by
Mercedes-Benz. Notes on driving with MOExtended tires with
a flat tire (Y
page 354).
i Vehicles equipped with MOExtended tires
are not equipped with a TIREFIT kit at the
factory. It is therefore recommended that
you additionally equip your vehicle with a
TIREFIT kit if you mount tires that do not
feature run-flat properties, e.g. winter tires.
A TIREFIT kit can be obtained from a
qualified specialist workshop. Winter operation
General notes
Have your vehicle winterproofed at a qualified
specialist workshop at the onset of winter.
Observe the notes in the "Changing a wheel"
section (Y page 395). Driving with summer tires
At temperatures below 45 ‡(+7 †), summer
tires lose elasticity significantly, and
therefore traction and braking power as well.
Change the tires on your vehicle to
M+S tires. Using summer tires at very cold
temperatures could cause cracks to form,
thereby damaging the tires permanently.
Mercedes-Benz cannot accept responsibility
for this type of damage. M+S tires
G
WARNING
M+S tires with a tire tread depth of less than
ã in (4 mm) are not suitable for use in winter
and do not provide sufficient traction. There
is a risk of an accident.
M+S tires with a tread depth of less than ã
in (4 mm) must be replaced immediately.
At temperatures below 45 ‡ (+7 †), use
winter tires or all-weather tires. Both types of
tire are identified by the M+S marking. 374
Winter operationWheels and tires
ProCarManuals.com
Page 381 of 430
when adjusting the tire pressure
(Y
page 376).
i The actual values for tires are vehicle-
specific and may deviate from the values in
the illustration. Checking the tire pressures
Important safety notes Observe the notes on tire pressure
(Y
page 376).
Information on air pressure for the tires on
your vehicle can be found:
R on the vehicle's Tire and Loading
Information placard on the B-pillar
(Y page 383)
R on the tire pressure label on the fuel filler
flap ( Ypage 176)
R in the "Tire pressure" section
R under "Tire pressure" (Y page 376)
Checking tire pressures manually To determine and set the correct tire
pressure, proceed as follows:
X Remove the valve cap of the tire that is to
be checked.
X Press the tire pressure gauge securely onto
the valve.
X Read the tire pressure and compare it with
the recommended value on the Tire and
Loading Information placard (Y page 376).
X If the tire pressure is too low, increase it to
the recommended value.
X If the tire pressure is too high, release air
by pressing down the metal pin in the valve.
Use the tip of a pen, for example. Then,
check the tire pressure again using the tire
pressure gauge.
X Screw the valve cap onto the valve.
X Repeat these steps for the other tires. Tire pressure loss warning system
(Canada only)
General notes While the vehicle is in motion, the tire
pressure loss warning system monitors the
set tire pressure using the rotational speed of
the wheels. This enables the system to detect
significant pressure loss in a tire. If the speed
of rotation of a wheel changes as a result of
a loss of pressure, a corresponding warning
message will appear in the multifunction
display.
You can recognize the tire pressure loss
warning by the Run Flat Indicator Run Flat Indicator
Active Press 'OK' to Restart
Active Press 'OK' to Restart message
which appears in the Service
Servicemenu of the
multifunction display. Information on the
message display can be found in the
"Restarting the tire pressure loss warning
system" section (Y page 380).
Important safety notes The tire pressure warning system does not
warn you of an incorrectly set tire pressure.
Observe the notes on the recommended tire
pressure (Y
page 376).
The tire pressure loss warning does not
replace the need to regularly check the tire
pressure. An even loss of pressure on several
tires at the same time cannot be detected by
the tire pressure loss warning system.
The tire pressure monitor is not able to warn
you of a sudden loss of pressure, e.g. if the
tire is penetrated by a foreign object. In the
event of a sudden loss of pressure, bring the
vehicle to a halt by braking carefully. Avoid
abrupt steering maneuvers.
The function of the tire pressure loss warning
system is limited or delayed if:
R snow chains are mounted on your vehicle's
tires.
R road conditions are wintry.
R you are driving on sand or gravel. Tire pressure
379Wheels and tires Z
ProCarManuals.com
Page 382 of 430
R
you adopt a very sporty driving style
(cornering at high speeds or driving with
high rates of acceleration).
R you are driving with a heavy load (in the
vehicle or on the roof).
Restarting the tire pressure loss
warning system Restart the tire pressure loss warning system
if you have:
R changed the tire pressure
R changed the wheels or tires
R mounted new wheels or tires
X Before restarting, make sure that the tire
pressures are set properly on all four tires
for the respective operating conditions.
The recommended tire pressure can be
found on the Tire and Loading Information
placard on the B-pillar on the driver's side.
Additionally, a tire pressure table is
attached to the fuel filler flap. The tire
pressure loss warning system can only give
reliable warnings if you have set the correct
tire pressure. If an incorrect tire pressure
is set, these incorrect values will be
monitored.
X Also observe the notes in the section on tire
pressures ( Ypage 376).
X Make sure that the SmartKey is in position
2 in the ignition lock (Y page 159).
X Press the =or; button on the
steering wheel to select the Service
Service
menu.
X Press the 9or: button on the
steering wheel to select the Tire
Tire
Pressure Pressure menu.
X Press the abutton.
The Run Flat Indicator Active
Run Flat Indicator Active
Press 'OK' to Restart
Press 'OK' to Restart message
appears in the multifunction display. If you wish to confirm the restart:
X
Press the abutton.
The Tire Pressure Now OK? Tire Pressure Now OK? message
appears in the multifunction display.
X Press the 9or: button to select
Yes
Yes .
X Press the abutton.
The Run Flat Indicator Restarted
Run Flat Indicator Restarted
message appears in the multifunction
display.
After a teach-in period, the tire pressure
loss warning system will monitor the set
tire pressures of all four tires.
If you wish to cancel the restart:
X Press the %button.
or
X When the Tire Pressure Now OK? Tire Pressure Now OK?
message appears, press the 9
or : button to select Cancel
Cancel.
X Press the abutton.
The tire pressure values stored at the last
restart will continue to be monitored. Tire pressure monitor
General notes If a tire pressure monitor is installed, the
vehicle's wheels have sensors that monitor
the tire pressures in all four tires. The tire
pressure monitor warns you if the pressure
drops in one or more of the tires. The tire
pressure monitor only functions if the correct
sensors are installed on all wheels.
Information on tire pressures is displayed in
the multifunction display. After a few minutes
of driving, the current tire pressure of each
tire is shown in the Service Servicemenu of the
multifunction display. 380
Ti
re pressureWhe els and tires
ProCarManuals.com