2014 MERCEDES-BENZ E-SEDAN buttons
[x] Cancel search: buttonsPage 123 of 430
Problems with the steering wheel heating
Problem Possible causes/consequences and
M
MSolutions The steering wheel
heating has switched
off prematurely or
cannot be switched on. The on-board voltage is too low because too many electrical
consumers are switched on.
X
Switch off electrical consumers that you do not need, such as
the rear window defroster or interior lighting.
Once the battery is sufficiently charged, the steering wheel
heating will switch back on automatically. EASY-ENTRY/EXIT feature
Important safety notes G
WARNING
When the EASY-ENTRY/EXIT feature adjusts
the steering wheel, you and other vehicle
occupants – particularly children – could
become trapped. There is a risk of injury.
While the EASY-ENTRY/EXIT feature is
making adjustments, make sure that no one
has any body parts in the sweep of the
steering wheel.
If somebody becomes trapped:
R press one of the memory function position
buttons, or
R move the switch for steering wheel
adjustment in the opposite direction to that
in which the steering wheel is moving.
The adjustment process is stopped. G
WARNING
If children activate the EASY-ENTRY/EXIT
feature, they can become trapped,
particularly when unattended. There is a risk
of injury.
When leaving the vehicle, always take the
SmartKey with you and lock the vehicle. Never
leave children unsupervised in the vehicle. G
WARNING
If you drive off while the EASY-ENTRY/EXIT
feature is making adjustments, you could lose control of the vehicle. There is a risk of an
accident.
Always wait until the adjustment process is
complete before driving off.
The EASY-ENTRY/EXIT feature makes getting
in and out of your vehicle easier.
You can activate and deactivate the EASY-
ENTRY/EXIT feature in the on-board
computer (Y page 252).
Position of the steering wheel when the
EASY-ENTRY/EXIT feature is active The steering wheel swings upwards when
you:
R
remove the SmartKey from the ignition lock
R with KEYLESS-GO: open the driver's door;
KEYLESS-GO must be in position 1
R with the SmartKey: open the driver's
door; the SmartKey must be in position 0
or 1in the ignition lock (Y page 159)
i The steering wheel only moves upwards if
it has not already reached the upper end
stop. Steering wheel
121Seats, steering wheel and mirrors Z
ProCarManuals.com
Page 128 of 430
G
WARNING
Children could become trapped if they
activate the memory function, particularly
when unattended. There is a risk of injury.
When leaving the vehicle, always take the
SmartKey with you and lock the vehicle. Never
leave children unsupervised in the vehicle.
With the memory function, you can store up
to three different settings, e.g. for three
different people.
The following settings are stored as a single
memory preset:
R position of the seat, backrest and head
restraint
R active multicontour seat: seat contour,
dynamic function level
R driver's side: position of the exterior
mirrors on the driver's and front-passenger
sides X
Adjust the seat (Y page 110).
X On the driver's side, adjust the steering
wheel (Y page 119) and the exterior mirrors
(Y page 122).
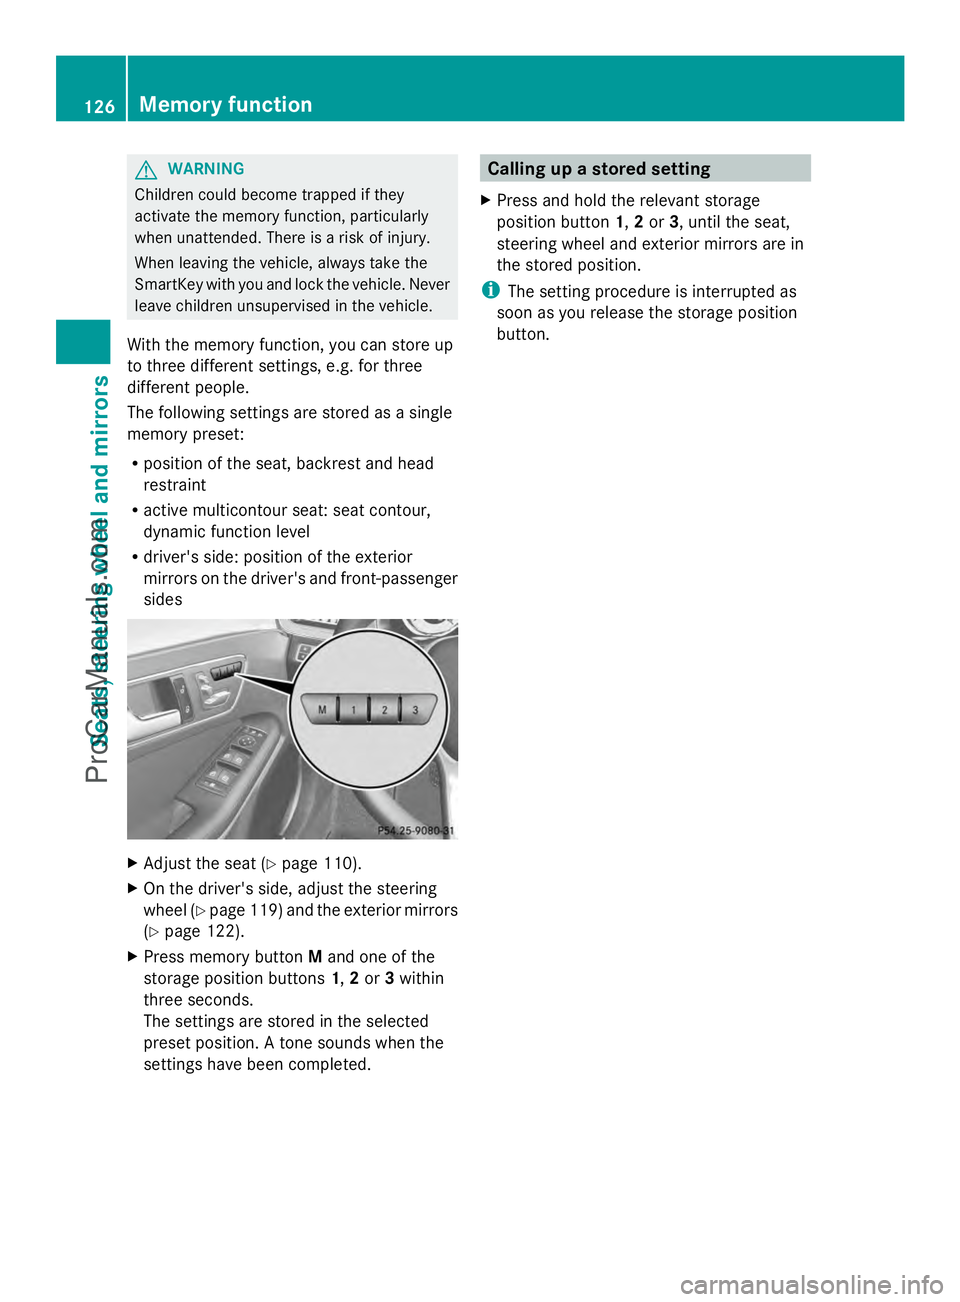
X Press memory button Mand one of the
storage position buttons 1,2or 3within
three seconds.
The settings are stored in the selected
preset position. A tone sounds when the
settings have been completed. Calling up a stored setting
X Press and hold the relevant storage
position button 1,2or 3, until the seat,
steering wheel and exterior mirrors are in
the stored position.
i The setting procedure is interrupted as
soon as you release the storage position
button. 126
Memory functionSeats, steering wheel and mirrors
ProCarManuals.com
Page 148 of 430

C
Switches the rear window defroster on/off (Y page 153)
D Switches climate control on/off ( Ypage 148)
E Sets the temperature, right ( Ypage 151)
F Sets the air distribution (Y page 151)
G Sets the airflow (Y page 152)
H Sets the temperature, left ( Ypage 151)
I Display Information about using dual-zone
automatic climate control
Automatic climate control The following contains notes and
recommendations on optimum use of dual-
zone automatic climate control.
R Activate climate control using the Ãand
¿ buttons. The indicator lamps above
the à and¿ buttons light up.
R Set the temperature to 72 ‡ (22 †).
R Only use the "Windshield defrosting"
function briefly until the windshield is clear
again.
R Only use air-recirculation mode briefly, e.g.
if there are unpleasant outside odors or
when in a tunnel. The windows could
otherwise fog up, since no fresh air is drawn
into the vehicle in air-recirculation mode.
R Use the ZONE function to adopt the
temperature settings on the driver's side
for the front-passenger side as well. The
indicator lamp above the ábutton goes
out.
R Vehicles with COMAND: if you change the
settings of the climate control system, the
climate status display appears for
approximately three seconds at the bottom
of the screen in the COMAND display. See
also the separate COMAND operating
instructions. You will see the current
settings of the various climate control
functions. ECO start/stop function During automatic engine switch-off, the ECO
start/stop function only operates at a
reduced capacity. If you require the full
climate control output, you can switch off the
ECO start/stop function by pressing the ECO
button (
Ypage 164). 146
Overvie
w of climate cont rol systemsClimate control
ProCarManuals.com
Page 150 of 430

N
To reduce the airflow (Y page 152)
O To reduce the temperature (Y page 151)Information about using 3-zone
automatic climate control
Automatic climate control The 3-zone automatic climate control is only
available on vehicles for Canada.
The following contains instructions and
recommendations to enable you to get the
most out of your automatic climate control.
R Activate climate control using the Ãand
¿ buttons. The indicator lamps above
the à and¿ buttons light up.
R In automatic mode, you can also use the
ñ button to set a climate mode
(FOCUS/MEDIUM/DIFFUSE). The
MEDIUM level is recommended.
R Set the temperature to 72 ‡ (22 †).
R Only use the "Windshield defrosting"
function briefly until the windshield is clear
again.
R Only use air-recirculation mode briefly, e.g.
if there are unpleasant outside odors or
when in a tunnel. The windows could
otherwise fog up, since no fresh air is drawn
into the vehicle in air-recirculation mode.
R Use the ZONE function to adopt the
temperature settings on the driver's side
for the front-passenger side and the rear
compartment as well. The indicator lamp
above the ábutton goes out.
R Use the residual heat function if you want
to heat or ventilate the vehicle interior
when the ignition is switched off. The
residual heat function can only be activated
or deactivated with the ignition switched
off.
R Vehicles with COMAND: if you change the
settings of the climate control system, the
climate status display appears for
approximately three seconds at the bottom
of the screen in the COMAND display. See also the separate COMAND operating
instructions. You will see the current
settings of the various climate control
functions.
ECO start/stop function During automatic engine switch-off, the ECO
start/stop function only operates at a
reduced capacity. If you require the full
climate control output, you can switch off the
ECO start/stop function by pressing the ECO
button (Y page 164). Operating the climate control
systems
Switching climate control on/off
General notes When the climate control is switched off, the
air supply and air circulation are also
switched off. The windows could fog up.
Therefore, switch off climate control only
briefly
i
Activate climate control primarily using
the à button (Y page 150). 148
Operating the climate control systemsClimate control
ProCarManuals.com
Page 241 of 430
The fuel supply is interrupted to protect the
engine when the red band is reached. Outside temperature display
You should pay special attention to road
conditions when temperatures are around
freezing point.
The outside temperature display is in the
multifunction display (Y page 240).
Changes in the outside temperature are
displayed after a short delay. Speedometer with segments
The segments in the speedometer indicate
which speed range is available.
R Cruise control activated (Y page 189):
The segments light up from the stored
speed to the maximum speed.
R DISTRONIC PLUS activated (Y page 191):
One or two segments in the set speed
range light up.
R DISTRONIC PLUS detects a vehicle in front:
The segments between the speed of the
vehicle in front and the stored speed light
up. Operating the on-board computer
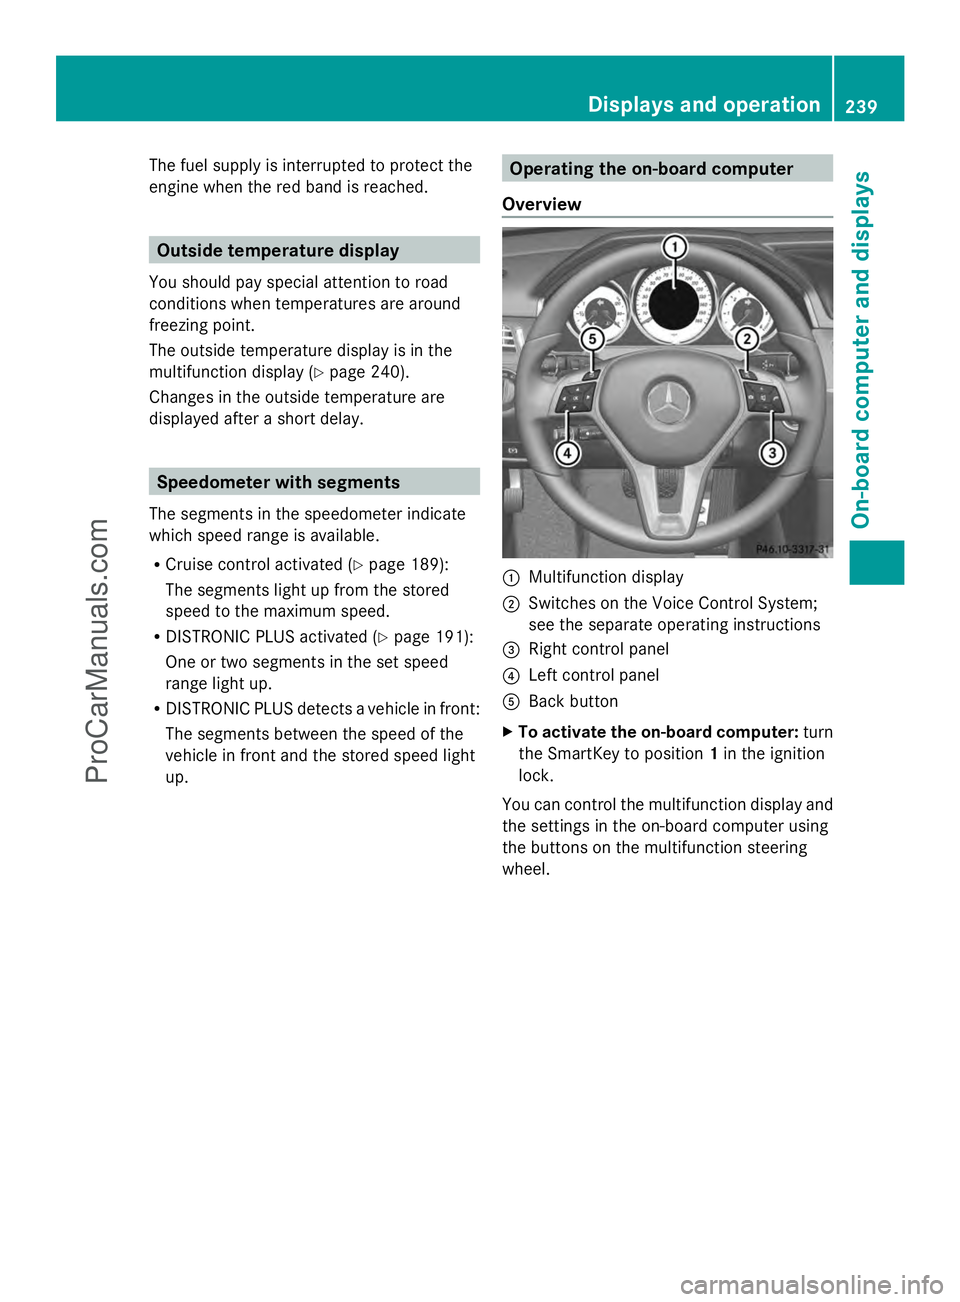
Overview :
Multifunction display
; Switches on the Voice Control System;
see the separate operating instructions
= Right control panel
? Left control panel
A Back button
X To activate the on-board computer: turn
the SmartKey to position 1in the ignition
lock.
You can control the multifunction display and
the settings in the on-board computer using
the buttons on the multifunction steering
wheel. Displays and operation
239On-board computer and displays Z
ProCarManuals.com
Page 254 of 430
X
Press :or9 to select the Auto.
Auto.
Door Locks
Door Locks function.
When the Auto. Door Locks
Auto. Door Locks function is
activated, the vehicle doors are displayed
in orange in the multifunction display.
X Press the abutton to save the setting.
If you activate the Auto. Door Locks
Auto. Door Locks
function, the vehicle is centrally locked above
a speed of around 9 mph (15 km/h).
For further information on the automatic
locking feature, see (Y page 89).
Activating/deactivating the acoustic
locking verification signal
If you switch on the Acoustic
Acoustic Lock Lockfunction,
an acoustic signal sounds when you lock the
vehicle.
X Press the =or; button on the
steering wheel to select the Sett.
Sett. menu.
X Press :or9 to select the Vehicle Vehicle
submenu.
X Press ato confirm.
X Press the :or9 button to select the
Acoustic Lock
Acoustic Lock function.
If the Acoustic
Acoustic Lock
Lockfunction is activated,
the & symbol in the multifunction
display lights up orange.
X Press the abutton to save the setting.
Convenience Activating/deactivating the EASY-
ENTRY/EXIT feature
G
WARNING
When the EASY-ENTRY/EXIT feature adjusts
the steering wheel, you and other vehicle
occupants – particularly children – could
become trapped. There is a risk of injury.
While the EASY-ENTRY/EXIT feature is
making adjustments, make sure that no one
has any body parts in the sweep of the
steering wheel. If somebody becomes trapped:
R
press one of the memory function position
buttons, or
R move the switch for steering wheel
adjustment in the opposite direction to that
in which the steering wheel is moving.
The adjustment process is stopped.
X Press the =or; button on the
steering wheel to select the Sett. Sett.menu.
X Press the :or9 button to select the
Convenience
Convenience submenu.
X Press ato confirm.
X Press the :or9 button to select the
Easy Entry/Exit
Easy Entry/Exit function.
If the Easy Entry/Exit
Easy Entry/Exit function is
activated, the vehicle steering wheel is
displayed in orange in the multifunction
display.
X Press the abutton to save the setting.
Further information on the EASY-ENTRY/EXIT
feature (Y page 121).
Switching the belt adjustment on/off
X Press the =or; button on the
steering wheel to select the Sett.
Sett. menu.
X Press the :or9 button to select the
Convenience Convenience submenu.
X Press ato confirm.
X Press the :or9 button to select the
Belt Adjustment
Belt Adjustment function.
If the Belt Adjustment
Belt Adjustment function is
activated, the vehicle seat belt is shown in
orange in the multifunction display.
X Press the abutton to save the setting.
For further information on belt adjustment,
see (Y page 57).
Switching the fold-in mirrors with the
locking feature on/off
This function is only available on vehicles with
the memory function (Y page 125).
This function is only available in Canada. 252
Menus and submenusOn-board computer and displays
ProCarManuals.com
Page 325 of 430
The mbrace system
To adjust the volume during a call, proceed
as follows:
X Press the WorX button on the
multifunction steering wheel.
or
X Use the volume controller of the audio
system/COMAND.
The system offers various services, e.g:
R Automatic and manual emergency call
R Roadside Assistance call
R MB Info call
USA only: you can find information and a
description of all available features under
"Owners Online" at http://www.mbusa.com.
System self-test After you have switched on the ignition, the
system carries out a self-diagnosis.
A malfunction in the system has been
detected if one of the following occurs:
R The indicator lamp in the SOS button does
not come on during the system self-test.
R The indicator lamp in the FRoadside
Assistance button does not light up during
self-diagnosis of the system.
R The indicator lamp in the ïMB Info call
button does not light up during self-
diagnosis of the system.
R The indicator lamp in one or more of the
following buttons continues to light up red
after the system self-diagnosis:
- SOS button
- F Roadside Assistance call button
- ï MB Info call button
R After the system self-diagnosis, the
Inoperative
Inoperative orService Not Service Not
Activated
Activated message appears in the
multifunction display.
If a malfunction is indicated as outlined
above, the system may not operate as expected. In the event of an emergency, help
will have to be summoned by other means.
Have the system checked at the nearest
authorized Mercedes-Benz Center or contact
the following service hotlines:
R
USA: Mercedes-Benz Customer Assistance
Center at
1-800-FOR-MERCedes (1-800-367-6372)
or 1-866-990-9007
R Canada: Customer Service at
1-888-923-8367
Emergency call Important safety notes
G
WARNING
It can be dangerous to remain in the vehicle,
even if you have pressed the SOS button in an
emergency if:
R you see smoke inside or outside of the
vehicle, e.g. if there is a fire after an
accident
R the vehicle is on a dangerous section of
road
R the vehicle is not visible or cannot easily be
seen by other road users, particularly when
dark or in poor visibility conditions
There is a risk of an accident and injury.
Leave the vehicle immediately in this or
similar situations as soon as it is safe to do
so. Move to a safe location along with other
vehicle occupants. In such situations, secure
the vehicle in accordance with national
regulations, e. g. with a warning triangle.
You must have a license agreement to
activate the mbrace service. Make sure that
your system is activated and operational. To
register, press the ïMB Info call button.
If any of the steps mentioned are not carried
out, the system may not be activated. Features
323Stowage an d features Z
ProCarManuals.com
Page 333 of 430
Garage door opener
Important safety notes G
WARNING
When you operate or program the garage door
with the integrated garage door opener,
persons in the range of movement of the
garage door can become trapped or struck by
the garage door. There is a risk of injury.
When using the integrated garage door
opener, always make sure that nobody is
within the range of movement of the garage
door. G
WARNING
Combustion engines emit poisonous exhaust
gases such as carbon monoxide. Inhaling
these exhaust gases leads to poisoning. There
is a risk of fatal injury. Therefore never leave
the engine running in enclosed spaces
without sufficient ventilation.
The HomeLink ®
garage door opener
integrated in the rear-view mirror allows you
to operate up to three different door and gate
systems.
Use the integrated garage door opener only
on garage doors that:
R have safety stop and reverse features and
R meet current U.S. federal safety standards
When programming a garage door opener,
park the vehicle outside the garage.
i Certain garage door drives are
incompatible with the integrated garage
door opener. If you have difficulty
programming the integrated garage door
opener, contact an authorized Mercedes-
Benz Center. Alternatively, you can call the following
telephone assistance services:
R
USA: Mercedes-Benz Customer
Assistance Center at
1-800-FOR-MERCedes
R Canada: Customer Service at
1-800-387-0100
R HomeLink ®
hotline 1-800-355-3515
(free of charge)
More information on HomeLink ®
and/or
compatible products is also available
online at http://www.homelink.com.
i Notes on the declaration of conformity
(Y page 26).
USA: FCC ID: CB2HMIHL4
Canada: IC: 279B-HMIHL4
Programming Programming buttons
Observe the "Important safety notes"
(Y
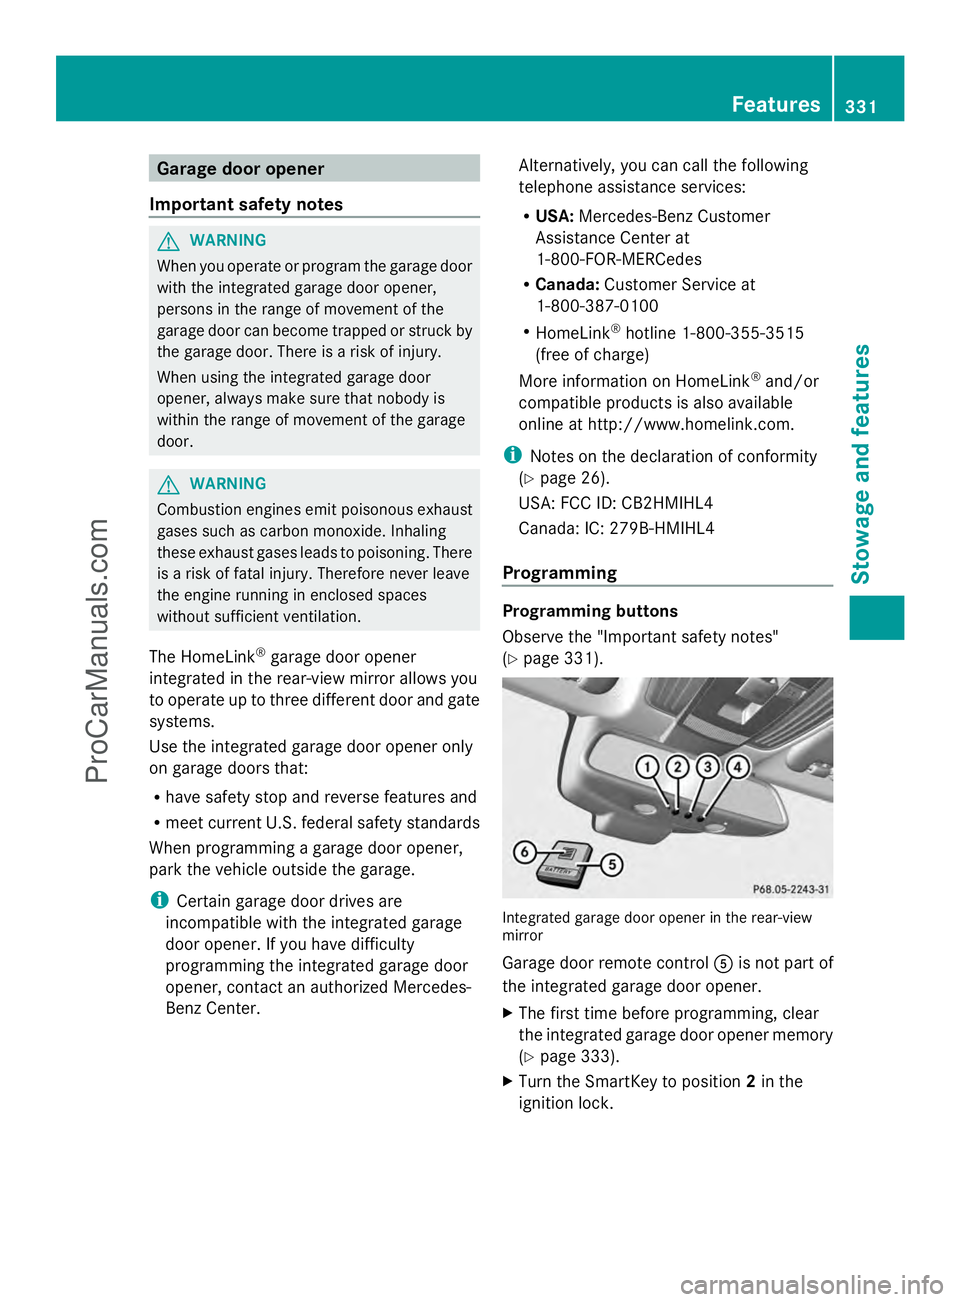
page 331). Integrated garage door opener in the rear-view
mirror
Garage door remote control
Ais not part of
the integrated garage door opener.
X The first time before programming, clear
the integrated garage door opener memory
(Y page 333).
X Turn the SmartKey to position 2in the
ignition lock. Features
331Stowage and features Z
ProCarManuals.com