2014 MERCEDES-BENZ E-SEDAN dimensions
[x] Cancel search: dimensionsPage 20 of 430
Paddle shifter
s............................... 172
Steering wheel heating ..................120
Storing settings (memory function) 125
Steering wheel heating
Problem (malfunction) ...................121
Switching on/off ........................... 120
Steering wheel paddle shifters ........172
Stopwatch (RACETIMER) ................... 254
Stowage areas ................................... 298
Stowage compartments Armrest (under) ............................. 300
Center console .............................. 299
Cup holders ................................... 316
Eyeglasses compartment ...............299
Glove box ...................................... .299
Important safety information .........298
Rear ............................................... 300
Stowage net ................................... 301
Under driver's seat/front-
passenger seat .............................. 300
Stowage net ....................................... 301
Stowage well beneath the trunk
floor .................................................... 312
Summer tires ..................................... 374
Sun visor ............................................ 317
Surround lighting (on-board
computer) .......................................... 251
Suspension tuning AIRMATIC ...................................... 205
AMG adaptive sport suspension
system ........................................... 206
SETUP (on-board computer) ..........254
Switching air-recirculation mode
on/off ................................................. 154
Switching off the alarm (ATA) ............78 T
Tachometer ........................................ 238
Tailgate Display message ............................ 282
Emergency unlocking .......................97
Important safety notes ....................90
Limiting the opening angle ...............96
Opening/closing (automatically
from inside) ...................................... 95
Opening/closing (automatically
from outside) ................................... 92Opening/closing (from outside)
.......92
Opening dimensions ......................426
Tail lamps
Display message ............................ 267
Tank content
Fuel gauge ....................................... 31
Technical data
Capacities ...................................... 418
Emergency spare wheel .................414
Information .................................... 416
Tires/wheels ................................. 400
Vehicle data ................................... 426
TELEAID
Call priority .................................... 326
Downloading destinations
(COMAND) ..................................... 326
Downloading routes .......................330
Emergency call .............................. 323
Geo fencing ................................... 330
Locating a stolen vehicle ...............328
MB info call button ........................325
Remote vehicle locking ..................328
Roadside Assistance button ..........325
Search & Send ............................... 327
Self-test ......................................... 323
Speed alert .................................... 330
System .......................................... 323
Triggering the vehicle alarm ........... 330
Vehicle remote malfunction
diagnosis ....................................... 329
Vehicle remote unlocking ..............328
Tele Aid
General notes ................................ 322
Telephone
Accepting a call ............................. 245
Display message ............................ 283
Menu (on-board computer) ............245
Number from the phone book ....... .245
Redialing ........................................ 246
Rejecting/ending a call .................245
Telescopic rod (EASY-PACK load-
securing kit) ....................................... 312
Temperature Coolant .......................................... 238
Coolant (on-board computer) ......... 253
Engine oil (on-board computer) ...... 253
Outside temperature ..................... .239
Setting (climate control) ................15118
IndexProCarManuals.com
Page 22 of 430
Uniform Tire Quality Grading
Standards
...................................... 387
Uniform Tire Quality Grading
Standards (definition) ....................393
Unladen weight (definition) ............394
Wear indicator (definition) .............394
Wheel rim (definition) ....................393
see Flat tire
Top Tether ............................................ 64
Towing Important safety guidelines ...........364
Installing the towing eye ................365
Removing the towing eye ...............366
With the rear axle raised ................366
Towing away
With both axles on the ground .......366
Tow-starting
Emergency engine starting ............367
Important safety notes ..................364
Transfer case ..................................... 175
Transmission see Automatic transmission
Transmission position display .........168
Transmission position display
(DIRECT SELECT lever) ......................168
Transporting the vehicle ..................366
Trim pieces (cleaning instructions) .348
Trip computer (on-board computer) 241
Trip odometer Calling up ....................................... 241
Resetting (on-board computer) ......242
Trunk
Emergency release ..........................97
Locking separately ...........................96
Opening/closing (from outside,
HANDS-FREE ACCESS) ....................93
Trunk lid
Display message ............................ 282
Opening dimensions ......................426
Trunk load (maximum) ......................426
Turn signals Changing bulbs (front) ...................138
Display message ............................ 266
Switching on/off ........................... 131
Type identification plate
see Vehicle identification plate U
Unlocking Emergency unlocking .......................90
From inside the vehicle (central
unlocking button) ............................. 89 V
Vanity mirror (in the sun visor) ........317
Vehicle Correct use ...................................... 27
Data acquisition ............................... 28
Display message ............................ 282
Equipment ....................................... 23
Individual settings ..........................249
Limited Warranty ............................. 27
Loading .......................................... 383
Locking (in an emergency) ...............90
Locking (SmartKey) .......................... 82
Lowering ........................................ 400
Maintenance .................................... 24
Parking for a long period ................ 183
Pulling away ................................... 162
Raising ........................................... 397
Reporting problems .........................27
Securing from rolling away ............396
Towing away .................................. 364
Transporting .................................. 366
Unlocking (in an emergency) ...........90
Unlocking (SmartKey) ......................82
Vehicle data ................................... 426
Vehicle data ....................................... 426
Vehicle dimensions ...........................426
Vehicle emergency locking ................90
Vehicle identification number see VIN
Vehicle identification plate ..............416
Vehicle level AIRMATIC ...................................... 204
Vehicle level (display message) .......273
Vehicle tool kit .................................. 352
Video Operating the DVD ......................... 245
VIN ...................................................... 41620
IndexProCarManuals.com
Page 98 of 430
Limiting the opening angle of the
tailgate (Wagon)
Important safety notes !
Make sure there is sufficient clearance to
open the tailgate fully when setting the
opening angle. The tailgate could otherwise
be damaged. Ideally, set the opening angle
outside.
Activating You can limit the opening angle of the
tailgate. This is possible in the top half of its
opening range, up to approximately 8 in
(20 cm) before the stop.
X To open the tailgate: pull the handle on
the tailgate.
X To stop the opening procedure at the
desired position: press the closing button
(Y page 92 )in the tailgate or pull the handle
on the outside of the tailgate again.
X To store the position: press and hold the
closing button in the tailgate until you hear
a short tone.
The opening angle limiter is activated. The
tailgate will now stop in the stored position
when opening.
Deactivating X
Press and hold the closing button
(Y page 92) in the tailgate until you hear
two short tones. Opening the tailgate from inside the
vehicle (Wagon with a folding bench
seat)
General notes i
Tailgate opening dimensions
(Y page 426). Opening
Inside of tailgate
X
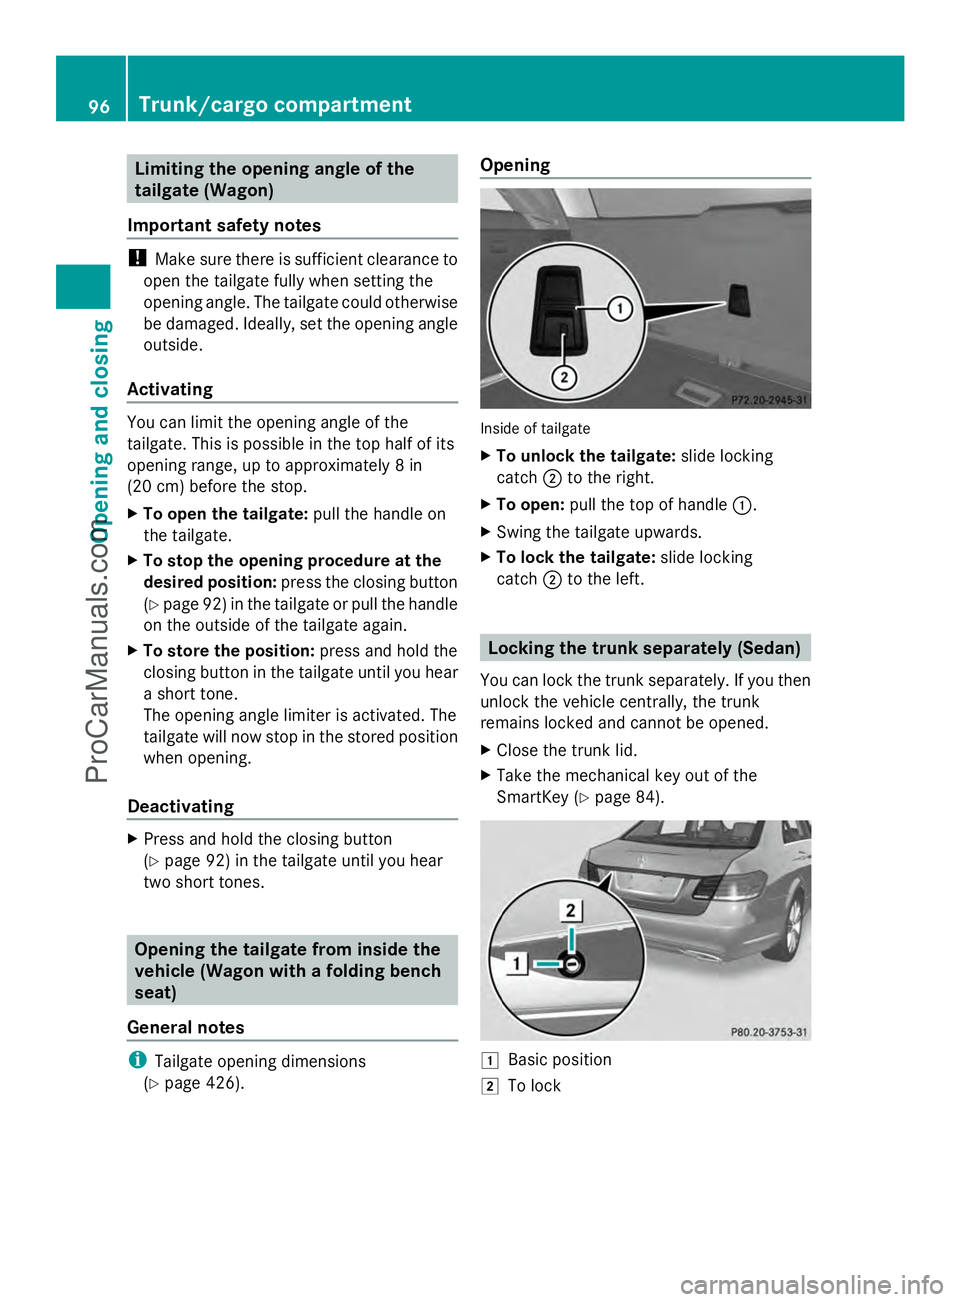
To unlock the tailgate: slide locking
catch ;to the right.
X To open: pull the top of handle :.
X Swing the tailgate upwards.
X To lock the tailgate: slide locking
catch ;to the left. Locking the trunk separately (Sedan)
You can lock the trunk separately. If you then
unlock the vehicle centrally, the trunk
remains locked and cannot be opened.
X Close the trunk lid.
X Take the mechanical key out of the
SmartKey (Y page 84). 1
Basic position
2 To lock 96
Trunk/cargo compartmentOpening and closing
ProCarManuals.com
Page 99 of 430
X
Insert the mechanical key into the trunk lid
lock as far as it will go.
X Turn the mechanical key clockwise from
position 1to position 2.
X Remove the mechanical key.
X Insert the mechanical key into the
SmartKey. Unlocking the trunk (Sedan)
! The trunk lid swings upwards when
opened. Therefore, make sure that there is
sufficient clearance above the trunk lid.
If the trunk cannot be unlocked with the
SmartKey or KEYLESS-GO, use the
mechanical key.
If you use the mechanical key to unlock and
open the trunk lid, the anti-theft alarm system
will be triggered (Y page 78).
X Take the mechanical key out of the
SmartKey (Y page 84).
X Insert the mechanical key into the trunk lid
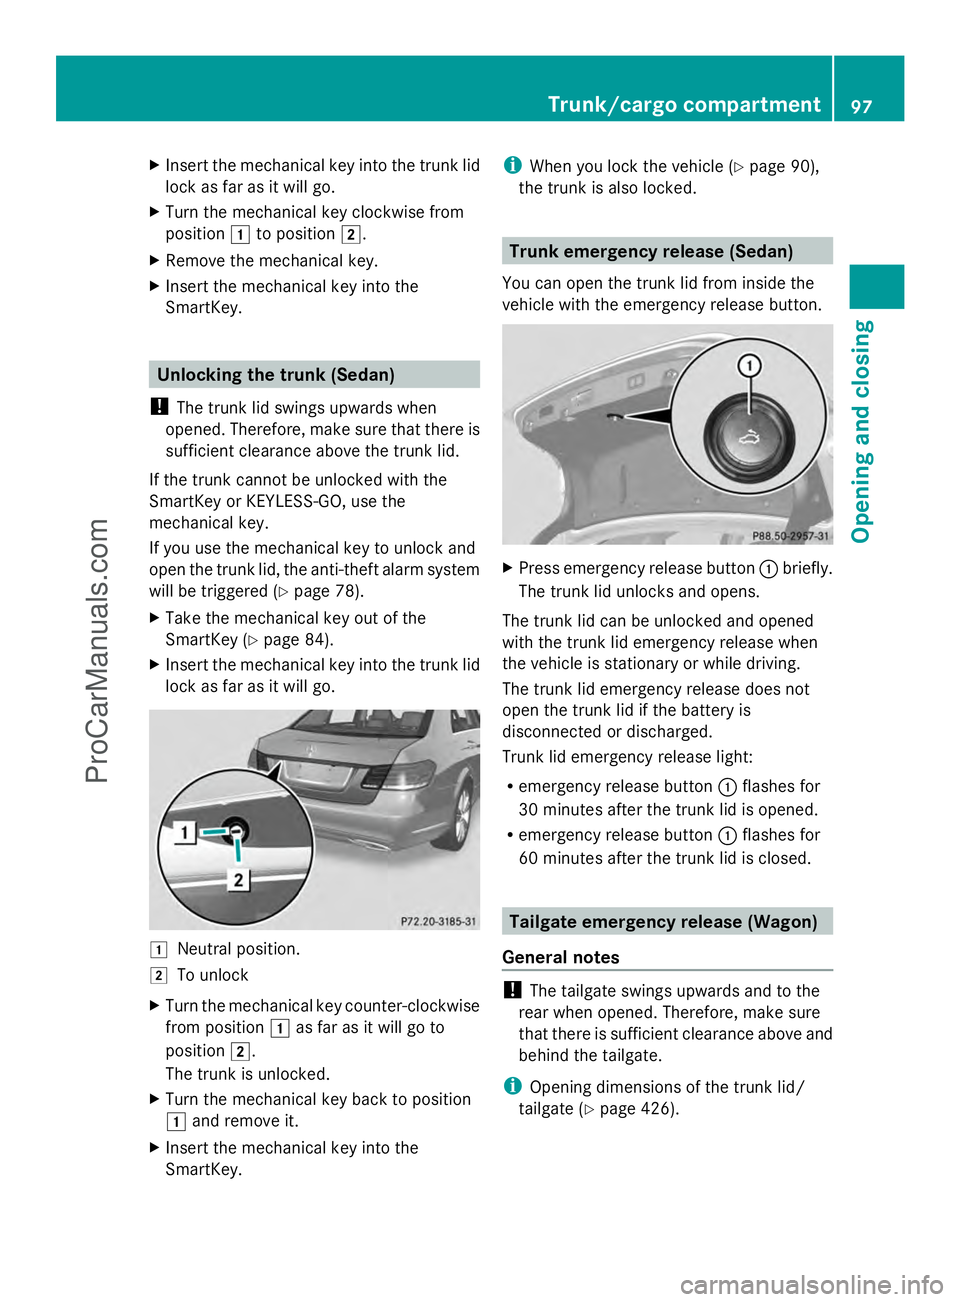
lock as far as it will go. 1
Neutral position.
2 To unlock
X Turn the mechanical key counter-clockwise
from position 1as far as it will go to
position 2.
The trunk is unlocked.
X Turn the mechanical key back to position
1 and remove it.
X Insert the mechanical key into the
SmartKey. i
When you lock the vehicle (Y page 90),
the trunk is also locked. Trunk emergency release (Sedan)
You can open the trunk lid from inside the
vehicle with the emergency release button. X
Press emergency release button :briefly.
The trunk lid unlocks and opens.
The trunk lid can be unlocked and opened
with the trunk lid emergency release when
the vehicle is stationary or while driving.
The trunk lid emergency release does not
open the trunk lid if the battery is
disconnected or discharged.
Trunk lid emergency release light:
R emergency release button :flashes for
30 minutes after the trunk lid is opened.
R emergency release button :flashes for
60 minutes after the trunk lid is closed. Tailgate emergency release (Wagon)
General notes !
The tailgate swings upwards and to the
rear when opened. Therefore, make sure
that there is sufficient clearance above and
behind the tailgate.
i Opening dimensions of the trunk lid/
tailgate (Y page 426). Trunk/cargo compartment
97Opening and closing Z
ProCarManuals.com
Page 313 of 430
X
Raise box :and press hooks Ainto
anchorage ?as far as they will go.
X Turn left-hand rotating catch Bclockwise
and right-hand rotating catch Bcounter-
clockwise by 90°.
X To remove: turn left-hand rotating catch
B counter-clockwise and right-hand
rotating catch Bclockwise by 90°.
X Move box :downwards and pull it out
from anchorages ?.
i Store the EASY-PACK trunk box on a flat
surface after removal, e.g. on a suitable
shelf. EASY-PACK load-securing kit (Wagon)
Components and storage The EASY-PACK load-securing kit allows you
to use your cargo compartment for a variety
of purposes. The accessory parts are located
under the cargo compartment floor.
X Open the EASY-PACK folding luggage-
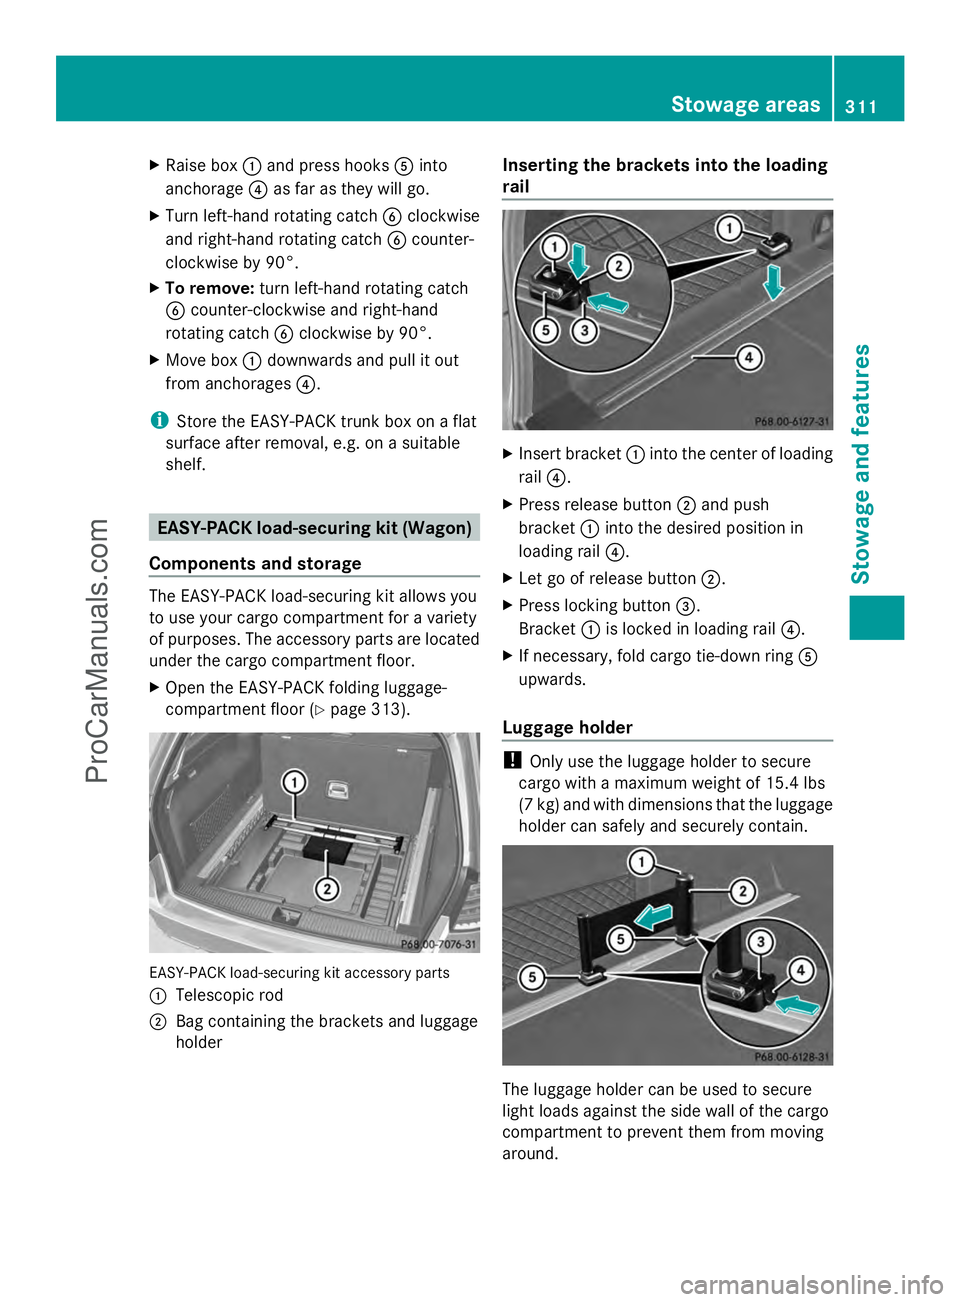
compartment floor (Y page 313).EASY-PACK load-securing kit accessory parts
: Telescopic rod
; Bag containing the brackets and luggage
holder Inserting the brackets into the loading
rail
X
Insert bracket :into the center of loading
rail ?.
X Press release button ;and push
bracket :into the desired position in
loading rail ?.
X Let go of release button ;.
X Press locking button =.
Bracket :is locked in loading rail ?.
X If necessary, fold cargo tie-down ring A
upwards.
Luggage holder !
Only use the luggage holder to secure
cargo with a maximum weight of 15.4 lbs
(7 kg) and with dimensions that the luggage
holder can safely and securely contain. The luggage holder can be used to secure
light loads against the side wall of the cargo
compartment to prevent them from moving
around. Stowage areas
311Stowage and fea tures Z
ProCarManuals.com
Page 374 of 430
Useful information
i This Operator's Manual describes all
models and all standard and optional
equipment of your vehicle available at the
time of publication of the Operator's
Manual. Country-specific differences are
possible. Please note that your vehicle may
not be equipped with all features
described. This also applies to safety-
related systems and functions.
i Read the information on qualified
specialist workshops: (Y page 26).Important safety notes
G
WARNING
If wheels and tires of the wrong size are used,
the wheel brakes or suspension components
may be damaged. There is a risk of an
accident.
Always replace wheels and tires with those
that fulfill the specifications of the original
part.
When replacing wheels, make sure to use the
correct:
R designation
R model
When replacing tires, make sure to use the
correct:
R designation
R manufacturer
R model G
WARNING
A flat tire severely impairs the driving,
steering and braking characteristics of the
vehicle. There is a risk of accident.
Tires without run-flat characteristics:
R do not drive with a flat tire.
R immediately replace the flat tire with your
emergency spare wheel or spare wheel, or
consult a qualified specialist workshop. Tires with run-flat characteristics:
R
pay attention to the information and
warning notices on MOExtended tires (tires
with run-flat characteristics).
Accessories that are not approved for your
vehicle by Mercedes-Benz or are not being
used correctly can impair the operating
safety.
Before purchasing and using non-approved
accessories, visit a qualified specialist
workshop and ask about:
R suitability
R legal stipulations
R factory recommendations
Information on the dimensions and types of
wheels and tires for your vehicle can be found
in the "Wheel/tire combinations" section
(Y page 400).
Information on air pressure for the tires on
your vehicle can be found:
R on the vehicle's Tire and Loading
Information placard on the B-pillar
(Y page 383)
R on the tire pressure label on the fuel filler
flap (Y page 176)
R under "Tire pressure" (Y page 376) Operation
Information on driving
If the vehicle is heavily loaded, check the tire
pressures and correct them if necessary.
While driving, pay attention to vibrations,
noises and unusual handling characteristics,
e.g. pulling to one side. This may indicate that
the wheels or tires are damaged. If you
suspect that a tire is defective, reduce your
speed immediately. Stop the vehicle as soon
as possible to check the wheels and tires for
damage. Hidden tire damage could also be
causing the unusual handling characteristics.
If you find no signs of damage, have the tires 372
OperationWheels and tires
ProCarManuals.com
Page 379 of 430
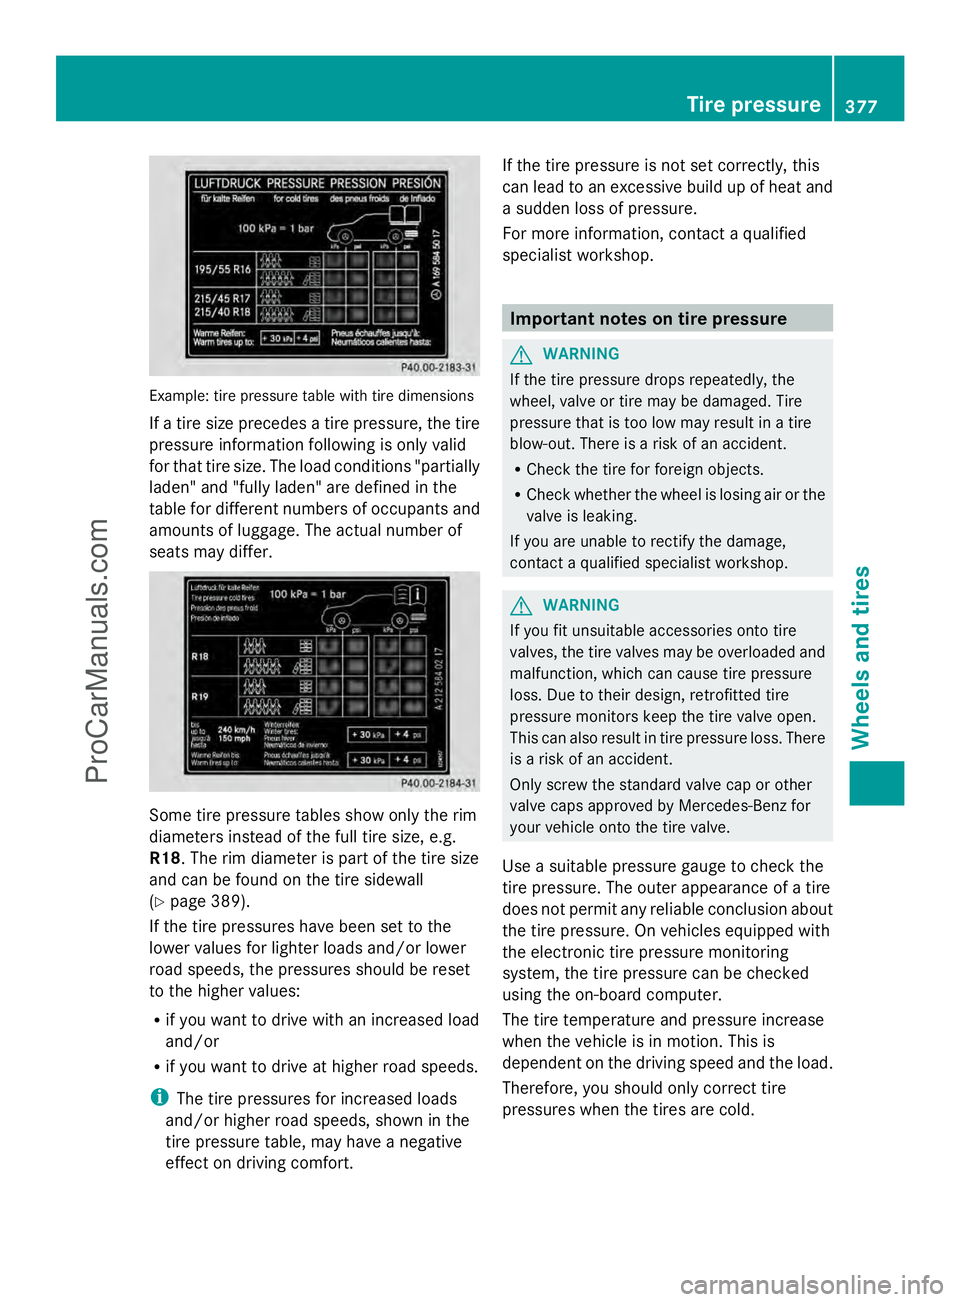
Example: tire pressure table with tire dimensions
If a tire size precedes a tire pressure, the tire
pressure information following is only valid
for that tire size. The load conditions "partially
laden" and "fully laden" are defined in the
table for different numbers of occupants and
amounts of luggage. The actual number of
seats may differ. Some tire pressure tables show only the rim
diameters instead of the full tire size, e.g.
R18 . The rim diameter is part of the tire size
and can be found on the tire sidewall
(Y page 389).
If the tire pressures have been set to the
lower values for lighter loads and/or lower
road speeds, the pressures should be reset
to the higher values:
R if you want to drive with an increased load
and/or
R if you want to drive at higher road speeds.
i The tire pressures for increased loads
and/or higher road speeds, shown in the
tire pressure table, may have a negative
effect on driving comfort. If the tire pressure is not set correctly, this
can lead to an excessive build up of heat and
a sudden loss of pressure.
For more information, contact a qualified
specialist workshop.
Important notes on tire pressure
G
WARNING
If the tire pressure drops repeatedly, the
wheel, valve or tire may be damaged. Tire
pressure that is too low may result in a tire
blow-out. There is a risk of an accident.
R Check the tire for foreign objects.
R Check whether the wheel is losing air or the
valve is leaking.
If you are unable to rectify the damage,
contact a qualified specialist workshop. G
WARNING
If you fit unsuitable accessories onto tire
valves, the tire valves may be overloaded and
malfunction, which can cause tire pressure
loss. Due to their design, retrofitted tire
pressure monitors keep the tire valve open.
This can also result in tire pressure loss. There
is a risk of an accident.
Only screw the standard valve cap or other
valve caps approved by Mercedes-Benz for
your vehicle onto the tire valve.
Use a suitable pressure gauge to check the
tire pressure. The outer appearance of a tire
does not permit any reliable conclusion about
the tire pressure. On vehicles equipped with
the electronic tire pressure monitoring
system, the tire pressure can be checked
using the on-board computer.
The tire temperature and pressure increase
when the vehicle is in motion. This is
dependent on the driving speed and the load.
Therefore, you should only correct tire
pressures when the tires are cold. Tire pressure
377Wheels and tires Z
ProCarManuals.com
Page 397 of 430

Occupant distribution
The distribution of occupants in a vehicle at
their designated seating positions.
Total load limit
Rated cargo and luggage load plus
68 kilograms (150 lb) multiplied by the
number of seats in the vehicle. Changing a wheel
Flat tire
The "Breakdown assistance" section
(Y page 354)c ontains information and notes
on how to deal with a flat tire. Information on
driving with MOExtended tires in the event of
a flat tire can be found under "MOExtended
tires (tires with run-flat characteristics"
(Y page 354).
Vehicle with emergency spare wheel: in
the event of a flat tire, the emergency spare
wheel is mounted as described under
"Mounting a wheel" ( Ypage 396). Rotating the wheels
G
WARNING
Interchanging the front and rear wheels may
severely impair the driving characteristics if
the wheels or tires have different dimensions.
The wheel brakes or suspension components
may also be damaged. There is a risk of
accident.
Rotate front and rear wheels only if the wheels
and tires are of the same dimensions.
! On vehicles equipped with a tire pressure
monitor, electronic components are
located in the wheel.
Tire-mounting tools should not be used
near the valve. This could damage the
electronic components.
Only have tires changed at a qualified
specialist workshop. Always observe the instructions and safety
notes in the "Mounting a wheel" section
(Y
page 396).
The wear patterns on the front and rear tires
differ, depending on the operating conditions.
Rotate the wheels before a clear wear pattern
has formed on the tires. Front tires typically
wear more on the shoulders and the rear tires
in the center.
If your vehicle's tire configuration allows, you
can rotate the wheels according to the
intervals in the tire manufacturer's warranty
book in your vehicle documents. If no
warranty book is available, the tires should be
rotated every 3,000 to 6,000 miles (5,000 to
10,000 km), or earlier if tire wear requires. Do
not change the direction of wheel rotation.
Clean the contact surfaces of the wheel and
the brake disc thoroughly every time a wheel
is rotated. Check the tire pressure and, if
necessary, restart the tire pressure loss
warning system or the tire pressure monitor. Direction of rotation
Tires with a specified direction of rotation
have additional benefits, e.g. if there is a risk
of hydroplaning. You will only gain these
benefits if the correct direction of rotation is
maintained.
An arrow on the sidewall of the tire indicates
its correct direction of rotation. Storing wheels
Store wheels that are not being used in a cool,
dry and preferably dark place. Protect the
tires from oil, grease, gasoline and diesel. Cleaning the wheels
G
WARNING
The water jet from a circular jet nozzle (dirt
blasters) can cause invisible exterior damage
to the tires or chassis components. Changing a wheel
395Wheels and tires
Z
ProCarManuals.com