2014 MERCEDES-BENZ E-SEDAN TRUNK MAXIMUM
[x] Cancel search: TRUNK MAXIMUMPage 18 of 430

Remote control
Garage door opener .......................331
Programming (garage door opener) 331
Replacing bulbs
Important safety notes ..................137
Overview of bulb type s.................. 137
Reporting safety defects ....................27
Reserve (fuel tank) see Fuel
Reserve fuel
Display message ............................ 272
Warning lamp ................................. 292
see Fuel
Residual heat (climate control) ........154
Restraint system see SRS (Supplemental Restraint
System)
Reverse gear
Engaging (automatic transmission) 167
Reversing feature
Panorama sliding sunroo f.............. 103
Roller sunblinds ............................. 104
Side windows ................................... 98
Sliding sunroof .............................. .103
Trunk lid/tailgate ............................. 91
Reversing lamps (display message) 268
Roadside Assistance (breakdown) ....24
Roller sunblind Panorama roof with power tilt/
sliding pane l.................................. 104
Rear side windows .........................318
Rear window .................................. 318
Roof carrier ........................................ 314
Roof lining and carpets (cleaning
guidelines) ......................................... 349
Roof load (maximum) ........................426 S
Safety Children in the vehicle .....................60
Child restraint systems ....................60
Occupant Classification System
(OCS) ............................................... 48
Safety system
see Driving safety systems Seat belts
Adjusting the driver's and front-
passenger seat belt .........................57
Adjusting the height ......................... 58
Belt force limiters ............................ 59
center rear-compartment sea t......... 58
Cleaning ......................................... 348
Correct usage .................................. 56
Emergency Tensioning Devices ....... .59
Fastening ......................................... 56
Important safety guidelines .............55
Releasing ......................................... 58
Safety guidelines ............................. 41
Switching belt adjustment on/off
(on-board computer) ......................252
Warning lamp ................................. 285
Warning lamp (function) ................... 58
Seats
Adjusting (electrically) ...................110
Adjusting the 4-way lumbar
support .......................................... 114
Adjusting the active multicontour
seat ............................................... 113
Adjusting the head restraint ..........110
Cleaning the cover .........................348
Correct driver's seat position ........108
Folding the backrest (rear
compartment) forwards/back .......305
Important safety notes ..................109
Massage function .......................... 113
Overview ........................................ 109
Seat heating problem ....................118
Seat ventilation problem ................119
Storing settings (memory function) 125
Switching seat heating on/off .......116
Switching seat ventilation on/off ..118
Selector lever
Cleaning ......................................... 347
Sensors (cleaning instructions) .......346
Service menu (on-board computer) .249
Service products Brake fluid ..................................... 423
Coolant (engine) ............................ 423
DEF special additives .....................421
Engine oil ....................................... 422
Fuel ................................................ 418
Important safety notes ..................41816
IndexProCarManuals.com
Page 22 of 430
Uniform Tire Quality Grading
Standards
...................................... 387
Uniform Tire Quality Grading
Standards (definition) ....................393
Unladen weight (definition) ............394
Wear indicator (definition) .............394
Wheel rim (definition) ....................393
see Flat tire
Top Tether ............................................ 64
Towing Important safety guidelines ...........364
Installing the towing eye ................365
Removing the towing eye ...............366
With the rear axle raised ................366
Towing away
With both axles on the ground .......366
Tow-starting
Emergency engine starting ............367
Important safety notes ..................364
Transfer case ..................................... 175
Transmission see Automatic transmission
Transmission position display .........168
Transmission position display
(DIRECT SELECT lever) ......................168
Transporting the vehicle ..................366
Trim pieces (cleaning instructions) .348
Trip computer (on-board computer) 241
Trip odometer Calling up ....................................... 241
Resetting (on-board computer) ......242
Trunk
Emergency release ..........................97
Locking separately ...........................96
Opening/closing (from outside,
HANDS-FREE ACCESS) ....................93
Trunk lid
Display message ............................ 282
Opening dimensions ......................426
Trunk load (maximum) ......................426
Turn signals Changing bulbs (front) ...................138
Display message ............................ 266
Switching on/off ........................... 131
Type identification plate
see Vehicle identification plate U
Unlocking Emergency unlocking .......................90
From inside the vehicle (central
unlocking button) ............................. 89 V
Vanity mirror (in the sun visor) ........317
Vehicle Correct use ...................................... 27
Data acquisition ............................... 28
Display message ............................ 282
Equipment ....................................... 23
Individual settings ..........................249
Limited Warranty ............................. 27
Loading .......................................... 383
Locking (in an emergency) ...............90
Locking (SmartKey) .......................... 82
Lowering ........................................ 400
Maintenance .................................... 24
Parking for a long period ................ 183
Pulling away ................................... 162
Raising ........................................... 397
Reporting problems .........................27
Securing from rolling away ............396
Towing away .................................. 364
Transporting .................................. 366
Unlocking (in an emergency) ...........90
Unlocking (SmartKey) ......................82
Vehicle data ................................... 426
Vehicle data ....................................... 426
Vehicle dimensions ...........................426
Vehicle emergency locking ................90
Vehicle identification number see VIN
Vehicle identification plate ..............416
Vehicle level AIRMATIC ...................................... 204
Vehicle level (display message) .......273
Vehicle tool kit .................................. 352
Video Operating the DVD ......................... 245
VIN ...................................................... 41620
IndexProCarManuals.com
Page 210 of 430
lowers; with an increase in temperature,
the vehicle level rises.
Changing the rear axle ride height
This function is only available for the E 63
AMG 4MATIC.
The vehicle level at the rear axle depends on
the selected suspension tuning and the
vehicle speed.
The vehicle level at the rear axle changes
during the journey depending on the selected
suspension tuning:
R Comfort: +0.4 in (+10 mm)
R Sport + and Sport: -0.6 in (-15 mm)
When switching from Comfort to Sport or
Sport +, the rear axle lowers by approximately
1.0 in (25 mm). When switching from Sport
or Sport + to Comfort, the rear axle raises by
approximately 1.0 in (25 mm). This level
change also takes place when the vehicle is
stationary.
If you drive faster than 105 mph (170 km/h),
the rear axle ride height is set to a medium
level. This increases driving safety and
reduces air resistance. If you then drive at
speeds below 93 mph (150 km/h), the rear
axle ride height is readjusted to the selected
suspension tuning.
Load compensation
The vehicle can compensate differences in
the vehicle level by raising or lowering the
rear axle. This is the case, for example, if
people get out or if luggage is being loaded.
Load compensation takes place if:
R a door or the trunk lid/tailgate is opened
R the parked vehicle is unlocked
For larger level changes, the engine must be
running. 4MATIC (permanent four-wheel drive)
If you fail to adapt your driving style, 4MATIC
can neither reduce the risk of accident nor
override the laws of physics. 4MATIC cannot take account of road, weather and traffic
conditions. 4MATIC is only an aid. You are
responsible for the distance to the vehicle in
front, for vehicle speed, for braking in good
time and for staying in your lane.
If a drive wheel spins due to insufficient grip:
R
Only depress the accelerator pedal as far
as necessary when pulling away.
R Accelerate less when driving.
! Never tow the vehicle with one axle
raised. This may damage the transfer case.
Damage of this sort is not covered by the
Mercedes-Benz Limited Warranty. All
wheels must remain either on the ground
or be fully raised. Observe the instructions
for towing the vehicle with all wheels in full
contact with the ground.
i In wintry driving conditions, the maximum
effect of 4MATIC can only be achieved if
you use winter tires (M+S tires), with snow
chains if necessary.
4MATIC ensures that all four wheels are
permanently driven. Together with ESP ®
, it
improves the traction of your vehicle
whenever a drive wheel spins due to
insufficient grip. PARKTRONIC
Important safety notes PARKTRONIC is an electronic parking aid with
ultrasonic sensors. It indicates visually and
audibly the distance between your vehicle
and an object.
PARKTRONIC is only an aid. It is not a
replacement for your attention to your
immediate surroundings. You are always
responsible for safe maneuvering, parking
and exiting a parking space. When
maneuvering, parking or pulling out of a
parking space, make sure that there are no
persons, animals or objects in the area in
which you are maneuvering. 208
Driving systemsDriving and parking
ProCarManuals.com
Page 224 of 430
X
Make sure that the SmartKey is in position
2 in the ignition lock.
X Make sure that the Activation by R
Activation by R
gear
gear setting is active in COMAND, see the
separate COMAND operating instructions.
X To show the 360° camera image: engage
reverse gear.
The area behind the vehicle is shown in the
COMAND display in split-screen mode. You
see the top view of the vehicle and the
image from the rear view camera.
Selecting the split-screen and full
screen displays X
To switch between split screen views:
switch to the line with the vehicle icons by
sliding ZVthe COMAND controller.
X Turn cVd the COMAND controller and
select one of the vehicle symbols.
X To switch to full screen mode: select
Full Screen
Full Screen by turningcVdthe
COMAND controller and press Wto
confirm.
i The full screen option is only available in
the following views:
R Top view with picture from the rear view
camera
R Top view with picture from the front
camera
Displays in the COMAND display Important safety notes
The camera system may show a distorted
view of obstacles, show them incorrectly or
not at all. Obstacles are not shown by the
system in the following locations:
R under the front and rear bumpers
R very close to the front and rear bumpers
R in the area immediately above the tailgate
handle/trunk lid handle R
very close to the exterior mirrors
R in the transitional areas between the
various cameras in the virtual top view
! Objects not at ground level may appear to
be further away than they actually are, e.g.:
R the bumper of a parked vehicle
R the drawbar of a trailer
R the ball coupling of a trailer tow hitch
R the rear section of an HGV
R a slanted post
Use the guidelines only for orientation.
Approach objects no further than the
bottom-most guideline.
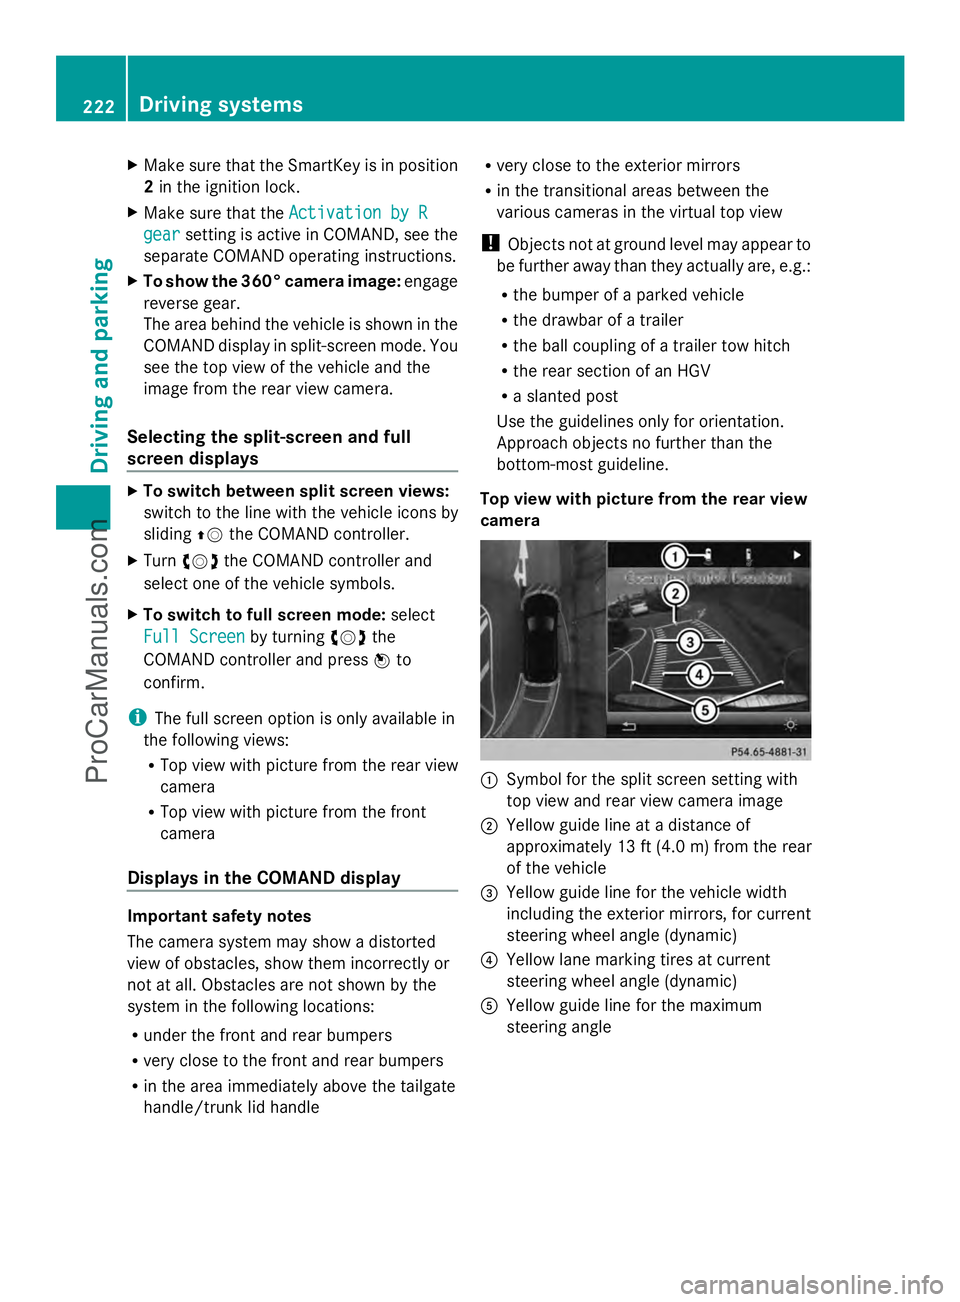
Top view with picture from the rear view
camera :
Symbol for the split screen setting with
top view and rear view camera image
; Yellow guide line at a distance of
approximately 13 ft (4.0 m) from the rear
of the vehicle
= Yellow guide line for the vehicle width
including the exterior mirrors, for current
steering wheel angle (dynamic)
? Yellow lane marking tires at current
steering wheel angle (dynamic)
A Yellow guide line for the maximum
steering angle 222
Driving systemsDriving and parking
ProCarManuals.com
Page 300 of 430
Useful information
i This Operator's Manual describes all
models and all standard and optional
equipment of your vehicle available at the
time of publication of the Operator's
Manual. Country-specific differences are
possible. Please note that your vehicle may
not be equipped with all features
described. This also applies to safety-
related systems and functions.
i Read the information on qualified
specialist workshops: (Y page 26).Stowage areas
Loading guidelines
G
WARNING
If objects, luggage or loads are not secured or
not secured sufficiently, they could slip, tip
over or be flung around and thereby hit vehicle
occupants. There is a risk of injury,
particularly in the event of sudden braking or
a sudden change in direction.
Always store objects so that they cannot be
flung around. Secure objects, luggage or
loads against slipping or tipping before the
journey. G
WARNING
Combustion engines emit poisonous exhaust
gases such as carbon monoxide. Exhaust
gases can enter the vehicle interior if the
trunk lid/tailgate is open when the engine is
running, especially if the vehicle is in motion.
There is a risk of poisoning.
Always switch off the engine before opening
the trunk lid/tailgate. Never drive with the
trunk lid/tailgate open. The handling characteristics of a laden
vehicle are dependent on the distribution of
the load within the vehicle. For this reason,
you should observe the following notes when
transporting a load:
R
Never exceed the maximum permissible
gross vehicle weight or the gross axle
weight rating of the vehicle (including
occupants). The values are specified on the
vehicle identification plate on the B-pillar of
the driver's door.
R The trunk/cargo compartment is the
preferred place to store objects.
R Position heavy loads as far forwards as
possible and as low down in the trunk/
cargo compartment as possible.
R The load must not protrude above the
upper edge of the seat backrests.
R Always place the load against the rear or
front seat backrests. Make sure that the
seat backrests are securely locked into
place.
R Always place the load behind unoccupied
seats if possible.
R Use the cargo tie down rings and the parcel
nets to transport loads and luggage.
R Use cargo tie-down rings and fastening
materials appropriate for the weight and
size of the load.
R When transporting objects in the cargo
compartment, the combined cargo cover
and net must always be installed (cargo
compartment cover and cargo net).
R Secure the load with sufficiently strong and
wear-resistant tie-downs. pad sharp edges
for protection. Stowage space
Important safety notes G
WARNING
If objects in the passenger compartment are
stowed incorrectly, they can slide or be
thrown around and hit vehicle occupants. 298
Stowage areasStowage and features
ProCarManuals.com
Page 302 of 430
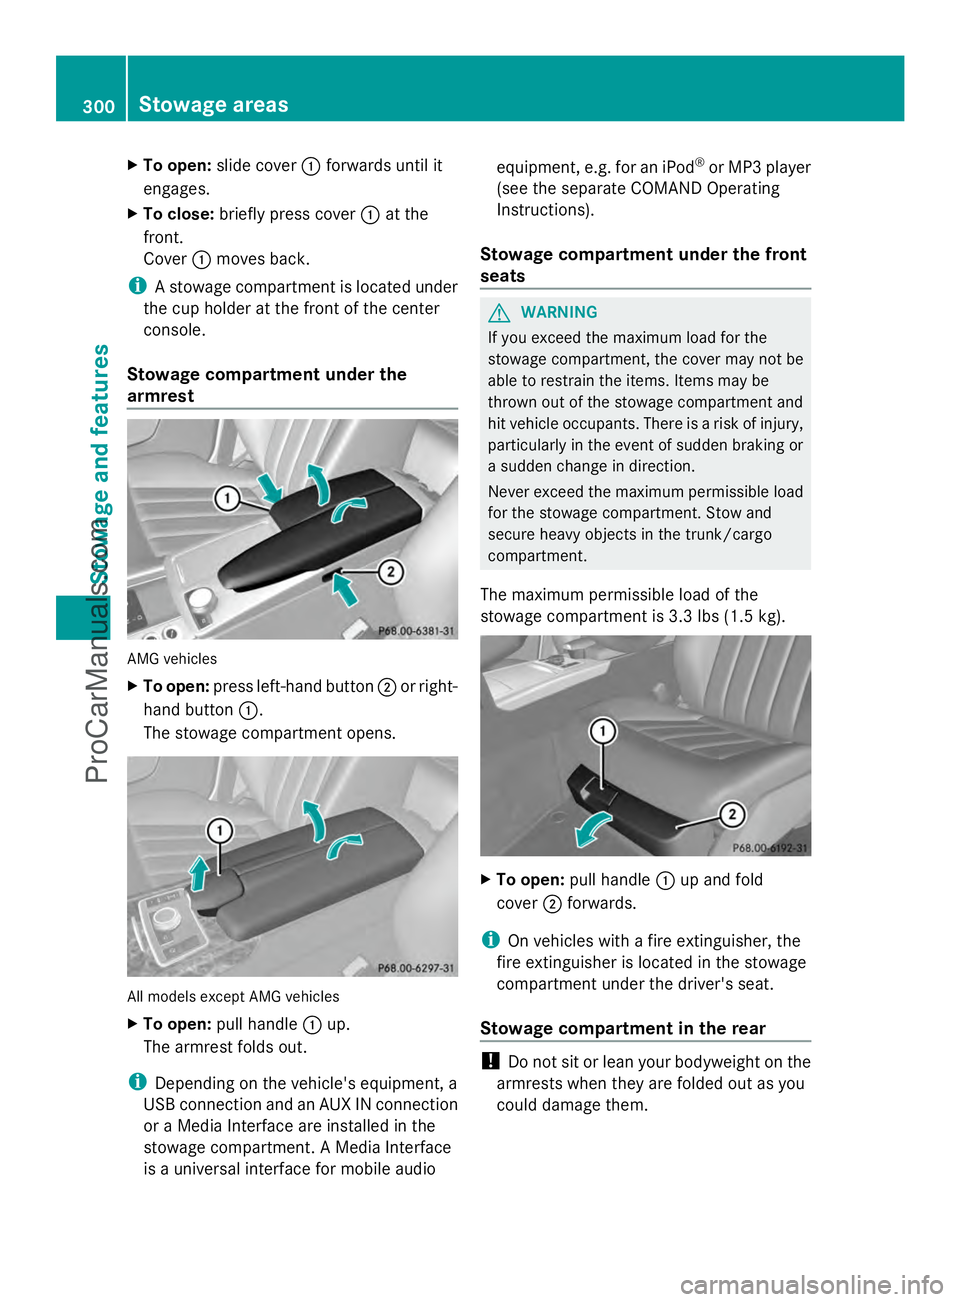
X
To open: slide cover :forwards until it
engages.
X To close: briefly press cover :at the
front.
Cover :moves back.
i A stowage compartment is located under
the cup holder at the front of the center
console.
Stowage compartment under the
armrest AMG vehicles
X
To open: press left-hand button ;or right-
hand button :.
The stowage compartment opens. All models except AMG vehicles
X
To open: pull handle :up.
The armrest folds out.
i Depending on the vehicle's equipment, a
USB connection and an AUX IN connection
or a Media Interface are installed in the
stowage compartment. A Media Interface
is a universal interface for mobile audio equipment, e.g. for an iPod
®
or MP3 player
(see the separate COMAND Operating
Instructions).
Stowage compartment under the front
seats G
WARNING
If you exceed the maximum load for the
stowage compartment, the cover may not be
able to restrain the items. Items may be
thrown out of the stowage compartment and
hit vehicle occupants. There is a risk of injury,
particularly in the event of sudden braking or
a sudden change in direction.
Never exceed the maximum permissible load
for the stowage compartment. Stow and
secure heavy objects in the trunk/cargo
compartment.
The maximum permissible load of the
stowage compartment is 3.3 lbs (1.5 kg). X
To open: pull handle :up and fold
cover ;forwards.
i On vehicles with a fire extinguisher, the
fire extinguisher is located in the stowage
compartment under the driver's seat.
Stowage compartment in the rear !
Do not sit or lean your bodyweight on the
armrests when they are folded out as you
could damage them. 300
Stowage areasSto
wage an d features
ProCarManuals.com
Page 308 of 430
Securing cargo
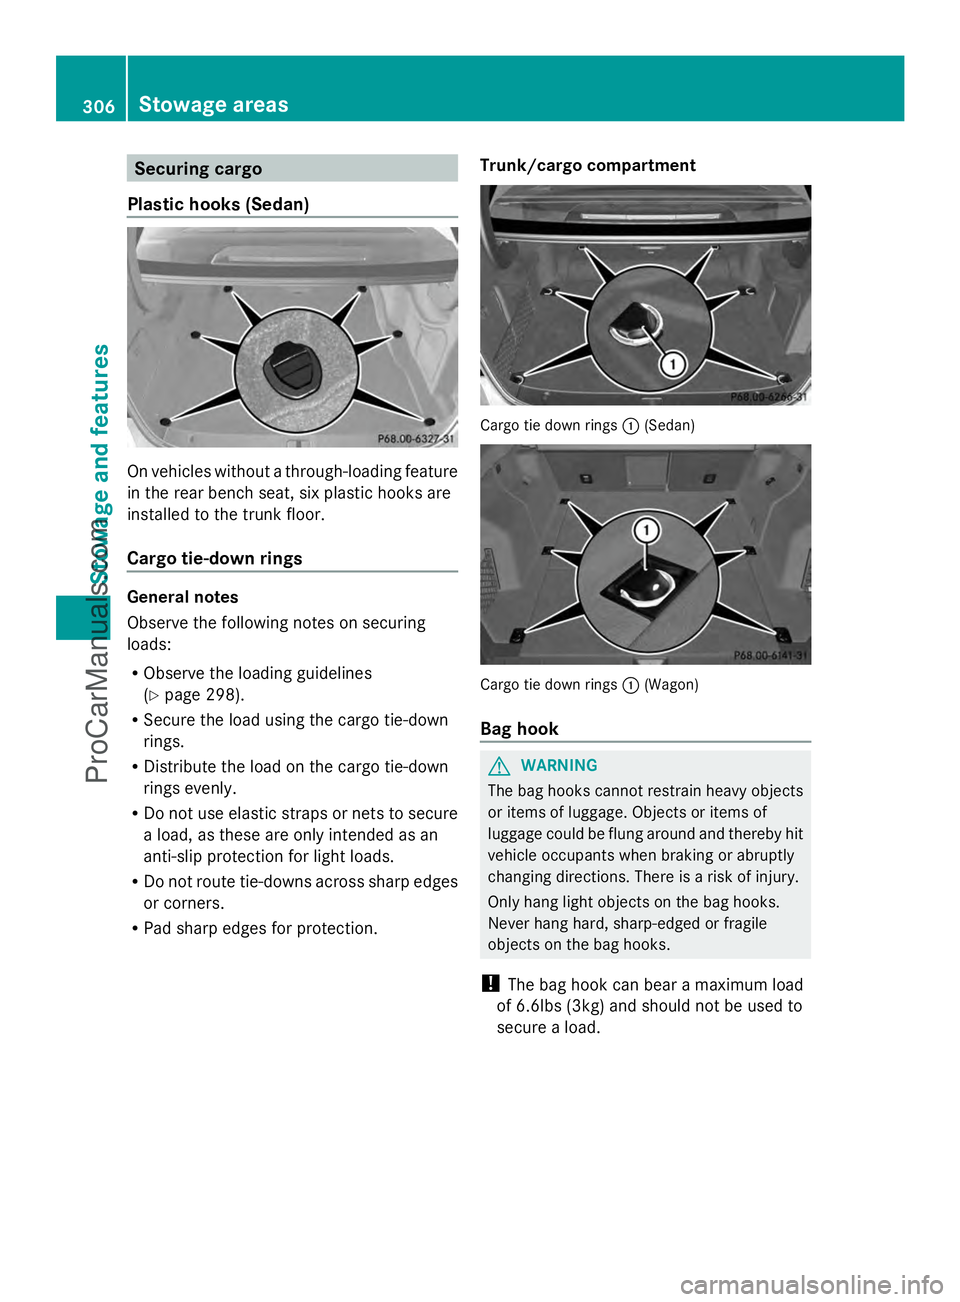
Plastic hooks (Sedan) On vehicles without a through-loading feature
in the rear bench seat, six plastic hooks are
installed to the trunk floor.
Cargo tie-down rings General notes
Observe the following notes on securing
loads:
R
Observe the loading guidelines
(Y page 298).
R Secure the load using the cargo tie-down
rings.
R Distribute the load on the cargo tie-down
rings evenly.
R Do not use elastic straps or nets to secure
a load, as these are only intended as an
anti-slip protection for light loads.
R Do not route tie-downs across sharp edges
or corners.
R Pad sharp edges for protection. Trunk/cargo compartment Cargo tie down rings
:(Sedan) Cargo tie down rings
:(Wagon)
Bag hook G
WARNING
The bag hooks cannot restrain heavy objects
or items of luggage. Objects or items of
luggage could be flung around and thereby hit
vehicle occupants when braking or abruptly
changing directions. There is a risk of injury.
Only hang light objects on the bag hooks.
Never hang hard, sharp-edged or fragile
objects on the bag hooks.
! The bag hook can bear a maximum load
of 6.6lbs (3kg) and should not be used to
secure a load. 306
Stowage areasStowage and features
ProCarManuals.com
Page 312 of 430
!
When the EASY-PACK trunk box is pulled
out, no objects may be placed on the frame
of the box, nor should the frame be pushed
from above. Otherwise, the box could be
damaged.
! Sharp-edged, pointed or fragile objects
can damage the EASY-PACK trunk box and
then be thrown out. There is a risk of injury.
Do not transport sharp-edged, pointed or
fragile objects in the EASY-PACK trunk box.
Always store and secure these or similar
objects in the trunk outside of the EASY-
PACK trunk box.
! If you exceed the maximum permitted
load of the EASY-PACK trunk box, objects
can be thrown out of the EASY-PACK trunk
box and strike vehicle occupants. There is
a risk of injury, particularly in the event of
sudden braking or a sudden change in
direction.
Always observe the maximum permitted
load of the EASY-PACK trunk box. Always
store and secure heavy objects in the trunk
outside of the EASY-PACK trunk box.
The maximum permitted load of the EASY-
PACK trunk box is 22 lbs (10 kg). With a load
of above approx. 11 lbs (5kg), the bottom of
the box moves downward until it is rests on
the mat of the trunk floor. Thus, overloading
of the box is avoided.
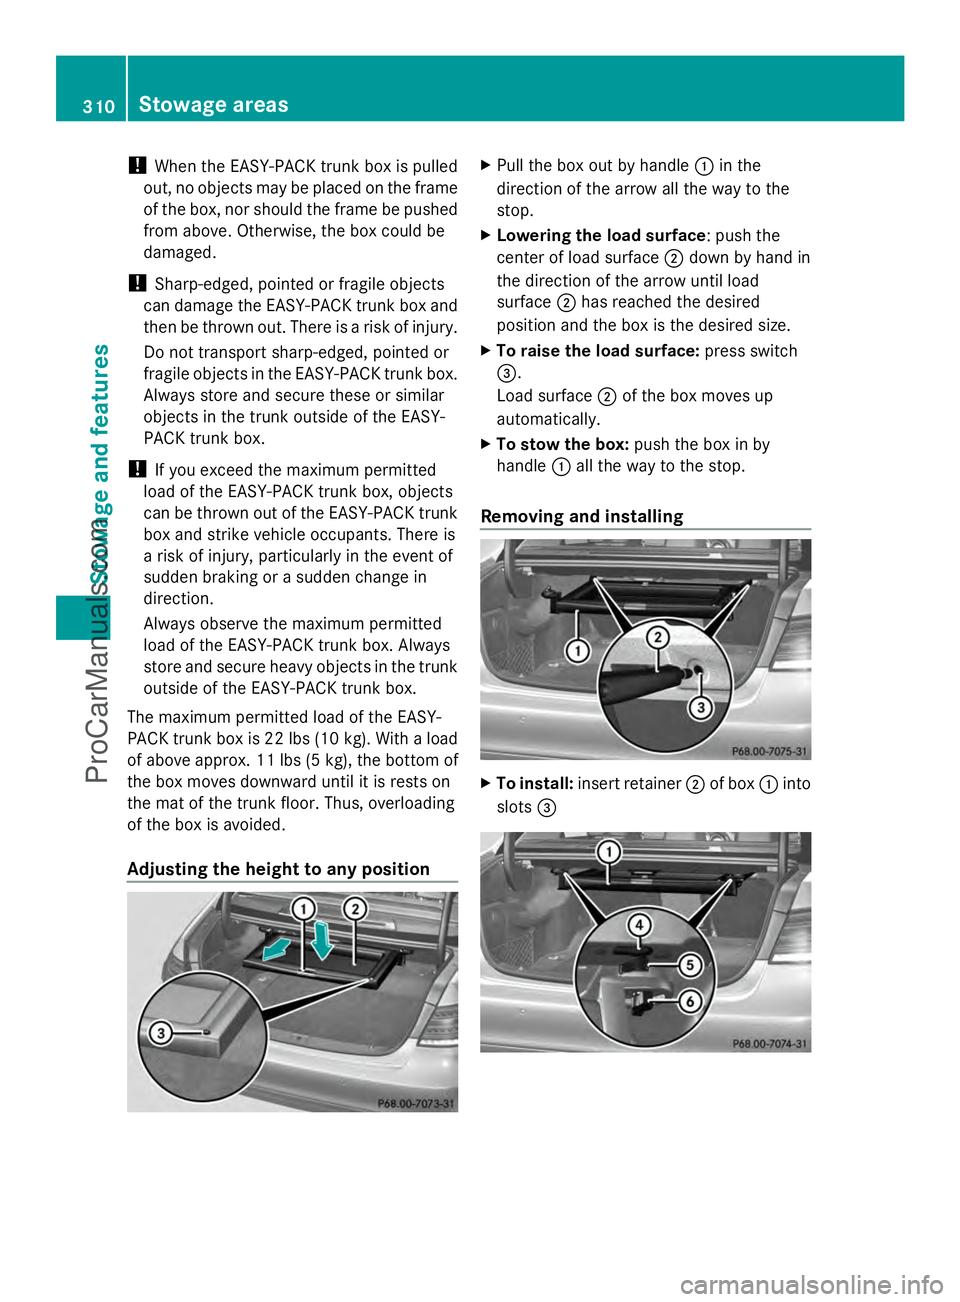
Adjusting the height to any position X
Pull the box out by handle :in the
direction of the arrow all the way to the
stop.
X Lowering the load surface: push the
center of load surface ;down by hand in
the direction of the arrow until load
surface ;has reached the desired
position and the box is the desired size.
X To raise the load surface: press switch
=.
Load surface ;of the box moves up
automatically.
X To stow the box: push the box in by
handle :all the way to the stop.
Removing and installing X
To install: insert retainer ;of box :into
slots = 310
Sto
wage areasStowage an d features
ProCarManuals.com