2014 MERCEDES-BENZ E-SEDAN TRUNK MAXIMUM
[x] Cancel search: TRUNK MAXIMUMPage 313 of 430
X
Raise box :and press hooks Ainto
anchorage ?as far as they will go.
X Turn left-hand rotating catch Bclockwise
and right-hand rotating catch Bcounter-
clockwise by 90°.
X To remove: turn left-hand rotating catch
B counter-clockwise and right-hand
rotating catch Bclockwise by 90°.
X Move box :downwards and pull it out
from anchorages ?.
i Store the EASY-PACK trunk box on a flat
surface after removal, e.g. on a suitable
shelf. EASY-PACK load-securing kit (Wagon)
Components and storage The EASY-PACK load-securing kit allows you
to use your cargo compartment for a variety
of purposes. The accessory parts are located
under the cargo compartment floor.
X Open the EASY-PACK folding luggage-
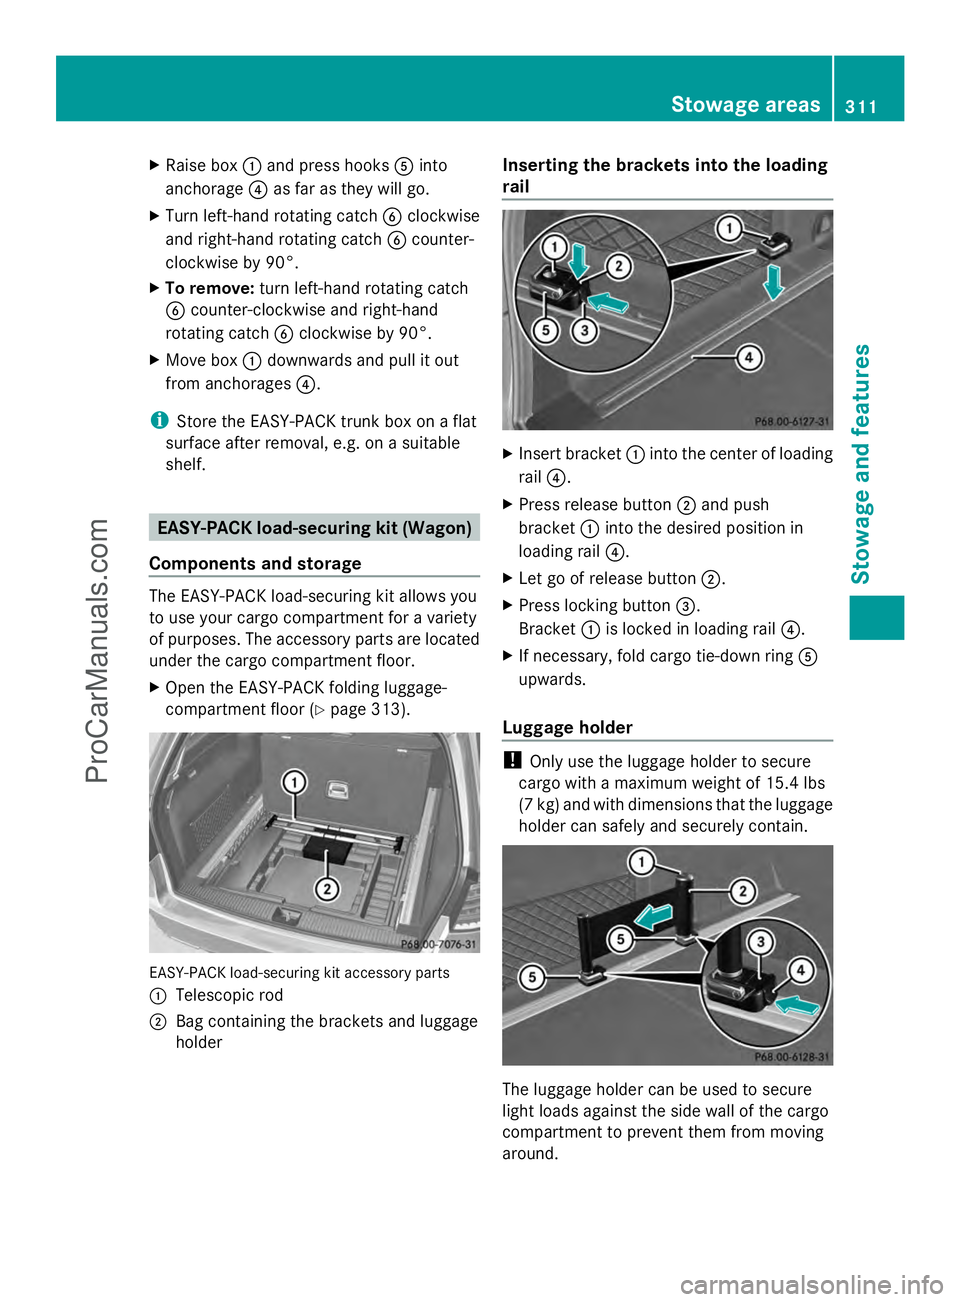
compartment floor (Y page 313).EASY-PACK load-securing kit accessory parts
: Telescopic rod
; Bag containing the brackets and luggage
holder Inserting the brackets into the loading
rail
X
Insert bracket :into the center of loading
rail ?.
X Press release button ;and push
bracket :into the desired position in
loading rail ?.
X Let go of release button ;.
X Press locking button =.
Bracket :is locked in loading rail ?.
X If necessary, fold cargo tie-down ring A
upwards.
Luggage holder !
Only use the luggage holder to secure
cargo with a maximum weight of 15.4 lbs
(7 kg) and with dimensions that the luggage
holder can safely and securely contain. The luggage holder can be used to secure
light loads against the side wall of the cargo
compartment to prevent them from moving
around. Stowage areas
311Stowage and fea tures Z
ProCarManuals.com
Page 317 of 430
Position the load on the roof carrier in such
a way that the vehicle will not sustain
damage even when it is in motion.
Ensure that when the roof carrier is
installed:
R you can raise the sliding sunroof or the
panorama roof with power tilt/sliding
panel fully (depending on the vehicle's
equipment)
R you can open the tailgate or trunk lid fully
R the roof carrier does not come into
contact with the antenna
! To avoid damaging or scratching the
covers, do not use metallic or hard objects
to open them.
The maximum roof load is 220 lbs(100 kg).
An incorrectly secured roof carrier or roof
load may become detached from the vehicle.
You must therefore ensure that you observe
the roof carrier manufacturer's installation
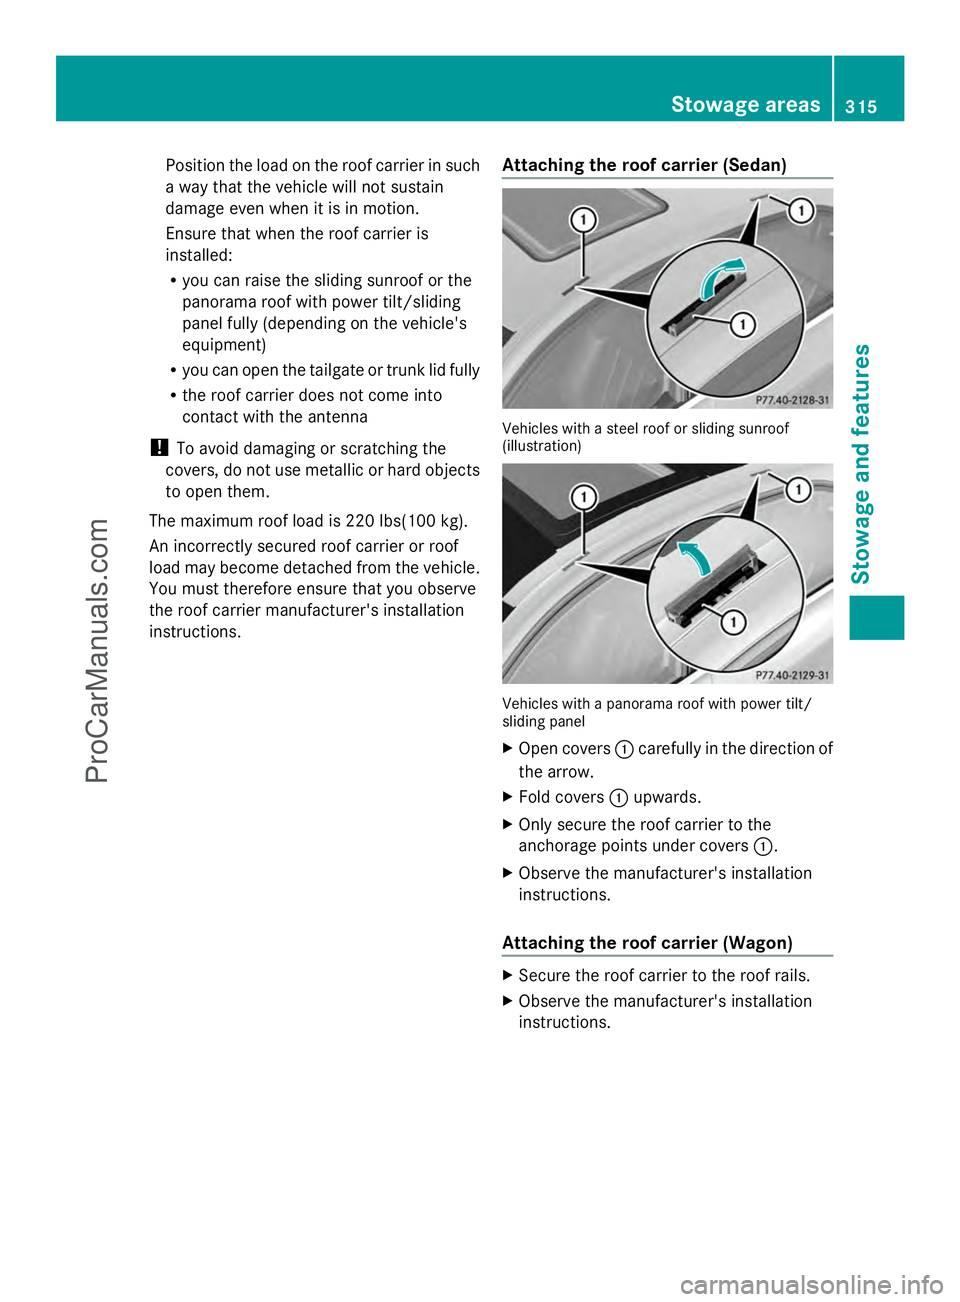
instructions. Attaching the roof carrier (Sedan) Vehicles with a steel roof or sliding sunroof
(illustration)
Vehicles with a panorama roof with power tilt/
sliding panel
X
Open covers :carefully in the direction of
the arrow.
X Fold covers :upwards.
X Only secure the roof carrier to the
anchorage points under covers :.
X Observe the manufacturer's installation
instructions.
Attaching the roof carrier (Wagon) X
Secure the roof carrier to the roof rails.
X Observe the manufacturer's installation
instructions. Stowage areas
315Stowage and features Z
ProCarManuals.com
Page 322 of 430
12 V sockets
General notes X
Turn the SmartKey to position 1in the
ignition lock (Y page 159).
The sockets can be used for accessories with
a maximum draw of 180 W (15 A).
Accessories include such items as lamps or
chargers for mobile phones.
If you use the sockets for long periods when
the engine is switched off, the battery may
discharge.
i An emergency cut-out ensures that the
on-board voltage does not drop too low. If
the on-board voltage is too low, the power
to the sockets is automatically cut. This
ensures that there is sufficient power to
start the engine.
Socket in the front-compartment center
console X
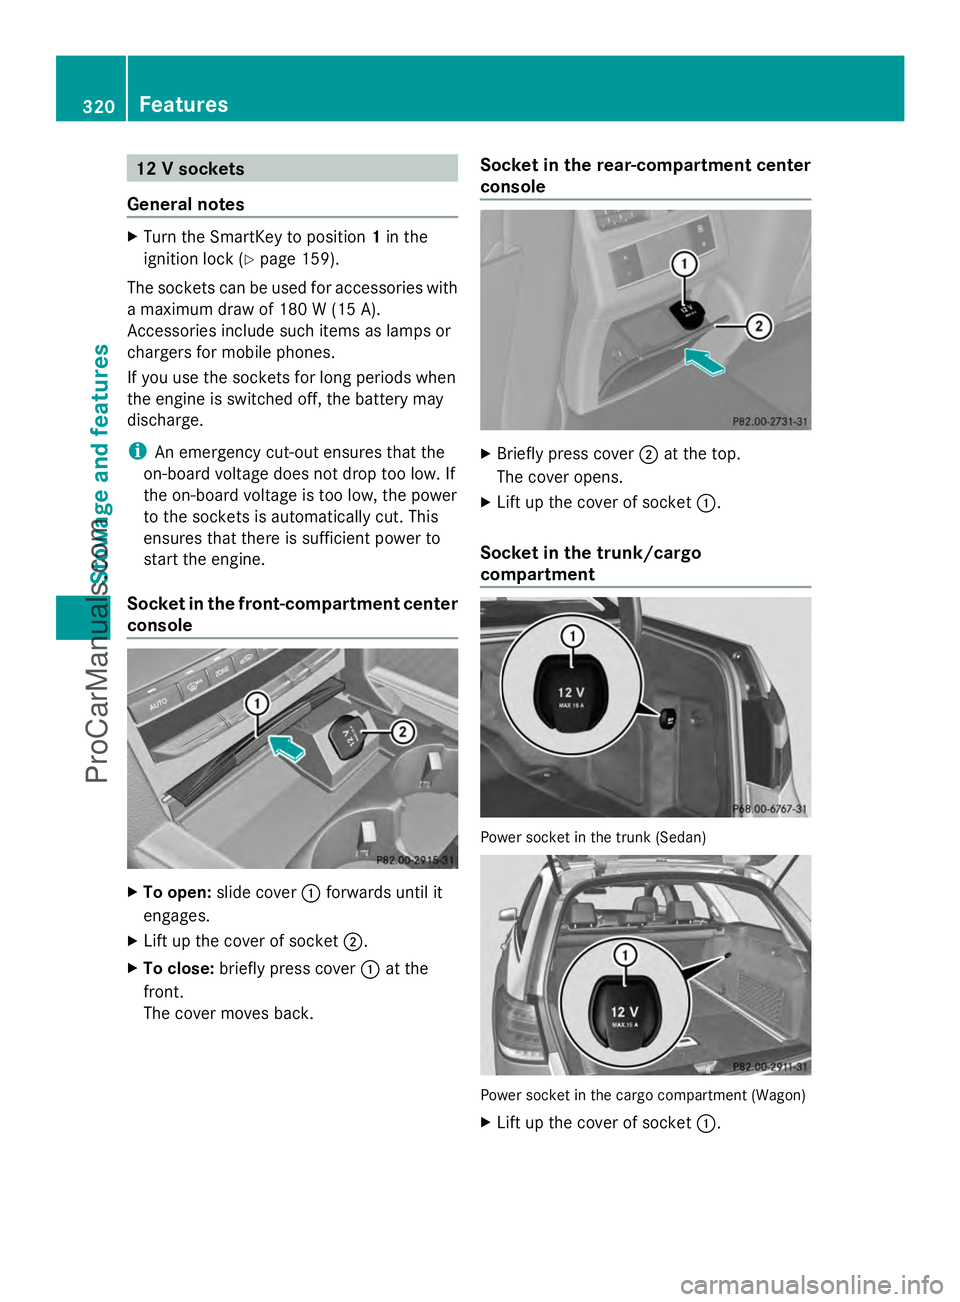
To open: slide cover :forwards until it
engages.
X Lift up the cover of socket ;.
X To close: briefly press cover :at the
front.
The cover moves back. Socket in the rear-compartment center
console
X
Briefly press cover ;at the top.
The cover opens.
X Lift up the cover of socket :.
Socket in the trunk/cargo
compartment Power socket in the trunk (Sedan)
Power socket in the cargo compartment (Wagon)
X
Lift up the cover of socket :.320
FeaturesStowage and features
ProCarManuals.com
Page 323 of 430
115 V socket
Important safety notes G
DANGER
When a suitable device is connected, the
115 V power socket will be carrying a high
voltage. You could receive an electric shock
if the connector cable or the 115 V power
socket is pulled out of the trim or is damaged
or wet. There is a risk of fatal injury.
R Use only connector cables that are dry and
free of damage.
R When the ignition is off, make sure that the
115 V power socket is dry.
R Have the 115 V power socket checked or
replaced immediately at a qualified
specialized workshop if it is damaged or has
been pulled out of the trim.
R Never plug the connector cable into a
115 V power socket that is damaged or has
been pulled out of the trim. G
DANGER
If you reach into the power socket or plug
inappropriate devices into the power socket,
you could receive an electric shock. There is
a risk of fatal injury.
Only connect appropriate devices to the
power socket.
! Note that work and repairs on the 115 V
power socket should only be carried out by
qualified specialist personnel.
General notes The 115 V power socket provides an
alternating voltage of 115 V so that small
electronic devices can be connected. These
devices, such as games consoles, chargers
and laptops, should not consume more than
a maximum of 150 watts altogether.
Requirements for operation of these devices:
R the electronic device that you connect has
a suitable connector and conforms to standards specific to the country you are
in.
R the plug of the electronic device is plugged
correctly into 115 V power socket.
R the maximum wattage of the device to be
connected must not exceed 150 watts.
R the on-board power supply is within a
permissible voltage range.
R the 12 V sockets in the rear and the cargo
compartment/trunk are operational
(Y page 320).
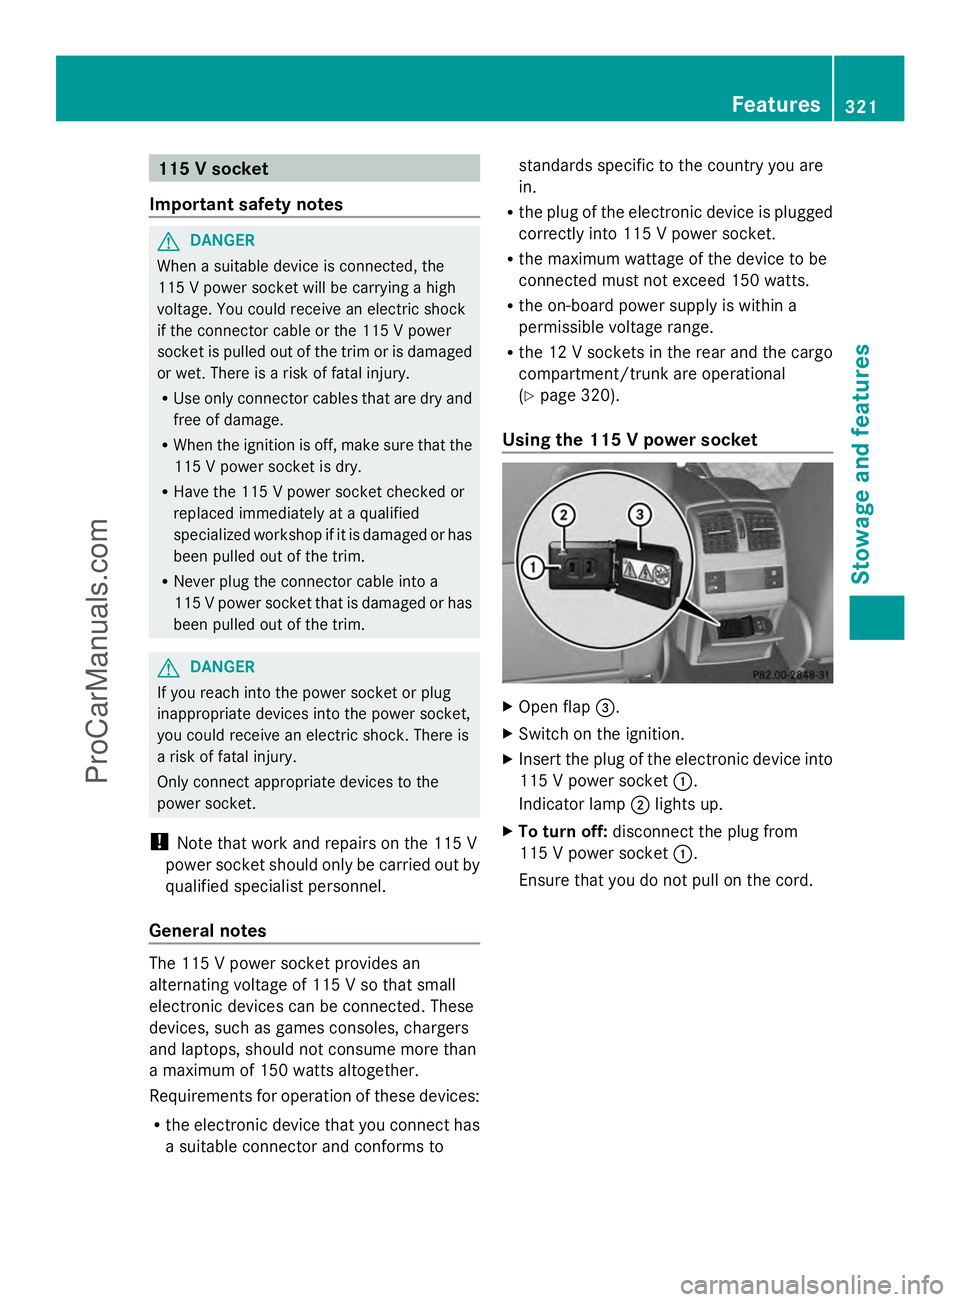
Using the 115 V power socket X
Open flap =.
X Switch on the ignition.
X Insert the plug of the electronic device into
115 V power socket :.
Indicator lamp ;lights up.
X To turn off: disconnect the plug from
115 V power socket :.
Ensure that you do not pull on the cord. Features
321Stowage and features Z
ProCarManuals.com
Page 358 of 430
X
Do not remove any foreign objects which
have penetrated the tire, e.g. screws or
nails.
X Remove the tire sealant bottle, the
accompanying TIREFIT sticker and the tire
inflation compressor from the stowage well
underneath the trunk floor/cargo
compartment floor (Y page 352).
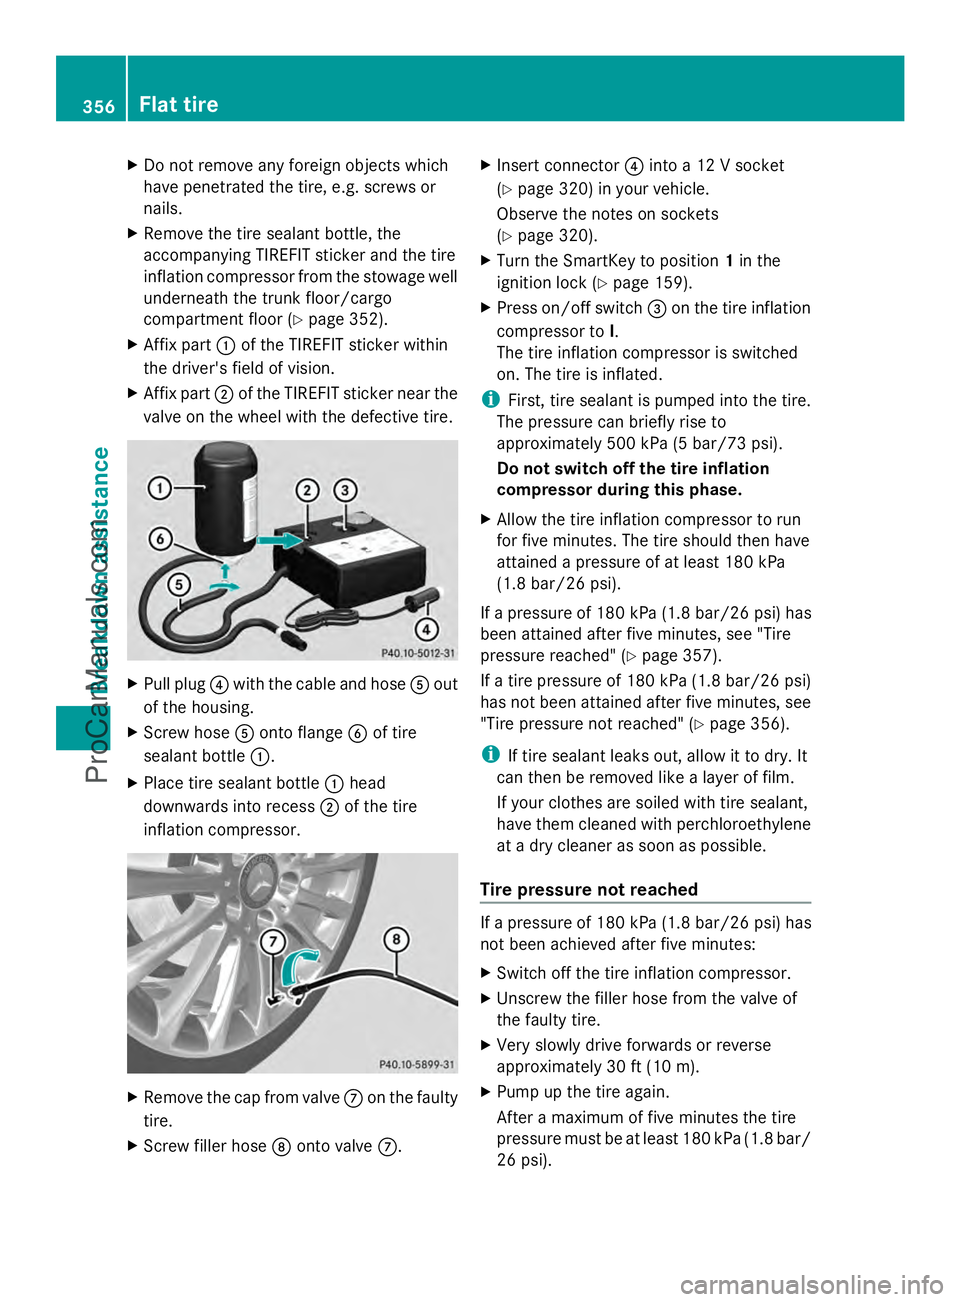
X Affix part :of the TIREFIT sticker within
the driver's field of vision.
X Affix part ;of the TIREFIT sticker near the
valve on the wheel with the defective tire. X
Pull plug ?with the cable and hose Aout
of the housing.
X Screw hose Aonto flange Bof tire
sealant bottle :.
X Place tire sealant bottle :head
downwards into recess ;of the tire
inflation compressor. X
Remove the cap from valve Con the faulty
tire.
X Screw filler hose Donto valve C. X
Insert connector ?into a 12 V socket
(Y page 320) in your vehicle.
Observe the notes on sockets
(Y page 320).
X Turn the SmartKey to position 1in the
ignition lock ( Ypage 159).
X Press on/off switch =on the tire inflation
compressor to I.
The tire inflation compressor is switched
on. The tire is inflated.
i First, tire sealant is pumped into the tire.
The pressure can briefly rise to
approximately 500 kPa (5 bar/73 psi).
Do not switch off the tire inflation
compressor during this phase.
X Allow the tire inflation compressor to run
for five minutes. The tire should then have
attained a pressure of at least 180 kPa
(1.8 bar/26 psi).
If a pressure of 180 kPa (1.8 ba r/26 psi) has
been attained after five minutes, see "Tire
pressure reached" (Y page 357).
If a tire pressure of 180 kPa (1.8 ba r/26 psi)
has not been attained after five minutes, see
"Tire pressure not reached" (Y page 356).
i If tire sealant leaks out, allow it to dry. It
can then be removed like a layer of film.
If your clothes are soiled with tire sealant,
have them cleaned with perchloroethylene
at a dry cleaner as soon as possible.
Tire pressure not reached If a pressure of 180 kPa
(1.8 ba r/26 psi) has
not been achieved after five minutes:
X Switch off the tire inflation compressor.
X Unscrew the filler hose from the valve of
the faulty tire.
X Very slowly drive forwards or reverse
approximately 30 ft (10 m).
X Pump up the tire again.
After a maximum of five minutes the tire
pressure must be at least 180 kPa (1.8 bar/
26 psi). 356
Flat tireBreakdown assistance
ProCarManuals.com
Page 429 of 430
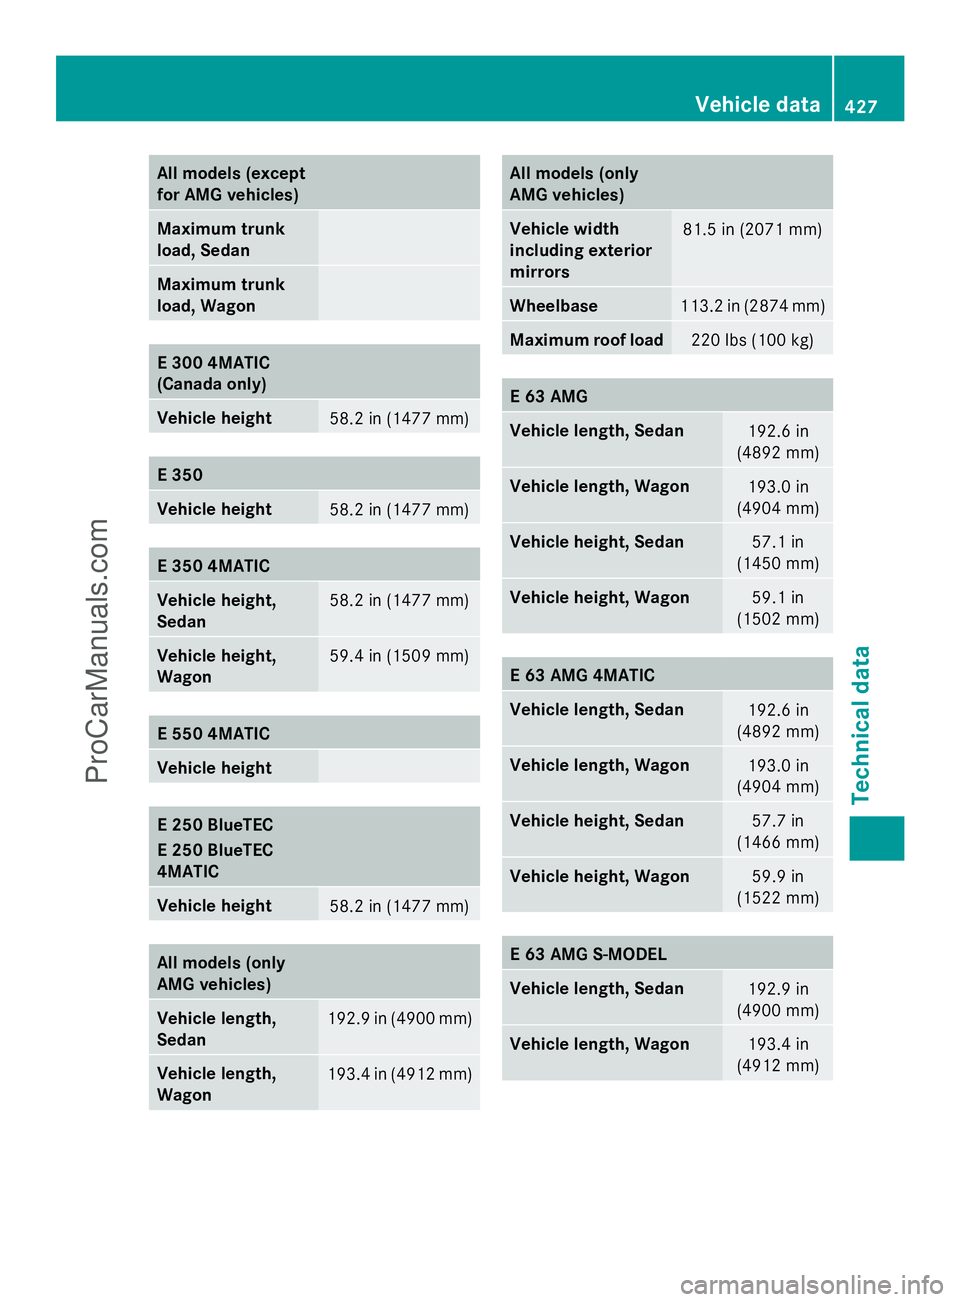
All models (except
for AMG vehicles)
Maximum trunk
load, Sedan
Maximum trunk
load, Wagon
E 300 4MATIC
(Canada only)
Vehicle height
58.2 in (1477 mm)
E 350
Vehicle height
58.2 in (1477 mm)
E 350 4MATIC
Vehicle height,
Sedan
58.2 in (1477 mm)
Vehicle height,
Wagon
59.4 in (1509 mm)
E 550 4MATIC
Vehicle height
E 250 BlueTEC
E 250 BlueTEC
4MATIC Vehicle height
58.2 in (1477 mm)
All models (only
AMG vehicles) Vehicle length,
Sedan
192.9 in (4900 mm)
Vehicle length,
Wagon
193.4 in (4912 mm) All models (only
AMG vehicles)
Vehicle width
including exterior
mirrors
81.5 in (2071 mm)
Wheelbase
113.2 in (2874 mm)
Maximum roof load
220 lbs (100 kg)
E 63 AMG
Vehicle length, Sedan
192.6 in
(4892 mm) Vehicle length, Wagon
193.0 in
(4904 mm) Vehicle height, Sedan
57.1 in
(1450 mm) Vehicle height, Wagon
59.1 in
(1502 mm) E 63 AMG 4MATIC
Vehicle length, Sedan
192.6 in
(4892 mm) Vehicle length, Wagon
193.0 in
(4904 mm) Vehicle height, Sedan
57.7 in
(1466 mm) Vehicle height, Wagon
59.9 in
(1522 mm) E 63 AMG S-MODEL
Vehicle length, Sedan
192.9 in
(4900 mm) Vehicle length, Wagon
193.4 in
(4912 mm) Vehicle data
427Technical data Z
ProCarManuals.com