2014 MERCEDES-BENZ CLS SHOOTING BRAKE brake
[x] Cancel search: brakePage 167 of 417

i
All vehicles (except AMG vehicles):
automatic engine switch-off can take place a maximum of four times consecutively (ini-
tial stop, then three subsequent stops). The ¤ symbol is shown in yellow in the mul-
tifunction display after the engine has been
started automatically for the fourth time.
When the ¤symbol is lit green in the
multifunction display, automatic engine
switch-off is again possible.
i AMG vehicles:
the number of consecu-
tive automatic engine stops is unlimited.
i The HOLD function can also be activated
if the engine has been switched off auto-
matically. It is then not necessary to con-
tinue applying the brakes during the auto-
matic stop phase. When you depress the
accelerator pedal, the engine starts auto-
matically and the braking effect of the
HOLD function is deactivated.
Automatic engine start The engine is started automatically if:
R you switch off the ECO start/stop function
by pressing the ECO button
R in transmission position Dor N, the brake
pedal is released and the HOLD function is not active
R you depress the accelerator pedal
R you engage reverse gear R
R you move the transmission out of position
P
R you switch to drive program S,S+ orM
(AMG vehicles)
R you unfasten your seat belt or open the
driver's door
R the vehicle starts to roll
R the brake system requires this
R the temperature in the vehicle interior devi-
ates from the set range R
the system detects moisture on the wind-
screen when the air-conditioning system is
switched on
R the battery's charge status is too low
i Shifting the transmission to position
P
does not start the engine.
i If you shift the transmission from
Rto D,
the ECO start/stop function is available
again once the ¤symbol reappears in
green in the multifunction display.
Deactivating/activating the ECO start/
stop function All vehicles (except AMG vehicles)
X
To switch off: press ECO button :.
Indicator lamp ;and the ¤symbol in
the multifunction display go out.
X To switch on: press ECO button :.
Indicator lamp ;lights up. If all conditions
for automatic engine switch-off
(Y page 163) are met, the ¤symbol is lit
green in the multifunction display.
If not all conditions for automatic engine
switch-off (Y page 163) are met, the ¤
symbol is lit yellow in the multifunction dis- play. If this is the case, the ECO start/stop
function is not available.
i If indicator lamp
;is off, the ECO start/
stop function has been deactivated man-
ually or as the result of a malfunction. The
engine will then not be switched off auto-
matically when the vehicle stops. 164
DrivingDriving and pa
rking
Page 170 of 417
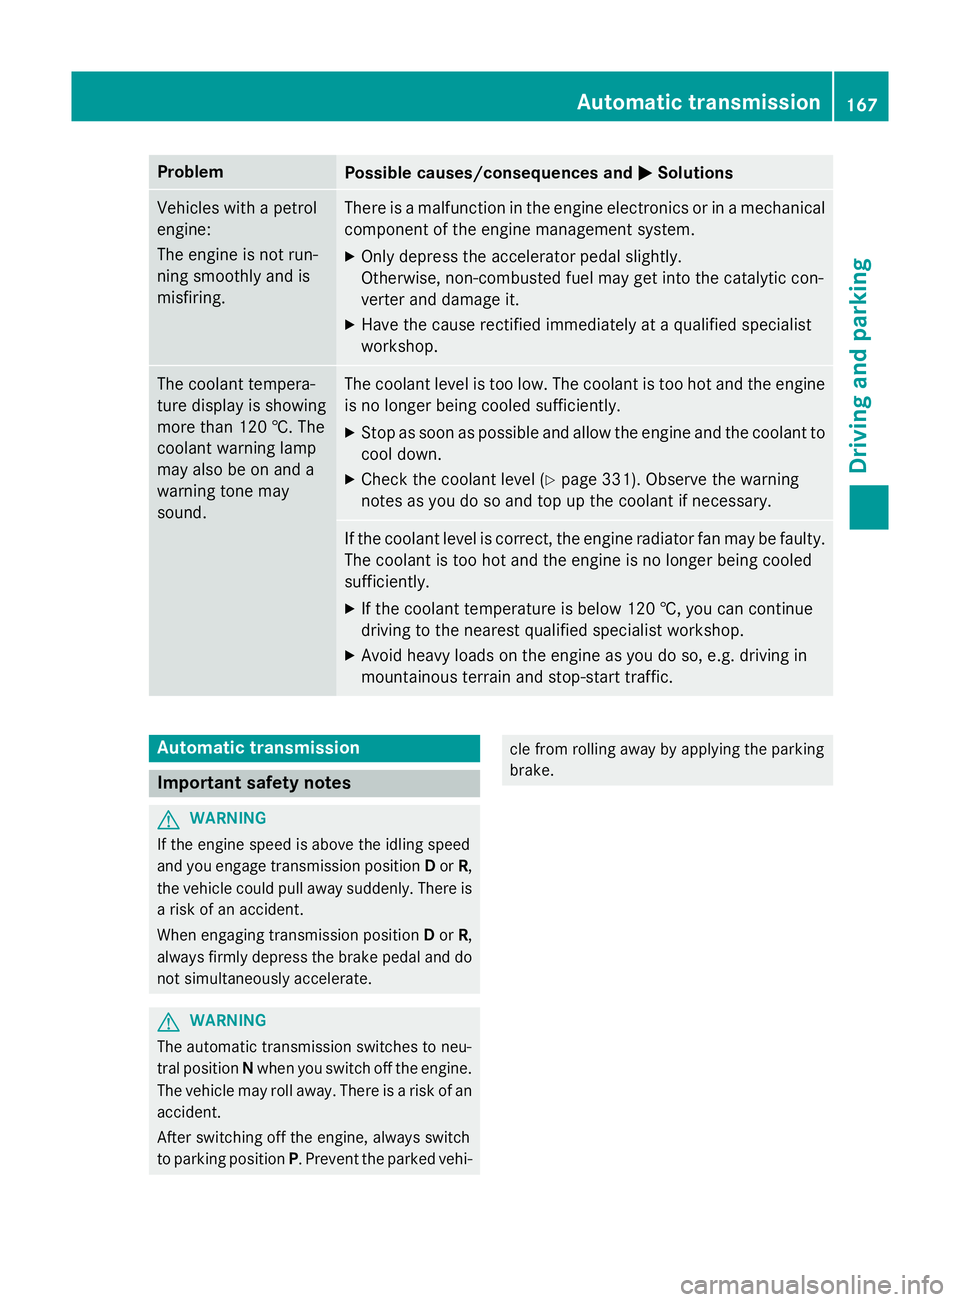
Problem
Possible causes/consequences and
M
MSolutions Vehicles with a petrol
engine:
The engine is not run-
ning smoothly and is
misfiring. There is a malfunction in the engine electronics or in a mechanical
component of the engine management system.
X Only depress the accelerator pedal slightly.
Otherwise, non-combusted fuel may get into the catalytic con-
verter and damage it.
X Have the cause rectified immediately at a qualified specialist
workshop. The coolant tempera-
ture display is showing
more than 120 †. The
coolant warning lamp
may also be on and a
warning tone may
sound. The coolant level is too low. The coolant is too hot and the engine
is no longer being cooled sufficiently.
X Stop as soon as possible and allow the engine and the coolant to
cool down.
X Check the coolant level (Y page 331). Observe the warning
notes as you do so and top up the coolant if necessary. If the coolant level is correct, the engine radiator fan may be faulty.
The coolant is too hot and the engine is no longer being cooled
sufficiently.
X If the coolant temperature is below 120 †, you can continue
driving to the nearest qualified specialist workshop.
X Avoid heavy loads on the engine as you do so, e.g. driving in
mountainous terrain and stop-start traffic. Automatic transmission
Important safety notes
G
WARNING
If the engine speed is above the idling speed
and you engage transmission position Dor R,
the vehicle could pull away suddenly. There is a risk of an accident.
When engaging transmission position Dor R,
always firmly depress the brake pedal and do not simultaneously accelerate. G
WARNING
The automatic transmission switches to neu-
tral position Nwhen you switch off the engine.
The vehicle may roll away. There is a risk of an
accident.
After switching off the engine, always switch
to parking position P. Prevent the parked vehi- cle from rolling away by applying the parking
brake. Automatic transmission
167Driving and parking Z
Page 172 of 417
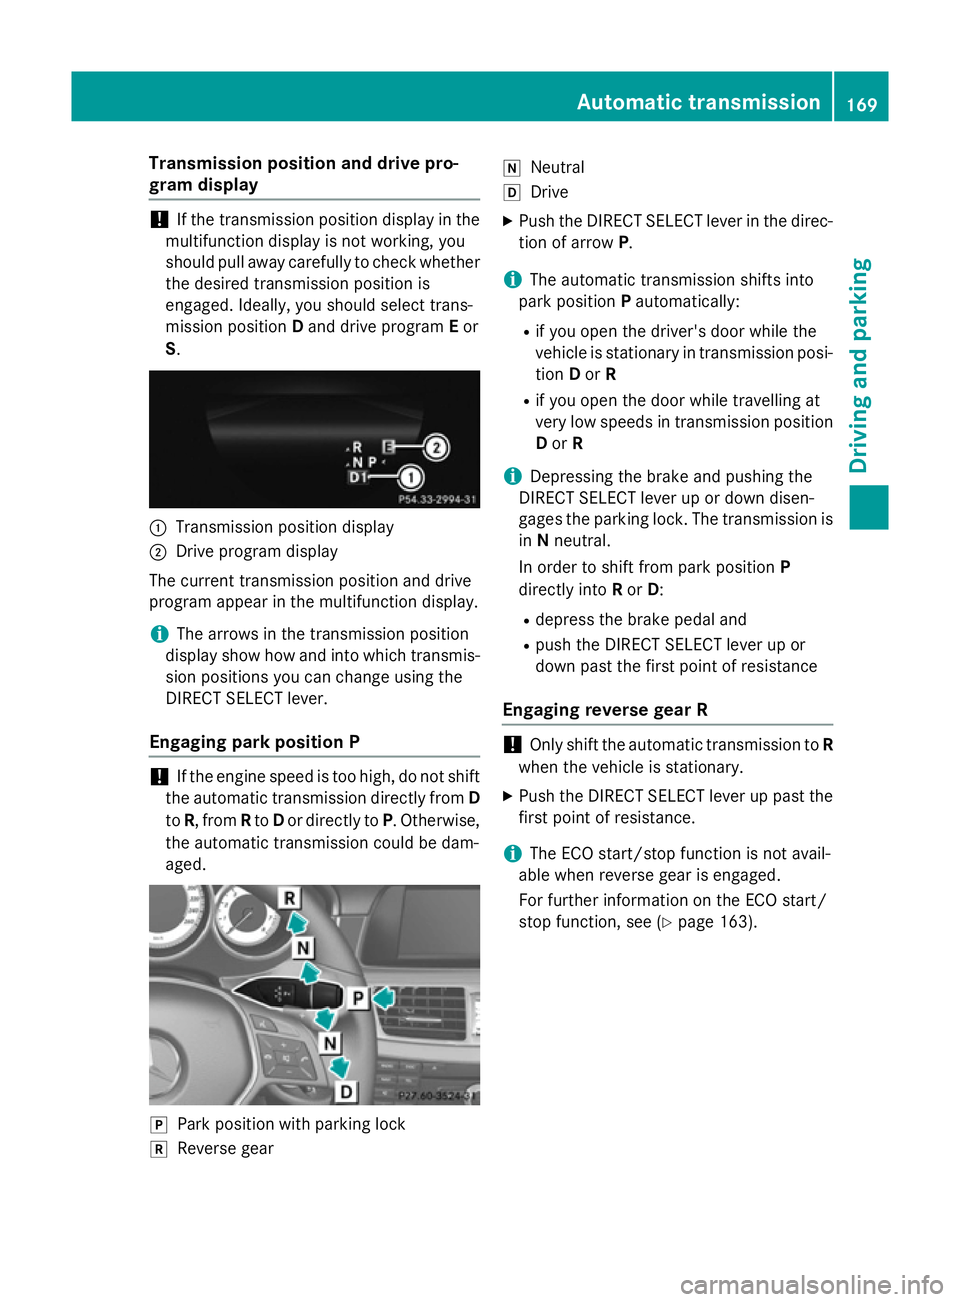
Transmission position and drive pro-
gram display !
If the transmission position display in the
multifunction display is not working, you
should pull away carefully to check whether the desired transmission position is
engaged. Ideally, you should select trans-
mission position Dand drive program Eor
S. :
Transmission position display
; Drive program display
The current transmission position and drive
program appear in the multifunction display.
i The arrows in the transmission position
display show how and into which transmis-
sion positions you can change using the
DIRECT SELECT lever.
Engaging park position P !
If the engine speed is too high, do not shift
the automatic transmission directly from D
to R, from Rto Dor directly to P. Otherwise,
the automatic transmission could be dam-
aged. j
Park position with parking lock
k Reverse gear i
Neutral
h Drive
X Push the DIRECT SELECT lever in the direc-
tion of arrow P.
i The automatic transmission shifts into
park position Pautomatically:
R if you open the driver's door while the
vehicle is stationary in transmission posi-
tion Dor R
R if you open the door while travelling at
very low speeds in transmission position
D or R
i Depressing the brake and pushing the
DIRECT SELECT lever up or down disen-
gages the parking lock. The transmission is in Nneutral.
In order to shift from park position P
directly into Ror D:
R depress the brake pedal and
R push the DIRECT SELECT lever up or
down past the first point of resistance
Engaging reverse gear R !
Only shift the automatic transmission to
R
when the vehicle is stationary.
X Push the DIRECT SELECT lever up past the
first point of resistance.
i The ECO start/stop function is not avail-
able when reverse gear is engaged.
For further information on the ECO start/
stop function, see (Y page 163). Automatic transmission
169Driving and parking Z
Page 173 of 417
Shifting to neutral N
G
WARNING
If children are left unsupervised in the vehicle, they can:
R open doors and endanger other persons or
road users
R climb out and be injured by the traffic
R operate vehicle equipment and, for exam-
ple, trap themselves.
Children could also set the vehicle in motion, for example by:
R releasing the parking brake
R shifting the automatic transmission out of
park position P
R starting the engine.
There is a risk of an accident and injury.
When leaving the vehicle, always take the key
with you and lock the vehicle. Never leave
children unattended in the vehicle. Always
keep the key out of reach of children.
X Push the DIRECT SELECT lever up or down
to the first point of resistance.
Engaging drive position D X
Push the DIRECT SELECT lever down past
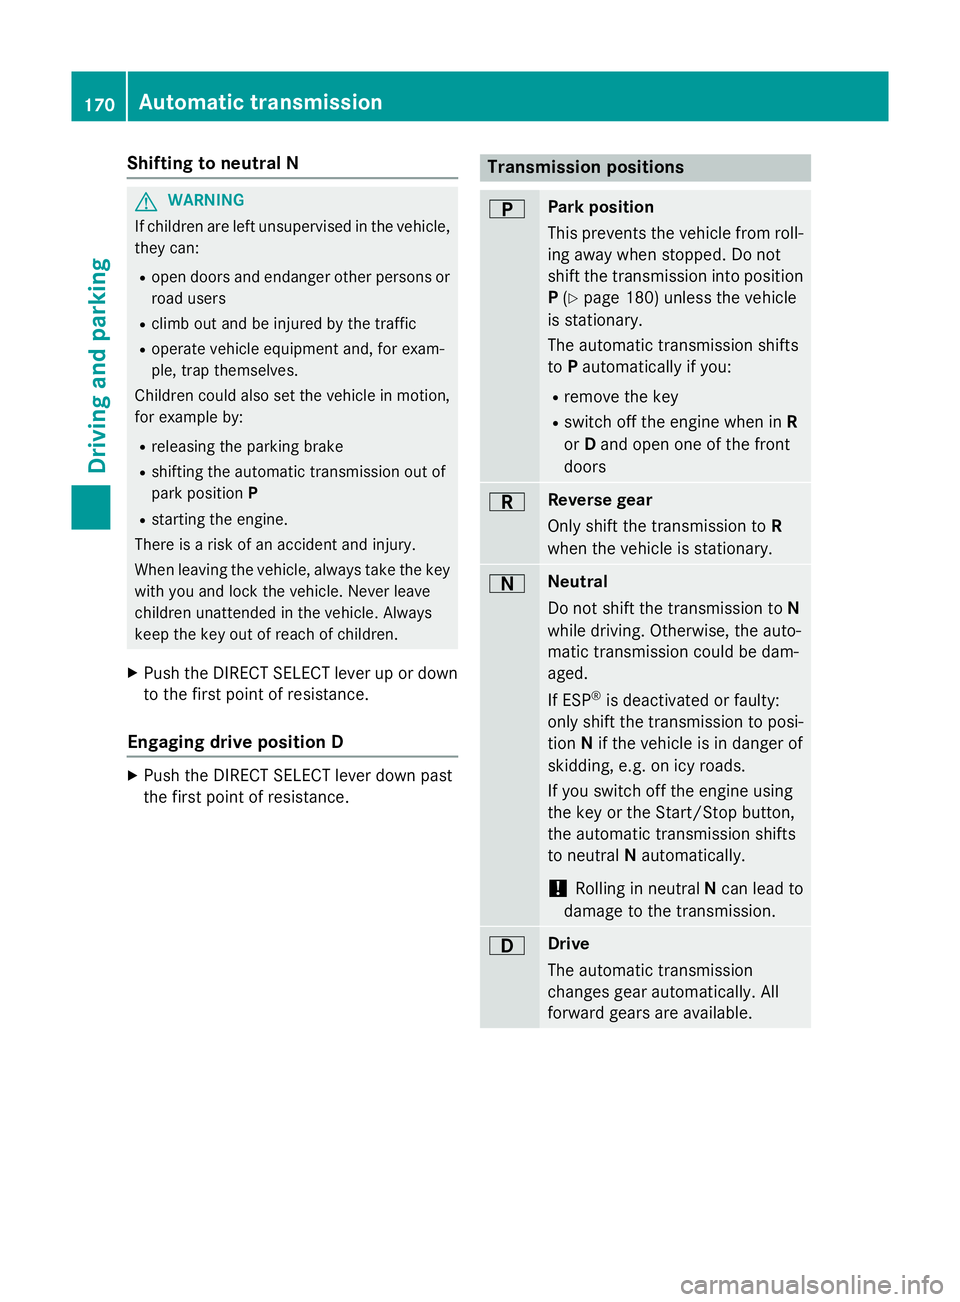
the first point of resistance. Transmission positions
B Park position
This prevents the vehicle from roll-
ing away when stopped. Do not
shift the transmission into position
P (Y page 180) unless the vehicle
is stationary.
The automatic transmission shifts
to Pautomatically if you:
R remove the key
R switch off the engine when in R
or Dand open one of the front
doors C Reverse gear
Only shift the transmission to
R
when the vehicle is stationary. A Neutral
Do not shift the transmission to
N
while driving. Otherwise, the auto-
matic transmission could be dam-
aged.
If ESP ®
is deactivated or faulty:
only shift the transmission to posi- tion Nif the vehicle is in danger of
skidding, e.g. on icy roads.
If you switch off the engine using
the key or the Start/Stop button,
the automatic transmission shifts
to neutral Nautomatically.
! Rolling in neutral
Ncan lead to
damage to the transmission. 7 Drive
The automatic transmission
changes gear automatically. All
forward gears are available.170
Automatic transmissionDriving and parking
Page 176 of 417
Steering wheel gearshift paddles
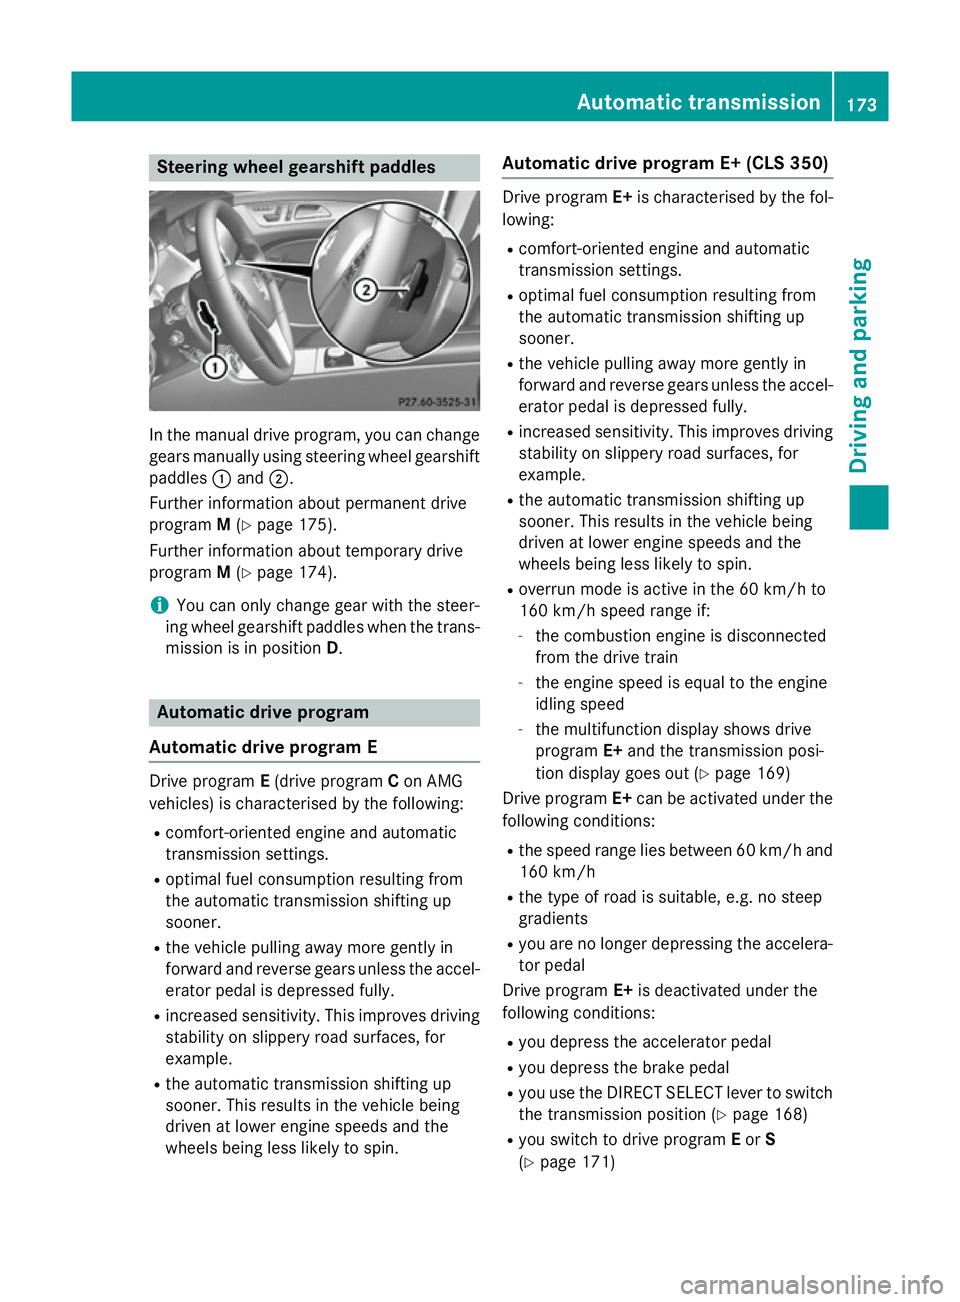
In the manual drive program, you can change
gears manually using steering wheel gearshift
paddles :and ;.
Further information about permanent drive
program M(Y page 175).
Further information about temporary drive
program M(Y page 174).
i You can only change gear with the steer-
ing wheel gearshift paddles when the trans- mission is in position D.Automatic drive program
Automatic drive program E Drive program
E(drive program Con AMG
vehicles) is characterised by the following:
R comfort-oriented engine and automatic
transmission settings.
R optimal fuel consumption resulting from
the automatic transmission shifting up
sooner.
R the vehicle pulling away more gently in
forward and reverse gears unless the accel- erator pedal is depressed fully.
R increased sensitivity. This improves driving
stability on slippery road surfaces, for
example.
R the automatic transmission shifting up
sooner. This results in the vehicle being
driven at lower engine speeds and the
wheels being less likely to spin. Automatic drive program E+ (CLS 350) Drive program
E+is characterised by the fol-
lowing:
R comfort-oriented engine and automatic
transmission settings.
R optimal fuel consumption resulting from
the automatic transmission shifting up
sooner.
R the vehicle pulling away more gently in
forward and reverse gears unless the accel-
erator pedal is depressed fully.
R increased sensitivity. This improves driving
stability on slippery road surfaces, for
example.
R the automatic transmission shifting up
sooner. This results in the vehicle being
driven at lower engine speeds and the
wheels being less likely to spin.
R overrun mode is active in the 60 km/h to
160 km/h speed range if:
- the combustion engine is disconnected
from the drive train
- the engine speed is equal to the engine
idling speed
- the multifunction display shows drive
program E+and the transmission posi-
tion display goes out (Y page 169)
Drive program E+can be activated under the
following conditions:
R the speed range lies between 60 km/h and
160 km/h
R the type of road is suitable, e.g. no steep
gradients
R you are no longer depressing the accelera-
tor pedal
Drive program E+is deactivated under the
following conditions:
R you depress the accelerator pedal
R you depress the brake pedal
R you use the DIRECT SELECT lever to switch
the transmission position (Y page 168)
R you switch to drive program Eor S
(Y page 171) Automatic transmission
173Driving and parking Z
Page 181 of 417
If you mix diesel fuel with petrol, the flash
point of this fuel mixture is lower than that of pure diesel fuel. When the engine is running,
components in the exhaust system may over-
heat unnoticed. There is a risk of fire.
Never refuel with petrol. Never add petrol to
diesel fuel.
! Do not use petrol to refuel vehicles with a
diesel engine. Do not use diesel to refuel
vehicles with a petrol engine. Do not switch on the ignition if you accidentally refuel
with the wrong fuel. Otherwise, the fuel will enter the fuel system. Even small amounts
of the wrong fuel could result in damage to the fuel system and the engine. The repair
costs are high. Notify a qualified specialist
workshop and have the fuel tank and fuel
lines drained completely.
! Overfilling the fuel tank could damage the
fuel system.
! Take care not to spill any fuel on painted
surfaces. You could otherwise damage the
paintwork.
! Use a filter when adding fuel from a fuel
can. The fuel lines and/or the diesel injec-
tion system could otherwise be blocked by
particles from the fuel can.
Do not get into the vehicle again during the
refuelling process. Otherwise, electrostatic
charge could build up again.
If you overfill the fuel tank, some fuel may
spray out when you remove the fuel pump
nozzle.
For further information on fuel and fuel quality (Y page 399). Refuelling
General notes Observe the important safety notes
(Y
page 177). The fuel filler flap is unlocked or locked auto-
matically when you open or close the vehicle
with the key or using KEYLESS-GO.
The position of the 8fuel filler cap is dis-
played in the instrument cluster. The arrow
next to the filling pump indicates the side of
the vehicle.
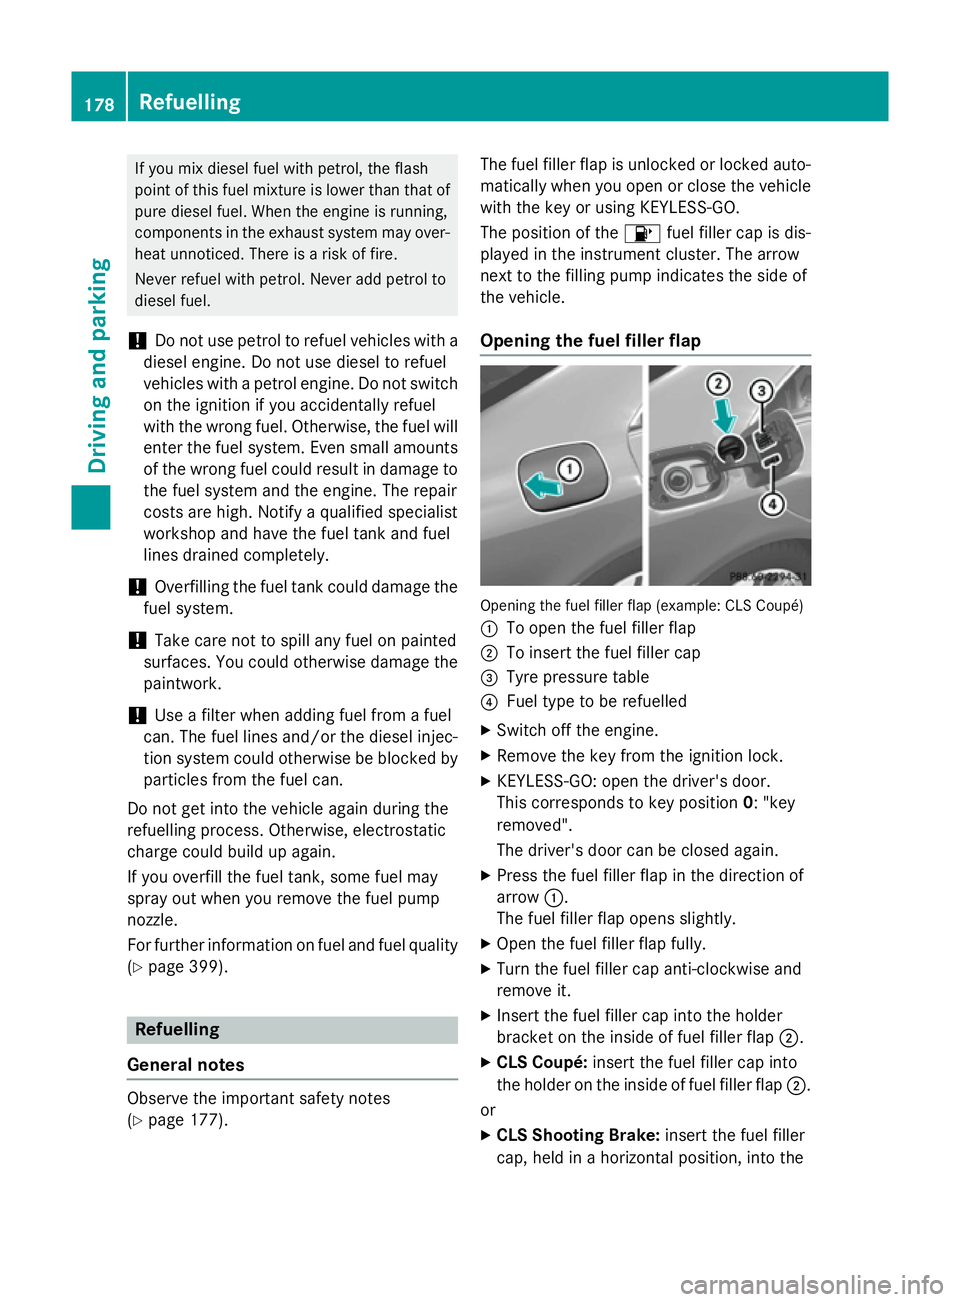
Opening the fuel filler flap Opening the fuel filler flap (example: CLS Coupé)
:
To open the fuel filler flap
; To insert the fuel filler cap
= Tyre pressure table
? Fuel type to be refuelled
X Switch off the engine.
X Remove the key from the ignition lock.
X KEYLESS-GO: open the driver's door.
This corresponds to key position 0: "key
removed".
The driver's door can be closed again.
X Press the fuel filler flap in the direction of
arrow :.
The fuel filler flap opens slightly.
X Open the fuel filler flap fully.
X Turn the fuel filler cap anti-clockwise and
remove it.
X Insert the fuel filler cap into the holder
bracket on the inside of fuel filler flap ;.
X CLS Coupé: insert the fuel filler cap into
the holder on the inside of fuel filler flap ;.
or
X CLS Shooting Brake: insert the fuel filler
cap, held in a horizontal position, into the 178
RefuellingDriving and parking
Page 182 of 417
recesses in the fuel filler flap hinge arm
from above.
X Completely insert the filler neck of the fuel
pump nozzle into the tank, hook in place
and refuel.
X Only fill the tank until the pump nozzle
switches off.
i Vehicles with a diesel engine: the filler
neck is designed for refuelling at diesel fill-
ing pumps.
i Do not add any more fuel after the pump
stops filling for the first time. Otherwise,
fuel may leak out.
Closing the fuel filler flap X
Replace the cap on the filler neck and turn
clockwise until it engages audibly.
X Close the fuel filler flap.
i Close the fuel filler flap before locking the
vehicle. Otherwise, the locking pin of the
central locking prevents the fuel filler flap
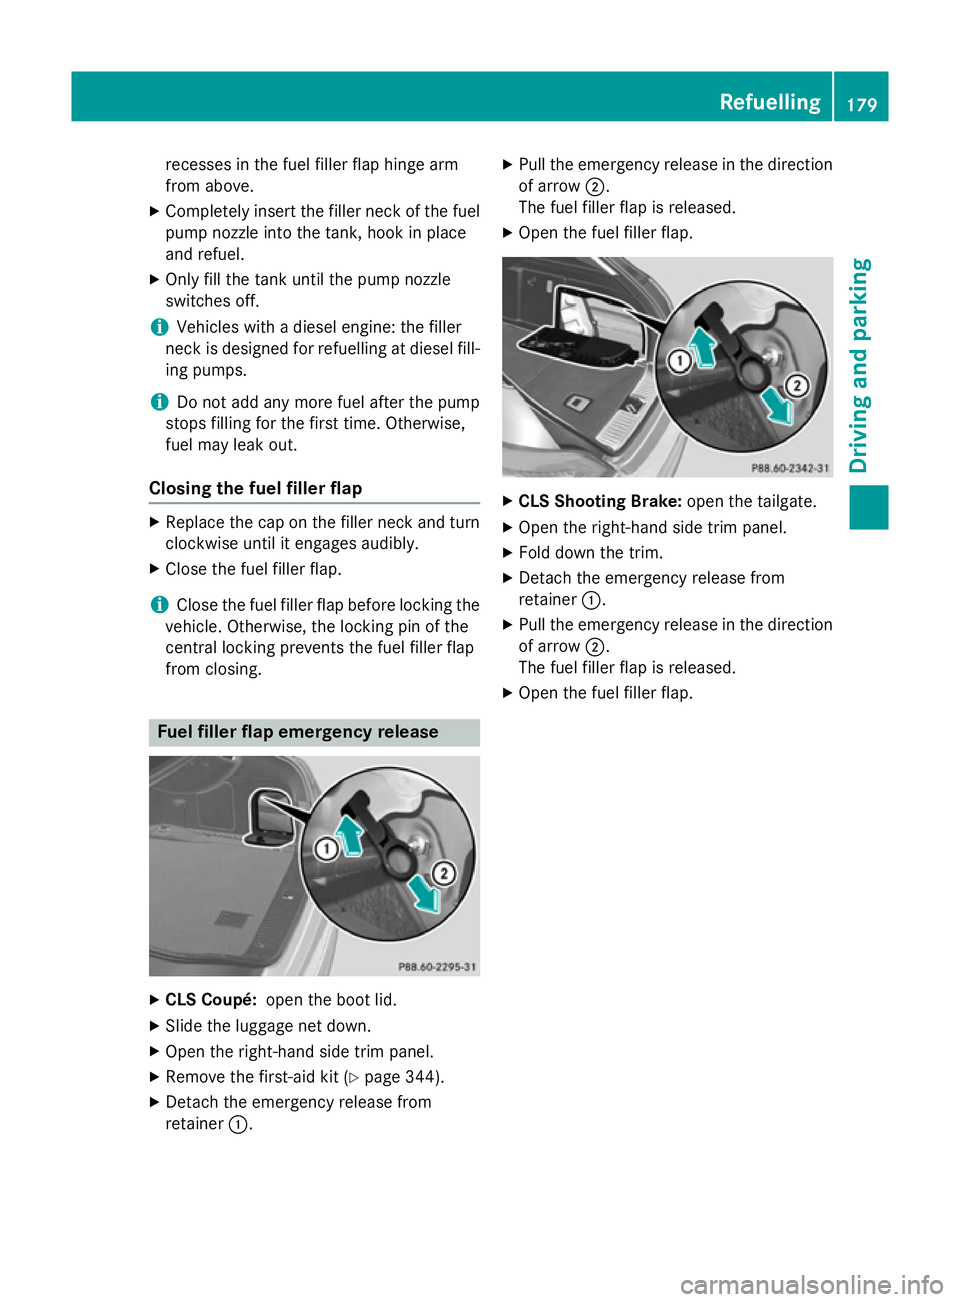
from closing. Fuel filler flap emergency release
X
CLS Coupé: open the boot lid.
X Slide the luggage net down.
X Open the right-hand side trim panel.
X Remove the first-aid kit (Y page 344).
X Detach the emergency release from
retainer :. X
Pull the emergency release in the direction
of arrow ;.
The fuel filler flap is released.
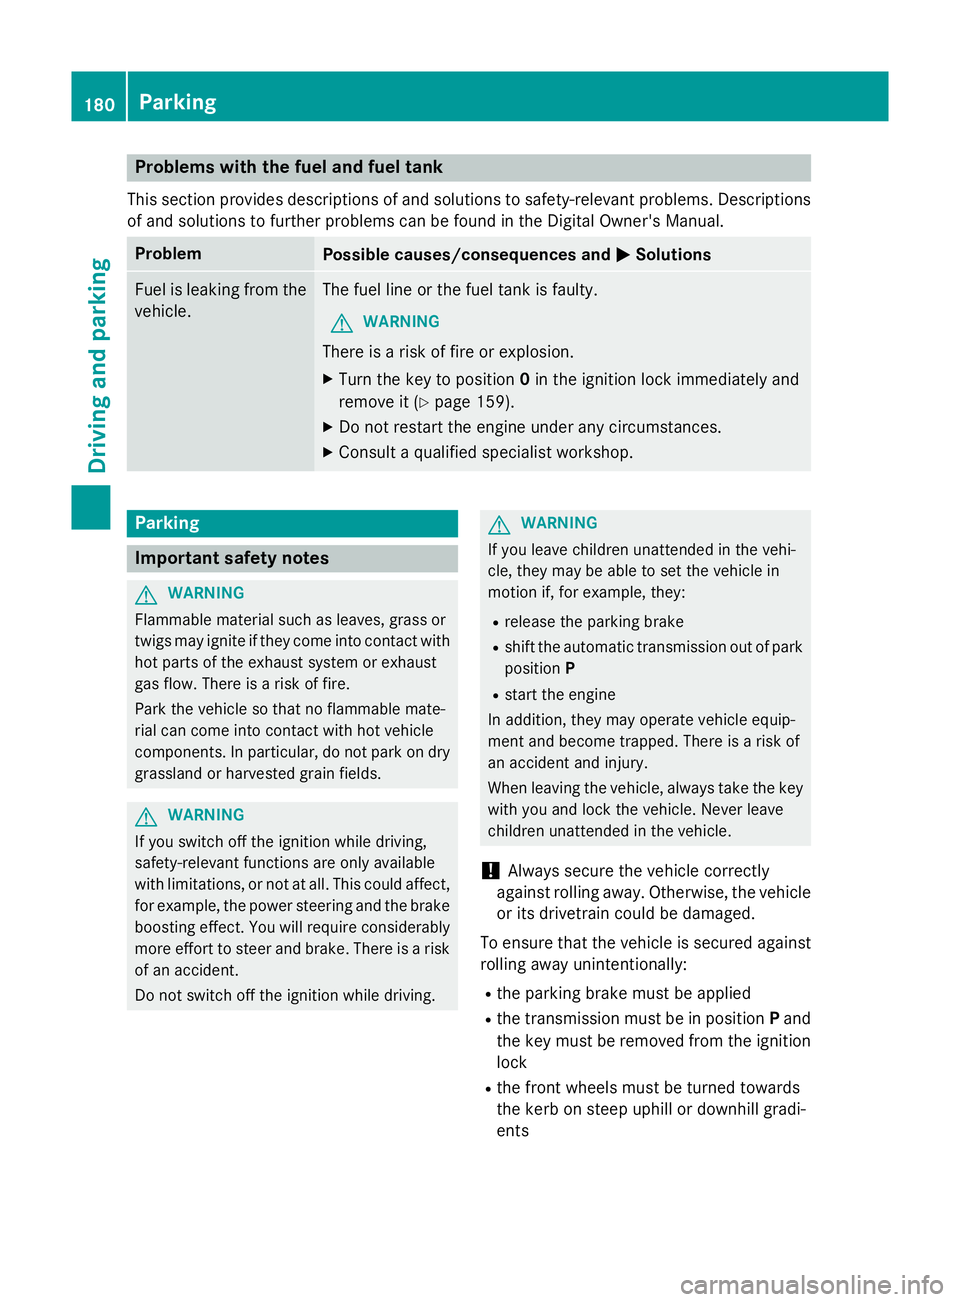
X Open the fuel filler flap. X
CLS Shooting Brake: open the tailgate.
X Open the right-hand side trim panel.
X Fold down the trim.
X Detach the emergency release from
retainer :.
X Pull the emergency release in the direction
of arrow ;.
The fuel filler flap is released.
X Open the fuel filler flap. Refuelling
179Driving and parking Z
Page 183 of 417
Problems with the fuel and fuel tank
This section provides descriptions of and solutions to safety-relevant problems. Descriptions
of and solutions to further problems can be found in the Digital Owner's Manual. Problem
Possible causes/consequences and
M
MSolutions Fuel is leaking from the
vehicle. The fuel line or the fuel tank is faulty.
G WARNING
There is a risk of fire or explosion. X Turn the key to position 0in the ignition lock immediately and
remove it (Y page 159).
X Do not restart the engine under any circumstances.
X Consult a qualified specialist workshop. Parking
Important safety notes
G
WARNING
Flammable material such as leaves, grass or
twigs may ignite if they come into contact with hot parts of the exhaust system or exhaust
gas flow. There is a risk of fire.
Park the vehicle so that no flammable mate-
rial can come into contact with hot vehicle
components. In particular, do not park on dry grassland or harvested grain fields. G
WARNING
If you switch off the ignition while driving,
safety-relevant functions are only available
with limitations, or not at all. This could affect, for example, the power steering and the brake
boosting effect. You will require considerably
more effort to steer and brake. There is a risk of an accident.
Do not switch off the ignition while driving. G
WARNING
If you leave children unattended in the vehi-
cle, they may be able to set the vehicle in
motion if, for example, they:
R release the parking brake
R shift the automatic transmission out of park
position P
R start the engine
In addition, they may operate vehicle equip-
ment and become trapped. There is a risk of
an accident and injury.
When leaving the vehicle, always take the key
with you and lock the vehicle. Never leave
children unattended in the vehicle.
! Always secure the vehicle correctly
against rolling away. Otherwise, the vehicle or its drivetrain could be damaged.
To ensure that the vehicle is secured against rolling away unintentionally:
R the parking brake must be applied
R the transmission must be in position Pand
the key must be removed from the ignition lock
R the front wheels must be turned towards
the kerb on steep uphill or downhill gradi-
ents 180
ParkingDriving and parking