2014 MERCEDES-BENZ CLS SHOOTING BRAKE keyless
[x] Cancel search: keylessPage 165 of 417
Using KEYLESS-GO to start the engine
i
The Start/Stop button can be used to
start the vehicle manually without inserting
the key into the ignition lock. The key must be in the vehicle and the Start/Stop button
must be inserted in the ignition lock. This
mode for starting the engine operates inde- pendently of the ECO start/stop automatic engine start function.
X Depress the brake pedal and keep it
depressed.
X Press the Start/Stop button once
(Y page 159).
Vehicles with a petrol engine: the engine
starts.
Vehicles with a diesel engine: preglow is
activated and the engine starts. Pulling away
General notes G
WARNING
If the engine speed is above the idling speed
and you engage transmission position Dor R,
the vehicle could pull away suddenly. There is a risk of an accident.
When engaging transmission position Dor R,
always firmly depress the brake pedal and do not simultaneously accelerate.
! If a warning tone sounds and the
Release park. brake
Release park. brake message appears
in the multifunction display, the parking
brake is still applied. Release the parking
brake.
i Depress the accelerator carefully when
pulling away.
i The vehicle locks centrally once you have
pulled away. The locking knobs in the doors drop down.
You can open the doors from the inside at
any time. You can also deactivate the automatic lock-
ing feature (Y page 255).
i It is only possible to shift the transmission
from position Pto the desired position if
you depress the brake pedal. If the brake
pedal is not depressed, the DIRECT SELECT
lever can still be moved, but the parking
lock remains engaged.
i Upshifts take place at higher engine
speeds after a cold start. This helps the
catalytic converter to reach its operating
temperature more quickly.
Hill start assist Hill start assist helps you when pulling away
forwards or in reverse on an uphill gradient. It holds the vehicle for a short time after you
have removed your foot from the brake pedal.
This gives you enough time to move your foot from the brake pedal to the accelerator pedal
and depress it before the vehicle begins to
roll. G
WARNING
After a short time, hill start assist will no lon-
ger brake your vehicle and it could roll away.
There is a risk of an accident and injury.
Therefore, quickly move your foot from the
brake pedal to the accelerator pedal. Never
leave the vehicle when it is held by hill start
assist.
Hill start assist is not active if: R you are pulling away on a level road or a
downhill gradient
R the transmission is in position N
R the parking brake is applied
R ESP ®
is malfunctioning 162
DrivingDriving and parking
Page 181 of 417
If you mix diesel fuel with petrol, the flash
point of this fuel mixture is lower than that of pure diesel fuel. When the engine is running,
components in the exhaust system may over-
heat unnoticed. There is a risk of fire.
Never refuel with petrol. Never add petrol to
diesel fuel.
! Do not use petrol to refuel vehicles with a
diesel engine. Do not use diesel to refuel
vehicles with a petrol engine. Do not switch on the ignition if you accidentally refuel
with the wrong fuel. Otherwise, the fuel will enter the fuel system. Even small amounts
of the wrong fuel could result in damage to the fuel system and the engine. The repair
costs are high. Notify a qualified specialist
workshop and have the fuel tank and fuel
lines drained completely.
! Overfilling the fuel tank could damage the
fuel system.
! Take care not to spill any fuel on painted
surfaces. You could otherwise damage the
paintwork.
! Use a filter when adding fuel from a fuel
can. The fuel lines and/or the diesel injec-
tion system could otherwise be blocked by
particles from the fuel can.
Do not get into the vehicle again during the
refuelling process. Otherwise, electrostatic
charge could build up again.
If you overfill the fuel tank, some fuel may
spray out when you remove the fuel pump
nozzle.
For further information on fuel and fuel quality (Y page 399). Refuelling
General notes Observe the important safety notes
(Y
page 177). The fuel filler flap is unlocked or locked auto-
matically when you open or close the vehicle
with the key or using KEYLESS-GO.
The position of the 8fuel filler cap is dis-
played in the instrument cluster. The arrow
next to the filling pump indicates the side of
the vehicle.
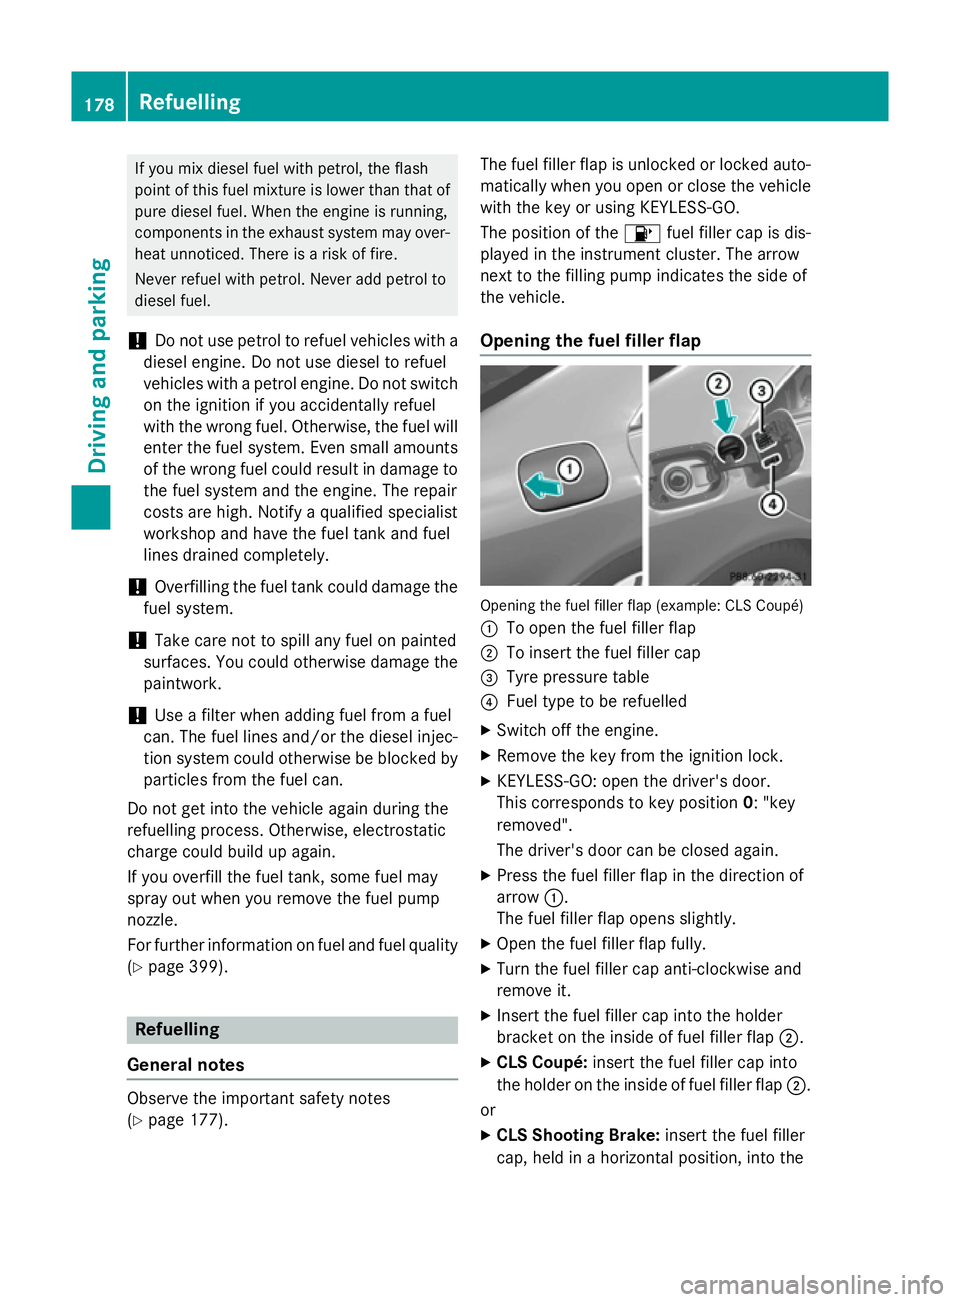
Opening the fuel filler flap Opening the fuel filler flap (example: CLS Coupé)
:
To open the fuel filler flap
; To insert the fuel filler cap
= Tyre pressure table
? Fuel type to be refuelled
X Switch off the engine.
X Remove the key from the ignition lock.
X KEYLESS-GO: open the driver's door.
This corresponds to key position 0: "key
removed".
The driver's door can be closed again.
X Press the fuel filler flap in the direction of
arrow :.
The fuel filler flap opens slightly.
X Open the fuel filler flap fully.
X Turn the fuel filler cap anti-clockwise and
remove it.
X Insert the fuel filler cap into the holder
bracket on the inside of fuel filler flap ;.
X CLS Coupé: insert the fuel filler cap into
the holder on the inside of fuel filler flap ;.
or
X CLS Shooting Brake: insert the fuel filler
cap, held in a horizontal position, into the 178
RefuellingDriving and parking
Page 184 of 417
Switching off the engine
Important safety notes G
WARNING
The automatic transmission switches to neu-
tral position Nwhen you switch off the engine.
The vehicle may roll away. There is a risk of an
accident.
After switching off the engine, always switch
to parking position P. Prevent the parked vehi-
cle from rolling away by applying the parking
brake.
Vehicles with automatic transmission X
Firmly depress the parking brake.
X All vehicles (except AMG vehicles): shift
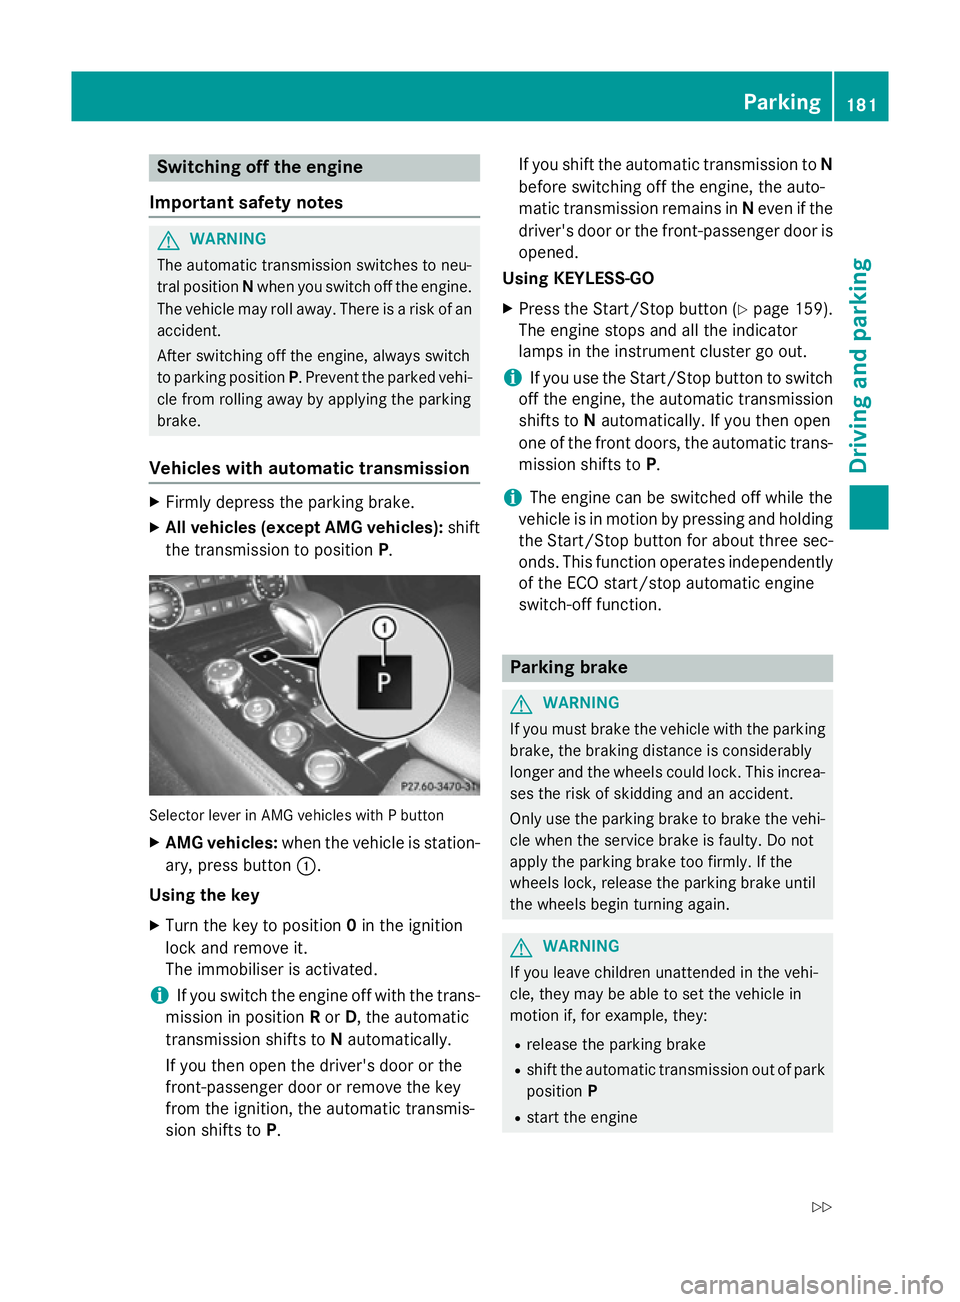
the transmission to position P.Selector lever in AMG vehicles with P button
X AMG vehicles: when the vehicle is station-
ary, press button :.
Using the key X Turn the key to position 0in the ignition
lock and remove it.
The immobiliser is activated.
i If you switch the engine off with the trans-
mission in position Ror D, the automatic
transmission shifts to Nautomatically.
If you then open the driver's door or the
front-passenger door or remove the key
from the ignition, the automatic transmis-
sion shifts to P. If you shift the automatic transmission to
N
before switching off the engine, the auto-
matic transmission remains in Neven if the
driver's door or the front-passenger door is
opened.
Using KEYLESS-GO
X Press the Start/Stop button (Y page 159).
The engine stops and all the indicator
lamps in the instrument cluster go out.
i If you use the Start/Stop button to switch
off the engine, the automatic transmission
shifts to Nautomatically. If you then open
one of the front doors, the automatic trans-
mission shifts to P.
i The engine can be switched off while the
vehicle is in motion by pressing and holding
the Start/Stop button for about three sec- onds. This function operates independently
of the ECO start/stop automatic engine
switch-off function. Parking brake
G
WARNING
If you must brake the vehicle with the parking brake, the braking distance is considerably
longer and the wheels could lock. This increa-
ses the risk of skidding and an accident.
Only use the parking brake to brake the vehi- cle when the service brake is faulty. Do not
apply the parking brake too firmly. If the
wheels lock, release the parking brake until
the wheels begin turning again. G
WARNING
If you leave children unattended in the vehi-
cle, they may be able to set the vehicle in
motion if, for example, they:
R release the parking brake
R shift the automatic transmission out of park
position P
R start the engine Parking
181Driving and parking
Z
Page 288 of 417
Display messages
Possible causes/consequences and
M
MSolutions Ð
Power Power
steering
steering mal‐
mal‐
function See Own‐
function See Own‐
er's Manual er's Manual The power steering assistance is faulty.
A warning tone also sounds.
G WARNING
You will need to use more force to steer.
There is a risk of an accident. X Check whether you are able to apply the extra force required.
X If you are able to steer safely: carefully drive on to a qualified
specialist workshop.
X If you are unable to steer safely: do not drive on. Contact the
nearest qualified specialist workshop. Telephone No ser‐ Telephone No ser‐
vice vice Your vehicle is outside the network provider's transmitter/
receiver range.
X Wait until the mobile phone operational readiness symbol
appears in the multifunction display. ¥
Top Top
up
upwasher
washer fluid
fluid The washer fluid level in the washer fluid reservoir has dropped
below the minimum.
X Top up the washer fluid (Y page 332).Key
Display messages
Possible causes/consequences and
M MSolutions Â
Key does not Key does not
belong to vehicle belong to vehicle You have put the wrong key in the ignition lock.
X Use the correct key. Â
Replace key Replace key The key needs to be replaced.
X Visit a qualified specialist workshop. Â
Change key batter‐ Change key batter‐
ies ies The batteries of the KEYLESS-GO key are discharged.
X Replace the batteries (Y page 86). Display
messages
285On-board computer and displays Z
Page 289 of 417
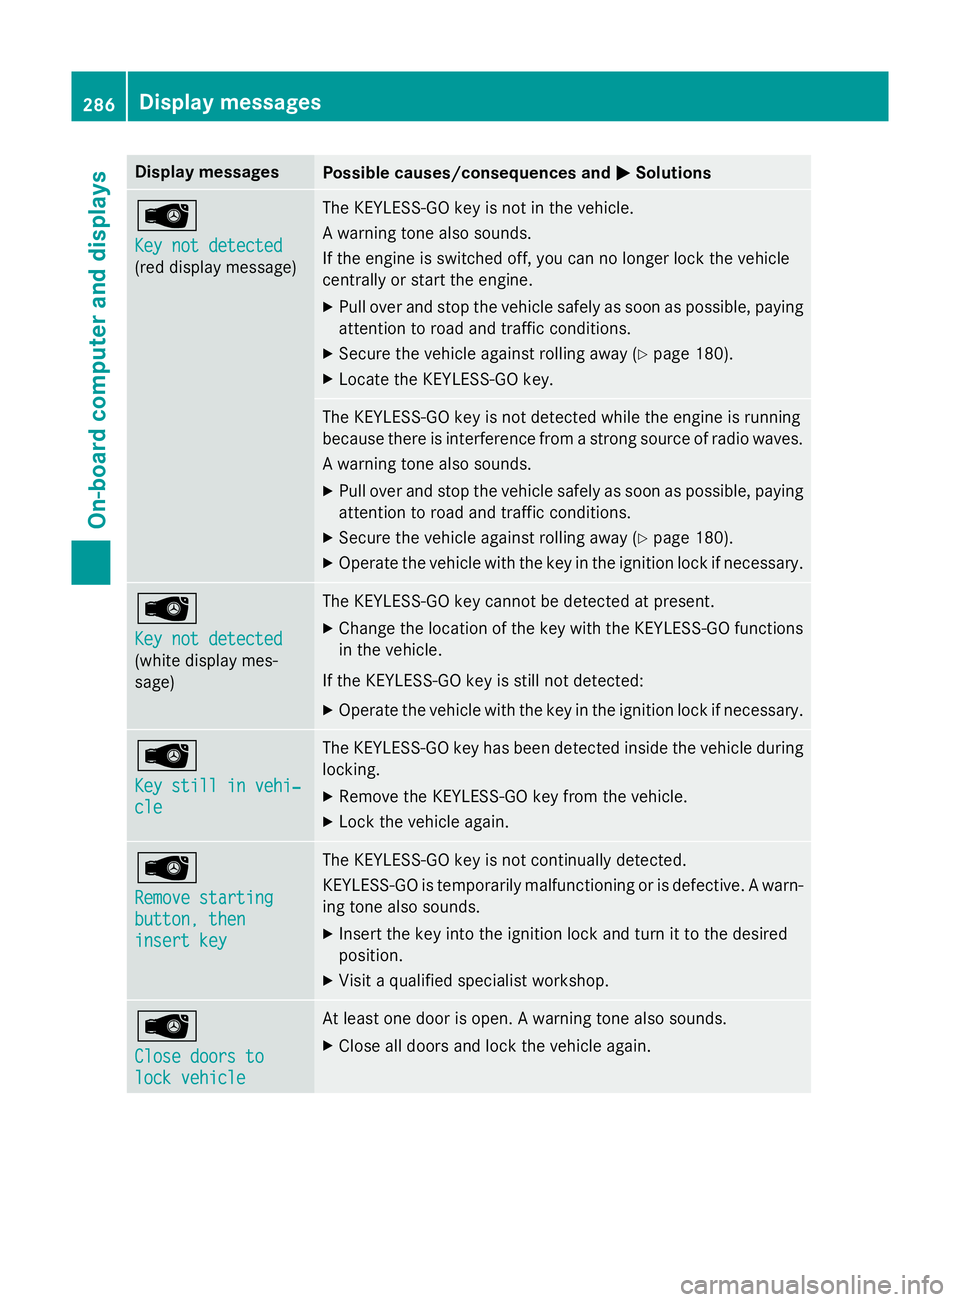
Display messages
Possible causes/consequences and
M
MSolutions Â
Key not detected Key not detected
(red display message) The KEYLESS-GO key is not in the vehicle.
A warning tone also sounds.
If the engine is switched off, you can no longer lock the vehicle
centrally or start the engine.
X Pull over and stop the vehicle safely as soon as possible, paying
attention to road and traffic conditions.
X Secure the vehicle against rolling away (Y page 180).
X Locate the KEYLESS-GO key. The KEYLESS-GO key is not detected while the engine is running
because there is interference from a strong source of radio waves.
A warning tone also sounds.
X Pull over and stop the vehicle safely as soon as possible, paying
attention to road and traffic conditions.
X Secure the vehicle against rolling away (Y page 180).
X Operate the vehicle with the key in the ignition lock if necessary. Â
Key not detected Key not detected
(white display mes-
sage) The KEYLESS-GO key cannot be detected at present.
X Change the location of the key with the KEYLESS-GO functions
in the vehicle.
If the KEYLESS-GO key is still not detected:
X Operate the vehicle with the key in the ignition lock if necessary. Â
Key still in vehi‐ Key still in vehi‐
cle cle The KEYLESS-GO key has been detected inside the vehicle during
locking.
X Remove the KEYLESS-GO key from the vehicle.
X Lock the vehicle again. Â
Remove starting Remove starting
button, then button, then
insert key insert key The KEYLESS-GO key is not continually detected.
KEYLESS-GO is temporarily malfunctioning or is defective. A warn-
ing tone also sounds.
X Insert the key into the ignition lock and turn it to the desired
position.
X Visit a qualified specialist workshop. Â
Close doors to Close doors to
lock vehicle lock vehicle At least one door is open. A warning tone also sounds.
X Close all doors and lock the vehicle again. 286
Display
messagesOn-board computer and displays
Page 334 of 417
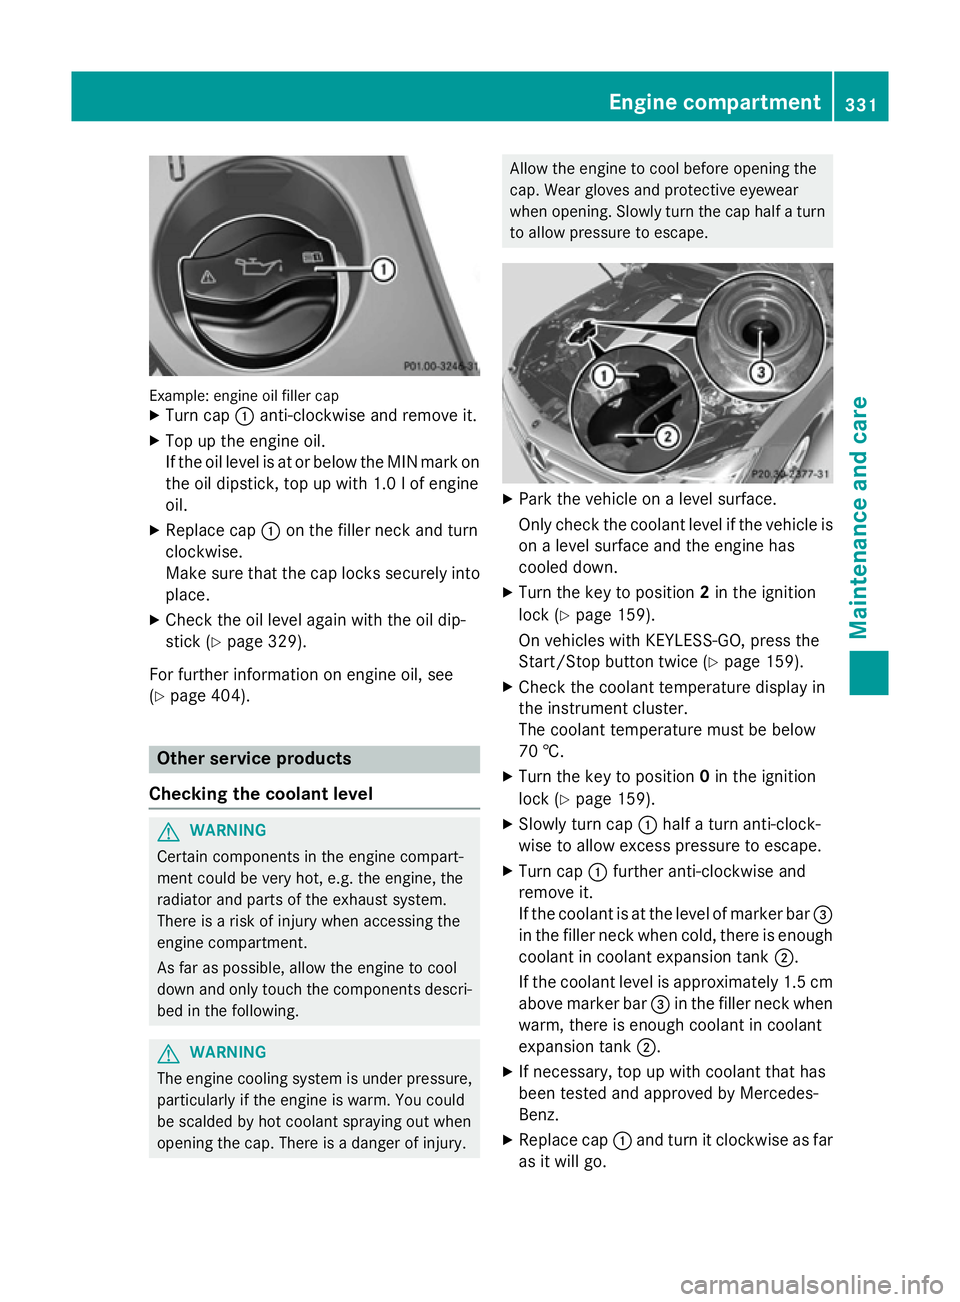
Example: engine oil filler cap
X Turn cap :anti-clockwise and remove it.
X Top up the engine oil.
If the oil level is at or below the MIN mark on
the oil dipstick, top up with 1.0 lof engine
oil.
X Replace cap :on the filler neck and turn
clockwise.
Make sure that the cap locks securely into place.
X Check the oil level again with the oil dip-
stick (Y page 329).
For further information on engine oil, see
(Y page 404). Other service products
Checking the coolant level G
WARNING
Certain components in the engine compart-
ment could be very hot, e.g. the engine, the
radiator and parts of the exhaust system.
There is a risk of injury when accessing the
engine compartment.
As far as possible, allow the engine to cool
down and only touch the components descri- bed in the following. G
WARNING
The engine cooling system is under pressure, particularly if the engine is warm. You could
be scalded by hot coolant spraying out when
opening the cap. There is a danger of injury. Allow the engine to cool before opening the
cap. Wear gloves and protective eyewear
when opening. Slowly turn the cap half a turn
to allow pressure to escape. X
Park the vehicle on a level surface.
Only check the coolant level if the vehicle is
on a level surface and the engine has
cooled down.
X Turn the key to position 2in the ignition
lock (Y page 159).
On vehicles with KEYLESS-GO, press the
Start/Stop button twice (Y page 159).
X Check the coolant temperature display in
the instrument cluster.
The coolant temperature must be below
70 †.
X Turn the key to position 0in the ignition
lock (Y page 159).
X Slowly turn cap :half a turn anti-clock-
wise to allow excess pressure to escape.
X Turn cap :further anti-clockwise and
remove it.
If the coolant is at the level of marker bar =
in the filler neck when cold, there is enough coolant in coolant expansion tank ;.
If the coolant level is approximately 1.5 cm above marker bar =in the filler neck when
warm, there is enough coolant in coolant
expansion tank ;.
X If necessary, top up with coolant that has
been tested and approved by Mercedes-
Benz.
X Replace cap :and turn it clockwise as far
as it will go. Engine compartment
331Maintenance and care Z
Page 338 of 417
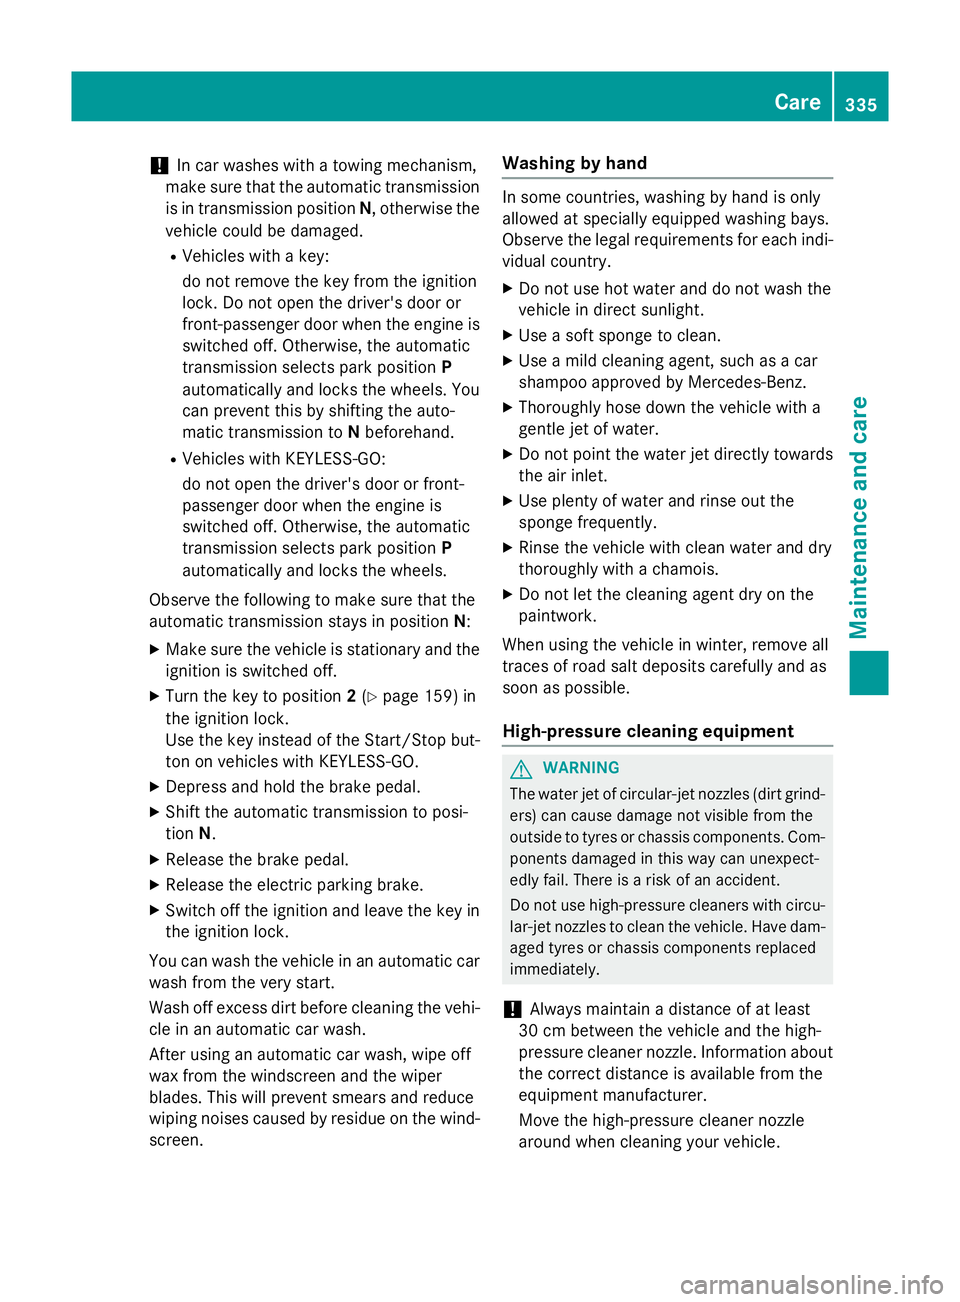
!
In car washes with a towing mechanism,
make sure that the automatic transmission is in transmission position N, otherwise the
vehicle could be damaged.
R Vehicles with a key:
do not remove the key from the ignition
lock. Do not open the driver's door or
front-passenger door when the engine is
switched off. Otherwise, the automatic
transmission selects park position P
automatically and locks the wheels. You
can prevent this by shifting the auto-
matic transmission to Nbeforehand.
R Vehicles with KEYLESS-GO:
do not open the driver's door or front-
passenger door when the engine is
switched off. Otherwise, the automatic
transmission selects park position P
automatically and locks the wheels.
Observe the following to make sure that the
automatic transmission stays in position N:
X Make sure the vehicle is stationary and the
ignition is switched off.
X Turn the key to position 2(Y page 159) in
the ignition lock.
Use the key instead of the Start/Stop but-
ton on vehicles with KEYLESS-GO.
X Depress and hold the brake pedal.
X Shift the automatic transmission to posi-
tion N.
X Release the brake pedal.
X Release the electric parking brake.
X Switch off the ignition and leave the key in
the ignition lock.
You can wash the vehicle in an automatic car
wash from the very start.
Wash off excess dirt before cleaning the vehi-
cle in an automatic car wash.
After using an automatic car wash, wipe off
wax from the windscreen and the wiper
blades. This will prevent smears and reduce
wiping noises caused by residue on the wind- screen. Washing by hand In some countries, washing by hand is only
allowed at specially equipped washing bays.
Observe the legal requirements for each indi- vidual country.
X Do not use hot water and do not wash the
vehicle in direct sunlight.
X Use a soft sponge to clean.
X Use a mild cleaning agent, such as a car
shampoo approved by Mercedes-Benz.
X Thoroughly hose down the vehicle with a
gentle jet of water.
X Do not point the water jet directly towards
the air inlet.
X Use plenty of water and rinse out the
sponge frequently.
X Rinse the vehicle with clean water and dry
thoroughly with a chamois.
X Do not let the cleaning agent dry on the
paintwork.
When using the vehicle in winter, remove all
traces of road salt deposits carefully and as
soon as possible.
High-pressure cleaning equipment G
WARNING
The water jet of circular-jet nozzles (dirt grind- ers) can cause damage not visible from the
outside to tyres or chassis components. Com-
ponents damaged in this way can unexpect-
edly fail. There is a risk of an accident.
Do not use high-pressure cleaners with circu-
lar-jet nozzles to clean the vehicle. Have dam- aged tyres or chassis components replaced
immediately.
! Always maintain a distance of at least
30 cm between the vehicle and the high-
pressure cleaner nozzle. Information about
the correct distance is available from the
equipment manufacturer.
Move the high-pressure cleaner nozzle
around when cleaning your vehicle. Care
335Maintenance and care Z
Page 350 of 417
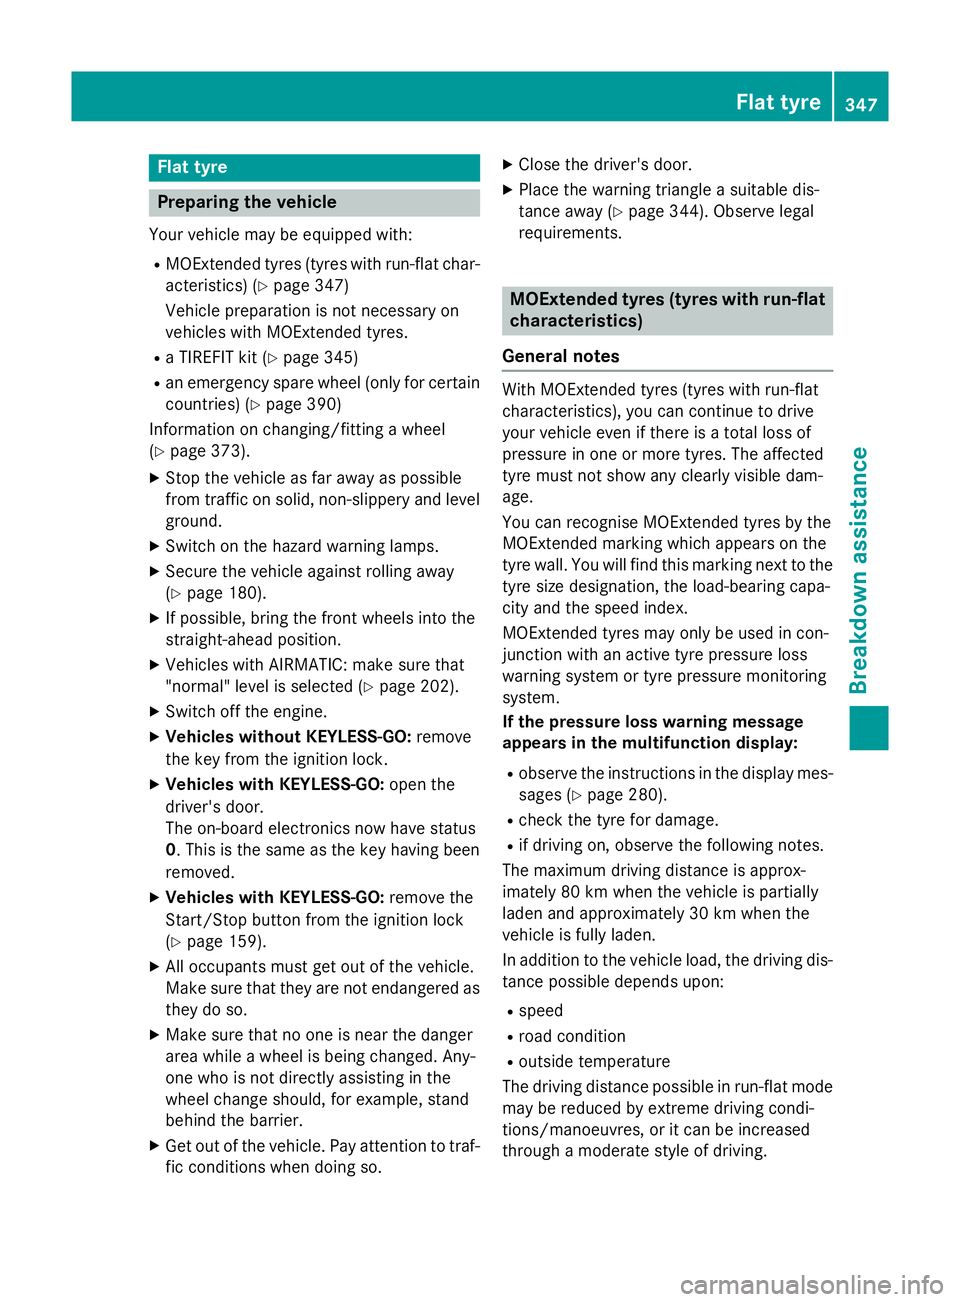
Flat tyre
Preparing the vehicle
Your vehicle may be equipped with: R MOExtended tyres (tyres with run-flat char-
acteristics) (Y page 347)
Vehicle preparation is not necessary on
vehicles with MOExtended tyres.
R a TIREFIT kit (Y page 345)
R an emergency spare wheel (only for certain
countries) (Y page 390)
Information on changing/fitting a wheel
(Y page 373).
X Stop the vehicle as far away as possible
from traffic on solid, non-slippery and level
ground.
X Switch on the hazard warning lamps.
X Secure the vehicle against rolling away
(Y page 180).
X If possible, bring the front wheels into the
straight-ahead position.
X Vehicles with AIRMATIC: make sure that
"normal" level is selected (Y page 202).
X Switch off the engine.
X Vehicles without KEYLESS-GO: remove
the key from the ignition lock.
X Vehicles with KEYLESS-GO: open the
driver's door.
The on-board electronics now have status
0 . This is the same as the key having been
removed.
X Vehicles with KEYLESS-GO: remove the
Start/Stop button from the ignition lock
(Y page 159).
X All occupants must get out of the vehicle.
Make sure that they are not endangered as they do so.
X Make sure that no one is near the danger
area while a wheel is being changed. Any-
one who is not directly assisting in the
wheel change should, for example, stand
behind the barrier.
X Get out of the vehicle. Pay attention to traf-
fic conditions when doing so. X
Close the driver's door.
X Place the warning triangle a suitable dis-
tance away (Y page 344). Observe legal
requirements. MOExtended tyres (tyres with run-flat
characteristics)
General notes With MOExtended tyres (tyres with run-flat
characteristics), you can continue to drive
your vehicle even if there is a total loss of
pressure in one or more tyres. The affected
tyre must not show any clearly visible dam-
age.
You can recognise MOExtended tyres by the
MOExtended marking which appears on the
tyre wall. You will find this marking next to the
tyre size designation, the load-bearing capa-
city and the speed index.
MOExtended tyres may only be used in con-
junction with an active tyre pressure loss
warning system or tyre pressure monitoring
system.
If the pressure loss warning message
appears in the multifunction display:
R observe the instructions in the display mes-
sages (Y page 280).
R check the tyre for damage.
R if driving on, observe the following notes.
The maximum driving distance is approx-
imately 80 km when the vehicle is partially
laden and approximately 30 km when the
vehicle is fully laden.
In addition to the vehicle load, the driving dis- tance possible depends upon:
R speed
R road condition
R outside temperature
The driving distance possible in run-flat mode may be reduced by extreme driving condi-
tions/manoeuvres, or it can be increased
through a moderate style of driving. Flat tyre
347Breakdown assistance