2014 MERCEDES-BENZ CLS SHOOTING BRAKE keyless
[x] Cancel search: keylessPage 98 of 417
X
To open the tailgate: pull the handle on
the tailgate.
X To stop the opening procedure at the
desired position: press the closing button
(Y page 92) in the tailgate or pull the handle
on the outside of the tailgate again.
X To store the position: press and hold the
closing button in the tailgate until you hear a short tone.
The opening angle limiter is activated. The
tailgate then stops in the stored position
when opened.
Deactivating X
Press and hold the closing button
(Y page 92) in the tailgate until you hear
two short tones. Unlocking the boot (CLS Coupé)
! The boot lid swings upwards when
opened. Therefore, make sure that there is sufficient clearance above the boot lid.
If the boot cannot be unlocked with the key or
KEYLESS-GO, use the emergency key ele-
ment.
If you use the emergency key element to
unlock and open the boot lid, the anti-theft
alarm system will be triggered (Y page 78).
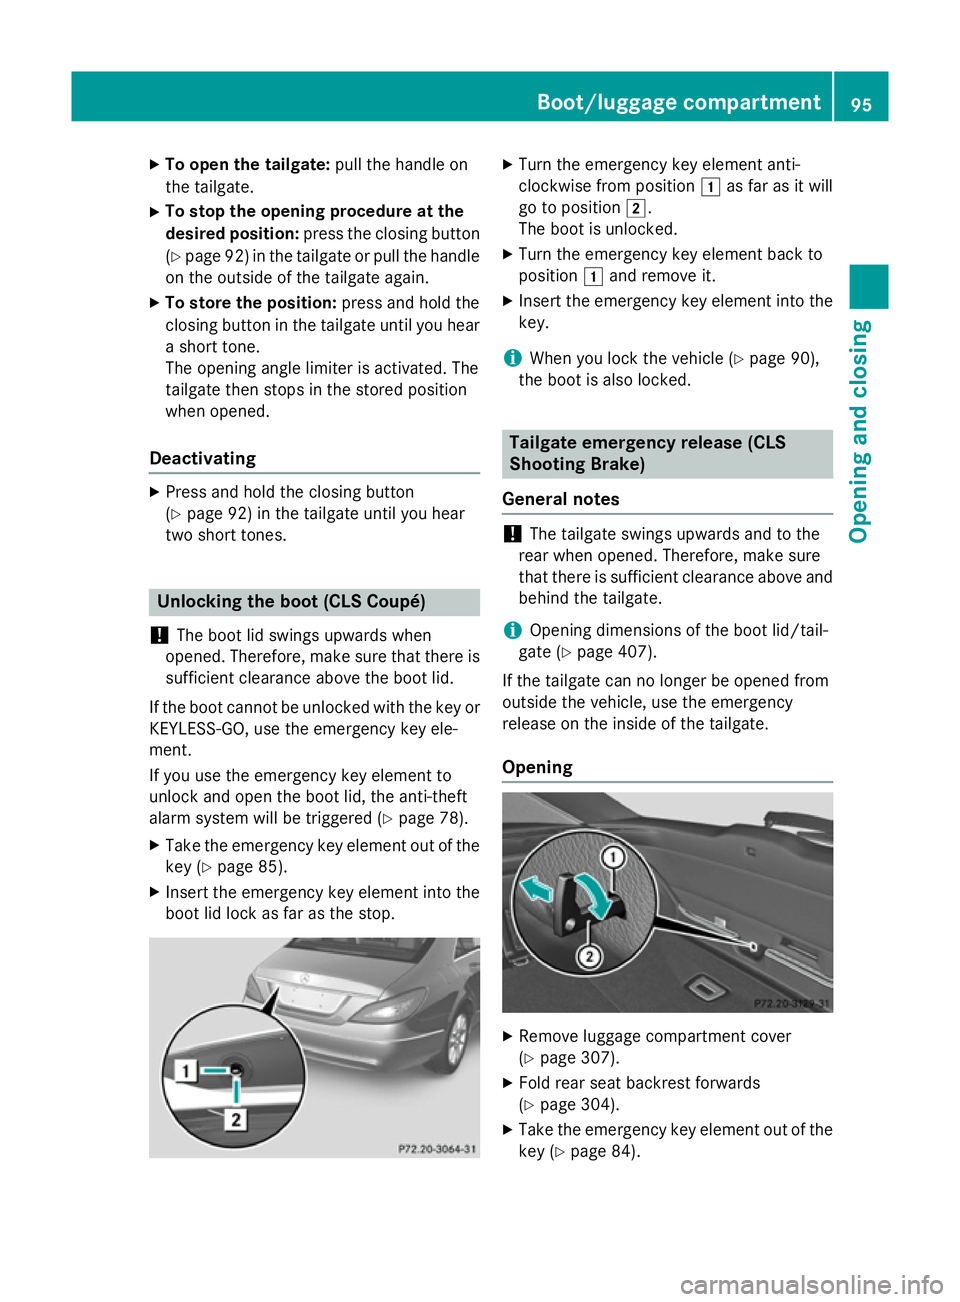
X Take the emergency key element out of the
key (Y page 85).
X Insert the emergency key element into the
boot lid lock as far as the stop. X
Turn the emergency key element anti-
clockwise from position 1as far as it will
go to position 2.
The boot is unlocked.
X Turn the emergency key element back to
position 1and remove it.
X Insert the emergency key element into the
key.
i When you lock the vehicle (Y
page 90),
the boot is also locked. Tailgate emergency release (CLS
Shooting Brake)
General notes !
The tailgate swings upwards and to the
rear when opened. Therefore, make sure
that there is sufficient clearance above and behind the tailgate.
i Opening dimensions of the boot lid/tail-
gate (Y page 407).
If the tailgate can no longer be opened from
outside the vehicle, use the emergency
release on the inside of the tailgate.
Opening X
Remove luggage compartment cover
(Y page 307).
X Fold rear seat backrest forwards
(Y page 304).
X Take the emergency key element out of the
key (Y page 84). Boot/luggage compartment
95Opening and closing Z
Page 101 of 417
With KEYLESS-GO:
X Release the sensor surface on the door
handle.
X Pull the door handle immediately and hold
it.
The side windows and the sliding sunroof or
the panorama sliding sunroof open.
General notes When you lock the vehicle, you can simulta-
neously:
R close the side windows
R close the sliding sunroof
Using the key X
Vehicles without KEYLESS-GO: point the
tip of the key at the door handle on the
driver's door.
X Vehicles with KEYLESS-GO: the key must
be in close proximity to the vehicle.
X Press and hold the &button until the
side windows and the sliding sunroof are
fully closed.
X Make sure that all the side windows and the
sliding sunroof are closed.
X To interrupt convenience closing:
release the &button.
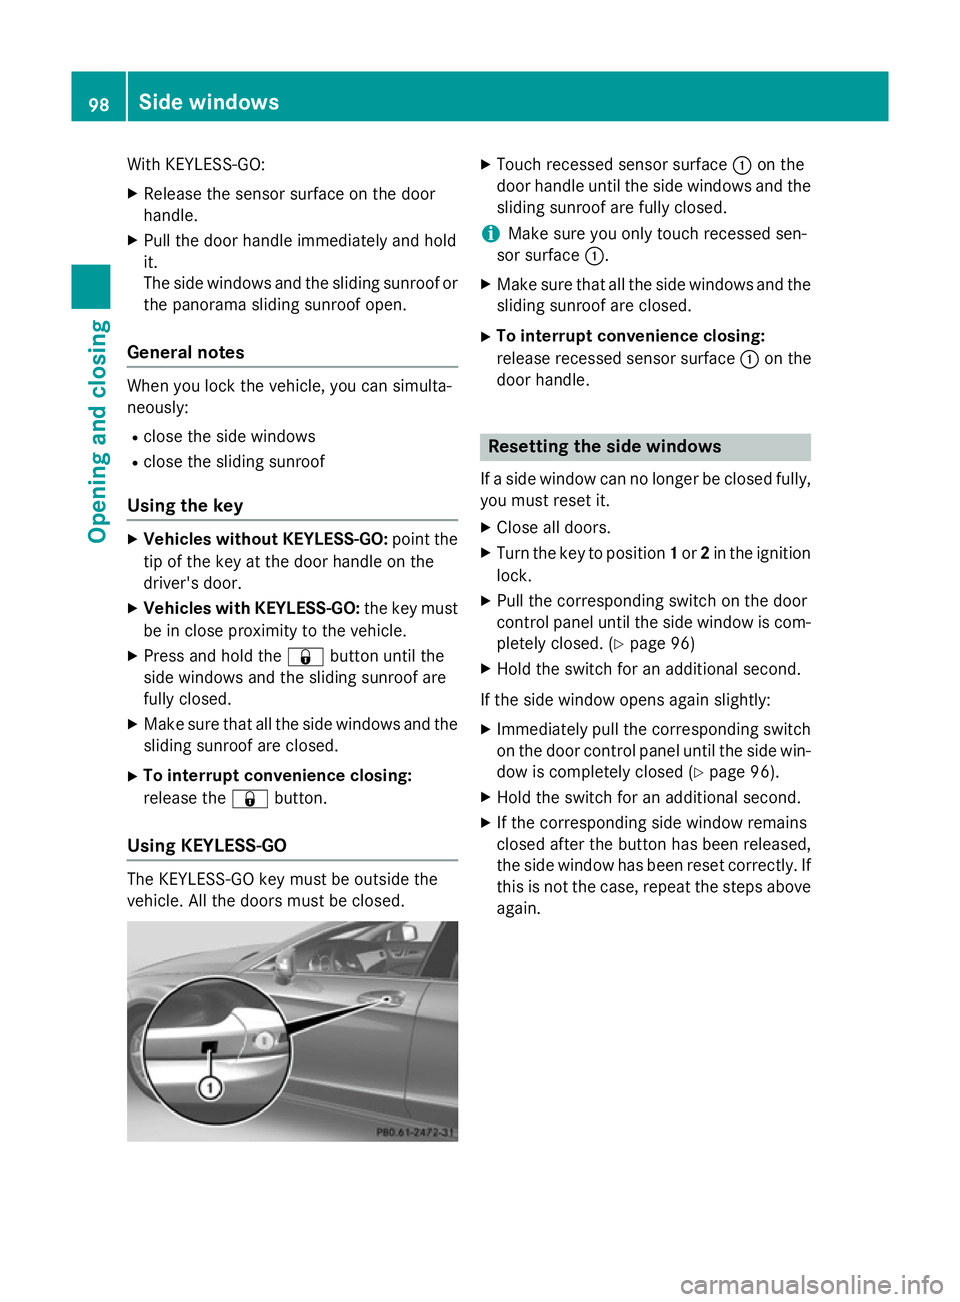
Using KEYLESS-GO The KEYLESS-GO key must be outside the
vehicle. All the doors must be closed. X
Touch recessed sensor surface :on the
door handle until the side windows and the sliding sunroof are fully closed.
i Make sure you only touch recessed sen-
sor surface :.
X Make sure that all the side windows and the
sliding sunroof are closed.
X To interrupt convenience closing:
release recessed sensor surface :on the
door handle. Resetting the side windows
If a side window can no longer be closed fully, you must reset it.
X Close all doors.
X Turn the key to position 1or 2in the ignition
lock.
X Pull the corresponding switch on the door
control panel until the side window is com-
pletely closed. (Y page 96)
X Hold the switch for an additional second.
If the side window opens again slightly:
X Immediately pull the corresponding switch
on the door control panel until the side win-
dow is completely closed (Y page 96).
X Hold the switch for an additional second.
X If the corresponding side window remains
closed after the button has been released,
the side window has been reset correctly. If
this is not the case, repeat the steps aboveagain. 98
Side windowsOpening and closing
Page 117 of 417
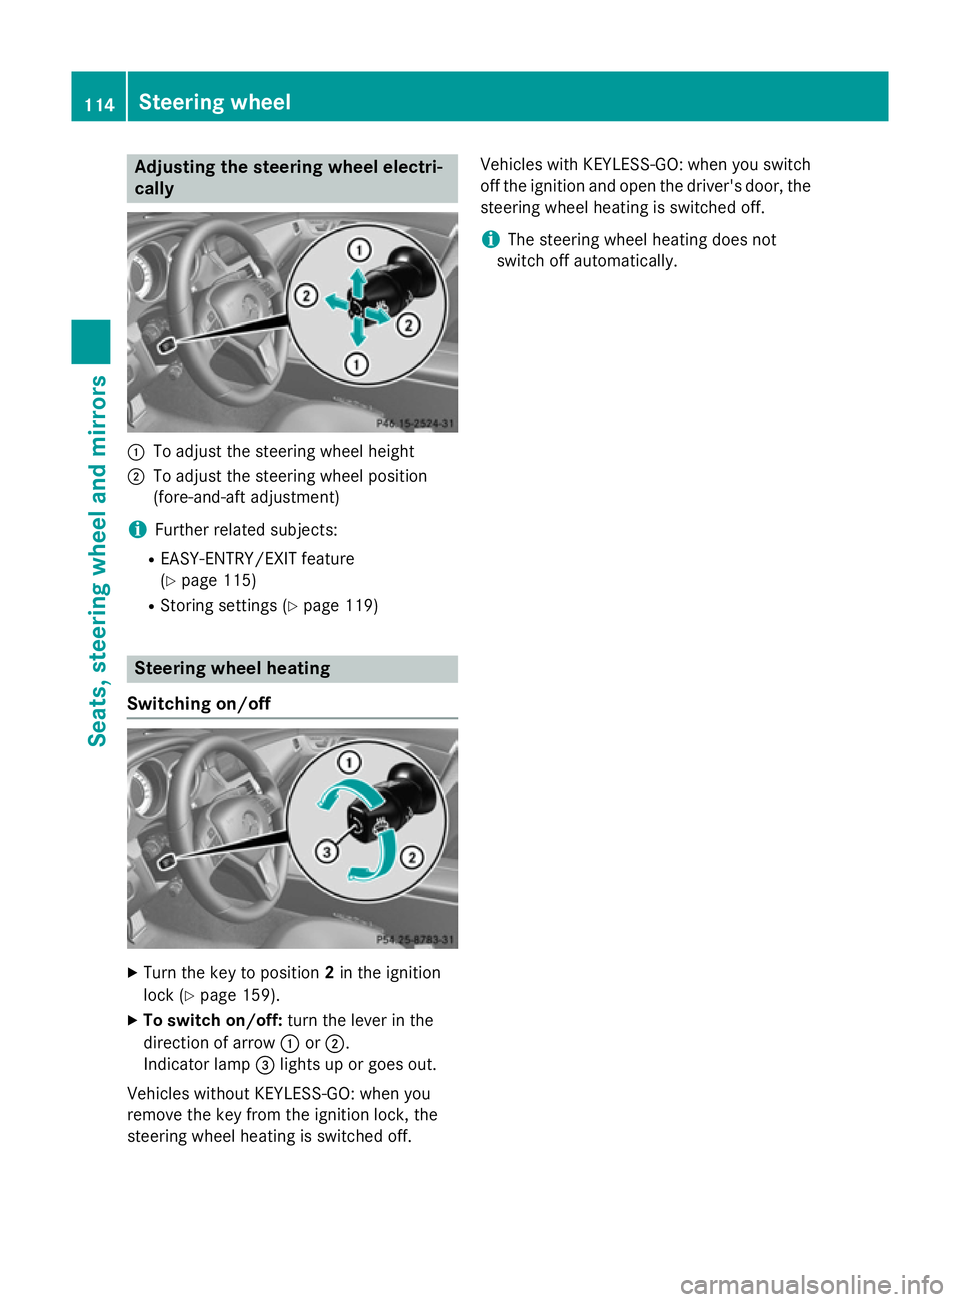
Adjusting the steering wheel electri-
cally :
To adjust the steering wheel height
; To adjust the steering wheel position
(fore-and-aft adjustment)
i Further related subjects:
R EASY-ENTRY/EXIT feature
(Y page 115)
R Storing settings (Y page 119)Steering wheel heating
Switching on/off X
Turn the key to position 2in the ignition
lock (Y page 159).
X To switch on/off: turn the lever in the
direction of arrow :or;.
Indicator lamp =lights up or goes out.
Vehicles without KEYLESS-GO: when you
remove the key from the ignition lock, the
steering wheel heating is switched off. Vehicles with KEYLESS-GO: when you switch
off the ignition and open the driver's door, the steering wheel heating is switched off.
i The steering wheel heating does not
switch off automatically. 114
Steering wheelSeats
, steering wheel and mirrors
Page 137 of 417
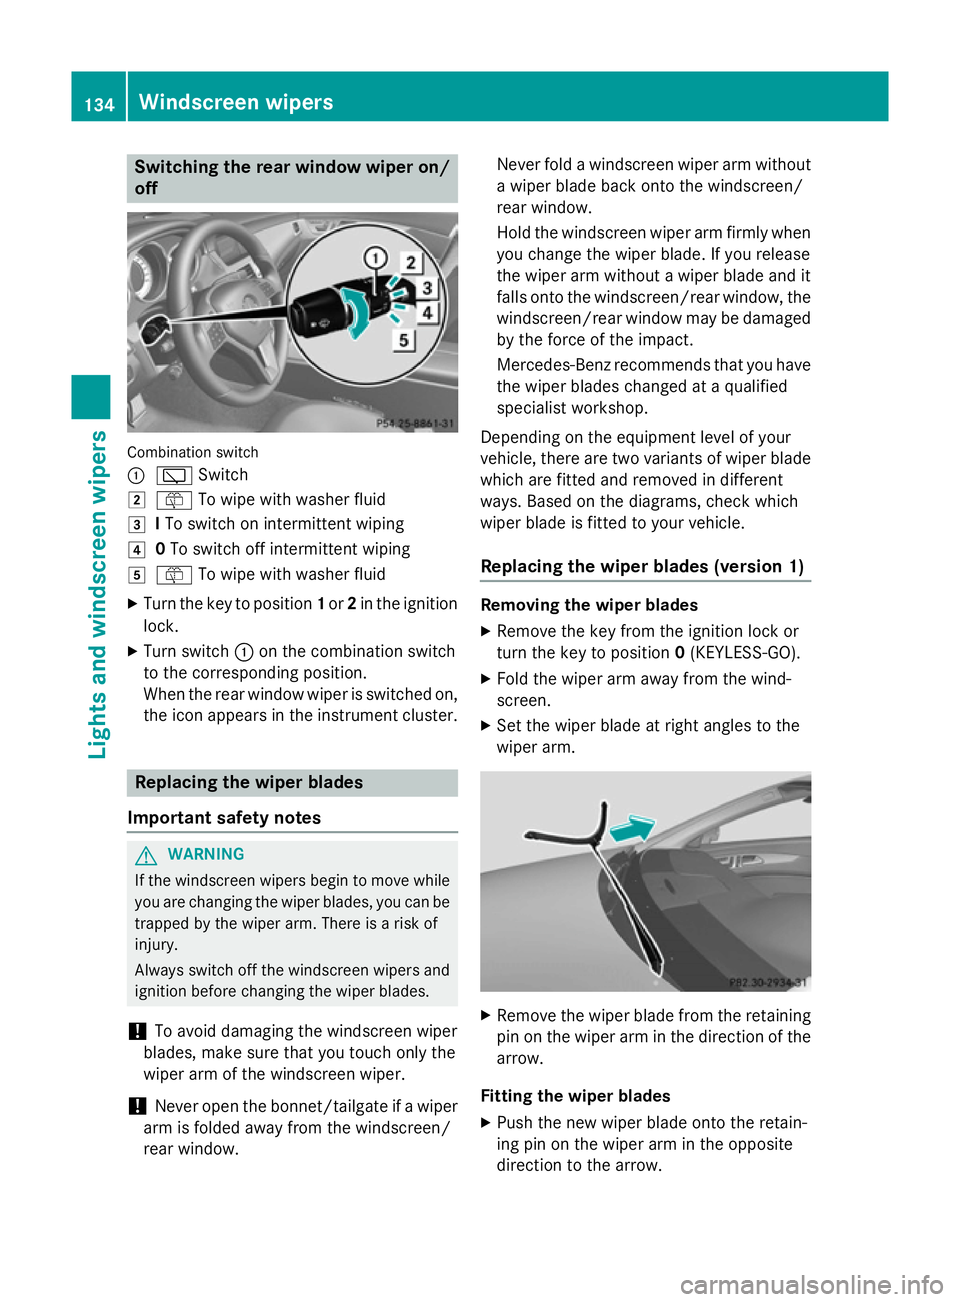
Switching the rear window wiper on/
off Combination switch
:
è Switch
2 ô To wipe with washer fluid
3 ITo switch on intermittent wiping
4 0To switch off intermittent wiping
5 ô To wipe with washer fluid
X Turn the key to position 1or 2in the ignition
lock.
X Turn switch :on the combination switch
to the corresponding position.
When the rear window wiper is switched on,
the icon appears in the instrument cluster. Replacing the wiper blades
Important safety notes G
WARNING
If the windscreen wipers begin to move while
you are changing the wiper blades, you can be trapped by the wiper arm. There is a risk of
injury.
Always switch off the windscreen wipers and
ignition before changing the wiper blades.
! To avoid damaging the windscreen wiper
blades, make sure that you touch only the
wiper arm of the windscreen wiper.
! Never open the bonnet/tailgate if a wiper
arm is folded away from the windscreen/
rear window. Never fold a windscreen wiper arm without
a wiper blade back onto the windscreen/
rear window.
Hold the windscreen wiper arm firmly when
you change the wiper blade. If you release
the wiper arm without a wiper blade and it
falls onto the windscreen/rear window, the windscreen/rear window may be damaged
by the force of the impact.
Mercedes-Benz recommends that you have
the wiper blades changed at a qualified
specialist workshop.
Depending on the equipment level of your
vehicle, there are two variants of wiper blade which are fitted and removed in different
ways. Based on the diagrams, check which
wiper blade is fitted to your vehicle.
Replacing the wiper blades (version 1) Removing the wiper blades
X Remove the key from the ignition lock or
turn the key to position 0(KEYLESS-GO).
X Fold the wiper arm away from the wind-
screen.
X Set the wiper blade at right angles to the
wiper arm. X
Remove the wiper blade from the retaining
pin on the wiper arm in the direction of thearrow.
Fitting the wiper blades
X Push the new wiper blade onto the retain-
ing pin on the wiper arm in the opposite
direction to the arrow. 134
Windscreen wipersLights and windscreen wipers
Page 138 of 417
Make sure that the wiper blade slides fully
onto the retaining pin on the wiper arm.
X Turn the wiper blade parallel to the wiper
arm.
X Fold the wiper arm back onto the wind-
screen.
Replacing the wiper blades (version 2) Removing the wiper blades
X Remove the key from the ignition lock or
turn the key to position 0(KEYLESS-GO).
X Fold the wiper arm away from the wind-
screen. X
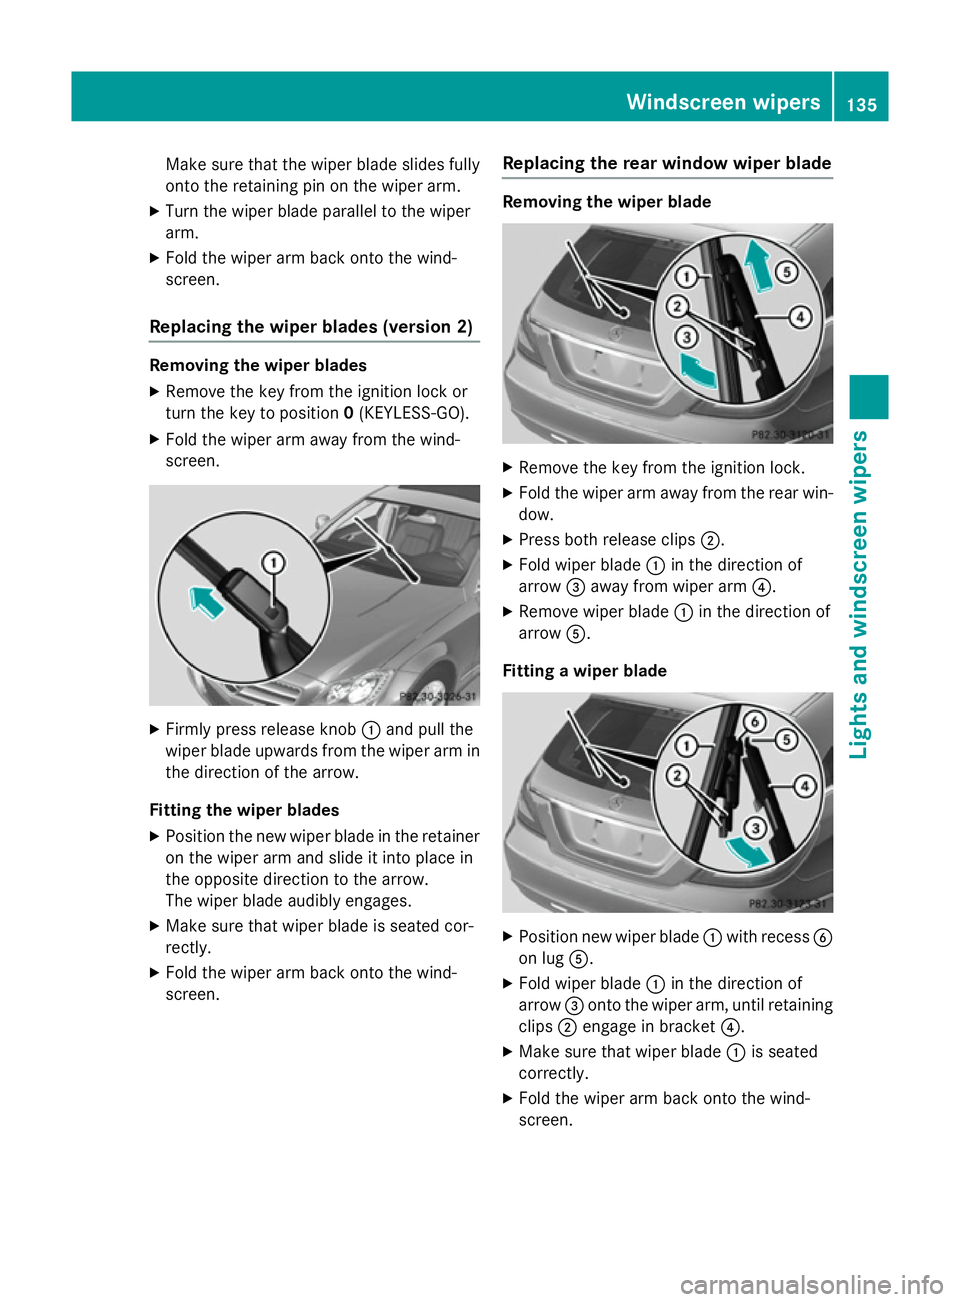
Firmly press release knob :and pull the
wiper blade upwards from the wiper arm in the direction of the arrow.
Fitting the wiper blades
X Position the new wiper blade in the retainer
on the wiper arm and slide it into place in
the opposite direction to the arrow.
The wiper blade audibly engages.
X Make sure that wiper blade is seated cor-
rectly.
X Fold the wiper arm back onto the wind-
screen. Replacing the rear window wiper blade Removing the wiper blade
X
Remove the key from the ignition lock.
X Fold the wiper arm away from the rear win-
dow.
X Press both release clips ;.
X Fold wiper blade :in the direction of
arrow =away from wiper arm ?.
X Remove wiper blade :in the direction of
arrow A.
Fitting a wiper blade X
Position new wiper blade :with recess B
on lug A.
X Fold wiper blade :in the direction of
arrow =onto the wiper arm, until retaining
clips ;engage in bracket ?.
X Make sure that wiper blade :is seated
correctly.
X Fold the wiper arm back onto the wind-
screen. Windscreen wipers
135Lights and windscreen wipers Z
Page 162 of 417
G
WARNING
Unsuitable footwear can hinder correct usage of the pedals, e.g.:
R shoes with thick soles
R shoes with high heels
R slippers
There is a risk of an accident.
Wear suitable footwear to ensure correct
usage of the pedals. G
WARNING
If you switch off the ignition while driving,
safety-relevant functions are only available
with limitations, or not at all. This could affect, for example, the power steering and the brake
boosting effect. You will require considerably
more effort to steer and brake. There is a risk of an accident.
Do not switch off the ignition while driving. G
WARNING
If the parking brake has not been fully
released when driving, the parking brake can:
R overheat and cause a fire
R lose its hold function.
There is a risk of fire and an accident. Release
the parking brake fully before driving off.
! Warm up the engine quickly. Do not use
the engine's full performance until it has
reached operating temperature.
Only set the automatic transmission to the
respective drive positions when the vehicle
is stationary.
Where possible, avoid spinning the drive
wheels when pulling away on slippery
roads. Otherwise, you could damage the
drive train.
! AMG vehicles:
at low engine oil temper-
atures (below +20 †), the maximum
engine speed is restricted in order to pro-
tect the engine. To protect the engine and
maintain smooth engine operation, avoid driving at full throttle when the engine is
cold. Key positions
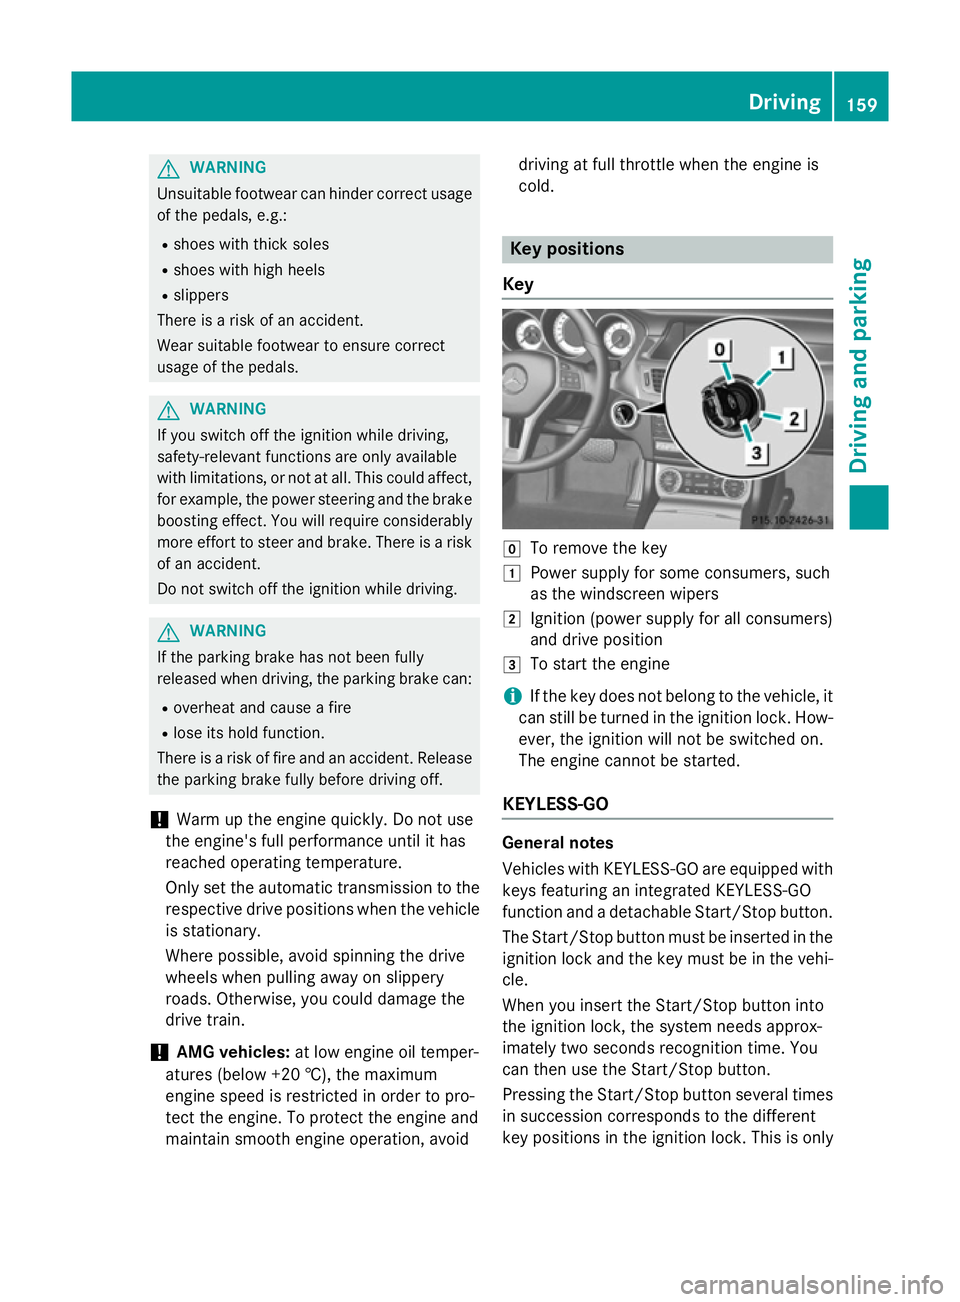
Key g
To remove the key
1 Power supply for some consumers, such
as the windscreen wipers
2 Ignition (power supply for all consumers)
and drive position
3 To start the engine
i If the key does not belong to the vehicle, it
can still be turned in the ignition lock. How-
ever, the ignition will not be switched on.
The engine cannot be started.
KEYLESS-GO General notes
Vehicles with KEYLESS-GO are equipped with
keys featuring an integrated KEYLESS-GO
function and a detachable Start/Stop button.
The Start/Stop button must be inserted in the ignition lock and the key must be in the vehi-cle.
When you insert the Start/Stop button into
the ignition lock, the system needs approx-
imately two seconds recognition time. You
can then use the Start/Stop button.
Pressing the Start/Stop button several times
in succession corresponds to the different
key positions in the ignition lock. This is only Driving
159Driving and parking Z
Page 163 of 417
the case if you are not depressing the brake
pedal.
If you depress the brake pedal and press the
Start/Stop button, the engine starts immedi-
ately.
A check which periodically establishes a radio
connection between the vehicle and the key
determines whether a valid key is in the vehi- cle. This occurs, for example, when starting
the engine.
To start the vehicle without actively using the
key:
R the Start/Stop button must be inserted in
the ignition lock
R the key must be in the vehicle
R the vehicle must not be locked with the key
or KEYLESS-GO (Y page 83)
R do not keep the KEYLESS-GO key together
with:
- electronic devices, e.g. a mobile phone
or another key
- metallic objects, e.g. coins or metal film
R do not keep the KEYLESS-GO key together
with metallic objects, such as a metal case,
for example
This can affect the functionality of KEY-
LESS-GO.
The engine can be switched off while the vehi-
cle is in motion by pressing and holding the
Start/Stop button for three seconds. This
function operates independently of the ECO
start/stop automatic engine switch-off func-
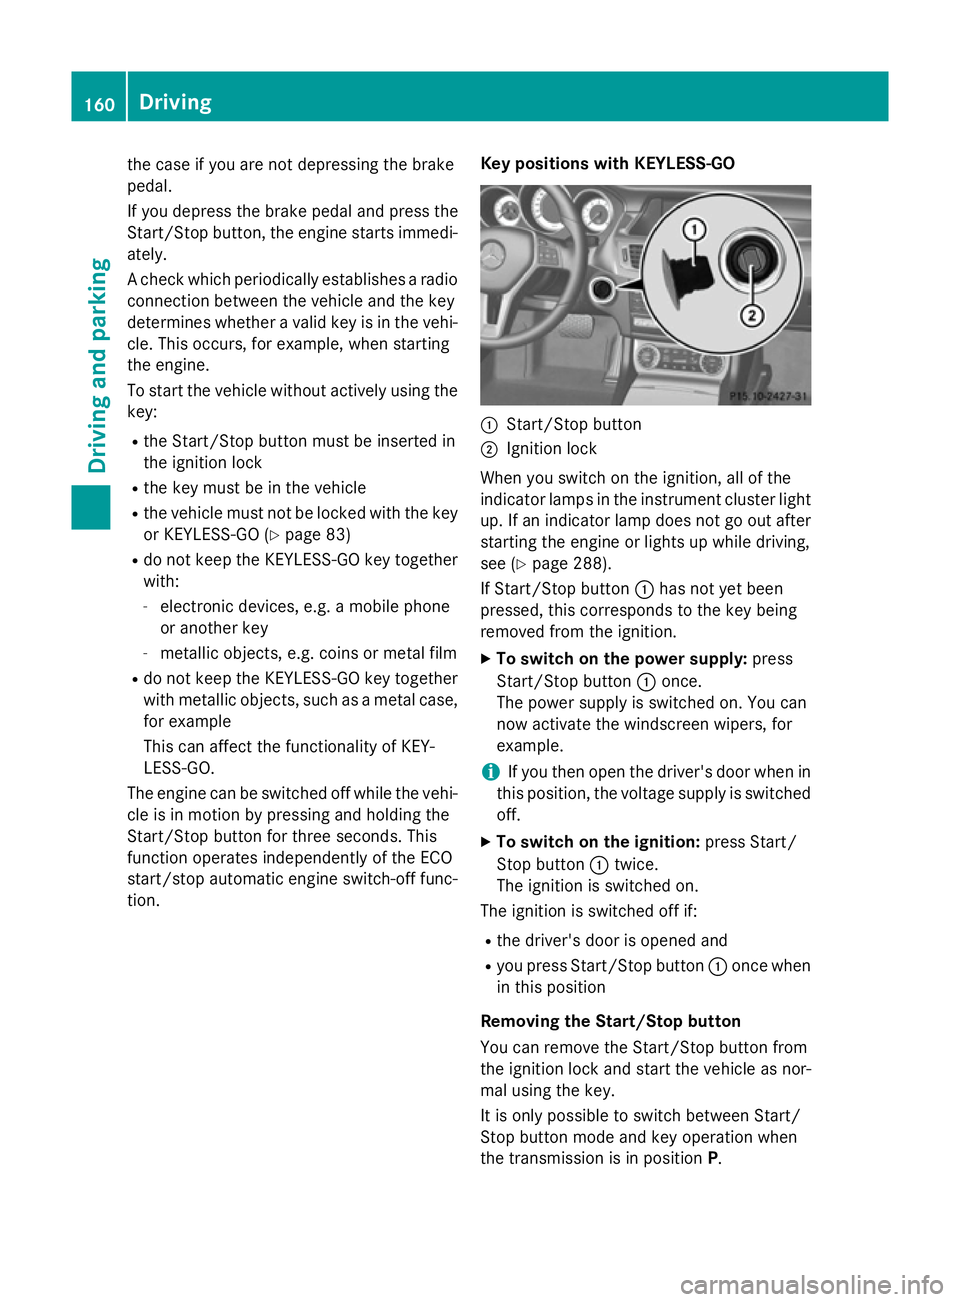
tion. Key positions with KEYLESS-GO :
Start/Stop button
; Ignition lock
When you switch on the ignition, all of the
indicator lamps in the instrument cluster light up. If an indicator lamp does not go out after
starting the engine or lights up while driving,
see (Y page 288).
If Start/Stop button :has not yet been
pressed, this corresponds to the key being
removed from the ignition.
X To switch on the power supply: press
Start/Stop button :once.
The power supply is switched on. You can
now activate the windscreen wipers, for
example.
i If you then open the driver's door when in
this position, the voltage supply is switched
off.
X To switch on the ignition: press Start/
Stop button :twice.
The ignition is switched on.
The ignition is switched off if:
R the driver's door is opened and
R you press Start/Stop button :once when
in this position
Removing the Start/Stop button
You can remove the Start/Stop button from
the ignition lock and start the vehicle as nor-
mal using the key.
It is only possible to switch between Start/
Stop button mode and key operation when
the transmission is in position P.160
DrivingDriving an
d parking
Page 164 of 417
X
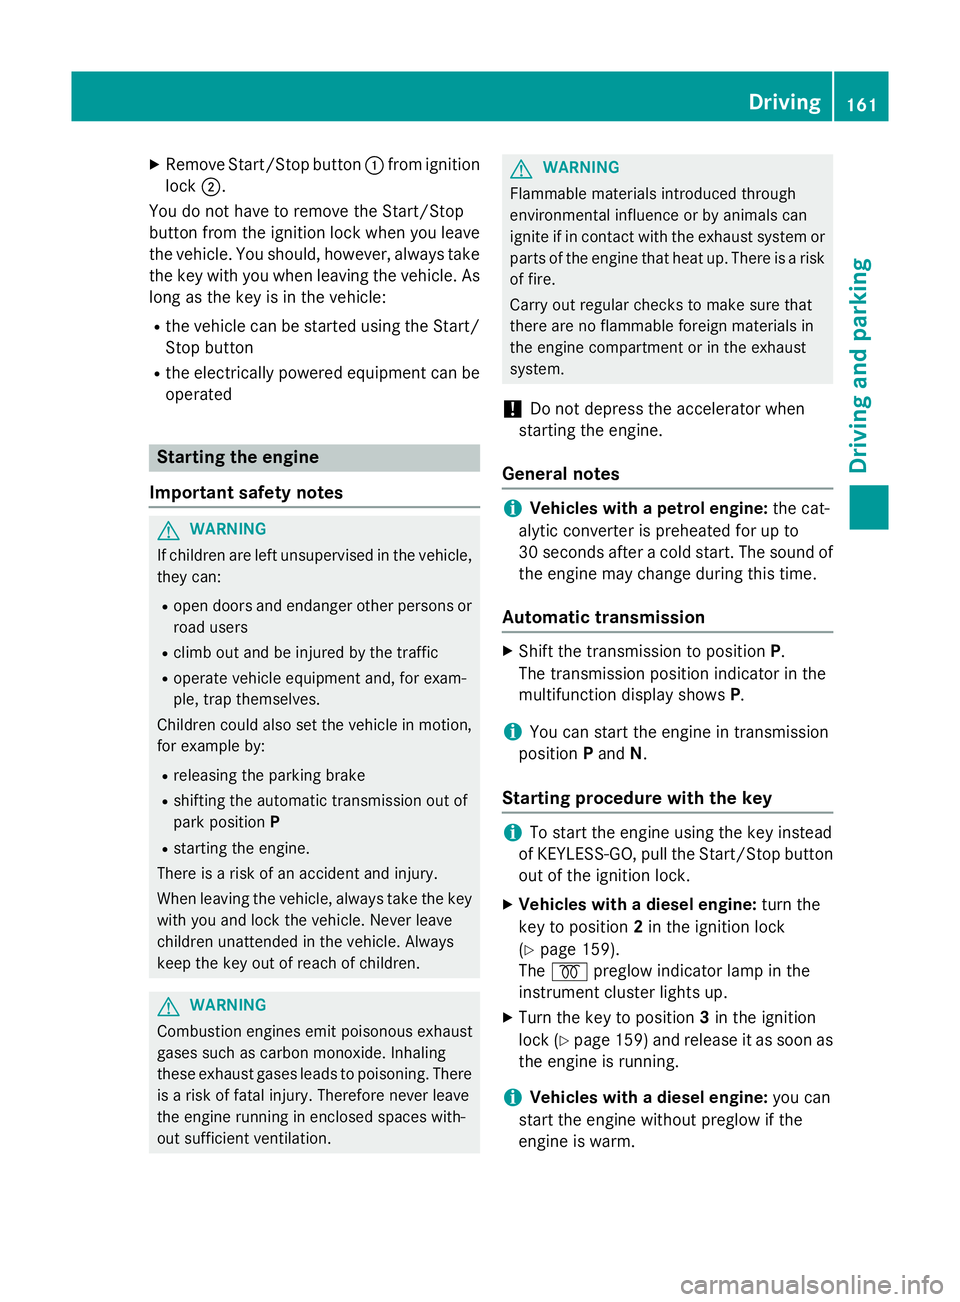
Remove Start/Stop button :from ignition
lock ;.
You do not have to remove the Start/Stop
button from the ignition lock when you leave
the vehicle. You should, however, always take the key with you when leaving the vehicle. As
long as the key is in the vehicle:
R the vehicle can be started using the Start/
Stop button
R the electrically powered equipment can be
operated Starting the engine
Important safety notes G
WARNING
If children are left unsupervised in the vehicle, they can:
R open doors and endanger other persons or
road users
R climb out and be injured by the traffic
R operate vehicle equipment and, for exam-
ple, trap themselves.
Children could also set the vehicle in motion, for example by:
R releasing the parking brake
R shifting the automatic transmission out of
park position P
R starting the engine.
There is a risk of an accident and injury.
When leaving the vehicle, always take the key
with you and lock the vehicle. Never leave
children unattended in the vehicle. Always
keep the key out of reach of children. G
WARNING
Combustion engines emit poisonous exhaust
gases such as carbon monoxide. Inhaling
these exhaust gases leads to poisoning. There is a risk of fatal injury. Therefore never leave
the engine running in enclosed spaces with-
out sufficient ventilation. G
WARNING
Flammable materials introduced through
environmental influence or by animals can
ignite if in contact with the exhaust system or parts of the engine that heat up. There is a risk
of fire.
Carry out regular checks to make sure that
there are no flammable foreign materials in
the engine compartment or in the exhaust
system.
! Do not depress the accelerator when
starting the engine.
General notes i
Vehicles with a petrol engine:
the cat-
alytic converter is preheated for up to
30 seconds after a cold start. The sound of the engine may change during this time.
Automatic transmission X
Shift the transmission to position P.
The transmission position indicator in the
multifunction display shows P.
i You can start the engine in transmission
position Pand N.
Starting procedure with the key i
To start the engine using the key instead
of KEYLESS-GO, pull the Start/Stop button
out of the ignition lock.
X Vehicles with a diesel engine: turn the
key to position 2in the ignition lock
(Y page 159).
The % preglow indicator lamp in the
instrument cluster lights up.
X Turn the key to position 3in the ignition
lock (Y page 159) and release it as soon as
the engine is running.
i Vehicles with a diesel engine:
you can
start the engine without preglow if the
engine is warm. Driving
161Driving and pa rking Z