2014 MERCEDES-BENZ CLS SHOOTING BRAKE brake
[x] Cancel search: brakePage 300 of 417
Problem
Possible causes/consequences and
M
MSolutions X
Leave the vehicle and keep a safe distance from the vehicle until
the engine has cooled down.
X Check the coolant level and top up the coolant, observing the
warning notes (Y page 331).
X If you have to top up the coolant frequently, have the engine
cooling system checked.
X Make sure that the air supply to the engine radiator is not
blocked, e.g. by frozen slush.
X If the coolant temperature is below 120 †, you can continue
driving to the nearest qualified specialist workshop.
X Avoid putting the engine under heavy load as you do so, e.g.
driving in mountainous terrain and stop-start traffic. Driving systems
Problem
Possible causes/consequences and
M MSolutions ·
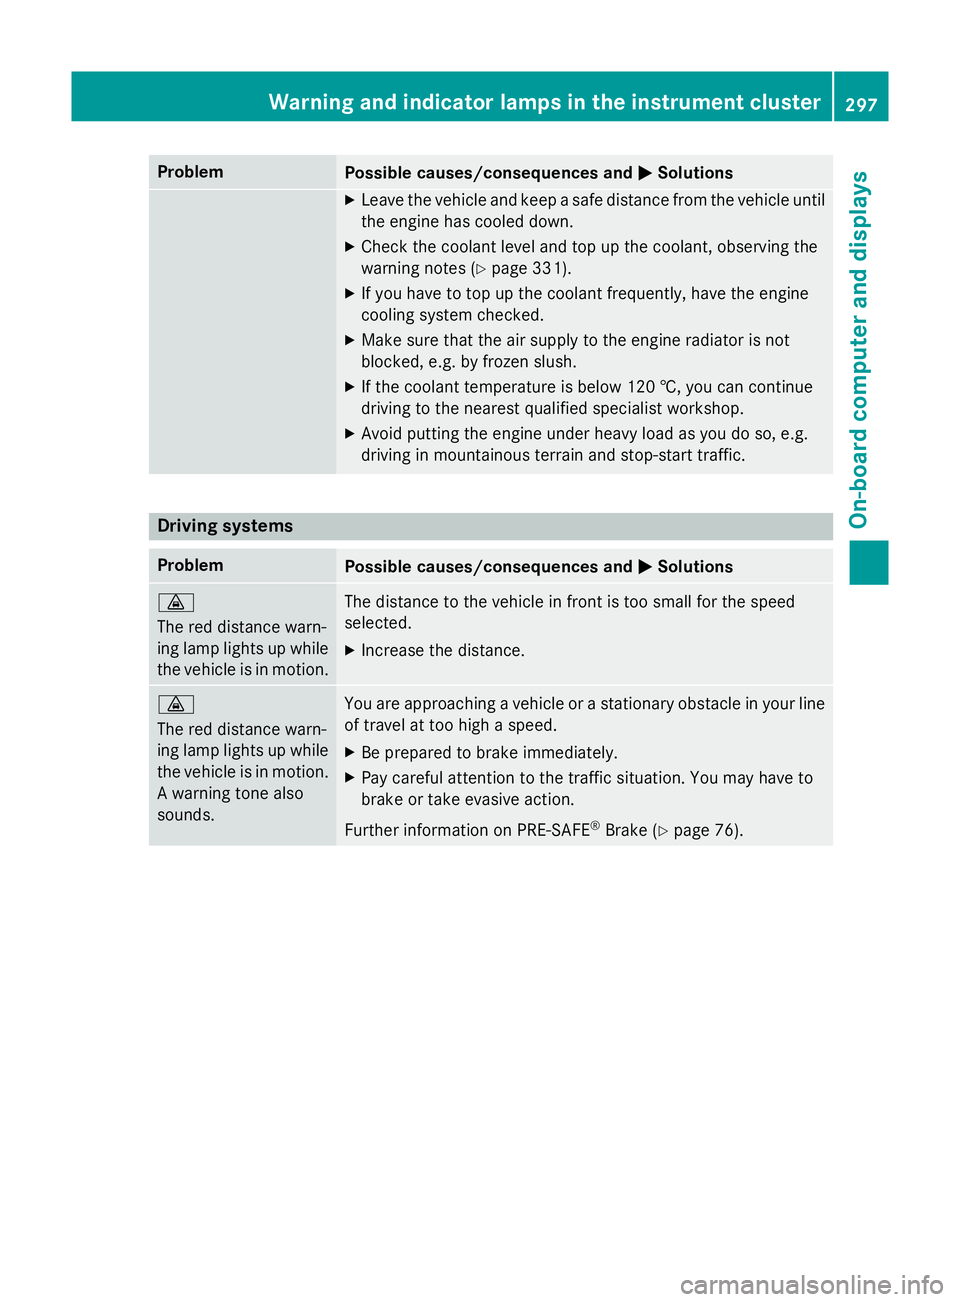
The red distance warn-
ing lamp lights up while
the vehicle is in motion. The distance to the vehicle in front is too small for the speed
selected.
X Increase the distance. ·
The red distance warn-
ing lamp lights up while
the vehicle is in motion. A warning tone also
sounds. You are approaching a vehicle or a stationary obstacle in your line
of travel at too high a speed.
X Be prepared to brake immediately.
X Pay careful attention to the traffic situation. You may have to
brake or take evasive action.
Further information on PRE‑SAFE ®
Brake (Y page 76). Warning and indicator lamps in the instrument cluster
297On-board computer and displays Z
Page 306 of 417
thrown out of the stowage compartment and
hit vehicle occupants as a result. There is a
risk of injury, particularly in the event of sud-
den braking or a sudden change in direction.
Always observe the maximum load of the
stowage compartment. Stow and secure
heavy objects in the boot/luggage compart-
ment.
The maximum permissible load of the stow-
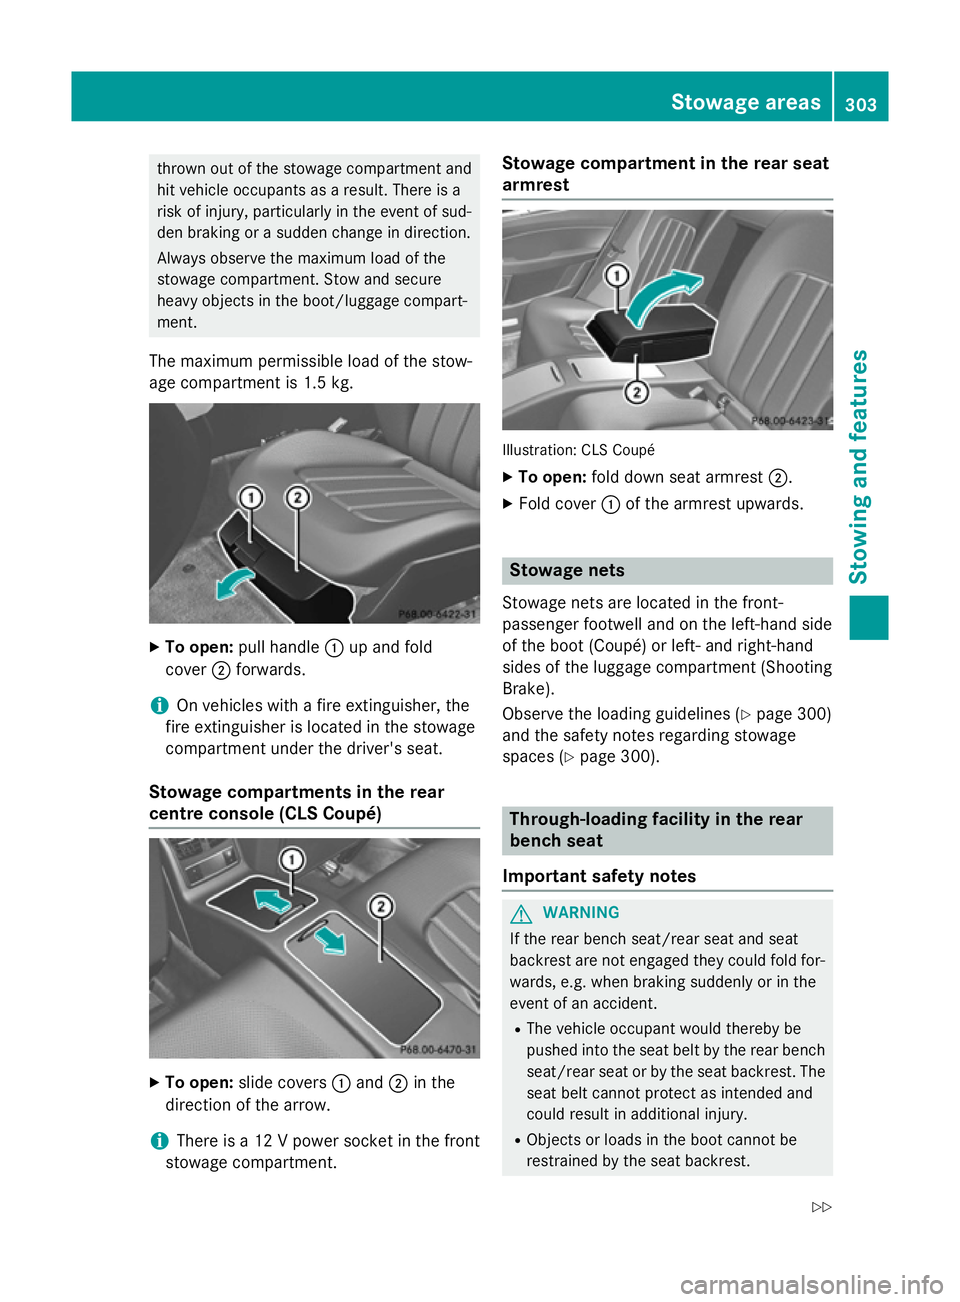
age compartment is 1.5 kg. X
To open: pull handle :up and fold
cover ;forwards.
i On vehicles with a fire extinguisher, the
fire extinguisher is located in the stowage
compartment under the driver's seat.
Stowage compartments in the rear
centre console (CLS Coupé) X
To open: slide covers :and ;in the
direction of the arrow.
i There is a 12 V power socket in the front
stowage compartment. Stowage compartment in the rear seat
armrest
Illustration: CLS Coupé
X To open: fold down seat armrest ;.
X Fold cover :of the armrest upwards. Stowage nets
Stowage nets are located in the front-
passenger footwell and on the left-hand side
of the boot (Coupé) or left- and right-hand
sides of the luggage compartment (Shooting
Brake).
Observe the loading guidelines (Y page 300)
and the safety notes regarding stowage
spaces (Y page 300). Through-loading facility in the rear
bench seat
Important safety notes G
WARNING
If the rear bench seat/rear seat and seat
backrest are not engaged they could fold for- wards, e.g. when braking suddenly or in the
event of an accident.
R The vehicle occupant would thereby be
pushed into the seat belt by the rear bench
seat/rear seat or by the seat backrest. The
seat belt cannot protect as intended and
could result in additional injury.
R Objects or loads in the boot cannot be
restrained by the seat backrest. Sto
wage areas
303Stowing and features
Z
Page 307 of 417
This poses an increased risk of injury.
Before every trip, make sure that the seat
backrests and the rear bench seat/rear seat
are engaged before every trip.
Observe the loading guidelines (Y page 300).
The left-hand and right-hand rear seat backr- ests can be folded down separately to
increase the boot capacity.
Folding the seat backrest forwards i
Vehicles with memory function: when you
fold one or both parts of the rear seat back- rest forwards, the respective front seat
moves forward slightly, when necessary, in
order to avoid contact.
X Vehicles without memory function: if nec-
essary, move the driver's or front-
passenger seat forwards.
X Open the boot.
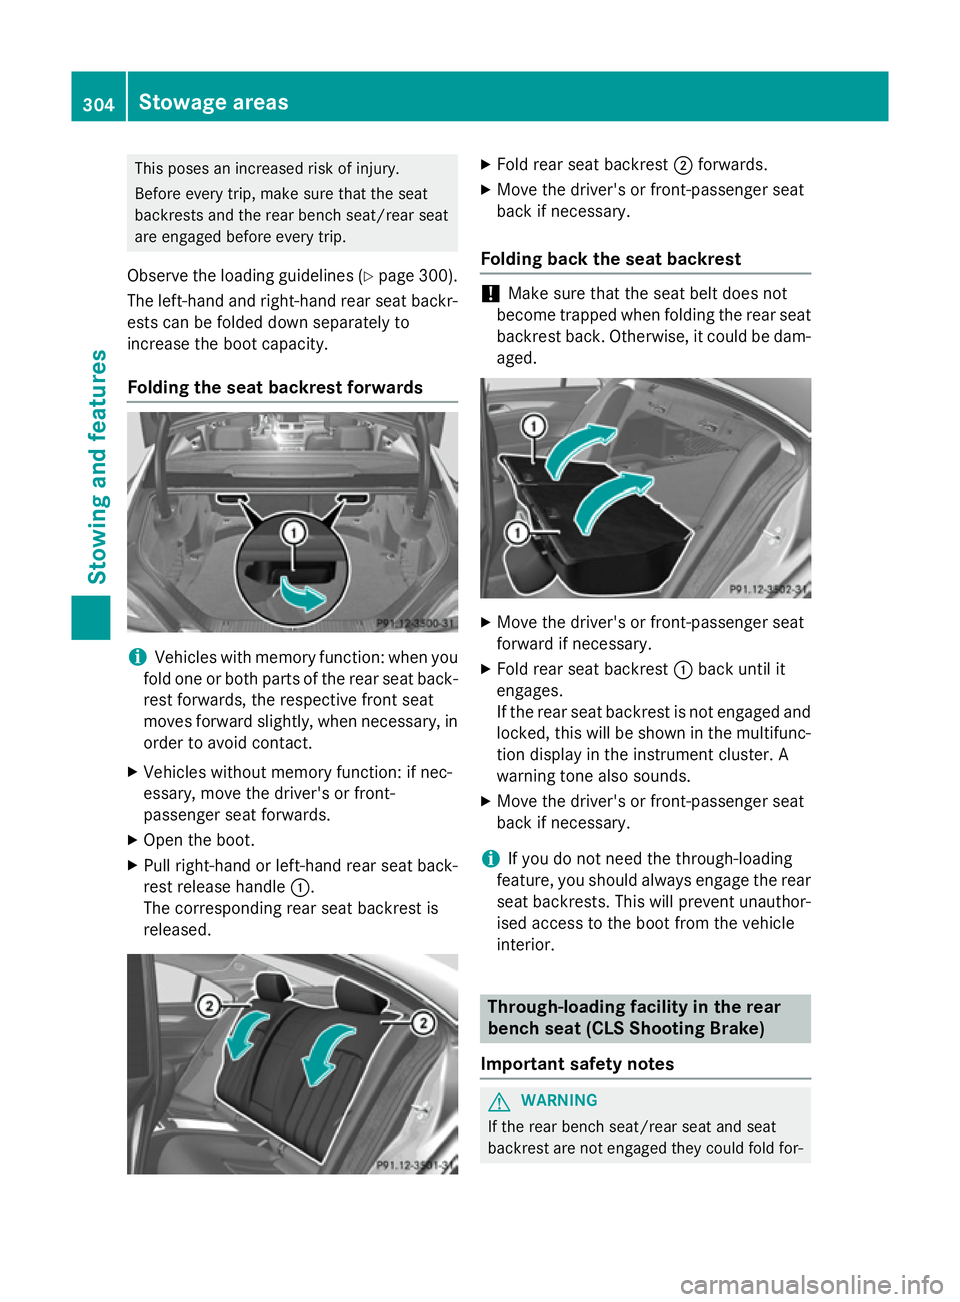
X Pull right-hand or left-hand rear seat back-
rest release handle :.
The corresponding rear seat backrest is
released. X
Fold rear seat backrest ;forwards.
X Move the driver's or front-passenger seat
back if necessary.
Folding back the seat backrest !
Make sure that the seat belt does not
become trapped when folding the rear seat backrest back. Otherwise, it could be dam- aged. X
Move the driver's or front-passenger seat
forward if necessary.
X Fold rear seat backrest :back until it
engages.
If the rear seat backrest is not engaged and
locked, this will be shown in the multifunc-
tion display in the instrument cluster. A
warning tone also sounds.
X Move the driver's or front-passenger seat
back if necessary.
i If you do not need the through-loading
feature, you should always engage the rear seat backrests. This will prevent unauthor-
ised access to the boot from the vehicle
interior. Through-loading facility in the rear
bench seat (CLS Shooting Brake)
Important safety notes G
WARNING
If the rear bench seat/rear seat and seat
backrest are not engaged they could fold for- 304
Stowage areasStowing and features
Page 309 of 417
Securing a load
Lashing eyelets General notes
Observe the following notes on securing
loads:
R Observe the loading guidelines
(Y page 300).
R Secure the load using the lashing eyelets.
R Distribute the load on the lashing eyelets
evenly.
R Do not use elastic straps or nets to secure
a load. These are only intended as an anti-
slip protection for light loads.
R Do not route lashing materials across sharp
edges or corners.
R Pad sharp edges for protection.
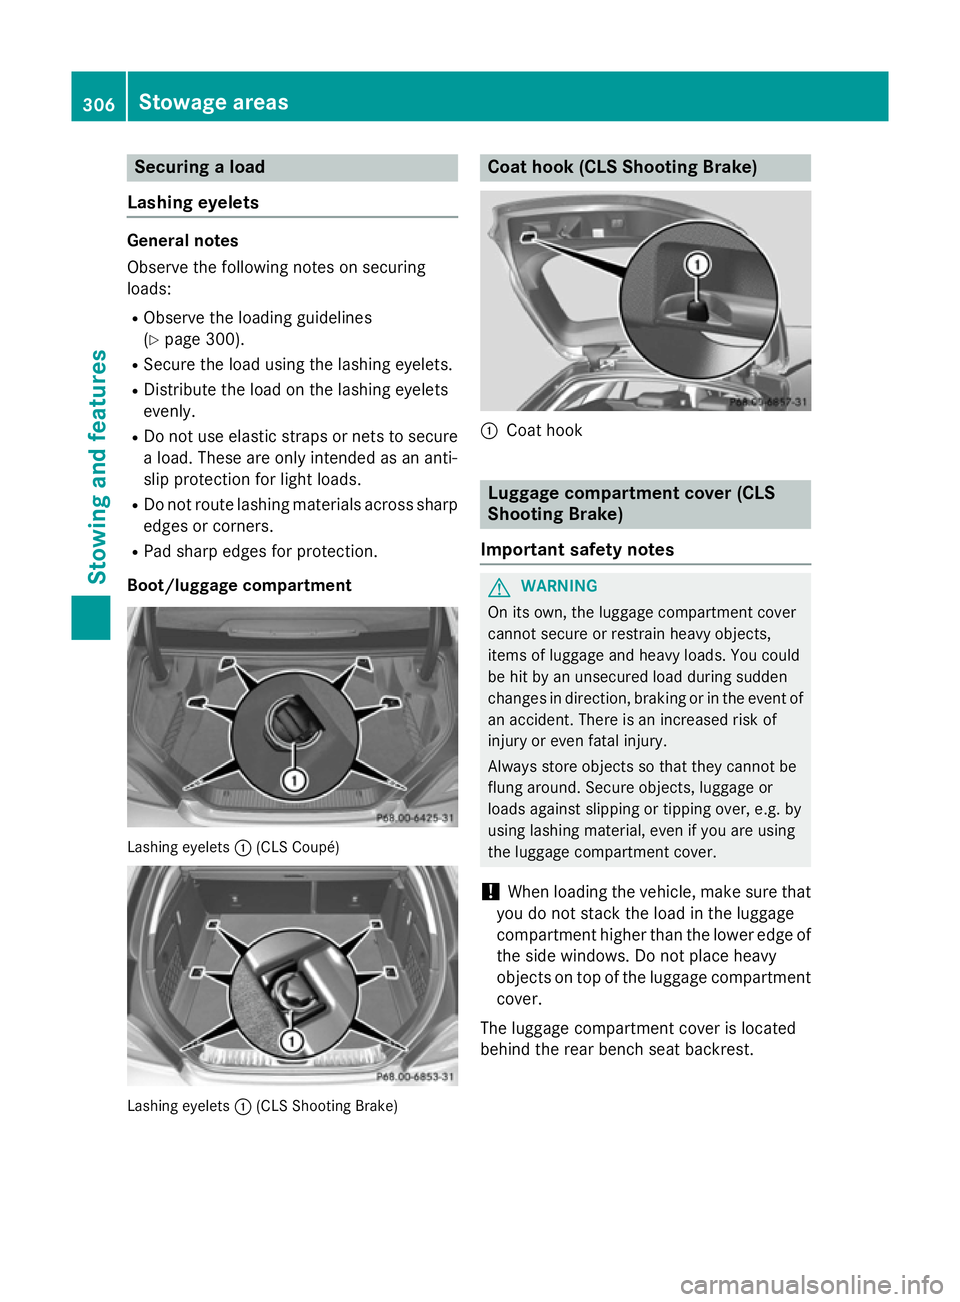
Boot/luggage compartment Lashing eyelets
:(CLS Coupé) Lashing eyelets
:(CLS Shooting Brake) Coat hook (CLS Shooting Brake)
:
Coat hook Luggage compartment cover (CLS
Shooting Brake)
Important safety notes G
WARNING
On its own, the luggage compartment cover
cannot secure or restrain heavy objects,
items of luggage and heavy loads. You could
be hit by an unsecured load during sudden
changes in direction, braking or in the event of an accident. There is an increased risk of
injury or even fatal injury.
Always store objects so that they cannot be
flung around. Secure objects, luggage or
loads against slipping or tipping over, e.g. by
using lashing material, even if you are using
the luggage compartment cover.
! When loading the vehicle, make sure that
you do not stack the load in the luggage
compartment higher than the lower edge of the side windows. Do not place heavy
objects on top of the luggage compartment
cover.
The luggage compartment cover is located
behind the rear bench seat backrest. 306
Stowage areasStowing and features
Page 310 of 417
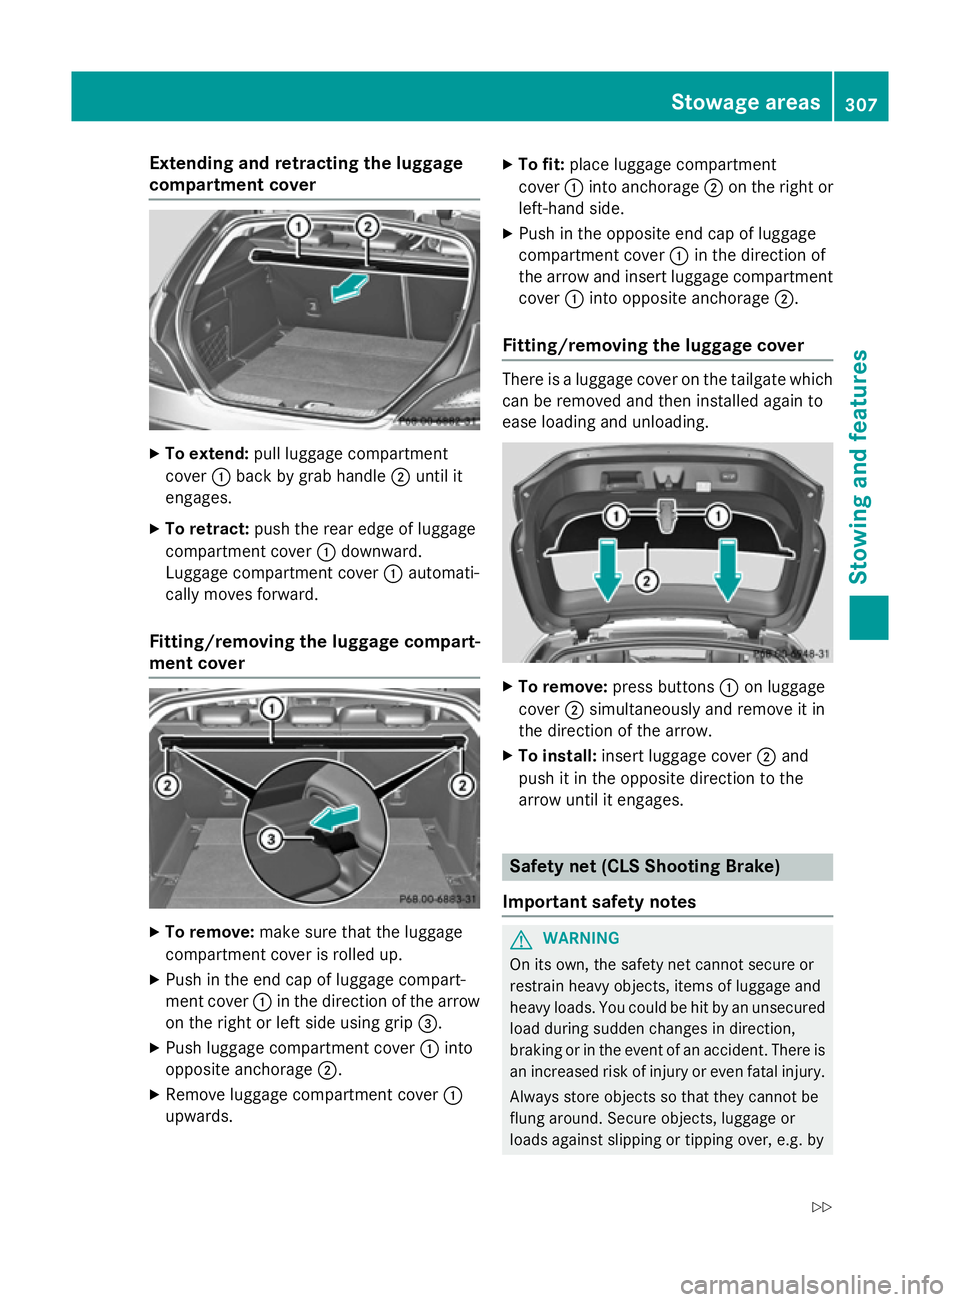
Extending and retracting the luggage
compartment cover X
To extend: pull luggage compartment
cover :back by grab handle ;until it
engages.
X To retract: push the rear edge of luggage
compartment cover :downward.
Luggage compartment cover :automati-
cally moves forward.
Fitting/removing the luggage compart-
ment cover X
To remove: make sure that the luggage
compartment cover is rolled up.
X Push in the end cap of luggage compart-
ment cover :in the direction of the arrow
on the right or left side using grip =.
X Push luggage compartment cover :into
opposite anchorage ;.
X Remove luggage compartment cover :
upwards. X
To fit: place luggage compartment
cover :into anchorage ;on the right or
left-hand side.
X Push in the opposite end cap of luggage
compartment cover :in the direction of
the arrow and insert luggage compartment cover :into opposite anchorage ;.
Fitting/removing the luggage cover There is a luggage cover on the tailgate which
can be removed and then installed again to
ease loading and unloading. X
To remove: press buttons :on luggage
cover ;simultaneously and remove it in
the direction of the arrow.
X To install: insert luggage cover ;and
push it in the opposite direction to the
arrow until it engages. Safety net (CLS Shooting Brake)
Important safety notes G
WARNING
On its own, the safety net cannot secure or
restrain heavy objects, items of luggage and
heavy loads. You could be hit by an unsecured load during sudden changes in direction,
braking or in the event of an accident. There isan increased risk of injury or even fatal injury.
Always store objects so that they cannot be
flung around. Secure objects, luggage or
loads against slipping or tipping over, e.g. by Stowage areas
307Stowing and features
Z
Page 313 of 417
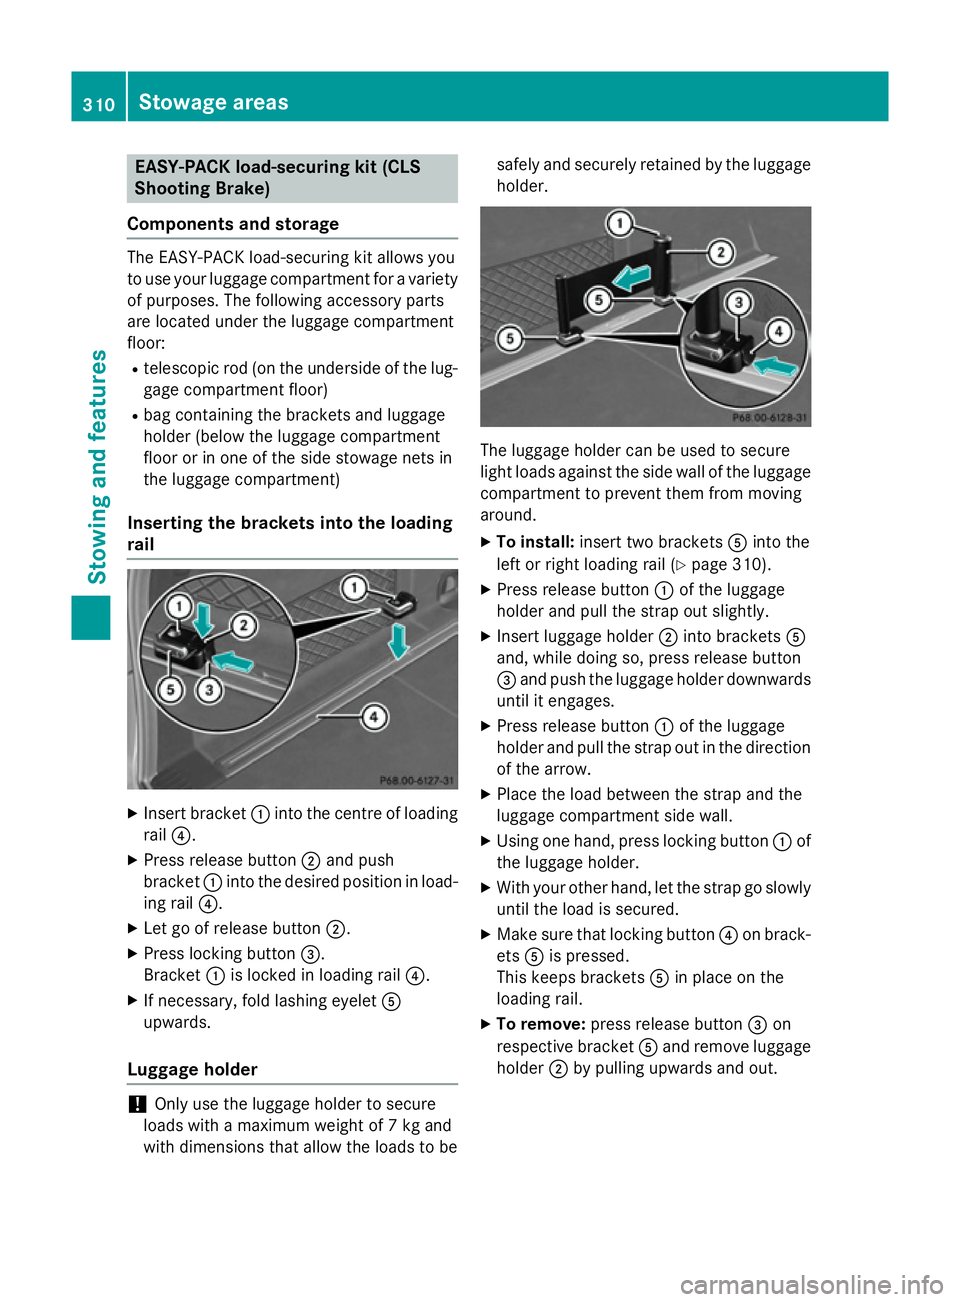
EASY-PACK load-securing kit (CLS
Shooting Brake)
Components and storage The EASY-PACK load-securing kit allows you
to use your luggage compartment for a variety of purposes. The following accessory parts
are located under the luggage compartment
floor:
R telescopic rod (on the underside of the lug-
gage compartment floor)
R bag containing the brackets and luggage
holder (below the luggage compartment
floor or in one of the side stowage nets in
the luggage compartment)
Inserting the brackets into the loading
rail X
Insert bracket :into the centre of loading
rail ?.
X Press release button ;and push
bracket :into the desired position in load-
ing rail ?.
X Let go of release button ;.
X Press locking button =.
Bracket :is locked in loading rail ?.
X If necessary, fold lashing eyelet A
upwards.
Luggage holder !
Only use the luggage holder to secure
loads with a maximum weight of 7 kg and
with dimensions that allow the loads to be safely and securely retained by the luggage
holder. The luggage holder can be used to secure
light loads against the side wall of the luggage
compartment to prevent them from moving
around.
X To install: insert two brackets Ainto the
left or right loading rail (Y page 310).
X Press release button :of the luggage
holder and pull the strap out slightly.
X Insert luggage holder ;into brackets A
and, while doing so, press release button
= and push the luggage holder downwards
until it engages.
X Press release button :of the luggage
holder and pull the strap out in the direction
of the arrow.
X Place the load between the strap and the
luggage compartment side wall.
X Using one hand, press locking button :of
the luggage holder.
X With your other hand, let the strap go slowly
until the load is secured.
X Make sure that locking button ?on brack-
ets Ais pressed.
This keeps brackets Ain place on the
loading rail.
X To remove: press release button =on
respective bracket Aand remove luggage
holder ;by pulling upwards and out. 310
Stowage areasStowing and features
Page 314 of 417
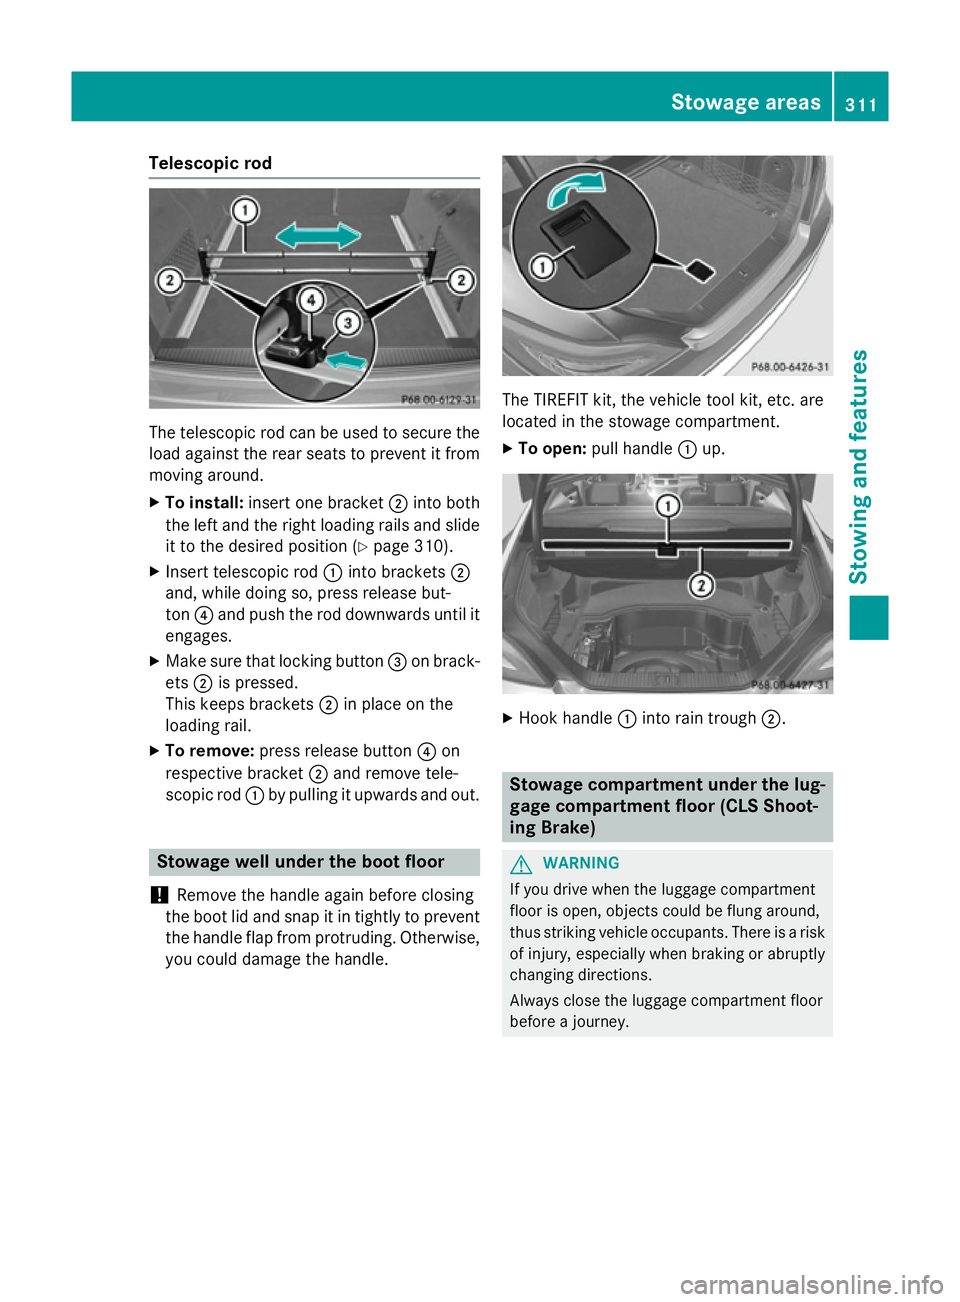
Telescopic rod
The telescopic rod can be used to secure the
load against the rear seats to prevent it from
moving around.
X To install: insert one bracket ;into both
the left and the right loading rails and slide it to the desired position (Y page 310).
X Insert telescopic rod :into brackets ;
and, while doing so, press release but-
ton ?and push the rod downwards until it
engages.
X Make sure that locking button =on brack-
ets ;is pressed.
This keeps brackets ;in place on the
loading rail.
X To remove: press release button ?on
respective bracket ;and remove tele-
scopic rod :by pulling it upwards and out. Stowage well under the boot floor
! Remove the handle again before closing
the boot lid and snap it in tightly to prevent the handle flap from protruding. Otherwise,
you could damage the handle. The TIREFIT kit, the vehicle tool kit, etc. are
located in the stowage compartment.
X To open: pull handle :up. X
Hook handle :into rain trough ;. Stowage compartment under the lug-
gage compartment floor (CLS Shoot-
ing Brake) G
WARNING
If you drive when the luggage compartment
floor is open, objects could be flung around,
thus striking vehicle occupants. There is a risk of injury, especially when braking or abruptly
changing directions.
Always close the luggage compartment floor
before a journey. Sto
wage areas
311Stowing and features Z
Page 319 of 417
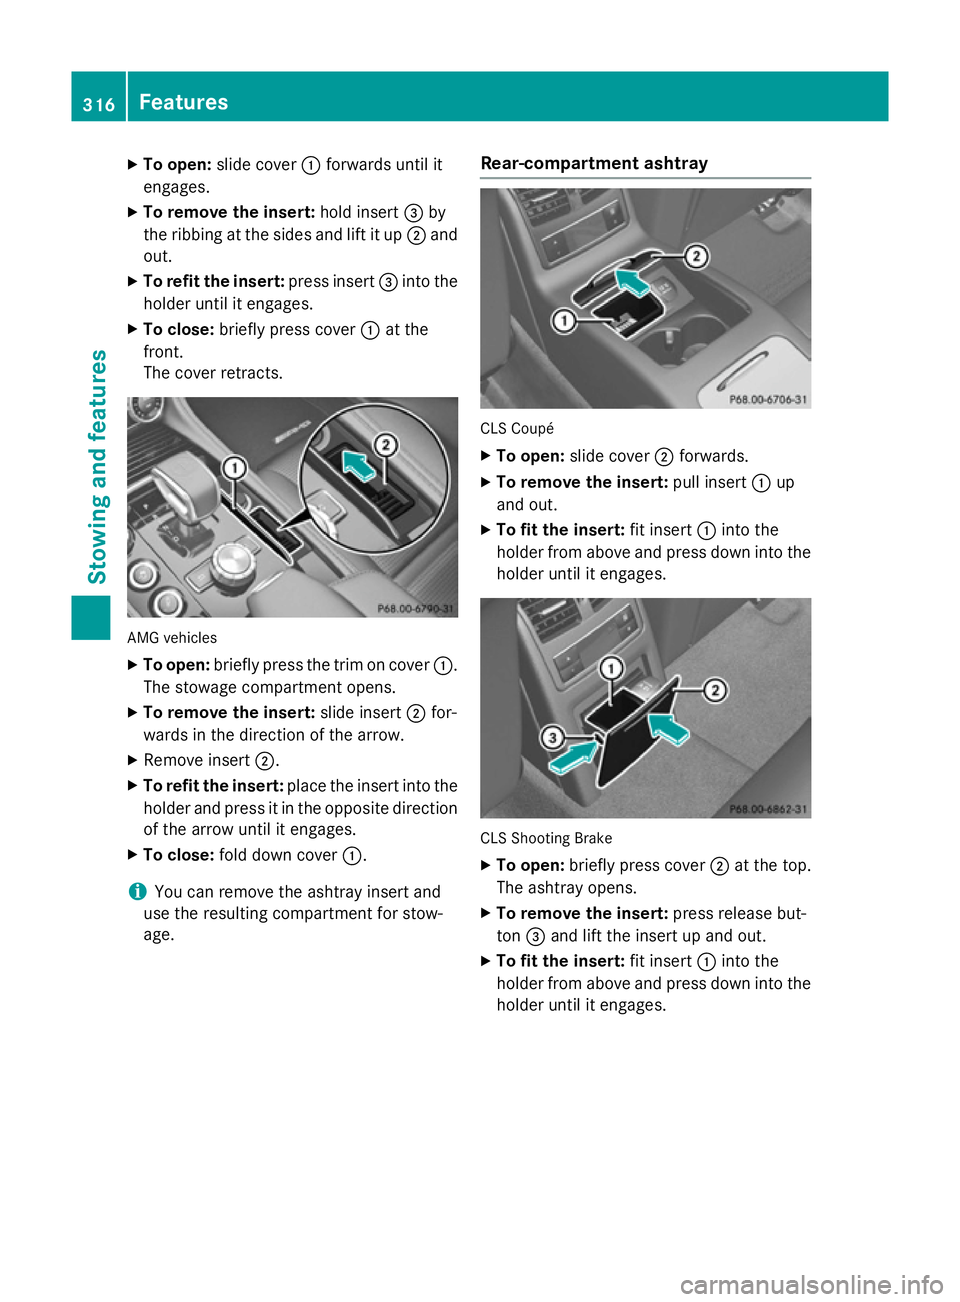
X
To open: slide cover :forwards until it
engages.
X To remove the insert: hold insert=by
the ribbing at the sides and lift it up ;and
out.
X To refit the insert: press insert=into the
holder until it engages.
X To close: briefly press cover :at the
front.
The cover retracts. AMG vehicles
X
To open: briefly press the trim on cover :.
The stowage compartment opens.
X To remove the insert: slide insert;for-
wards in the direction of the arrow.
X Remove insert ;.
X To refit the insert: place the insert into the
holder and press it in the opposite direction of the arrow until it engages.
X To close: fold down cover :.
i You can remove the ashtray insert and
use the resulting compartment for stow-
age. Rear-compartment ashtray CLS Coupé
X To open: slide cover ;forwards.
X To remove the insert: pull insert:up
and out.
X To fit the insert: fit insert:into the
holder from above and press down into the
holder until it engages. CLS Shooting Brake
X To open: briefly press cover ;at the top.
The ashtray opens.
X To remove the insert: press release but-
ton =and lift the insert up and out.
X To fit the insert: fit insert:into the
holder from above and press down into the holder until it engages. 316
FeaturesSto
wing an d features