2014 MERCEDES-BENZ CLS COUPE mirror
[x] Cancel search: mirrorPage 119 of 417
when you store the setting with the memory
function (Y page 119).
Crash-responsive EASY-EXIT feature If the crash-responsive EASY-EXIT feature is
triggered in an accident, the steering column
will move upwards when the driver's door is
opened. This occurs irrespective of the posi-
tion of the key in the ignition lock. This makes it easier to exit the vehicle and rescue the
occupants.
The crash-responsive EASY-EXIT feature is
only operational if the EASY-EXIT/ENTRY fea-
ture is activated in the on-board computer
(Y page 257). Mirrors
Rear-view mirror
X
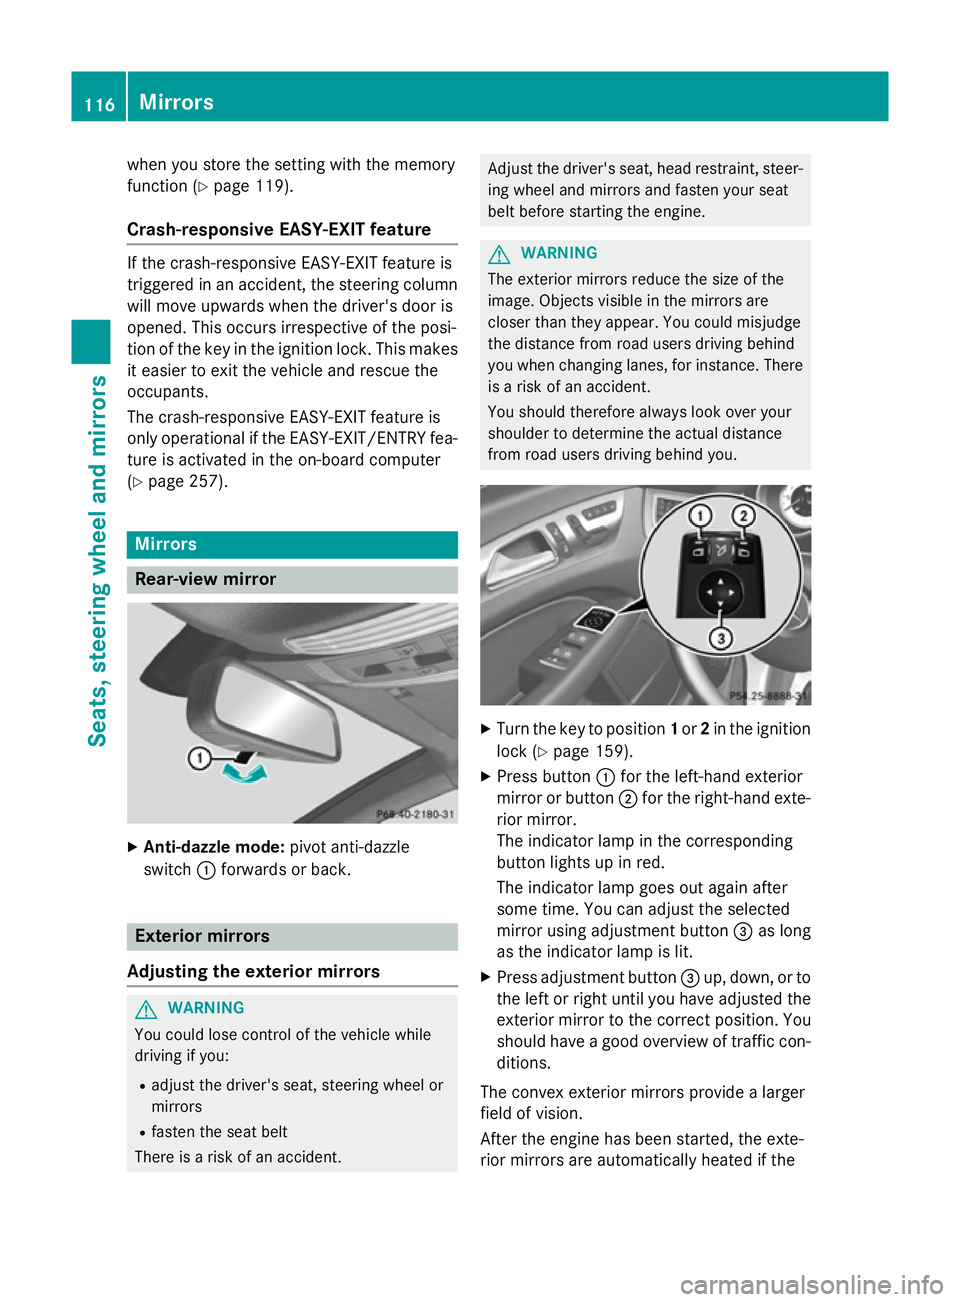
Anti-dazzle mode: pivot anti-dazzle
switch :forwards or back. Exterior mirrors
Adjusting the exterior mirrors G
WARNING
You could lose control of the vehicle while
driving if you:
R adjust the driver's seat, steering wheel or
mirrors
R fasten the seat belt
There is a risk of an accident. Adjust the driver's seat, head restraint, steer-
ing wheel and mirrors and fasten your seat
belt before starting the engine. G
WARNING
The exterior mirrors reduce the size of the
image. Objects visible in the mirrors are
closer than they appear. You could misjudge
the distance from road users driving behind
you when changing lanes, for instance. There is a risk of an accident.
You should therefore always look over your
shoulder to determine the actual distance
from road users driving behind you. X
Turn the key to position 1or 2in the ignition
lock (Y page 159).
X Press button :for the left-hand exterior
mirror or button ;for the right-hand exte-
rior mirror.
The indicator lamp in the corresponding
button lights up in red.
The indicator lamp goes out again after
some time. You can adjust the selected
mirror using adjustment button =as long
as the indicator lamp is lit.
X Press adjustment button =up, down, or to
the left or right until you have adjusted the
exterior mirror to the correct position. You
should have a good overview of traffic con- ditions.
The convex exterior mirrors provide a larger
field of vision.
After the engine has been started, the exte-
rior mirrors are automatically heated if the 116
MirrorsSeats, steering wheel and mirrors
Page 120 of 417

rear window heating is switched on and the
outside temperature is low. Heating takes a
maximum of ten minutes.
i The exterior mirrors can also be heated
manually by switching on the rear window
heating.
Folding the exterior mirrors in/out elec- trically X
Turn the key to position 1or 2in the ignition
lock (Y page 159).
X Briefly press button :.
Both exterior mirrors fold in or out.
i Make sure that the exterior mirrors are
always folded out fully while driving. They
could otherwise vibrate.
i If you are driving faster than 47 km/h, you
can no longer fold in the exterior mirrors.
Resetting the exterior mirrors If the battery has been disconnected or com-
pletely discharged, the exterior mirrors must
be reset. The exterior mirrors will otherwise
not fold in when you select the "Fold in mir-
rors when locking" function in the on-board
computer (Y page 257).
X Turn the key to position 1in the ignition
lock (Y page 159).
X Briefly press button :. Folding the exterior mirrors in/out
automatically If the "Fold in mirrors when locking" function
is activated in the on-board computer
(Y page 257):
R the exterior mirrors fold in automatically as
soon as you lock the vehicle from the out-
side
R the exterior mirrors fold out again automat-
ically as soon as you unlock the vehicle and
then open the driver's or front-passenger
door
i If the exterior mirrors have been folded in
manually, they do not fold out.
Exterior mirror pushed out of position If an exterior mirror has been pushed out of
position (forwards or backwards), proceed as
follows:
X Vehicles without electrically folding
exterior mirrors: move the exterior mirror
into the correct position manually.
X Vehicles with electrically folding exte-
rior mirrors: press and hold mirror-folding
button :until you hear a click and the
mirror engages audibly into position
(Y page 117).
The mirror housing is engaged again and
you can adjust the exterior mirrors as usual
(Y page 116). Automatic anti-dazzle mirrors
The rear-view mirror and the exterior mirror
on the driver's side automatically go into anti- dazzle mode if the following conditions are
met simultaneously:
R the ignition is switched on and
R incident light from headlamps strikes the
sensor in the rear-view mirror
The mirrors do not dip if reverse gear is
engaged or if the interior lighting is switched
on. Mirrors
117Seats, steering wheel and mirrors Z
Page 121 of 417
Parking position of the exterior mirror
on the front-passenger side
Setting and storing the parking position Using reverse gear
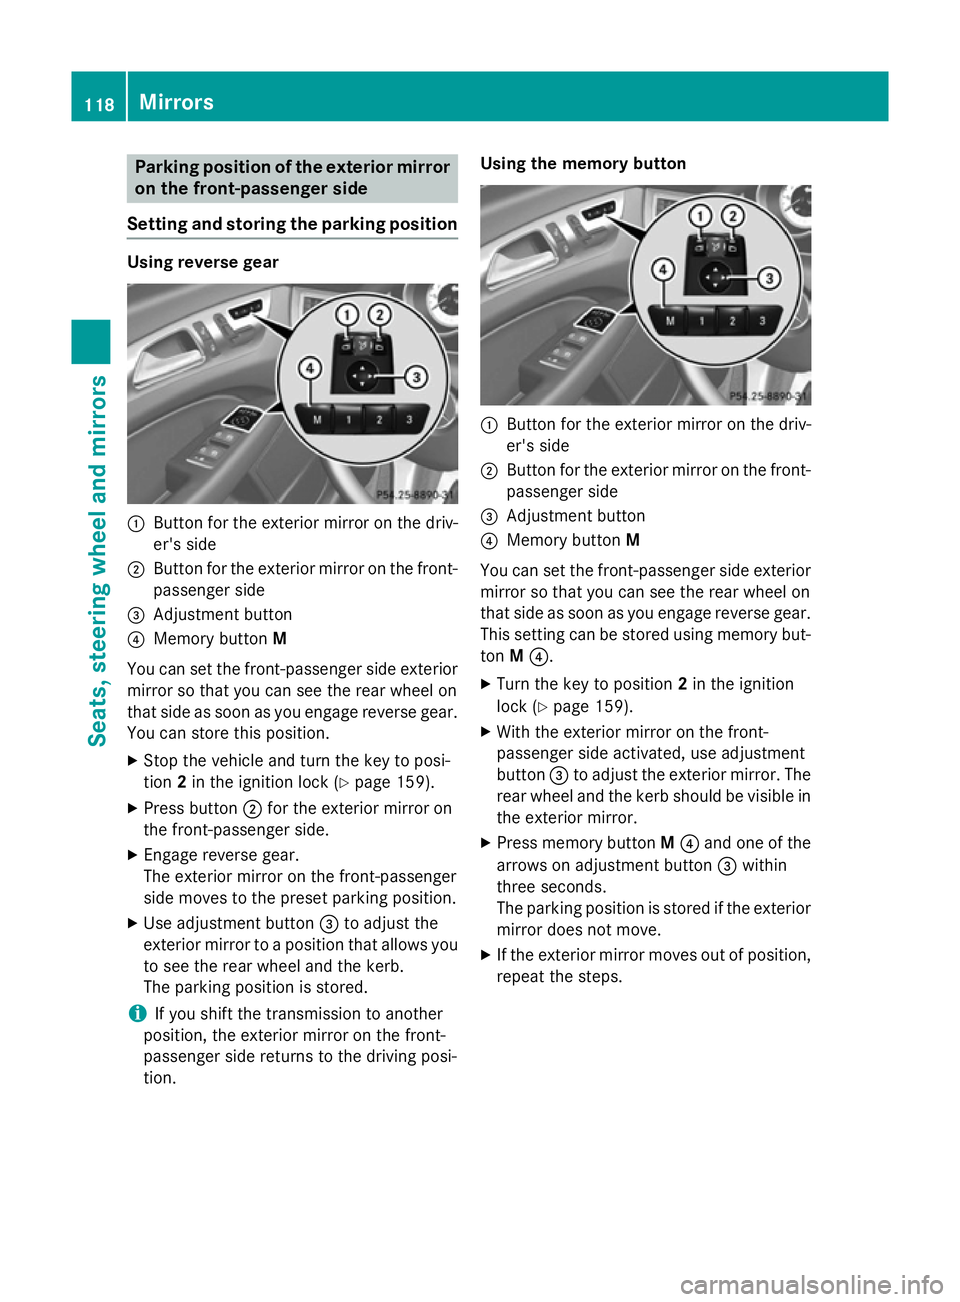
:
Button for the exterior mirror on the driv-
er's side
; Button for the exterior mirror on the front-
passenger side
= Adjustment button
? Memory button M
You can set the front-passenger side exterior
mirror so that you can see the rear wheel on
that side as soon as you engage reverse gear.
You can store this position.
X Stop the vehicle and turn the key to posi-
tion 2in the ignition lock (Y page 159).
X Press button ;for the exterior mirror on
the front-passenger side.
X Engage reverse gear.
The exterior mirror on the front-passenger
side moves to the preset parking position.
X Use adjustment button =to adjust the
exterior mirror to a position that allows you to see the rear wheel and the kerb.
The parking position is stored.
i If you shift the transmission to another
position, the exterior mirror on the front-
passenger side returns to the driving posi-
tion. Using the memory button
:
Button for the exterior mirror on the driv-
er's side
; Button for the exterior mirror on the front-
passenger side
= Adjustment button
? Memory button M
You can set the front-passenger side exterior
mirror so that you can see the rear wheel on
that side as soon as you engage reverse gear.
This setting can be stored using memory but-
ton M?.
X Turn the key to position 2in the ignition
lock (Y page 159).
X With the exterior mirror on the front-
passenger side activated, use adjustment
button =to adjust the exterior mirror. The
rear wheel and the kerb should be visible in
the exterior mirror.
X Press memory button M? and one of the
arrows on adjustment button =within
three seconds.
The parking position is stored if the exterior mirror does not move.
X If the exterior mirror moves out of position,
repeat the steps. 118
MirrorsSeats, steering wheel and mirrors
Page 122 of 417
Calling up a stored parking position set-
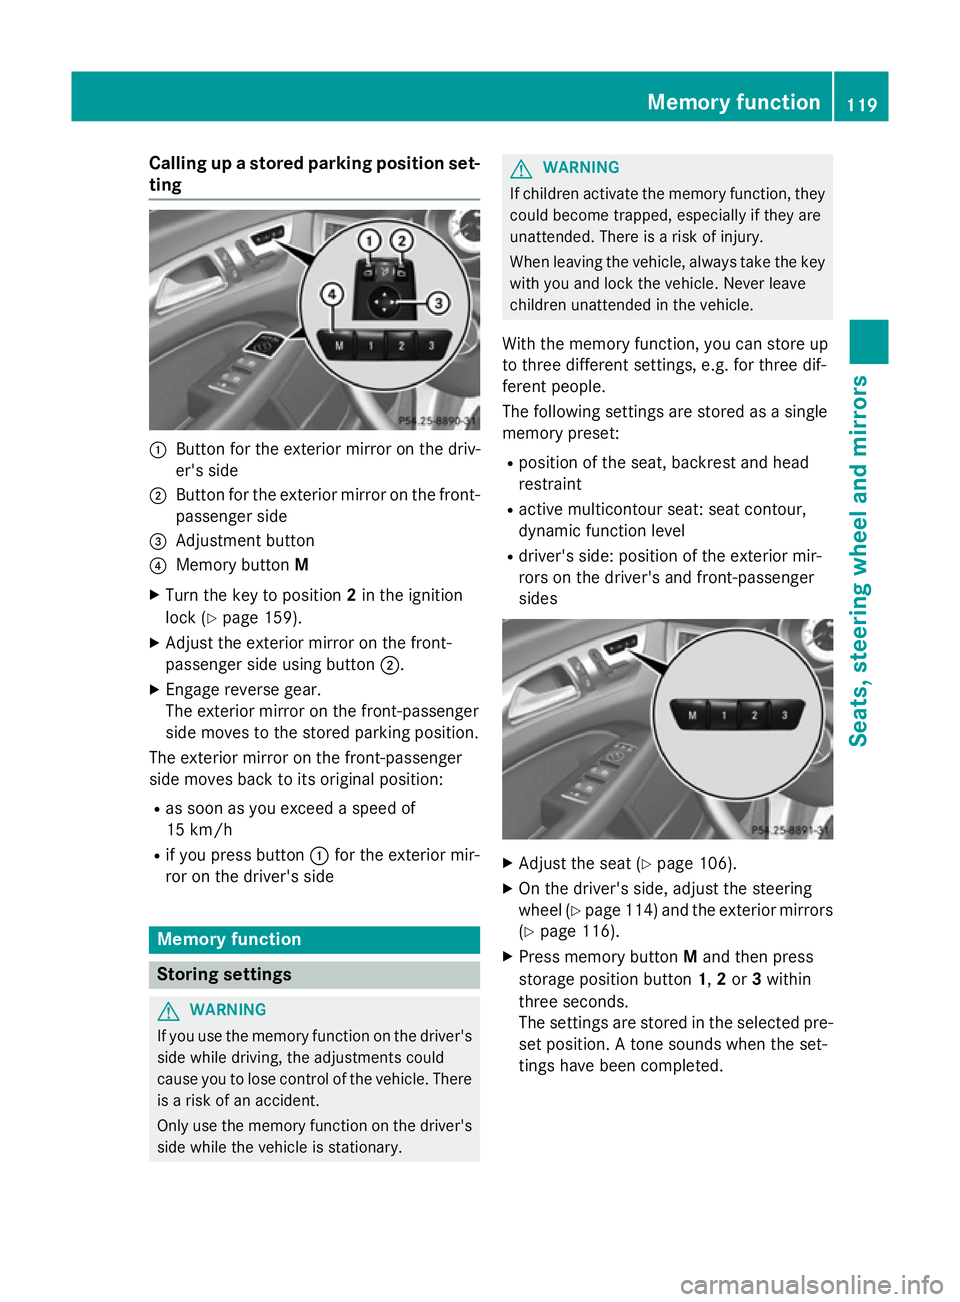
ting :
Button for the exterior mirror on the driv-
er's side
; Button for the exterior mirror on the front-
passenger side
= Adjustment button
? Memory button M
X Turn the key to position 2in the ignition
lock (Y page 159).
X Adjust the exterior mirror on the front-
passenger side using button ;.
X Engage reverse gear.
The exterior mirror on the front-passenger
side moves to the stored parking position.
The exterior mirror on the front-passenger
side moves back to its original position:
R as soon as you exceed a speed of
15 km/h
R if you press button :for the exterior mir-
ror on the driver's side Memory function
Storing settings
G
WARNING
If you use the memory function on the driver's side while driving, the adjustments could
cause you to lose control of the vehicle. There
is a risk of an accident.
Only use the memory function on the driver's
side while the vehicle is stationary. G
WARNING
If children activate the memory function, they
could become trapped, especially if they are
unattended. There is a risk of injury.
When leaving the vehicle, always take the key with you and lock the vehicle. Never leave
children unattended in the vehicle.
With the memory function, you can store up
to three different settings, e.g. for three dif-
ferent people.
The following settings are stored as a single
memory preset:
R position of the seat, backrest and head
restraint
R active multicontour seat: seat contour,
dynamic function level
R driver's side: position of the exterior mir-
rors on the driver's and front-passenger
sides X
Adjust the seat (Y page 106).
X On the driver's side, adjust the steering
wheel (Y page 114) and the exterior mirrors
(Y page 116).
X Press memory button Mand then press
storage position button 1,2 or 3within
three seconds.
The settings are stored in the selected pre- set position. A tone sounds when the set-
tings have been completed. Memory function
119Seats, steering wheel and mirrors Z
Page 123 of 417
Calling up a stored setting
X Press and hold the relevant storage posi-
tion button 1,2 or 3, until the seat, steering
wheel and exterior mirrors are in the stored position.
i The setting procedure is interrupted as
soon as you release the storage position
button. 120
Memory functionSeats, steering wheel and
mirrors
Page 217 of 417
Reversing camera
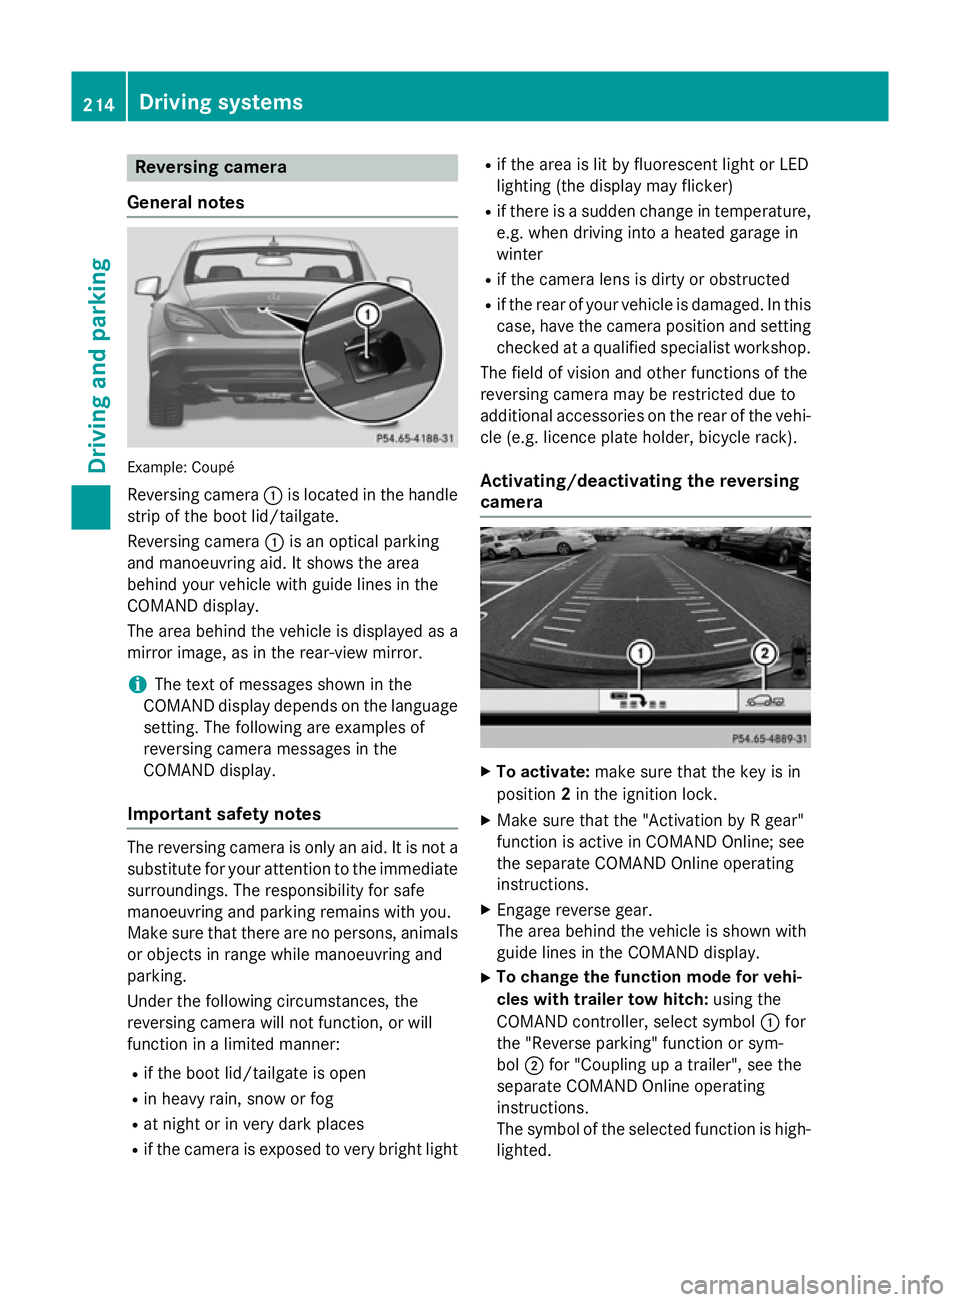
General notes Example: Coupé
Reversing camera :is located in the handle
strip of the boot lid/tailgate.
Reversing camera :is an optical parking
and manoeuvring aid. It shows the area
behind your vehicle with guide lines in the
COMAND display.
The area behind the vehicle is displayed as a
mirror image, as in the rear-view mirror.
i The text of messages shown in the
COMAND display depends on the language setting. The following are examples of
reversing camera messages in the
COMAND display.
Important safety notes The reversing camera is only an aid. It is not a
substitute for your attention to the immediate
surroundings. The responsibility for safe
manoeuvring and parking remains with you.
Make sure that there are no persons, animals
or objects in range while manoeuvring and
parking.
Under the following circumstances, the
reversing camera will not function, or will
function in a limited manner:
R if the boot lid/tailgate is open
R in heavy rain, snow or fog
R at night or in very dark places
R if the camera is exposed to very bright light R
if the area is lit by fluorescent light or LED
lighting (the display may flicker)
R if there is a sudden change in temperature,
e.g. when driving into a heated garage in
winter
R if the camera lens is dirty or obstructed
R if the rear of your vehicle is damaged. In this
case, have the camera position and setting checked at a qualified specialist workshop.
The field of vision and other functions of the
reversing camera may be restricted due to
additional accessories on the rear of the vehi-
cle (e.g. licence plate holder, bicycle rack).
Activating/deactivating the reversing
camera X
To activate: make sure that the key is in
position 2in the ignition lock.
X Make sure that the "Activation by R gear"
function is active in COMAND Online; see
the separate COMAND Online operating
instructions.
X Engage reverse gear.
The area behind the vehicle is shown with
guide lines in the COMAND display.
X To change the function mode for vehi-
cles with trailer tow hitch: using the
COMAND controller, select symbol :for
the "Reverse parking" function or sym-
bol ;for "Coupling up a trailer", see the
separate COMAND Online operating
instructions.
The symbol of the selected function is high- lighted. 214
Driving systemsDriving and parking
Page 218 of 417
To deactivate:
the reversing camera deacti-
vates if you shift the transmission to Por after
driving forwards a short distance.
Displays in the COMAND display The reversing camera may show a distorted
view of obstacles or show them incorrectly or
not at all. Obstacles are not shown by the
reversing camera in the following locations:
R very close to the rear bumper
R under the rear bumper
R in the area immediately above the tailgate/
boot
i The following reversing camera messages
in the COMAND display correspond to the
display in the CLS Coupé. The details of the
display of the guide lines differ slightly for
the CLS Shooting Brake.
! Objects not at ground level may appear to
be further away than they actually are, e.g.:
R the bumper of a parked vehicle
R the drawbar of a trailer
R the ball coupling of a trailer tow hitch
R the rear section of an HGV
R a slanted post
Use the guidelines only for orientation.
Approach objects no further than the bot-
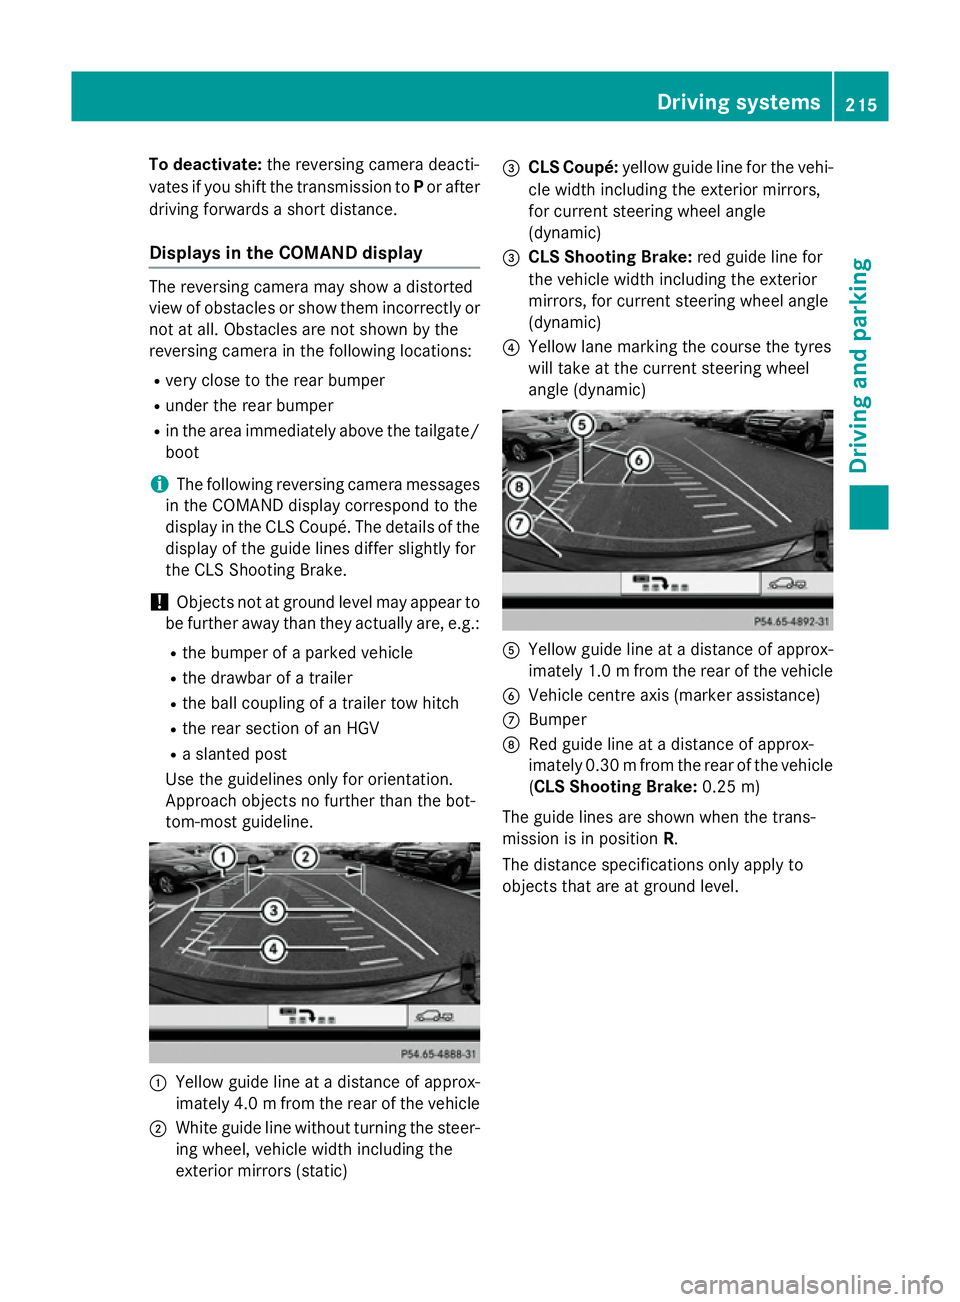
tom-most guideline. :
Yellow guide line at a distance of approx-
imately 4.0 mfrom the rear of the vehicle
; White guide line without turning the steer-
ing wheel, vehicle width including the
exterior mirrors (static) =
CLS Coupé: yellow guide line for the vehi-
cle width including the exterior mirrors,
for current steering wheel angle
(dynamic)
= CLS Shooting Brake: red guide line for
the vehicle width including the exterior
mirrors, for current steering wheel angle
(dynamic)
? Yellow lane marking the course the tyres
will take at the current steering wheel
angle (dynamic) A
Yellow guide line at a distance of approx-
imately 1.0 mfrom the rear of the vehicle
B Vehicle centre axis (marker assistance)
C Bumper
D Red guide line at a distance of approx-
imately 0.30 mfrom the rear of the vehicle
(CLS Shooting Brake: 0.25 m)
The guide lines are shown when the trans-
mission is in position R.
The distance specifications only apply to
objects that are at ground level. Driving systems
215Driving and parking Z
Page 219 of 417
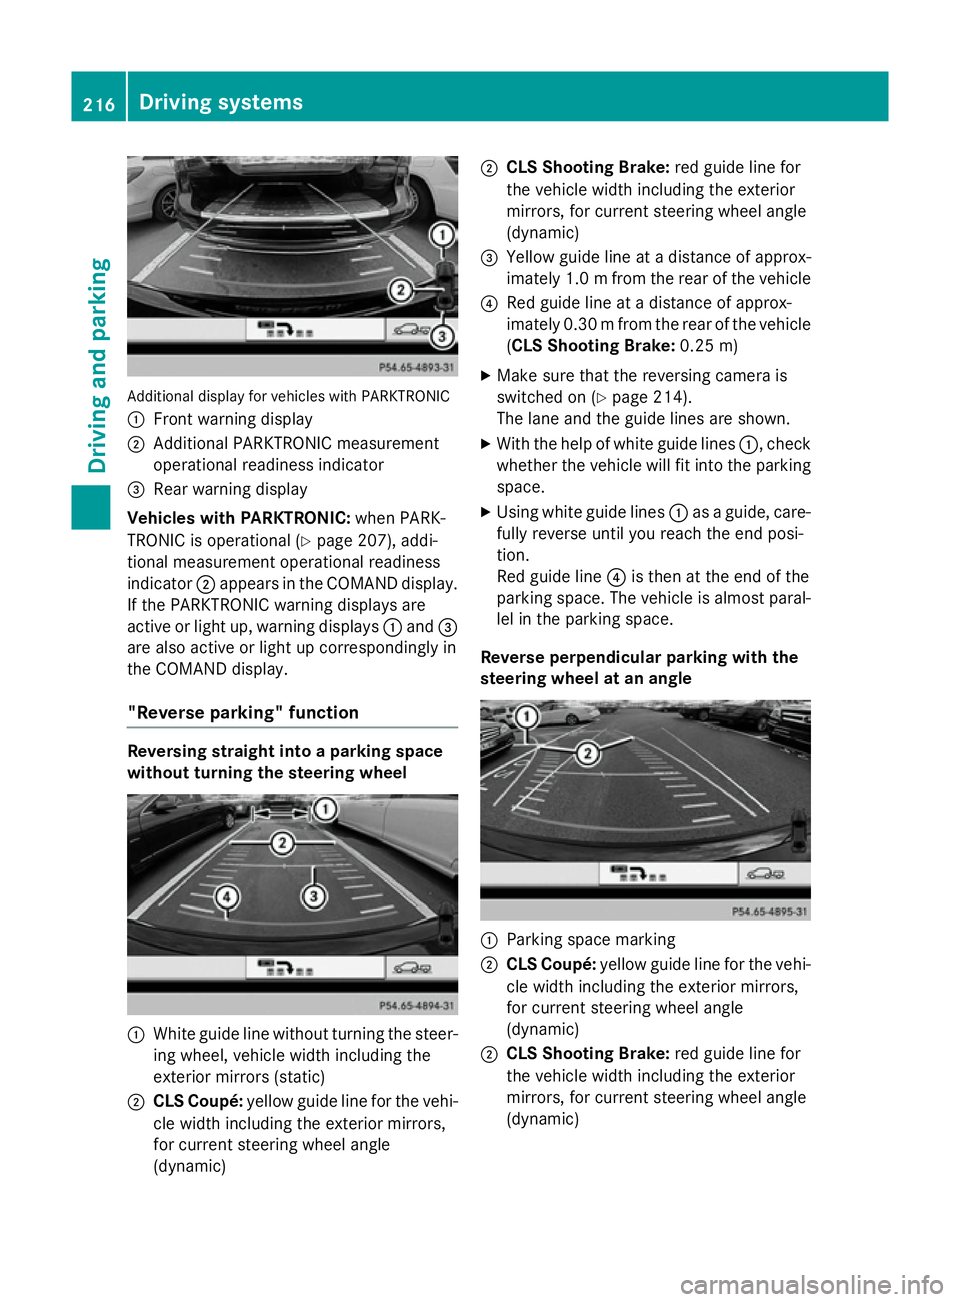
Additional display for vehicles with PARKTRONIC
: Front warning display
; Additional PARKTRONIC measurement
operational readiness indicator
= Rear warning display
Vehicles with PARKTRONIC: when PARK-
TRONIC is operational (Y page 207), addi-
tional measurement operational readiness
indicator ;appears in the COMAND display.
If the PARKTRONIC warning displays are
active or light up, warning displays :and =
are also active or light up correspondingly in
the COMAND display.
"Reverse parking" function Reversing straight into a parking space
without turning the steering wheel :
White guide line without turning the steer-
ing wheel, vehicle width including the
exterior mirrors (static)
; CLS Coupé: yellow guide line for the vehi-
cle width including the exterior mirrors,
for current steering wheel angle
(dynamic) ;
CLS Shooting Brake: red guide line for
the vehicle width including the exterior
mirrors, for current steering wheel angle
(dynamic)
= Yellow guide line at a distance of approx-
imately 1.0 mfrom the rear of the vehicle
? Red guide line at a distance of approx-
imately 0.30 mfrom the rear of the vehicle
(CLS Shooting Brake: 0.25 m)
X Make sure that the reversing camera is
switched on (Y page 214).
The lane and the guide lines are shown.
X With the help of white guide lines :, check
whether the vehicle will fit into the parking space.
X Using white guide lines :as a guide, care-
fully reverse until you reach the end posi-
tion.
Red guide line ?is then at the end of the
parking space. The vehicle is almost paral-
lel in the parking space.
Reverse perpendicular parking with the
steering wheel at an angle :
Parking space marking
; CLS Coupé: yellow guide line for the vehi-
cle width including the exterior mirrors,
for current steering wheel angle
(dynamic)
; CLS Shooting Brake: red guide line for
the vehicle width including the exterior
mirrors, for current steering wheel angle
(dynamic) 216
Driving systemsDriving and parking