2014 MERCEDES-BENZ CLS COUPE mirror
[x] Cancel search: mirrorPage 260 of 417
X
Press ato confirm.
You can now change the departure time.
X Press the =or; button to select the
display to be changed: hours, minutes.
X Press the :or9 button to set the
selected display.
X Press the abutton to store the entry.
The yellow indicator lamp on the auxiliary
heating button lights up.
Comfort Activating/deactivating the EASY-
ENTRY/EXIT feature
G
WARNING
When the EASY-ENTRY/EXIT feature adjusts
the steering wheel, you and other vehicle
occupants – particularly children – could
become trapped. There is a risk of injury.
While the EASY-ENTRY/EXIT feature is mak-
ing adjustments, make sure that no one has
any body parts in the sweep of the steering
wheel.
If someone is trapped:
R press one of the memory function position
buttons, or
R move the switch for steering wheel adjust-
ment in the opposite direction to that in
which the steering wheel is moving.
The adjustment process is stopped.
X Press the =or; button on the steer-
ing wheel to select the Settings
Settings menu.
X Press the :or9 button to select the
Convenience
Convenience submenu.
X Press ato confirm.
X Press the :or9 button to select the
Easy Entry/Exit: Easy Entry/Exit: function.
If the Easy Entry/Exit
Easy Entry/Exit function is activa-
ted, the vehicle steering wheel is displayed
in orange in the multifunction display.
X Press the abutton to save the setting.
Further information on the EASY-ENTRY/EXIT feature (Y page 115). Switching belt adjustment on/off
X Press the =or; button on the steer-
ing wheel to select the Settings
Settings menu.
X Press the :or9 button to select the
Convenience
Convenience submenu.
X Press ato confirm.
X Press the :or9 button to select the
Belt adjustment
Belt adjustment function.
If the Belt adjustment
Belt adjustment function is activa-
ted, the vehicle seat belt is shown in orange
in the multifunction display.
X Press the abutton to save the setting.
For further information on belt adjustment,
see (Y page 47).
Switching the fold-in mirrors when lock-
ing function on/off
This function is only available on vehicles with
a memory function (Y page 119).
When you switch on the Auto. fold in
Auto. fold in
function, the exterior mirrors are folded in
when the vehicle is locked. When you unlock
the vehicle and then open a door, the exterior mirrors fold out again.
X Press the =or; button on the steer-
ing wheel to select the Settings Settingsmenu.
X Press the :or9 button to select the
Convenience
Convenience submenu.
X Press ato confirm.
X Press the :or9 button to select the
Auto. fold in
Auto. fold in function.
If the Auto.
Auto. fold
foldin
infunction is switched
on, the vehicle's exterior mirror is displayed
in orange in the multifunction display.
X Press the abutton to save the setting. Menus and submenus
257On-board computer and displays Z
Page 261 of 417
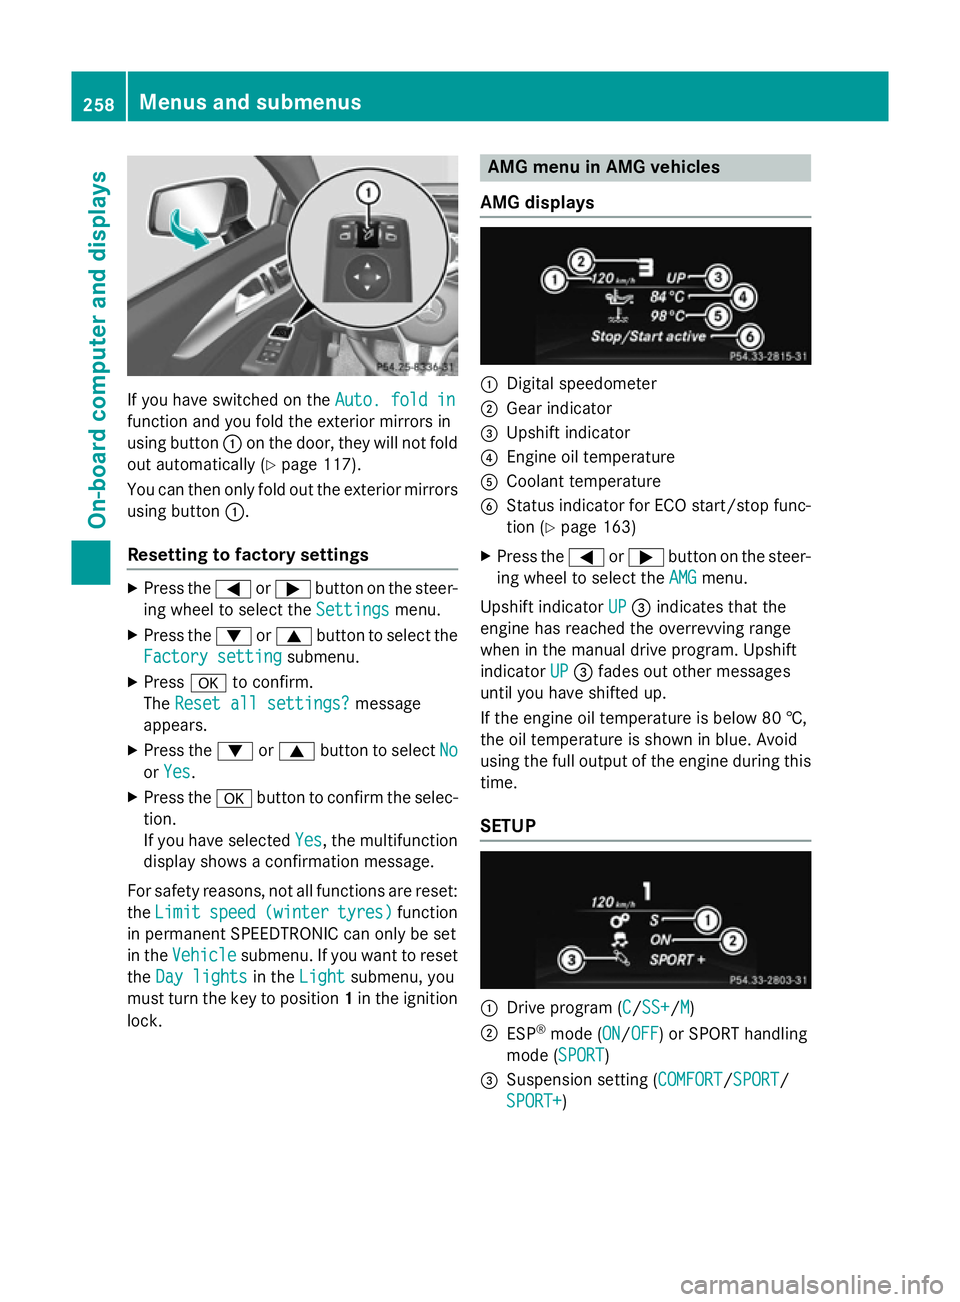
If you have switched on the
Auto. fold in
Auto. fold in
function and you fold the exterior mirrors in
using button :on the door, they will not fold
out automatically (Y page 117).
You can then only fold out the exterior mirrors
using button :.
Resetting to factory settings X
Press the =or; button on the steer-
ing wheel to select the Settings Settingsmenu.
X Press the :or9 button to select the
Factory setting
Factory setting submenu.
X Press ato confirm.
The Reset all settings?
Reset all settings? message
appears.
X Press the :or9 button to select No
No
or Yes
Yes.
X Press the abutton to confirm the selec-
tion.
If you have selected Yes Yes, the multifunction
display shows a confirmation message.
For safety reasons, not all functions are reset: the Limit
Limit speed
speed(winter
(winter tyres)
tyres)function
in permanent SPEEDTRONIC can only be set
in the Vehicle
Vehicle submenu. If you want to reset
the Day lights
Day lights in theLight
Light submenu, you
must turn the key to position 1in the ignition
lock. AMG menu in AMG vehicles
AMG displays :
Digital speedometer
; Gear indicator
= Upshift indicator
? Engine oil temperature
A Coolant temperature
B Status indicator for ECO start/stop func-
tion (Y page 163)
X Press the =or; button on the steer-
ing wheel to select the AMG
AMGmenu.
Upshift indicator UP
UP= indicates that the
engine has reached the overrevving range
when in the manual drive program. Upshift
indicator UP UP= fades out other messages
until you have shifted up.
If the engine oil temperature is below 80 †,
the oil temperature is shown in blue. Avoid
using the full output of the engine during this time.
SETUP :
Drive program (C C/SS+SS+/M M)
; ESP ®
mode (ON ON/OFFOFF) or SPORT handling
mode (SPORT SPORT)
= Suspension setting ( COMFORT COMFORT/SPORTSPORT/
SPORT+
SPORT+) 258
Menus and submenusOn-board computer and displays
Page 271 of 417
Display messages
Possible causes/consequences and
M
MSolutions b
Trailer left turn Trailer left turn
signal signal
orTrailer
Trailer
right turn signal
right turn signal The left or right-hand trailer turn signal lamp is faulty.
X Observe the separate operating instructions provided by the
trailer manufacturer. b
Trailer brake lamp Trailer brake lamp The trailer brake lamp is faulty.
X Observe the separate operating instructions provided by the
trailer manufacturer. b
Rear Rear
left
leftturn
turn sig‐
sig‐
nal
nal orRear right
Rear right
turn signal
turn signal The rear left-hand or rear right-hand turn signal is faulty.
X Visit a qualified specialist workshop. b
Front left turn Front left turn
signal signal
orFront
Front
right turn signal
right turn signal The front left-hand or front right-hand turn signal is faulty.
X Visit a qualified specialist workshop. b
Left mirror turn Left mirror turn
signal signal
orRight
Right
mirror turn signal
mirror turn signal The turn signal in the left-hand or right-hand exterior mirror is
faulty.
X Visit a qualified specialist workshop. b
Third brake lamp Third brake lamp The third brake lamp is faulty.
X Visit a qualified specialist workshop. b
Left-hand tail Left-hand tail
lamp/brake lamp lamp/brake lamp
or
Right-hand tail
Right-hand tail
lamp/brake lamp lamp/brake lamp The left or right-hand tail lamp/brake lamp is faulty.
X Visit a qualified specialist workshop. b
Left main beam Left main beam
or
Right main beam
Right main beam The left or right-hand main-beam headlamp is faulty.
X Visit a qualified specialist workshop. b
Left Left
licence
licence plate
plate
lamp
lamp orRight
Right
licence plate lamp
licence plate lamp The left or right-hand licence plate lamp is faulty.
X Visit a qualified specialist workshop. 268
Display
messagesOn-board computer and displays
Page 317 of 417
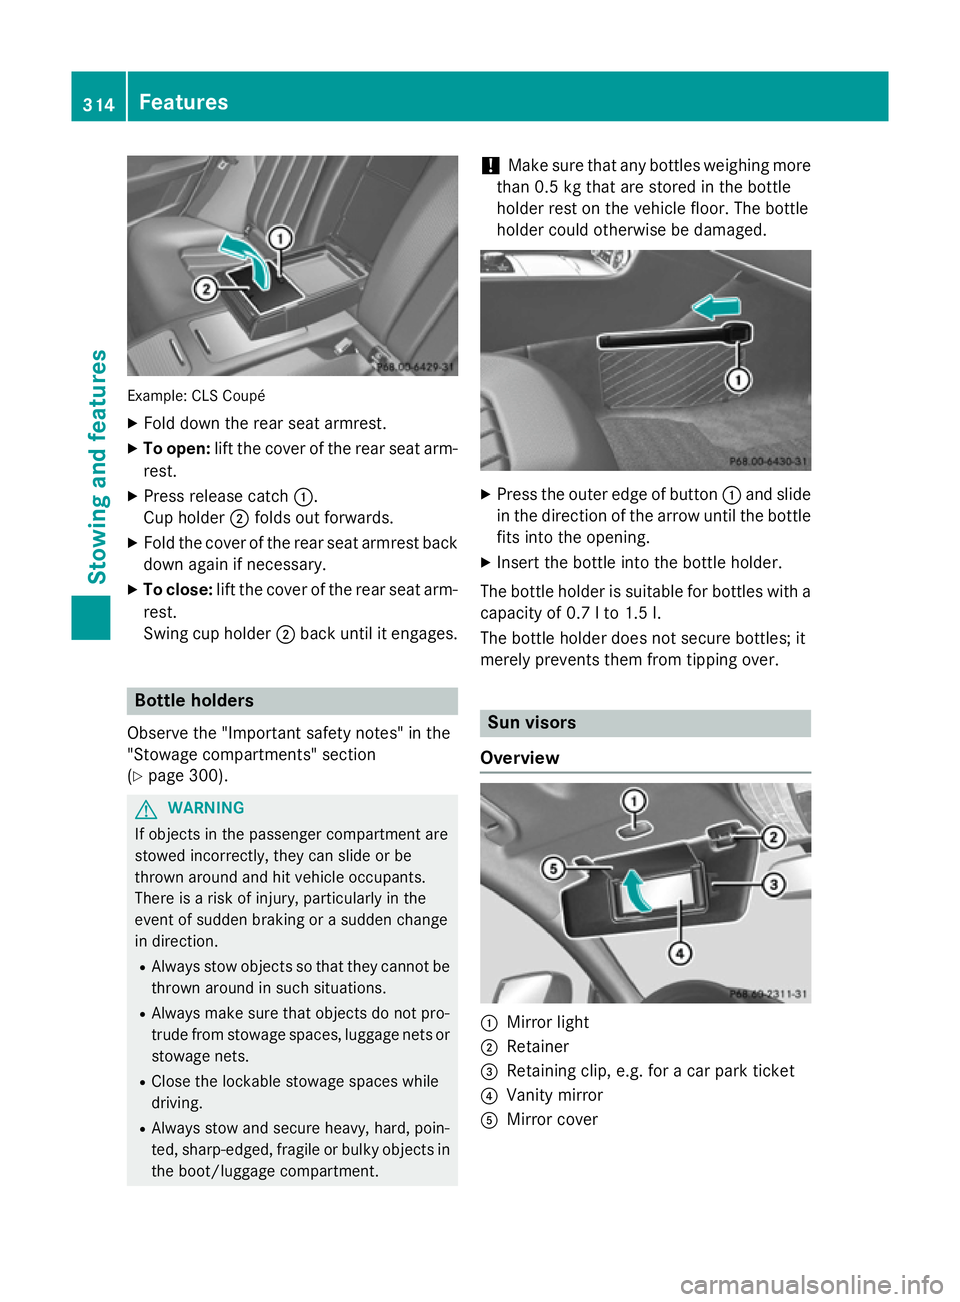
Example: CLS Coupé
X Fold down the rear seat armrest.
X To open: lift the cover of the rear seat arm-
rest.
X Press release catch :.
Cup holder ;folds out forwards.
X Fold the cover of the rear seat armrest back
down again if necessary.
X To close: lift the cover of the rear seat arm-
rest.
Swing cup holder ;back until it engages. Bottle holders
Observe the "Important safety notes" in the
"Stowage compartments" section
(Y page 300). G
WARNING
If objects in the passenger compartment are
stowed incorrectly, they can slide or be
thrown around and hit vehicle occupants.
There is a risk of injury, particularly in the
event of sudden braking or a sudden change
in direction.
R Always stow objects so that they cannot be
thrown around in such situations.
R Always make sure that objects do not pro-
trude from stowage spaces, luggage nets or stowage nets.
R Close the lockable stowage spaces while
driving.
R Always stow and secure heavy, hard, poin-
ted, sharp-edged, fragile or bulky objects in
the boot/luggage compartment. !
Make sure that any bottles weighing more
than 0.5 kg that are stored in the bottle
holder rest on the vehicle floor. The bottle
holder could otherwise be damaged. X
Press the outer edge of button :and slide
in the direction of the arrow until the bottle
fits into the opening.
X Insert the bottle into the bottle holder.
The bottle holder is suitable for bottles with a
capacity of 0.7 lto 1.5 l.
The bottle holder does not secure bottles; it
merely prevents them from tipping over. Sun visors
Overview :
Mirror light
; Retainer
= Retaining clip, e.g. for a car park ticket
? Vanity mirror
A Mirror cover 314
FeaturesStowing and features
Page 318 of 417
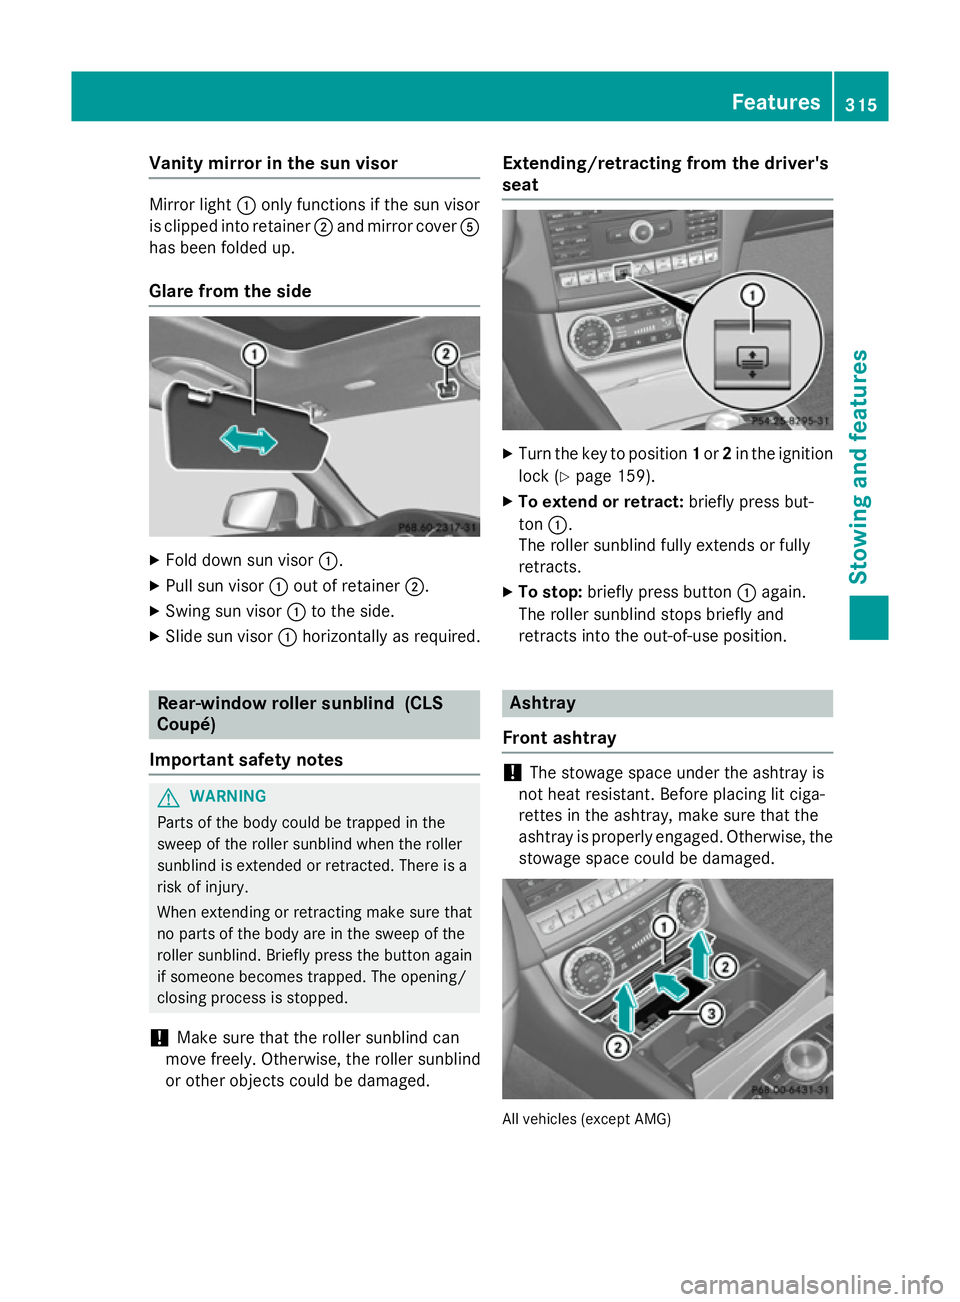
Vanity mirror in the sun visor
Mirror light
:only functions if the sun visor
is clipped into retainer ;and mirror cover A
has been folded up.
Glare from the side X
Fold down sun visor :.
X Pull sun visor :out of retainer ;.
X Swing sun visor :to the side.
X Slide sun visor :horizontally as required. Rear-window roller sunblind (CLS
Coupé)
Important safety notes G
WARNING
Parts of the body could be trapped in the
sweep of the roller sunblind when the roller
sunblind is extended or retracted. There is a
risk of injury.
When extending or retracting make sure that
no parts of the body are in the sweep of the
roller sunblind. Briefly press the button again if someone becomes trapped. The opening/
closing process is stopped.
! Make sure that the roller sunblind can
move freely. Otherwise, the roller sunblind
or other objects could be damaged. Extending/retracting from the driver's
seat
X
Turn the key to position 1or 2in the ignition
lock (Y page 159).
X To extend or retract: briefly press but-
ton :.
The roller sunblind fully extends or fully
retracts.
X To stop: briefly press button :again.
The roller sunblind stops briefly and
retracts into the out-of-use position. Ashtray
Front ashtray !
The stowage space under the ashtray is
not heat resistant. Before placing lit ciga-
rettes in the ashtray, make sure that the
ashtray is properly engaged. Otherwise, the
stowage space could be damaged. All vehicles (except AMG) Features
315Stowing an d features Z
Page 323 of 417
Using a mobile phone
If the mobile phone is inserted in the mobile
phone bracket, the mobile phone will be
charged and connected with the exterior aer- ial.
X Open the telephone compartment
(Y page 302).
X Insert the mobile phone into the mobile
phone bracket; see the separate installa-
tion instructions for the mobile phone fit-
ting.
Operating the mobile phone You can operate the telephone using the
6 and~ buttons on the multifunction
steering wheel. You can operate other mobile
phone functions via the on-board computer
(Y page 247).
When you remove the key from the ignition
lock, the mobile phone is disconnected from
the hands-free system. Active calls will first
be transferred to the mobile phone directly. Garage door opener
General notes The HomeLink
®
garage door opener integra-
ted in the rear-view mirror allows you to oper-
ate up to three different door and gate sys-
tems.
Once programmed, the integrated garage
door opener in the rear-view mirror will
assume the function of the garage door sys-
tem's remote control. Please also read the
operating instructions for the garage door
system.
When programming a garage door opener,
park the vehicle outside the garage. Do not
run the engine while programming.
The garage door opener is only available for
certain countries. Observe the legal require-
ments for each individual country.
The HomeLink ®
garage door opener is com-
patible with most European garage and gate opener drives. More information on Home-
Link
®
and/or compatible products is availa-
ble:
R at a qualified specialised workshop
R via the HomeLink ®
Hotline
(0) 08000 466 354 65 or alternatively
+49 (0) 6838 907-277
R on the Internet at
http://www.homelink.com
Important safety notes G
WARNING
When you operate or program the garage door with the integrated garage door opener, per-
sons in the range of movement of the garage
door can become trapped or struck by the
garage door. There is a risk of injury.
When using the integrated garage door
opener, always make sure that nobody is
within the range of movement of the garage
door. G
WARNING
Combustion engines emit poisonous exhaust
gases such as carbon monoxide. Inhaling
these exhaust gases leads to poisoning. There is a risk of fatal injury. Therefore never leave
the engine running in enclosed spaces with-
out sufficient ventilation.
Programming Programming buttons
Pay attention to the "Important safety notes"
(Y page 320). 320
FeaturesStowing and features
Page 324 of 417

Integrated garage door opener in the rear-view mir-
ror
Garage door remote control Ais not inclu-
ded with the integrated garage door opener.
X Turn the key to position 2in the ignition
lock (Y page 159).
X Select one of buttons ;to? to control
the garage door drive.
X To start programming mode: press and
hold one of buttons ;to? of the inte-
grated garage door opener.
The garage door opener is now in program- ming mode. After a short time, indicator
lamp :begins to light up yellow.
Indicator lamp :lights up yellow immedi-
ately the first time button ;,=or? is
programmed. If the selected button has
already been programmed, indicator
lamp :lights up yellow after ten seconds
have elapsed.
X Release button ;,=or?. Indicator
lamp :flashes yellow.
X To program the remote control: point
garage door remote control Atowards
buttons ;to? on the rear-view mirror at
a distance of 5 to 20 cm.
X Press and hold button Bon remote control
A until indicator lamp :lights up green.
When indicator lamp :lights up green:
programming is finished. When indicator lamp
:flashes green: pro-
gramming was successful. The next step is to synchronise the rolling code.
X Release button Bof remote control Aof
the garage door drive.
If indicator lamp :lights up red: repeat the
programming process for the correspond-
ing button on the rear-view mirror. When
doing so, vary the distance between remote
control Aand the rear-view mirror.
The required distance between remote
control Aand the integrated garage door
opener depends on the garage door drive
system. Several attempts may be required.
You should test every position for at least
25 seconds before trying another position.
Synchronising the rolling code
Pay attention to the "Important safety notes"
(Y page 320).
If the garage door system uses a rolling code, you will also have to synchronise the garage
door system with the integrated garage door
opener in the rear-view mirror. To do this, you
will need to use the programming button on
the door drive control panel. The program-
ming button may be placed at different loca-
tions, depending on the manufacturer. It is
usually located on the door drive unit on the
garage ceiling.
Familiarise yourself with the garage door
drive operating instructions, e.g. under "Pro-
gramming of additional remote controls",
before carrying out the following steps.
Your vehicle must be within range of the
garage door or gate opener drive. Make sure
that neither your vehicle nor any persons/
objects are present within the sweep of the
door or gate.
X Turn the key to position 2in the ignition
lock (Y page 159).
X Get out of the vehicle.
X Press the programming button on the door
drive unit.
Usually, you now have 30 seconds to ini-
tiate the next step. Features
321Stowing and features Z
Page 325 of 417

X
Get into the vehicle.
X Press previously programmed button ;,
= or? of the integrated garage door
opener until the door closes.
The rolling code synchronisation is then
complete.
Problems when programming
If you have problems when programming the
integrated garage door opener, please note
the following:
R Check the transmitter frequency used by
garage door drive remote control Aand
whether it is supported. The transmitter
frequency can usually be found on the back
of the garage door drive remote control.
R Replace the batteries in garage door
remote control A. This increases the like-
lihood that garage door remote control A
will transmit a strong and precise signal to
the integrated garage door opener in the
rear-view mirror.
R When programming, hold remote control
A at varying distances and angles from the
button which you are programming. Try var- ious angles at a distance between 5and
30 cm or at the same angle but at varying
distances.
R If there is another remote control for the
same garage door drive, perform the pro-
gramming steps again using this remote
control. Before performing these steps,
make sure that new batteries have been
fitted in garage door drive remote control
A.
R Note that some remote controls transmit
only for a limited period (the indicator lamp on the remote control goes out). Press but-ton Bon remote control Aagain before
transmission ends.
R Align the aerial cable of the garage door
opener unit. This can improve signal recep- tion/transmission. Opening or closing the garage door Once programmed, the integrated garage
door opener will assume the function of the
garage door system's remote control. Please
also read the operating instructions for the
garage door system.
X Turn the key to position 2in the ignition
lock (Y page 159).
X Press button ;,=or? which you have
programmed to operate the garage door.
Garage door system with a fixed code: indi-
cator lamp :lights up green.
Garage door system with a rolling code:
indicator lamp :flashes green.
The transmitter will transmit a signal for as
long as the button is pressed. The transmis-
sion is halted after a maximum of ten seconds and indicator lamp :lights up yellow. Press
button ;,=or? again if necessary.
Clearing the memory Make sure that you clear the memory of the
integrated garage door opener before selling
the vehicle.
X Turn the key to position 2in the ignition
lock (Y page 159).
X Press and hold buttons ;and ?.
The indicator lamp initially lights up yellow
and then green.
X Release buttons ;and ?.
The memory of the integrated garage door
opener in the rear-view mirror is cleared. 322
FeaturesStowing and featu
res