2014 MERCEDES-BENZ CLS COUPE child seat
[x] Cancel search: child seatPage 70 of 417
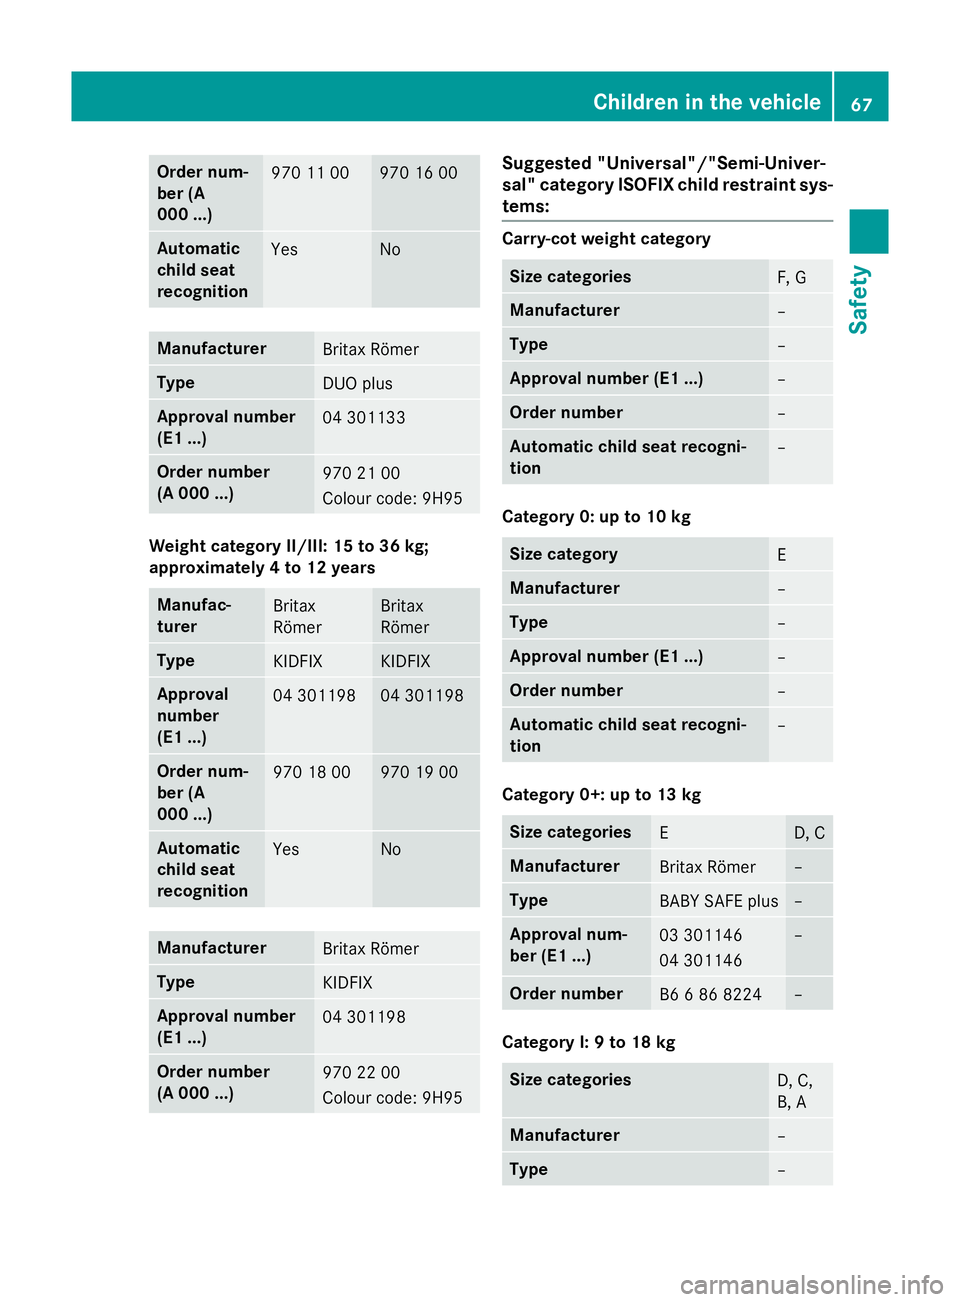
Order num-
ber (A
000 ...)
970 11 00 970 16 00
Automatic
child seat
recognition
Yes No
Manufacturer
Britax Römer
Type
DUO plus
Approval number
(E1 ...)
04 301133
Order number
(A 000 ...) 970 21 00
Colour code: 9H95
Weight category II/III: 15 to 36 kg;
approximately 4 to 12 years Manufac-
turer
Britax
Römer Britax
Römer
Type
KIDFIX KIDFIX
Approval
number
(E1 ...)
04 301198 04 301198
Order num-
ber (A
000 ...) 970 18 00 970 19 00
Automatic
child seat
recognition
Yes No
Manufacturer
Britax Römer
Type
KIDFIX
Approval number
(E1 ...)
04 301198
Order number
(A 000 ...) 970 22 00
Colour code: 9H95 Suggested "Universal"/"Semi-Univer-
sal" category ISOFIX child restraint sys-
tems: Carry-cot weight category
Size categories
F, G
Manufacturer
–
Type
–
Approval number (E1 ...)
–
Order number
–
Automatic child seat recogni-
tion
–
Category 0: up to 10 kg
Size category
E
Manufacturer
–
Type
–
Approval number (E1 ...)
–
Order number
–
Automatic child seat recogni-
tion
–
Category 0+: up to 13 kg
Size categories
E D, C
Manufacturer
Britax Römer –
Type
BABY SAFE plus –
Approval num-
ber (E1 ...)
03 301146
04 301146 –
Order number
B6 6 86 8224 –
Category I: 9 to 18 kg
Size categories
D, C,
B, A
Manufacturer
–
Type
–Children in the vehicle
67Safety Z
Page 71 of 417
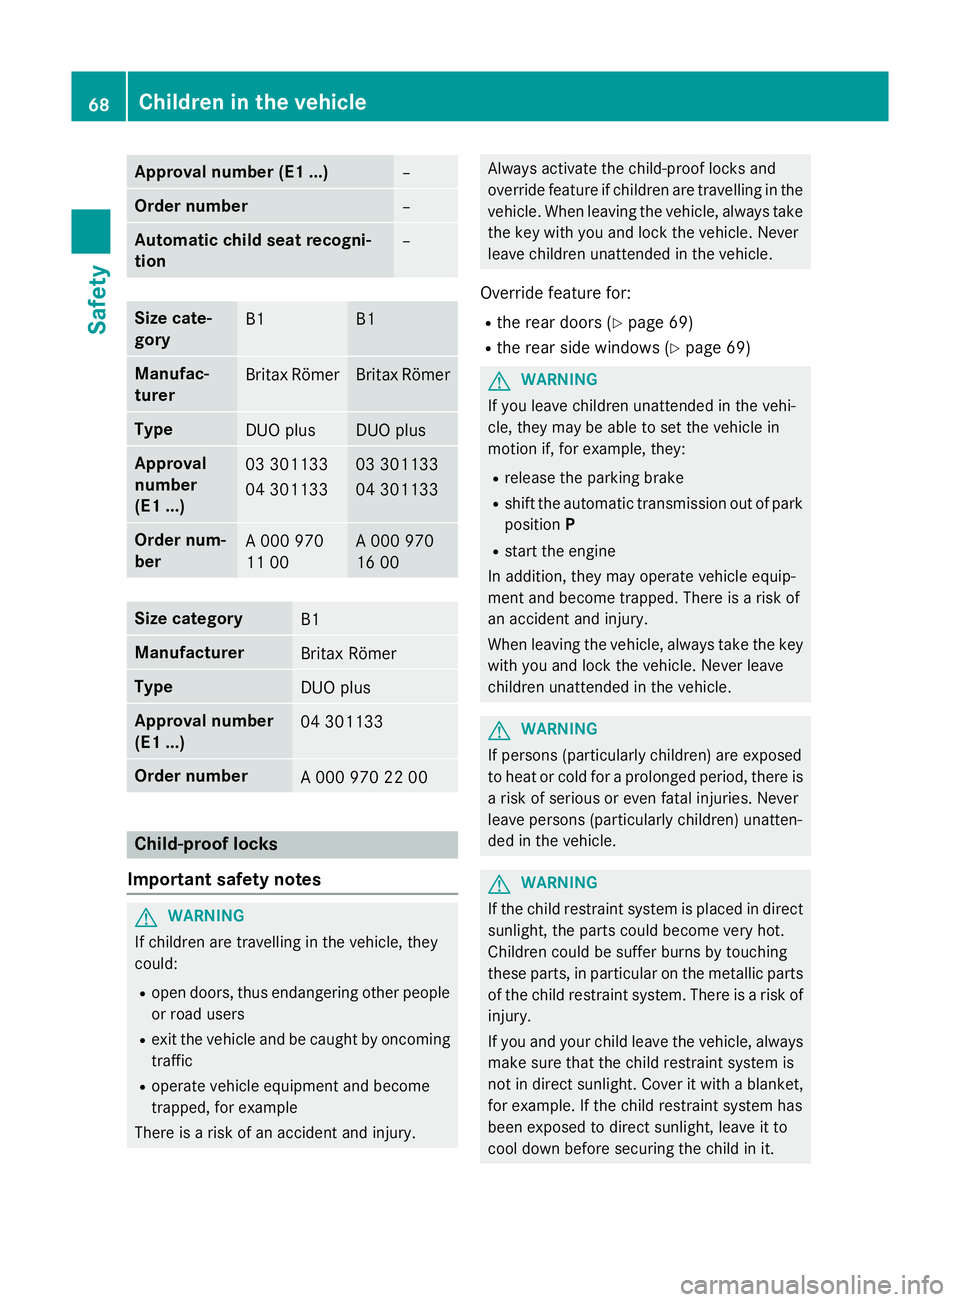
Approval number (E1 ...)
–
Order number
–
Automatic child seat recogni-
tion
–
Size cate-
gory
B1 B1
Manufac-
turer
Britax Römer Britax Römer
Type
DUO plus DUO plus
Approval
number
(E1 ...)
03 301133
04 301133 03 301133
04 301133
Order num-
ber
A 000 970
11 00 A 000 970
16 00
Size category
B1
Manufacturer
Britax Römer
Type
DUO plus
Approval number
(E1 ...)
04 301133
Order number
A 000 970 22 00
Child-proof locks
Important safety notes G
WARNING
If children are travelling in the vehicle, they
could:
R open doors, thus endangering other people
or road users
R exit the vehicle and be caught by oncoming
traffic
R operate vehicle equipment and become
trapped, for example
There is a risk of an accident and injury. Always activate the child-proof locks and
override feature if children are travelling in the vehicle. When leaving the vehicle, always take the key with you and lock the vehicle. Never
leave children unattended in the vehicle.
Override feature for:
R the rear doors (Y page 69)
R the rear side windows (Y page 69) G
WARNING
If you leave children unattended in the vehi-
cle, they may be able to set the vehicle in
motion if, for example, they:
R release the parking brake
R shift the automatic transmission out of park
position P
R start the engine
In addition, they may operate vehicle equip-
ment and become trapped. There is a risk of
an accident and injury.
When leaving the vehicle, always take the key
with you and lock the vehicle. Never leave
children unattended in the vehicle. G
WARNING
If persons (particularly children) are exposed
to heat or cold for a prolonged period, there is a risk of serious or even fatal injuries. Never
leave persons (particularly children) unatten-
ded in the vehicle. G
WARNING
If the child restraint system is placed in direct sunlight, the parts could become very hot.
Children could be suffer burns by touching
these parts, in particular on the metallic parts
of the child restraint system. There is a risk of injury.
If you and your child leave the vehicle, always
make sure that the child restraint system is
not in direct sunlight. Cover it with a blanket, for example. If the child restraint system has
been exposed to direct sunlight, leave it to
cool down before securing the child in it. 68
Children in the vehicleSafety
Page 91 of 417
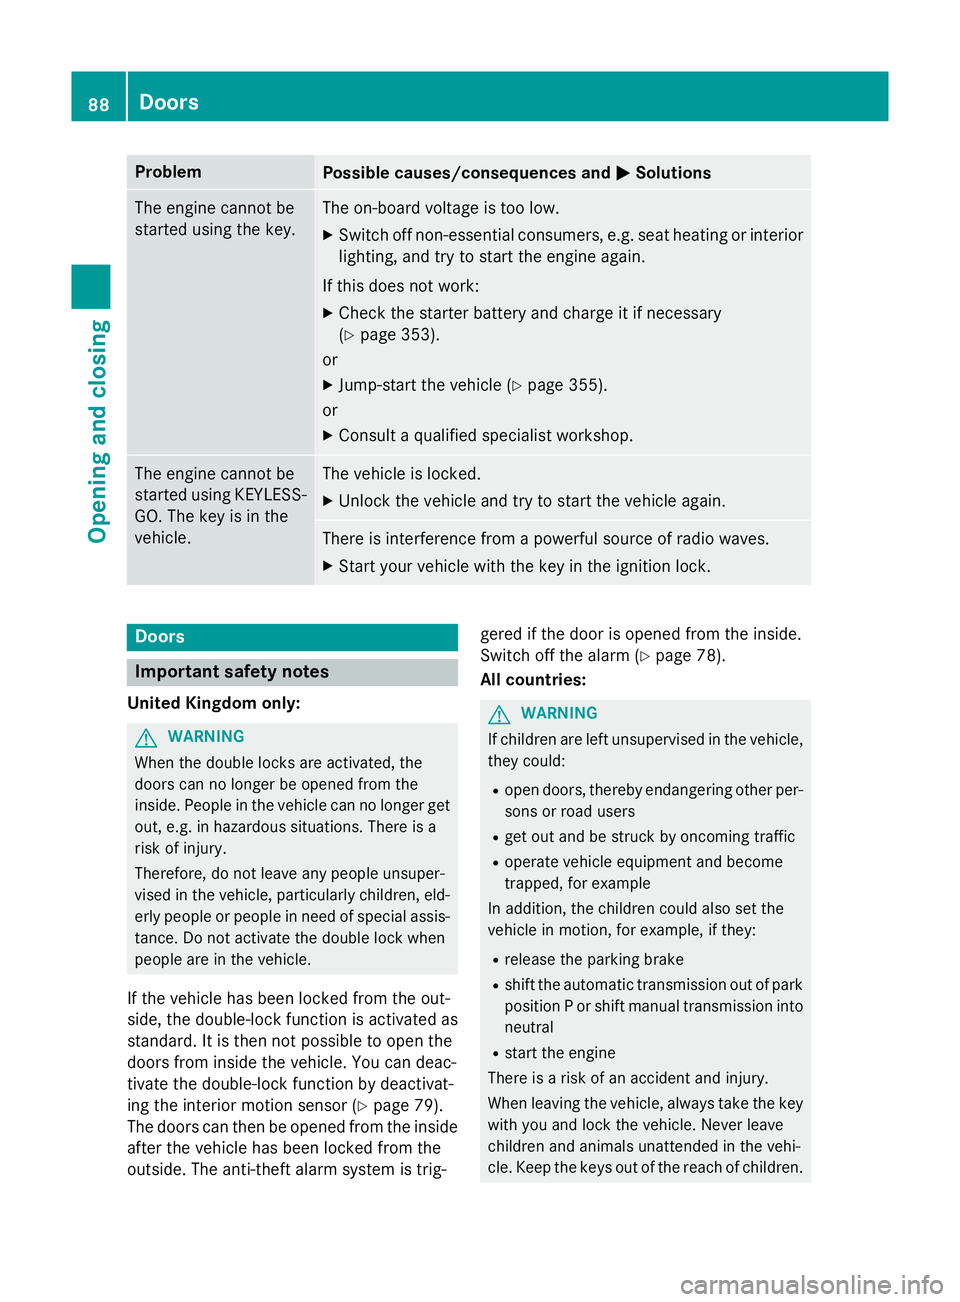
Problem
Possible causes/consequences and
M
MSolutions The engine cannot be
started using the key. The on-board voltage is too low.
X Switch off non-essential consumers, e.g. seat heating or interior
lighting, and try to start the engine again.
If this does not work:
X Check the starter battery and charge it if necessary
(Y page 353).
or
X Jump-start the vehicle (Y page 355).
or
X Consult a qualified specialist workshop. The engine cannot be
started using KEYLESS-
GO. The key is in the
vehicle. The vehicle is locked.
X Unlock the vehicle and try to start the vehicle again. There is interference from a powerful source of radio waves.
X Start your vehicle with the key in the ignition lock. Doors
Important safety notes
United Kingdom only: G
WARNING
When the double locks are activated, the
doors can no longer be opened from the
inside. People in the vehicle can no longer get out, e.g. in hazardous situations. There is a
risk of injury.
Therefore, do not leave any people unsuper-
vised in the vehicle, particularly children, eld-
erly people or people in need of special assis-
tance. Do not activate the double lock when
people are in the vehicle.
If the vehicle has been locked from the out-
side, the double-lock function is activated as
standard. It is then not possible to open the
doors from inside the vehicle. You can deac-
tivate the double-lock function by deactivat-
ing the interior motion sensor (Y page 79).
The doors can then be opened from the inside after the vehicle has been locked from the
outside. The anti-theft alarm system is trig- gered if the door is opened from the inside.
Switch off the alarm (Y
page 78).
All countries: G
WARNING
If children are left unsupervised in the vehicle, they could:
R open doors, thereby endangering other per-
sons or road users
R get out and be struck by oncoming traffic
R operate vehicle equipment and become
trapped, for example
In addition, the children could also set the
vehicle in motion, for example, if they:
R release the parking brake
R shift the automatic transmission out of park
position P or shift manual transmission into
neutral
R start the engine
There is a risk of an accident and injury.
When leaving the vehicle, always take the key with you and lock the vehicle. Never leave
children and animals unattended in the vehi-
cle. Keep the keys out of the reach of children. 88
DoorsOpening and closing
Page 97 of 417
If KEYLESS-GO detects a second key out-
side the vehicle, the boot lid/tailgate
remains closed. Opening/closing automatically from
the inside
Important safety notes G
WARNING
Parts of the body could become trapped dur-
ing automatic closing of the boot lid or tail-
gate. Moreover, people, e.g. children, may be standing in the closing area or may enter the
closing area during the closing process. There
is a risk of injury.
Make sure that nobody is in the vicinity of the closing area during the closing process.
Use one of the following options to stop the
closing process:
R Press the Fbutton on the key.
R Press the remote operating switch on the
driver's door.
R Press the closing or locking button on the
boot lid/tailgate.
R Pull the handle on the boot lid/tailgate.
! The boot lid/tailgate swings upwards and
to the rear when opened. Therefore, make
sure that there is sufficient clearance
above and behind the boot lid/tailgate.
i Boot lid/tailgate opening dimensions
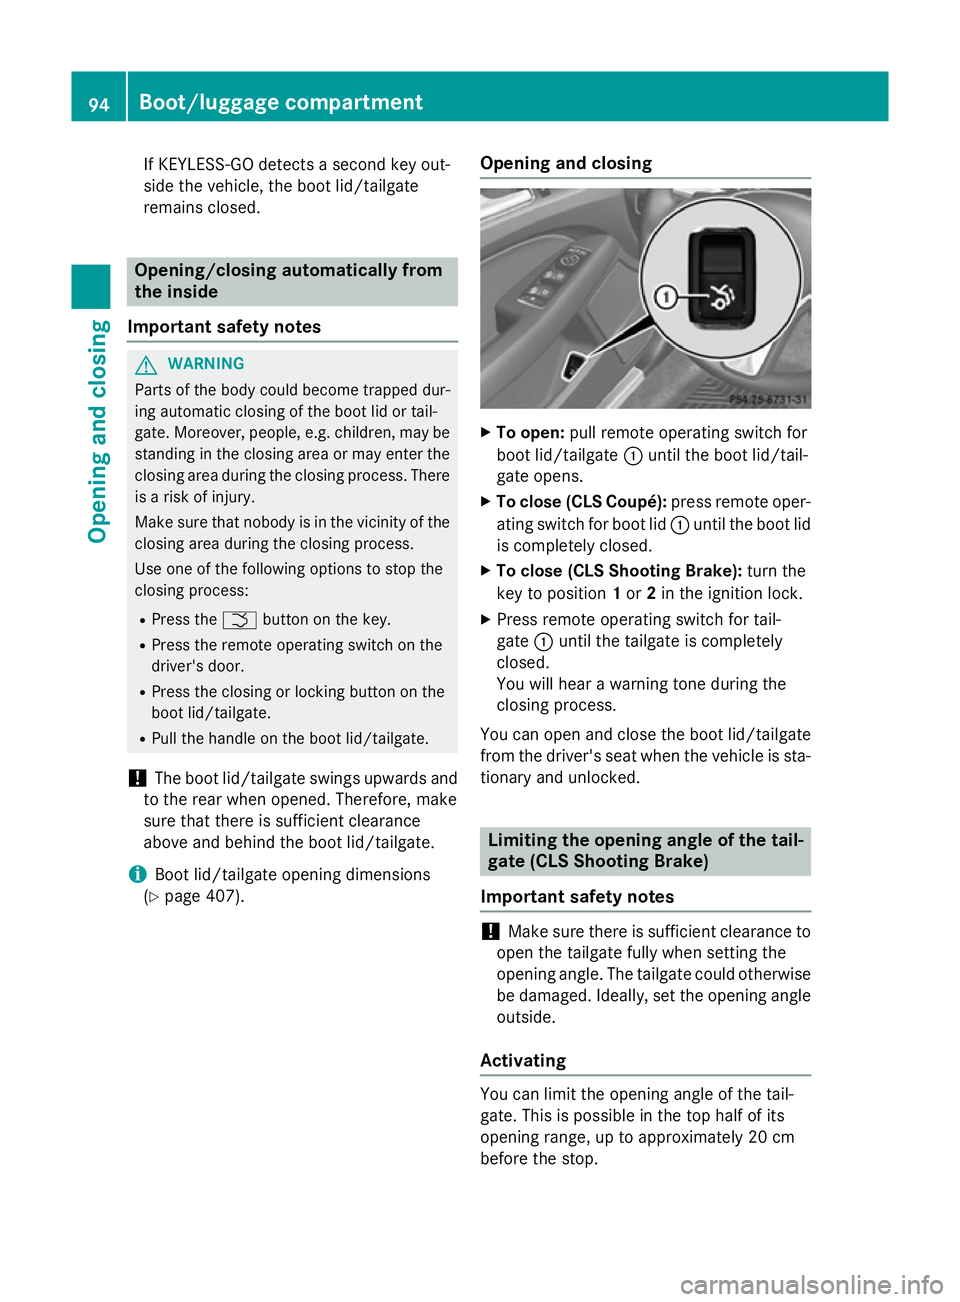
(Y page 407). Opening and closing X
To open: pull remote operating switch for
boot lid/tailgate :until the boot lid/tail-
gate opens.
X To close (CLS Coupé): press remote oper-
ating switch for boot lid :until the boot lid
is completely closed.
X To close (CLS Shooting Brake): turn the
key to position 1or 2in the ignition lock.
X Press remote operating switch for tail-
gate :until the tailgate is completely
closed.
You will hear a warning tone during the
closing process.
You can open and close the boot lid/tailgate
from the driver's seat when the vehicle is sta-
tionary and unlocked. Limiting the opening angle of the tail-
gate (CLS Shooting Brake)
Important safety notes !
Make sure there is sufficient clearance to
open the tailgate fully when setting the
opening angle. The tailgate could otherwise
be damaged. Ideally, set the opening angle outside.
Activating You can limit the opening angle of the tail-
gate. This is possible in the top half of its
opening range, up to approximately 20 cm
before the stop. 94
Boot/luggage compartmentOpening and closing
Page 108 of 417
The seat belt should:
R fit snugly across your body
R be routed across the middle of your shoul-
der
R be routed across your hips in the pelvic
area
X Before starting off, adjust the rear-view mir-
ror and the exterior mirrors so that you
have a good view of road and traffic condi-
tions (Y page 116).
X Vehicles with a memory function: save
the seat, steering wheel and exterior mirror
settings with the memory function
(Y page 119). Seats
Important safety notes
G
WARNING
If children adjust the seats, they could
become trapped, especially if they are unat-
tended. There is a risk of injury.
When leaving the vehicle, always take the key with you and lock the vehicle. Never leave
children unattended in the vehicle. G
WARNING
You could lose control of the vehicle while
driving if you:
R adjust the driver's seat, steering wheel or
mirrors
R fasten the seat belt
There is a risk of an accident.
Adjust the driver's seat, head restraint, steer-
ing wheel and mirrors and fasten your seat
belt before starting the engine. G
WARNING
If you adjust the seat height carelessly, you or other vehicle occupants could be trapped andthereby injured. Children in particular could
accidentally press the electrical seat adjust- ment buttons and become trapped. There is a
risk of injury.
While moving the seats, make sure that your
hands or other body parts do not get under the
lever assembly of the seat adjustment sys-
tem. G
WARNING
When adjusting a seat, you or another vehicle occupant could become trapped by the guiderail of the seat, for instance. There is a risk of
injury.
Make sure that no one has any part of their
body within the sweep of the seat when
adjusting it. G
WARNING
The head restraints cannot provide the inten-
ded protection unless they are fitted and
adjusted correctly. There is an increased risk of injury to the head and neck in the event of
an accident or sudden braking, for example.
Always drive with the head restraints fitted.
Ensure that the centre of the head restraints
support the back of each vehicle occupant's
head at eye level before driving off. G
WARNING
The seat belt does not offer the intended level of protection if you have not moved the back-
rest to an almost vertical position. When brak-
ing or in the event of an accident, you could
slide underneath the seat belt and sustain
abdomen or neck injuries, for example. This
poses an increased risk of injury or even fatal injury.
Adjust the seat properly before beginning
your journey. Always ensure that the backrest
is in an almost vertical position and that the
shoulder section of your seatbelt is routed
across the centre of your shoulder. Seats
105Seats, steering wheel and mirrors Z
Page 109 of 417
!
To avoid damage to the seats and the seat
heating, observe the following information:
R do not spill any liquids on the seats. If
liquid is spilled on the seats, dry them as soon as possible.
R if the seat covers are damp or wet, do not
switch on the seat heating. The seat
heating should also not be used to dry
the seats.
R clean the seat covers as recommended;
see "Interior care".
R do not transport heavy loads on the
seats. Do not place sharp objects on the seat cushions, e.g. knives, nails or tools. The seats should only be occupied by
passengers, if possible.
R when the seat heating is in operation, do
not cover the seats with insulating mate-
rials, e.g. blankets, coats, bags, seat cov- ers, child seats or booster seats.
! Make sure that there are no objects in the
footwell under or behind the seats when
moving the seats back. There is a risk that
the seats and/or the objects could be dam- aged.
i The head restraints in the front seats are
fitted with the NECK-PRO system
(Y page 53). For this reason, it is not pos-
sible to remove the head restraints from
the front seats.
For more information, contact a qualified
specialist workshop.
i Further related subjects:
R Through-loading facility in the rear bench
seat (Y page 305)
R Through-loading facility in the rear bench
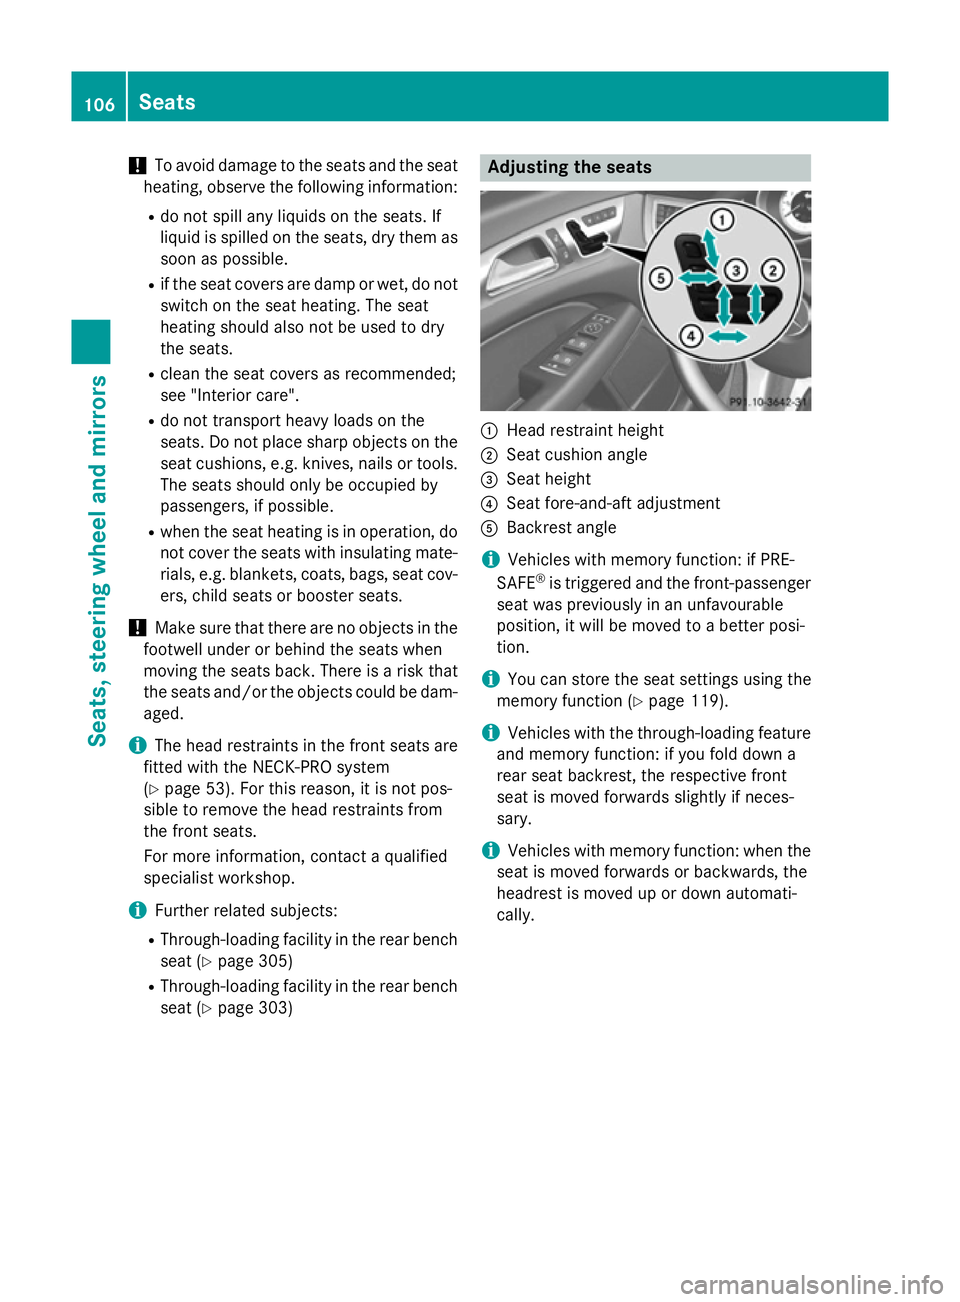
seat (Y page 303) Adjusting the seats
:
Head restraint height
; Seat cushion angle
= Seat height
? Seat fore-and-aft adjustment
A Backrest angle
i Vehicles with memory function: if PRE-
SAFE ®
is triggered and the front-passenger
seat was previously in an unfavourable
position, it will be moved to a better posi-
tion.
i You can store the seat settings using the
memory function (Y page 119).
i Vehicles with the through-loading feature
and memory function: if you fold down a
rear seat backrest, the respective front
seat is moved forwards slightly if neces-
sary.
i Vehicles with memory function: when the
seat is moved forwards or backwards, the
headrest is moved up or down automati-
cally. 106
SeatsSeats, steering wheel and mirrors
Page 116 of 417
Problems with the seat ventilation
Problem
Possible causes/consequences and
M
MSolutions The seat ventilation has
switched off prema-
turely or cannot be
switched on. The on-board voltage is too low because too many electrical con-
sumers are switched on.
X Switch off electrical consumers that you do not need, such as
the rear window heating or interior lighting.
Once the battery is sufficiently charged, the seat ventilation will
switch back on automatically. Steering wheel
Important safety notes
G
WARNING
You could lose control of the vehicle while
driving if you:
R adjust the driver's seat, steering wheel or
mirrors
R fasten the seat belt
There is a risk of an accident.
Adjust the driver's seat, head restraint, steer-
ing wheel and mirrors and fasten your seat
belt before starting the engine. G
WARNING
Children could become trapped by the steer-
ing wheel if they adjust it. There is a risk of
injury.
When leaving the vehicle, always take the key with you and lock the vehicle. Never leave
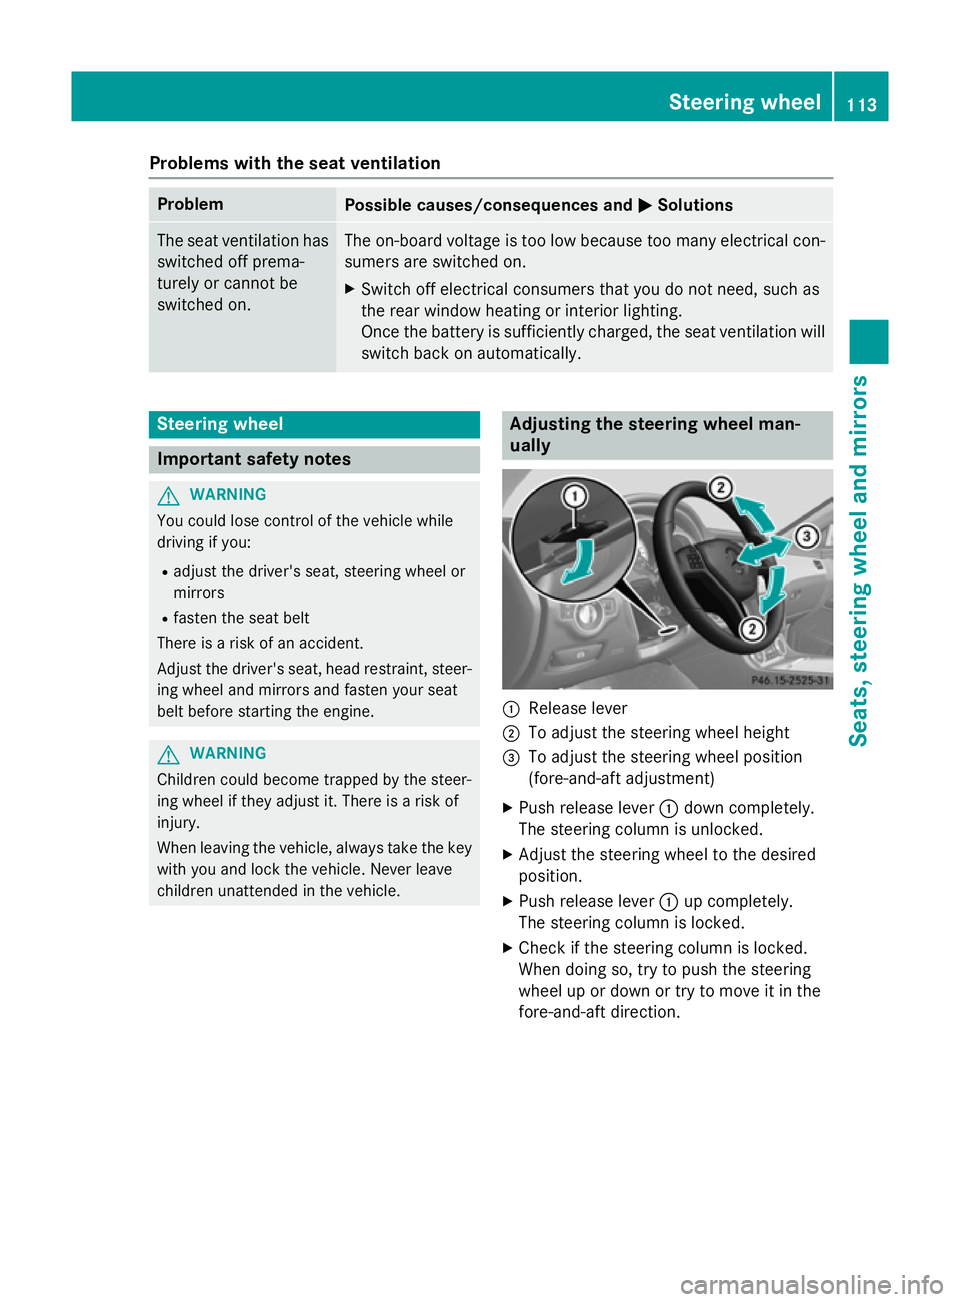
children unattended in the vehicle. Adjusting the steering wheel man-
ually
:
Release lever
; To adjust the steering wheel height
= To adjust the steering wheel position
(fore-and-aft adjustment)
X Push release lever :down completely.
The steering column is unlocked.
X Adjust the steering wheel to the desired
position.
X Push release lever :up completely.
The steering column is locked.
X Check if the steering column is locked.
When doing so, try to push the steering
wheel up or down or try to move it in the
fore-and-aft direction. Steering wheel
113Seats, steering wheel and mirrors Z
Page 118 of 417
Problems with the steering wheel heating
Problem
Possible causes/consequences and
M
MSolutions The steering wheel
heating has switched
itself off prematurely or
cannot be switched on. The on-board voltage is too low because too many electrical con-
sumers are switched on.
X Switch off electrical consumers that you do not need, such as
the rear window heating or interior lighting.
Once the battery is sufficiently charged, the steering wheel
heating will switch back on automatically. EASY-ENTRY/EXIT feature
Important safety notes G
WARNING
When the EASY-ENTRY/EXIT feature adjusts
the steering wheel, you and other vehicle
occupants – particularly children – could
become trapped. There is a risk of injury.
While the EASY-ENTRY/EXIT feature is mak-
ing adjustments, make sure that no one has
any body parts in the sweep of the steering
wheel.
If someone is trapped:
R press one of the memory function position
buttons, or
R move the switch for steering wheel adjust-
ment in the opposite direction to that in
which the steering wheel is moving.
The adjustment process is stopped. G
WARNING
If children activate the EASY-ENTRY/EXIT fea- ture, they can become trapped, particularly
when unattended. There is a risk of injury.
When leaving the vehicle, always take the key with you and lock the vehicle. Never leave
children unattended in the vehicle. G
WARNING
If you drive off while the EASY-ENTRY/EXIT
feature is making adjustments, you could lose
control of the vehicle. There is a risk of an
accident. Always wait until the adjustment process is
complete before driving off.
The EASY-ENTRY/EXIT feature makes getting in and out of your vehicle easier.
You can activate and deactivate the EASY-
ENTRY/EXIT feature in the on-board com-
puter (Y page 257).
Position of the steering wheel when the
EASY-ENTRY/EXIT feature is active The steering wheel tilts upwards if you:
R remove the key from the ignition lock
R with the key: open the driver's door; the
key must be in position 0or 1in the ignition
lock (Y page 159).
i The steering wheel only moves upwards if
it has not already reached the upper stop.
Position of the steering wheel for driv-
ing The steering wheel is moved to the previously
set position if:
R the driver's door is closed and
R with the key: you insert the key into the
ignition lock
If you close the driver's door with the key
inserted in the ignition lock, the steering
wheel is automatically moved to the previ-
ously set position.
The last position of the steering wheel is
stored when you switch off the ignition or Steering wheel
115Seats, steering wheel and mirrors Z