2014 MERCEDES-BENZ CL-Class ad blue
[x] Cancel search: ad bluePage 222 of 274

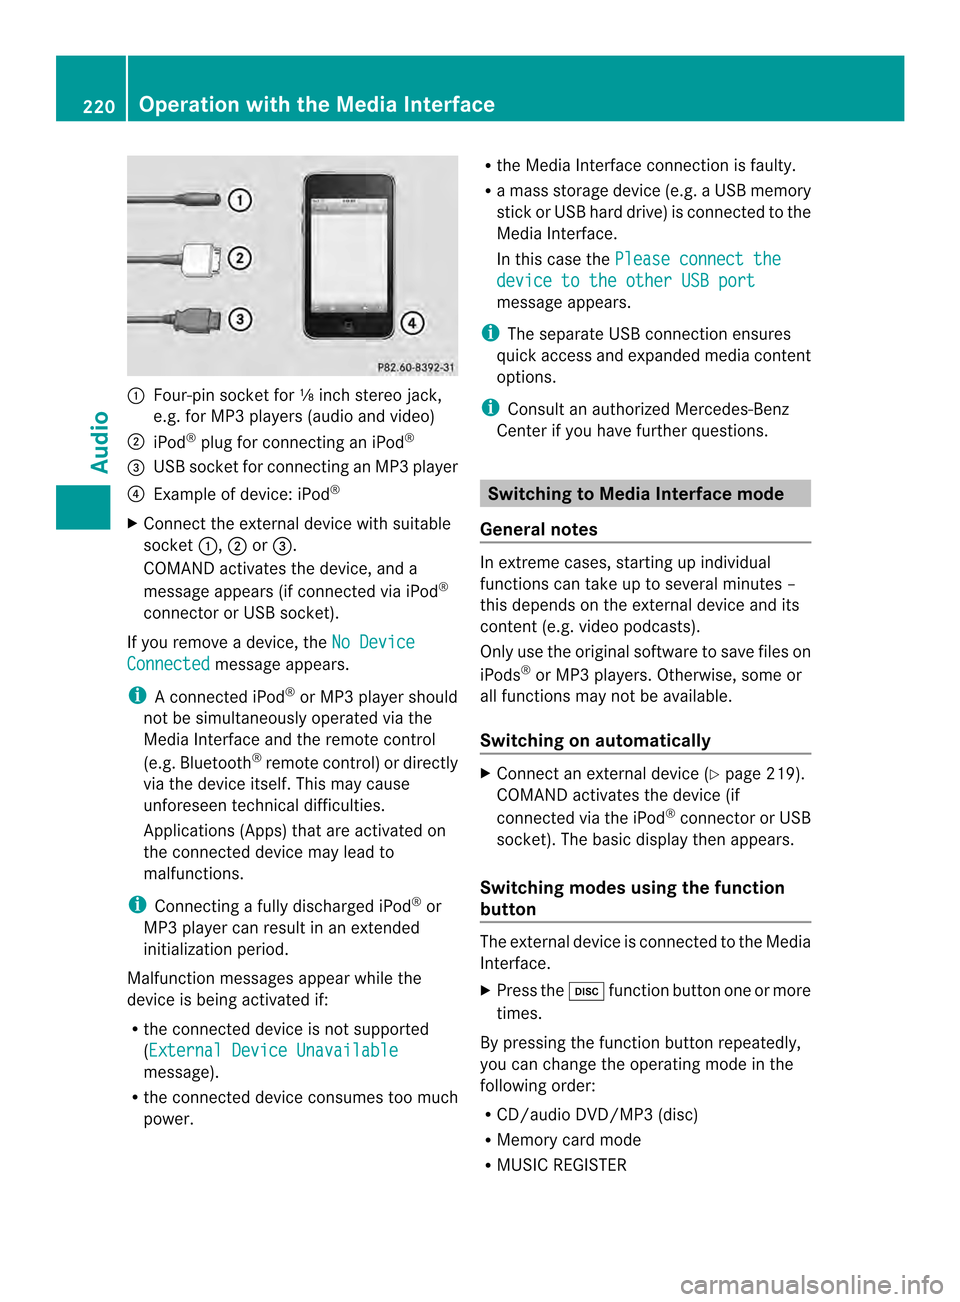
0001
Four-pin socket for ⅛ inch stereo jack,
e.g. for MP3 players (audio and video)
0002 iPod ®
plug for connecting an iPod ®
0014 USB socket for connecting an MP3 player
0013 Example of device: iPod ®
X Connect the external device with suitable
socket 0001,0002or0014.
COMAND activates the device, and a
message appears (i fconnected via iPod ®
connector or USB socket).
If you remove a device, the No DeviceConnected message appears.
i A connected iPod ®
or MP3 players hould
not be simultaneously operated via the
Media Interface and the remote control
(e.g. Bluetooth ®
remote control) or directly
via the device itself. This may cause
unforeseen technical difficulties.
Applications (Apps) that are activated on
the connected device may lead to
malfunctions.
i Connecting a fully discharged iPod ®
or
MP3 player can result in an extended
initialization period.
Malfunction messages appearw hile the
device is being activated if:
R the connected device is not supported
(External Device Unavailable message).
R the connected device consumes too much
power. R
the Media Interface connection is faulty.
R a mass storage device (e.g. a USB memory
stick or USB hard drive) is connected to the
Media Interface.
In this case the Please connect the device to the other USB port
message appears.
i The separate USB connection ensures
quick access and expanded media content
options.
i Consult an authorized Mercedes-Benz
Center if you have further questions. Switching to Media Interface mode
General notes In extreme cases, starting up individual
functions can take up to several minutes –
this depends on the external device and its
content (e.g. video podcasts).
Only use the original software to save files on
iPods
®
or MP3 players. Otherwise, some or
all functions may not be available.
Switching on automatically X
Connect an external device (Y page 219).
COMAND activates the device (if
connected via the iPod ®
connector or USB
socket). The basic display then appears.
Switching modes using the function
button The external device is connected to the Media
Interface.
X
Press the 0007function button one or more
times.
By pressing the function button repeatedly,
you can change the operating mode in the
following order:
R CD/audio DVD/MP3 (disc)
R Memory card mode
R MUSIC REGISTER 220
Operation with the Media InterfaceAudio
Page 223 of 274

R
USB storage device
R Media Interface or audio AUX mode
R Bluetooth ®
audio mode
Switching on using anumber key X
Press the 001Dnumber key (for a DVD
changer) or the 002Dnumber key (for a
single DVD drive).
This selects the connected external audio
device directly.
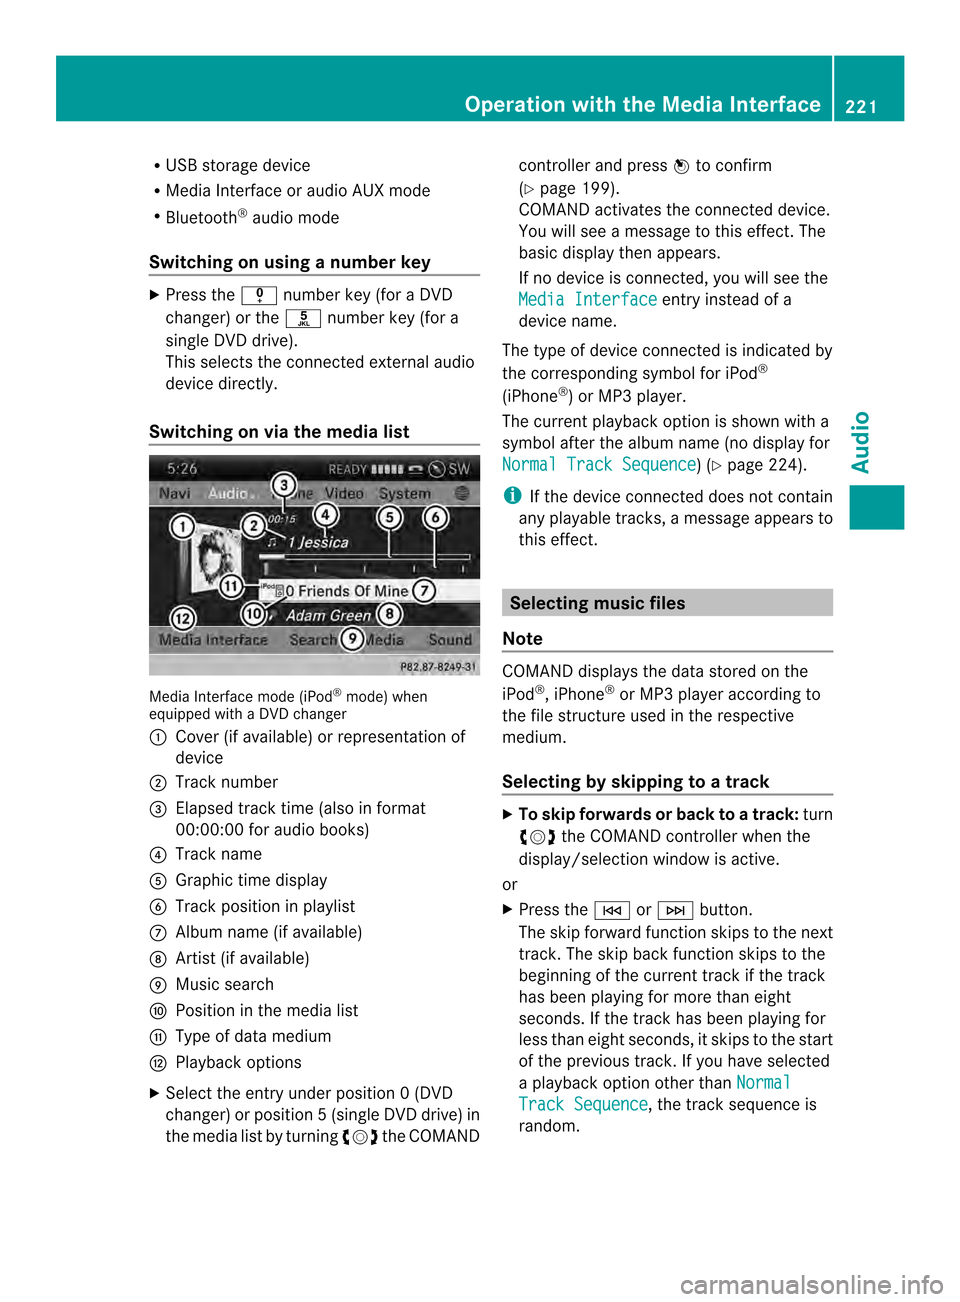
Switching on via the media list Media Interface mode (iPod
®
mode) when
equipped with a DVD changer
0001 Cove r(if available) or representation of
device
0002 Track number
0014 Elapsed track time (also in format
00:00:00 for audio books)
0013 Track name
0011 Graphic time display
0012 Trac kposition in playlist
0005 Album name (if available)
0006 Artist (if available)
0007 Music search
0008 Position in the media list
0009 Type of data medium
000B Playback options
X Select the entry under position 0 (DVD
changer) or position 5(single DVD drive) in
the media list by turning 003C0012003Dthe COMAND controller and press
0037to confirm
(Y page 199).
COMAND activates the connected device.
You will see a message to this effect. The
basic display then appears.
If no device is connected, you will see the
Media Interface entry instead of a
device name.
The type of device connected is indicated by
the corresponding symbol for iPod ®
(iPhone ®
) or MP3 player.
The current playback option is shown with a
symbol after the albumn ame (no display for
Normal Track Sequence ) (Y
page 224).
i If the device connected does not contain
any playable tracks, a message appears to
this effect. Selecting music files
Note COMAND displays the data stored on the
iPod
®
, iPhone ®
or MP3 player according to
the file structure used in the respective
medium.
Selecting by skipping to atrack X
To skip forwards or back to a track: turn
003C0012003D the COMAND controller when the
display/selectio nwindow is active.
or
X Press the 0001or0002 button.
The skip forward function skips to the next
track. The skip back function skips to the
beginning of the current track if the track
has been playing for more than eight
seconds .Ifthe track has been playing for
less than eight seconds, it skips to the start
of the previous track.Ify ou have selected
a playback option other than Normal Track Sequence , the track sequence is
random. Operation with the Media Interface
221Audio Z
Page 227 of 274

All the tracks on the mediu
mare played in
random order.
R Random Tracks The tracks in the currently active category
or folder, including any subfolders, are
played in random order.
i If the connected iPod ®
/iPhone ®
is not
functioning or paused, the playback
options are inactive. The display of options
is grayed out. MP3 player instructions
General information Up to 30,000 tracks per medium are
supported.
You can speed up some functions and
improve the search results by:
R
making sure the names of tracks, albums
and artists, for example, are written the
same way
R labeling albums featuring various artists as
"compilations"
i Multiple entries of tracks in playlists are
filtered out for some players.
Data formats MP3 and WMA are supported as data formats
with fixed and variable bit rates (up to
320 kbits/s).
Special considerations when using MP3
players Up to eigh
tdirectory levels with up to 1,000
tracks per directory are supported.
Do not use USB extension leads or adapters.
They can impair functionality.
i DRM (Digital Rights Management)
protected files are not supported by the
Media Interface. Audio AUX mode
Notes on audio AUX mode
External audio sources may have different
volumes, which can mean that system
messages such as traffic announcements and
navigation system announcements are much
louder. If necessary, deactivate the system
messages or adjust their volume manually.
You can connect an external audio source
(AUX) to COMAND. You will find the socket in
the center console stowage compartment.
If COMAND is equipped with the Media
Interface, external audio sources are
connected using the cable set provided. An
AUX socket is not provided. The connections
for the Media Interface are located in the
stowage compartmen tinthe center console.
i You will find further information online at
http://www.mbusa-mobile.com.Orc all
the Mercedes-Ben zCustome rAssistance
Center at
1-800-FOR-MERCedes(1-800-367-6372)
(for the USA) or Customer Relations at
1-800-387-0100 (for Canada). Activating audio AUX mode
Switching modes using the function
button The external device is connected to the audio
AUX in.
X
Press the 0007function button one or more
times.
By pressing the function button repeatedly,
you can change the operating mode in the
following order:
R CD/audio DVD/MP3 (disc)
R Memory card mode
R MUSIC REGISTER
R USB storage device
R Media Interface or audio AUX mode
R Bluetooth ®
audio mode Audio AUX mode
225Audio Z
Page 232 of 274

Switching modes using the function
button
X
Press the 0007function button.
COMAND switches to the previous disc
operating mode.
By pressing the function button repeatedly,
you can change the operating mode in the
following order:
R Video DVD/CD/audio DVD/MP3 in the
DVD changer or DVD single drive (disc
mode)
R Memory card mode
R MUSIC REGISTER
R USB storage device
R Media Interface or audio AUX mode
R Bluetooth ®
audio mode
X DVD changer: selectMedia by sliding
00120008 and turning 003C0012003Dthe COMAND
controller and press 0037to confirm.
Single DVD drive: selectMedia by sliding
00120008 and turning 003C0012003Dthe COMAND
controller and press 0037to confirm.
X Select a ývideo DVD from the media list
(Y page 232).
Switching on with the video menu X
Select Video in the main function bar by
sliding 00360012and turning 003C0012003Dthe COMAND
controller and press 0037to confirm.
Video DVD mode is switched on. Showing/hiding the control menu
X To show: in DVD video mode, slide 003600120008
the COMAND controller.
X To hide: slide003600120008 the COMAND
controller.
or
X Wait for approximately eight seconds. Control menu displayed
0001
Type of data medium
0002 Current title
0014 Current scene
0013 Track time
0011 Shows the menu
i This function is not available while the
DVD's own menu is being displayed. Showing/hiding the menu
X To show: in full-screen DVD video mode,
press 0037the COMAND controller.
or
X Select Menu while the control menu is
shown and press 0037to confirm.
X To hide: slide00360012the COMAND controller
and confirm Full Screen by pressing
0037. Menu shown
0001
Video DVD options
0002 Pause function
0014 Stop function 230
Video DVD modeVideo
Page 271 of 274

Displaying stor
mcharacteristics
Conditions: theStorm Characteristics layer is active (Y
page 267) and weather data
is available.
In the example, the weather map shows a
hailstorm and tornadic storms with the path
and directional movement speed.
The storms legend can be called up
(Y page 271). Example: weather map with information on a
cyclone
X Slide 003400120035, 003600120008or00320012003B the COMAND
controller and move the crosshair onto a
corresponding symbol.
X Press 0037the COMAND controller.
The following information is shown (if
available):
R characteristics of the storm cell
R date and time of observation (time stamp)
R directional movement speed and path
i The directional movement speed is the
speed at which the storm cell moves. Example: weather map showing weather fronts
Conditions:
theAtmospheric Pressure layer is switched on (Y
page 267) and weather
data is available.
The example shows the position of high and
low-pressure areas (H, L), weather fronts and
isobars.
i Isobars are lines that show where the air
pressure is the same. Legend: weather fronts
0001
Cold front (blue line with blue triangles)
0002 Warm front (red line with red semi-circles)
0014 Stationary front (red-blue line with red
semi-circles and blue triangles)
0013 Occlusion (violet line with a violet semi-
circle and triangles) Weather map
269SIRIUS Weather