2014 MERCEDES-BENZ C-CLASS ESTATE check engine
[x] Cancel search: check enginePage 252 of 489
R
if there is a sudden change in temperature,
e.g. when driving into a heated garage in
winter
R if the camera lens is dirty or obstructed.
Observe the notes on cleaning
(Y page 405)
R if the rear of your vehicle is damaged. In this
case, have the camera position and setting checked at a qualified specialist workshop.
The field of vision and other functions of the
reversing camera may be restricted due to
additional accessories on the rear of the vehi-
cle (e.g. licence plate holder, bicycle rack).
i The reversing camera is protected from
raindrops and dust by means of a flap.
When the reversing camera is activated,
this flap opens.
The flap closes again when:
R you have finished the manoeuvring proc-
ess
R you switch off the engine
R you open the luggage compartment
Observe the notes on cleaning
(Y page 405).
For technical reasons, the flap may remain
open briefly after the reversing camera has been deactivated.
Activating/deactivating the reversing
camera X
To activate: make sure that the key is in
position 2in the ignition lock.
X Make sure that the Activation by R Activation by R
gear
gear function is selected in Audio 20/
COMAND Online; see the Digital Owner's
Manual.
X Engage reverse gear.
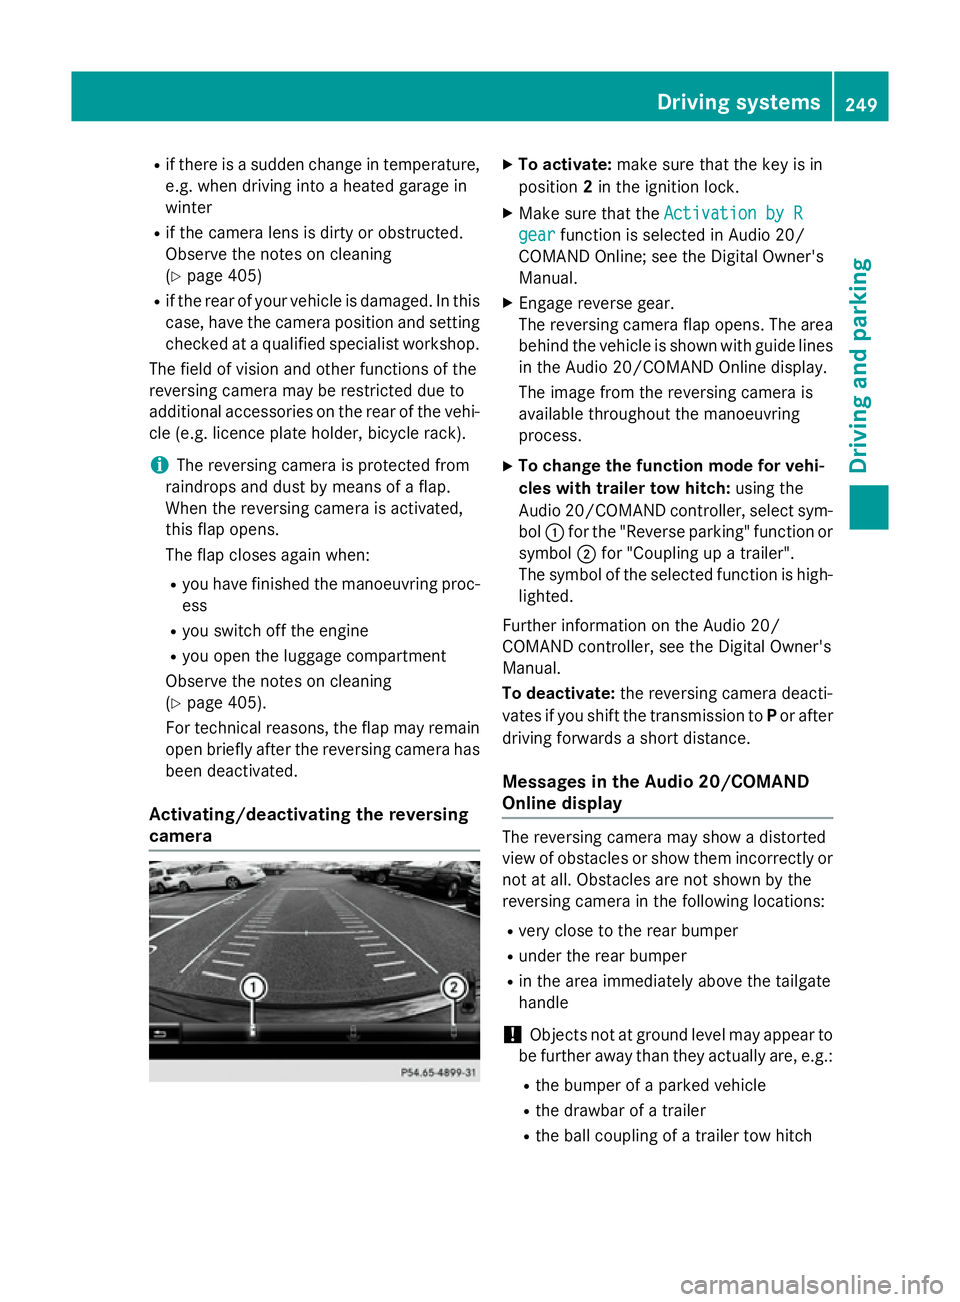
The reversing camera flap opens. The area
behind the vehicle is shown with guide lines
in the Audio 20/COMAND Online display.
The image from the reversing camera is
available throughout the manoeuvring
process.
X To change the function mode for vehi-
cles with trailer tow hitch: using the
Audio 20/COMAND controller, select sym-
bol :for the "Reverse parking" function or
symbol ;for "Coupling up a trailer".
The symbol of the selected function is high-
lighted.
Further information on the Audio 20/
COMAND controller, see the Digital Owner's
Manual.
To deactivate: the reversing camera deacti-
vates if you shift the transmission to Por after
driving forwards a short distance.
Messages in the Audio 20/COMAND
Online display The reversing camera may show a distorted
view of obstacles or show them incorrectly or
not at all. Obstacles are not shown by the
reversing camera in the following locations:
R very close to the rear bumper
R under the rear bumper
R in the area immediately above the tailgate
handle
! Objects not at ground level may appear to
be further away than they actually are, e.g.:
R the bumper of a parked vehicle
R the drawbar of a trailer
R the ball coupling of a trailer tow hitch Driving systems
249Driving and parking Z
Page 267 of 489
the case if there are vehicles at the edge of
their lane nearest your vehicle.
Due to the nature of the system:
R warnings may be issued in error when driv-
ing close to crash barriers or similar solid
lane borders
R warnings may be interrupted when driving
alongside long vehicles, for example lor-
ries, for a prolonged time
The two radar sensors for Blind Spot Assist
are integrated into the sides of the rear
bumper. Make sure that the bumper is free of dirt, ice or slush in the vicinity of the sensors.
The sensors must not be covered, for exam-
ple by cycle racks or overhanging loads. Fol-
lowing a severe impact or in the event of dam- age to the bumpers, have the function of the
sensors checked at a qualified specialist
workshop. Blind Spot Assist may otherwise
not work properly.
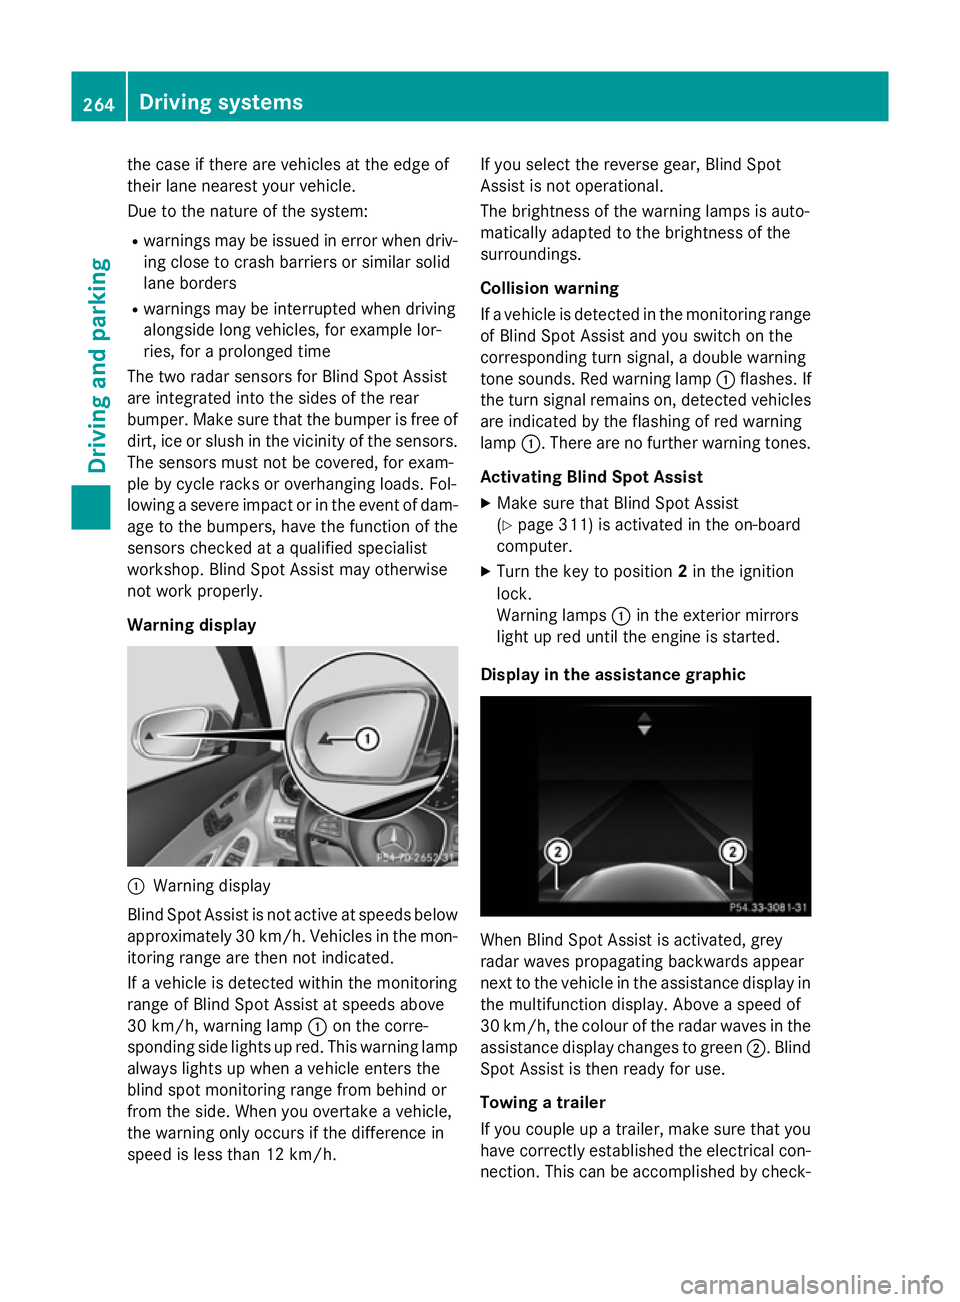
Warning display :
Warning display
Blind Spot Assist is not active at speeds below approximately 30 km/h. Vehicles in the mon-itoring range are then not indicated.
If a vehicle is detected within the monitoring
range of Blind Spot Assist at speeds above
30 km/h, warning lamp :on the corre-
sponding side lights up red. This warning lamp
always lights up when a vehicle enters the
blind spot monitoring range from behind or
from the side. When you overtake a vehicle,
the warning only occurs if the difference in
speed is less than 12 km/h. If you select the reverse gear, Blind Spot
Assist is not operational.
The brightness of the warning lamps is auto-
matically adapted to the brightness of the
surroundings.
Collision warning
If a vehicle is detected in the monitoring range
of Blind Spot Assist and you switch on the
corresponding turn signal, a double warning
tone sounds. Red warning lamp :flashes. If
the turn signal remains on, detected vehicles
are indicated by the flashing of red warning
lamp :. There are no further warning tones.
Activating Blind Spot Assist X Make sure that Blind Spot Assist
(Y page 311) is activated in the on-board
computer.
X Turn the key to position 2in the ignition
lock.
Warning lamps :in the exterior mirrors
light up red until the engine is started.
Display in the assistance graphic When Blind Spot Assist is activated, grey
radar waves propagating backwards appear
next to the vehicle in the assistance display in
the multifunction display. Above a speed of
30 km/h, the colour of the radar waves in the
assistance display changes to green ;. Blind
Spot Assist is then ready for use.
Towing a trailer
If you couple up a trailer, make sure that you
have correctly established the electrical con- nection. This can be accomplished by check- 264
Driving systemsDriving an
d parking
Page 275 of 489
Activating Active Lane Keeping Assist
X
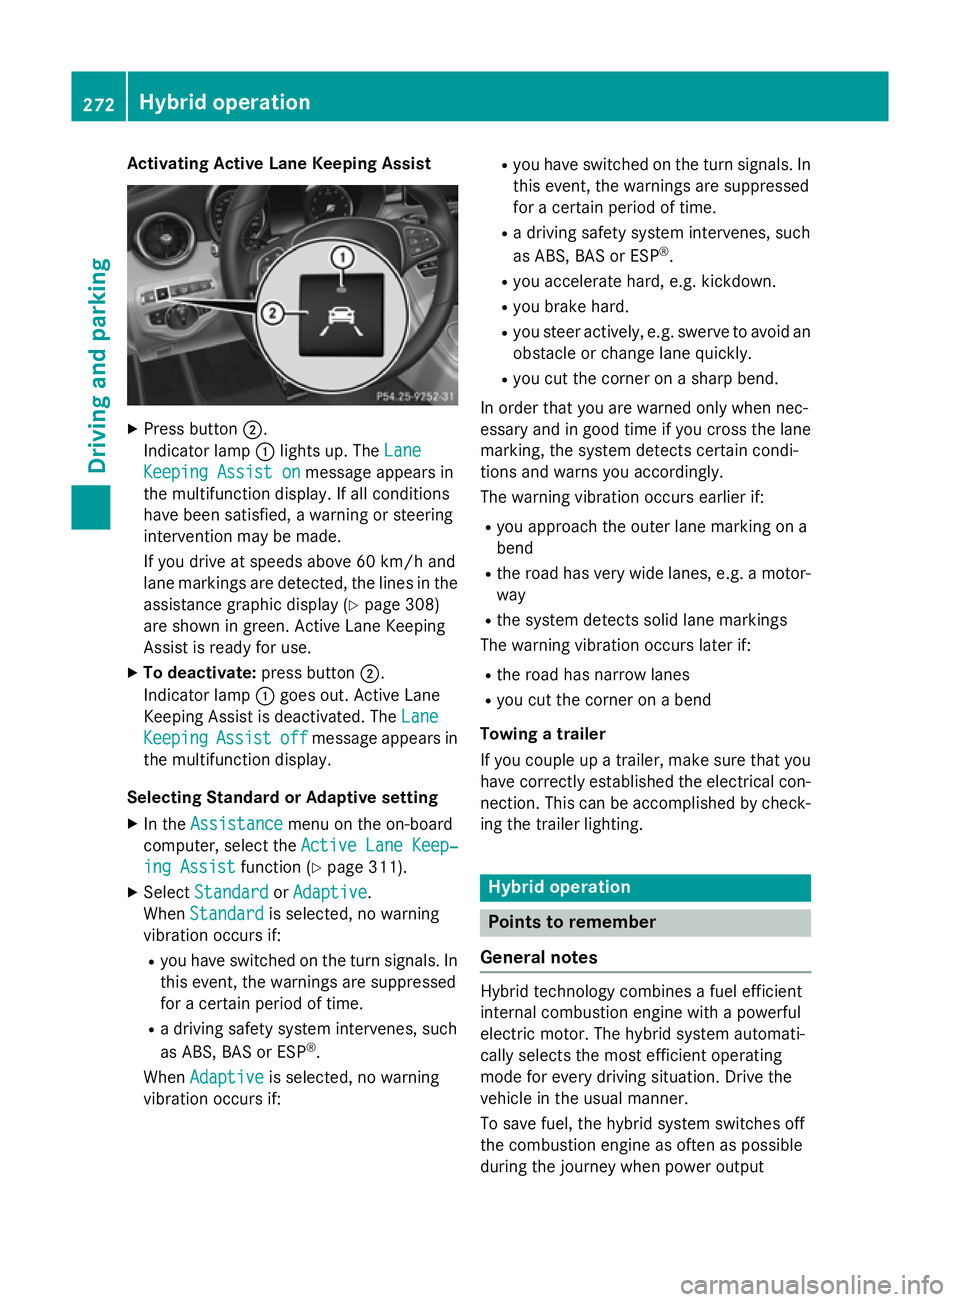
Press button ;.
Indicator lamp :lights up. The Lane
Lane
Keeping Assist on
Keeping Assist on message appears in
the multifunction display. If all conditions
have been satisfied, a warning or steering
intervention may be made.
If you drive at speeds above 60 km/h and
lane markings are detected, the lines in the assistance graphic display (Y page 308)
are shown in green. Active Lane Keeping
Assist is ready for use.
X To deactivate: press button;.
Indicator lamp :goes out. Active Lane
Keeping Assist is deactivated. The Lane Lane
Keeping
Keeping Assist
Assistoff
offmessage appears in
the multifunction display.
Selecting Standard or Adaptive setting X In the Assistance
Assistance menu on the on-board
computer, select the Active Lane Keep‐
Active Lane Keep‐
ing Assist
ing Assist function (Ypage 311).
X Select Standard
Standard orAdaptive
Adaptive.
When Standard
Standard is selected, no warning
vibration occurs if:
R you have switched on the turn signals. In
this event, the warnings are suppressed
for a certain period of time.
R a driving safety system intervenes, such
as ABS, BAS or ESP ®
.
When Adaptive
Adaptive is selected, no warning
vibration occurs if: R
you have switched on the turn signals. In
this event, the warnings are suppressed
for a certain period of time.
R a driving safety system intervenes, such
as ABS, BAS or ESP ®
.
R you accelerate hard, e.g. kickdown.
R you brake hard.
R you steer actively, e.g. swerve to avoid an
obstacle or change lane quickly.
R you cut the corner on a sharp bend.
In order that you are warned only when nec-
essary and in good time if you cross the lane marking, the system detects certain condi-
tions and warns you accordingly.
The warning vibration occurs earlier if:
R you approach the outer lane marking on a
bend
R the road has very wide lanes, e.g. a motor-
way
R the system detects solid lane markings
The warning vibration occurs later if:
R the road has narrow lanes
R you cut the corner on a bend
Towing a trailer
If you couple up a trailer, make sure that you have correctly established the electrical con- nection. This can be accomplished by check-
ing the trailer lighting. Hybrid operation
Points to remember
General notes Hybrid technology combines a fuel efficient
internal combustion engine with a powerful
electric motor. The hybrid system automati-
cally selects the most efficient operating
mode for every driving situation. Drive the
vehicle in the usual manner.
To save fuel, the hybrid system switches off
the combustion engine as often as possible
during the journey when power output 272
Hybrid operationDriving and pa
rking
Page 290 of 489
The vehicle/trailer combination:
R is heavier
R is restricted in its acceleration and gradi-
ent-climbing capability
R has an increased braking distance
R is affected more by strong crosswinds
R demands more sensitive steering
R has a larger turning circle
This can impair the vehicle's handling char-
acteristics. Adapt your driving style accord-
ingly. Maintain a safe distance. Drive care-
fully.
When towing a trailer, always adjust your
speed to the current road and weather con-
ditions. Do not exceed the maximum permis-
sible speed for your vehicle/trailer combina-
tion. Notes on towing a trailer
General notes When towing a trailer, set the tyre pressure on
the rear axle of the towing vehicle for a max-
imum load; see the tyre pressure table in the
fuel filler flap (Y page 436).
On vehicles without level control, the height
of the ball coupling will alter according to the load placed on the vehicle. If necessary, use a
trailer with a height-adjustable drawbar.
You will find fitting dimensions and loads
under "Technical data" (Y page 478).
When towing a trailer, the ECO start/stop
function is deactivated. The èECO sym-
bol appears yellow in the multifunction dis-
play. For further information on the ECO
start/stop function; see (Y page 190).
Driving tips Observe the notes on ESP
®
trailer stabilisa-
tion (Y page 83).
The maximum permissible speed for vehicle/ trailer combinations depends on the type of
trailer. Before beginning the journey, check the trailer's documents to see what the max-
imum permitted speed is. Observe the legally
prescribed maximum speed in the relevant
country.
For certain Mercedes-Benz vehicles, the max-
imum permissible rear axle load is increased
when towing a trailer. See the "Technical
data" section to find out whether this applies
to your vehicle (Y page 480). If you utilise any
of the added maximum rear axle load when
towing a trailer, the vehicle/trailer combina-
tion may not exceed a maximum speed of
100 km/h for reasons concerning the oper-
ating permit. This also applies in countries in
which the permissible maximum speed for
vehicle/trailer combinations is above
100 km/h.
When towing a trailer, your vehicle's handling
characteristics will be different in comparison to when driving without a trailer and it will
consume more fuel.
Change into a lower gear in good time on long
and steep downhill gradients.
This also applies if cruise control, DISTRONIC
PLUS or SPEEDTRONIC are activated.
This will use the braking effect of the engine,
so less braking will be required to maintain
vehicle speed. This relieves the load on the
brake system and prevents the brakes from
overheating and wearing too quickly. If you
need additional braking, depress the brake
pedal repeatedly rather than continuously.
Driving tips If the trailer swings from side to side:
X Do not accelerate.
X Do not countersteer.
X Brake if necessary.
R Maintain a greater distance to the vehicle in
front than when driving without a trailer.
R Avoid braking abruptly. If possible, brake
gently at first to allow the trailer to run on. Then, increase the braking force rapidly.
R The values given for gradient-climbing
capabilities from a standstill refer to sea Towing a trailer
287Driving and parking Z
Page 291 of 489
level. When driving in mountainous areas,
note that the power output of the engine,
and consequently the vehicle's gradient-
climbing capability, decrease with increas-
ing altitude. Folding out the ball coupling
G
WARNING
If the ball coupling is not correctly engaged,
the trailer can detach. There is a risk of an
accident.
Always engage the ball coupling as described. G
WARNING
If you release the ball coupling or it does not
engage correctly when folding in, it will swing out. Within pivoting range of the ball coupling,
there is an increased risk of an accident and
injury.
Only release the ball coupling if the pivoting
range is unobstructed. Always make sure that the ball coupling engages when folding in.
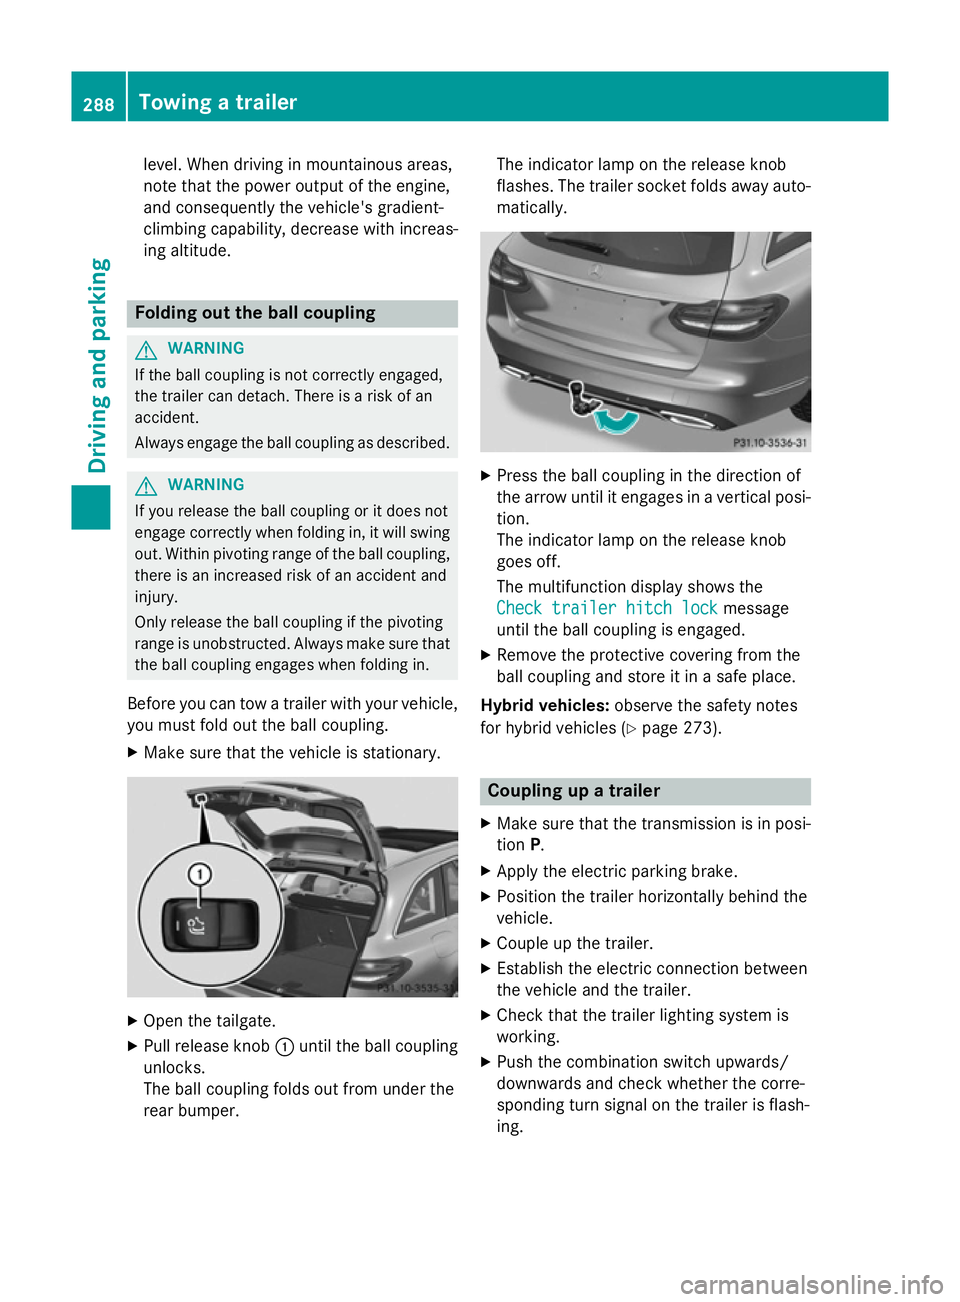
Before you can tow a trailer with your vehicle, you must fold out the ball coupling.
X Make sure that the vehicle is stationary. X
Open the tailgate.
X Pull release knob :until the ball coupling
unlocks.
The ball coupling folds out from under the
rear bumper. The indicator lamp on the release knob
flashes. The trailer socket folds away auto- matically. X
Press the ball coupling in the direction of
the arrow until it engages in a vertical posi-
tion.
The indicator lamp on the release knob
goes off.
The multifunction display shows the
Check trailer hitch lock Check trailer hitch lock message
until the ball coupling is engaged.
X Remove the protective covering from the
ball coupling and store it in a safe place.
Hybrid vehicles: observe the safety notes
for hybrid vehicles (Y page 273). Coupling up a trailer
X Make sure that the transmission is in posi-
tion P.
X Apply the electric parking brake.
X Position the trailer horizontally behind the
vehicle.
X Couple up the trailer.
X Establish the electric connection between
the vehicle and the trailer.
X Check that the trailer lighting system is
working.
X Push the combination switch upwards/
downwards and check whether the corre-
sponding turn signal on the trailer is flash-
ing. 288
Towing a trailerDriving and parking
Page 327 of 489
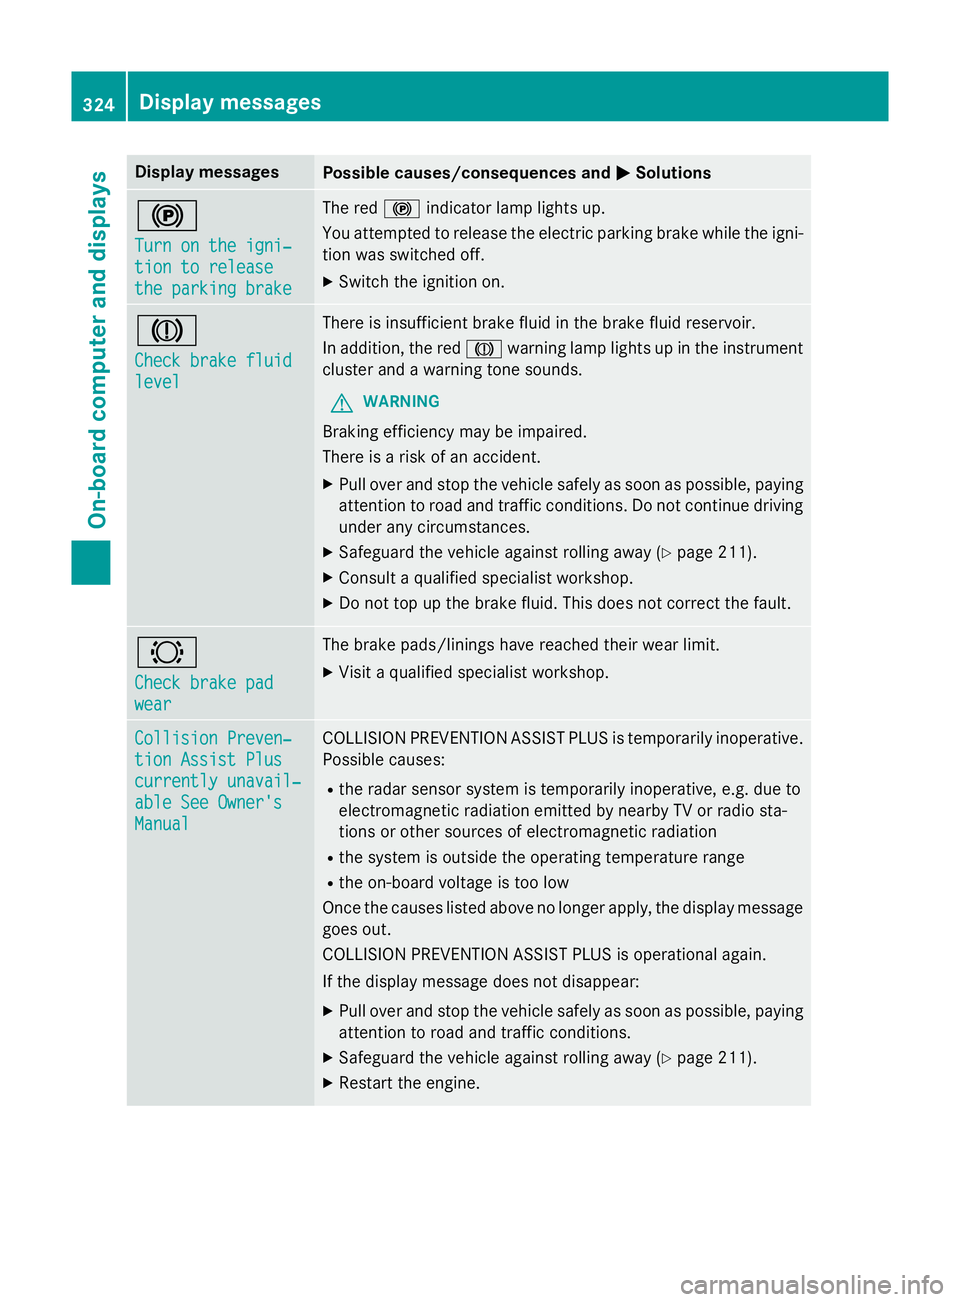
Display messages
Possible causes/consequences and
M
MSolutions !
Turn on the igni‐ Turn on the igni‐
tion to release tion to release
the parking brake the parking brake The red
!indicator lamp lights up.
You attempted to release the electric parking brake while the igni-
tion was switched off.
X Switch the ignition on. J
Check brake fluid Check brake fluid
level level There is insufficient brake fluid in the brake fluid reservoir.
In addition, the red Jwarning lamp lights up in the instrument
cluster and a warning tone sounds.
G WARNING
Braking efficiency may be impaired.
There is a risk of an accident. X Pull over and stop the vehicle safely as soon as possible, paying
attention to road and traffic conditions. Do not continue driving
under any circumstances.
X Safeguard the vehicle against rolling away (Y page 211).
X Consult a qualified specialist workshop.
X Do not top up the brake fluid. This does not correct the fault. #
Check brake pad Check brake pad
wear wear The brake pads/linings have reached their wear limit.
X Visit a qualified specialist workshop. Collision Preven‐
Collision Preven‐
tion Assist Plus tion Assist Plus
currently unavail‐ currently unavail‐
able See Owner's able See Owner's
Manual Manual COLLISION PREVENTION ASSIST PLUS is temporarily inoperative.
Possible causes:
R the radar sensor system is temporarily inoperative, e.g. due to
electromagnetic radiation emitted by nearby TV or radio sta-
tions or other sources of electromagnetic radiation
R the system is outside the operating temperature range
R the on-board voltage is too low
Once the causes listed above no longer apply, the display message goes out.
COLLISION PREVENTION ASSIST PLUS is operational again.
If the display message does not disappear:
X Pull over and stop the vehicle safely as soon as possible, paying
attention to road and traffic conditions.
X Safeguard the vehicle against rolling away (Y page 211).
X Restart the engine. 324
Display
messagesOn-board computer and displays
Page 338 of 489
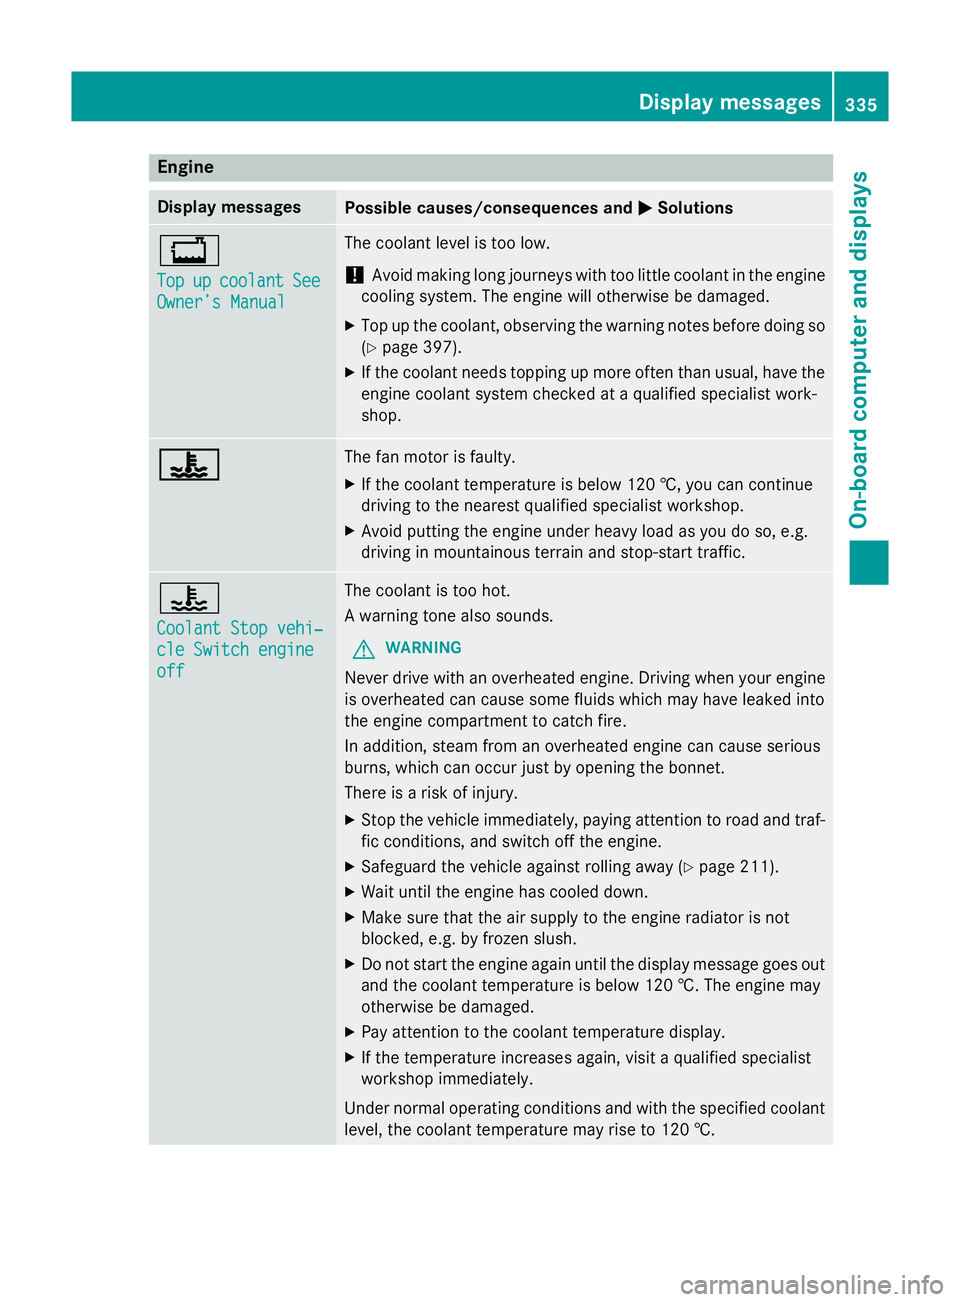
Engine
Display messages
Possible causes/consequences and
M
MSolutions +
Top Top
up
upcoolant
coolant See
See
Owner’s Manual
Owner’s Manual The coolant level is too low.
! Avoid making long journeys with too little coolant in the engine
cooling system. The engine will otherwise be damaged.
X Top up the coolant, observing the warning notes before doing so
(Y page 397).
X If the coolant needs topping up more often than usual, have the
engine coolant system checked at a qualified specialist work-
shop. ? ? The fan motor is faulty.
X If the coolant temperature is below 120 †, you can continue
driving to the nearest qualified specialist workshop.
X Avoid putting the engine under heavy load as you do so, e.g.
driving in mountainous terrain and stop-start traffic. ?
Coolant Stop vehi‐ Coolant Stop vehi‐
cle Switch engine cle Switch engine
off off The coolant is too hot.
A warning tone also sounds.
G WARNING
Never drive with an overheated engine. Driving when your engine is overheated can cause some fluids which may have leaked into
the engine compartment to catch fire.
In addition, steam from an overheated engine can cause serious
burns, which can occur just by opening the bonnet.
There is a risk of injury.
X Stop the vehicle immediately, paying attention to road and traf-
fic conditions, and switch off the engine.
X Safeguard the vehicle against rolling away (Y page 211).
X Wait until the engine has cooled down.
X Make sure that the air supply to the engine radiator is not
blocked, e.g. by frozen slush.
X Do not start the engine again until the display message goes out
and the coolant temperature is below 120 †. The engine may
otherwise be damaged.
X Pay attention to the coolant temperature display.
X If the temperature increases again, visit a qualified specialist
workshop immediately.
Under normal operating conditions and with the specified coolant level, the coolant temperature may rise to 120 †. Display messages
335On-board computer and displays Z
Page 340 of 489
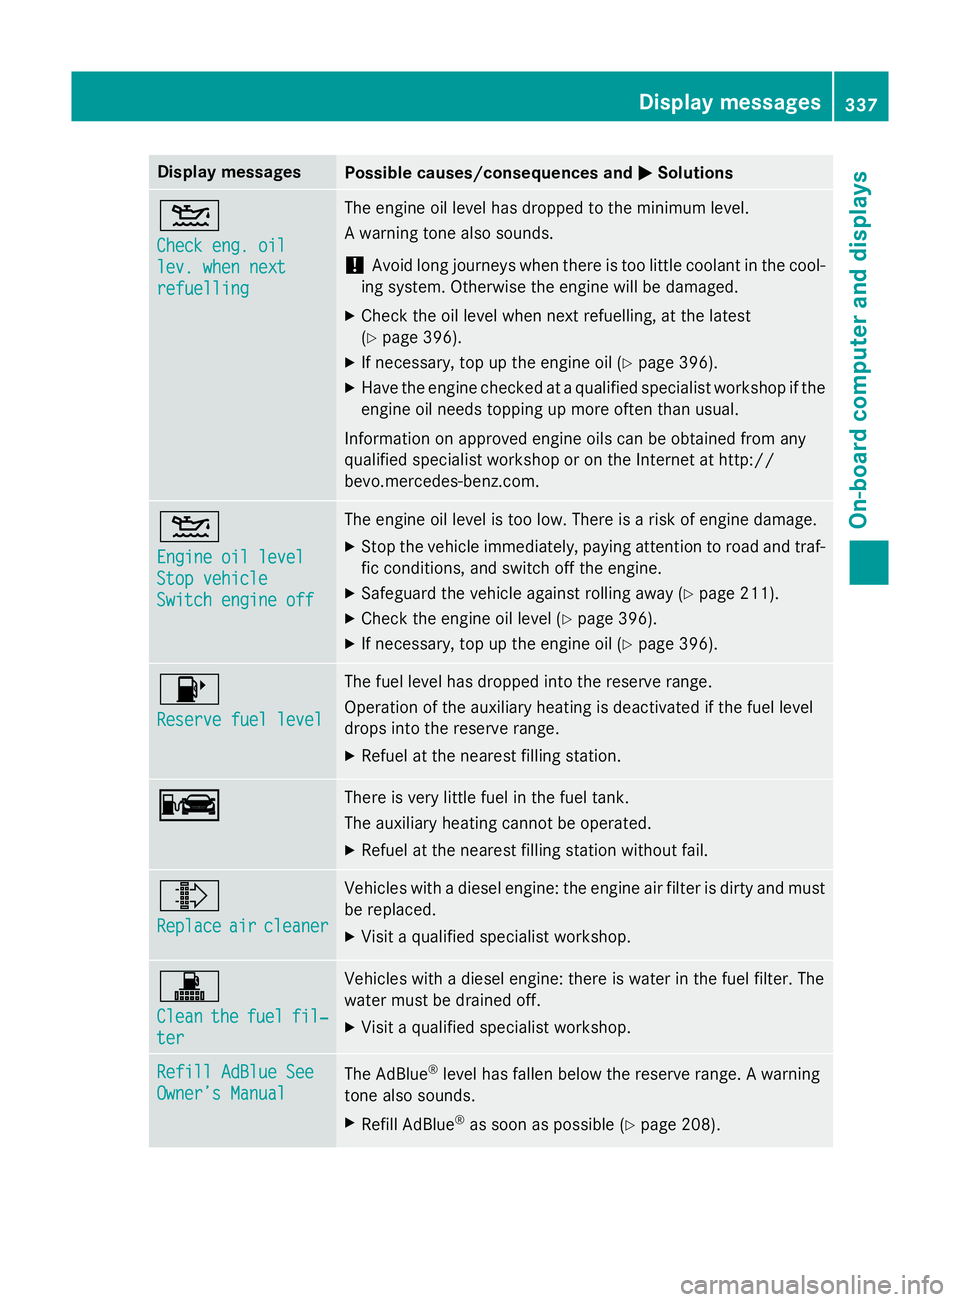
Display messages
Possible causes/consequences and
M
MSolutions 4
Check eng. oil Check eng. oil
lev. when next lev. when next
refuelling refuelling The engine oil level has dropped to the minimum level.
A warning tone also sounds.
! Avoid long journeys when there is too little coolant in the cool-
ing system. Otherwise the engine will be damaged.
X Check the oil level when next refuelling, at the latest
(Y page 396).
X If necessary, top up the engine oil (Y page 396).
X Have the engine checked at a qualified specialist workshop if the
engine oil needs topping up more often than usual.
Information on approved engine oils can be obtained from any
qualified specialist workshop or on the Internet at http://
bevo.mercedes-benz.co m.4
Engine oil level Engine oil level
Stop vehicle Stop vehicle
Switch engine off Switch engine off The engine oil level is too low. There is a risk of engine damage.
X Stop the vehicle immediately, paying attention to road and traf-
fic conditions, and switch off the engine.
X Safeguard the vehicle against rolling away (Y page 211).
X Check the engine oil level (Y page 396).
X If necessary, top up the engine oil (Y page 396).8
Reserve fuel level Reserve fuel level The fuel level has dropped into the reserve range.
Operation of the auxiliary heating is deactivated if the fuel level
drops into the reserve range.
X Refuel at the nearest filling station. C C There is very little fuel in the fuel tank.
The auxiliary heating cannot be operated.
X Refuel at the nearest filling station without fail. ¸
Replace Replace
air
aircleaner
cleaner Vehicles with a diesel engine: the engine air filter is dirty and must
be replaced.
X Visit a qualified specialist workshop. !
Clean Clean
the
thefuel
fuel fil‐
fil‐
ter
ter Vehicles with a diesel engine: there is water in the fuel filter. The
water must be drained off.
X Visit a qualified specialist workshop. Refill AdBlue See Refill AdBlue See
Owner’s Manual Owner’s Manual
The AdBlue
®
level has fallen below the reserve range. A warning
tone also sounds.
X Refill AdBlue ®
as soon as possible (Y page 208). Display messages
337On-board computer and displays Z