2014 MERCEDES-BENZ C-CLASS ESTATE service
[x] Cancel search: servicePage 68 of 489
load in an accident. Have the child restraint
securing systems checked in a qualified spe-
cialist workshop before fitting a child restraint
system again.
The securing systems of child restraint sys-
tems are:
R the seat belt system
R the ISOFIX securing rings
R the Top Tether anchorages
If it is absolutely necessary to carry a child on the front-passenger seat, be sure to observe
the information on "Child restraint systems
on the front-passenger seat" (Y page 66).
Observe the warning labels in the vehicle inte-
rior and on the child restraint system.
i It is advisable to use Mercedes-Benz care
products to clean child restraint systems
recommended by Mercedes-Benz. You can obtain information about this at any
Mercedes-Benz Service Centre. ISOFIX child seat securing system
G
WARNING
ISOFIX child restraint systems do not offer
sufficient protective effect for children whose weight is greater than 22 kg who are securedusing the safety belt integrated in the child
restraint system. The child could, for example, not be restrained correctly in the event of an
accident. This poses an increased risk of
injury or even fatal injury.
If the child weighs more than 22 kg, only use
ISOFIX child restraint systems with which the child is also secured with the vehicle seat belt. Also secure the child restraint system with the
Top Tether belt, if available.
When fitting a child restraint system, be sure to observe the manufacturer's installation
instructions and the instructions for correct
use of the child restraint system
(Y page 68). Before every trip, make sure that the ISOFIX
child restraint system is engaged correctly in
both ISOFIX securing rings.
! When fitting the child restraint system,
make sure that the seat belt for the centre
seat does not get trapped. Otherwise, the
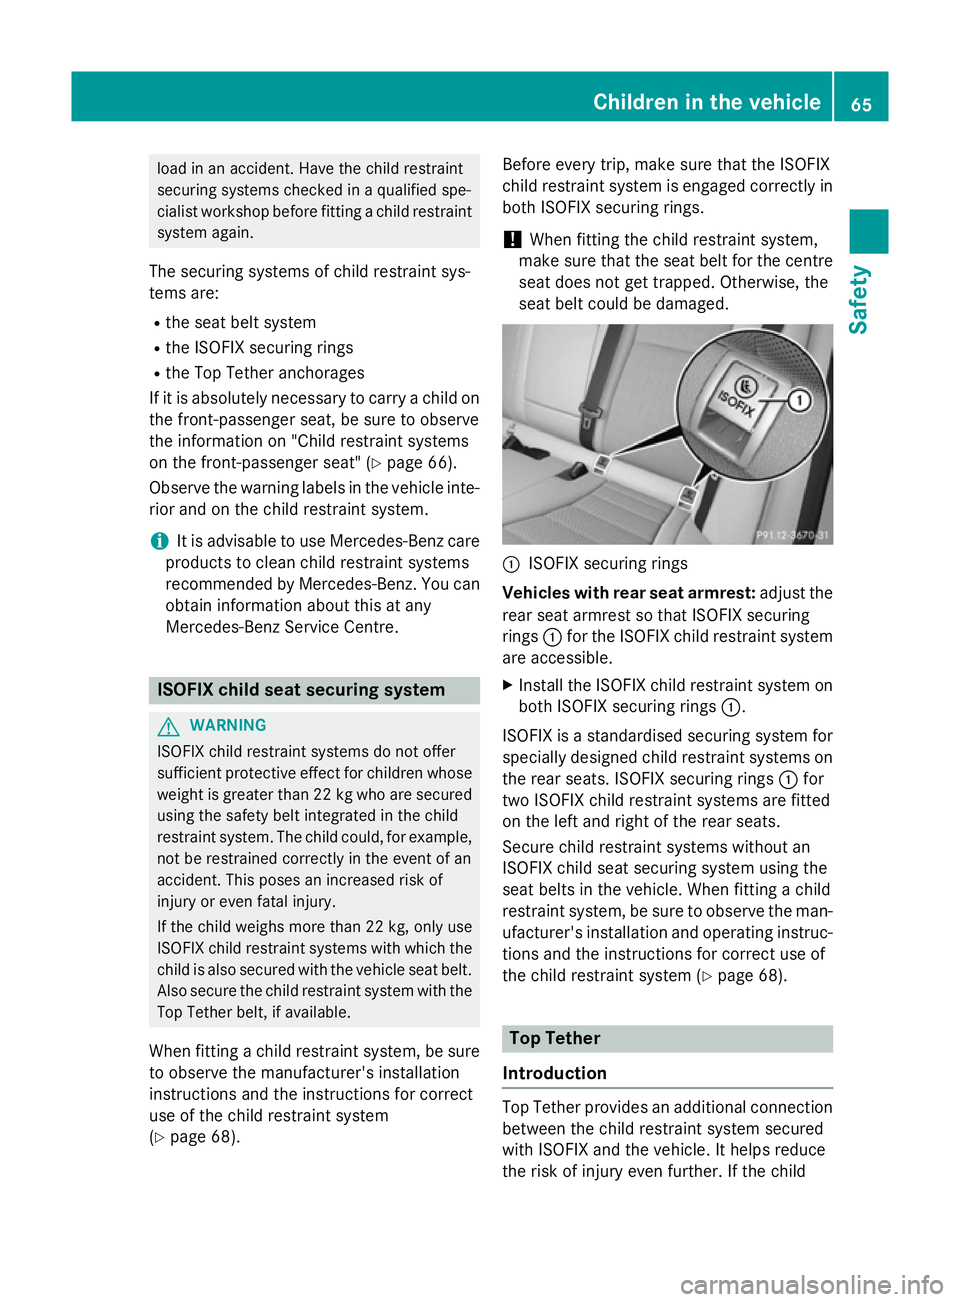
seat belt could be damaged. :
ISOFIX securing rings
Vehicles with rear seat armrest: adjust the
rear seat armrest so that ISOFIX securing
rings :for the ISOFIX child restraint system
are accessible.
X Install the ISOFIX child restraint system on
both ISOFIX securing rings :.
ISOFIX is a standardised securing system for specially designed child restraint systems on
the rear seats. ISOFIX securing rings :for
two ISOFIX child restraint systems are fitted
on the left and right of the rear seats.
Secure child restraint systems without an
ISOFIX child seat securing system using the
seat belts in the vehicle. When fitting a child
restraint system, be sure to observe the man-
ufacturer's installation and operating instruc-
tions and the instructions for correct use of
the child restraint system (Y page 68). Top Tether
Introduction Top Tether provides an additional connection
between the child restraint system secured
with ISOFIX and the vehicle. It helps reduce
the risk of injury even further. If the child Children in the vehicle
65Safety Z
Page 75 of 489
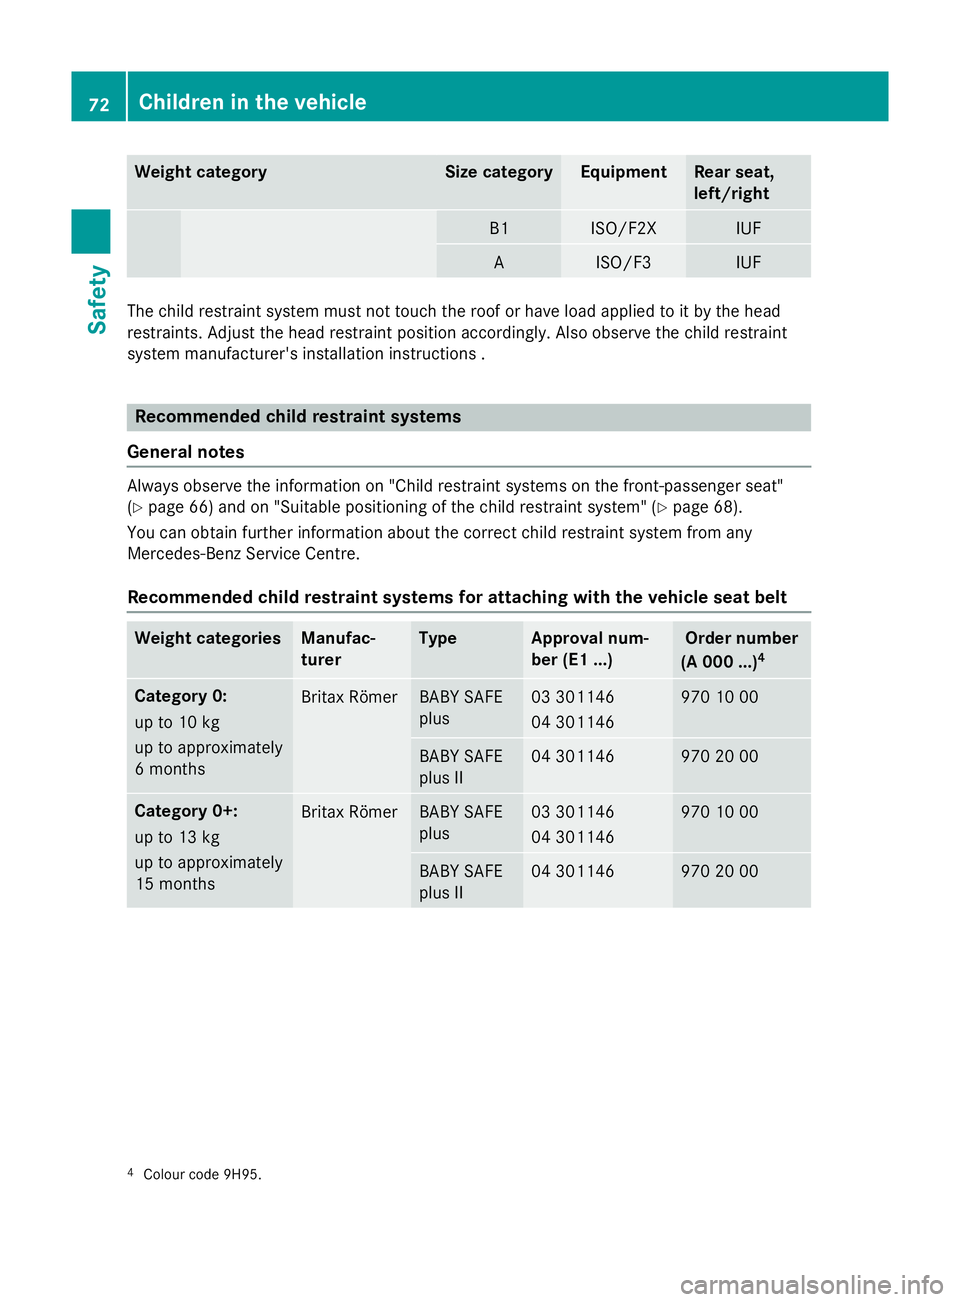
Weight category Size category Equipment Rear seat,
left/right
B1 ISO/F2X IUF
A ISO/F3 IUF
The child restraint system must not touch the roof or have load applied to it by the head
restraints. Adjust the head restraint position accordingly. Also observe the child restraint
system manufacturer's installation instructions . Recommended child restraint systems
General notes Always observe the information on "Child restraint systems on the front-passenger seat"
(Y
page 66) and on "Suitable positioning of the child restraint system" (Y page 68).
You can obtain further information about the correct child restraint system from any
Mercedes-Benz Service Centre.
Recommended child restraint systems for attaching with the vehicle seat belt Weight categories Manufac-
turer Type Approval num-
ber (E1 ...) Order number
(A 000 ...) 4 Category 0:
up to 10 kg
up to approximately
6 months
Britax Römer BABY SAFE
plus 03 301146
04 301146 970 10 00
BABY SAFE
plus II 04 301146 970 20 00
Category 0+:
up to 13 kg
up to approximately
15 months
Britax Römer BABY SAFE
plus 03 301146
04 301146 970 10 00
BABY SAFE
plus II 04 301146 970 20 00
4
Colour code 9H95. 72
Children in the vehicleSafety
Page 82 of 489
If COLLISION PREVENTION ASSIST PLUS
detects that there is a risk of a collision, you
will be warned visually and acoustically. If you do not react to the visual and audible collision
warning, autonomous braking can be initiated in critical situations. If you apply the brake
yourself in a critical situation, the COLLISION
PREVENTION ASSIST PLUS adaptive Brake
Assist assists you.
Important safety notes In particular, the detection of obstacles can
be impaired in the case of:
R dirt on the sensors or obscured sensors
R snow or heavy rain
R interference by other radar sources
R strong radar reflections, for example, in
multi-storey car parks
R a narrow vehicle travelling in front, e.g. a
motorcycle
R a vehicle travelling in front on a different
line
R new vehicles or after a service on the COL-
LISION PREVENTION ASSIST PLUS system
Please observe the information in the sec-
tion on running-in the vehicle
(Y page 184).
Following damage to the front end of the vehi- cle, have the configuration and operation of
the radar sensor checked at a qualified spe-
cialist workshop. This also applies to colli-
sions at slow speeds where there is no visible
damage to the front of the vehicle.
Distance warning function Important safety notes
i Observe the "Important safety notes" sec-
tion for driving safety systems (Y page 76).G
WARNING
The distance warning function does not react:
R to people or animals
R to oncoming vehicles R
to crossing traffic
R when cornering
Thus, the distance warning function cannot
provide a warning in all critical situations.
There is a risk of an accident.
Always pay careful attention to the traffic sit- uation and be ready to brake. G
WARNING
The distance warning function cannot always
clearly identify objects and complex traffic
situations.
In such cases, the distance warning function
may:
R give an unnecessary warning
R not give a warning
There is a risk of an accident.
Always pay careful attention to the traffic sit-
uation; do not rely on the distance warning
function alone.
Function X To activate/deactivate: activate or deac-
tivate the distance warning function in the
on-board computer (Y page 310).
If the distance warning function is deactiva-
ted, the æsymbol appears in the assis-
tance graphics display.
The distance warning function can help you to
minimise the risk of a collision with the vehi-
cle in front or reduce the effects of such a
collision. If the distance warning function
detects that there is a risk of a collision, you
will be warned visually and acoustically.
The distance warning function issues a warn- ing at speeds:
R of approximately 30 km/h or more, if, over
several seconds, the distance maintained
to the vehicle travelling in front is insuffi-
cient. The ·distance warning lamp
then lights up in the instrument cluster.
R of approximately 7 km/h or more, if you
rapidly approach a vehicle in front. An inter-
mittent warning tone will then sound and Driving safety systems
79Safety Z
Page 145 of 489
R
you drop it
R you scratch it
Only operate bulbs in enclosed lamps
designed for that purpose. Only fit spare
bulbs of the same type and the specified volt- age.
Marks on the glass tube reduce the service
life of the bulbs. Do not touch the glass tube
with your bare hands. If necessary, clean the
glass tube when cold with alcohol or spirit and
rub it off with a lint-free cloth.
Protect bulbs from moisture during opera-
tion. Do not allow bulbs to come into contact
with liquids.
Replace only the bulbs listed (Y page 142).
Have the bulbs that you cannot replace your-
self replaced at a qualified specialist work-
shop.
If you require assistance replacing bulbs, con-
sult a qualified specialist workshop.
If the new bulb still does not light up, consult a qualified specialist workshop.
Bulbs and lamps are an important aspect of
vehicle safety. You must therefore make sure
that these function correctly at all times.
Have the headlamp setting checked regularly.
Vehicles with LED headlamps: the front
light clusters of your vehicle are equipped
with LED light bulbs. Do not replace the bulbs
yourself. Contact a qualified specialist work-
shop which has the necessary specialist
knowledge and tools to carry out the work
required. Overview of bulb types
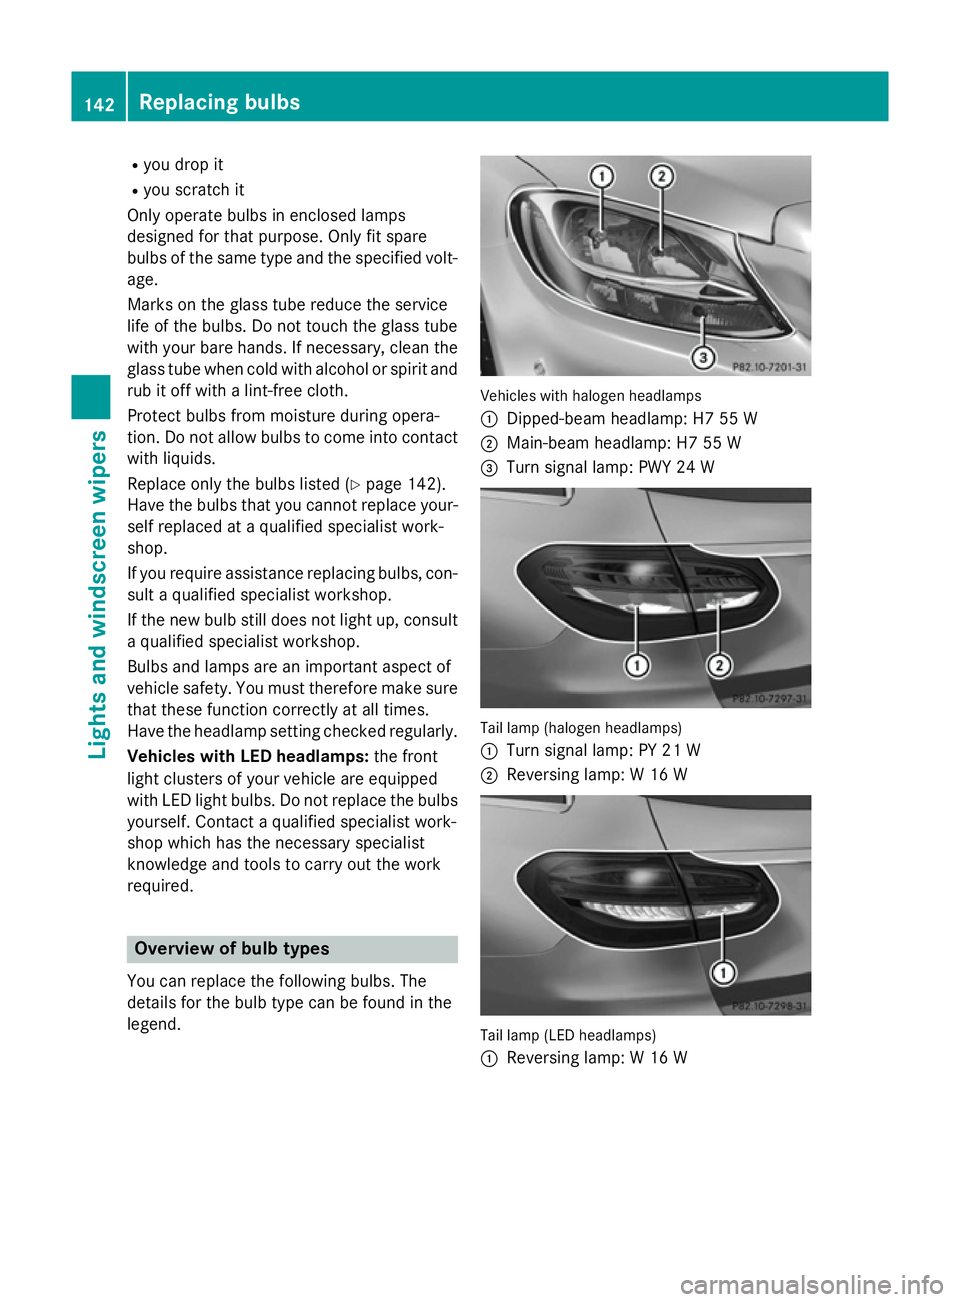
You can replace the following bulbs. The
details for the bulb type can be found in the
legend. Vehicles with halogen headlamps
:
Dipped-beam headlamp: H7 55 W
; Main-beam headlamp: H7 55 W
= Turn signal lamp: PWY 24 W Tail lamp (halogen headlamps)
:
Turn signal lamp: PY 21 W
; Reversing lamp: W 16 W Tail lamp (LED headlamps)
:
Reversing lamp: W 16 W 142
Replacing bulbsLigh
ts and windscreen wipers
Page 151 of 489
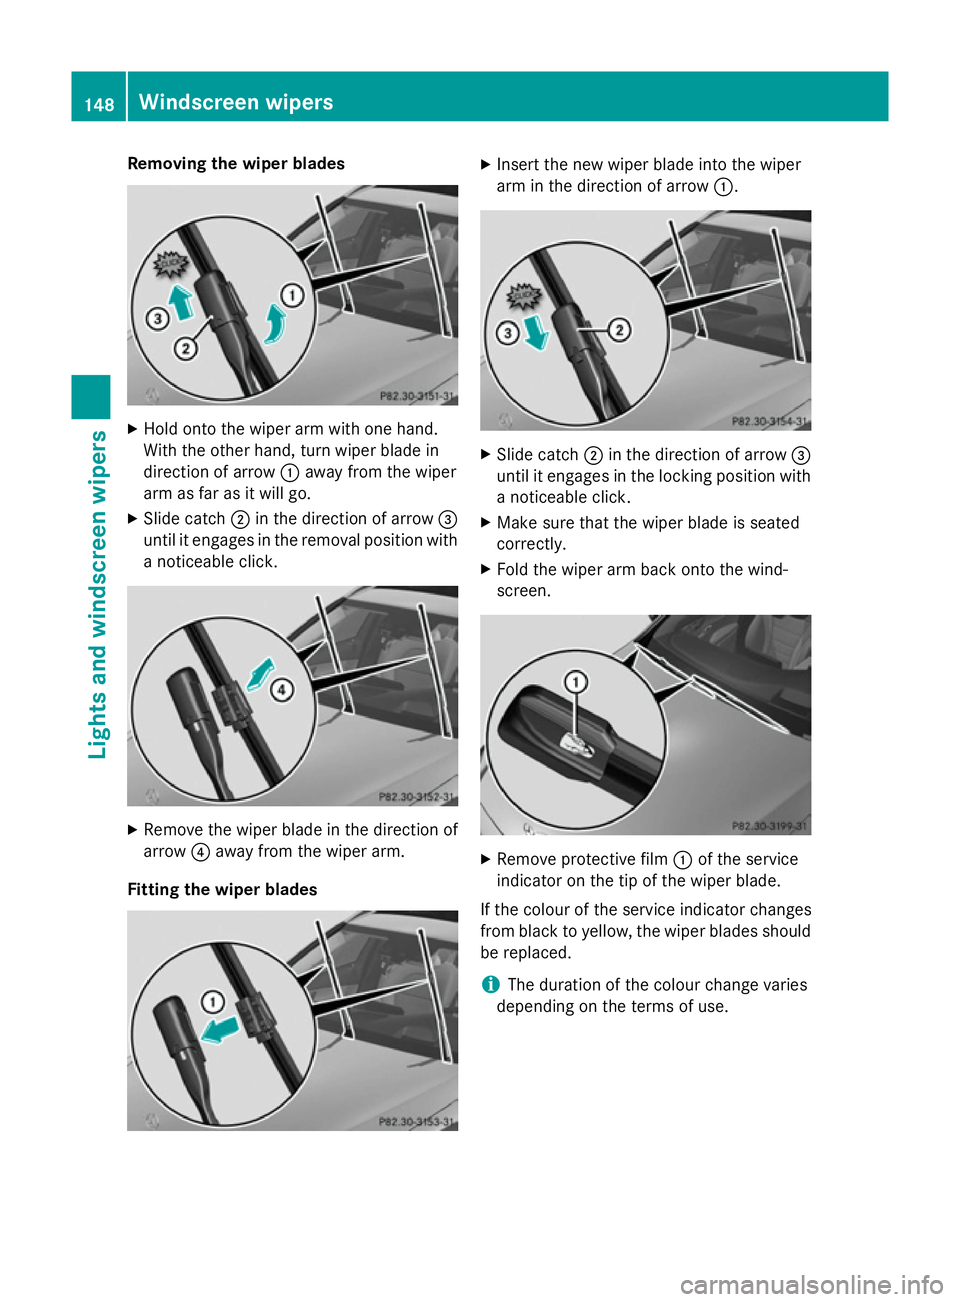
Removing the wiper blades
X
Hold onto the wiper arm with one hand.
With the other hand, turn wiper blade in
direction of arrow :away from the wiper
arm as far as it will go.
X Slide catch ;in the direction of arrow =
until it engages in the removal position with
a noticeable click. X
Remove the wiper blade in the direction of
arrow ?away from the wiper arm.
Fitting the wiper blades X
Insert the new wiper blade into the wiper
arm in the direction of arrow :. X
Slide catch ;in the direction of arrow =
until it engages in the locking position with a noticeable click.
X Make sure that the wiper blade is seated
correctly.
X Fold the wiper arm back onto the wind-
screen. X
Remove protective film :of the service
indicator on the tip of the wiper blade.
If the colour of the service indicator changes
from black to yellow, the wiper blades should be replaced.
i The duration of the colour change varies
depending on the terms of use. 148
Windscreen wipersLights and windscreen wipers
Page 155 of 489
Useful information
i This Owner's Manual describes all mod-
els, series and optional equipment for your
vehicle that were available at the time of
going to press. National variations are pos- sible. Note that your vehicle may not be
equipped with all of the functions descri-
bed. This is also the case for systems and
functions relevant to safety.
i Read the information on qualified special-
ist workshops: (Y page 27). Overview of climate control systems
Important safety notes
Observe the settings recommended on the
following pages. The windows could other-
wise mist up.
To prevent the windows from misting up:
R switch off climate control only briefly
R switch on air-recirculation mode only
briefly
R switch on the cooling with air dehumidifi-
cation function
R switch on the "demist windscreen" function
briefly, if required
Climate control regulates the temperature
and air humidity in the vehicle interior. The
interior filter cleans the air, thus improving
the interior climate.
For vehicles with a combustion engine, the
cooling with air dehumidification function is
only available when the engine is running. For hybrid vehicles, the "Cooling with air dehu-
midification" function is also available via the
electric refrigerant compressor when the
engine is not running. Optimum climate con-
trol is only achieved with the side windows
and roof closed.
The residual heat function can only be acti-
vated or deactivated with the ignition
switched off (Y page 169). i
Ventilate the vehicle for a brief period
during warm weather, e.g. using the con-
venience opening feature (Y page 108).
This will speed up the cooling process and
the desired interior temperature will be
reached more quickly.
i The integrated filter filters out most par-
ticles of dust and soot and completely fil-
ters out pollen. It also reduces gaseous pol-
lutants and odours. A clogged filter reduces
the amount of air supplied to the vehicle
interior. For this reason, you should always observe the interval for replacing the filter,which is specified in the Service Booklet. As this depends on environmental conditions,
e.g. heavy air pollution, the interval may be
shorter than stated in the Service Booklet.
i It is possible that the blower may be acti-
vated automatically 60 minutes after the
key has been removed depending on vari-
ous factors, e.g. the outside temperature.
The vehicle is then ventilated for
30 minutes to dry the automatic climate
control. 152
Overview of climate control systemsClimate control
Page 211 of 489
Problem
Possible causes/consequences and
M
MSolutions The fuel filler flap can-
not be opened. The fuel filler flap is not unlocked.
or
The key battery is discharged.
X Unlock the vehicle (Y page 91).
or
X Unlock the vehicle using the emergency key element
(Y page 93). The fuel filler flap is unlocked, but the opening mechanism is jam-
med.
X Consult a qualified specialist workshop. AdBlue
®
(BlueTEC vehicles only)
Important notes on use To function properly, BlueTEC exhaust gas
aftertreatment must be operated with the
reducing agent AdBlue ®
. Topping up AdBlue ®
is part of the maintenance work.
When the supply of AdBlue ®
is down to
approximately 3.0 litres, the Refill
Refill
AdBlue See Owner's Manual AdBlue See Owner's Manual message is
shown in the multifunction display.
When the AdBlue ®
supply drops to a mini-
mum, the Refill
Refill AdBlue
AdBlueNo
No start
start in
inX
X
km
km message is shown in the multifunction dis-
play.
If you drive the vehicle faster than 15 km/h,
the Refill AdBlue See Owner's Manual Refill AdBlue See Owner's Manual
message goes out after approximately one
minute.
If the Refill AdBlue No start in X km Refill AdBlue No start in X km
message is shown in the multifunction dis-
play, you can still drive the vehicle over the
distance shown. If the AdBlue ®
is not topped
up, you will subsequently be unable to
start the engine. If the Refill AdBlue
Refill AdBlue
Start not possible
Start not possible message appears in
the multifunction display and the engine does
not start, you must top up AdBlue ®
. X
Add at least 3.5 l of AdBlue ®
.
X Switch on the ignition for at least 60 sec-
onds.
X Start the engine.
i You can also have the AdBlue ®
tank refil-
led at a qualified specialist workshop.
Before driving your vehicle outside Europe,
have the AdBlue ®
supply checked at a quali-
fied specialist workshop.
Further information about BlueTEC exhaust
gas aftertreatment and about AdBlue ®
can
be obtained from any Mercedes-Benz Service Centre.
Important notes on the refilling proce-
dure AdBlue
®
is a water-soluble fluid for the
exhaust gas aftertreatment of diesel engines. It is:
R non-toxic
R colourless and odourless
R non-flammable
If you open the AdBlue ®
tank, small amounts
of ammonia vapour may be released.
Ammonia vapours have a pungent odour and
are particularly irritating to the skin, to
mucous membranes and to the eyes. You may experience a burning sensation in your eyes, 208
RefuellingDriving and parking
Page 213 of 489
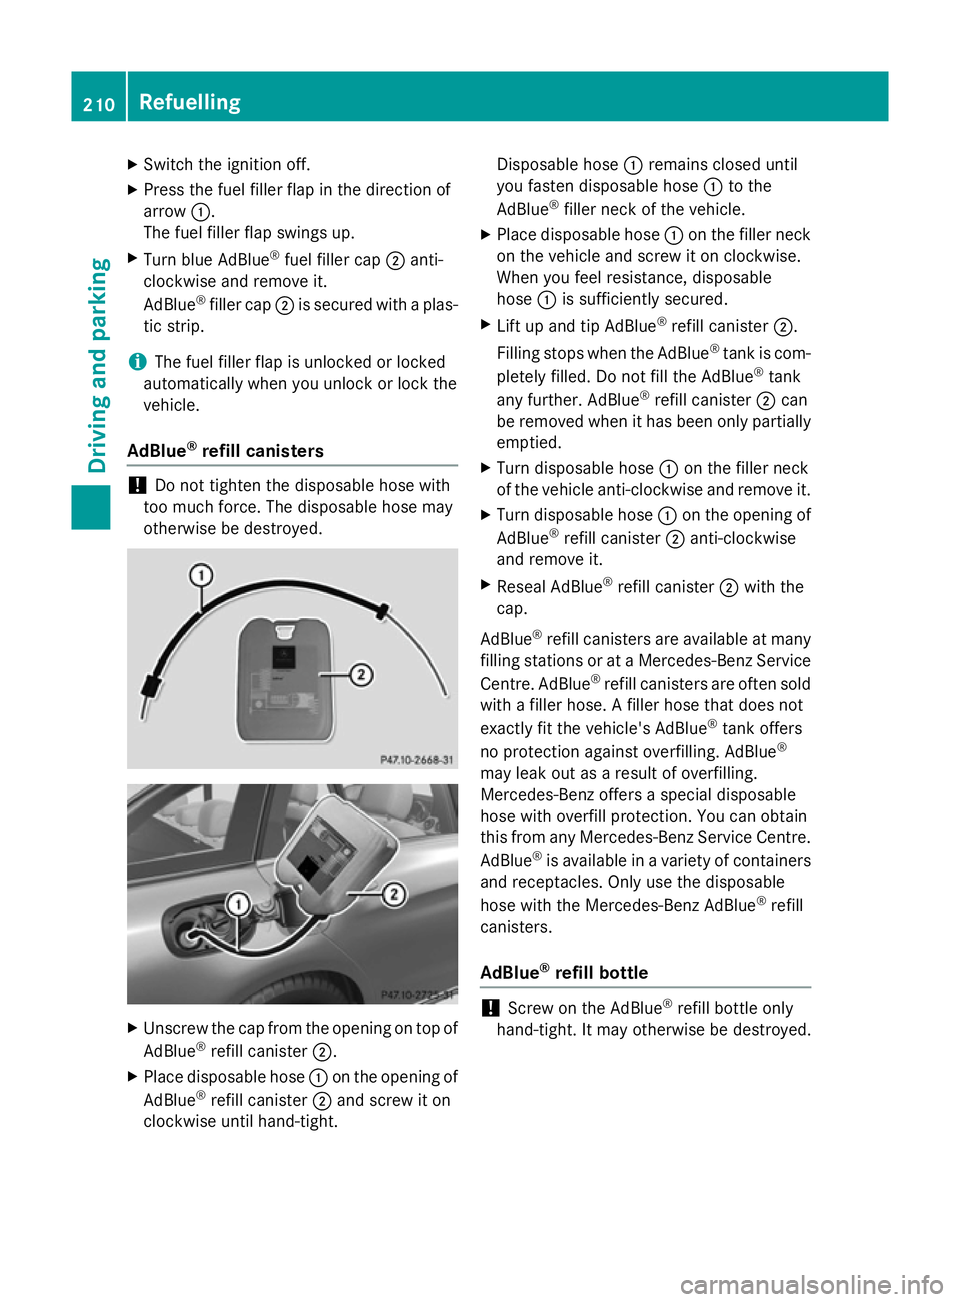
X
Switch the ignition off.
X Press the fuel filler flap in the direction of
arrow :.
The fuel filler flap swings up.
X Turn blue AdBlue ®
fuel filler cap ;anti-
clockwise and remove it.
AdBlue ®
filler cap ;is secured with a plas-
tic strip.
i The fuel filler flap is unlocked or locked
automatically when you unlock or lock the
vehicle.
AdBlue ®
refill canisters !
Do not tighten the disposable hose with
too much force. The disposable hose may
otherwise be destroyed. X
Unscrew the cap from the opening on top of
AdBlue ®
refill canister ;.
X Place disposable hose :on the opening of
AdBlue ®
refill canister ;and screw it on
clockwise until hand-tight. Disposable hose
:remains closed until
you fasten disposable hose :to the
AdBlue ®
filler neck of the vehicle.
X Place disposable hose :on the filler neck
on the vehicle and screw it on clockwise.
When you feel resistance, disposable
hose :is sufficiently secured.
X Lift up and tip AdBlue ®
refill canister ;.
Filling stops when the AdBlue ®
tank is com-
pletely filled. Do not fill the AdBlue ®
tank
any further. AdBlue ®
refill canister ;can
be removed when it has been only partially emptied.
X Turn disposable hose :on the filler neck
of the vehicle anti-clockwise and remove it.
X Turn disposable hose :on the opening of
AdBlue ®
refill canister ;anti-clockwise
and remove it.
X Reseal AdBlue ®
refill canister ;with the
cap.
AdBlue ®
refill canisters are available at many
filling stations or at a Mercedes-Benz Service
Centre. AdBlue ®
refill canisters are often sold
with a filler hose. A filler hose that does not
exactly fit the vehicle's AdBlue ®
tank offers
no protection against overfilling. AdBlue ®
may leak out as a result of overfilling.
Mercedes-Benz offers a special disposable
hose with overfill protection. You can obtain
this from any Mercedes-Benz Service Centre.
AdBlue ®
is available in a variety of containers
and receptacles. Only use the disposable
hose with the Mercedes-Benz AdBlue ®
refill
canisters.
AdBlue ®
refill bottle !
Screw on the AdBlue ®
refill bottle only
hand-tight. It may otherwise be destroyed. 210
RefuellingDriving and parking