2014 MERCEDES-BENZ C-CLASS ESTATE bulb
[x] Cancel search: bulbPage 145 of 489
R
you drop it
R you scratch it
Only operate bulbs in enclosed lamps
designed for that purpose. Only fit spare
bulbs of the same type and the specified volt- age.
Marks on the glass tube reduce the service
life of the bulbs. Do not touch the glass tube
with your bare hands. If necessary, clean the
glass tube when cold with alcohol or spirit and
rub it off with a lint-free cloth.
Protect bulbs from moisture during opera-
tion. Do not allow bulbs to come into contact
with liquids.
Replace only the bulbs listed (Y page 142).
Have the bulbs that you cannot replace your-
self replaced at a qualified specialist work-
shop.
If you require assistance replacing bulbs, con-
sult a qualified specialist workshop.
If the new bulb still does not light up, consult a qualified specialist workshop.
Bulbs and lamps are an important aspect of
vehicle safety. You must therefore make sure
that these function correctly at all times.
Have the headlamp setting checked regularly.
Vehicles with LED headlamps: the front
light clusters of your vehicle are equipped
with LED light bulbs. Do not replace the bulbs
yourself. Contact a qualified specialist work-
shop which has the necessary specialist
knowledge and tools to carry out the work
required. Overview of bulb types
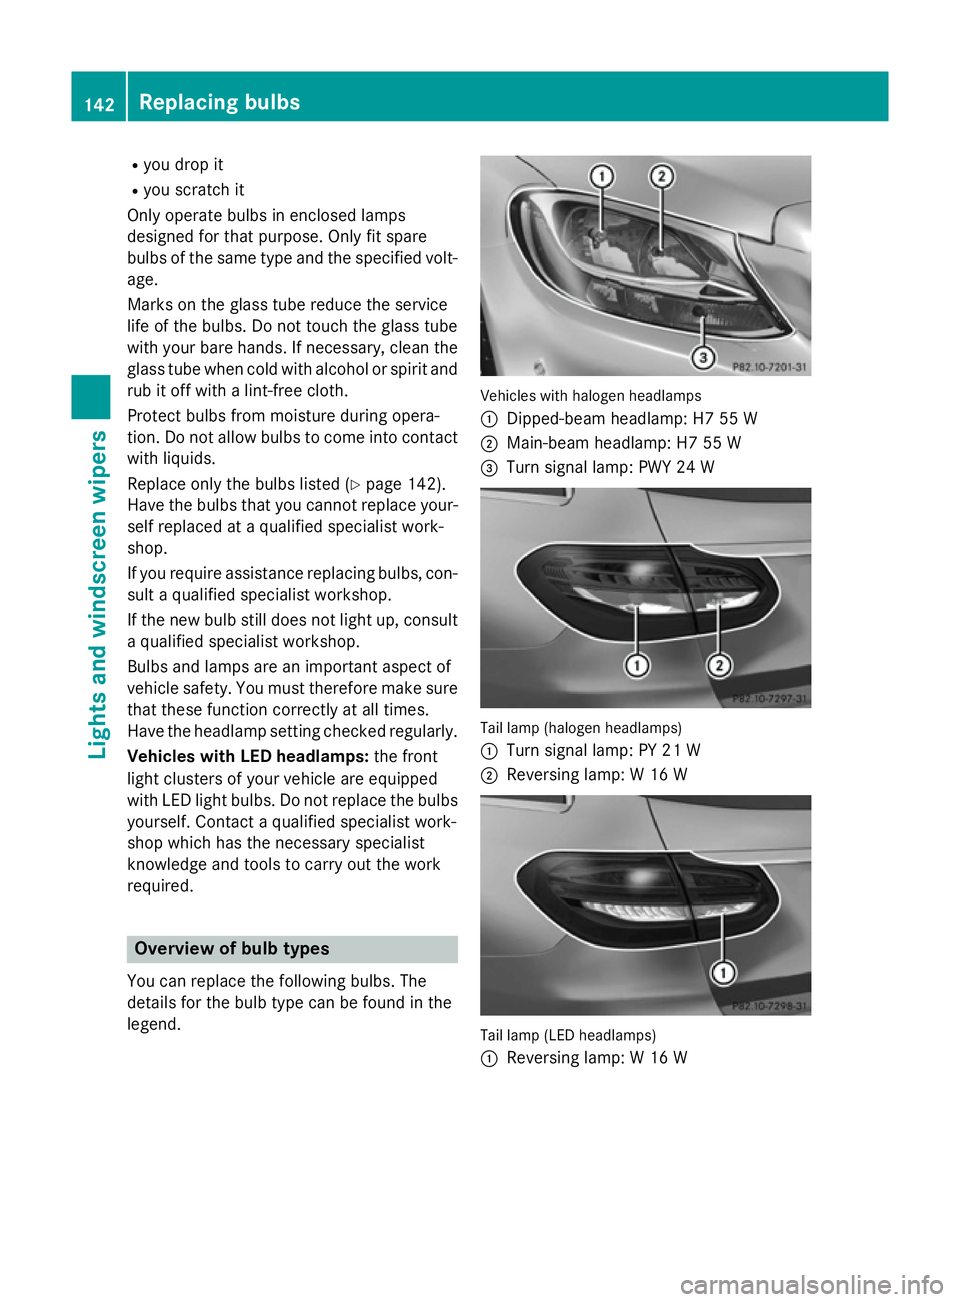
You can replace the following bulbs. The
details for the bulb type can be found in the
legend. Vehicles with halogen headlamps
:
Dipped-beam headlamp: H7 55 W
; Main-beam headlamp: H7 55 W
= Turn signal lamp: PWY 24 W Tail lamp (halogen headlamps)
:
Turn signal lamp: PY 21 W
; Reversing lamp: W 16 W Tail lamp (LED headlamps)
:
Reversing lamp: W 16 W 142
Replacing bulbsLigh
ts and windscreen wipers
Page 146 of 489
Replacing front bulbs (vehicles with
halogen headlamps)
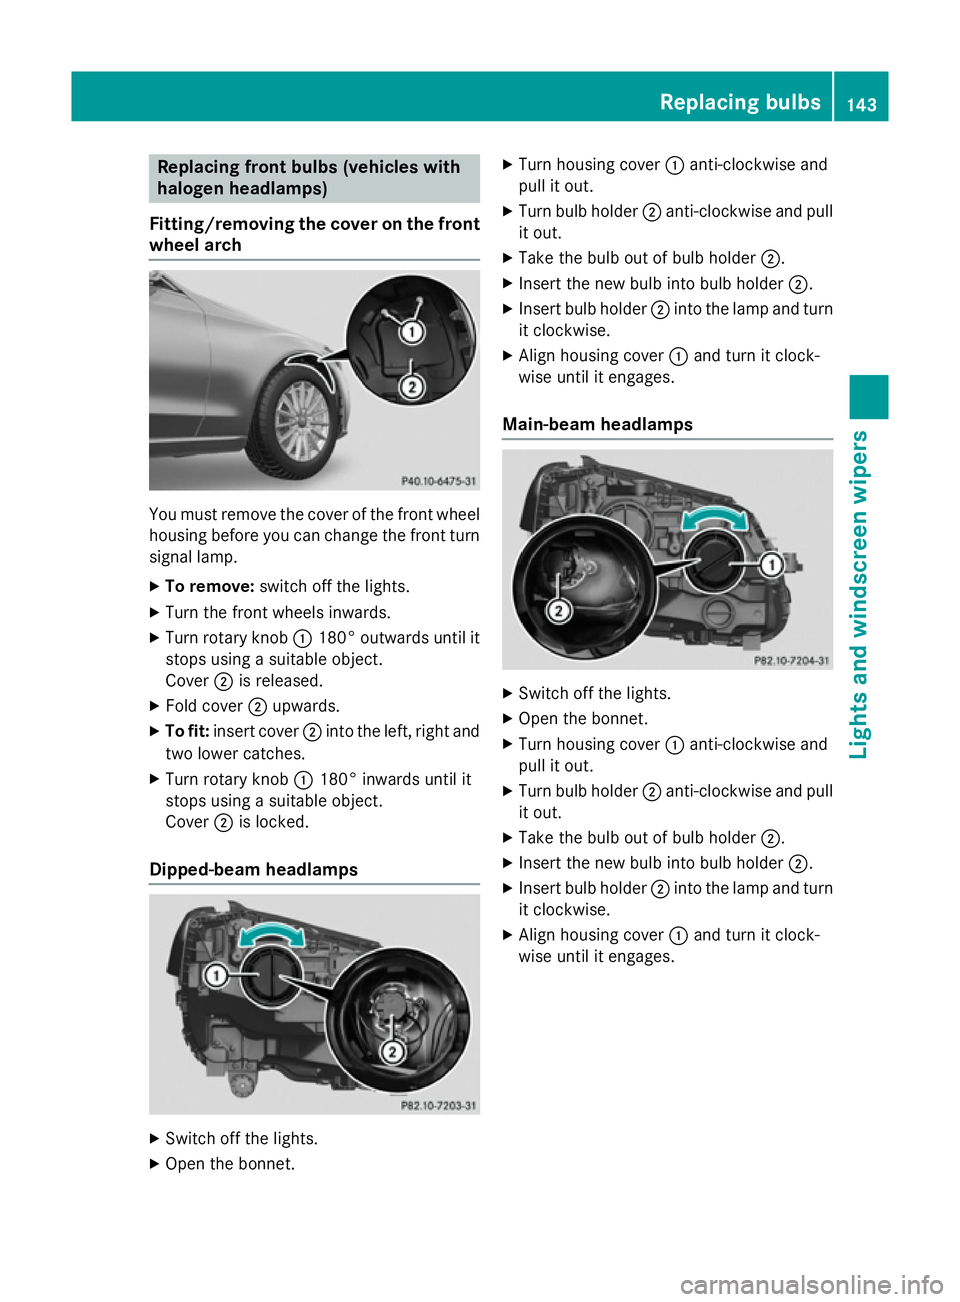
Fitting/removing the cover on the front wheel arch You must remove the cover of the front wheel
housing before you can change the front turn signal lamp.
X To remove: switch off the lights.
X Turn the front wheels inwards.
X Turn rotary knob :180° outwards until it
stops using a suitable object.
Cover ;is released.
X Fold cover ;upwards.
X To fit: insert cover ;into the left, right and
two lower catches.
X Turn rotary knob :180° inwards until it
stops using a suitable object.
Cover ;is locked.
Dipped-beam headlamps X
Switch off the lights.
X Open the bonnet. X
Turn housing cover :anti-clockwise and
pull it out.
X Turn bulb holder ;anti-clockwise and pull
it out.
X Take the bulb out of bulb holder ;.
X Insert the new bulb into bulb holder ;.
X Insert bulb holder ;into the lamp and turn
it clockwise.
X Align housing cover :and turn it clock-
wise until it engages.
Main-beam headlamps X
Switch off the lights.
X Open the bonnet.
X Turn housing cover :anti-clockwise and
pull it out.
X Turn bulb holder ;anti-clockwise and pull
it out.
X Take the bulb out of bulb holder ;.
X Insert the new bulb into bulb holder ;.
X Insert bulb holder ;into the lamp and turn
it clockwise.
X Align housing cover :and turn it clock-
wise until it engages. Replacing bulbs
143Lights and windscreen wipers Z
Page 147 of 489
Turn signals
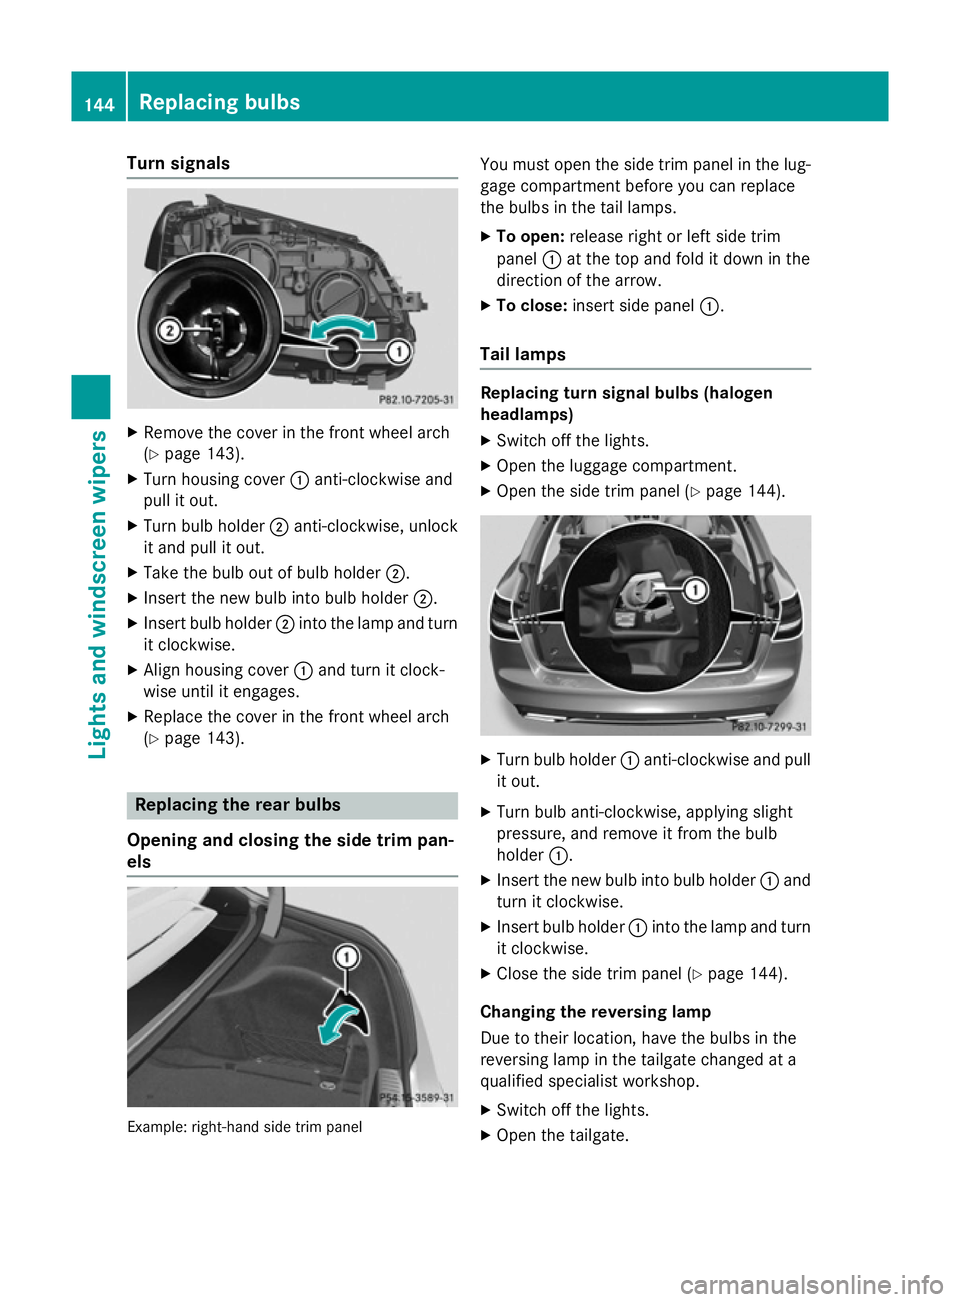
X
Remove the cover in the front wheel arch
(Y page 143).
X Turn housing cover :anti-clockwise and
pull it out.
X Turn bulb holder ;anti-clockwise, unlock
it and pull it out.
X Take the bulb out of bulb holder ;.
X Insert the new bulb into bulb holder ;.
X Insert bulb holder ;into the lamp and turn
it clockwise.
X Align housing cover :and turn it clock-
wise until it engages.
X Replace the cover in the front wheel arch
(Y page 143). Replacing the rear bulbs
Opening and closing the side trim pan-
els Example: right-hand side trim panel You must open the side trim panel in the lug-
gage compartment before you can replace
the bulbs in the tail lamps.
X To open: release right or left side trim
panel :at the top and fold it down in the
direction of the arrow.
X To close: insert side panel :.
Tail lamps Replacing turn signal bulbs (halogen
headlamps)
X Switch off the lights.
X Open the luggage compartment.
X Open the side trim panel (Y page 144). X
Turn bulb holder :anti-clockwise and pull
it out.
X Turn bulb anti-clockwise, applying slight
pressure, and remove it from the bulb
holder :.
X Insert the new bulb into bulb holder :and
turn it clockwise.
X Insert bulb holder :into the lamp and turn
it clockwise.
X Close the side trim panel (Y page 144).
Changing the reversing lamp
Due to their location, have the bulbs in the
reversing lamp in the tailgate changed at a
qualified specialist workshop. X Switch off the lights.
X Open the tailgate. 144
Replacing bulbsLights and
windscreen wipers
Page 148 of 489
Example: right-hand side handle
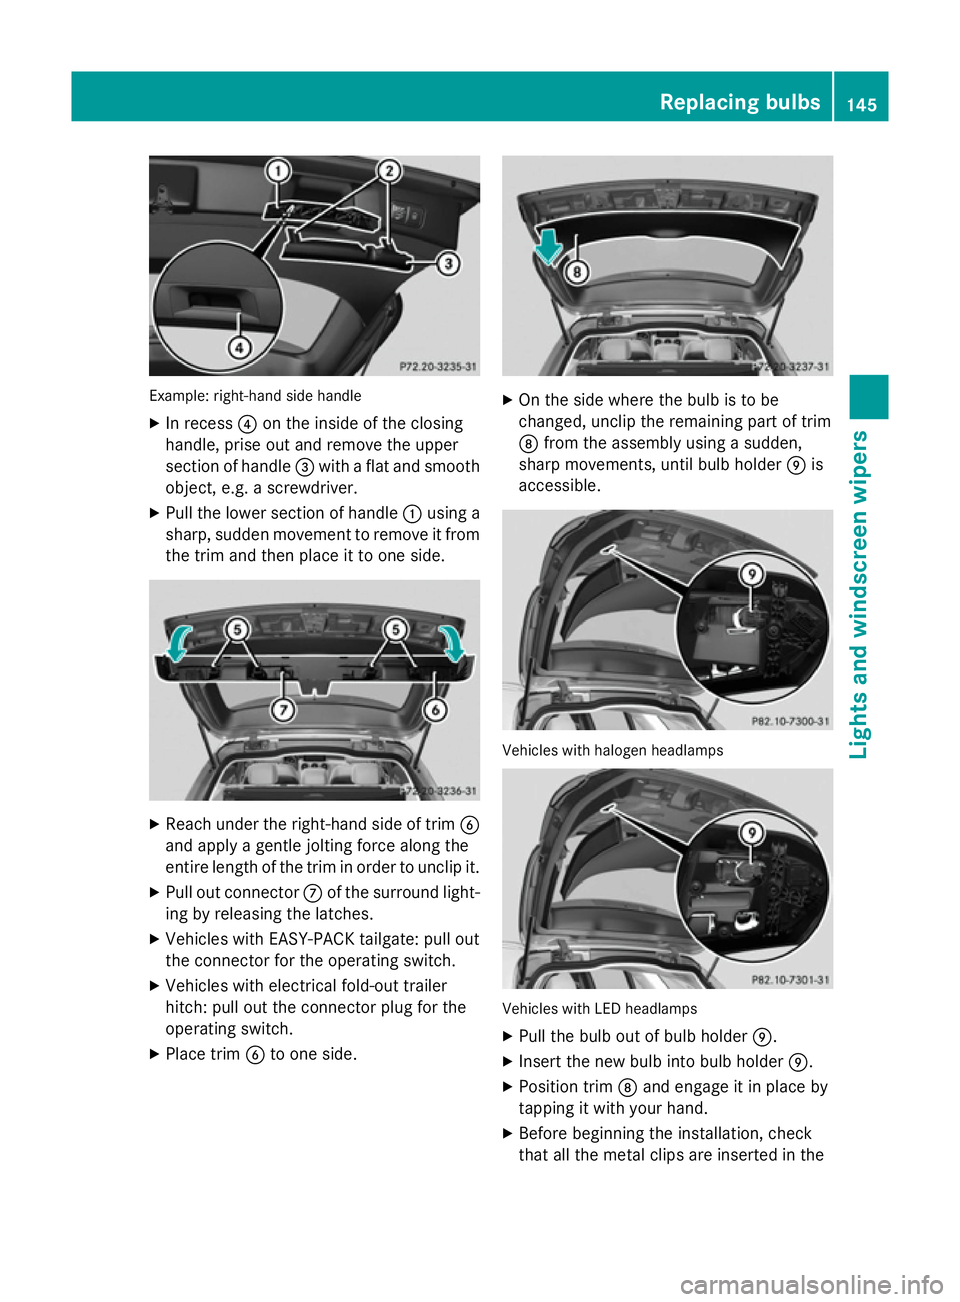
X In recess ?on the inside of the closing
handle, prise out and remove the upper
section of handle =with a flat and smooth
object, e.g. a screwdriver.
X Pull the lower section of handle :using a
sharp, sudden movement to remove it from the trim and then place it to one side. X
Reach under the right-hand side of trim B
and apply a gentle jolting force along the
entire length of the trim in order to unclip it.
X Pull out connector Cof the surround light-
ing by releasing the latches.
X Vehicles with EASY-PACK tailgate: pull out
the connector for the operating switch.
X Vehicles with electrical fold-out trailer
hitch: pull out the connector plug for the
operating switch.
X Place trim Bto one side. X
On the side where the bulb is to be
changed, unclip the remaining part of trim
D from the assembly using a sudden,
sharp movements, until bulb holder Eis
accessible. Vehicles with halogen headlamps
Vehicles with LED headlamps
X Pull the bulb out of bulb holder E.
X Insert the new bulb into bulb holder E.
X Position trim Dand engage it in place by
tapping it with your hand.
X Before beginning the installation, check
that all the metal clips are inserted in the Replacing bulbs
145Lights andwindscreen wipers Z
Page 251 of 489
appears in the multifunction display. You will
then have to steer and merge into traffic on
your own. PARKTRONIC is still available. You
can take over the steering before the vehicle has exited the parking space completely. This is useful, for example when you recognise
that it is already possible to pull out of the
parking space.
Cancelling Active Parking Assist X
Stop the movement of the multifunction
steering wheel or steer yourself.
Active Parking Assist will be cancelled at
once. The Park Assist cancelled
Park Assist cancelled mes-
sage appears in the multifunction display.
or
X Press the PARKTRONIC button
(Y page 242).
PARKTRONIC is switched off and Active
Parking Assist is immediately cancelled.
The Park Assist cancelled Park Assist cancelled message
appears in the multifunction display.
Active Parking Assist is cancelled automati-
cally if:
R the electric parking brake is applied
R transmission position Pis selected in vehi-
cles with automatic transmission
R parking using Active Parking Assist is no
longer possible
R you are driving faster than 10 km/h
R a wheel spins and ESP ®
intervenes or fails.
The ÷ warning lamp lights up in the
instrument cluster.
A warning tone sounds. The parking symbol
disappears and the multifunction display
shows the Park Assist cancelled
Park Assist cancelled mes-
sage.
When Active Parking Assist is cancelled, you
must steer and brake again yourself.
If a system malfunction occurs, the vehicle is braked to a standstill. To drive on, depress the
accelerator pedal again. Reversing camera
General notes Reversing camera
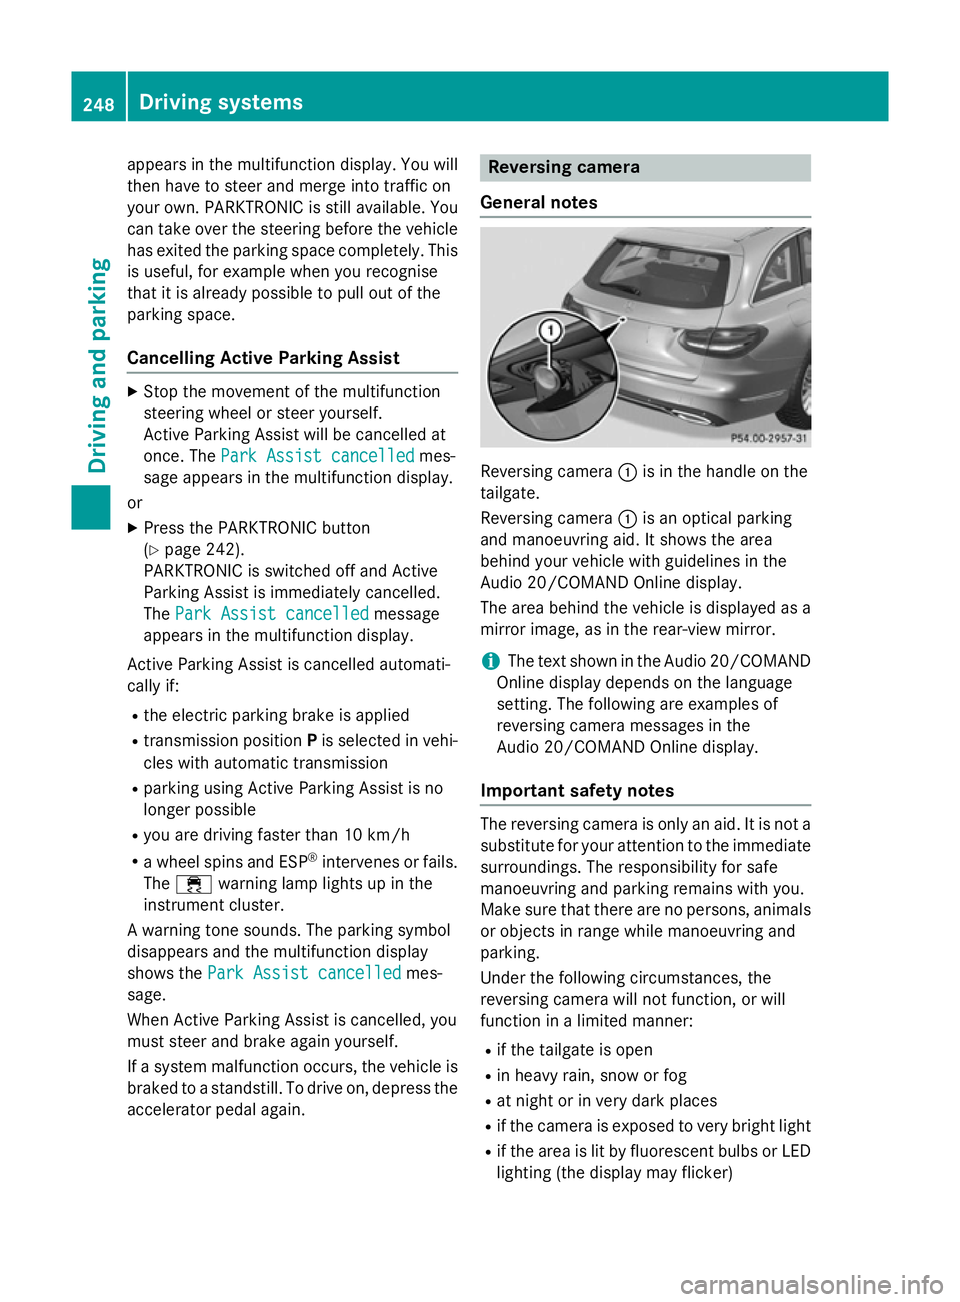
:is in the handle on the
tailgate.
Reversing camera :is an optical parking
and manoeuvring aid. It shows the area
behind your vehicle with guidelines in the
Audio 20/COMAND Online display.
The area behind the vehicle is displayed as a
mirror image, as in the rear-view mirror.
i The text shown in the Audio 20/COMAND
Online display depends on the language
setting. The following are examples of
reversing camera messages in the
Audio 20/COMAND Online display.
Important safety notes The reversing camera is only an aid. It is not a
substitute for your attention to the immediate surroundings. The responsibility for safe
manoeuvring and parking remains with you.
Make sure that there are no persons, animals
or objects in range while manoeuvring and
parking.
Under the following circumstances, the
reversing camera will not function, or will
function in a limited manner:
R if the tailgate is open
R in heavy rain, snow or fog
R at night or in very dark places
R if the camera is exposed to very bright light
R if the area is lit by fluorescent bulbs or LED
lighting (the display may flicker) 248
Driving systemsDriving and parking
Page 257 of 489
R
top view and enlarged front view
R top view and trailer view (vehicles with
trailer tow hitch)
R top view and images from the rear-facing
side cameras (rear wheel view)
R top view and images from the forward-
facing side cameras (front wheel view)
When the function is active and you shift the
transmission from Dor Rto N, the guide lines
in the COMAND/Audio 20 display are hidden.
When you change between transmission
positions Dand R, you see the previously
selected front or rear view.
Important safety notes The 360° camera is only an aid and may show
a distorted view of obstacles, show them
incorrectly or not at all. The 360° camera is
not a substitute for attentive driving.
The responsibility for safe manoeuvring and
parking remains with you. Make sure that
there are no persons, animals or objects in
range while manoeuvring and parking.
You are always responsible for safety and
must always pay attention to your surround-
ings when parking and manoeuvring. This
applies to the areas behind, in front of and
beside the vehicle. You could otherwise
endanger yourself and others.
The 360° camera will not function or will
function only in a limited manner:
R if the doors are open
R if the exterior mirrors are folded in
R if the boot lid is open
R in heavy rain, snow or fog
R at night or in very dark places
R if the cameras are exposed to very bright
light
R if the area is lit by fluorescent bulbs or LED
lighting (the display may flicker)
R if the camera lenses mist up, e.g. when
driving into a heated garage in winter, caus- ing a rapid change in temperature R
if the camera lenses are dirty or covered
R if the vehicle components in which the
cameras are fitted are damaged. In this
event, have the camera position and setting
checked at a qualified specialist workshop.
Do not use the 360° camera in this case. You could otherwise injure others or damage
objects when parking the vehicle.
Guide lines are always shown at road level.
In trailer mode, the guide lines are shown at
the level of the trailer tow hitch.
The camera in the rear area is protected by
means of a flap. This flap opens when the
360° camera is activated. Observe the notes on cleaning (Y page 405). For technical rea-
sons, the flap may remain open briefly after
the 360° camera has been deactivated.
Activation conditions The 360° camera image can be displayed if:
R COMAND Online/Audio 20 is switched on,
see the Digital Owner's Manual
R the 360° camera 360° camera function is switched on
i If the 360° camera is activated at speeds
above 30 km/h, a warning message
appears.
The warning message disappears if:
R the vehicle's speed falls below 30 km/h.
The 360° camera is then activated.
R the message is confirmed with the %
button. 254
Driving systemsDriving an
d parking
Page 293 of 489
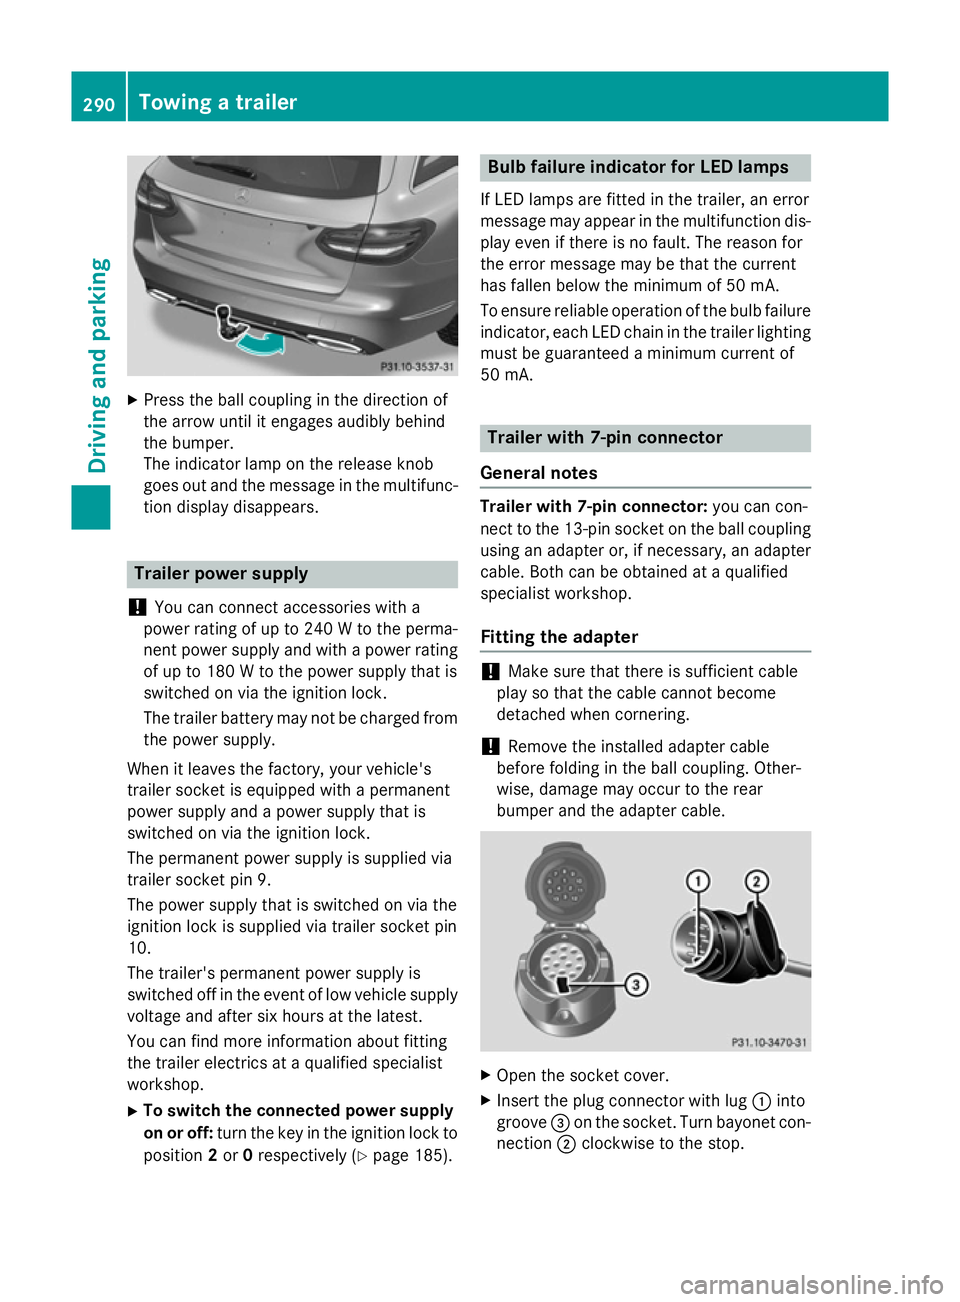
X
Press the ball coupling in the direction of
the arrow until it engages audibly behind
the bumper.
The indicator lamp on the release knob
goes out and the message in the multifunc-
tion display disappears. Trailer power supply
! You can connect accessories with a
power rating of up to 240 W to the perma-
nent power supply and with a power rating of up to 180 W to the power supply that is
switched on via the ignition lock.
The trailer battery may not be charged from the power supply.
When it leaves the factory, your vehicle's
trailer socket is equipped with a permanent
power supply and a power supply that is
switched on via the ignition lock.
The permanent power supply is supplied via
trailer socket pin 9.
The power supply that is switched on via the
ignition lock is supplied via trailer socket pin
10.
The trailer's permanent power supply is
switched off in the event of low vehicle supply
voltage and after six hours at the latest.
You can find more information about fitting
the trailer electrics at a qualified specialist
workshop.
X To switch the connected power supply
on or off: turn the key in the ignition lock to
position 2or 0respectively (Y page 185). Bulb failure indicator for LED lamps
If LED lamps are fitted in the trailer, an error
message may appear in the multifunction dis-
play even if there is no fault. The reason for
the error message may be that the current
has fallen below the minimum of 50 mA.
To ensure reliable operation of the bulb failure indicator, each LED chain in the trailer lighting
must be guaranteed a minimum current of
50 mA. Trailer with 7-pin connector
General notes Trailer with 7-pin connector:
you can con-
nect to the 13-pin socket on the ball coupling
using an adapter or, if necessary, an adapter
cable. Both can be obtained at a qualified
specialist workshop.
Fitting the adapter !
Make sure that there is sufficient cable
play so that the cable cannot become
detached when cornering.
! Remove the installed adapter cable
before folding in the ball coupling. Other-
wise, damage may occur to the rear
bumper and the adapter cable. X
Open the socket cover.
X Insert the plug connector with lug :into
groove =on the socket. Turn bayonet con-
nection ;clockwise to the stop. 290
Towing a trailerDriving and parking
Page 334 of 489
Display messages
Possible causes/consequences and
M
MSolutions front-passenger front airbag deactivation system has disa-
bled the front-passenger front airbag (Y
page 54).
R the display messages Front-passenger Front-passengerairbag
airbagenabled
enabled
See
See Owner's
Owner's Manual
ManualorFront-passenger
Front-passenger airbag
airbagdisa‐
disa‐
bled See Owner's Manual
bled See Owner's Manual must not appear in the multi-
function display.
X Wait for a period of at least 60 seconds until the necessary sys-
tem checks have been completed.
X Make sure that the display messages do not appear in the mul-
tifunction display.
If these conditions are met, the front-passenger seat can be occu- pied again. Whether the PASSENGER AIRBAG OFF or ON indicator
lamp remains lit or goes out depends on how the automatic front- passenger front airbag deactivation system classifies the occu-
pant.
If the conditions are not met, the system is not operating correctly.
X Visit a qualified specialist workshop immediately.
Further information on the automatic front-passenger front airbag deactivation feature (Y page 54).Lights
i Vehicles with LED bulbs in the lamp units:
The display message for the corresponding light will only appear if all the LEDs have failed. Display messages
Possible causes/consequences and
M MSolutions b
Left cornering Left cornering
light light
orRight cor‐
Right cor‐
nering light
nering light The left or right-hand cornering light is faulty.
X Visit a qualified specialist workshop. b
Left dipped beam Left dipped beam
or
Right dipped Right dipped
beam beam The left or right-hand dipped-beam headlamp is faulty.
X Check whether you are permitted to replace the bulb yourself
(Y page 142).
or
X Visit a qualified specialist workshop. b
Trailer left tail Trailer left tail
lamp lampor
Trailer
Trailer
right tail lamp right tail lamp The left or right-hand trailer tail lamp is faulty.
X Observe the separate operating instructions provided by the
trailer manufacturer. Display
messages
331On-board computer and displays Z