2014 MERCEDES-BENZ C-Class change language
[x] Cancel search: change languagePage 7 of 270

Opening and selecting an entry ..... 140
Saving an entry in the address
book ..............................................1
41
Car pool lanes ...................................... 62
Category list (music search) ............ 204
CD
Copy protection ............................ .204
Fast forward/fast rewind .............. .200
General information ....................... 204
Inserting ........................................ 196
Inserting/loading (Rear Seat
Entertainment System) .................. 244
Mode, switching to ........................ 197
Multisession .................................. 203
Notes on discs ............................... 204
Pause function ............................... 198
Removing/ejecting (Rear Seat
Entertainment System) .................. 244
Safety notes .................................. 195
Selecting a media type .................. 198
Selecting a track ............................ 199
Sound settings (balance, bass,
treble) .............................................. 30
CD mode
Playback options ........................... 202
CD/DVD
Inserting ........................................ 196
Removing ....................................... 196
Changing direction
Announcement phase ..................... .88
Change-of-direction phase .............. .88
Preparation phase ............................88
Changing the character set ................ 36
Channel presets ................................ 188
Characters
Changing the character set .............. 35
Changing the language .................... 34
Deleting .......................................... .35
Entering ........................................... 35
Entering (address book, phone
book) ............................................... 33
Entering (navigation) ........................ 35
Moving the cursor ............................ 35
Switching to letters .......................... 34
Clear button ......................................... 27
Color, setting (TV, video) .................. 226COMAND
Active multicontour seat .................. 52
Basic functions ................................ 29
Calling up drive status regulator
(ABC) ............................................... 52
Display ............................................. 21
Examples of operation ..................... 27
Importing POIs ............................... 171
Menu overview ................................. 22
Multicontour seat ............................ 52
Seat functions .................................. 52
Settings ......................................... 183
Switching on/off .............................. 29
COMAND and Internet
see Online and Internet functions
COMAND control panel ....................... 25
COMAND controller ............................. 26
COMAND display
Cleaning instructions ....................... 24
Setting ............................................. 42
Switching on/off .............................. 24
Compass function ............................. 117
Connecting a USB device ................. 197
Contacts
Deleting ......................................... 153
Importing ....................................... 152
Contrast, setting (TV, video) ............ 226
Copy protection (CD/DVD) ............... 204
Country-specific information (nav-
igation) ............................................... 118 D
Data carrier MUSIC REGISTER ........................... 207
Data medium
CD/DVD ........................................ 204
MP3 ............................................... 202
Date format, setting ............................ 43
Day design, setting ............................. 42
Deleting
Call lists ......................................... 142
Destination
Assigning to an address book
entry .............................................. 105
Destination (navigation)
Displaying information ..................... 94
Entering a destination by address .... 63 Index
5
Page 25 of 270

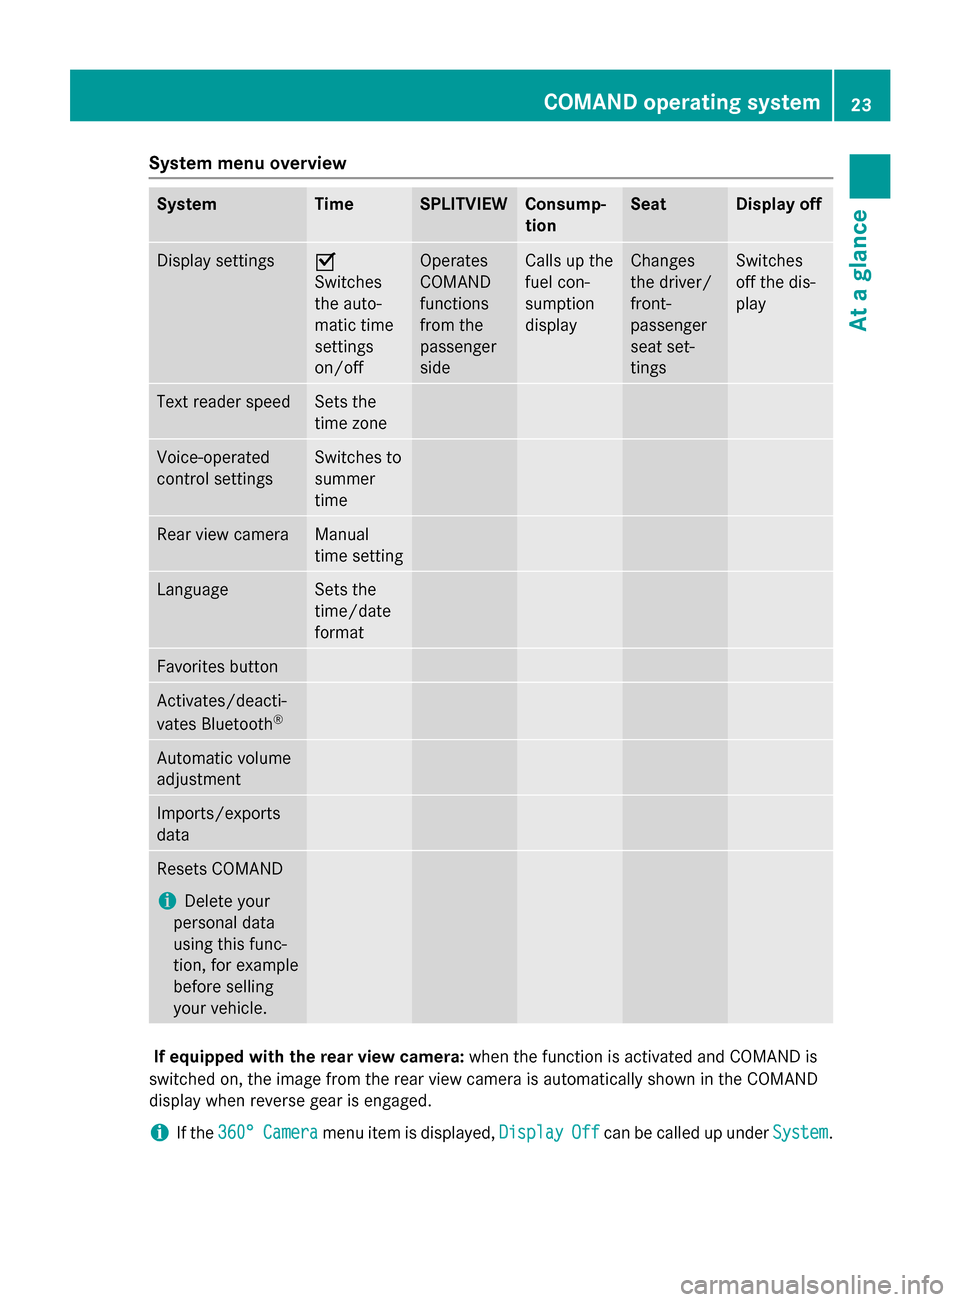
System menu overview
System Time SPLITVIEW Consump-
tion Seat Display off
Display settings 0073
Switches
the auto-
matic time
settings
on/off
Operates
COMAND
functions
from the
passenger
side Calls up the
fuel con-
sumption
display Changes
the driver/
front-
passenger
seat set-
tings Switches
off the dis-
play
Text reader speed Sets the
time zone
Voice-operated
control settings Switches to
summer
time
Rear view camera Manual
time setting
Language Sets the
time/date
format
Favorites button
Activates/deacti-
vates Bluetooth
® Automatic volume
adjustment
Imports/exports
data
Resets COMAND
i
Delete your
personal data
using this func-
tion, for example
before selling
your vehicle. If equipped with the rear view camera:
when the function is activated and COMAND is
switched on, the image from the rear view camera is automatically shown in the COMAND
display when reverse gear is engaged.
i If the
360° 360° Camera
Camera menu item is displayed, Display
DisplayOff
Offcan be called up under System
System. COMAND operating system
23At a glance
Page 35 of 270

This setting provides a crisp, clear, luxury
high-end sound setting for a studio atmos-
phere in your vehicle.
R surround
surround
This setting enables a wide-ranging sound
experience for playing music and videos. 0043
Current position of the sound setting
For the optimum musical enjoyment, you can
focus the sound image precisely on one seat. This means you are right at the center of the
listening experience, with all system param-
eters being precisely calculated for the selec-
ted position. The result is authentic music
reproduction inside the vehicle.
Focusing the sound setting
X Press the 002Abutton.
X Select Sound Soundby sliding 00520064and turning
00790052007A the COMAND controller and press 0098
to confirm.
X Select Bang&Olufsen
Bang&Olufsen and press0098to con-
firm.
A menu appears. A 003Bdot marks the current
setting for Sound Mode.
Depending on the vehicle model series X Select left
left, all allorrear
rear and press 0098to
confirm.
or
X Select left
left,all
allorright
right and press 0098to
confirm.
X To exit the menu: press the003Dback
button or slide 009500520096the COMAND control-
ler. i
Please note the following: you will achieve
the best sound results on your Bang & Oluf- sen sound system by playing high-quality
CDs.
MP3 tracks should have a bit rate of at least
224 kbit/s.
When playing using an iPod ®
, the bit rate
should also be at least 224 kbit/s.
For optimum playback quality:
XDeactivate the “EQ” setting on the
iPod ®
.
Surround-sound playback does not func-
tion for mono signal sources, such as the
medium wave range (MW) in radio mode.
On some stereo recordings, the sound
characteristics may differ from conven-
tional stereo playback. Character entry (telephony)
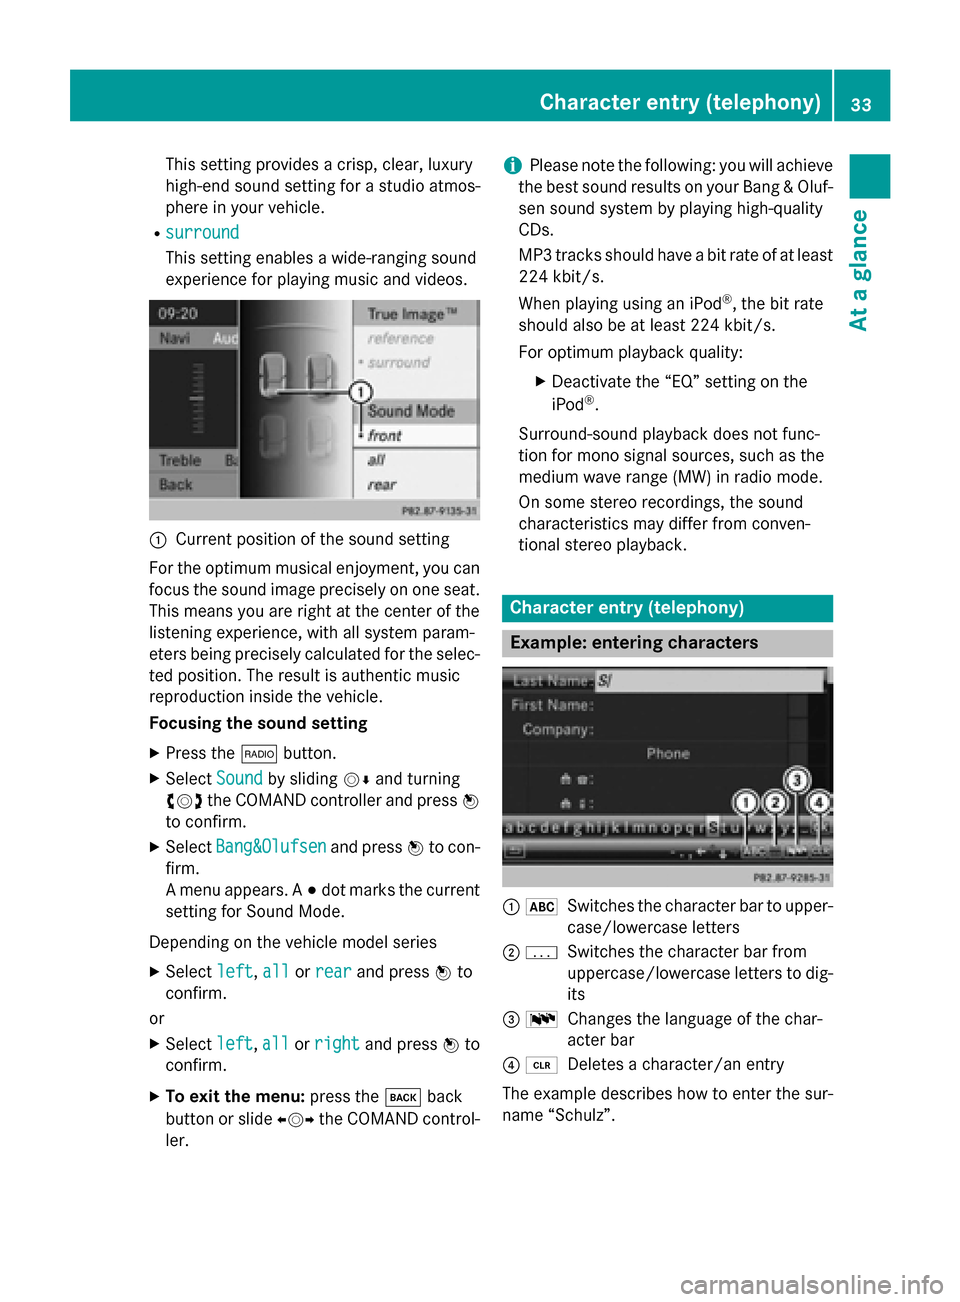
Example: entering characters
0043
0069
Switches the character bar to upper-
case/lowercase letters
0044 0042
Switches the character bar from
uppercase/lowercase letters to dig-
its
0087 0054
Changes the language of the char-
acter bar
0085 0084
Deletes a character/an entry
The example describes how to enter the sur-
name “Schulz”. Character entry (telephony)
33At a glance
Page 47 of 270

Activating/deactivating Bluetooth
®
X Press 0066.
The system menu appears.
X Select Settings
Settings by turning 00790052007Athe
COMAND controller and press 0098to con-
firm.
X Select Activate Activate Bluetooth Bluetooth and press0098
to confirm.
This switches Bluetooth ®
on 0073 or off 0053. Setting the system language
This function allows you to determine the lan-
guage for the menu displays and the naviga-
tion announcements. The selected language
affects the characters available for entry.
The navigation announcements are not avail-
able in all languages. If a language is not avail- able, the navigation announcements will be in English.
When you set the system language, the lan-
guage of the Voice Control System will
change accordingly. If the selected language
is not supported by the Voice Control System,
English will be selected.
X Press the 0066button.
X Select System
System by turning 00790052007Athe
COMAND controller and press 0098to con-
firm.
X Select Language Language and press0098to confirm.
The list of languages appears. The 003Bdot
indicates the current setting.
X Select the language by turning 00790052007Athe
COMAND controller and press 0098to con-
firm.
COMAND loads the selected language and
sets it. Assigning a favorites button
X To assign a favorites button: press the
0066 button.
X Select System System by turning 00790052007Athe
COMAND controller and press 0098to con-
firm.
X Select Assign
Assign as
asFavorite
Favorite and press0098
to confirm.
The list of predefined functions appears.
The dot 003Bindicates the currently selected
function.
X Select the function by turning 00790052007Athe
COMAND controller and press 0098to con-
firm.
The favorites button is assigned the selec-
ted function.
X Example: to call up a favorite: press the
007D favorites button.
This calls up the predefined function.
You can select the following predefined func-
tions in a menu:
R SplitView on/off SplitView on/off : you can switch the
screen view for the front passenger on or
off.
R Display On/Off Display On/Off : you can switch the dis-
play off or on.
R Full Screen: 'Clock'
Full Screen: 'Clock': you can call up
the full screen with the clock.
R 00A7 Menu
Menu: you can call up the online and
Internet functions.
R 360°
360° Camera
Camera : you can call up the picture of
the 360° camera.
R Full screen: 'Map'
Full screen: 'Map' : you can call up the
full screen with the map.
R Spoken Driving Tip
Spoken Driving Tip : you can call up the
current driving recommendation.
R Display
Display Traffic
Traffic Messages
Messages: you can call
up traffic reports.
R Navigate Home
Navigate Home: you can start route guid-
ance to your home address if you have
already entered and saved the address
(Y page 69). Assigning a favorites button
45System settings
Page 147 of 270

X
To scroll through the display or select
phone numbers in a text message: turn
00790052007A the COMAND controller.
The display scrolls up or down line by line,
or skips to the next or previous telephone
number and automatically highlights it.
X To return to the list: press0098and select
Back Back.
Text message read-aloud function Settings for the read-aloud function:
R Language (Y page 45)
R Speed (Y page 44)
X Press 0098while a text message is being dis-
played, select Read
ReadAloud
Aloud and press 0098to
confirm.
COMAND reads out the text message.
X To cancel the read-aloud function: press
the 0063 button.
or
X Press 0098, select Cancel Read-Aloud
Cancel Read-Aloud
Function Function and press0098to confirm.
Sender or text display You can switch between displaying the text
message sender or the text message content.
The sender display shows the sender of the
text message. If the sender is stored in the
COMAND phone book, the name is displayed. The text display shows the first few words of
the text message.
X Select a text message in the text message
inbox by turning 00790052007Athe COMAND con-
troller.
X To switch to the text display: select the
list symbol to the right of the text message by sliding 00520096the COMAND controller and
press 0098to confirm.
X Select Display Display Text
Textand press 0098to con-
firm.
The view changes.
X To switch to the sender display: select
the list symbol to the right of the text mes- sage by sliding
00520096the COMAND controller
and press 0098to confirm.
X Select Display Sender Display Sender and press0098to
confirm.
The view changes.
X To return to the telephone basic menu:
press the 003Dbutton.
Displaying details and phone numbers COMAND can also show a shortened sender
display in full.
X Select a text message in the text message
inbox by turning 00790052007Athe COMAND con-
troller.
X Select the list symbol to the right of the text
message by sliding 00520096the COMAND con-
troller and press 0098to confirm.
X Select Details Details and press 0098to confirm.
The detailed view appears.
X To close the detailed view: slide009500520096 the
COMAND controller.
X To return to the telephone basic menu:
press the 003Dbutton. Managing text messages
Calling a text message sender X
Press 0098the COMAND controller while the
text message is being displayed.
X Select Call Sender
Call Sender and press0098to con-
firm.
The telephone makes the call to the sender. Text messages
145Telephone Z
Page 232 of 270

Selecting a video DVD from the media
list
X Show the menu (Y page 228).
X Select Media
Mediaby sliding 00520064and turning
00790052007A the COMAND controller and press 0098
to confirm.
The media list appears. The 003Bdot indicates
the current medium being played. Video
DVDs are indicated by the ýicon.
X Press 0098the COMAND controller.
COMAND loads the video DVD and begins
playing it.
i If you select a CD or an MP3 medium, you
switch to the respective audio mode.
Further information on the media list
(Y page 198). DVD menu
Calling up the DVD menu The DVD menu is the menu stored on the DVD
itself. It is structured in various ways accord- ing to the individual DVD and permits certain
actions and settings.
In the case of multi-language DVDs, for exam-
ple, you can change the DVD language in the DVD menu.
X Show the menu (Y page 228).
X Select DVD-Video
DVD-Video in the menu by turning
00790052007A the COMAND controller and press 0098
to confirm.
X Select DVD Functions DVD Functions and press0098to
confirm.
X Select Menu
Menu and press 0098to confirm.
The DVD menu appears. Selecting menu items in the DVD menu X
Show the DVD menu (Y page 230).
X Select a menu item by sliding 009700520064the
COMAND controller and press 0098to con-
firm.
or X Select a menu item by sliding 009500520096the
COMAND controller and press 0098to con-
firm.
The menu appears.
X To reconfirm your selection: confirm
Select Select by pressing 0098.
COMAND carries out the action.
Make a selection from the further options,
if necessary.
COMAND then switches back to the DVD
menu.
i Menu items which cannot be selected are
shown in gray.
i Depending on the DVD, the menu items:
Back (to movie) Back (to movie), Play
Play,Stop
Stop,004E,
004F orGo
Go Up
Upmay either not function at all
or may not function at certain points in the DVD menu. To indicate this, the 0047symbol
appears in the display.
Moving up one level in the DVD menu X
Show the DVD menu (Y page 230).
X Select the corresponding menu item in the
DVD menu and press 0098the COMAND con-
troller to confirm.
or 230
Video DVD modeVideo
Page 244 of 270

i
The headphones' volume setting does not
affect the main loudspeakers. Selecting sound settings
You can select the sound settings in the CD/
MP3, video DVD and AUX modes.
X Switch on an operating mode (e.g. audio
CD mode) (Y page 244).
X Select Treble
Treble orBass
Bass using
the 006400590065 buttons on the remote
control and press the 008Bbutton to confirm.
An adjustment scale appears.
X Select a setting using the 00630064but-
tons and press the 008Bbutton to confirm. Multiple users
Simultaneous use of the rear-compart-
ment disc drive The two rear-compartment screens can be
operated almost entirely independently from
one another. However, there can be a conflict
in some menus if the two screens are used
simultaneously.
If the rear-compartment disc drive is being
used for both screens simultaneously, select- ing certain menus or settings on one of the
screens also affects the other screen.
The following functions affect both screens:
R changing playback options
R selecting a track (from a track list or folder)
R using the play, pause and stop functions
R fast forwarding/rewinding or scrolling
R calling up the DVD menu and navigating
within it
R setting the language, subtitles and camera
angle
R calling up interactive DVD content The following functions affect only one
screen:
R audio and video functions as well as picture
settings
R switching between full screen and the
menu
Switching between operating modes When you exit an operating mode (e.g. audio
CD mode), the current setting is saved. If youcall up this operating mode again later, there
are two possibilities:
R the operating mode has been changed on
the other screen.
R the operating mode has not been changed.
In the first case, the operating mode appears as it is on the other screen.
In the second case, the setting appears on the
screen as it was when you last exited the
operating mode. Picture settings
Overview You can select picture settings in video DVD
and AUX mode (Y
page 254).
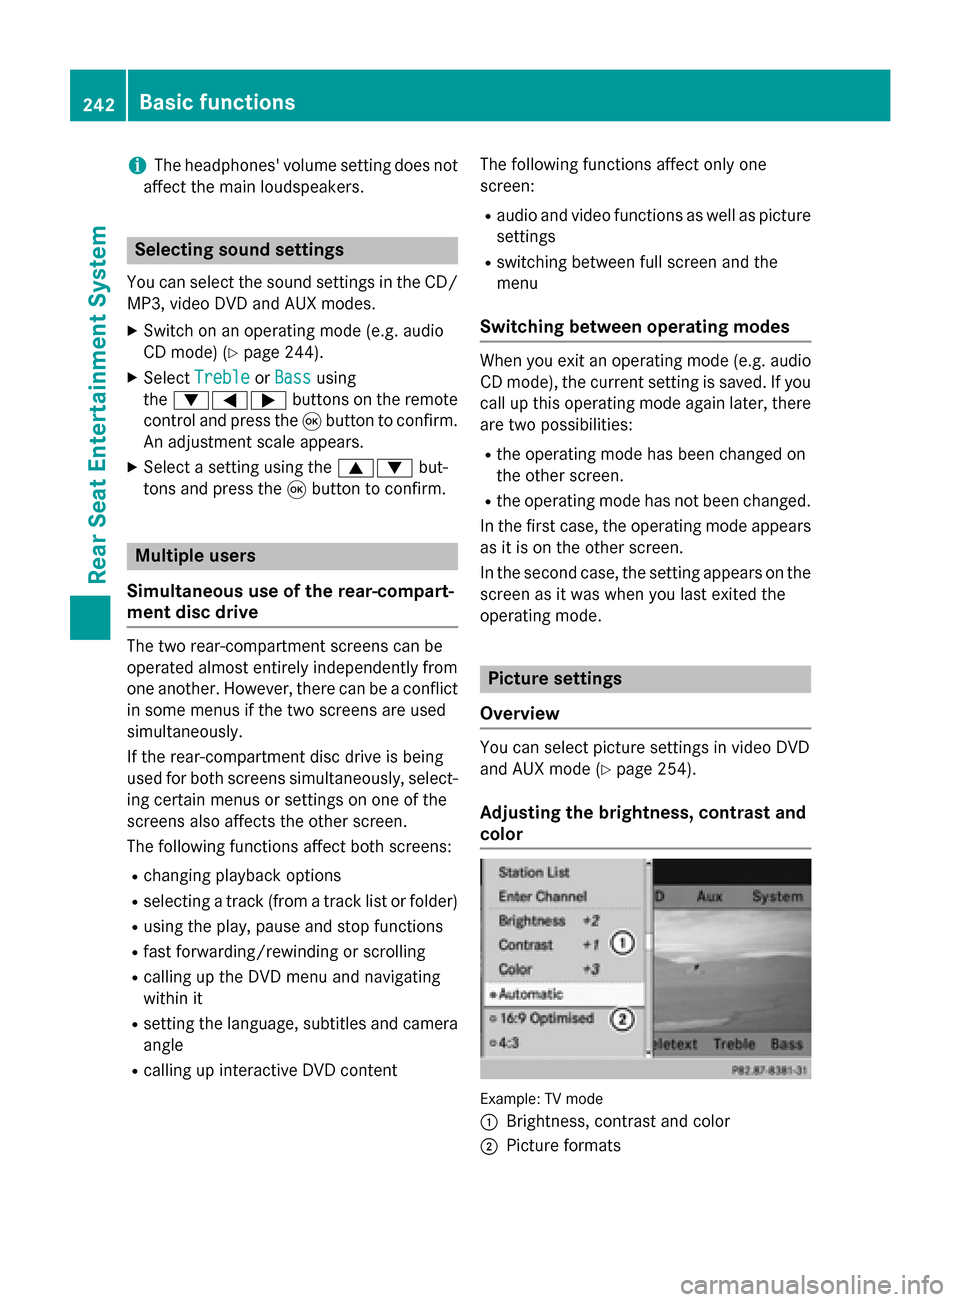
Adjusting the brightness, contrast and
color Example: TV mode
0043
Brightness, contrast and color
0044 Picture formats 242
Basic functionsRear Seat Entertainment System
Page 245 of 270

X
Switch on video DVD mode (Y page 247).
X To show the menu: press the008Bbutton on
the remote control.
or
X While the navigation menu is shown,
(Y page 228) select Menu Menuand press the 008B
button to confirm.
X Select DVD-Video
DVD-Video using
the 006400590065 buttons and press the
008B button to confirm.
X Select Brightness
Brightness, Contrast
ContrastorColor
Color
using the 00630064 buttons and press the
008B button to confirm.
An adjustment scale appears.
X Select a setting using the 00630064but-
tons and press the 008Bbutton to confirm. Changing the picture format
X To show the menu: press the008Bbutton on
the remote control.
or X While the navigation menu is shown,
(Y page 228) select Menu
Menu and press the 008B
button to confirm.
X Select DVD-Video
DVD-Video using
the 006400590065 buttons and press the
008B button to confirm.
The dot in front of one of the menu items
16:9 16:9 Optimized
Optimized ,4:3
4:3 orWidescreen
Widescreen indi-
cates the format currently selected.
X Select a format using the 00630064but-
tons and press the 008Bbutton to confirm. System settings
Note
You can adjust almost all system settings
individually for each screen without affecting
the other screen. You make these settings
using the remote control (Y page 237). Selecting the display language
X Select System System using the 006300590065
buttons on the remote control and press 008B
to confirm.
You see the system menu on the selected
rear screen.
X Select Settings Settings using the0064button
and press 008Bto confirm.
X Select Language
Language using the00630064 but-
tons and press the 008Bbutton to confirm.
The list of languages appears. A 0036dot
indicates the current setting.
X Select a language using the 00630064but-
tons and press the 008Bbutton to confirm.
The Rear Seat Entertainment System acti-
vates the selected language. Switching the display design
X Select Settings Settings using the0064button
and press 008Bto confirm.
X Select Day Mode Day Mode, Night Mode
Night Mode orAuto‐
Auto‐
matic
matic using the 00630064 buttons and
press the 008Bbutton to confirm.
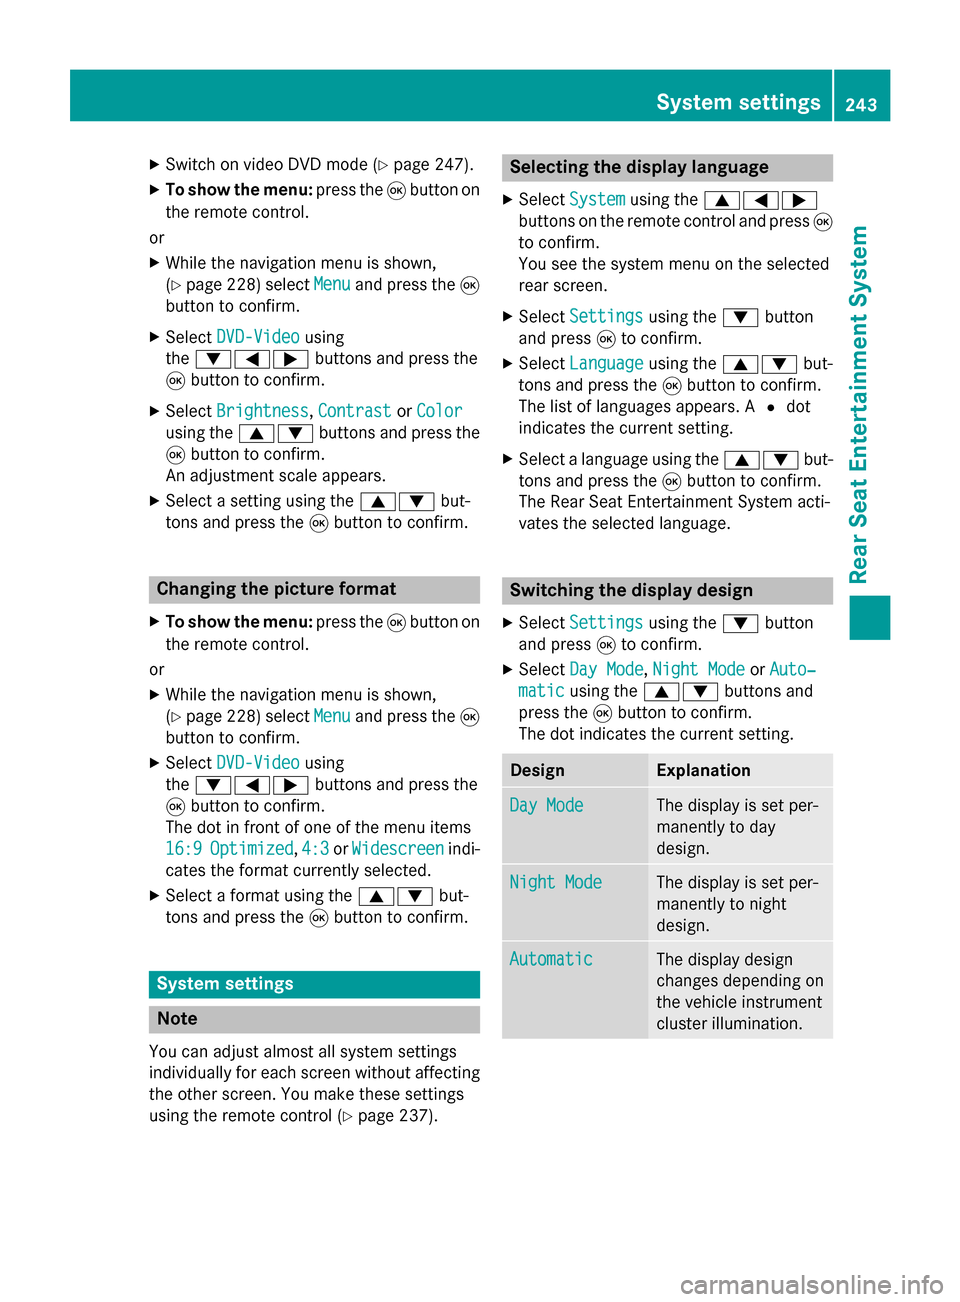
The dot indicates the current setting. Design Explanation
Day Mode
Day Mode The display is set per-
manently to day
design.
Night Mode Night Mode The display is set per-
manently to night
design.
Automatic Automatic The display design
changes depending on
the vehicle instrument
cluster illumination. System settings
243Rear Seat Entertainment System Z