2014 MERCEDES-BENZ C-Class change time
[x] Cancel search: change timePage 153 of 270

X
Enter the destination address (Y page 63)
X Start route guidance.
The navigable address is automatically
added to the address book entry.
i This will provide you with an address book
entry that is suitable for navigation. The
next time the navigation is started, the
address data in the navigation, rather than
the postal address, is used if you have
changed address in the address entry
menu. Therefore, make sure that the des-
tination address is the desired destination
when starting navigation from the address
book. Voice tags
Introduction You can enter voice tags via the Voice Control
System (see the separate operating instruc-
tions). Once you have assigned a voice tag to
an address book entry, you can call up this
entry with a voice command and dial a phone
number, for example. You can add one voice
tag per address book entry.
Adding or changing a voice tag X
Search for an address book entry with or
without a voice tag (¦) (Y page 148).
X Select the list symbol to the right of the
entry by sliding 00520096the COMAND control-
ler and press 0098to confirm.
X Select Voice Name Voice Name and press0098to con-
firm.
X Select Add
Add orChange
Change and press 0098to con-
firm.
Subsequent operation is voice-controlled.
The Voice Control System guides you
through the dialogs. Deleting a voice tag X
Search for an address book entry with a
voice tag (Y page 148).
X Select the list symbol to the right of the
entry by sliding 00520096the COMAND control-
ler and press 0098to confirm.
X Select Voice Name Voice Name and press0098to con-
firm.
X Select Delete
Delete and press 0098to confirm.
A deletion prompt appears.
X Select Yes
YesorNo
No and press the 008Bbutton to
confirm.
If you select Yes Yes, COMAND deletes the
voice tag.
If you select No No, the process will be can-
celed.
Listening to a voice tag X
Search for an address book entry with a
voice tag (Y page 148).
X Select the list symbol to the right of the
entry by sliding 00520096the COMAND control-
ler and press 0098to confirm.
X Select Voice Name Voice Name and press0098to con-
firm.
X Select Listen
Listen and press 0098to confirm.
You hear the voice tag. Importing phone book entries
This function allows you to store phone book
entries from the mobile phone in the address book.
The following can be used as a source:
R the mobile phone
R the memory card
R the USB device
R the Bluetooth ®
Interface
Imported phone book entries are indicated in
the phone book by different symbols
(Y page 137). Using the address book
151Telephone Z
Page 167 of 270

Managing access data of the mobile
phone network provider
Overview The access data of the mobile phone network
provider can be:
R edited
R copied, then edited and accepted for a new
provider name
R deleted
i Changes that you make to the access
data of a mobile phone network provider
apply to all mobile phones that use this
access data.
i When the Internet connection is active,
you cannot edit or delete the access data of
the currently set mobile phone network
provider.
Editing the access data X
Select a provider from the list of mobile
phone network providers by turning 00790052007A
the COMAND controller (Y page 161).
X Select the symbol to the right of the entry
by sliding 00520096the COMAND controller and
press 0098to confirm. X
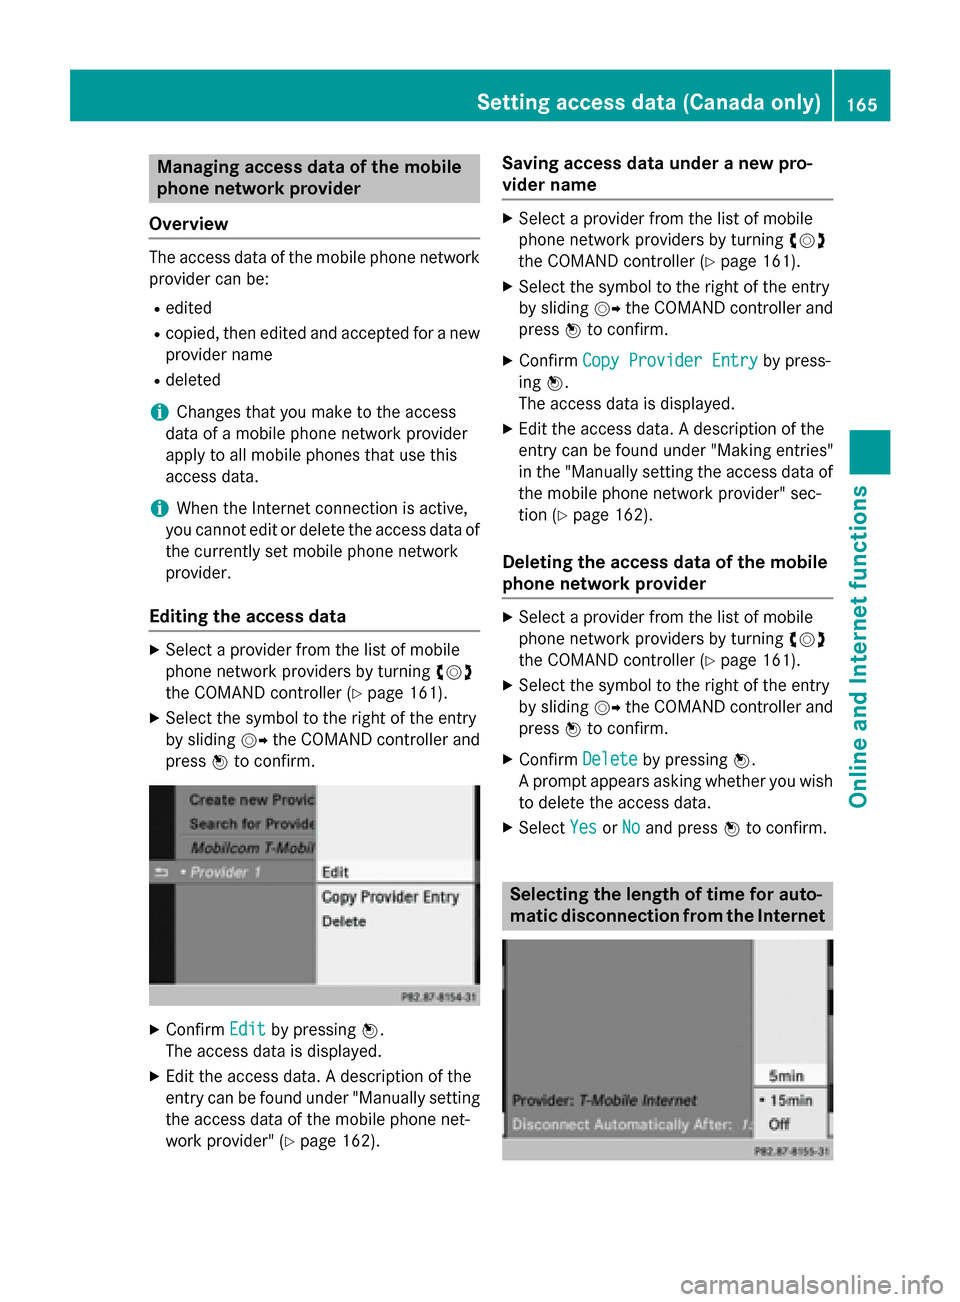
Confirm Edit Editby pressing 0098.
The access data is displayed.
X Edit the access data. A description of the
entry can be found under "Manually setting the access data of the mobile phone net-
work provider" (Y page 162). Saving access data under a new pro-
vider name X
Select a provider from the list of mobile
phone network providers by turning 00790052007A
the COMAND controller (Y page 161).
X Select the symbol to the right of the entry
by sliding 00520096the COMAND controller and
press 0098to confirm.
X Confirm Copy Provider Entry Copy Provider Entry by press-
ing 0098.
The access data is displayed.
X Edit the access data. A description of the
entry can be found under "Making entries"
in the "Manually setting the access data of
the mobile phone network provider" sec-
tion (Y page 162).
Deleting the access data of the mobile
phone network provider X
Select a provider from the list of mobile
phone network providers by turning 00790052007A
the COMAND controller (Y page 161).
X Select the symbol to the right of the entry
by sliding 00520096the COMAND controller and
press 0098to confirm.
X Confirm Delete Deleteby pressing 0098.
A prompt appears asking whether you wish to delete the access data.
X Select Yes
YesorNo
No and press 0098to confirm. Selecting the length of time for auto-
matic disconnection from the InternetSetting access data (Canada only)
165Online and Internet functions Z
Page 185 of 270

Settings
Settings menu X
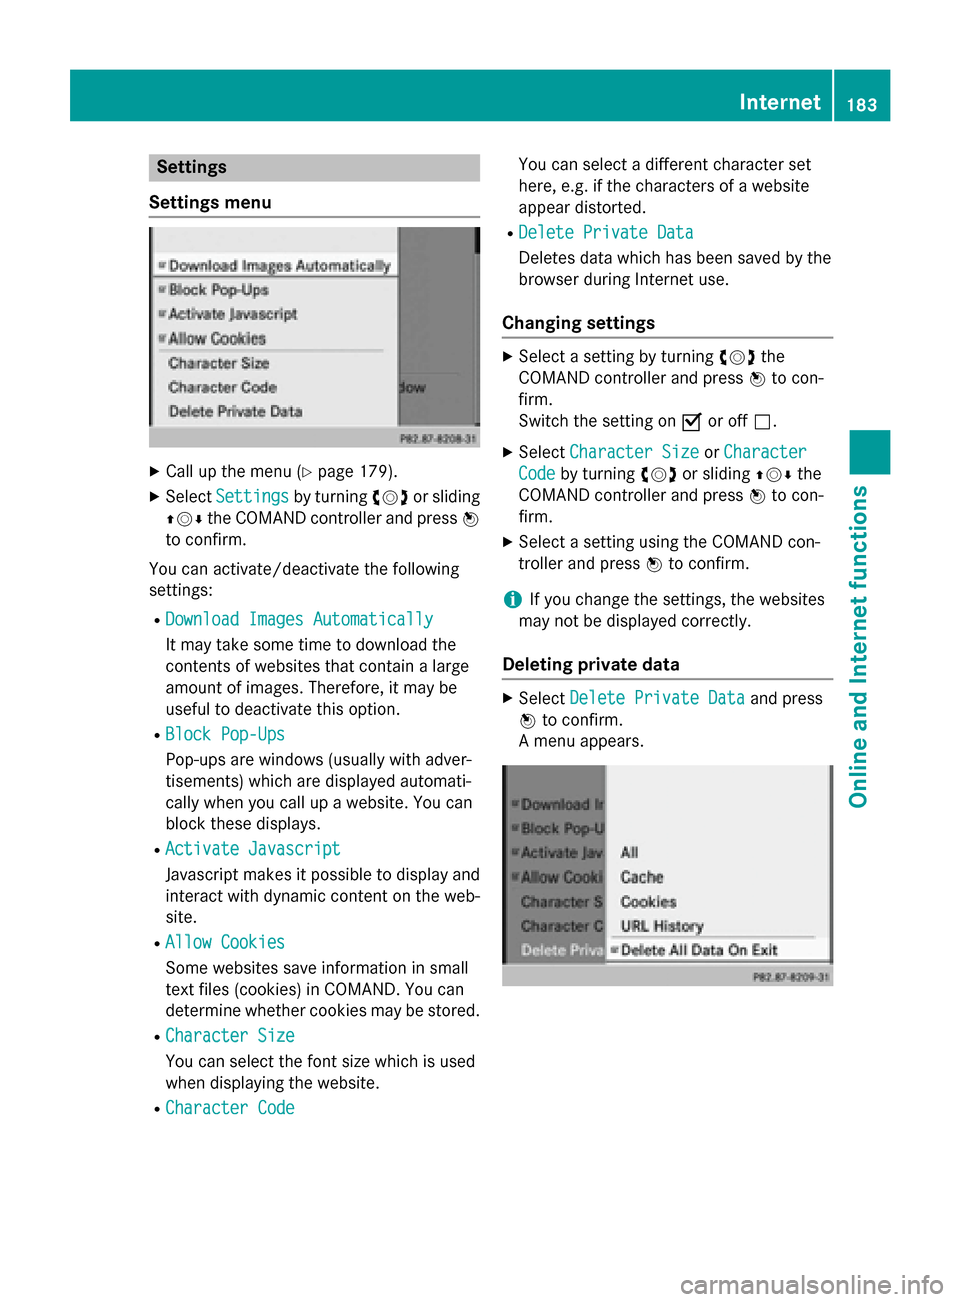
Call up the menu (Y page 179).
X Select Settings
Settings by turning00790052007Aor sliding
009700520064 the COMAND controller and press 0098
to confirm.
You can activate/deactivate the following
settings:
R Download Images Automatically
Download Images Automatically
It may take some time to download the
contents of websites that contain a large
amount of images. Therefore, it may be
useful to deactivate this option.
R Block Pop-Ups
Block Pop-Ups
Pop-ups are windows (usually with adver-
tisements) which are displayed automati-
cally when you call up a website. You can
block these displays.
R Activate Javascript
Activate Javascript
Javascript makes it possible to display and
interact with dynamic content on the web-
site.
R Allow Cookies Allow Cookies
Some websites save information in small
text files (cookies) in COMAND. You can
determine whether cookies may be stored.
R Character Size Character Size
You can select the font size which is used
when displaying the website.
R Character Code
Character Code You can select a different character set
here, e.g. if the characters of a website
appear distorted.
R Delete Private Data Delete Private Data
Deletes data which has been saved by the
browser during Internet use.
Changing settings X
Select a setting by turning 00790052007Athe
COMAND controller and press 0098to con-
firm.
Switch the setting on 0073or off 0053.
X Select Character Size Character Size orCharacter
Character
Code
Code by turning 00790052007Aor sliding 009700520064the
COMAND controller and press 0098to con-
firm.
X Select a setting using the COMAND con-
troller and press 0098to confirm.
i If you change the settings, the websites
may not be displayed correctly.
Deleting private data X
Select Delete Private Data Delete Private Data and press
0098 to confirm.
A menu appears. Internet
183Online and Internet functions Z
Page 204 of 270

For all media that contain MP3 data (e.g. MP3
CD, SD memory card, MUSIC REGISTER), you
can determine whether:
R the metadata contained in the tags of the
encoded music data should be displayed
R the file and directory names should be dis-
played during playback
X To display the album and artist name:
select MP3
MP3 orUSB USB in the basic display by
sliding 00520064and turning 00790052007Athe COMAND
controller and press 0098to confirm.
X Select Display Track Information
Display Track Information and
press 0098to confirm. Selecting an active partition (USB
mass storage devices only)
You can select this function for USB mass
storage devices when the storage device is
partitioned. Up to 5 partitions (primary or log- ical, FAT, FAT32 and NTFS) are supported.
X Select MP3
MP3 in the basic display by sliding
00520064 and turning 00790052007Athe COMAND con-
troller and press 0098to confirm.
X Select Select Active Partition
Select Active Partition and
press 0098to confirm. Playback options
X To select options: switch on audio CD or
MP3 mode (Y page 197).
X Select CD CDorMP3
MP3 mode by sliding 00520064and
turning 00790052007Athe COMAND controller and
then pressing 0098to confirm.
The options list appears. The 003Bdot indi-
cates the option selected.
X Select an option by turning 00790052007Aand press
0098 to confirm.
The option is switched on. For all options
except Normal Track Sequence
Normal Track Sequence , you will
see a corresponding display in the display/ selection window.
The following options are available to you:
R Normal Track Sequence
Normal Track Sequence The tracks are played in the normal order
(e.g. track 1, 2, 3, etc.).
In MP3 mode, the track order is determined
by the order in which the tracks are written to the MP3 data carrier when it is created.
Alphabetical order is the most common.
Once all the tracks in a folder have been
played, the tracks in the next folder are
played.
R Random Medium Random Medium
All the tracks on the medium are played in
random order (e.g. track 3, 8, 5 etc.).
R Random Track List Random Track List (MP3 mode only)
You will hear the tracks in the current play-
list or currently active folder (including all
subfolders) in random order.
i The
Normal Track Sequence Normal Track Sequence option is
automatically selected when you change
the disc you are currently listening to or
when you select a different medium. If an
option is selected, it remains selected after COMAND is switched on or off. Notes on MP3 mode
General notes Depending on the volume and format of the
MP3 data, the length of time required for
reading the data may increase.
Permissible data carriers R
CD-R and CD-RW
R DVD-R and DVD-RW
R DVD+R and DVD+RW
R SD memory card
R USB storage device
Permissible file systems R
ISO 9660/Joliet standard for CDs
R UDF for video DVDs
R FAT16, FAT32 and NTFS for SD memory
card and USB storage media 202
Audio CD and MP3 modeAudio
Page 225 of 270

The tracks in the currently active category
or folder, including any subfolders, are
played in random order.
i If the connected iPod ®
/iPhone ®
is not
functioning or paused, the playback
options are inactive. The display of options is grayed out. MP3 player instructions
General information Up to 30,000 tracks per medium are suppor-
ted.
You can speed up some functions and
improve the search results by:
R making sure the names of tracks, albums
and artists, for example, are written the
same way
R labeling albums featuring various artists as
"compilations"
i Multiple entries of tracks in playlists are
filtered out for some players.
Data formats MP3 and WMA are supported as data formats
with fixed and variable bit rates (up to
320 kbits/s).
Special considerations when using MP3
players Up to eight directory levels with up to 1,000
tracks per directory are supported.
Do not use USB extension leads or adapters. They can impair functionality.
i DRM (Digital Rights Management) protec-
ted files are not supported by the Media
Interface. Audio AUX mode
Notes on audio AUX mode
External audio sources may have different
volumes, which can mean that system mes-
sages such as traffic announcements and
navigation system announcements are much louder. If necessary, deactivate the system
messages or adjust their volume manually.
You can connect an external audio source
(AUX) to COMAND.
Depending on the vehicle model series, the
connection is made using a jack in the stow-
age compartment in the center console or a
USB port (Y page 197).
If COMAND is equipped with the Media Inter-
face, external audio sources are connected
using the cable set provided. An AUX socket
is not provided. The connections for the
Media Interface are located in the stowage
compartment in the center console.
i You will find further information online at
http://www.mbusa-mobile.com. Or call
the Mercedes-Benz Customer Assistance
Center at 1-800-FOR-MERCedes
(1-800-367-6372) (for the USA) or Cus-
tomer Relations at 1-800-387-010 0(for
Canada). Switching to audio AUX mode
Switching on using the DISC button The external device is connected to the audio
AUX input.
X Press the 003Abutton one or more times.
By pressing the function button repeatedly,
you can change the operating mode in the
following order:
R CD/MP3 (disc)
R Memory card mode
R MUSIC REGISTER
R USB storage device Audio AUX mode
223Audio Z
Page 229 of 270

Notes on discs
! Do not affix stickers or labels to the discs.
They could peel off and damage COMAND.
Stickers can cause the disc to bend, which can result in read errors and disc recogni-
tion problems.
! COMAND is designed to play discs that
comply with the EN 60908 standard. There-
fore, you can only use discs with a maxi-
mum thickness of 1.3 mm.
If you insert thicker discs, e.g. those that
contain data on both sides (DVD on one
side and audio data on the other), they can- not be ejected and can damage the device.
Only use round discs with a diameter of
12 cm. Do not use discs with a diameter of 8 cm, even with an adapter.
Playback problems may occur when playing
copied discs. There are a large variety of
discs, DVD authoring software, writing soft-
ware and writers available. This variety means that there is no guarantee that the system will
be able to play discs that you have copied
yourself. DVD playback conditions
If video DVDs do not conform to the NTSC or PAL TV standards, they may create picture,
sound or other problems during playback.
COMAND is capable of playing back video
DVDs produced according to the following
standards:
R Region code 1 or region code 0 (no region
code)
R PAL or NTSC standard
You will generally find the relevant details
either on the DVD itself or on the DVD case.
i If you insert a video DVD with a different
region code, you will see a message to this
effect.
i COMAND is set to region code 1 at the
factory. This setting can be changed at an authorized Mercedes-Benz Center. This will
allow you to play video DVDs with a differ-
ent region code, provided that they are pro- duced in accordance with the PAL or NTSC
standard. The region code can be changed up to five times. Function restrictions
Depending on the DVD, it is possible that cer- tain functions or actions will be temporarily
blocked or may not function at all. As soon as
you try to activate these functions or actions, you will see the 0047symbol in the display. Inserting and removing DVDs
X Proceed as described in the "Inserting and
ejecting CDs and DVDs" section
(Y page 196). Switching to video DVD mode
Switching on automatically X
Insert a video DVD.
COMAND loads the medium inserted and
starts to play it.
Switching on using the DISC button X
Press the 003Abutton.
COMAND switches to the previous disc
operating mode.
By pressing the 003Abutton repeatedly, you
can switch modes in the following order:
R video DVD/CD/MP3 in the single DVD
drive (disc mode)
R memory card mode
R MUSIC REGISTER
R USB storage device
R Media Interface or audio AUX mode
R Bluetooth ®
audio mode Video
DVDmode
227Video Z
Page 238 of 270

Your COMAND equipment
These operating instructions describe all the
standard and optional equipment for your
COMAND system, as available at the time of
going to print. Country-specific differences
are possible. Please note that your
COMAND system may not be equipped with
all the features described. Overview
Important safety notes
G
WARNING
The CD/DVD drive is a class 1 laser product. If you open the housing of the CD/DVD drive,
there is a risk of exposure to invisible laser
radiation. This laser radiation could damage
your retina. There is a risk of injury.
Never open the housing. Always have main-
tenance and repair work carried out at a quali- fied specialist workshop. G
WARNING
If objects such as headphones/headsets or
external audio/video sources are not secured in the passenger compartment, they can be
flung around and hit vehicle occupants. There
is a risk of injury, for example in the event of
sudden braking or a sudden change in direc-
tion.
Always stow these items or similar objects
carefully so that they cannot be flung around, for example in a lockable vehicle stowage
compartment. equipment
Observe that a range of Rear Seat Entertain-
ment Systems are available for Mercedes-
Benz vehicles. In this Operator's Manual, the
Rear Seat Entertainment System Code 864 is
used for illustration purposes. If you have a
different Rear Seat Entertainment System in your vehicle, please refer to the separate prin-
ted operating instructions . Components
The Rear Seat Entertainment System
includes:
R two screens for the rear behind the front-
seat head restraints
R two remote controls
R a CD/DVD drive
R AUX jacks on both screens (AUX display)
and on the CD/DVD drive (AUX drive)
R two sets of cordless headphones 236
OverviewRea
r Seat Entertainment System
Page 268 of 270

Weather
front Explanation
Cold front If a cold front moves in, the
weather remains changeable
and there are often rain show-
ers and thunderstorms. The
air temperature decreases. Warm front This can mean longer periods
of rain and can lead to an
increase in cloud cover and a
slow increase in temperature. Stationary
front The weather front moves min-
imally. The weather remains
changeable in this area. Occlusion This occurs when a faster cold
front reaches an advancing
warm front and combines
with it. The weather remains
changeable and rainy within
an occlusion. Example: weather map showing the progress of a
tropical storm
0043
Position on the forecast path
0044 Current position of the cyclone
0087 Position on the previous path
Conditions: theTropical Storm Tracks Tropical Storm Tracks
layer is switched on (Y page 263) and weather
data is available.
A dotted line shows the previous path and the
forecast path of a tropical low-pressure area
(cyclone). Information on a cyclone
You can select individual points ( 0043,0044and
0087) on the path and display further informa-
tion on them.
X In the map, slide 009500520096,009700520064or009100520078 the
COMAND controller and slide the crosshair
to 0043, 0044or0087.
X Press 0098the COMAND controller.
Showing information (if available):
R name of the tropical storm and category
R time stamp
R speed and direction of propagation (Wind Wind)
R maximum wind speed ( Max. Wind Speed Max. Wind Speed)
i The directional movement speed is the
speed at which the storm cell of a tropical
storm moves.
A tropical storm is separated into different
categories according to the location at which
it develops. Region of origin Category
Atlantic, North and
South Pacific
Oceans
Tropical Low Tropical Low
Pressure System Pressure System
Atlantic, North and
South Pacific
Oceans
Tropical Rain Tropical Rain
Zone Zone
Atlantic, North and
South Pacific
Oceans
Tropical Storm Tropical Storm266
Weather mapSIRIUS Weather