2014 MERCEDES-BENZ B-CLASS SPORTS remote control
[x] Cancel search: remote controlPage 16 of 360
Function/notes
............................. 172
Important safety notes ..................172
Problem (malfunction) ...................175
Range of the sensors .....................173
Warning displa y............................. 173
PASSENGE RAIR BAG OFF
Problem s(malfunction) .................. 219
PASSENGER AIR BAG OFF indicator
lamp ...................................................... 47
Plastic trim (cleaning instructions) .290
Power washers .................................. 287
Power windows see Side windows
Program selector button ..................146
Protection of the environment General notes .................................. 21
Pulling away
Automatic transmission .................138 Q
Qualifie dspecialis tworkshop ...........25 R
Radar sensor system Activating/deactivating .................205
Display message ............................ 226
Radio
Selecting astation ......................... 196
see separate operating instructions
Radio-wave reception/
transmission in the vehicle
Declaratio nofconformity ................ 24
Readin glamp ..................................... 109
Rear compartment Setting the airv ents...................... 134
Rear fog lamp
Changing bulbs .............................. 115
Display message ............................ 222
Switching on/off ........................... 106
Rear lamps
Changing bulbs .............................. 115
see Lights Rear seat
Adjusting the angl eofthe
backrests ....................................... 256
Folding the backres tforwards/
back (vehicles without the EASY-
VARIO-PLUS system) .....................254
Folding the backrest forwards/
back (vehicle switht he EASY-
VARIO-PLUS system) .....................255
Fore-and-aft adjustment ................257
Rear vie wcamera
Cleaning instructions .....................289
Function/notes ............................. 179
Switching on/off ........................... 180
Rear-vie wmirror
Anti-glare (manual ).......................... 99
Dipping (automatic) .......................100
Rear window defroster
Problem (malfunction) ...................132
Switching on/off ........................... 131
Rear window wiper
Replacing the wiper blade .............. 119
Switching on/off ........................... 118
Refrigerant (air-conditioning
system)
Important safety notes ..................352
Refueling
Fuel gauge ....................................... 31
Important safety notes ..................150
Refueling proces s.......................... 151
see Fuel
Remote control
Garage door opener .......................273
Programming (garage door opener) 274
Replacing bulbs
Important safety notes ..................110
Overview of bul btypes .................. 111
Removing/replacing the cover
(front wheel arch) .......................... 112
Reportin gsafety defects ....................25
Reserve (fue ltank)
see Fuel
Reserve fuel
Display message ............................ 225
Warning lamp ................................. 245
see Fuel
Residual heat (climate control) ........132 14
Index
Page 19 of 360
Technical data
Capacities ...................................... 347
Emergency spare wheel .................343
Information .................................... 346
Tires/wheels ................................. 340
Vehicle data ................................... 353
TELEAID
Call priority .................................... 269
Downloading destinations
(COMAND) ..................................... 269
Downloading route s....................... 272
Emergency call .............................. 266
Geo fencing ................................... 273
Locating astolen vehicl e............... 271
MB info call button ........................268
Remote vehicle locking ..................271
Roadside Assistance button ..........267
Search &Send ............................... 270
Self-test ......................................... 266
Speed alert .................................... 273
System .......................................... 266
Triggering the vehicle alarm ........... 273
Vehicle remote malfunction
diagnosi s....................................... 271
Vehicle remote unlocking ..............270
Tele Aid
General notes ................................ 265
Telephone
Accepting acall............................. 198
Display message ............................ 236
Menu (on-board computer) ............197
Number from the phone book ....... .198
Redialing ........................................ 198
Rejecting/ending acall................. 198
Temperature
Coolant .......................................... 190
Outside temperature ..................... .191
Setting (climate control) ................128
Theft deterren tsystems
ATA (Anti-Theft Alarm system) .........70
Immobilize r...................................... 70
Through-loading ................................ 253
Time see separate operating instructions
TIREFIT kit .......................................... 296
Tire pressure Calling up (on-board computer) .....320
Checking manually ........................319Display message
............................ 231
Important safety notes ..................320
Maximum ....................................... 318
Notes ............................................. 317
Not reached (TIREFIT) ....................298
Reached (TIREFIT) ..........................298
Recommended ............................... 315
Tire pressure los swarning
system General notes ................................ 319
Important safety notes ..................319
Restarting ...................................... 319
Tire pressure monitoring system
Checking the tire pressure
electronically ................................. 322
Function/notes ............................. 320
General notes ................................ 320
Important safety notes ..................320
Restarting ...................................... 322
Warning lamp ................................. 248
Warning message .......................... 322
Tires
Aspect ratio (definition) .................335
Averag eweight of the vehicle
occupants (definition) ....................333
Bar (definition) ............................... 333
Changing awheel .......................... 336
Characteristics .............................. 333
Checking ........................................ 313
Definition of terms .........................333
Direction of rotatio n...................... 336
Display message ............................ 231
Distributio nofthe vehicle
occupants (definition) ....................335
DOT, Tire Identification Number
(TIN) .............................................. .332
DOT (Department of
Transportation) (definition) ............333
GAWR (Gross Axle Weight Rating)
(definition) ..................................... 334
GVW (Gross Vehicle Weight)
(definition) ..................................... 334
GVW R(Gross Vehicle Weight
Rating) (definition) .........................334
Important safety notes ..................312
Increase dvehicle weight due to
optional equipment (definition) ......333
Kilopascal (kPa )(definition) ...........334 Index
17
Page 76 of 360
Useful information
i This Operator's Manual describes all
models and all standard and optional
equipment of your vehicle available at the
time of publication of the Operator's
Manual. Country-specific differences are
possible. Please not ethat your vehicle may
not be equipped with all features
described. This also applies to safety-
related system sand functions.
i Read the information on qualified
specialist workshops: (Y page 25).SmartKey
Important safet
ynotes G
WARNING
If children are left unsupervised in the vehicle,
they could:
R open the doors, thus endangering other
people or road users.
R get out and disrupt traffic.
R operate the vehicle' sequipment.
Additionally, children could set the vehicle in
motion if, for example, they:
R release the parkin gbrake.
R shifting the automatic transmission out of
park position P
R Start the engine.
There is arisk of an acciden tand injury.
When leaving the vehicle, always tak ethe
SmartKey with you and lock the vehicle. Never
leave children or animals unattended in the
vehicle. Always keep the SmartKey out of
reach of children. G
WARNING
If persons, particularly children are subjected
to prolonged exposur etoextreme heat or
cold, ther eisarisk of injury, possibly even
fatal. Never leave children unattended in the
vehicle. G
WARNING
If you attach heavy or large objects to the
SmartKey, the SmartKey could be
unintentionally turned in the ignition lock .This
could cause the engine to be switched off.
There is arisk of an accident.
Do not attach any heavy or large objectsto
the SmartKey. Remove any bulky key rings
before inserting the SmartKey into the
ignition lock.
! Keep the SmartKey away from strong
magnetic fields. Otherwise, the remote
control function could be affected.
Strong magnetic fields can occur in the
vicinity of powerful electrical installations.
Do not keep the SmartKey:
R with electronic devices, e.g. amobile
phone or another SmartKey
R with metallic objects, e.g. coins or metal
foil
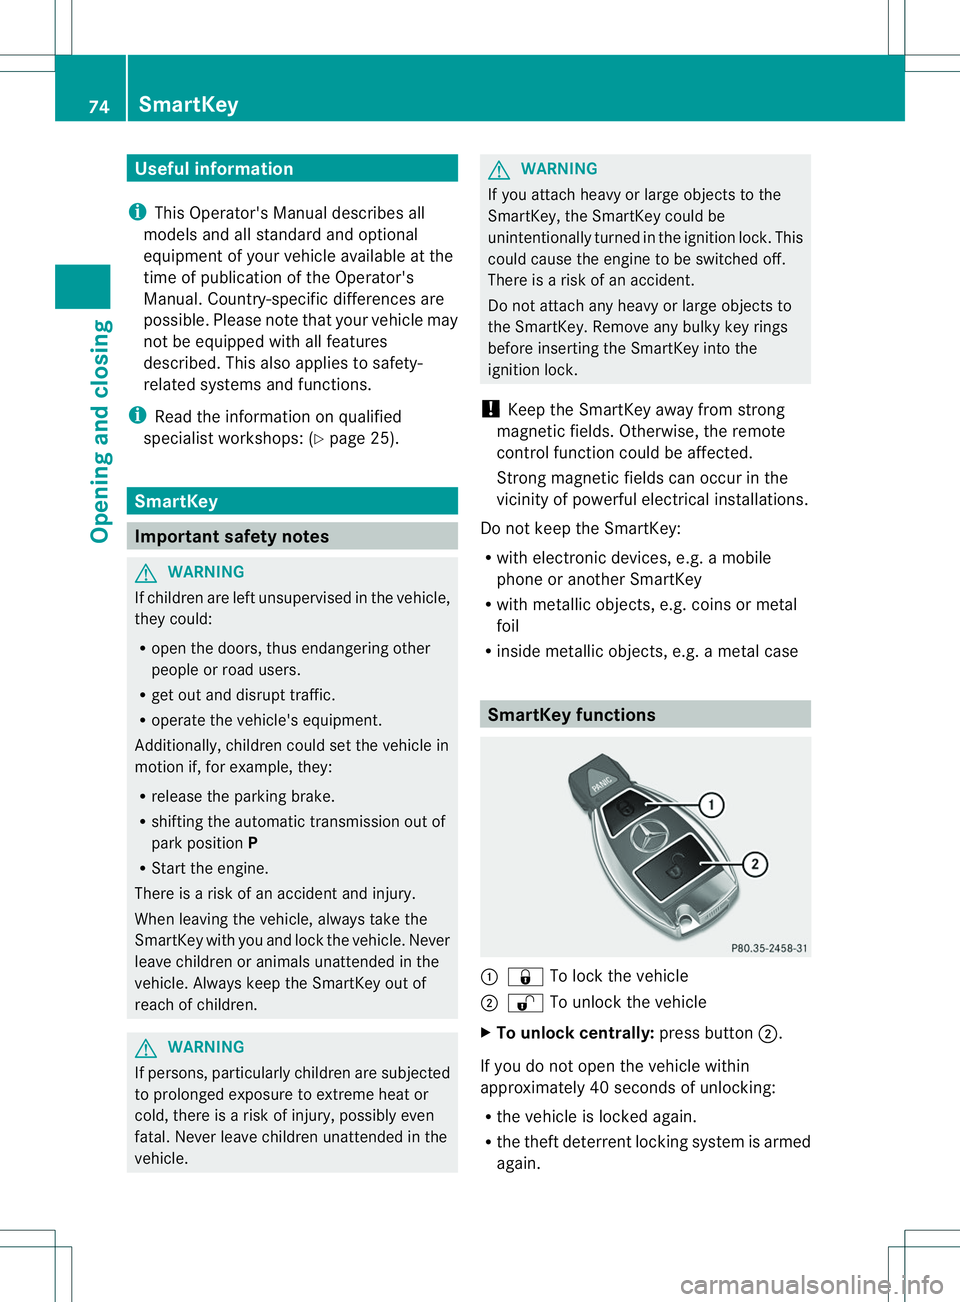
R inside metallic objects, e.g. ametal case SmartKey functions
001A
0010 To lock the vehicle
0010 0009 To unlock the vehicle
X To unlock centrally: press button0010.
If you do not open the vehicle within
approximately 40 seconds of unlocking:
R the vehicle is locked again.
R the theft deterrent locking system is armed
again. 74
SmartKeyOpening and closing
Page 80 of 360
Problems with the SmartKey
Problem Possible causes/consequences and
000B Solutions
You cannot lock or
unlock the vehicle
using the SmartKey. The SmartKey battery is discharged or nearly discharged.
X
Try again to lock/unlock the vehicle using the remote control
function of the SmartKey. Point the tip of the SmartKey at the
driver's door handle from close range and press the 0009or
0010 button.
If this does not work:
X Check the SmartKey battery and replace it if necessary
(Y page 76).
X Unlock (Y page 81) or lock (Y page 81) the vehicle using the
mechanical key. There is interference from
apowerful source of radio waves.
X Try again to lock/unlock the vehicle using the remote control
function of the SmartKey. Point the tip of the SmartKey at the
driver's door handle from close range and press the 0009/
0010 button. The SmartKey is faulty.
X
Unlock (Y page 81) or lock (Y page 81) the vehicle using the
mechanical key.
X Have the SmartKey checked at aqualified specialist workshop. You have lost a
SmartKey. X
Have the SmartKey deactivated at aqualified specialist
workshop.
X Report the loss immediately to the vehicle insurers.
X If necessary, have the locks changed as well. You have lost the
mechanical key. X
Report the loss immediately to the vehicle insurers.
X If necessary, have the locks changed as well. 78
SmartKeyOpening and closing
Page 272 of 360
i
The destination download function can
only be used if the vehicle is equipped with
an avigation system.
Route Assistance
This service is part of the mbrace PLUS
Package and cannot be purchased
separately.
i You can also use the Route Assistance
function if your vehicle is not equipped with
an avigation system.
Within the framework of this service, you
receive aprofessional and reliable form of
navigation support without having to leave
your vehicle.
The customer service representative finds a
suitable route depending on your vehicle's
curren tposition and the desired destination.
You will then be guided live through the
current route section.
Search &Send General notes
i
To use "Search &Send", your vehicle
must be equipped with mbrace and a
navigation system. Additionally, an mbrace
servic esubscription must be completed.
"Search &Send" is adestination entry
service. Adestination address which is found
on Google Maps ®
can be transferred via
mbrace directly to your vehicle's navigation
system.
Specifying and sending the destination
address
X Go to the website http://
www.maps.google.com and enter a
destination address intot he entry field.
X To send the destination address to the
e-mail address of your mbrace
account: click on the corresponding
button on the website.
i Example: If you select 'Sen
dtovehicle' and then
'Mercedes-Benz', the destination address
will be sent to your vehicle.
X When the "Send" dialog window appears:
Enter the e-mail address you specified
when setting up your mbrace accoun tinto
the correspondin gfield.
X Click "Send".
i Information on specific commands such
as "Address entry" or "Send" can be found
on the website.
Calling up destination addresses
X Switc hont he ignition.
The destination address is loaded intot he
vehicle's navigation system.
Ad isplay message appears, asking
whether navigation should be started.
X Select Yes by turning
0004000C000Bor sliding
0003000C0009 the COMAND controller and press
000E to confirm.
The system calculates the rout eand
subsequently starts the rout eguidance
wit hthe address entered.
i If you select No ,t
he address can be saved
in th eaddress book.
i If you have sen tmoret hano ne
destination address ,eachi ndividual
destination must be confirmed separately.
i Destination addresses are loaded in the
same order as th eorder in whic htheyw ere
sent.
If you own multiple Mercedes-Benz
vehicles wit hmbrace and activated mbrace
accounts:
If multiple vehicles are registere dunder the
same e-mail address ,the destination will
be sen ttoall the vehicles.
Vehicle remoteo pening You can use the vehicle remote opening if you
have unintentionally locked your vehicle and
ar
eplacement SmartKey is not available. 270
FeaturesStowage and features
Page 276 of 360
opener, contact an authorized Mercedes-
Benz Center.
Alternatively, you can call the following
telephone assistance services:
R
USA: Mercedes-Benz Customer
Assistance Center at
1-800-FOR-MERCedes
R Canada: Customer Servic eat
1-800-387-0100
R HomeLink ®
hotline 1-800-355-3515
(free of charge)
More information on HomeLink ®
and/or
compatible products is also available
online at http://www.homelink.com.
i Notes on the declaration of conformity
(Y page 24).
USA:F CC ID: CB2HMIHL4
Canada: IC: 279B-HMIHL4
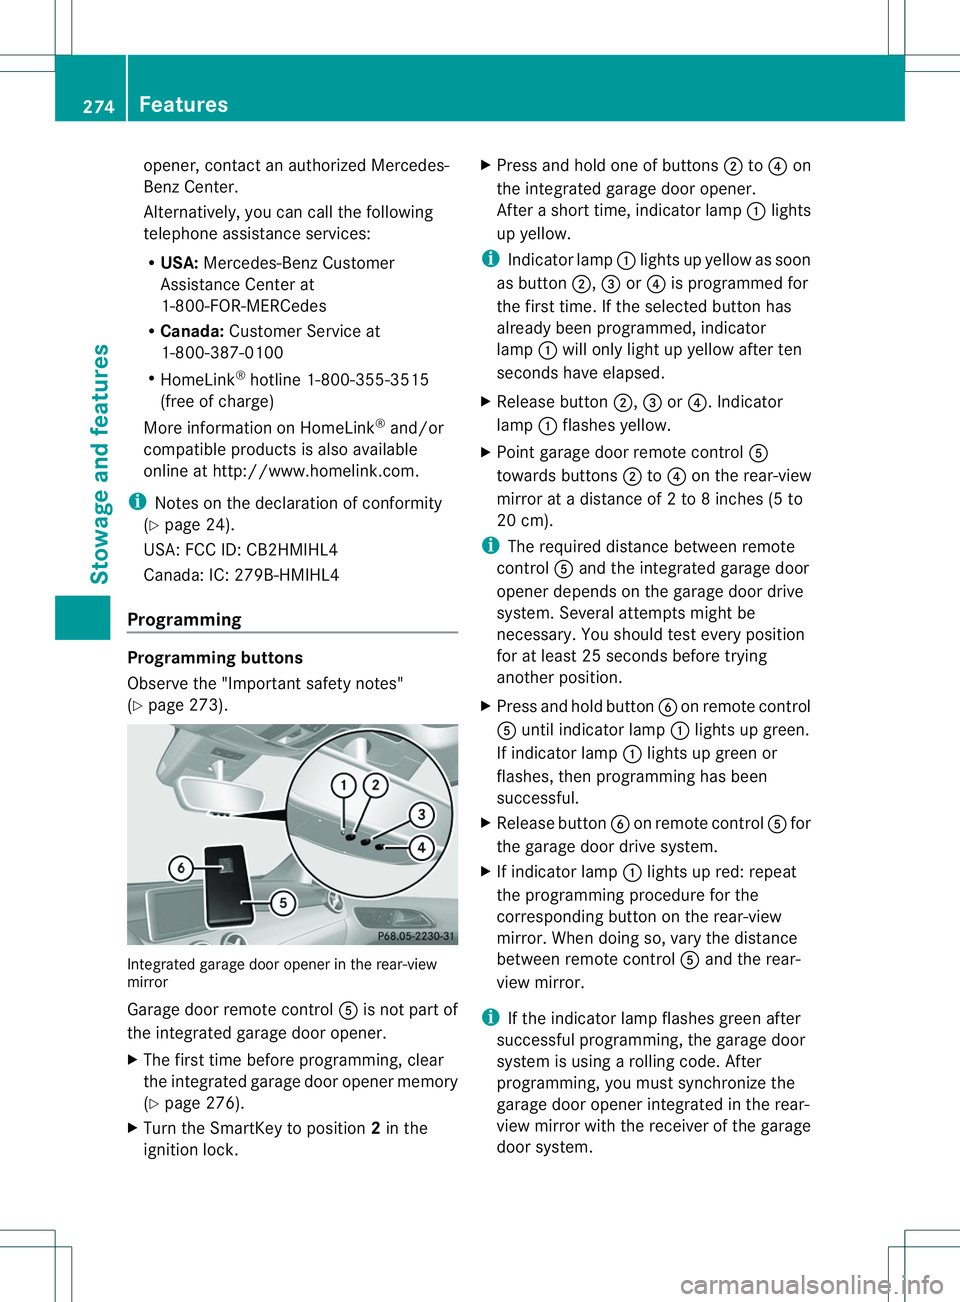
Programming Programming buttons
Observe the "Important safety notes"
(Y page 273). Integrated garage door opener in the rear-view
mirror
Garage door remote control
001Eis not part of
the integrated garage door opener.
X The first time before programming, clear
the integrated garage door opener memory
(Y page 276).
X Turn the SmartKey to position 2in the
ignition lock. X
Press and hold one of buttons 0010to0021 on
the integrated garage door opener.
After ashort time, indicator lamp 001Alights
up yellow.
i Indicator lamp 001Alights up yellow as soon
as button 0010,0023or0021 is programmed for
the first time. If the selected button has
already been programmed, indicator
lamp 001Awill only light up yellow after ten
seconds have elapsed.
X Release button 0010,0023or0021.I ndicator
lamp 001Aflashes yellow.
X Point garage door remote control 001E
towards buttons 0010to0021 on the rear-view
mirror at adistance of 2to8inches (5 to
20 cm).
i The required distance between remote
control 001Eand the integrated garage door
opener depends on the garage door drive
system. Several attempt smight be
necessary. You should tes tevery position
for at least 25 seconds before trying
another position.
X Press and hold button 0024on remote control
001E until indicator lamp 001Alights up green.
If indicator lamp 001Alights up green or
flashes, then programming has been
successful.
X Release button 0024on remote control 001Efor
the garage door drive system.
X If indicator lamp 001Alights up red: repeat
the programming procedure for the
corresponding button on the rear-view
mirror. When doing so, vary the distance
between remote control 001Eand the rear-
view mirror.
i If the indicator lamp flashes green after
successfu lprogramming, the garage door
system is using arolling code. After
programming, you must synchronize the
garage door opener integrated in the rear-
view mirror with the receive rofthe garage
door system. 274
FeaturesStowage and features
Page 277 of 360
Synchronizing the rolling code
Observe the "Important safety notes"
(Y
page 273).
Your vehicle must be within reach of the
garage door or exterior gate drive. Make sure
that neither your vehicle nor any persons/
objectsa re present within the sweep of the
door or gate.
X Turn the SmartKey to position 2in the
ignition lock.
X Press the program button of the door or
gate drive (see the door or gate drive
operating instructions, e.g. under
"programming of additional remote
controls").
i Usually, you now have 30seconds to
initiate the next step.
X Press previously programmed button 0010,
0023 or0021 of the integrated garage door
opener until the door closes.
The rolling code synchronization is then
complete.
Notes on programming the remote
control
Canadianr adio frequency laws require a
"break "(or interruption )ofthetransmission
signals after broadcastin gfor afew seconds.
Therefore, these signals may no tlast long
enough for th eintegrate dgarag edoor
opener. The signal is no trecognized during
programming. Comparable with Canadian
law, some U.S.g arage door openers also
feature a"break".
Procee dasfollows:
R if you live in Canada
R if you have difficulties programmin gthe
garag edoor opener (regardless of where
you live) when usin gthe programming
steps X
Press and hold on eofbuttons 0010to0021 on
th ei ntegrate dgarag edoor opener.
Afte ras hort time, indicator lamp 001Alights
up yellow.
X Release the button.
Indicator lamp 001Aflashes yellow.
X Press button 0024of garage door remote
control 001Efor two seconds, then release it
for two seconds.
X Press button 0024againf or two seconds.
X Repeat this sequence on button 0024of
remote control 001Euntil indicator lamp 001A
lights up green.
If indicator lamp 001Aturns red, repeat the
process.
X Continue with the other programming
steps (see above).
Problems when programming
If you are experiencing problems
programming the integrated garage door
opener on the rear-view mirror, take noteof
the following instructions:
R Check the transmitter frequency of garage
door drive remote control 001E.This can
usually be found on the back of the remote
control.
The integrated garage door opener is
compatible with devices that have units
which operate in the frequency range of
280to4 33MHz.
R Replace the batteries in garage door
remote control 001E.This increases the
likelihood that garage door remote control
001E will transmit astronga nd precis esignal
to the integrated garage door opene rinthe
rear-view mirror.
R When programming, hold remote control
001E at varying distances and angles from the
button that you are programming. Try
various angles at adistance between 2and
12 inches (5to 30 cm) or at the same angle
but at varying distances.
R If another remote control for the same
garage door drive is available, repeat the Features
275Stowage and features Z
Page 278 of 360
same programming steps with this remote
control. Before performing these steps,
make sure that new batteries have been
installed in garage door drive remote
control
001E.
R Note that some remote controls only
transmit for alimited amount of time (the
indicator lamp on the remote control goes
out). Press button 0024on remote control
001E againb efore transmission ends.
R Align the antenna cable of the garage door
opener unit. This can improve signal
reception/transmission.
Opening/closing the garage door After it has been programmed, the integrated
garage door opener perform sthe function of
the garage door system remot econtrol.
Please also read the operatin ginstructions
for the garage door system.
X Turn the SmartKey to position 2in the
ignition lock.
X Press button 0010,0023or0021 which you have
programmed to operate the garage door.
Garage door system with afixed code:
indicator lamp 001Alights up green.
Garage door system with arolling code:
indicator lamp 001Aflashes green.
i The transmitter will transmit asignal as
long as the button is pressed. The
transmission is halted after amaximum of
ten seconds and indicator lamp 001Alights
up yellow. Press button 0010,0023or0021 again
if necessary.
Clearing the memory X
Turn the SmartKey to position 2in the
ignition lock.
X Press buttons 0010and 0021.
The indicator lamp lights up yellow.
X Press and hold buttons 0010and 0021until the
indicator lamp turn sgreen. i
Make sure that you clear the memory of
the integrated garage door opener before
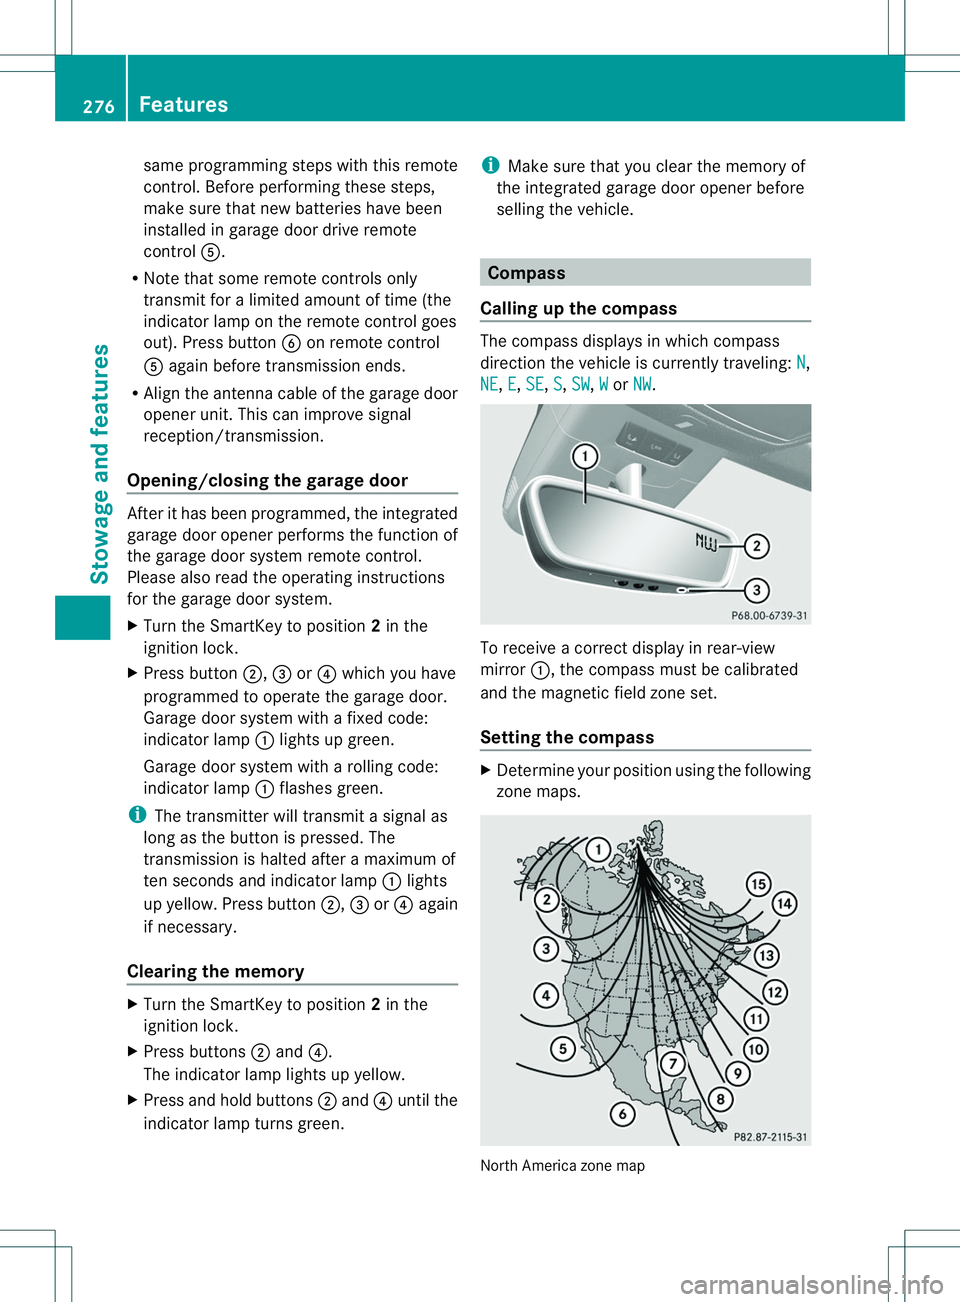
selling the vehicle. Compass
Calling up the compass The compass displays in which compass
direction the vehicle is currently traveling:
N ,
NE ,
E ,
SE ,
S ,
SW ,
W or
NW .
To receive
acorrect display in rear-view
mirror 001A,the compass must be calibrated
and the magnetic field zones et.
Setting the compass X
Determine your position using the following
zonem aps. Nort
hAmerica zon emap 276
FeaturesStowage and features