2014 MERCEDES-BENZ B-CLASS SPORTS dimensions
[x] Cancel search: dimensionsPage 18 of 360
SmartKey
Changing the battery .......................76
Changing the programming .............75
Checking the battery .......................76
Convenience closing feature ............84
Convenience opening feature ..........84
Display message ............................ 237
Door central locking/unlocking .......74
Important safety notes ....................74
Loss ................................................. 78
Mechanical key ................................ 75
Positions (ignition lock) .................137
Problem (malfunction) .....................78
Starting the engine ........................138
SmartKey position s(ignition lock) ..137
Sno wchains ...................................... 315
Sockets Center console .............................. 264
Luggage compartment ...................265
Points to observe before use .........264
Rea rcompartmen t......................... 265
Specialist workshop ............................ 25
Speed, controlling see Cruise control
Speedometer
Activating/deactivating the
additiona lspeedometer .................202
Digita l............................................ 195
In the Instrument cluster .................31
Segments ...................................... 191
Selecting the unit of measurement 202
see Instrument cluster
SRS
see SRS (Supplemental Restraint
System)
SRS (Supplemental Restraint
System)
Display message ............................ 216
Introduction ..................................... 40
Warning lamp ................................. 244
Warning lamp (function) ................... 41
Standin glamps
Changing bulbs .............................. 113
Display message ............................ 222
Switching on/off ........................... 106
Start/stop function
see ECO start/stop function
Starting (engine) ................................ 137 Status overview (on-board
computer)
.......................................... 199
STEE RCONTROL .................................. 70
Steering (display message) ..............236
Steering wheel Adjusting (manually )........................ 98
Button overview ............................... 33
Buttons (on-board computer) ......... 191
Cleaning ......................................... 290
Important safety notes ....................98
Paddle shifters ............................... 147
Steering wheel paddle shifters ........147
Stowage areas ................................... 251
Stowage compartments Armrest (front) ............................... 252
Armrest (under) ............................. 252
Center console .............................. 251
Cuph olders ................................... 261
Eyeglasses compartment ...............251
Glove box ...................................... .251
Important safety information .........251
Parce lnet ...................................... 253
Under driver's seat/front-
passenger sea t.............................. 252
Stowage space
Center console (rear) .....................252
Summer tires ..................................... 314
Sun visor ............................................ 263
Surround lighting (on-board
computer) .......................................... 204
Switchin gair-recirculation mode
on/off ................................................. 132
Switchin goff the alarm (ATA) ............70 T
Tachometer ........................................ 191
Tailgate Display message ............................ 235
Emergency unlocking .......................82
Important safety notes ....................81
Opening/closing (from outside) .......82
Opening dimensions ......................353
Tail lamps
Display message ............................ 221
see Lights
Tank content
Fuel gauge ....................................... 3116
Index
Page 21 of 360
Loading
.......................................... 323
Locking (in an emergency) ...............81
Locking (SmartKey) .......................... 74
Lowering ........................................ 339
Maintenance .................................... 22
Parking for along period ................ 155
Pulling away ................................... 138
Raising ........................................... 337
Reporting problems .........................25
Securing from rolling away ............337
Towing away .................................. 305
Tow-starting ................................... 305
Transporting .................................. 307
Unlocking (in an emergency) ...........81
Unlocking (SmartKey) ......................74
Vehicle data ................................... 353
Vehicle data ....................................... 353
Vehicle dimensions ...........................353
Vehicle emergency locking ................81
Vehicle identification number see VIN
Vehicle identification plate ..............346
Vehicle tool kit .................................. 294
Video (DVD) ........................................ 197
VIN ...................................................... 346W
Warning and indicator lamps ABS ................................................ 239
Brakes ........................................... 239
Check Engine ................................. 245
Coolant .......................................... 245
Distance warning ........................... 247
DISTRONI CPLUS ........................... 247
ESP ®
.............................................. 241
ESP ®
OFF ....................................... 242
Fuel tank ........................................ 245
Overview .......................................... 32
PASSENGER AIR BAG OFF
indicator lamp .................................. 47
Reserve fuel ................................... 245
Seat bel t........................................ 237
SRS ................................................ 244
Tire pressure monitor ....................248
Warranty ............................................ 346
Washer fluid Display message ............................ 236Whee
lboltt ightening torque ...........339
Whee lchock ...................................... 337
Wheels Changing awheel .......................... 336
Checking ........................................ 313
Cleaning ......................................... 287
Cleaning (warning) .........................336
Emergency spare wheel .................342
Important safety notes ..................312
Interchanging/changing ................336
Mounting anew wheel ................... 339
Mounting awheel .......................... 337
Removing awheel .......................... 339
Storing ........................................... 336
Tightening torqu e........................... 339
Whee lsize/tir esize ....................... 340
Windo wcurtain air bag
Display message ............................ 217
Operation ........................................ .47
Windows
see Side windows
Windshield
Defrosting ...................................... 130
Windshiel dwasher system
Adding washer fluid .......................284
Notes ............................................. 352
Windshiel dwipers
Display message ............................ 236
Problem (malfunction) ...................120
Rea rwindow wiper ........................ 118
Replacing the wiper blades ............118
Switching on/off ........................... 117
Winte rdriving
Slippery roa dsurface s................... 160
Snow chains .................................. 315
Winte roperation
General notes ................................ 314
Winte rtires
M+S tires ....................................... 314
Wiper blades
Cleaning ......................................... 288
Important safety notes ..................118
Replacing (rea rwindow) ................ 119
Replacing (windshield )................... 118
Wooden trim (cleaning instructions) 290
Workshops see Qualified specialist workshop Index
19
Page 84 of 360
particularly if the vehicle is moving, exhaust
fumes could enter the passenger
compartment .There is arisk of poisoning.
Turn off the engine before opening the
tailgate. Never drive with the tailgate open. G
WARNING
If persons, particularly children are subjected
to prolonged exposure to extremeh eat or
cold, there is arisk of injury, possibly even
fatal. Never leave children unattended in the
vehicle.
! The tailgate swings upwards and to the
rear when opened. Therefore, make sure
that there is sufficient clearance above and
behind the tailgate.
i The opening dimensions of the tailgate
can be found in the "Vehicle data" section
(Y page 353).
You should preferably place luggage or loads
in the cargo compartment. Observe the
loading guidelines (Y page 250).
Do not leave the SmartKey in the cargo
compartment. You could otherwise lock
yourself out.
The tailgate can be:
R opened and closed manually from outside
R unlocked from inside with the mechanical
key Opening/closing from outside
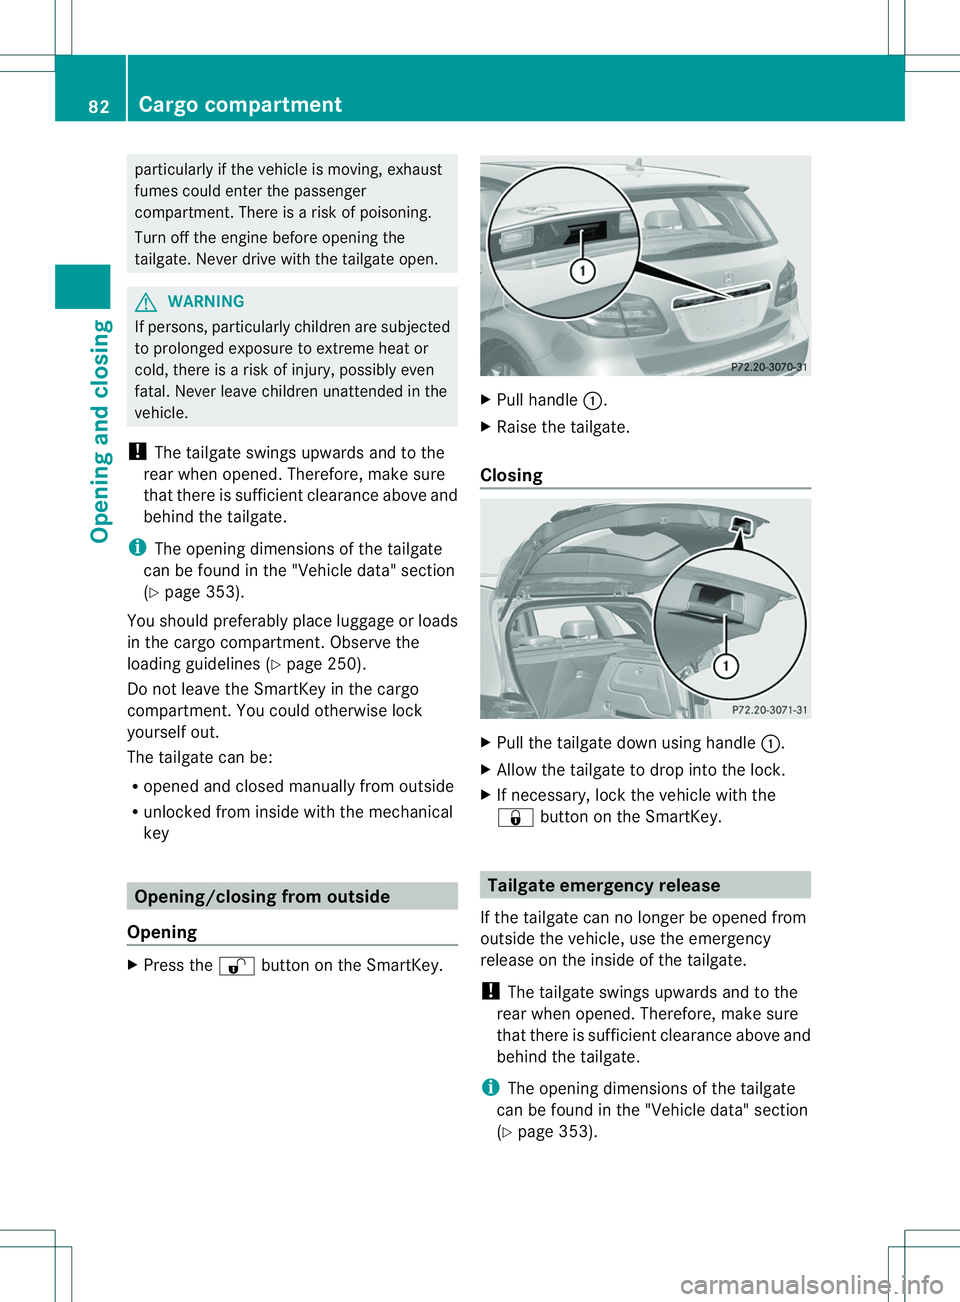
Opening X
Press the 0009button on the SmartKey. X
Pull handle 001A.
X Raise the tailgate.
Closing X
Pull the tailgate down using handle 001A.
X Allow the tailgate to drop into the lock.
X If necessary, lock the vehicle with the
0010 button on the SmartKey. Tailgate emergency release
If the tailgate can no longer be opened from
outside the vehicle, use the emergency
release on the inside of the tailgate.
! The tailgate swings upwards and to the
rear when opened. Therefore, make sure
that there is sufficient clearance above and
behind the tailgate.
i The opening dimensions of the tailgate
can be found in the "Vehicle data" section
(Y page 353). 82
Cargo compartmentOpening and closing
Page 314 of 360
Useful information
i This Operator's Manual describes all
models and all standard and optional
equipment of your vehicle available at the
time of publication of the Operator's
Manual. Country-specific differences are
possible. Please not ethat your vehicle may
not be equipped with all features
described. This also applies to safety-
related system sand functions.
i Read the information on qualified
specialist workshops: (Y page 25).Important safet
ynotes G
WARNING
If wheels and tires of the wrong size are used,
the wheel brakes or suspension components
may be damaged. There is arisk of an
accident.
Always replac ewheels and tires with those
that fulfill the specifications of the original
part.
When replacing wheels, make sure to use the
correct:
R designation
R model
When replacing tires, make sure to use the
correct:
R designation
R manufacturer
R model G
WARNING
Af lat tir eseverely impairs the driving,
steerin gand braking characteristics of the
vehicle. There is arisk of accident.
Tires without run-flat characteristics:
R do not drive with aflat tire.
R immediately replac ethe flat tir ewith your
emergenc yspare wheel or spare wheel, or
consult aqualified specialist workshop. Tires with run-flat characteristics:
R
pay attention to the information and
warnin gnotices on MOExtended tires (tires
with run-flat characteristics).
Accessories that are not approved for your
vehicle by Mercedes-Ben zorthat are not
being used correctly can impair operating
safety.
Before purchasing and using non-approved
accessories, visit aqualified specialist
workshop and inquire about:
R suitability
R legal stipulations
R factory recommendations
Information on dimensions and types of
wheels and tires for your vehicle can be found
(Y page 340).
Information on air pressure for the tires on
your vehicle can be found:
R on the vehicle's Tire and Loading
Information placard on the B-pillar
R on the tire pressure label on the fuel filler
flap
R under "Tire pressure"
i Further information on wheels and tires
can be obtained at any qualified specialist
workshop. Operation
Information on driving
R If the vehicle is heavily loaded, check the
tire pressures and correct them if
necessary.
R While driving, pay attention to vibrations,
noises and unusual handling
characteristics, e.g. pulling to one side.
This may indicate that the wheels or tires
are damaged. If you suspect that atire is
defective, reduce your speed immediately.
Stop the vehicle as soon as possible to
check the wheels and tires for damage.
Hidden tire damage could also be causing 312
OperationWheels and tires
Page 318 of 360
Follow recommende
dtire inflation pressures
and check the pressure of al lthe tires
including the spare wheel:
R monthly, at least
R if the loa dchanges
R before beginning along journey
R under different operating conditions, e.g.
off-roa ddriving
If necessary ,correct the tire pressure.
Use asuitabl epressure gaug etocheck the
tire pressure. The outer appearance of atire
doe snot permit any reliabl econclusio nabout
the tire pressure. On vehicles equipped with
the electronic tire pressure monitor, the tire
pressure can be checked in the on-board
computer.
The recommended tire pressures for the tires
mounted at the factory can be found on the
labels described here.
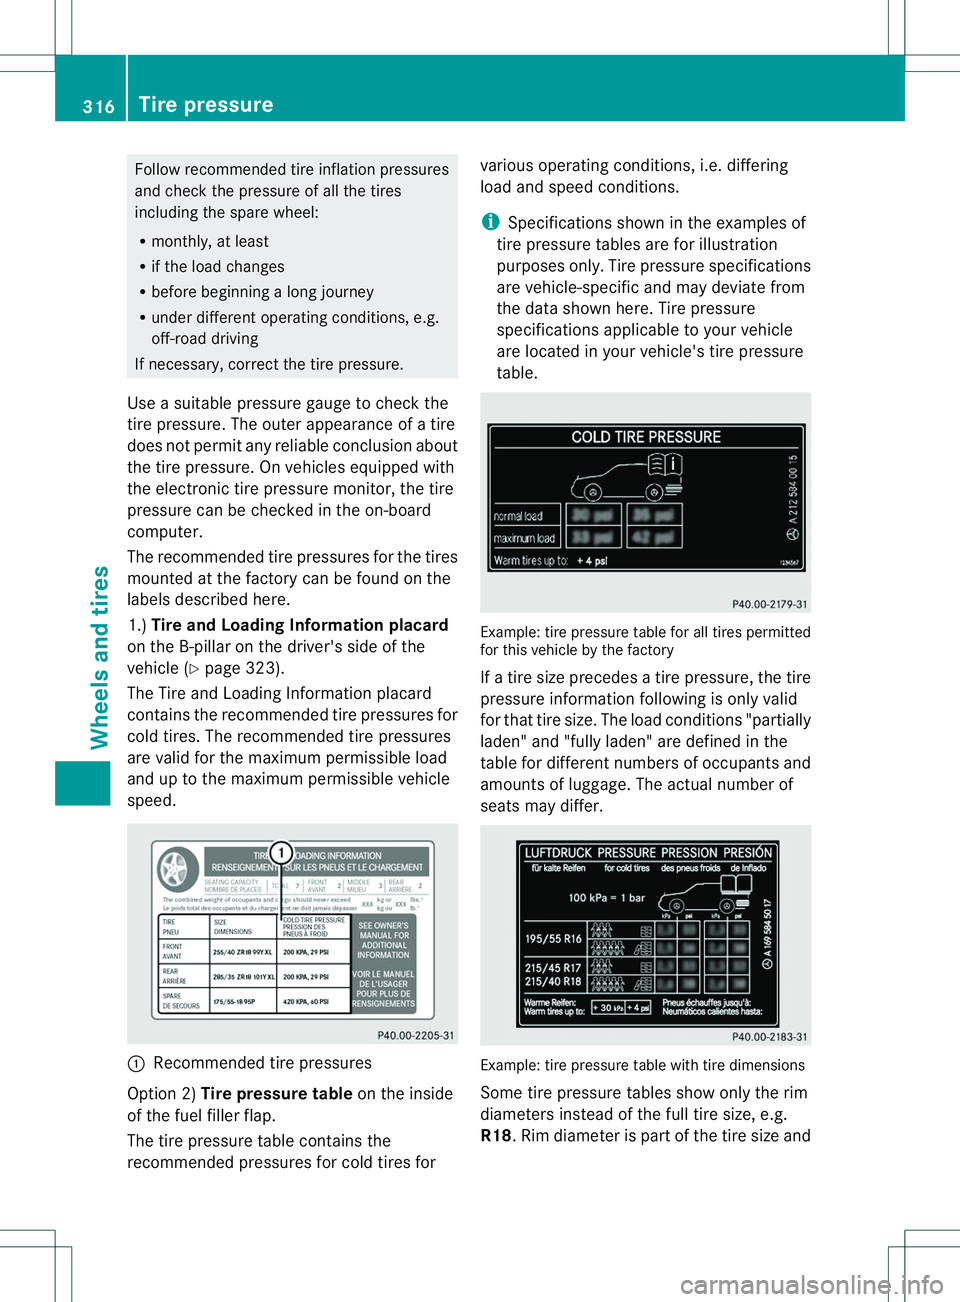
1.) Tirea nd Loading Information placard
on the B-pillar on the driver' sside of the
vehicle (Y page 323).
The Tire and Loading Information placard
contains the recommended tire pressures for
cold tires .The recommended tire pressures
are valid for the maximum permissible load
and up to the maximum permissible vehicle
speed. 001A
Recommended tire pressures
Option 2) Tire pressuret ableon the inside
of the fuel filler flap.
The tire pressure table contains the
recommended pressures for cold tires for various operating conditions, i.e. differing
load and speed conditions.
i
Specifications shown in the examples of
tire pressure tables are for illustration
purposes only. Tire pressure specifications
are vehicle-specific and may deviate from
the data shown here. Tire pressure
specifications applicable to your vehicle
are located in your vehicle's tire pressure
table. Example: tire pressure table for all tires permitted
for this vehicle by the factory
If
at ire size precedes atire pressure, the tire
pressure information following is only valid
for that tire size. The load conditions" partially
laden" and "fully laden" are defined in the
table for different numbers of occupants and
amounts of luggage. The actual number of
seats may differ. Example: tire pressure table with tire dimensions
Some tire pressure tables show only the rim
diameters instead of the full tire size, e.g.
R18.R
im diameter is part of the tir esize and 316
Tir
ep ressureWheels and tires
Page 338 of 360
Changing
awheel Flat tire
You can find information on wha ttodointhe
event of aflat tire in the "Flat tire" section
(Y page 295). Information on driving with
MOExtended tires in the event of aflat tire
can be found under "MOExtended tires (tires
with run-flat characteristics" (Y page 295).
Vehicle with emergency sparew heel:in
the event of aflat tire, the emergenc yspare
wheel is mounted as described under
"Mounting awheel" ( Ypage 337). Rotating the wheels
G
WARNING
Interchangin gthe front and rear wheels may
severely impair the driving characteristics if
the wheels or tires have different dimensions.
The wheel brakes or suspension components
may also be damaged. There is arisk of
accident.
Rotate front and rear wheels only if the wheels
and tires are of the same dimensions.
! On vehicles equipped with atire pressure
monitor, electronic components are
located in the wheel.
Tire-mounting tools should not be used
near the valve. This could damage the
electronic components.
Only have tires changed at aqualified
specialist workshop.
Always pay attention to the instructions and
safety notes when changing awheel
(Y page 336).
The wear pattern sonthe front and rear tires
differ, depending on the operating conditions.
Rotate the wheels before aclear wear pattern
has formed on the tires. Frontt ires typically
wear more on the shoulders and the rear tires
in the center.
If your vehicle's tire configuration allows, you
can rotatet he wheels according to the intervals in the tire manufacturer's warranty
book in your vehicle documents. If no
warranty book is available, the tires should be
rotated every 3,000 to 6,000 miles
(5,000 to
10,000 km), or earlier if tire wear requires. Do
not change the direction of wheel rotation.
Clean the contac tsurface softhe wheel and
the brake disc thoroughly every time awheel
is rotated. Check the tire pressure and, if
necessary, restart the tire pressure loss
warning system or the tire pressure monitor. Direction of rotation
Tires with aspecified direction of rotation
have additional benefits, e.g. if there is arisk
of hydroplaning. You will only gain these
benefits if the correct direction of rotation is
maintained.
An arrow on the sidewall of the tire indicates
its correct direction of rotation. Storing wheels
Storew heels that are not being used in acool,
dry and preferably dark place. Protect the
tires from oil, grease, gasoline and diesel. Cleaningt
he wheels G
WARNING
The water jet from acircular jet nozzle (dirt
blasters) can cause invisible exterior damage
to the tires or chassis components.
Components damaged in this way may fail
unexpectedly. There is arisk of an accident.
Do not use power washers with circular jet
nozzles to clean the vehicle. Have damaged
tires or chassis components replaced
immediately. 336
Changing
awheelWheels and tires
Page 344 of 360
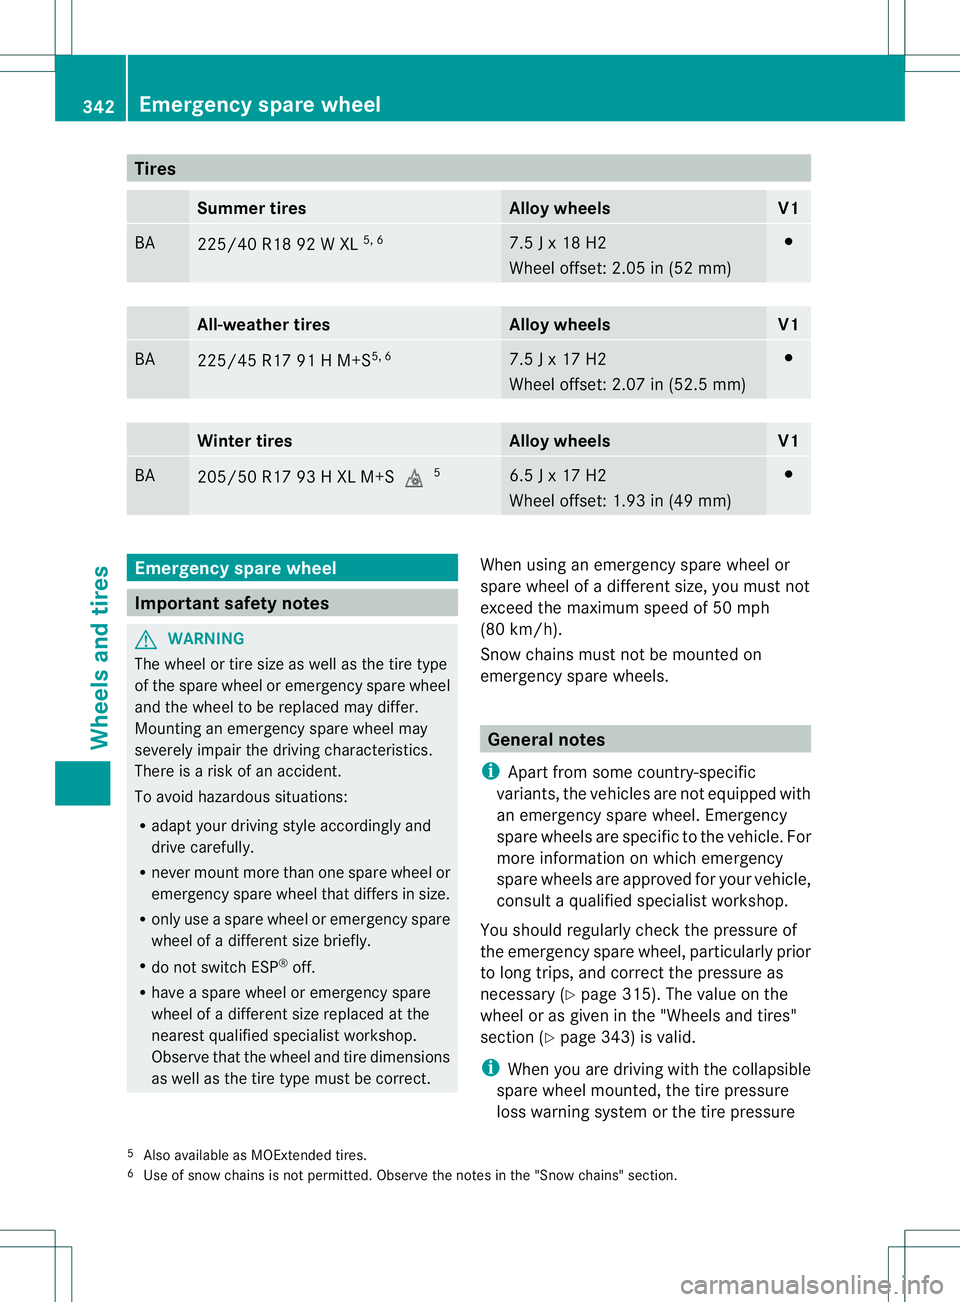
Tires
Summe
rtires Allo
ywheels V1
BA
225/40 R18 92
WXL5, 6 7.5
Jx18H2
Whee loffset: 2.05 in (52 mm) 0012
All-weather tires Alloy wheels V1
BA
225/45 R17 91
HM+S5, 6 7.5
Jx17H2
Whee loffset: 2.07 in (52.5 mm) 0012
Winte
rtires Alloy wheels V1
BA
205/50 R17 93
HXLM+S000E 5 6.5
Jx17H2
Whee loffset: 1.93 in (49 mm) 0012
Emergency spare wheel
Important safety notes
G
WARNING
The wheel or tire size as wel lasthe tire type
of the spare wheel or emergency spare wheel
and the wheel to be replaced may differ.
Mounting an emergency spare wheel may
severely impair the driving characteristics.
There is arisk of an accident.
To avoi dhazardou ssituations:
R adapt you rdriving style accordingly and
drive carefully.
R never mount more than one spare whee lor
emergency spare whee lthat differs in size.
R only use aspare whee loremergency spare
whee lofad ifferent size briefly.
R do not switch ESP ®
off.
R have aspare whee loremergency spare
whee lofad ifferent size replaced at the
nearest qualified specialist workshop.
Observe that the whee land tire dimensions
as wellast he tire type must be correct. When using an emergency spare whee
lor
spare whee lofadifferent size, you must not
exceed the maximu mspee dof50m ph
(80 km/h).
Snow chains must not be mounted on
emergency spare wheels. General notes
i Apart from some country-specific
variants, the vehicles are not equipped with
an emergency spare wheel. Emergency
spare wheels are specifi ctothe vehicle. For
more information on which emergency
spare wheels are approved for your vehicle,
consult aqualified specialist workshop.
You should regularly check the pressure of
the emergency spare wheel, particularly prior
to long trips, and correct the pressure as
necessary (Y page 315). The value on the
wheel or as given in the "Wheels and tires"
section (Y page 343) is valid.
i When you are driving with the collapsible
spare wheel mounted, the tire pressure
loss warning system or the tire pressure
5 Also available as MOExtended tires.
6 Use of snow chains is not permitted. Observe the notes in the "Snow chains" section. 342
Emergency sparew
heelWheels and tires
Page 355 of 360
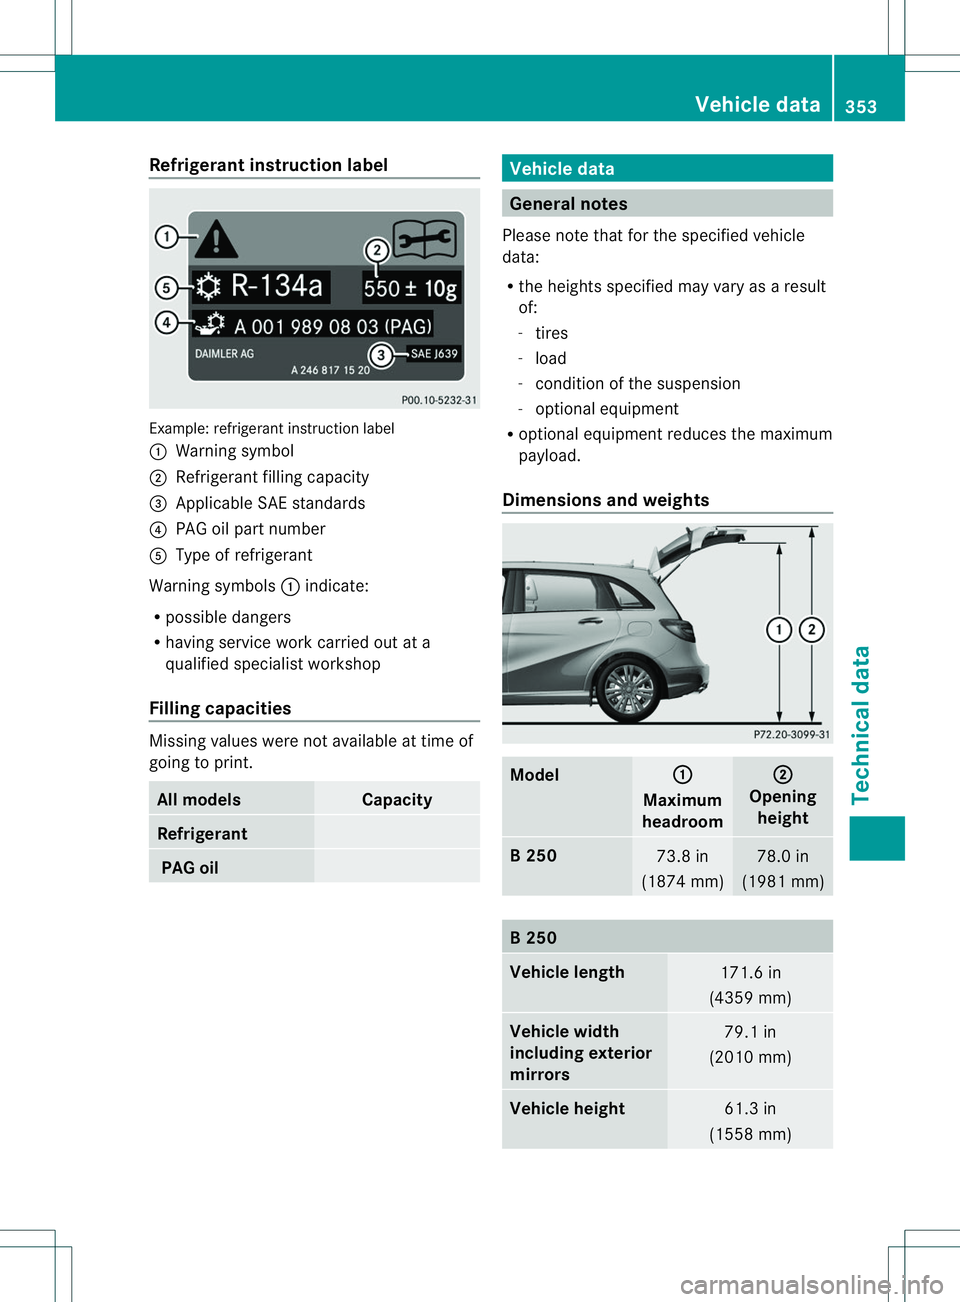
Refrigerant instructio
nlabel Example
:refrigerant instruction label
001A Warning symbol
0010 Refrigerant filling capacity
0023 Applicabl eSAE standards
0021 PAG oi lpartn umber
001E Type of refrigerant
Warning symbols 001Aindicate:
R possible dangers
R having service work carrie doutat a
qualified specialist workshop
Fillin gcapacities Missing value
sweren ot available at time of
going to print. Al
lm odels Capacity
Refrigerant
PA
Go il Vehicle data
Genera
lnotes
Please not ethat for the specified vehicle
data:
R the height sspecified may vary as aresult
of:
- tires
- load
- condition of the suspension
- optional equipment
R optional equipmen treduces the maximum
payload.
Dimensions and weights Model 001A
Maximum
headroom 0010
Opening
height B2
50 73.
8in
(187 4mm) 78.
0in
(198 1mm) B2
50 Vehicle length
171.6 in
(435 9mm) Vehicle width
including exterior
mirrors
79.
1in
(201 0mm) Vehicle height
61.
3in
(155 8mm) Vehicle data
353Technical data Z