2014 MERCEDES-BENZ B-CLASS SPORTS height
[x] Cancel search: heightPage 98 of 360
With this function you can adjust the distance
between the head restraint and the back of
the seat occupant's head.
X
To adjust forwards: pull the head restraint
forwards in the direction of the arrow until
it engages.
There are several notches.
X To move backwards: press and hold
release button 001Aand push the head
restraint backwards.
X When the head restraint is in the desired
position ,release the button and make sure
that the head restraint is engaged in
position.
Adjusting the height of the head
restraints electrically X
To adjust the head restraint height: slide
the switch for head restraint adjustment
(Y page 95) up or down in the direction of
the arrow.
Rear seat head restraints Adjusting the rear seat head restraint
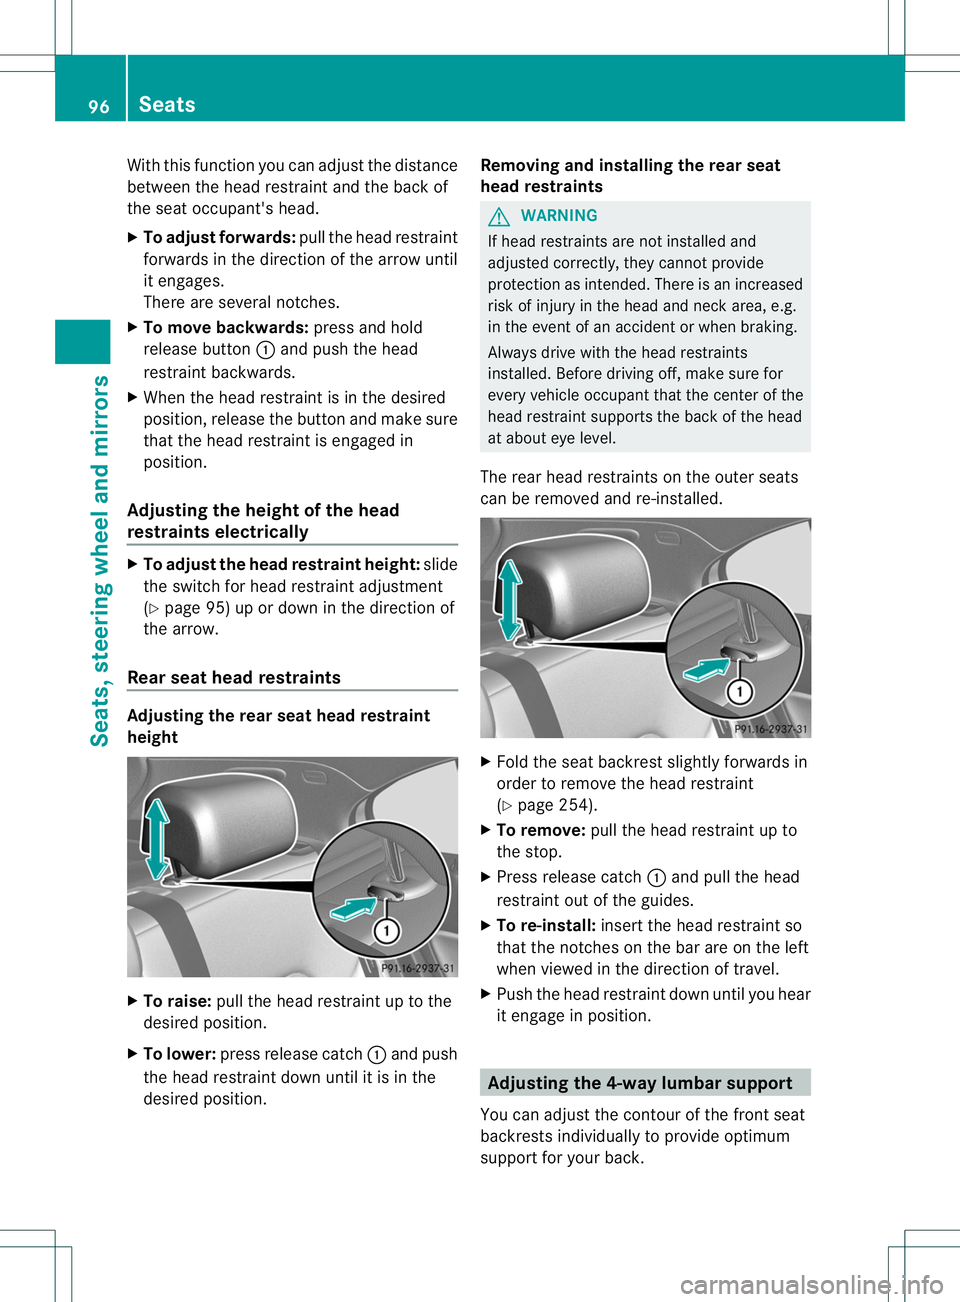
height
X
To raise: pull the head restraint up to the
desired position.
X To lower: press release catch 001Aand push
the head restraint down until it is in the
desired position. Removing and installing the rear seat
head restraints G
WARNING
If head restraints are not installed and
adjusted correctly, they cannot provide
protection as intended. There is an increased
risk of injury in the head and neck area, e.g.
in the event of an accident or when braking.
Always drive with the head restraints
installed. Befor edriving off, make sure for
every vehicle occupant that the center of the
head restraint supports the back of the head
at about eye level.
The rear head restraints on the outer seats
can be removed and re-installed. X
Fold the seat backres tslightly forwards in
order to remove the head restraint
(Y page 254).
X To remove: pull the head restraint up to
the stop.
X Press release catch 001Aand pull the head
restraint out of the guides.
X To re-install: insert the head restraint so
that the notches on the bar are on the left
when viewed in the direction of travel.
X Push the head restraint down until you hear
it engage in position. Adjusting th
e4-way lumbar support
You can adjust the contour of the front seat
backrest sindividually to provide optimum
support for your back. 96
SeatsSeats, steering wheel and mirrors
Page 100 of 360
Problems with the seat heating
Problem Possible causes/consequences and
000B Solutions
The seat heating has
switched off
prematurely or cannot
be switched on. The on-board voltage is too low because too many electrical
consumers are switched on.
X
Switch off electrical consumers that you do not need, such as
the rear window defroster or interior lighting.
Once the battery is sufficiently charged, the seat heating will
switch back on automatically. Steering wheel
Important safety notes
G
WARNING
You could lose control of your vehicle if you
do the following while driving:
R adjust the driver's seat, head restraint,
steering wheel or mirrors
R fasten the seat belt
There is arisk of an accident.
Adjust the driver's seat, head restraint,
steering wheel and mirror and fasten your
seat belt before startingt he engine.G
WARNING
Children could injure themselves if they
adjust the steering wheel. There is arisk of
injury.
When leaving the vehicle, always take the
SmartKey with you and lock the vehicle. Never
leave children unsupervised in the vehicle. Adjusting the steering wheel
G
WARNING
If the steering wheel is unlocked while the
vehicle is in motion, it could change position
unexpectedly. This could cause you to lose
control of the vehicle. There is arisk of an
accident. Before startingo
ff, make sure the steering
wheel is locked. Never unlock the steering
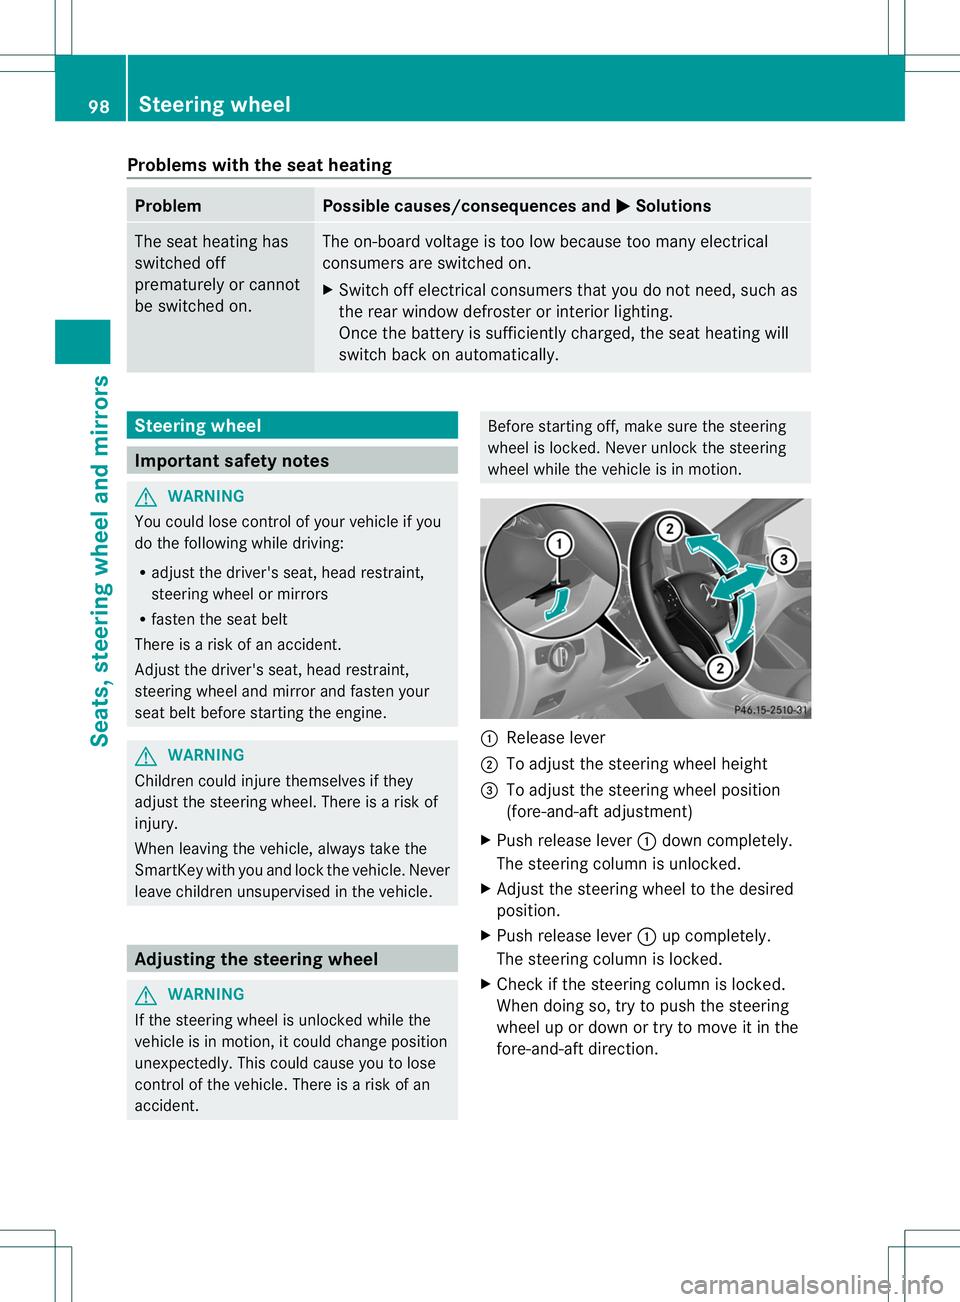
wheel while the vehicle is in motion. 001A
Release lever
0010 To adjust the steering wheel height
0023 To adjust the steering wheel position
(fore-and-aft adjustment)
X Push release lever 001Adown completely.
The steering column is unlocked.
X Adjust the steering wheel to the desired
position.
X Push release lever 001Aup completely.
The steering column is locked.
X Check if the steering column is locked.
When doing so, try to push the steering
wheel up or down or try to move it in the
fore-and-aft direction. 98
Steering wheelSeats, steering wheela
nd mirrors
Page 178 of 360
Activ
eParking Assist ma ypossibl yindicate
parking space swhich ar enot suitabl efor
parking ,for example:
R where parking or stopping is prohibited
R in front of driveway sorentrances and exits
R on unsuitable surfaces
Parking tips:
R On narrow roads ,drive as close to the
parking space as possible.
R Parking space sthata re littered or
overgrow nmight be identified or measured
incorrectly.
R Parking spaces that are partially occupied
by trailer drawbars might not be identified
as such or be measure dincorrectly.
R Snowfall or heavy rain may lead to aparking
space being measure dinaccurately.
R Pay attention to the PARKTRONIC
(Y page 173 )warning messages durin gthe
parking procedure.
R You can interven einthesteering procedure
to correct it at any time. Activ eParking
Assist will then be canceled.
R When transportin gaload whic hprotrudes
from your vehicle ,you should no tuse
Active Parking Assist.
R Never use Active Parking Assist when snow
chains are installed.
R Make sure that the tire pressures are
always correct.T his hasadirec tinfluence
on the parking characteristics of the
vehicle.
Use Active Parking Assist for parking spaces:
R tha tare paralleltot he direction of travel
R that are on straight roads, not bends
R that are on the same leve lasthe road ,e.g.
not on the pavement
Detectin gparking spaces Objects located above the height range of
Active Parking Assist willn ot be detected
when the parking space is measured. These
are not taken into account when the parking procedure is calculated
,e.g. overhanging
loads, tail sections or loading ramps of goods
vehicles. G
WARNING
If there are objects above the detection range,
Active Parking Assist may turn prematurely.
You may caus eacollision as aresult. There is
ar isk of an accident.
If there are objects above the detection range,
stop and deactivate Active Parking Assist.
For further information on the detection
range (Y page173).
Active Parking Assist does not support you
with parking spaces paralleltot he direction
of travel if:
R the parking space is on acurb
R thep arking spac eisapparentl yblocked,
for example by foliage or gras spaving
blocks
R ther ange of movement is to osmall
R thep arking spac eisbordered by an
obstacle whic hisnot clearly defined such
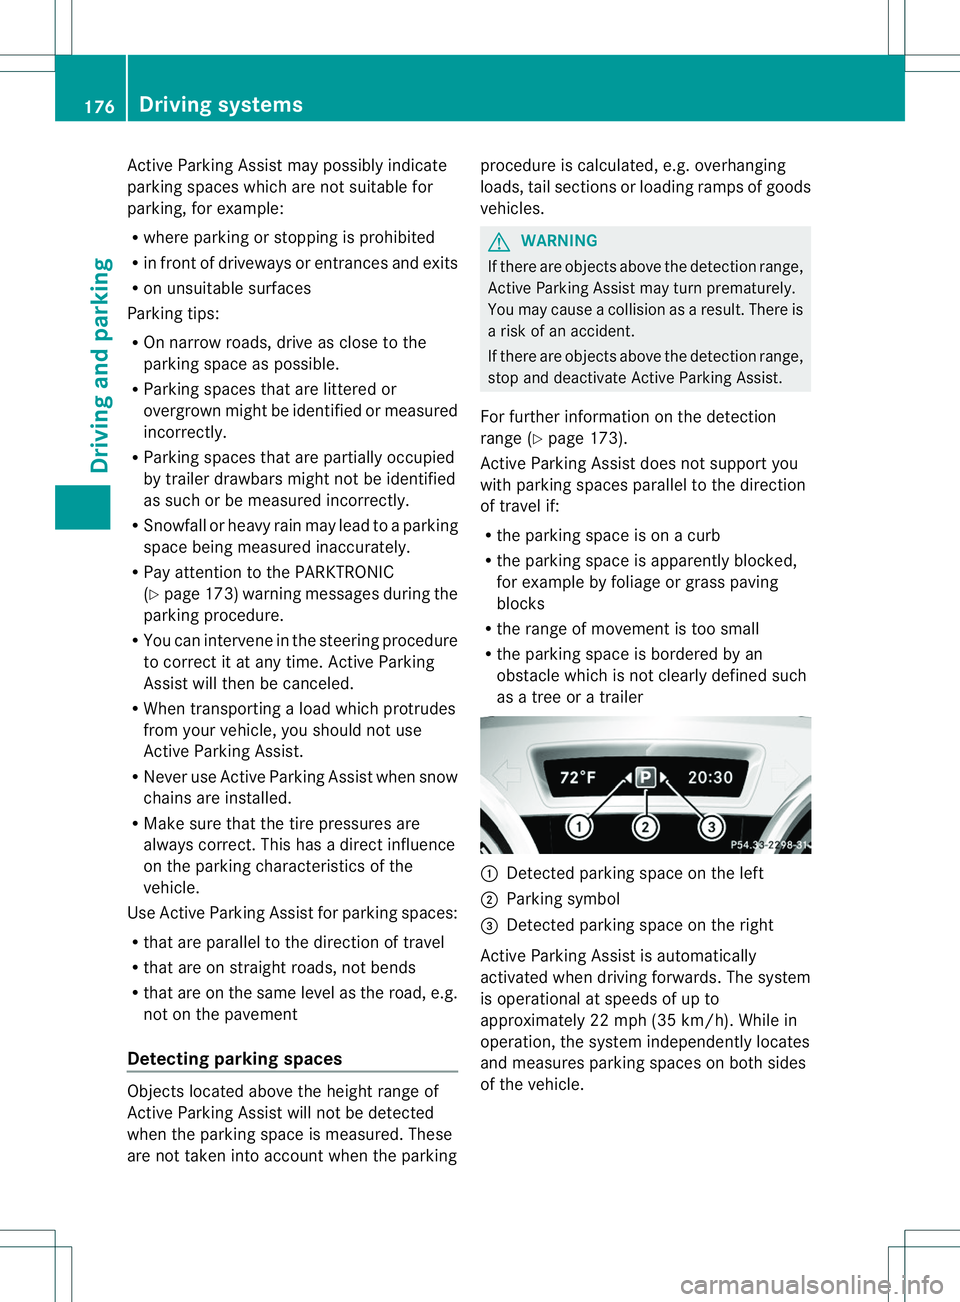
as atreeorat railer 001A
Detected parking space on the left
0010 Parking symbol
0023 Detected parking space on the right
Activ eParking Assist is automatically
activated when drivin gforwards. The system
is operational at speeds of up to
approximately 22 mph (35 km/h). While in
operation, the system independently locates
and measure sparking spaces on bot hsides
of the vehicle. 176
Driving systemsDriving and parking
Page 258 of 360
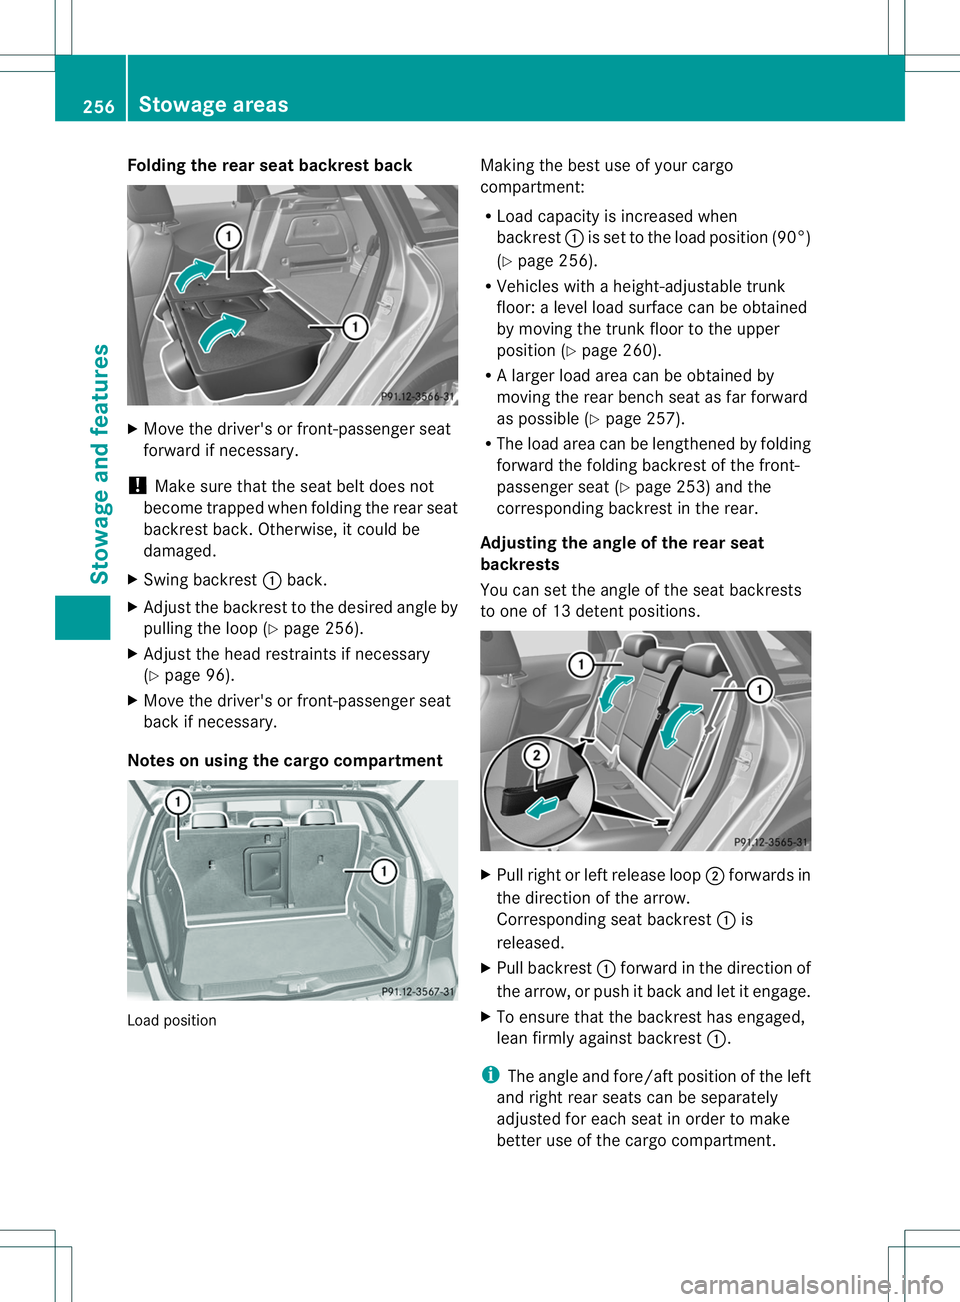
Folding th
erears eat backres tback X
Mov ethe driver' sorfront-pa ssenger seat
forward if necessary.
! Mak esure that th eseat belt does not
become trapped when foldin gthe rear seat
backres tback .Otherwise, it could be
damaged.
X Swing backrest 001Aback.
X Adjust the backrest to the desired angle by
pulling the loop (Y page 256).
X Adjust the head restraints if necessary
(Y page 96).
X Move the driver's or front-passenge rseat
back if necessary.
Notes on using the cargo compartment Load position Making the best use of your cargo
compartment:
R
Load capacity is increased when
backrest 001Ais set to the load position (90°)
(Y page 256).
R Vehicles with aheight-adjustable trunk
floor: alevel load surface can be obtained
by movin gthe trun kfloor to the upper
position (Y page 260).
R Al arge rload area can be obtained by
moving the rear bench seat as far forward
as possible (Y page 257).
R The load area can be lengthened by folding
forward the folding backrest of the front-
passenger seat (Y page 253) and the
corresponding backrest in the rear.
Adjusting the angle of the rear seat
backrests
You can set the angle of the seat backrests
to one of 13 detent positions. X
Pull right or left release loop 0010forwards in
the direction of the arrow.
Corresponding seat backrest 001Ais
released.
X Pull backrest 001Aforward in the direction of
the arrow, or push it back and let it engage.
X To ensure that the backrest has engaged,
lean firmly against backrest 001A.
i The angle and fore/aft position of the left
and right rear seats can be separately
adjusted for each seat in order to make
better use of the cargo compartment. 256
Stowage areasStowage and features
Page 262 of 360
X
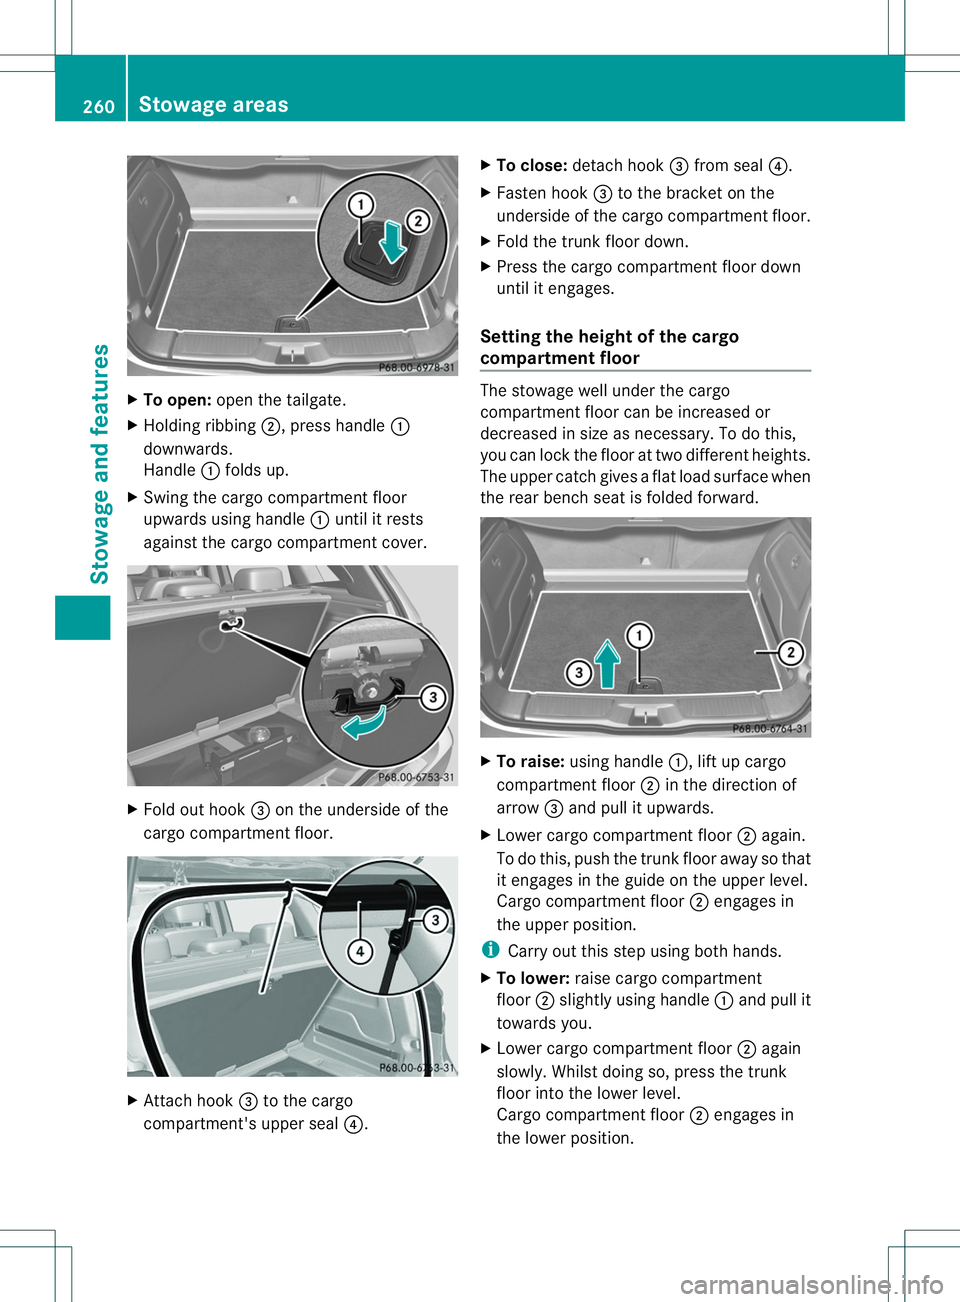
To open: open the tailgate.
X Holding ribbing 0010,press handle 001A
downwards.
Handle 001Afolds up.
X Swing the cargo compartment floor
upwards using handle 001Aunti litr ests
against the cargo compartment cover. X
Fol do ut hook 0023on th eunderside of the
cargo compartment floor. X
Attach hook 0023to the cargo
compartment's upper seal 0021.X
To close: detach hook 0023from seal 0021.
X Fasten hook 0023to the bracket on the
underside of the cargo compartment floor.
X Fold the trunk floor down.
X Press the cargo compartment floor down
until it engages.
Setting the height of the cargo
compartment floor The stowage well under the cargo
compartment floor can be increased or
decreased in size as necessary. To do this,
you can lock the floor at two different heights.
The upper catchg
ivesaflat load surface when
the rear bench seat is folded forward. X
To raise: using handle 001A,lift up cargo
compartment floor 0010in the direction of
arrow 0023and pull it upwards.
X Lower cargo compartment floor 0010again.
To do this, push the trunk floor away so that
it engages in the guide on the upper level.
Cargo compartment floor 0010engages in
the upper position.
i Carry out this step using both hands.
X To lower: raise cargo compartment
floor 0010slightly using handle 001Aand pull it
towards you.
X Lower cargo compartment floor 0010again
slowly. Whilst doing so, press the trunk
floor into the lower level.
Cargo compartment floor 0010engages in
the lower position. 260
Stowage areasStowage and features
Page 283 of 360
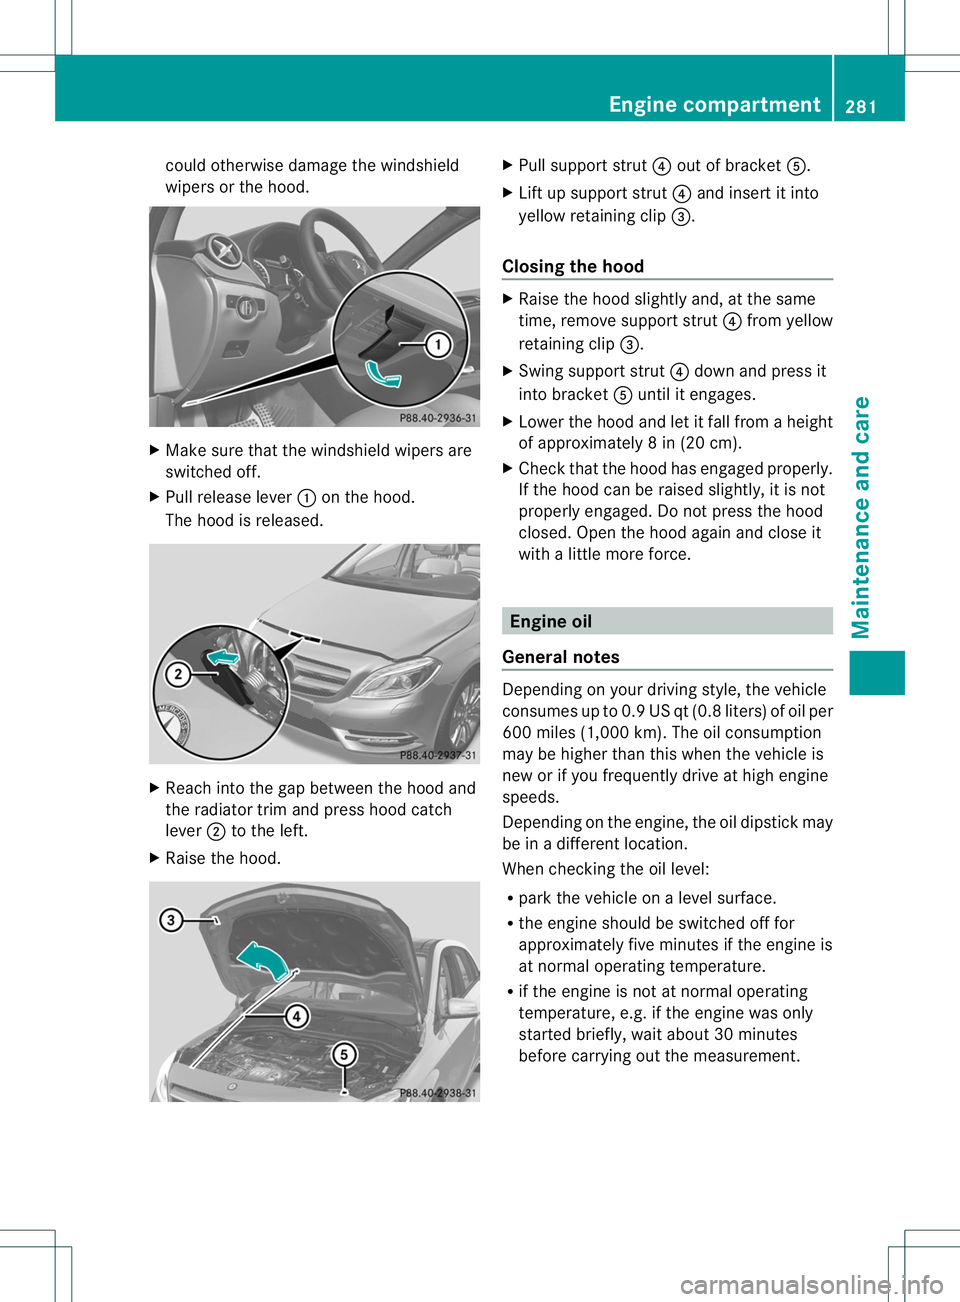
could otherwise damag
ethe windshield
wiper sorthe hood. X
Make sure that the windshield wiper sare
switched off.
X Pull release lever 001Aon the hood.
The hoo disreleased. X
Reach into the ga pbetween the hoo dand
the radiator trim and press hoo dcatch
lever 0010to the left.
X Raise the hood. X
Pull support strut 0021outofb racket 001E.
X Lift up support strut 0021and insert it into
yellow retaining clip 0023.
Closin gthe hood X
Raise the hoo dslightl yand,att he same
time ,remove support strut 0021from yellow
retaining clip 0023.
X Swing support strut 0021dow nand press it
into bracket 001Eunti lite ngages.
X Lower the hoo dand le titfall from aheight
of approximately 8in(20 cm).
X Chec kthat the hood has engaged properly.
If the hood can be raised slightly, it is not
properly engaged. Do not press the hood
closed. Open the hood again and close it
with alittle more force. Engine oil
General notes Depending on your driving style, the vehicle
consumes up to 0.9 US qt (0.8 liters) of oil per
600 miles (1,000 km). The oil consumption
may be higher than this when the vehicle is
new or if you frequently drive at high engine
speeds.
Depending on the engine, the oil dipstick may
be in
adifferent location.
When checking the oil level:
R park the vehicle on alevel surface.
R the engine should be switched off for
approximately five minutes if the engine is
at normal operating temperature.
R if the engine is not at normal operating
temperature, e.g. if the engine was only
started briefly, wait about 30 minutes
before carrying out the measurement. Engine compartment
281Maintenance and care Z
Page 332 of 360
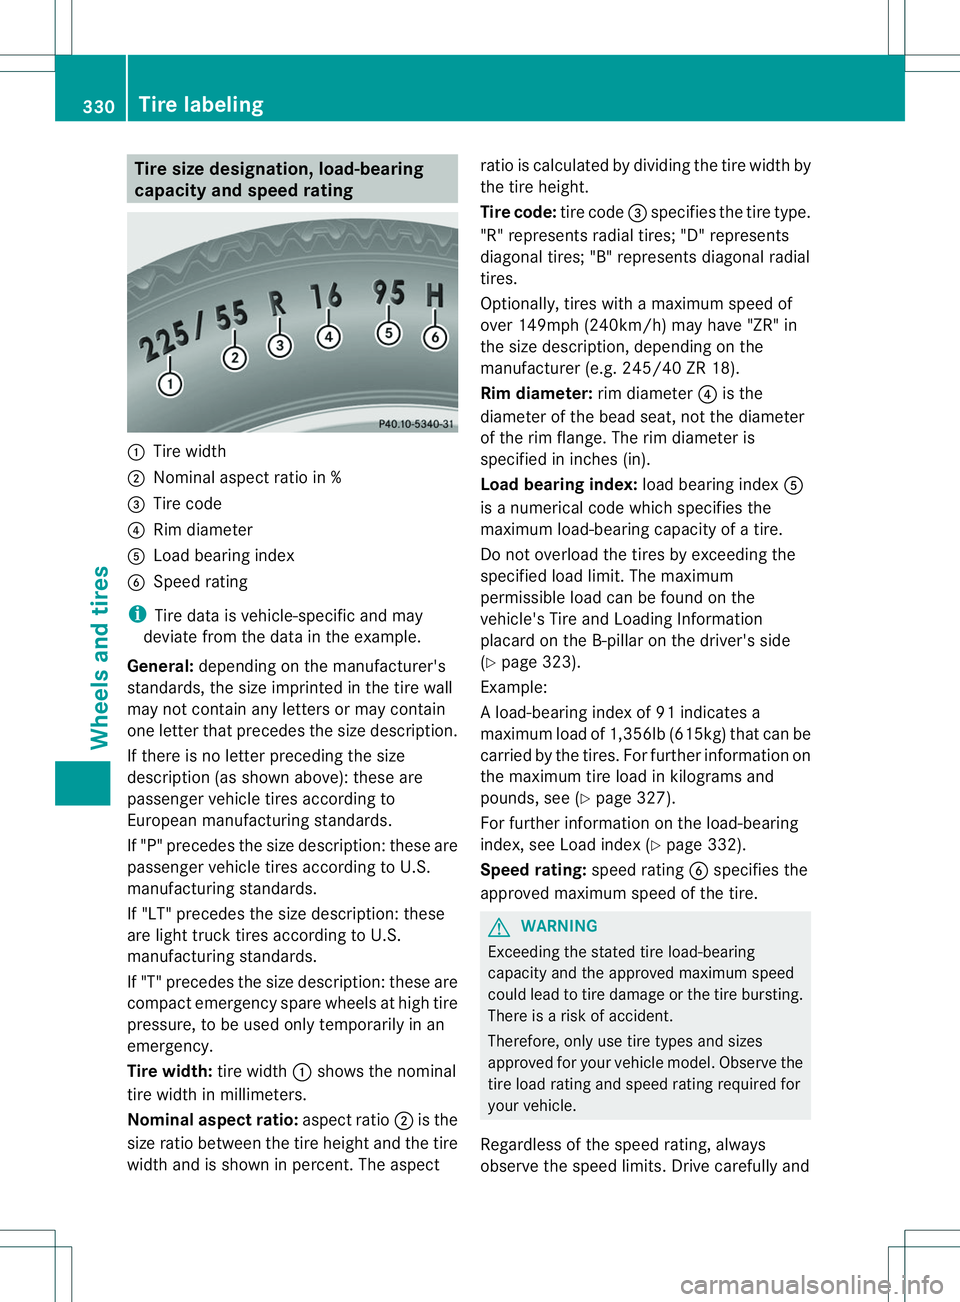
Tire size designation
,load-bearing
capacit yand speed rating 001A
Tire width
0010 Nominal aspec tratio in %
0023 Tire code
0021 Rim diameter
001E Load bearing index
0024 Speed rating
i Tire dat aisvehicle-specific and may
deviate from th edataint heexample.
General: dependingonthemanufacturer's
standards ,the sizeimprinted in th etirew all
may no tcontai nany letters or may contain
on elette rthat precedes the size description.
If there is no letter preceding the size
description (as shown above): these are
passenger vehicle tires according to
European manufacturing standards.
If "P" precedes the size description: these are
passenger vehicle tires according to U.S.
manufacturing standards.
If "LT" precedes the size description: these
are light truck tires according to U.S.
manufacturing standards.
If "T" precedes the size description: these are
compact emergency spare wheels at high tire
pressure, to be used only temporarily in an
emergency.
Tire width: tire width001Ashows the nominal
tire width in millimeters.
Nominal aspect ratio: aspect ratio0010is the
size ratio between the tire height and the tire
width and is shown in percent.T he aspectratio is calculated by dividing the tire width by
the tire height.
Tire code:
tire code0023specifies the tire type.
"R" represents radial tires; "D" represents
diagonal tires; "B" represents diagonal radial
tires.
Optionally, tires with amaximum speed of
over 149mph (240km/h) may have "ZR"in
the size description, depending on the
manufacturer (e.g. 245/40 ZR 18).
Rim diameter: rim diameter0021is the
diameter of the bead seat, not the diameter
of the rim flange. The rim diameter is
specified in inches (in).
Load bearing index: load bearing index001E
is an umerical code which specifies the
maximum load-bearing capacity of atire.
Do not overload the tires by exceeding the
specified load limit. The maximum
permissible load can be found on the
vehicle's Tire and Loading Information
placard on the B-pillar on the driver's side
(Y page 323).
Example:
Al oad-bearing index of 91 indicates a
maximum load of 1,356lb (615kg) that can be
carried by the tires. For further information on
the maximum tire load in kilograms and
pounds, see (Y page 327).
For further information on the load-bearing
index, see Load index (Y page 332).
Speed rating: speed rating0024specifies the
approved maximum speed of the tire. G
WARNING
Exceeding the stated tire load-bearing
capacity and the approved maximum speed
could lead to tire damage or the tire bursting.
There is arisk of accident.
Therefore, only use tire types and sizes
approved for your vehicle model. Observe the
tire load rating and speed rating required for
your vehicle.
Regardless of the speed rating, always
observe the speed limits. Drive carefully and 330
Tirel
abelingWheels and tires
Page 337 of 360
Aspect ratio
Relationship between tire height and tire
widt hinp ercent. Tire pressure
This is pressur einside th etirea pplyin gan
outward force to eac hsquar einc hoft hetire's
surface. The tire pressur eisspecifie din
pounds per squar einc h( psi), in kilopascal
(kPa) or in bar. The tire pressur eshould only
be correcte dwhen th etires are cold. Tire pressure of cold tires
The tires are cold:
R if th evehicl ehas been parked without
direct sunligh tonthe tires for at least three
hours and
R if the vehicle has not been driven further
than 1mile (1.6 km) Tread
The part of the tire that comes into contact
with the road. Bead
The tire bead ensures that the tire sits
securely on the wheel. There are several steel
wires in the bead to prevent the tire from
coming loose from the wheel rim. Sidewall
The part of the tire between the tread and the
bead. Weight of optional extras
The combined weight of those optional extras
that weigh more than the replaced standard
part and more than 2.3 kg (5 lbs). These optional extras, such as high-performance
brakes, level control,
aroof rack or ahigh-
performance battery, are not included in the
curb weight and the weight of the
accessories. TIN (Tire Identification Number)
This is aunique identifier which can be used
by atire manufacturer to identify tires, for
example for aproduct recall, and thus identify
the purchasers. The TIN is made up of the
manufacturer's identity code, tire size, tire
type code and the manufacturing date. Load bearing index
The load bearing index (also load index) is a
code that contains the maximum load bearing
capacity of atire. Traction
Traction is the result of friction between the
tires and the road surface. Treadwear indicators
Narrow bars (tread wear bars) that are
distributed over the tire tread. If the tire tread
is level with the bars, the wear limit of 0003in
(1.6 mm) has been reached. Occupant distribution
The distribution of occupants in avehicle at
their designated seating positions. Total load limit
Nominal load and luggage load plus
68 kilograms (150 lb) multiplied by the
number of seats in the vehicle. Definition of termsf
or tires and loading
335Wheels and tires Z