2014 MERCEDES-BENZ B-Class key
[x] Cancel search: keyPage 14 of 270

Storing sender in address book ..... 146
Storing the sender as a new
address book entry ........................ 146
Time
Setting ............................................. 44
Setting summer/standard time ....... 43
Setting the format ............................ 43
Setting the time ............................... 42
Setting the time manually ................ 42
Setting the time zone ....................... 43
Setting the time/date format .......... 43
Tone settings
Balance and fader ............................ 30
Track
Selecting (CD, MP3) ....................... 199
Selecting using the number key-
pad ................................................ 199
Track information .............................. 247
Traffic jam function ............................. 92
Traffic reports
Calling up a list .............................. 100
Real-time traffic report .................. 101
Treble, adjusting (sound) .................... 30
True Image™ ........................................ 32
TV
Automatic picture shutoff .............. 226
Picture settings .............................. 226
Sound settings (balance, bass,
treble) .............................................. 30 U
Updating the digital map .................. 118
USB
see Media Interface V
Vehicle Data acquisition ............................... 15
Video
see Video DVD
Video AUX
Setting the picture ......................... 226
Video DVD
Automatic picture shutoff .............. 226
DVD menu ..................................... 230
Fast forward/rewind ...................... 228 Function restrictions ...................... 227
Interactive content ........................ 231
Notes on discs ............................... 227
Operation ....................................... 226
Pause function ............................... 229
Playing conditions .......................... 227
Safety notes .................................. 226
Selecting ........................................ 230
Selecting a film/title ...................... 229
Selecting a scene/chapter ............ 229
Setting the audio format ................ 231
Setting the language ...................... 231
Setting the picture ......................... 226
Showing/hiding the control
menu ............................................. 228
Showing/hiding the menu ............. 228
Stop function ................................. 229
Subtitles ........................................ 231
Switching to ................................... 227
Voice Control System
Setting s........................................... 44
Volume, adjusting
COMAND ......................................... 29
Navigation messages ....................... 29 W
Way points Accepting for the route .................... 76
Creating ........................................... 73
Editing .............................................. 75
Entering ........................................... 73
Searching for a gas station when
the fuel level is lo w.......................... 76
Weather Band
Searching for a channel ................. 189
Switching on .................................. 189
Weather map (SIRIUS)
Activating/deactivating display
levels ............................................. 263
Calling up ....................................... 262
Legend ........................................... 267
Moving ........................................... 262
Showing/hiding the menu ............. 262
Time stamp .................................... 267
Weather memory (SIRIUS)
Selecting an area ........................... 261
Storing an area .............................. 261 12
Index
Page 34 of 270
The example describes how to set the sur-
round sound for radio mode.
X To switch surround sound on/off: press
the 002A button.
The radio display appears. You will hear the
last station played on the last waveband.
X Select Sound
Soundby sliding 00520064and turning
00790052007A the COMAND controller and press 0098
to confirm.
X Select Surround
Surround and press0098to confirm.
X Select Logic7
Logic7 ®
®
On
On orLogic7
Logic7 ®
®
Off
Off by turn-
ing 00790052007A the COMAND controller and press
0098 to confirm.
Depending on your selection, surround
sound is switched on or off and the menu is
exited.
X To exit the menu without saving: press
the 003D back button or slide 009500520096the
COMAND controller.
i Please note the following: for the opti-
mum audio experience for all passengers
when Logic7 ®
is switched on, the balance
should be set to the center of the vehicle
interior.
You will achieve the best sound results by
playing video DVD media.
MP3 tracks should have a bit rate of at least
128 kbit/ s.
Surround sound playback does not func-
tion for mono signal sources, such as for
AM radio mode.
If radio reception is poor, e.g. in a tunnel,
you should switch off Logic7 ®
, since it may
otherwise switch dynamically between
stereo and mono and cause temporary
sound distortions.
On some stereo recordings, the sound
characteristics may differ from conven-
tional stereo playback.
i The
Logic7 Logic7 ®
®
On
On function creates a sur-
round sound experience for every
passenger when playing stereo recordings, for example. It enables optimum playback
of music and films on CD or video DVD with multichannel audio formats, such as MLP,
dts or Dolby Digital. This results in sound
characteristics like those intended by the
sound engineer when the original was
recorded.
i If you select
Logic7 Logic7®
®
Off
Off , the sound sys-
tem plays the tracks as stored on the
medium. Due to the design of the
passenger compartment, an optimum
audio experience cannot be guaranteed for
all passengers.
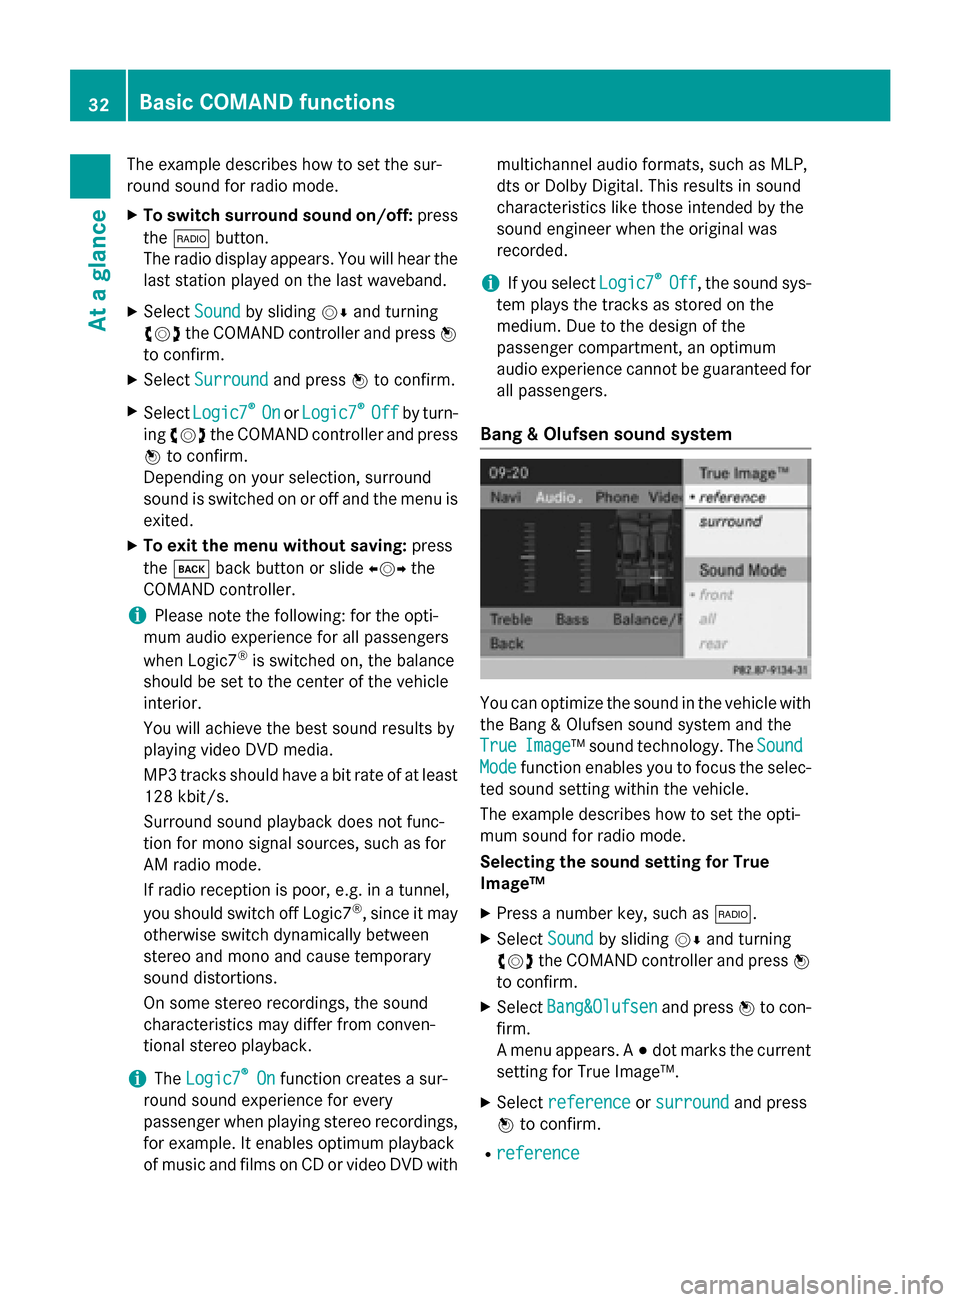
Bang & Olufsen sound system You can optimize the sound in the vehicle with
the Bang & Olufsen sound system and the
True True Image
Image™ sound technology. The Sound
Sound
Mode
Mode function enables you to focus the selec-
ted sound setting within the vehicle.
The example describes how to set the opti-
mum sound for radio mode.
Selecting the sound setting for True
Image™
X Press a number key, such as 002A.
X Select Sound Soundby sliding 00520064and turning
00790052007A the COMAND controller and press 0098
to confirm.
X Select Bang&Olufsen
Bang&Olufsen and press0098to con-
firm.
A menu appears. A 003Bdot marks the current
setting for True Image™.
X Select reference reference orsurround
surround and press
0098 to confirm.
R reference
reference 32
Basic COMAND functionsAt a glance
Page 37 of 270
Changing the character set
While making an entry in the input menu
(Y
page 139):
X Select the 0042symbol and press 0098to
confirm.
R ABC ABC (upper/lower case)
R 123
123 (digits)
R Other
Other (special characters such as @, €,
etc.)
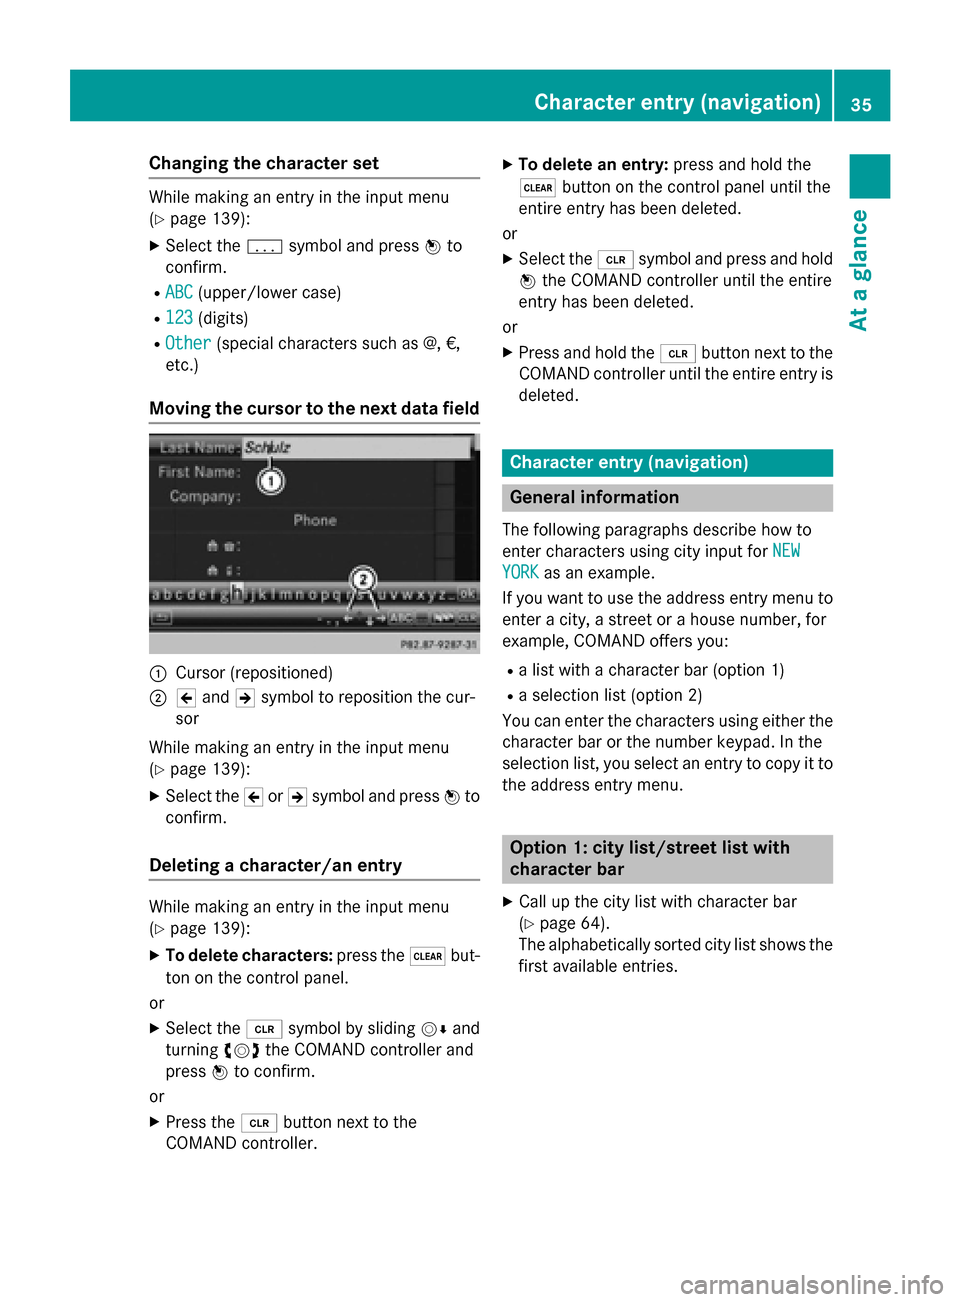
Moving the cursor to the next data field 0043
Cursor (repositioned)
0044 005D and 005Esymbol to reposition the cur-
sor
While making an entry in the input menu
(Y page 139):
X Select the 005Dor005E symbol and press 0098to
confirm.
Deleting a character/an entry While making an entry in the input menu
(Y page 139):
X To delete characters: press the0037but-
ton on the control panel.
or
X Select the 0084symbol by sliding 00520064and
turning 00790052007Athe COMAND controller and
press 0098to confirm.
or
X Press the 0084button next to the
COMAND controller. X
To delete an entry: press and hold the
0037 button on the control panel until the
entire entry has been deleted.
or X Select the 0084symbol and press and hold
0098 the COMAND controller until the entire
entry has been deleted.
or
X Press and hold the 0084button next to the
COMAND controller until the entire entry is
deleted. Character entry (navigation)
General information
The following paragraphs describe how to
enter characters using city input for NEW NEW
YORK
YORK as an example.
If you want to use the address entry menu to enter a city, a street or a house number, for
example, COMAND offers you:
R a list with a character bar (option 1)
R a selection list (option 2)
You can enter the characters using either the
character bar or the number keypad. In the
selection list, you select an entry to copy it to the address entry menu. Option 1: city list/street list with
character bar
X Call up the city list with character bar
(Y page 64).
The alphabetically sorted city list shows the first available entries. Character entry (navigation)
35At a glance
Page 38 of 270
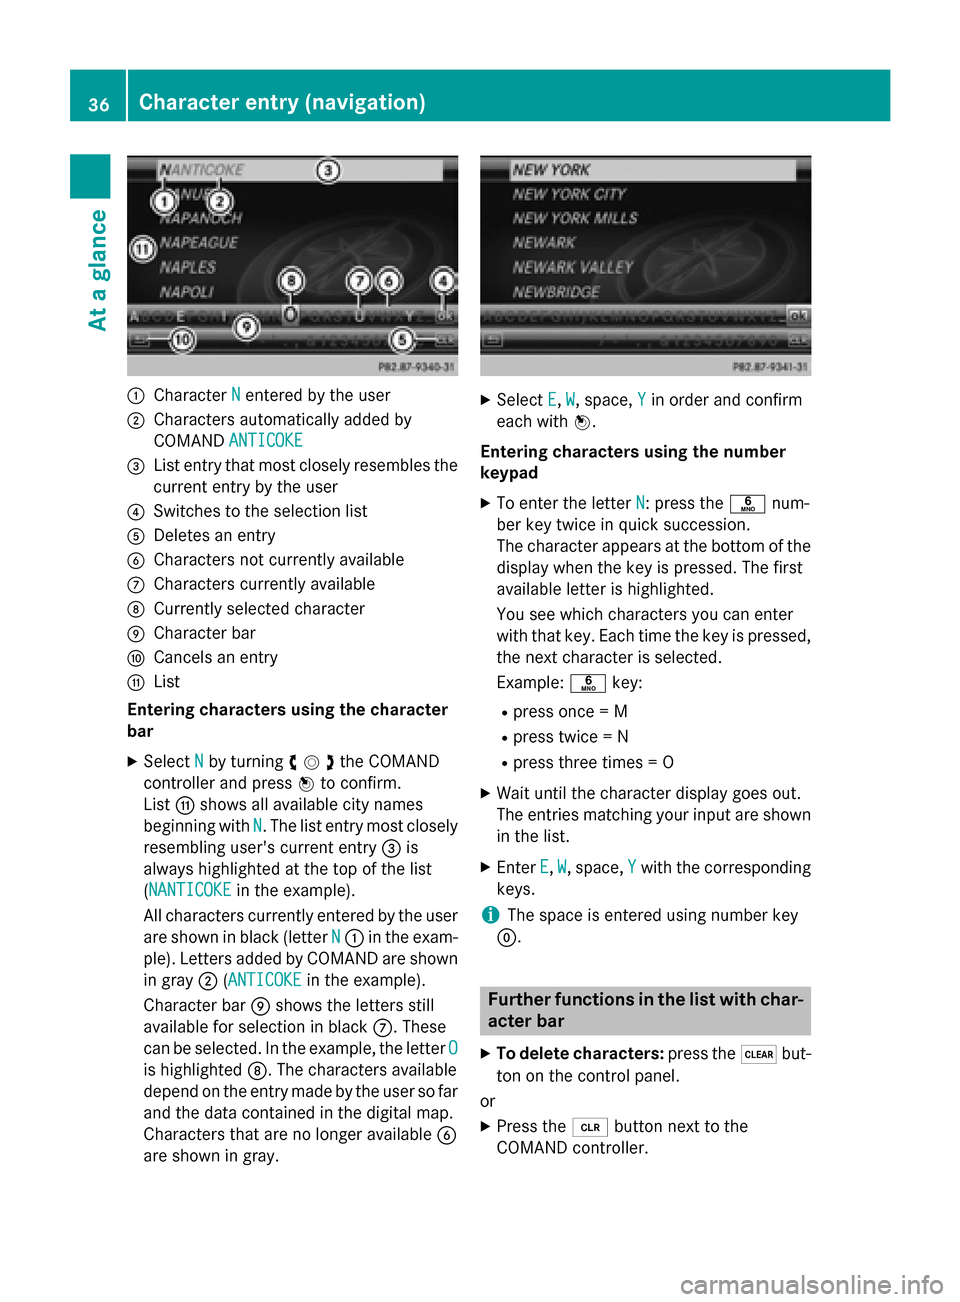
0043
Character N
Nentered by the user
0044 Characters automatically added by
COMAND ANTICOKE ANTICOKE
0087 List entry that most closely resembles the
current entry by the user
0085 Switches to the selection list
0083 Deletes an entry
0084 Characters not currently available
006B Characters currently available
006C Currently selected character
006D Character bar
006E Cancels an entry
006F List
Entering characters using the character
bar
X Select N Nby turning 00790052007Athe COMAND
controller and press 0098to confirm.
List 006Fshows all available city names
beginning with N
N. The list entry most closely
resembling user's current entry 0087is
always highlighted at the top of the list
(NANTICOKE NANTICOKE in the example).
All characters currently entered by the user
are shown in black (letter N
N 0043 in the exam-
ple). Letters added by COMAND are shown
in gray 0044(ANTICOKEANTICOKE in the example).
Character bar 006Dshows the letters still
available for selection in black 006B. These
can be selected. In the example, the letter O
O
is highlighted 006C. The characters available
depend on the entry made by the user so far and the data contained in the digital map.
Characters that are no longer available 0084
are shown in gray. X
Select E E,W
W, space, Y
Yin order and confirm
each with 0098.
Entering characters using the number
keypad
X To enter the letter N N: press the0086num-
ber key twice in quick succession.
The character appears at the bottom of the
display when the key is pressed. The first
available letter is highlighted.
You see which characters you can enter
with that key. Each time the key is pressed,
the next character is selected.
Example: 0086key:
R press once = M
R press twice = N
R press three times = O
X Wait until the character display goes out.
The entries matching your input are shown
in the list.
X Enter E
E, W W, space, Y
Ywith the corresponding
keys.
i The space is entered using number key
0045. Further functions in the list with char-
acter bar
X To delete characters: press the0037but-
ton on the control panel.
or
X Press the 0084button next to the
COMAND controller. 36
Character entry (navigation)At a glance
Page 40 of 270
To do so, use the special cordless head-
phones (Y page 239). Using the headphones
on the correct sides ensures an optimal
sound.
You can connect your own headphones to a
special headphones jack. You can use the
remote control to operate them. Points to remember
R You can only adjust the volume for the
headphones supplied, directly on the head-
phones.
R Only entertainment functions, i.e. audio,
TV, video and Internet, for example, may be used with SPLITVIEW.
R Different media can be used on the driver
and front-passenger sides as long as they
use different media sources. Example: if a
medium from the single DVD drive is being
played on the driver's side, then another
medium that is also played from the single
DVD drive cannot be played separately on
the front-passenger side. However, other
media can be used at the same time on the
front-passenger side, including radio,
memory card, MUSIC REGISTER, Media
Interface, USB or AUX.
R If you use the same medium on both sides,
you can both carry out the respective set-
tings.
R Internet use is only available at any one
time to the driver or the front passenger.
A corresponding message appears on the
display.
R Internet can only be used, if it is set and
connected via a telephone on the driver's
side.
R The multifunction steering wheel can only
be used for functions which relate to the
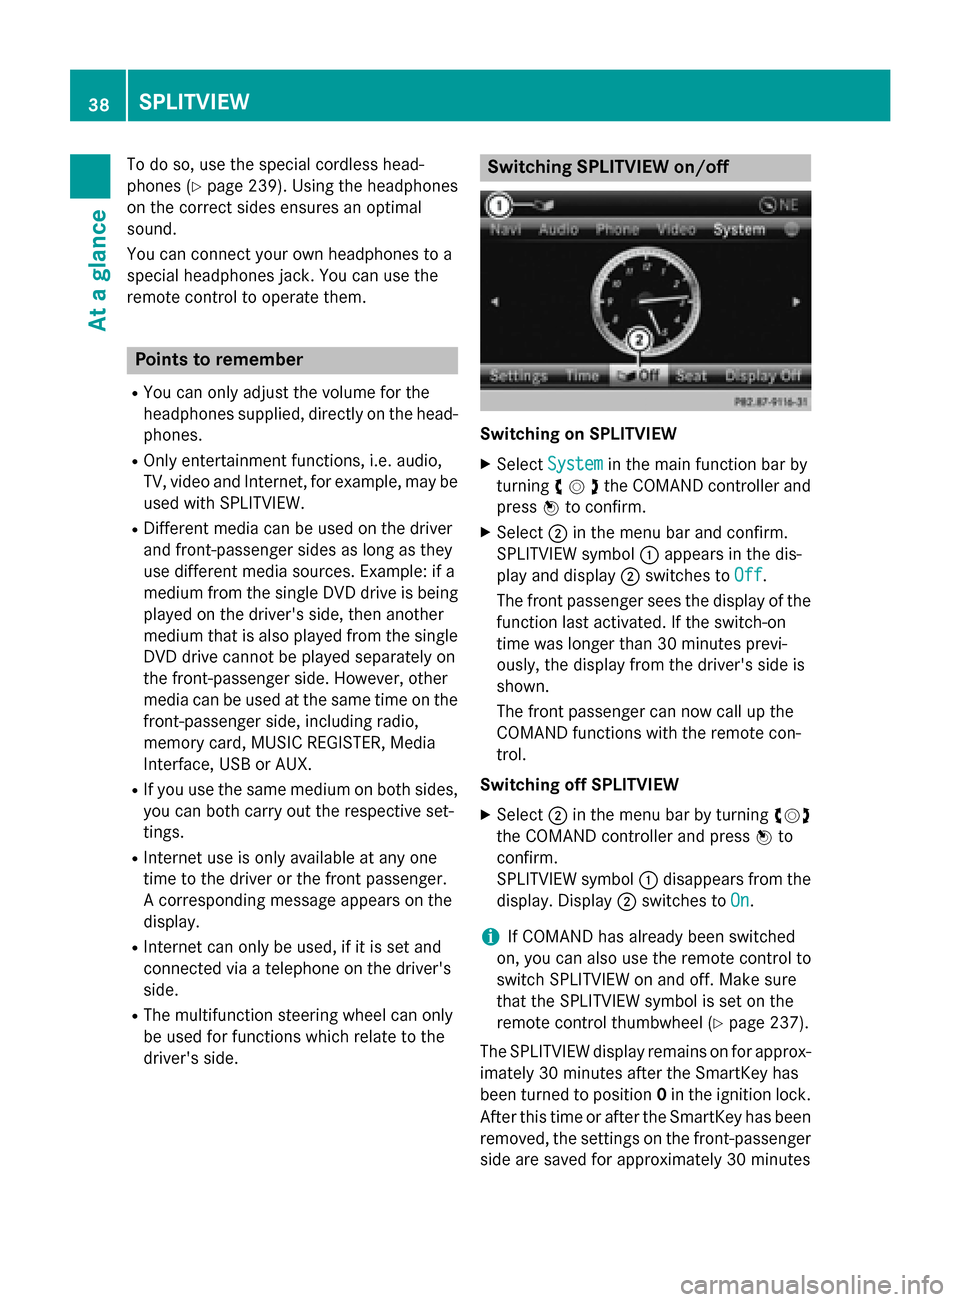
driver's side. Switching SPLITVIEW on/off
Switching on SPLITVIEW
X Select System System in the main function bar by
turning 00790052007Athe COMAND controller and
press 0098to confirm.
X Select 0044in the menu bar and confirm.
SPLITVIEW symbol 0043appears in the dis-
play and display 0044switches to Off
Off .
The front passenger sees the display of the
function last activated. If the switch-on
time was longer than 30 minutes previ-
ously, the display from the driver's side is
shown.
The front passenger can now call up the
COMAND functions with the remote con-
trol.
Switching off SPLITVIEW X Select 0044in the menu bar by turning 00790052007A
the COMAND controller and press 0098to
confirm.
SPLITVIEW symbol 0043disappears from the
display. Display 0044switches to On
On.
i If COMAND has already been switched
on, you can also use the remote control to
switch SPLITVIEW on and off. Make sure
that the SPLITVIEW symbol is set on the
remote control thumbwheel (Y page 237).
The SPLITVIEW display remains on for approx-
imately 30 minutes after the SmartKey has
been turned to position 0in the ignition lock.
After this time or after the SmartKey has been
removed, the settings on the front-passenger side are saved for approximately 30 minutes 38
SPLITVIEWAt a glance
Page 63 of 270
2 mph (3 km/h), the restriction becomes
inactive.
When the restriction is active, certain entries cannot be made. This will be indicated by the fact that certain menu items are grayed out
and cannot be selected.
The following entries are not possible, for
example:
R entering the destination city and street
R entering a destination via the map
R entering POIs in the vicinity of a city or via a
name search
R editing entries
R using the number keypad for direct entry
Other entries are possible, such as entering
points of interest in the vicinity of the desti-
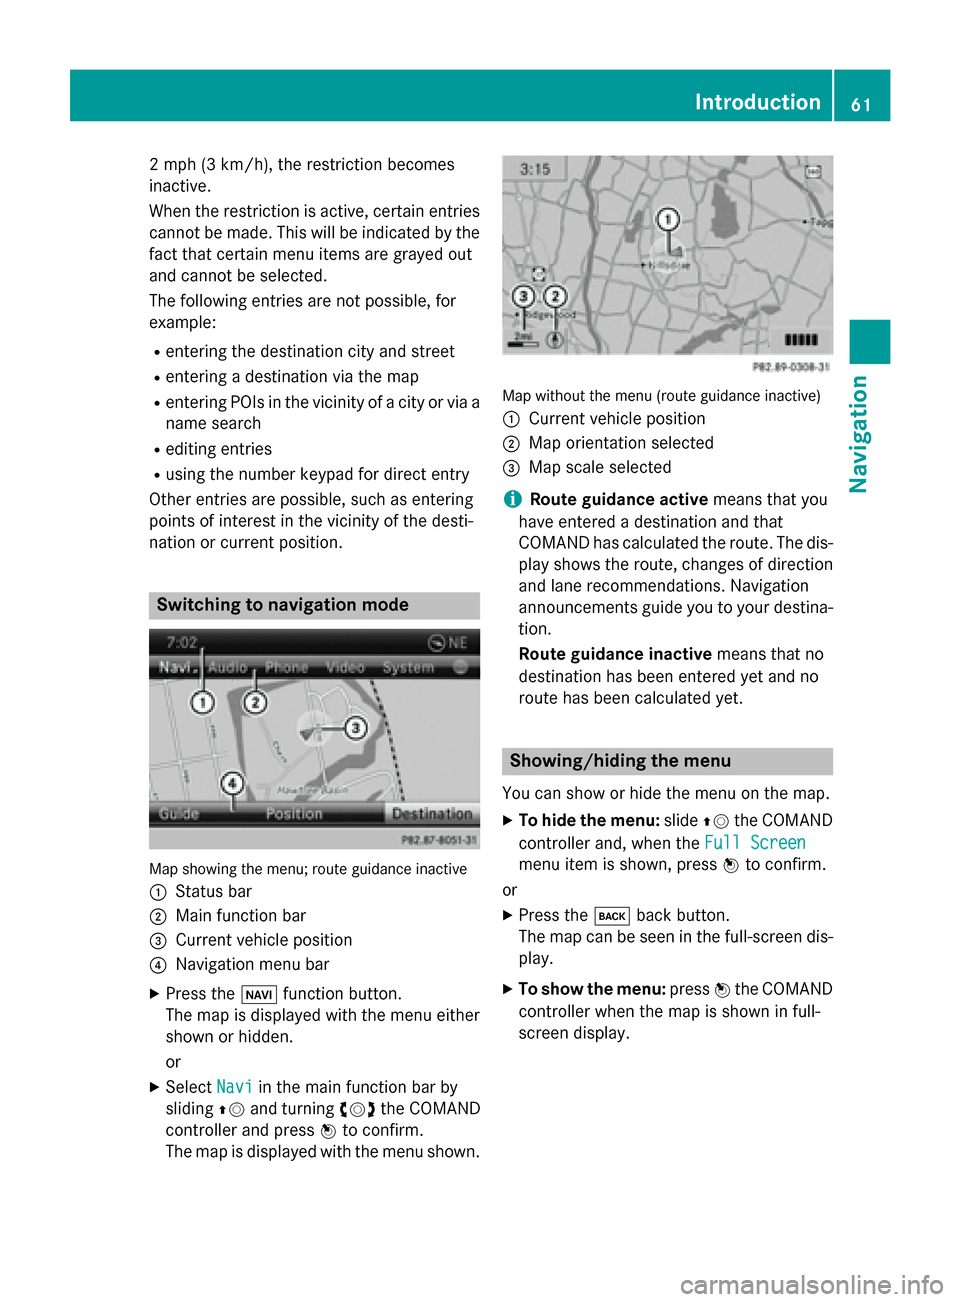
nation or current position. Switching to navigation mode
Map showing the menu; route guidance inactive
0043 Status bar
0044 Main function bar
0087 Current vehicle position
0085 Navigation menu bar
X Press the 00BEfunction button.
The map is displayed with the menu either
shown or hidden.
or
X Select Navi
Navi in the main function bar by
sliding 00970052and turning 00790052007Athe COMAND
controller and press 0098to confirm.
The map is displayed with the menu shown. Map without the menu (route guidance inactive)
0043
Current vehicle position
0044 Map orientation selected
0087 Map scale selected
i Route guidance active
means that you
have entered a destination and that
COMAND has calculated the route. The dis-
play shows the route, changes of direction and lane recommendations. Navigation
announcements guide you to your destina-
tion.
Route guidance inactive means that no
destination has been entered yet and no
route has been calculated yet. Showing/hiding the menu
You can show or hide the menu on the map.
X To hide the menu: slide00970052the COMAND
controller and, when the Full Screen Full Screen
menu item is shown, press 0098to confirm.
or X Press the 003Dback button.
The map can be seen in the full-screen dis- play.
X To show the menu: press0098the COMAND
controller when the map is shown in full-
screen display. Introduction
61Navigation Z
Page 74 of 270
X
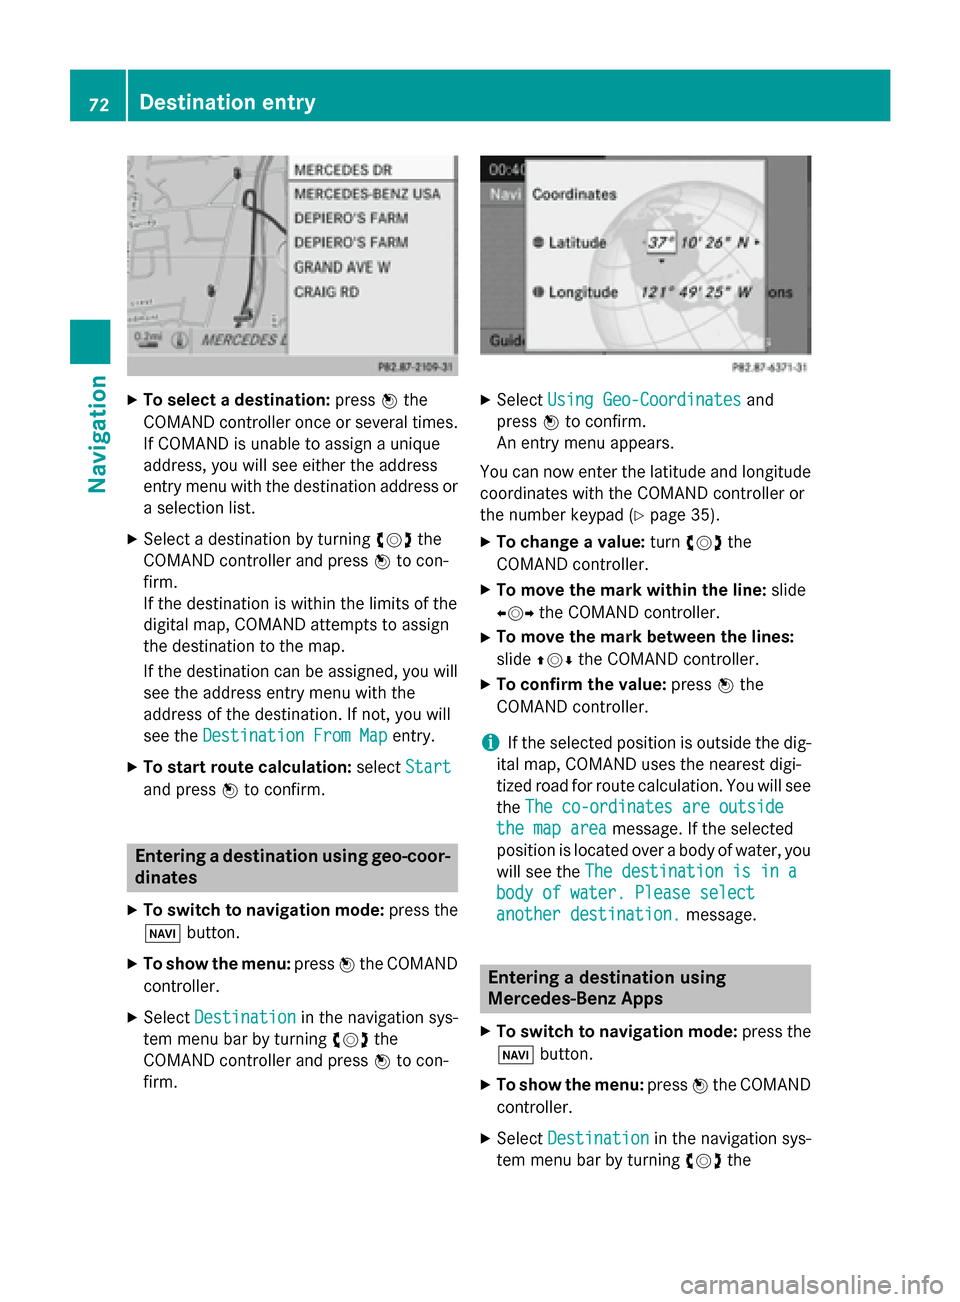
To select a destination: press0098the
COMAND controller once or several times. If COMAND is unable to assign a unique
address, you will see either the address
entry menu with the destination address or
a selection list.
X Select a destination by turning 00790052007Athe
COMAND controller and press 0098to con-
firm.
If the destination is within the limits of the
digital map, COMAND attempts to assign
the destination to the map.
If the destination can be assigned, you will see the address entry menu with the
address of the destination. If not, you will
see the Destination From Map
Destination From Map entry.
X To start route calculation: selectStart
Start
and press 0098to confirm. Entering a destination using geo-coor-
dinates
X To switch to navigation mode: press the
00BE button.
X To show the menu: press0098the COMAND
controller.
X Select Destination Destination in the navigation sys-
tem menu bar by turning 00790052007Athe
COMAND controller and press 0098to con-
firm. X
Select Using Geo-Coordinates Using Geo-Coordinates and
press 0098to confirm.
An entry menu appears.
You can now enter the latitude and longitude coordinates with the COMAND controller or
the number keypad (Y page 35).
X To change a value: turn00790052007A the
COMAND controller.
X To move the mark within the line: slide
009500520096 the COMAND controller.
X To move the mark between the lines:
slide 009700520064 the COMAND controller.
X To confirm the value: press0098the
COMAND controller.
i If the selected position is outside the dig-
ital map, COMAND uses the nearest digi-
tized road for route calculation. You will see
the The co-ordinates are outside
The co-ordinates are outside
the map area the map area message. If the selected
position is located over a body of water, you
will see the The destination is in a
The destination is in a
body of water. Please select body of water. Please select
another destination. another destination. message. Entering a destination using
Mercedes-Benz Apps
X To switch to navigation mode: press the
00BE button.
X To show the menu: press0098the COMAND
controller.
X Select Destination Destination in the navigation sys-
tem menu bar by turning 00790052007Athe 72
Destination entryNavigation
Page 114 of 270

X
Select Navi
Naviin the main function bar by
sliding 00970052and turning 00790052007Athe COMAND
controller and press 0098to confirm.
X Select Map
MapSettings
Settings and press0098to con-
firm.
The map settings menu appears.
X Select Compass On Map Compass On Map and press0098to
confirm.
A menu appears.
X Select Never
Never, When Off-Road When Off-Road orWhen
When
Route Guidance Inactive
Route Guidance Inactive and press0098
to confirm.
The selected setting is accepted.
Switching additional information
on/off Switching the topographic map on/off
X To show the menu: press0098the COMAND
controller.
X Select Navi Naviin the main function bar by
sliding 00970052and turning 00790052007Athe COMAND
controller and press 0098to confirm.
X Select Map
MapSettings
Settings and press0098to con-
firm.
The map settings menu appears.
X Select Topographic Map Topographic Map and press0098to
confirm.
Depending on the previous status, switch
the option on 0073or off 0053.
The topographical map uses different colors
to depict elevation. The color key generally
reflects the topography's dominant vegeta-
tion or the ground's perceived color when
seen from the air, for example:
R green (grass) for lowland
R yellow, brown (woodland) for hills
R gray (stone) and white (snow) for moun-
tains Example: highway information
Switching highway information on/off
When driving on the highway, you can see the following information on the right of the dis-
play:
R the nearest gas stations
R the nearest rest areas, etc.
R and their distance from the current vehicle
position
The entries show the number of the high-
way and the highway exits as well as their
distance from the current vehicle position.
The name of the highway exit continues to
be displayed.
X To switch to navigation mode: press the
00BE button.
X To show the menu: press0098the COMAND
controller.
X Select Navi Naviin the main function bar by
sliding 00970052and turning 00790052007Athe COMAND
controller and press 0098to confirm.
X Select Map
MapSettings
Settings and press0098to con-
firm.
The map settings menu appears.
X Select Highway Information
Highway Information and press
0098 to confirm.
Depending on the previous status, switch
the option on 0073or off 0053. 112
Map operation and map settingsNavigation