2014 LINCOLN MKZ HYBRID warning light
[x] Cancel search: warning lightPage 40 of 445

The Personal Safety System provides an
improved overall level of frontal crash
protection to front seat occupants and is
designed to help further reduce the risk
of airbag-related injuries. The system is
able to analyze different occupant
conditions and crash severity before
activating the appropriate safety devices
to help better protect a range of occupants
in a variety of frontal crash situations.
Your vehicle's Personal Safety System
consists of:
•
Driver and passenger dual-stage
airbag supplemental restraints.
• Front outboard safety belts with
pretensioners, energy management
retractors (first row only), and safety
belt usage sensors.
• Driver’ s seat position sensor.
• Front passenger sensing system.
• Passenger airbag off and on indicator
lamp.
• Front crash severity sensors.
• Restraints control module with impact
and safing sensors.
• Restraint system warning light and
backup tone.
• The electrical wiring for the airbags,
crash sensor(s), safety belt
pretensioners, front safety belt usage
sensors, driver seat position sensor,
front passenger sensing system, and
indicator lights. How Does the Personal Safety
System Work?
The Personal Safety System can adapt the
deployment strategy of your vehicle
’s
safety devices according to crash severity
and occupant conditions. A collection of
crash and occupant sensors provides
information to the restraints control
module. During a crash, the restraints
control module may activate the safety
belt pretensioners and may activate either
one or both stages of the dual-stage
airbag supplemental restraints based on
crash severity and occupant conditions.
38
MKZ (CC9) Personal Safety System
™
Page 42 of 445

not properly restrained or are otherwise
out of position at the time of airbag
deployment. Thus, it is extremely important
that occupants be properly restrained as
far away from the airbag module as
possible while maintaining vehicle control.
Routine maintenance of the airbags is not
required.
DRIVER AND PASSENGER
AIRBAGS
WARNINGS
Never place your arm or any objects
over an airbag module. Placing your
arm over a deploying airbag can result in
serious arm fractures or other injuries.
Objects placed on or over the airbag
inflation area may cause those objects to
be propelled by the airbag into your face
and torso causing serious injury. Airbags can kill or injure a child in a
child seat. Never place a rear-facing
child seat in front of an active airbag. If you
must use a forward-facing child seat in the
front seat, move the seat upon which the
child seat is installed all the way back. The driver and front passenger airbags
will deploy during significant frontal and
near frontal crashes.
The driver and passenger front airbag
system consists of:
•
driver and passenger airbag modules.
• front passenger sensing system. · crash sensors and monitoring
system with readiness indicator.
See Crash Sensors and Airbag
Indicator (page 46).
Proper Driver and Front Passenger
Seating Adjustment WARNING
National Highway Traffic Safety
Administration (NHTSA)
recommends a minimum distance of at
least 10 inches (25 centimeters) between
an occupant’ s chest and the driver airbag
module. To properly position yourself away from
the airbag:
•
Move your seat to the rear as far as
you can while still reaching the pedals
comfortably.
• Recline the seat slightly (one or two
degrees) from the upright position.
After all occupants have adjusted their
seats and put on safety belts, it is very
important that they continue to sit properly.
A properly seated occupant sits upright,
leaning against the seat back, and
centered on the seat cushion, with their
feet comfortably extended on the floor.
Sitting improperly can increase the chance
40
MKZ (CC9) Supplementary Restraints SystemE151127
Page 45 of 445

Passenger airbag
Passenger airbag status
indicator
Occupant
Disabled
OFF: Lit
Empty
ON: Unlit Disabled
OFF: Lit
Child
ON: Unlit Enabled
OFF: Unlit
Adult
ON: Lit
Note: When the passenger airbag status
indicator OFF light is illuminated, the
passenger (seat mounted) side airbag may
be disabled to avoid the risk of airbag
deployment injuries.
After all occupants have adjusted their
seats and put on safety belts, it is very
important that they continue to sit properly.
A properly seated occupant sits upright,
leaning against the seat back, and
centered on the seat cushion, with their
feet comfortably extended on the floor.
Sitting improperly can increase the chance
of injury in a crash event. For example, if
an occupant slouches, lies down, turns
sideways, sits forward, leans forward or
sideways, or puts one or both feet up, the
chance of injury during a crash is greatly
increased.
The conditions listed above may cause
the weight of a properly seated occupant
to be incorrectly interpreted by the front
passenger sensing system. The person in
the front passenger seat may appear
heavier or lighter due to the conditions
described in the list above. To know if the front passenger
sensing system is operating
properly, See Crash Sensors
and Airbag Indicator (page 46).
Do not attempt to repair or service the
system. Take your vehicle immediately to
an authorized dealer.
If it is necessary to modify an advanced
front airbag system to accommodate a
person with disabilities, contact the Ford
Customer Relationship Center.
See
Getting the Services You Need (page 232).
SIDE AIRBAGS WARNINGS
Do not place objects or mount
equipment on or near the airbag
cover, on the side of the seatbacks (of the
front seats), or in front seat areas that may
come into contact with a deploying airbag.
Failure to follow these instructions may
increase the risk of personal injury in the
event of a crash.
43
MKZ (CC9) Supplementary Restraints System
Page 48 of 445
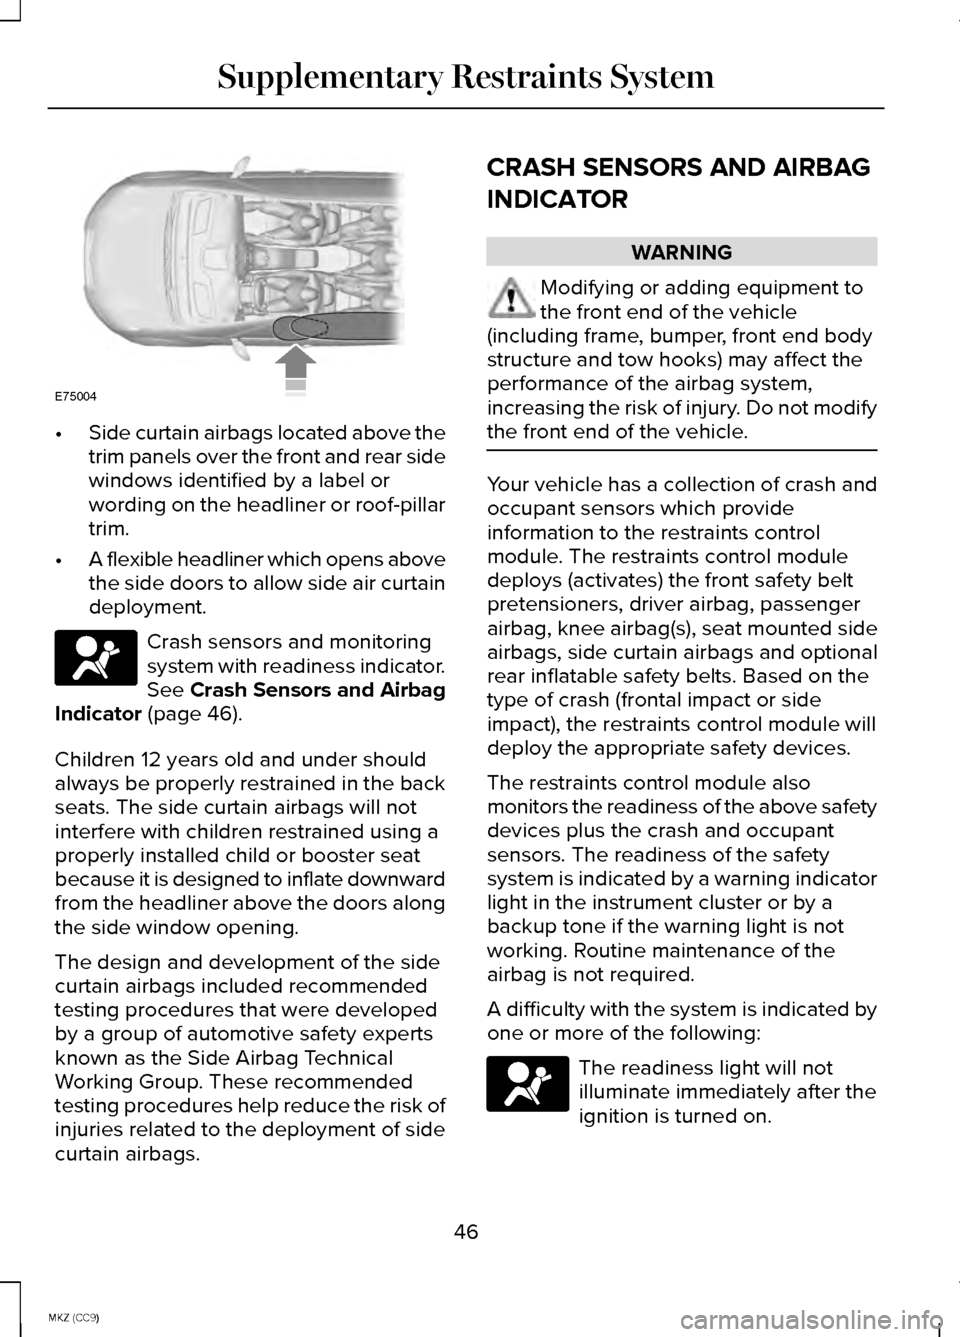
•
Side curtain airbags located above the
trim panels over the front and rear side
windows identified by a label or
wording on the headliner or roof-pillar
trim.
• A flexible headliner which opens above
the side doors to allow side air curtain
deployment. Crash sensors and monitoring
system with readiness indicator.
See Crash Sensors and Airbag
Indicator (page 46).
Children 12 years old and under should
always be properly restrained in the back
seats. The side curtain airbags will not
interfere with children restrained using a
properly installed child or booster seat
because it is designed to inflate downward
from the headliner above the doors along
the side window opening.
The design and development of the side
curtain airbags included recommended
testing procedures that were developed
by a group of automotive safety experts
known as the Side Airbag Technical
Working Group. These recommended
testing procedures help reduce the risk of
injuries related to the deployment of side
curtain airbags. CRASH SENSORS AND AIRBAG
INDICATOR WARNING
Modifying or adding equipment to
the front end of the vehicle
(including frame, bumper, front end body
structure and tow hooks) may affect the
performance of the airbag system,
increasing the risk of injury. Do not modify
the front end of the vehicle. Your vehicle has a collection of crash and
occupant sensors which provide
information to the restraints control
module. The restraints control module
deploys (activates) the front safety belt
pretensioners, driver airbag, passenger
airbag, knee airbag(s), seat mounted side
airbags, side curtain airbags and optional
rear inflatable safety belts. Based on the
type of crash (frontal impact or side
impact), the restraints control module will
deploy the appropriate safety devices.
The restraints control module also
monitors the readiness of the above safety
devices plus the crash and occupant
sensors. The readiness of the safety
system is indicated by a warning indicator
light in the instrument cluster or by a
backup tone if the warning light is not
working. Routine maintenance of the
airbag is not required.
A difficulty with the system is indicated by
one or more of the following:
The readiness light will not
illuminate immediately after the
ignition is turned on.
46
MKZ (CC9) Supplementary Restraints SystemE75004
Page 52 of 445

2. Insert a coin into the slot and twist to
separate the housing. 3. Remove the batteries.
4. Install new batteries with the + facing
each other.
Note: Make sure to replace the label
between the two batteries.
5. Reinstall the housing and cover.
Car Finder Press the button twice within
three seconds. The horn will
sound and the turn signals will
flash. We recommend you use this method
to locate your vehicle, rather than using
the panic alarm.
Sounding a Panic Alarm
Note: The panic alarm will only operate
when the ignition is off. Press the button to activate the
alarm. Press the button again or
switch the ignition on to
deactivate. Remote Start WARNING
To avoid exhaust fumes, do not use
remote start if your vehicle is parked
indoors or areas that are not well
ventilated. Note:
Do not use remote start if your
vehicle is low on fuel. The remote start button is on the
transmitter.
This feature allows you to start your
vehicle from outside the vehicle. The
transmitter has an extended operating
range.
Vehicles with automatic climate control
can be configured to operate when the
vehicle is remote started.
See Climate
Control (page 124). A manual climate
control system will run at the setting it was
set to when you switched the vehicle off.
Many states and provinces have
restrictions for the use of remote start.
Check your local and state or provincial
laws for specific requirements regarding
remote start systems.
The remote start system will not work if:
• the ignition is on
• the alarm system is triggered
• you disable the feature
• the hood is open
• the transmission is not in
P
• the vehicle battery voltage is too low
• the service engine soon light is on.
50
MKZ (CC9) Keys and Remote ControlsE153891 E138623 E138624 E138625
Page 65 of 445

With the Decklid Close Button
Press the button inside the
decklid on the left side.
Obstacle Detection
The decklid will reverse to full open if it
detects an obstacle while closing. Three
chimes will sound as the decklid begins
to reopen. Remove the obstacle to close
the decklid.
Note: Before driving off, check the
instrument cluster for a trunk ajar or door
ajar message or warning indicator. Failure
to do this could result in unintentionally
leaving the decklid open while driving.
The decklid will stop and three chimes will
sound if it detects an obstacle while
opening. Remove the obstacle to operate
the decklid.
Resetting the Power Decklid
The decklid may not operate properly and
you may need to reset it if:
• the battery is dead or has low voltage
• you disconnect the battery
• you manually close the decklid and
leave it unlatched.
To reset the power decklid:
1. Disconnect the battery for 20 seconds
then reconnect the battery.
2. Manually close and fully latch the decklid.
3. Power open the decklid using the remote control or instrument panel
button. KEYLESS ENTRY
SECURICODE™ KEYLESS ENTRY
KEYPAD
The keypad is located near the driver
window. It is invisible until touched and
then it lights up so you can see and touch
the appropriate buttons.
Note:
If you enter your entry code too fast
on the keypad, the unlock function may
not work. Re-enter your entry code more
slowly. You can use the keypad to:
•
lock or unlock the doors
• recall memory seat and mirror
positions
• program and erase personal entry
codes
• arm and disarm the anti-theft alarm
• release the trunk.
Note: The keypad will not operate a
power decklid.
63
MKZ (CC9) LocksE173217 E138637
Page 68 of 445

WARNINGS
Do not leave children, unreliable
adults, or animals unattended in the
vehicle. On hot days, the temperature in
the trunk or vehicle interior can rise very
quickly. Exposure of people or animals to
these high temperatures for even a short
time can cause death or serious
heat-related injuries, including brain
damage. Small children are particularly at
risk. Your vehicle is equipped with a release
handle that provides a means of escape
for children and adults if they become
locked inside the luggage compartment.
Adults should familiarize themselves with
the operation and location of the release
handle. The handle is located inside the luggage
compartment either on the luggage
compartment door (lid) or near the tail
lamps. It is composed of a material that
will glow for hours in darkness following
brief exposure to ambient light.
Pull the handle and push up on the
luggage compartment door (lid) to open
from within the luggage compartment.
66
MKZ (CC9) LocksE144403
Page 81 of 445

DAYTIME RUNNING LAMPS (IF
EQUIPPED) WARNING
Always remember to switch your
headlamps on in low light situations
or during inclement weather. The system
does not activate the tail lamps and may
not provide adequate lighting during these
conditions. Failure to activate your
headlamps under these conditions may
result in a collision. The system switches the signature lamps
on in day light conditions.
To switch the system on, switch the
ignition on, and switch the lighting control
to the off, autolamp, or parking lamp
position.
AUTOMATIC HIGH BEAM
CONTROL
(IF EQUIPPED)
The system will automatically turn on your
high beams if it is dark enough and no
other traffic is present. When it detects the
headlights of an approaching vehicle, the
tail lamps of the preceding vehicle or
street lighting, the system will turn off the
high beams before they distract other
drivers. The low beams remain on.
Note: If it appears that automatic control
of the high beams is not functioning
properly, check the windshield in front of
the camera for a blockage. A clear view
of the road is required for proper system
operation. Have any windshield damage
in the area of the camera ’s field-of-view
repaired. Note:
If the system detects a blockage
such as bird droppings, bug splatter, snow
or ice, and you do not observe changes,
the system will go into low beam mode
until you clear the blockage. A message
may also appear in the instrument cluster
display noting the front camera is blocked.
Note: Typical road dust, dirt and water
spots will not affect the performance of
the automatic high beam system .
However, in cold or inclement weather
conditions, you will notice a decrease in
the availability of the high beam system,
especially at start up. If you want to
change the beam state independently of
the system, you may switch the high
beams on or off using the multifunction
switch. Automatic control will resume
when conditions are correct.
Note: Modification of the vehicle ride
height such as using much larger tires,
may degrade feature performance.
A camera sensor, centrally mounted
behind the windshield of your vehicle,
continuously monitors conditions to decide
when to switch the high beams off and on.
Once the system is active, the high beams
will switch on if:
• the ambient light level is low enough
• there is no traffic in front of the vehicle
• the vehicle speed is greater than
25 mph (40 km/h)
The high beams will switch off if:
• the system detects the headlamps of
an approaching vehicle or the tail
lamps of a preceding vehicle.
• vehicle speed falls below
16 mph
(25 km/h)
79
MKZ (CC9) Lighting