Page 293 of 622

2935-6. Using Bluetooth® devices
5
Audio system
CT200h_OM_OM76135E_(EE)
■Automatic volume adjustment
When vehicle speed reaches 80 km/h (50 mph) or more, the volume automatically
increases. The volume returns to the previous volume setting when vehicle speed drops
to 70 km/h (43 mph) or less.
■Operations that cannot be performed while driving
●Operating the system with the “TUNE•SEL” knob
●Registering a portable player or cellular phone to the system
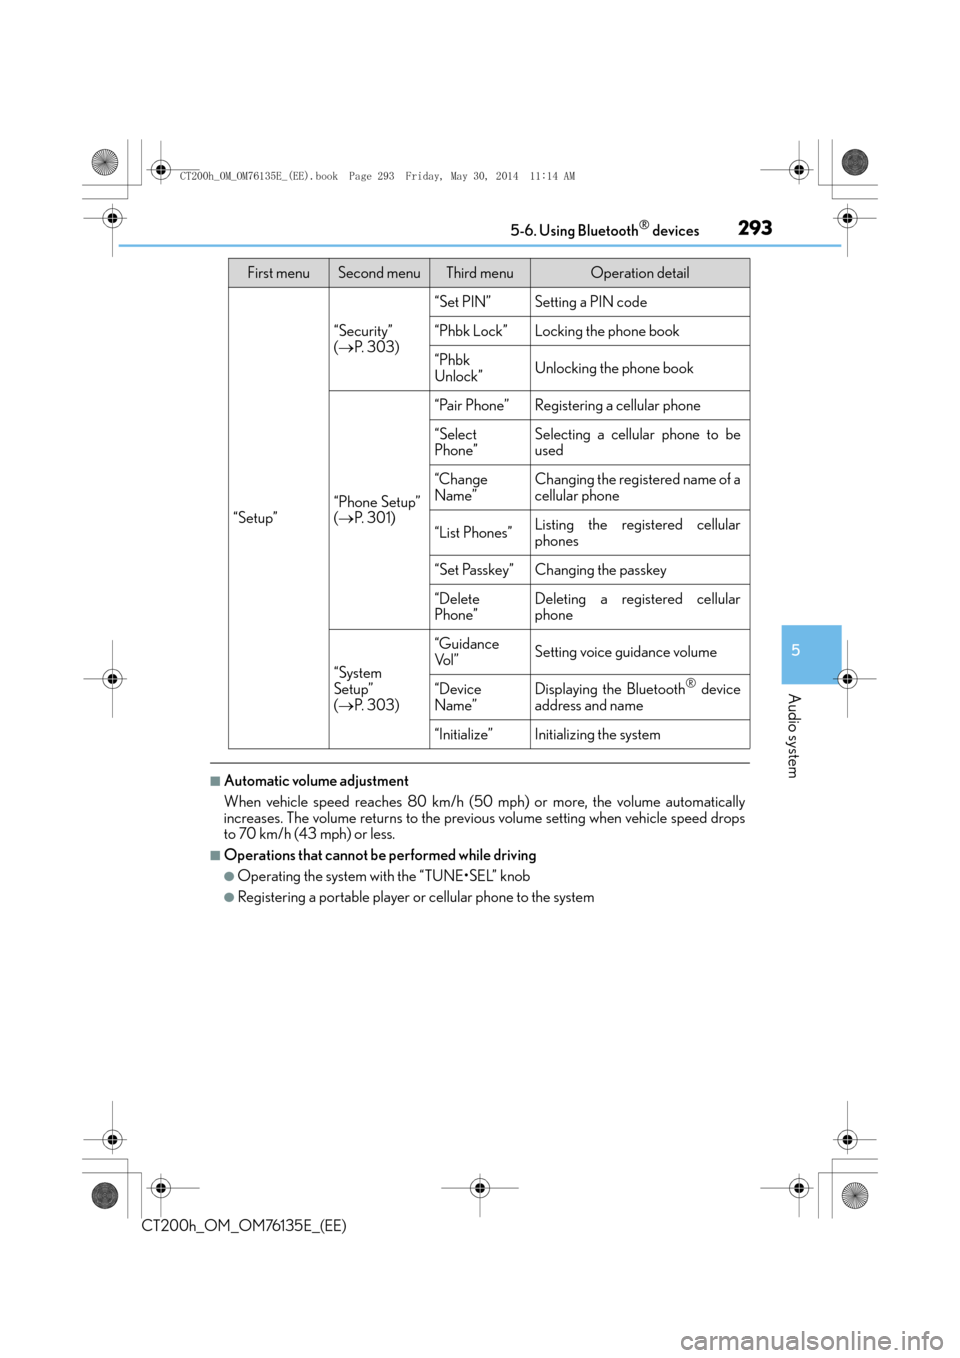
“Setup”
“Security”
( → P. 3 0 3 )
“Set PIN”Setting a PIN code
“Phbk Lock”Locking the phone book
“Phbk
Unlock”Unlocking the phone book
“Phone Setup”
(→ P. 3 0 1 )
“Pair Phone”Registering a cellular phone
“Select
Phone”Selecting a cellular phone to be
used
“Change
Name”Changing the registered name of a
cellular phone
“List Phones”Listing the registered cellular
phones
“Set Passkey”Changing the passkey
“Delete
Phone”Deleting a registered cellular
phone
“System
Setup”
(→ P. 3 0 3 )
“Guidance
Vo l ”Setting voice guidance volume
“Device
Name”Displaying the Bluetooth® device
address and name
“Initialize”Initializing the system
First menuSecond menuThird menuOperation detail
CT200h_OM_OM76135E_(EE).book Page 293 Friday, May 30, 2014 1 1:14 AM
Page 303 of 622
303
5
5-7. Setup menu
Audio system
CT200h_OM_OM76135E_(EE)
Security and system setup
To enter the menu of each setting, follow the steps below.
Press the off-hook switch and select “Setup” using the “TUNE•SEL” knob.
Select “Security” using the knob.
Select one of the following items using the knob:
●Setting or changing the PIN (Personal Identification Number)
“Set PIN”
●Locking the phone book
“Phbk Lock”
●Unlocking the phone book
“Phbk Unlock”
Press the off-hook switch and select “Setup” using the “TUNE•SEL” knob.
Select “System Setup” using the knob.
Select one of the following items using the knob:
●Setting voice guidance volume
“Guidance Vol”
●Displaying the Bluetooth® device address and name
“Device Name”
●Initializing the system
“Initialize”
Security setting items and operation procedures
System setup items an d operation procedures
1
2
3
1
2
3
CT200h_OM_OM76135E_(EE).book Page 303 Friday, May 30, 2014 1 1:14 AM
Page 304 of 622

3045-7. Setup menu
CT200h_OM_OM76135E_(EE)
■Setting a PINSelect “Set PIN” using the “TUNE•SEL” knob.
Enter a PIN using the knob.
Input the code 1 digit at a time.
■Changing the PINSelect “Set PIN” using the “TUNE•SEL” knob.
Enter the registered PIN using the knob.
Enter a new PIN using the knob.
Input the code 1 digit at a time.
Select “Phbk Lock” or “Phbk Unlock” using the “TUNE•SEL” knob.
Input a PIN by using the knob and select “Confirm” using the knob.
Input the code 1 digit at a time.
Select “Guidance Vol” using the “TUNE•SEL” knob.
Change the voice guidance volume.
To decrease the volume: Turn the knob counterclockwise.
To increase the volume: Turn the knob clockwise.
Select “Device Name” using the “TUNE•SEL” knob.
Turn the knob to display the Bluetooth
® device address and name.
Select “Go Back” using the knob to return to “System Setup”.
Select “Initialize” and then “Confirm” using the “TUNE•SEL” knob.
Select “Confirm” again using the knob.
Setting or changing the PIN
Locking or unlocking the phone book
Setting voice guidance volume
Displaying the Bluetooth® device address and name
Initializing the system
1
2
1
2
3
1
2
1
2
1
2
3
1
2
CT200h_OM_OM76135E_(EE).book Page 304 Friday, May 30, 2014 1 1:14 AM
Page 305 of 622
3055-7. Setup menu
5
Audio system
CT200h_OM_OM76135E_(EE)
■Initialization
●The following data in the system can be initialized:
• Phone book
• Outgoing and incoming call history
• Speed dials
• Registered cellular phone data
•Security code
• Registered Bluetooth
® enabled portable player data
• Passkeys for the cellular phones
• Passkey for the Bluetooth
® audio players
•Guidance volume
• Receiver volume
• Ring tone volume
●Once the initialization has been completed, the data cannot be restored to its original
state.
■When the phone book is locked
The following functions cannot be used:
●Dialing by inputting a name
●Speed dialing
●Dialing a number stored in the call history memory
●Using the phone book
CT200h_OM_OM76135E_(EE).book Page 305 Friday, May 30, 2014 1 1:14 AM
Page 335 of 622

335
5
5-12. Setup (Lexus Display Audio System)
Audio system
CT200h_OM_OM76135E_(EE)
Display settings
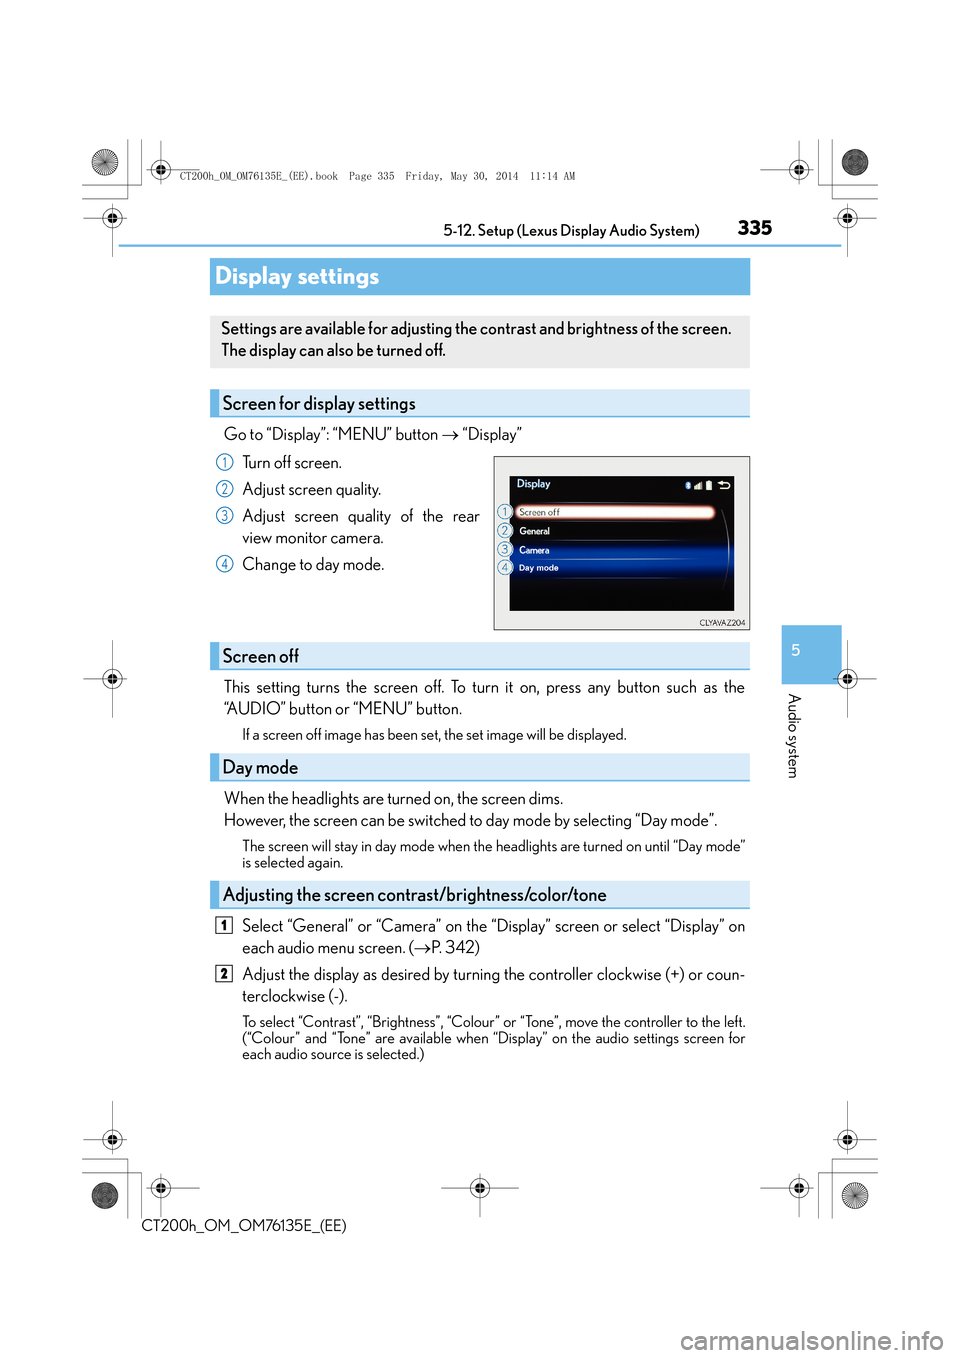
Go to “Display”: “MENU” button
→ “Display”
Turn off screen.
Adjust screen quality.
Adjust screen quality of the rear
view monitor camera.
Change to day mode.
This setting turns the screen off. To turn it on, press any button such as the
“AUDIO” button or “MENU” button.
If a screen off image has been se t, the set image will be displayed.
When the headlights are turned on, the screen dims.
However, the screen can be switched to day mode by selecting “Day mode”.
The screen will stay in day mode when the headlights are turned on until “Day mode”
is selected again.
Select “General” or “Camera” on the “Display” screen or select “Display” on
each audio menu screen. ( →P. 3 4 2 )
Adjust the display as desired by turning the controller clockwise (+) or coun-
terclockwise (-).
To select “Contrast”, “Brightness”, “Colour” or “Tone”, move the controller to the left.
(“Colour” and “Tone” are available when “Display” on the audio settings screen for
each audio source is selected.)
Settings are available for adjusting the contrast and brightness of the screen.
The display can also be turned off.
Screen for display settings
1
2
3
4
Screen off
Day mode
Adjusting the screen contrast/brightness/color/tone
1
2
CT200h_OM_OM76135E_(EE).book Page 335 Friday, May 30, 2014 1 1:14 AM
Page 407 of 622

407
6Interior features
CT200h_OM_OM76135E_(EE)
6-1. Using the air conditioning system and defogger
Automatic air conditioning system (Vehicles with
a navigation system or
Lexus Display Audio
System) ....................................... 408
Automatic air conditioning system (Vehicles without
a navigation system or
Lexus Display Audio
System) ..........................................417
Heated steering wheel/ seat heaters ............................... 424
• Heated steering wheel ...... 424
• Seat heaters............................ 425 6-2. Using the interior lights
Interior lights list ......................... 426• Personal/interior light main switch ............................. 426
• Front personal/ interior lights ...........................427
• Rear interior light ..................427
6-3. Using the storage features List of storage features ............ 428• Glove box ............................... 429
• Console box........................... 429
•Cup holders/
bottle holders/
door pockets..........................430
• Auxiliary boxes ...................... 431
Luggage compartment features ....................................... 433
6-4. Using the other interior features Other interior features ............ 436• Sun visors ................................ 436
• Vanity mirrors ........................ 436
• Clock ........................................ 437
• Power outlet ........................... 437
• Assist grips.............................. 439
CT200h_OM_OM76135E_(EE).book Page 407 Friday, May 30, 2014 1 1:14 AM
Page 414 of 622

4146-1. Using the air conditioning system and defogger
CT200h_OM_OM76135E_(EE)
■Registering air conditioning settings to electronic keys (vehicles with a smart entry &
start system)
●Unlocking the vehicle using an electronic key and turning the power switch to ON
mode will recall that key’s regist ered air conditioning settings.
●When the power switch is turned off, the cu rrent air conditioning settings will automati-
cally be registered to the electronic key that was used to unlock the vehicle.
The system may not operate correctly if more than one electronic key is in the vicinity or
if the smart entry & start system is used to unlock a passenger door.
Settings for the electronic key and the corresponding door can be changed.
Contact any authorized Lexus dealer or repa irer, or another duly qualified and equipped
professional.
■Using automatic mode
Fan speed is adjusted automatically according to the temperature setting and the ambi-
ent conditions.
Therefore, the fan may stop for a while until wa rm or cool air is ready to flow immediately
after the “AUTO” button is pressed or “AUTO” is selected.
■Fogging up of the windows
●The windows will easily fog up when the humidity in the vehicle is high. Pressing “A/C”
button or selecting “A/C” will dehumidify th e air from the outlets and defog the wind-
shield effectively.
●If you turn “A/C” off, the windows may fog up more easily.
●The windows may fog up if the recirculated air mode is used.
■Windshield fog detection function (if equipped)
When automatic mode is set, the humidity sensor ( →P. 416) detects fog on the wind-
shield and controls the air conditioning system to prevent fog.
■Outside/recirculated air mode
●When driving on dusty roads such as tunnels or in heavy traffic, set to
the recirculated air mode. This is effective in preventing outside air from entering the
vehicle interior. During cooling operation, setting the recirculated air mode will also
cool the vehicle interior effectively.
●Outside/recirculated air mode may automatically switch depending on the tempera-
ture setting or the inside temperature.
CT200h_OM_OM76135E_(EE).book Page 414 Friday, May 30, 2014 1 1:14 AM
Page 416 of 622

4166-1. Using the air conditioning system and defogger
CT200h_OM_OM76135E_(EE)
WA R N I N G
■To prevent the windshield from fogging up
●Do not use during cool air operation in extremely humid weather. The differ-
ence between the temperature of the outside air and that of the windshield can cause
the outer surface of the windshield to fog up, blocking your vision.
■To prevent burns
●Do not touch the rear view mirror surfaces when the outside rear view mirror defog-
gers are on.
●Do not touch the glass at lower part of the windshield or to the side of the front pillars
when the windshield wiper de-icer is on. (vehicles with windshield wiper de-icer)
NOTICE
■Humidity sensor (if equipped)
■To prevent 12-volt battery discharge
Do not leave the air conditioning system on longer than necessary when the hybrid sys-
tem is off.
●Do not place anything on the instrument
panel which may cover the air outlets. Other-
wise, air flow may be obstructed, preventing
the windshield defoggers from defogging.
In order to detect fog on the windshield, a sen-
sor which monitors the temperature of the
windshield, the surround humidity, etc. is
installed. (→P. 4 1 4 )
Follow these points to avoid damaging the sen-
sor:
●Do not disassemble the sensor
●Do not spray the glass cleaner on the sensor
or subject it to strong impacts
●Do not stick anything on the sensor
CT200h_OM_OM76135E_(EE).book Page 416 Friday, May 30, 2014 1 1:14 AM