Page 229 of 622

2294-5. Using the driving support systems
4
Driving
CT200h_OM_OM76135E_(EE)
●To permanently disable the monitor.
Push and hold the “AUTO” button for 12 to 15 seconds.
The monitor will turn off and on after 6 seconds. Continue holding the but-
ton down until the display turns back off.
The indicator should flash orange.
The monitor will not automatically turn on again after the power switch is
turned off and ON mode.
●To manually turn on the monitor when it is turned off.
Push the “AUTO” button. The indicator should turn green.
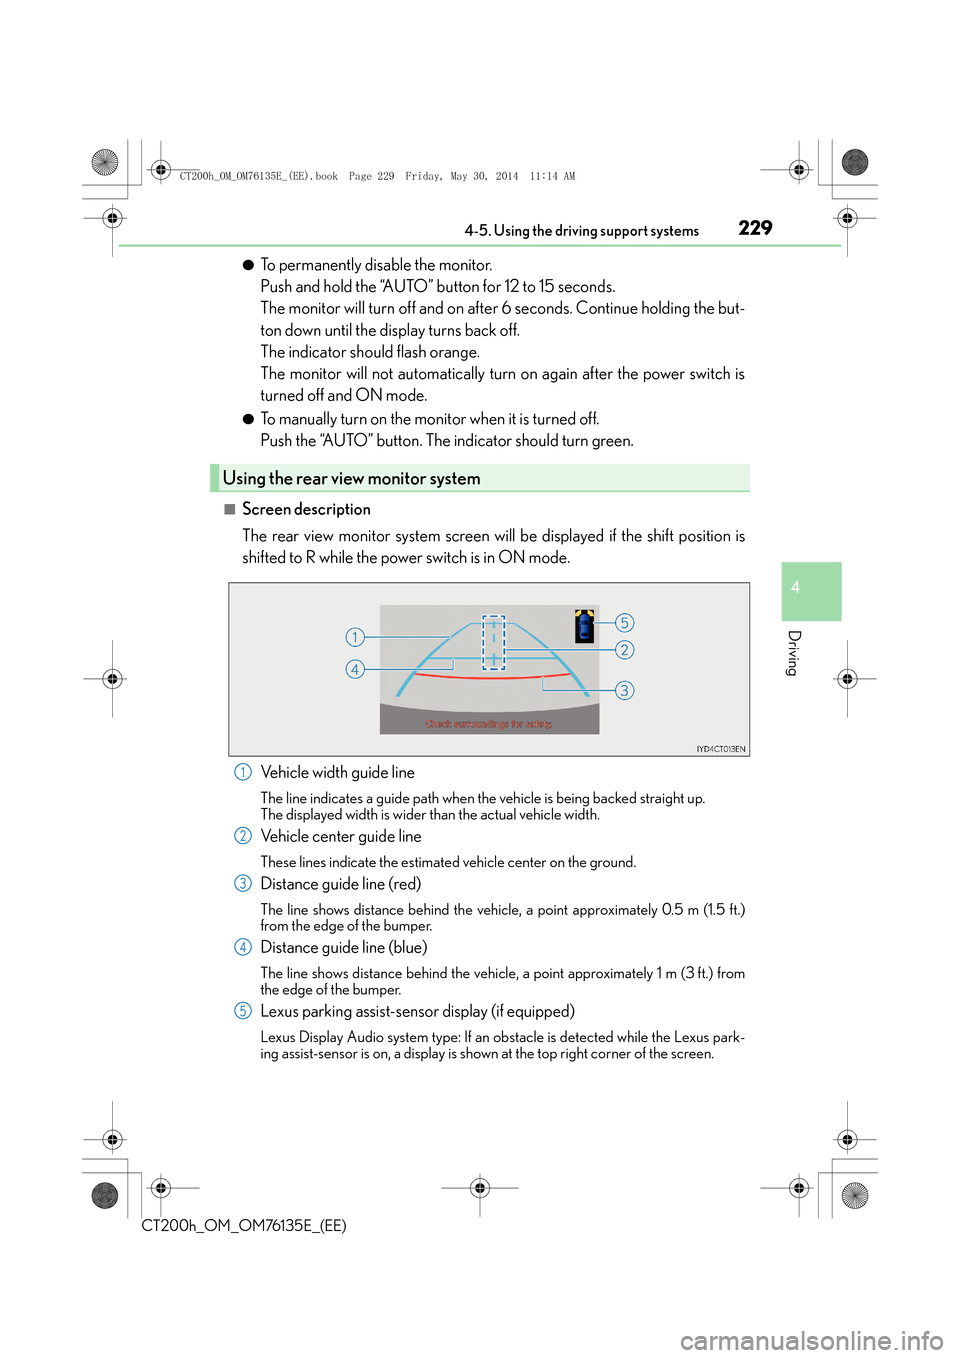
■Screen description
The rear view monitor system screen will be displayed if the shift position is
shifted to R while the power switch is in ON mode.
Vehicle width guide line
The line indicates a guide path when the vehicle is being backed straight up.
The displayed width is wider than the actual vehicle width.
Vehicle center guide line
These lines indicate the estimated vehicle center on the ground.
Distance guide line (red)
The line shows distance behind the vehicle, a point approximately 0.5 m (1.5 ft.)
from the edge of the bumper.
Distance guide line (blue)
The line shows distance behind the vehicle, a point approximately 1 m (3 ft.) from
the edge of the bumper.
Lexus parking assist-sensor display (if equipped)
Lexus Display Audio system type: If an ob stacle is detected while the Lexus park-
ing assist-sensor is on, a display is show n at the top right corner of the screen.
Using the rear view monitor system
1
2
3
4
5
CT200h_OM_OM76135E_(EE).book Page 229 Friday, May 30, 2014 1 1:14 AM
Page 231 of 622

2314-5. Using the driving support systems
4
Driving
CT200h_OM_OM76135E_(EE)
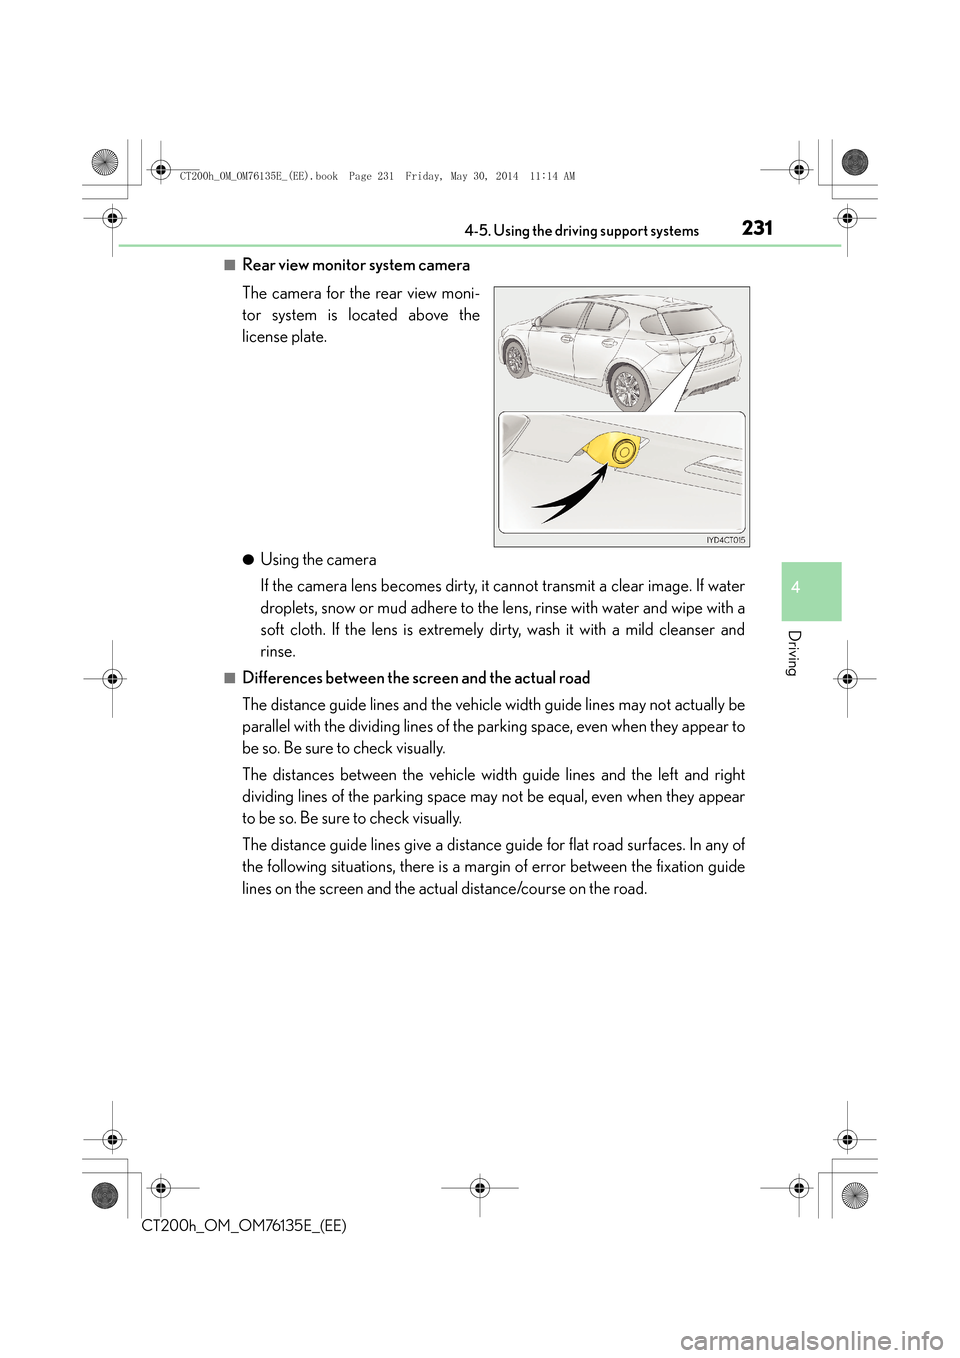
■Rear view monitor system camera
The camera for the rear view moni-
tor system is located above the
license plate.
●Using the camera
If the camera lens becomes dirty, it cannot transmit a clear image. If water
droplets, snow or mud adhere to the lens, rinse with water and wipe with a
soft cloth. If the lens is extremely dirty, wash it with a mild cleanser and
rinse.
■Differences between the screen and the actual road
The distance guide lines and the vehicle width guide lines may not actually be
parallel with the dividing lines of the parking space, even when they appear to
be so. Be sure to check visually.
The distances between the vehicle width guide lines and the left and right
dividing lines of the parking space may not be equal, even when they appear
to be so. Be sure to check visually.
The distance guide lines give a distance guide for flat road surfaces. In any of
the following situations, there is a margin of error between the fixation guide
lines on the screen and the actual distance/course on the road.
CT200h_OM_OM76135E_(EE).book Page 231 Friday, May 30, 2014 1 1:14 AM
Page 233 of 622

2334-5. Using the driving support systems
4
Driving
CT200h_OM_OM76135E_(EE)
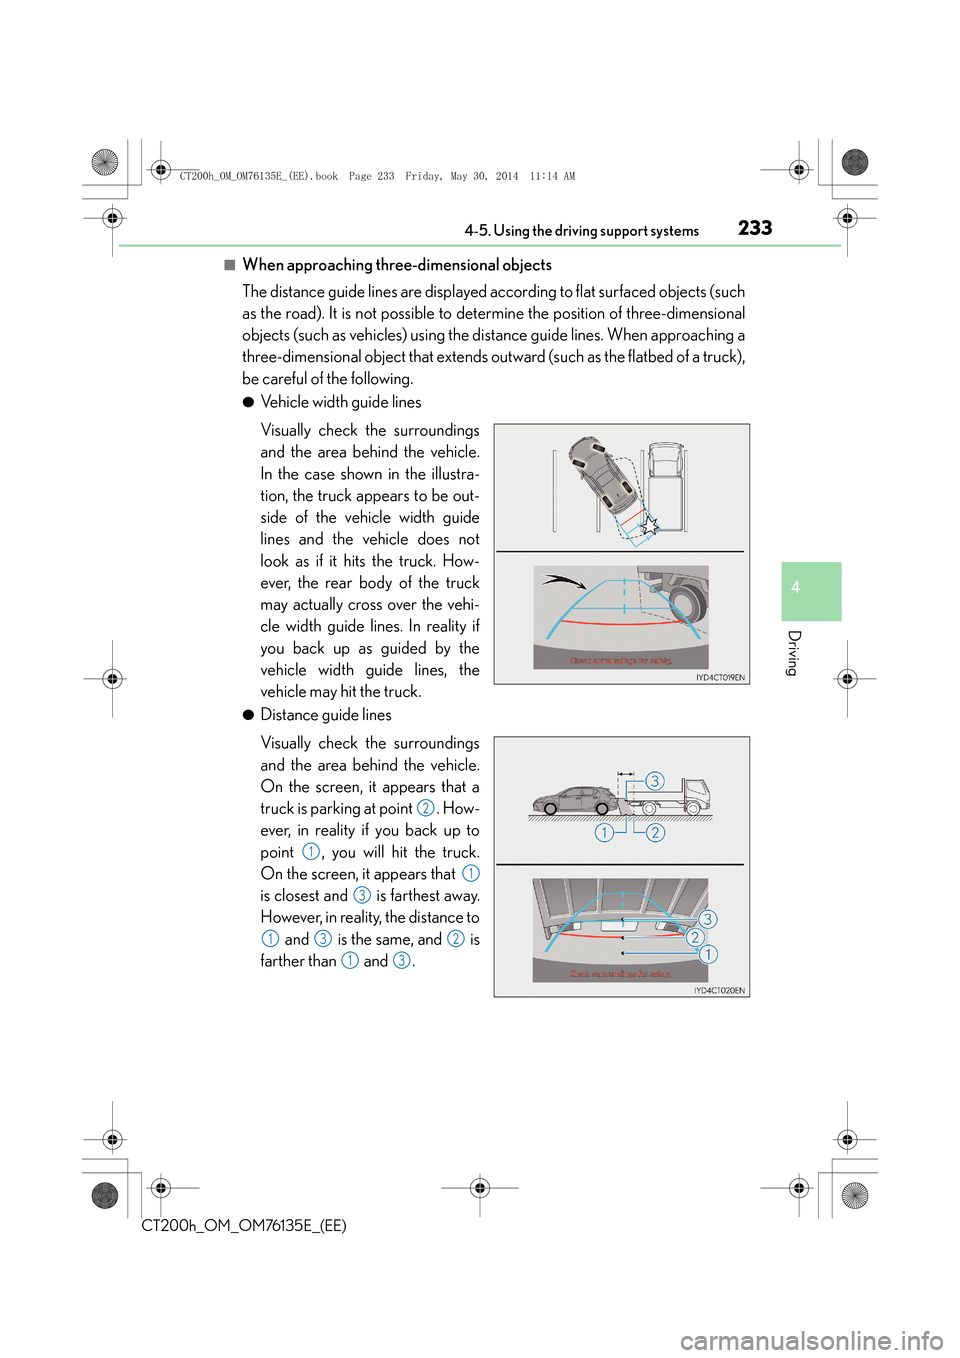
■When approaching three-dimensional objects
The distance guide lines are displayed according to flat surfaced objects (such
as the road). It is not possible to determine the position of three-dimensional
objects (such as vehicles) using the distance guide lines. When approaching a
three-dimensional object that extends outward (such as the flatbed of a truck),
be careful of the following.
●Vehicle width guide lines
Visually check the surroundings
and the area behind the vehicle.
In the case shown in the illustra-
tion, the truck appears to be out-
side of the vehicle width guide
lines and the vehicle does not
look as if it hits the truck. How-
ever, the rear body of the truck
may actually cross over the vehi-
cle width guide lines. In reality if
you back up as guided by the
vehicle width guide lines, the
vehicle may hit the truck.
●Distance guide lines
Visually check the surroundings
and the area behind the vehicle.
On the screen, it appears that a
truck is parking at point . How-
ever, in reality if you back up to
point , you will hit the truck.
On the screen, it appears that
is closest and is farthest away.
However, in reality, the distance to and is the same, and is
farther than and .
2
1
1
3
132
13
CT200h_OM_OM76135E_(EE).book Page 233 Friday, May 30, 2014 1 1:14 AM
Page 479 of 622

4797-3. Do-it-yourself maintenance
CT200h_OM_OM76135E_(EE)
7
Maintenance and care
Wheels
When replacing wheels, care should be taken to ensure that they are equivalent
to those removed in load capacity, diameter, rim width and inset
*.
Replacement wheels are available at any authorized Lexus dealer or repairer, or
another duly qualified and equipped professional.
*: Conventionally referred to as “offset”.
Lexus does not recommend using the following:
●Wheels of different sizes or types
●Used wheels
●Bent wheels that have been straightened
●Use only Lexus wheel nuts and wrenches designed for use with your alumi-
num wheels.
●When rotating, repairing or changing your tires, check that the wheel nuts are
still tight after driving 1600 km (1000 miles).
●Be careful not to damage the aluminum wheels when using tire chains.
●Use only Lexus genuine balance weights or equivalent and a plastic or rubber
hammer when balancing your wheels.
■When replacing wheels (vehicles with the tire pressure warning system)
The wheels of your vehicle are equipped with tire pressure warning valves and transmit-
ters that allow the tire pressure warning system to provide advance warning in the event
of a loss in tire inflation pressure. Whenever wheels are replaced, tire pressure warning
valves and transmitters must be installed. ( →P. 4 6 9 )
If a wheel is bent, cracked or heavily corroded, it should be replaced. Other-
wise, the tire may separate from the wheel or cause a loss of handling control.
Wheel selection
Aluminum wheel precautions
CT200h_OM_OM76135E_(EE).book Page 479 Friday, May 30, 2014 1 1:14 AM
Page 578 of 622

5789-1. Specifications
CT200h_OM_OM76135E_(EE)
Maintenance data (fuel, oil level, etc.)
*1:Unladen vehicle
*2: Vehicles with 16-inch and 17-inch tires
*3: Vehicles with 15-inch tires
■Vehicle identification number
The vehicle identification number (VIN) is the legal identifier for your vehicle.
This is the primary identification number for your Lexus. It is used in register-
ing the ownership of your vehicle.
This number is stamped on the top
left of the instrument panel.
Dimensions
Overall length4350 mm (171.3 in.)
Overall width1765 mm (69.5 in.)
Overall height*11455 mm (57.3 in.)*2
1445 mm (56.9 in)*3
Wheelbase2600 mm (102.4 in.)
Tr e a d
Front1525 mm (60.0 in.)*2
1535 mm (60.4 in.)*3
Rear1520 mm (59.8 in.)*2
1530 mm (60.2 in.)*3
Gross vehicle mass1845 kg (4068 lb.)*2
1790 kg (3946 lb.)*3
Maximum permissible axle
capacityFront1020 kg (2249 lb.)*2
1060 kg (2337 lb.)*3
Rear980 kg (2161 lb.)
Vehicle identification
CT200h_OM_OM76135E_(EE).book Page 578 Friday, May 30, 2014 1 1:14 AM