2014 Lancia Voyager remote control
[x] Cancel search: remote controlPage 24 of 364

The Vehicle Security Alarm re-mains armed during power lift-
gate entry. Pressing the liftgate
button will not disarm the Ve-
hicle Security Alarm. If someone
enters the vehicle through the
liftgate and opens any door the
alarm will sound.
When the Vehicle Security Alarm is armed, the interior
power door lock switches will
not unlock the doors.
The Vehicle Security Alarm is de-
signed to protect your vehicle; how-
ever, you can create conditions where
the system will give you a false alarm.
If one of the previously described
arming sequences has occurred, the
Vehicle Security Alarm will arm re-
gardless of whether you are in the
vehicle or not. If you remain in the
vehicle and open a door, the alarm
will sound. If this occurs, disarm the
Vehicle Security Alarm.
If the Vehicle Security Alarm is armed
and the battery becomes discon-
nected, the Vehicle Security Alarm
will remain armed when the battery is reconnected; the exterior lights will
flash, the horn will sound. If this oc-
curs, disarm the Vehicle Security
Alarm.
ILLUMINATED ENTRY
The courtesy lights will turn on when
you use the Remote Keyless Entry
(RKE) transmitter to unlock the
doors or open any door.
This feature also turns on the ap-
proach lighting in the outside mirrors
(for versions/markets, where pro-
vided). Refer to “Mirrors” in “Under-
standing The Features Of Your Ve-
hicle” for further information.
The lights will fade to off after ap-
proximately 30 seconds, or they will
immediately fade to off once the igni-
tion switch is turned to ON/RUN from
the OFF position.
NOTE:
The front courtesy overhead
console and door courtesy lights
will not turn off if the dimmer
control is in the “Dome ON” po-
sition (extreme top position). The illuminated entry system
will not operate if the dimmer
control is in the “dome defeat”
position (extreme bottom posi-
tion).REMOTE KEYLESS
ENTRY (RKE) (for
versions/markets, where
provided)
This system allows you to lock or un-
lock the doors and liftgate, open both
front windows, open or close the op-
tional power liftgate, left power slid-
ing door, and right power sliding door
from distances up to approximately
20 m using a hand-held RKE trans-
mitter. The RKE transmitter does not
need to be pointed at the vehicle to
activate the system.
NOTE: Inserting the RKE trans-
mitter with Integrated Key into the
ignition switch disables all but-
tons on that transmitter; however,
the buttons on the remaining
transmitters will continue to work.
Driving at speeds 8 km/h and
18
Page 39 of 364

the “OFF” Master Lock Out
Switch located in the front over-
head console, next to the driver.
WARNING!
Avoid trapping anyone in the ve-
hicle in a collision. Remember that
the sliding doors can only be
opened from the outside door
handle or the switches located on
the b-pillar trim panel just in front
of the power sliding door when the
Child Protection Door Locks are
engaged.
To Disengage the Child Protection
Door Lock
1. Open the sliding side door.
2. Slide the Child Protection Door
Lock control outward (away from the
vehicle) to disengage the Child Pro-
tection Door Lock.
3. Repeat Steps 1 and 2 on the oppo-
site sliding door (for versions/
markets, where provided). NOTE:
After setting the Child Protec-
tion Door Lock system, always
test the door from the inside to
make certain it is in the desired
position.
The power sliding side door switches will not open the power
sliding doors if the vehicle is in
gear or the vehicle speed is
above 0 km/h.
The power sliding door will op- erate from the outside door
handle, the RKE transmitter, the
switches on the overhead con-
sole, or the switches located on
the b-pillar trim panel just in
front of the power sliding door
when the shift lever is in PARK,
regardless of the child lock lever
position.
LIFTGATE
On vehicles equipped with power
locks, the liftgate can be unlocked
using the Remote Keyless Entry (RKE) transmitter button, or by acti-
vating the power door lock switches
located on the front doors.
To open the liftgate, press the liftgate
release handle located on the under-
side of the license plate bar and pull
the liftgate open with one fluid mo-
tion.
POWER LIFTGATE (for
versions/markets, where
available)
The power liftgate may be opened
manually or by using the button on
the Remote Keyless Entry (RKE)
transmitter. Press the button on the
transmitter twice within five seconds,
to open the power liftgate. When the
Liftgate Handle Location
33
Page 135 of 364

INTERIOR LIGHTING
Interior lights are turned on when a
door or liftgate is opened, the Remote
Keyless Entry (RKE) transmitter is
activated, or when the dimmer con-
trol is moved to the extreme top.
The interior lights will automatically
turn off in approximately 10 minutes
for the first activation and 90 seconds
every activation thereafter until the
engine is started, if one of the follow-
ing occur:
1. A door, sliding door or the liftgate
is left open
2. Any overhead reading light is left
on
NOTE: The key must be out of the
ignition switch or the ignition
switch must be in the OFF position
for this feature to operate.
Halo Lights (for versions/markets,
where provided)
Halo lights are strategically placed
soft lighting that help to illuminatespecific areas to aid the occupants in
locating specific features while driv-
ing at night.
The Halo control switch is located to
the right of the dimmer switch.
To activate the Halo lights,
rotate the Halo switch con-
trol upward or downward
to increase or decrease the
lighting.
PARKING LIGHTS
Turn the headlight switch
knob to the first detent to turn
the parking lights on. This also turns
on all instrument panel lighting.
HEADLIGHTS
Turn the headlight switch
knob to the second detent to
turn the headlights and
parking lights on. This also
turns on all instrument panel lighting.
To change the brightness of the in-
strument panel lights, rotate the dim-
mer control up or down.
AUTOMATIC HEADLIGHTS
(for versions/markets,
where provided)
This system automatically turns your
headlights on or off based on ambient
light levels. To turn the system on,
turn the headlight switch to the ex-
treme counterclockwise position
aligning the indicator with AUTO on
the headlight switch. When the sys-
tem is on, the Headlight Time Delay
feature is also on. This means your
headlights will stay on for up to 90
seconds after you turn the ignition
switch OFF. To turn the Automatic
System off, turn the headlight switch
clockwise to the O (Off) position.
Halo Control Switch
129
Page 151 of 364

NOTE: Premium sunroof console
models include all of above except
sunglass storage.
COURTESY/INTERIOR
LIGHTING
At the forward end of the console are
two courtesy lights (standard dome
light has two buttons). The lights turn
on when a front door, a sliding door or
the liftgate is opened. If your vehicle is
equipped with Remote Keyless Entry
(RKE) the lights will also turn on
when the UNLOCK button on the
RKE transmitter is pressed.
The courtesy lights also function as
reading lights. Press in on each lens to
turn these lights on while inside the
vehicle. Press a second time to turn
each light off. You may adjust thedirection of these lights by pressing
the outside ring, which is identified
with four directional arrows (LED
lamps only).
The area around the instrument panel
cupholders is also illuminated from a
light in the overhead console (premium
console only). This light is turned on
when the headlight switch is on, and
will adjust in brightness when the dim-
mer control is rotated up or down.
SUNGLASS STORAGE
(NON-SUNROOF ONLY)
At the front of the overhead console, a
compartment is provided for the stor-
age of two pairs of sunglasses.
From the closed position, press the
door latch to open the compartment.
The door will slowly rotate to the full
open position.
From this position, the door can be
fully closed or, by rotating upward
about 3/4 of the way and releasing,
positioned for conversation mirror
use.
NOTE: From the “conversation
mirror” position, the door can only
be closed.
Overhead Console
Over Door Latch
Full Open Position
Conversation Mirror Position
145
Page 173 of 364

PLAY A DVD USING THE TOUCH-SCREENRADIO .............................. .198
PLAY A DVD USING THE VES™ PLAYER (for versions/markets, where provided) ..........200
PLAY A Blu-ray DISC USING THE BLU-RAY PLAYER (for versions/markets, where
provided) ............................ .201
LISTEN TO AN AUDIO SOURCE WHILE A VIDEO IS PLAYING .......................... .202
THIRD ROW SWIVEL SCREEN (for versions/markets, where provided) ..........202
IMPORTANT NOTES FOR DUAL VIDEO SCREEN SYSTEM ............................. .202
VES™ REMOTE CONTROL (for versions/markets, where provided) ....................... .202
Blu-ray PLAYER REMOTE CONTROL (for versions/markets, where provided) ..........204
REMOTE CONTROL STORAGE ............205
LOCKING THE REMOTE CONTROL. . . ......205
REPLACING THE REMOTE CONTROL BATTERIES .......................... .206
HEADPHONES OPERATION ...............206
Blu-ray HEADPHONES OPERATION ........206
CONTROLS .......................... .207
REPLACING THE HEADPHONE BATTERIES . .207
UNWIRED® STEREO HEADPHONE LIFETIME LIMITED WARRANTY ...................207
SYSTEM INFORMATION .................208
SHARED MODES ...................... .208
167
Page 203 of 364

WARNING!
Do not plug in or remove the iPod®
or external USB device while driv-
ing. Failure to follow this warning
could result in an accident.
BLUETOOTH STREAMING
AUDIO (BTSA)
Music can be streamed from your cel-
lular phone to the Uconnect® phone
system.
Uconnect® MULTIMEDIA
VIDEO
ENTERTAINMENT
SYSTEM (VES™) (for
versions/markets, where
provided)
GETTING STARTED
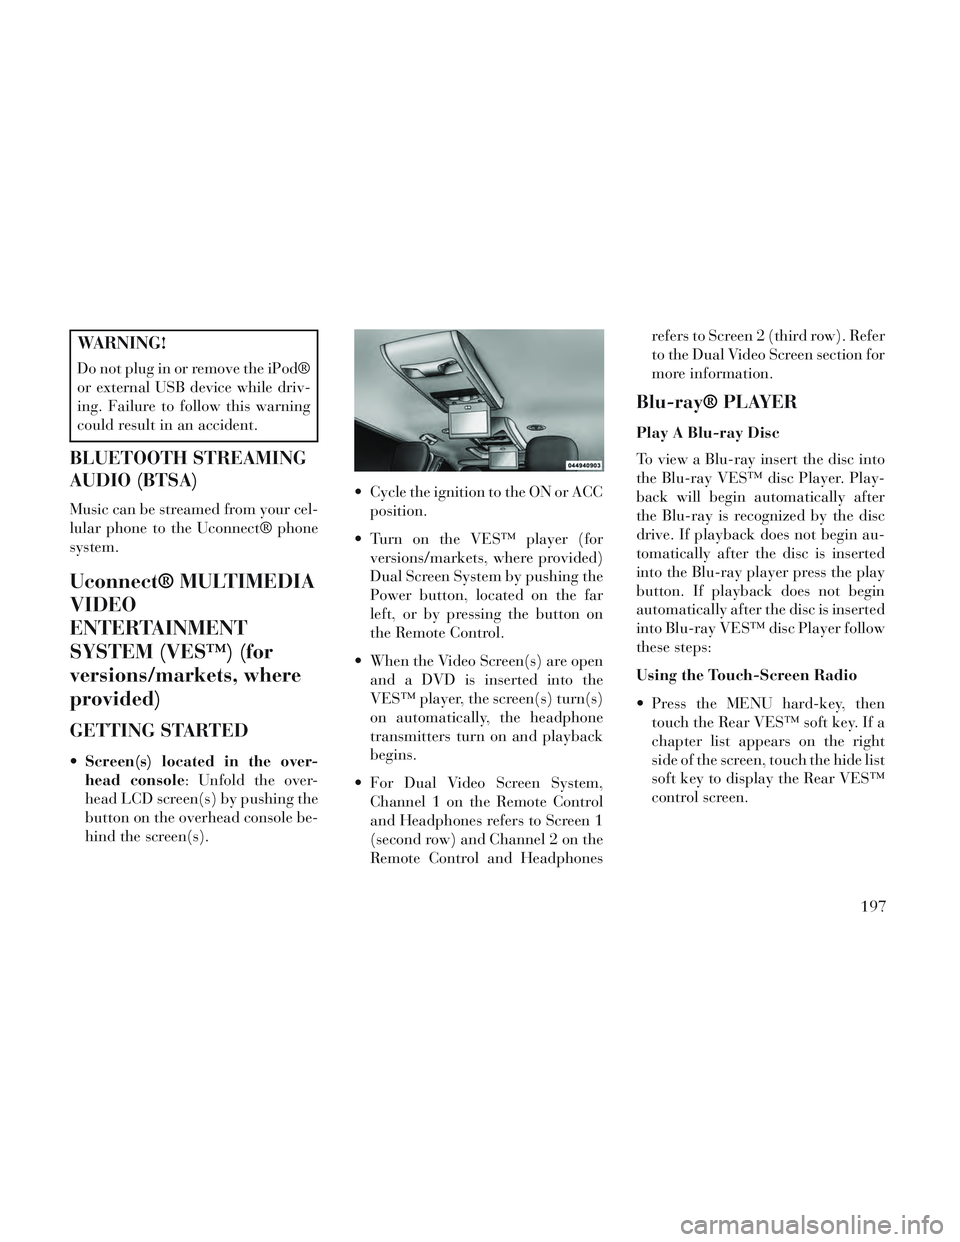
Screen(s) located in the over-
head console: Unfold the over-
head LCD screen(s) by pushing the
button on the overhead console be-
hind the screen(s). Cycle the ignition to the ON or ACC
position.
Turn on the VES™ player (for versions/markets, where provided)
Dual Screen System by pushing the
Power button, located on the far
left, or by pressing the button on
the Remote Control.
When the Video Screen(s) are open and a DVD is inserted into the
VES™ player, the screen(s) turn(s)
on automatically, the headphone
transmitters turn on and playback
begins.
For Dual Video Screen System, Channel 1 on the Remote Control
and Headphones refers to Screen 1
(second row) and Channel 2 on the
Remote Control and Headphones refers to Screen 2 (third row). Refer
to the Dual Video Screen section for
more information.
Blu-ray® PLAYER
Play A Blu-ray Disc
To view a Blu-ray insert the disc into
the Blu-ray VES™ disc Player. Play-
back will begin automatically after
the Blu-ray is recognized by the disc
drive. If playback does not begin au-
tomatically after the disc is inserted
into the Blu-ray player press the play
button. If playback does not begin
automatically after the disc is inserted
into Blu-ray VES™ disc Player follow
these steps:
Using the Touch-Screen Radio
Press the MENU hard-key, then
touch the Rear VES™ soft key. If a
chapter list appears on the right
side of the screen, touch the hide list
soft key to display the Rear VES™
control screen.
197
Page 204 of 364

Touch the 1 soft-key to select anaudio channel, then touch the
VES™ Disc soft-key in the media
column.
Using the Remote Control
Select an audio channel (Channel 1 for 2nd row screen and Channel 2
for 3rd row screen), then press the
source key and select VES™ Disc
from the menu.
Press popup/menu key to navigate disc menu and options.
NOTE: Due to the size of the con-
tent on a Blu-ray disc, the disc may
not start playing immediately.
PLAY VIDEO GAMES
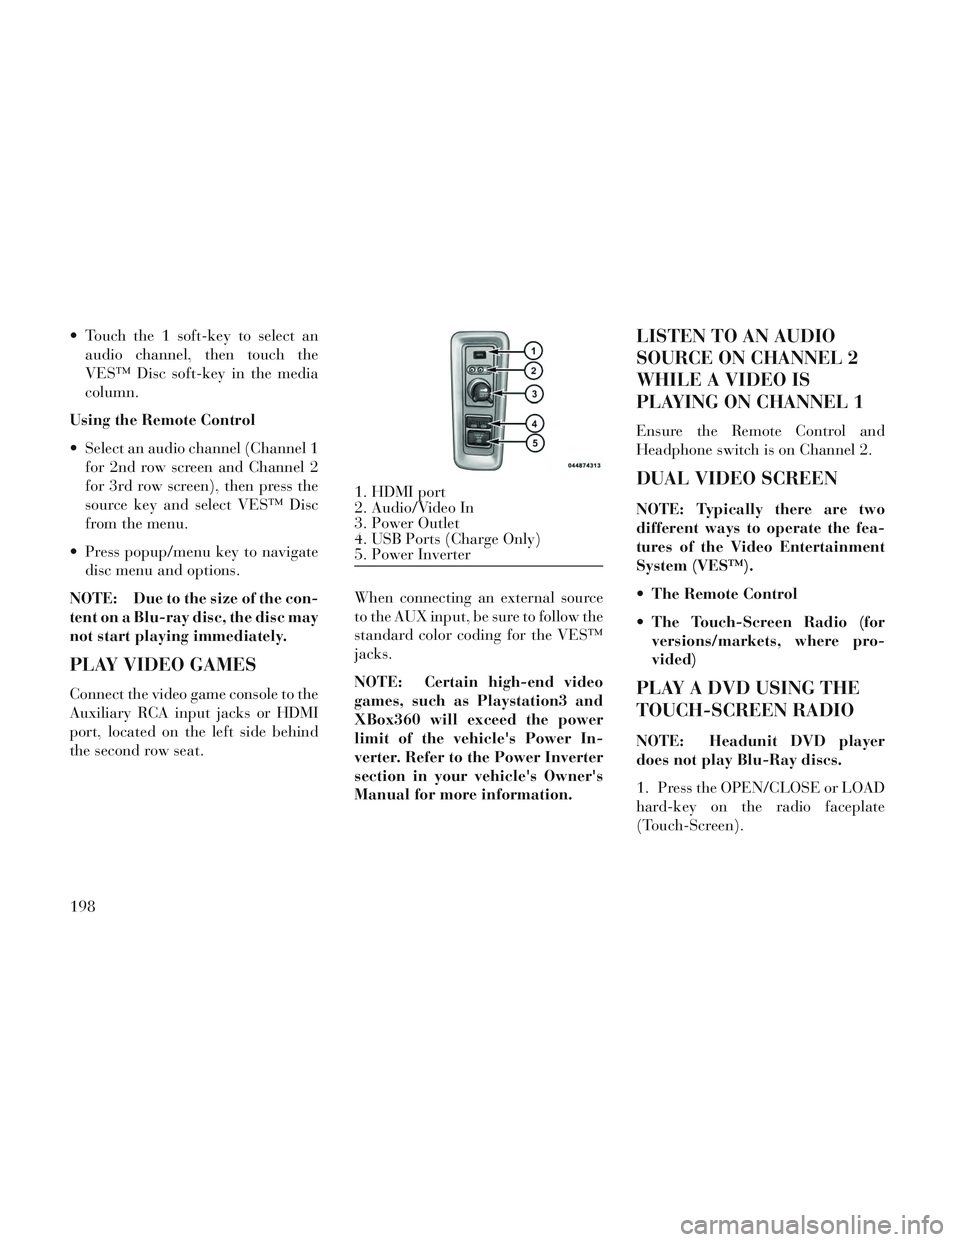
Connect the video game console to the
Auxiliary RCA input jacks or HDMI
port, located on the left side behind
the second row seat. When connecting an external source
to the AUX input, be sure to follow the
standard color coding for the VES™
jacks.
NOTE: Certain high-end video
games, such as Playstation3 and
XBox360 will exceed the power
limit of the vehicle's Power In-
verter. Refer to the Power Inverter
section in your vehicle's Owner's
Manual for more information.
LISTEN TO AN AUDIO
SOURCE ON CHANNEL 2
WHILE A VIDEO IS
PLAYING ON CHANNEL 1
Ensure the Remote Control and
Headphone switch is on Channel 2.
DUAL VIDEO SCREEN
NOTE: Typically there are two
different ways to operate the fea-
tures of the Video Entertainment
System (VES™).
The Remote Control
The Touch-Screen Radio (for
versions/markets, where pro-
vided)
PLAY A DVD USING THE
TOUCH-SCREEN RADIO
NOTE: Headunit DVD player
does not play Blu-Ray discs.
1. Press the OPEN/CLOSE or LOAD
hard-key on the radio faceplate
(Touch-Screen).
1. HDMI port
2. Audio/Video In
3. Power Outlet
4. USB Ports (Charge Only)
5. Power Inverter
198
Page 205 of 364

2. Insert the DVD with the label fac-
ing up. The radio automatically se-
lects the appropriate mode after the
disc is recognized and displays the
menu screen or starts playing the first
track.
3. To watch a DVD on Screen 1 for
second row passengers, ensure the Re-
mote Control and Headphone switch
is on Channel 1.
4. To watch a DVD on Screen 2 for
third row passengers, ensure the Re-
mote Control and Headphone switch
is on Channel 2.
Using The Remote Control
1. Press the SOURCE button on the
Remote Control.
2. While looking at Screen 1 or 2,
highlight DISC by either pressing Up/
Down/Left/Right buttons or by re-
peatedly pressing the SOURCE but-
ton, then press ENTER/OK.NOTE:
Channel/Screen 1 select mode
information is shown on the left
side of the screen.
Channel/Screen 2 select mode information is shown on the
right side of the screen.
The VES™ will retain the last setting when turned off.
Using The Touch-Screen Radio
Controls
1. Press the MENU hard-key on the
radio faceplate.
2. Touch the Rear VES soft-key to
display the Rear VES Controls. If a
channel list is displayed, press the
HIDE LIST soft-key to display the
Rear VES Controls screen.
3. Touch the 1 or 2 soft-key and then
the DISC soft-key in the MEDIA col-
umn. To exit touch the back arrow at
the top left of the screen. NOTE:
To view a DVD on the radio
press the RADIO/MEDIA hard-
key, on the radio faceplate, then
touch the DISC tab soft-key and
then the VIEW VIDEO soft-key.
Viewing a DVD on the Touch- Screen radio screen is not avail-
able in all states/provinces. If
available, the vehicle must be
stopped and the shift lever must
be in the PARK position for ve-
hicles with an automatic trans-
mission. In vehicles with a
manual transmission the park-
ing brake must be engaged.
Touching the screen on a Touch- Screen radio while a DVD is
playing brings up basic remote
control functions for DVD play
such as scene selection, Play,
Pause, FF, RW, and Stop. Press-
ing the X in the upper corner
will turn off the remote control
screen functions.
199