2014 Lancia Voyager fuel
[x] Cancel search: fuelPage 281 of 364

WARNING!(Continued)
Keep the liftgate closed whendriving your vehicle to prevent
carbon monoxide and other poi-
sonous exhaust gases from enter-
ing the vehicle.
FUEL REQUIREMENTS
— DIESEL ENGINE
Use Premium Quality Diesel fuels
with a Cetane rating of 50 or higher,
and meeting the EN590 standard are
highly recommended. See your autho-
rized dealer for further information
regarding fuels available in your area.
BIODIESEL FUEL
REQUIREMENTS
A maximum blend of 7% biodiesel
meeting the EN590 standard are also
recommended for use with your diesel
engine. See your authorized dealer for
further information regarding fuels
available in your area.
ADDING FUEL
LOCKING FUEL FILLER
CAP (GAS CAP) (for
versions/markets, where
provided)
The locking fuel filler cap is located
behind the fuel filler door, on the left
side of the vehicle. If the cap is lost or
damaged, be sure the replacement cap
has been designed for use with this
vehicle.
NOTE: The driver's side sliding
door cannot be opened while the
fuel door is open. This feature op-
erates only when the sliding door
is fully closed prior to opening the
fuel door.
1. Insert the fuel cap key into the key
cylinder and turn the key to the right
to unlock.
2. Turn the gas cap knob to the left to
remove the cap.
3. When tightening the filler cap,
tighten until two or three clicks are
heard to ensure that the cap is prop-
erly seated.
CAUTION!
Damage to the fuel system oremissions control system could
result from using an improper
fuel tank filler tube cap (gas cap).
A poorly fitting cap could let im-
purities into the fuel system and
may cause the “Malfunction Indi-
cator Light (MIL)” to turn on,
due to fuel vapors escaping from
the system.
To avoid fuel spillage and over- filling, do not “top off” the fuel
tank after filling.
WARNING!
Never have any smoking materi-als lit in or near the vehicle when
the gas cap is removed or the tank
is being filled.
Never add fuel when the engine is running. It may cause the MIL to
turn on and could cause a fire.
(Continued)
275
Page 282 of 364

WARNING!(Continued)
A fire may result if gasoline ispumped into a portable container
that is inside of a vehicle. You
could be burned. Always place
gas containers on the ground
while filling.
NOTE:
When the fuel nozzle “clicks” or shuts off, the fuel tank is full.
Tighten the fuel filler cap until
you hear a “clicking” sound. This
is an indication that the fuel filler
cap is properly tightened.
If the gas cap is not tightened
properly, the MIL may come on.
Be sure the gas cap is tightened
every time the vehicle is refueled.
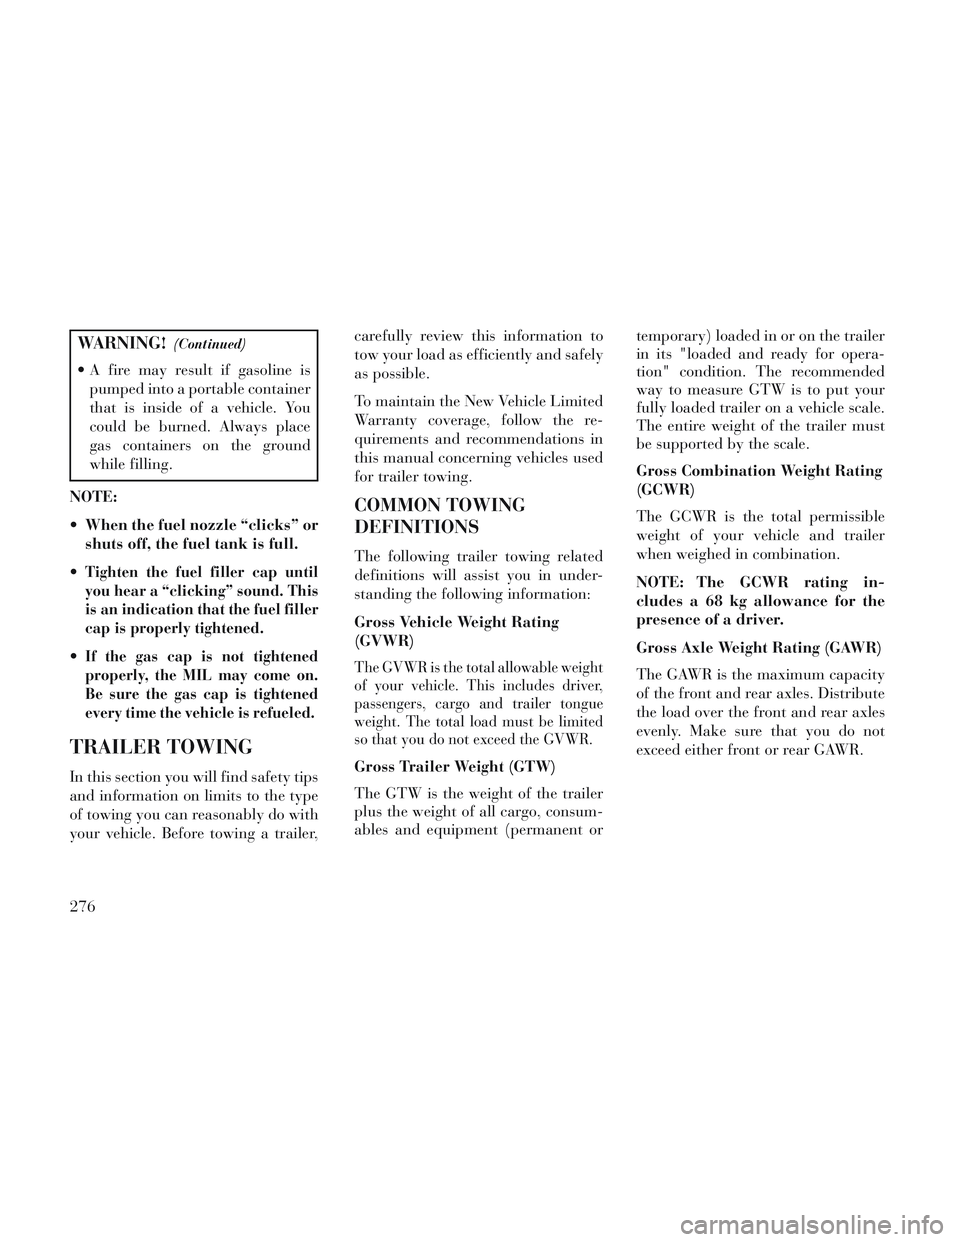
TRAILER TOWING
In this section you will find safety tips
and information on limits to the type
of towing you can reasonably do with
your vehicle. Before towing a trailer, carefully review this information to
tow your load as efficiently and safely
as possible.
To maintain the New Vehicle Limited
Warranty coverage, follow the re-
quirements and recommendations in
this manual concerning vehicles used
for trailer towing.
COMMON TOWING
DEFINITIONS
The following trailer towing related
definitions will assist you in under-
standing the following information:
Gross Vehicle Weight Rating
(GVWR)
The GVWR is the total allowable weight
of your vehicle. This includes driver,
passengers, cargo and trailer tongue
weight. The total load must be limited
so that you do not exceed the GVWR.
Gross Trailer Weight (GTW)
The GTW is the weight of the trailer
plus the weight of all cargo, consum-
ables and equipment (permanent or
temporary) loaded in or on the trailer
in its "loaded and ready for opera-
tion" condition. The recommended
way to measure GTW is to put your
fully loaded trailer on a vehicle scale.
The entire weight of the trailer must
be supported by the scale.
Gross Combination Weight Rating
(GCWR)
The GCWR is the total permissible
weight of your vehicle and trailer
when weighed in combination.
NOTE: The GCWR rating in-
cludes a 68 kg allowance for the
presence of a driver.
Gross Axle Weight Rating (GAWR)
The GAWR is the maximum capacity
of the front and rear axles. Distribute
the load over the front and rear axles
evenly. Make sure that you do not
exceed either front or rear GAWR.
276
Page 289 of 364

Use speed control in flat terrain andwith light loads to maximize fuel
efficiency.
Cooling System
To reduce potential for engine and
transmission overheating, take the
following actions:
City Driving
When stopped for short periods, shift
the transmission into NEUTRAL and
increase engine idle speed.
Highway Driving
Reduce speed.
Air Conditioning
Turn off temporarily. Trailer Hitch Attaching Points
Your vehicle will require extra equip-
ment to tow a trailer safely and effi-
ciently. The trailer tow hitch must be
attached to your vehicle using the
provided attaching points on the ve-
hicle's frame. Refer to the following
chart to determine the accurate at-
taching points. Other equipment,
such as trailer sway controls and
braking equipment, trailer equalizing
(leveling) equipment and low profile
mirrors, may also be required or
strongly recommended.
Trailer Tow Hitch Attaching
Points And Overhang Dimen- sions
Grand Voyager
A N/A
B 441.72 mm
C 568.61 mm
D 763.62 mm
E (maximum
overhang) 1185.40 mm
F 670.20 mm
283
Page 303 of 364

1. Set the parking brake, shift the
automatic transmission into PARK
and turn the ignition to LOCK.
2. Turn off the heater, radio, and all
unnecessary electrical accessories.
3. If using another vehicle to jump-
start the battery, park the vehicle
within the jumper cables reach, set
the parking brake and make sure the
ignition is OFF.
WARNING!
Do not allow vehicles to touch each
other as this could establish a
ground connection and personal in-
jury could result.
JUMP-STARTING
PROCEDURE
WARNING!
Failure to follow this procedure
could result in personal injury or
property damage due to battery ex-
plosion.
CAUTION!
Failure to follow these procedures
could result in damage to the
charging system of the booster ve-
hicle or the discharged vehicle.
1. Connect the positive (+)end of the
jumper cable to the positive (+)post of
the discharged vehicle.
2. Connect the opposite end of the
positive (+)jumper cable to the posi-
tive (+)post of the booster battery.
3. Connect the negative end (-)of the
jumper cable to the negative (-)post
of the booster battery.
4. Connect the opposite end of the
negative (-)jumper cable to a good
engine ground (exposed metal part of
the discharged vehicle’s engine) away
from the battery and the fuel injection
system.
WARNING!
Do not connect the jumper cable to
the negative (-)post of the dis-
charged battery. The resulting elec-
trical spark could cause the battery
to explode and could result in per-
sonal injury. Only use the specific
ground point, do not use any other
exposed metal parts.
5. Start the engine in the vehicle that
has the booster battery, let the engine
idle a few minutes, and then start the
engine in the vehicle with the dis-
charged battery. Once the engine is
started, remove the jumper cables in
the reverse sequence:
6. Disconnect the negative (-)jumper
cable from the negative (-)post of the
vehicle with the discharged battery.
7. Disconnect the negative end (-)of
the jumper cable from the negative (-)
post of the booster battery.
8. Disconnect the opposite end of the
positive (+)jumper cable from the
positive (+)post of the booster bat-
tery.
297
Page 313 of 364

ONBOARD DIAGNOSTIC
SYSTEM — OBD II
Your vehicle is equipped with a so-
phisticated Onboard Diagnostic sys-
tem called OBD II. This system moni-
tors the performance of the emissions,
engine, and automatic transmission
control systems. When these systems
are operating properly, your vehicle
will provide excellent performance
and fuel economy, as well as engine
emissions well within current govern-
ment regulations.
If any of these systems require service,
the OBD II system will turn on the
“Malfunction Indicator Light (MIL).”
It will also store diagnostic codes and
other information to assist your ser-
vice technician in making repairs. Al-
though your vehicle will usually be
drivable and not need towing, see
your authorized dealer for service as
soon as possible.
CAUTION!
Prolonged driving with the MILon could cause further damage to
the emission control system. It
could also affect fuel economy
and driveability. The vehicle
must be serviced before any emis-
sions tests can be performed.
If the MIL is flashing while the engine is running, severe catalytic
converter damage and power loss
will soon occur. Immediate ser-
vice is required.
REPLACEMENT PARTS
Use of genuine parts for normal/
scheduled maintenance and repairs is
highly recommended to ensure the de-
signed performance. Damage or fail-
ures caused by the use of parts which
are not quality-equivalent to genuine
parts for maintenance and repairs will
not be covered by the manufacturer’s
warranty.
MAINTENANCE
PROCEDURES
The pages that follow contain the re-
quired maintenance services deter-
mined by the engineers who designed
your vehicle.
Besides those maintenance items
specified in the fixed maintenance
schedule, there are other components
which may require servicing or re-
placement in the future.
CAUTION!
Failure to properly maintain your vehicle or perform repairs and
service when necessary could re-
sult in more costly repairs, dam-
age to other components or nega-
tively impact vehicle
performance. Immediately have
potential malfunctions examined
by an authorized dealership or
qualified repair center.
(Continued)
307
Page 314 of 364

CAUTION!(Continued)
Car maintenance should be doneat a LANCIA Dealership. For
routine and minor maintenance
operations you wish to carry out
yourself, we do recommend you
have the proper equipment,
genuine LANCIA spare parts and
the necessary fluids; do not how-
ever carry out these operations if
you have no experience.
Your vehicle has been built with improved fluids that protect the
performance and durability of
your vehicle and also allow ex-
tended maintenance intervals. Do
not use chemical flushes in these
components as the chemicals can
damage your engine, transmis-
sion, power steering or air condi-
tioning. Such damage is not cov-
ered by the New Vehicle Limited
Warranty. If a flush is needed be-
cause of component malfunction,
use only the specified fluid for the
flushing procedure.
ENGINE OIL
Checking Oil Level
To assure proper engine lubrication,
the engine oil must be maintained at
the correct level. Check the oil level at
regular intervals, such as every fuel
stop.
The best time to check the engine oil
level is about five minutes after a fully
warmed engine is shut off.
Checking the oil while the vehicle is
on level ground will improve the ac-
curacy of the oil level readings. Main-
tain the oil level between the MIN and
MAX markings on the dipstick. Add-
ing one quart of oil when the reading
is at the MIN mark will result in a
MAX reading on these engines.
CAUTION!
Overfilling or underfilling will
cause oil aeration or loss of oil pres-
sure. This could damage your en-
gine.
CAUTION!
Car maintenance should be done at
a LANCIA Dealership. For routine
and minor maintenance operations
you wish to carry out yourself, we
do recommend you have the proper
equipment, genuine LANCIA spare
parts and the necessary fluids; do
not however carry out these opera-
tions if you have no experience.
Change Engine Oil – All Engines
The oil change indicator system will
remind you that it is time to take your
vehicle in for scheduled maintenance.
Refer to “Maintenance Schedule” for
further information on this system.
Engine Oil Selection – 3.6L
Engine
SAE Grade 5W-20 SELENIA K
POWER fully synthetic engine oil that
meets FIAT Qualification 9.55535-
CR1 API SN, ILSAC GF-5 or equiva-
lent.
The engine oil filler cap also shows the
recommended engine oil viscosity for
308
Page 316 of 364

Engine Air Cleaner Filter
Selection
The quality of replacement engine air
cleaner filters varies considerably.
Only high quality filters should be
used to assure most efficient service.
LANCIA engine air cleaner filters are
a high quality filter and are recom-
mended.
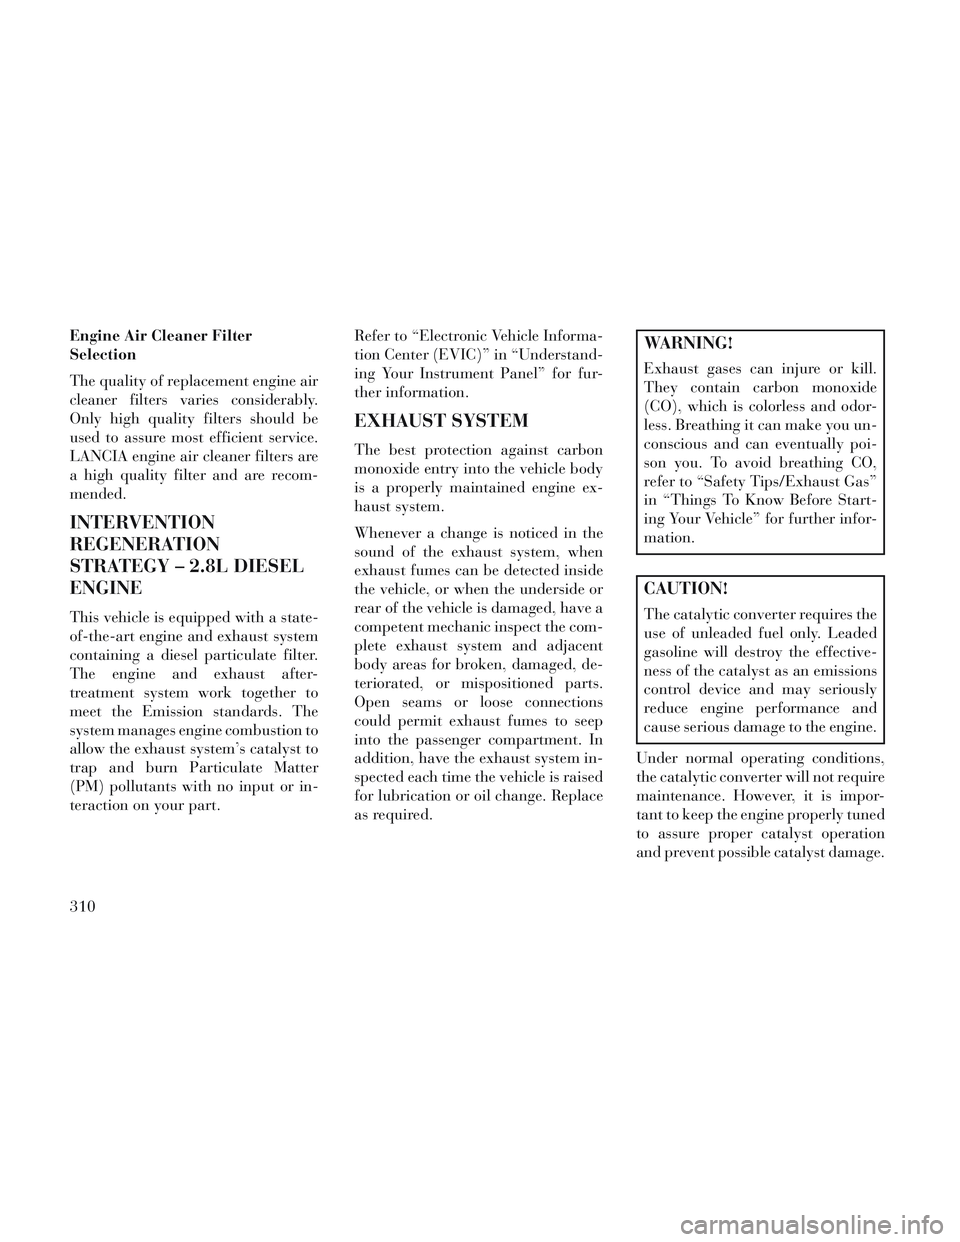
INTERVENTION
REGENERATION
STRATEGY – 2.8L DIESEL
ENGINE
This vehicle is equipped with a state-
of-the-art engine and exhaust system
containing a diesel particulate filter.
The engine and exhaust after-
treatment system work together to
meet the Emission standards. The
system manages engine combustion to
allow the exhaust system’s catalyst to
trap and burn Particulate Matter
(PM) pollutants with no input or in-
teraction on your part.Refer to “Electronic Vehicle Informa-
tion Center (EVIC)” in “Understand-
ing Your Instrument Panel” for fur-
ther information.
EXHAUST SYSTEM
The best protection against carbon
monoxide entry into the vehicle body
is a properly maintained engine ex-
haust system.
Whenever a change is noticed in the
sound of the exhaust system, when
exhaust fumes can be detected inside
the vehicle, or when the underside or
rear of the vehicle is damaged, have a
competent mechanic inspect the com-
plete exhaust system and adjacent
body areas for broken, damaged, de-
teriorated, or mispositioned parts.
Open seams or loose connections
could permit exhaust fumes to seep
into the passenger compartment. In
addition, have the exhaust system in-
spected each time the vehicle is raised
for lubrication or oil change. Replace
as required.
WARNING!
Exhaust gases can injure or kill.
They contain carbon monoxide
(CO), which is colorless and odor-
less. Breathing it can make you un-
conscious and can eventually poi-
son you. To avoid breathing CO,
refer to “Safety Tips/Exhaust Gas”
in “Things To Know Before Start-
ing Your Vehicle” for further infor-
mation.
CAUTION!
The catalytic converter requires the
use of unleaded fuel only. Leaded
gasoline will destroy the effective-
ness of the catalyst as an emissions
control device and may seriously
reduce engine performance and
cause serious damage to the engine.
Under normal operating conditions,
the catalytic converter will not require
maintenance. However, it is impor-
tant to keep the engine properly tuned
to assure proper catalyst operation
and prevent possible catalyst damage.
310
Page 332 of 364

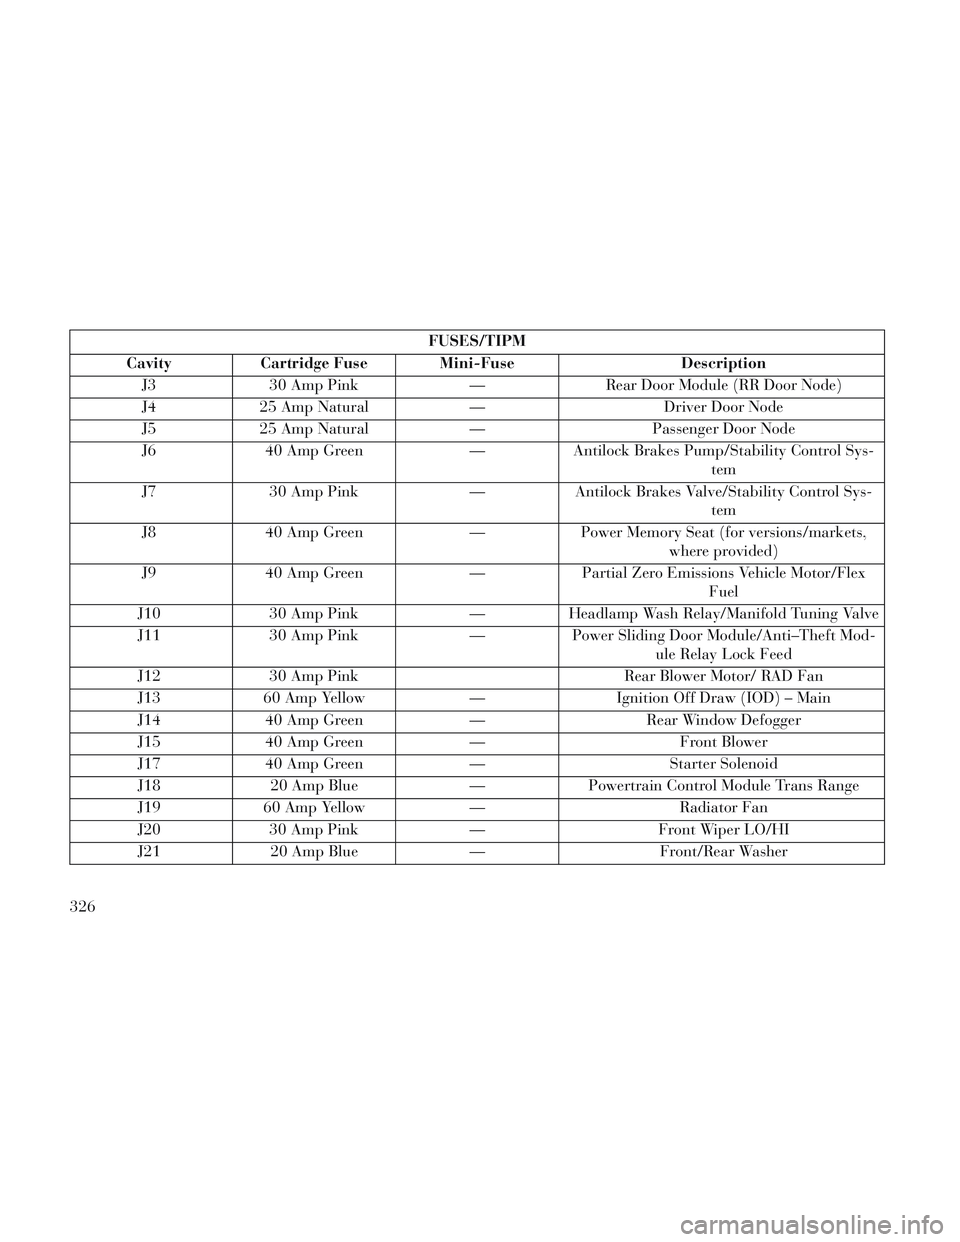
FUSES/TIPM
Cavity Cartridge Fuse Mini-Fuse Description J3 30 Amp Pink — Rear Door Module (RR Door Node)
J4 25 Amp Natural — Driver Door Node
J5 25 Amp Natural — Passenger Door Node
J6 40 Amp Green — Antilock Brakes Pump/Stability Control Sys- tem
J7 30 Amp Pink — Antilock Brakes Valve/Stability Control Sys- tem
J8 40 Amp Green — Power Memory Seat (for versions/markets, where provided)
J9 40 Amp Green — Partial Zero Emissions Vehicle Motor/Flex Fuel
J10 30 Amp Pink —Headlamp Wash Relay/Manifold Tuning Valve
J11 30 Amp Pink —Power Sliding Door Module/Anti–Theft Mod-
ule Relay Lock Feed
J12 30 Amp Pink Rear Blower Motor/ RAD Fan
J13 60 Amp Yellow —Ignition Off Draw (IOD) – Main
J14 40 Amp Green —Rear Window Defogger
J15 40 Amp Green — Front Blower
J17 40 Amp Green —Starter Solenoid
J18 20 Amp Blue —Powertrain Control Module Trans Range
J19 60 Amp Yellow — Radiator Fan
J20 30 Amp Pink —Front Wiper LO/HI
J21 20 Amp Blue —Front/Rear Washer
326