2014 KIA Sportage instrument
[x] Cancel search: instrumentPage 324 of 457
547
Driving your vehicle
✽
✽NOTICE
• During normal cruise control
operation, when the SET switch is
activated or reactivated after
applying the brakes, the cruise
control will energize after approx-
imately 3 seconds. The delay is
normal.
• To activate cruise control, depress the brake pedal at least once after
turning the ignition switch to the
ON position or starting the engine.
This is to check if the brake switch
which is important part to cancel
cruise control is in normal condi-
tion.
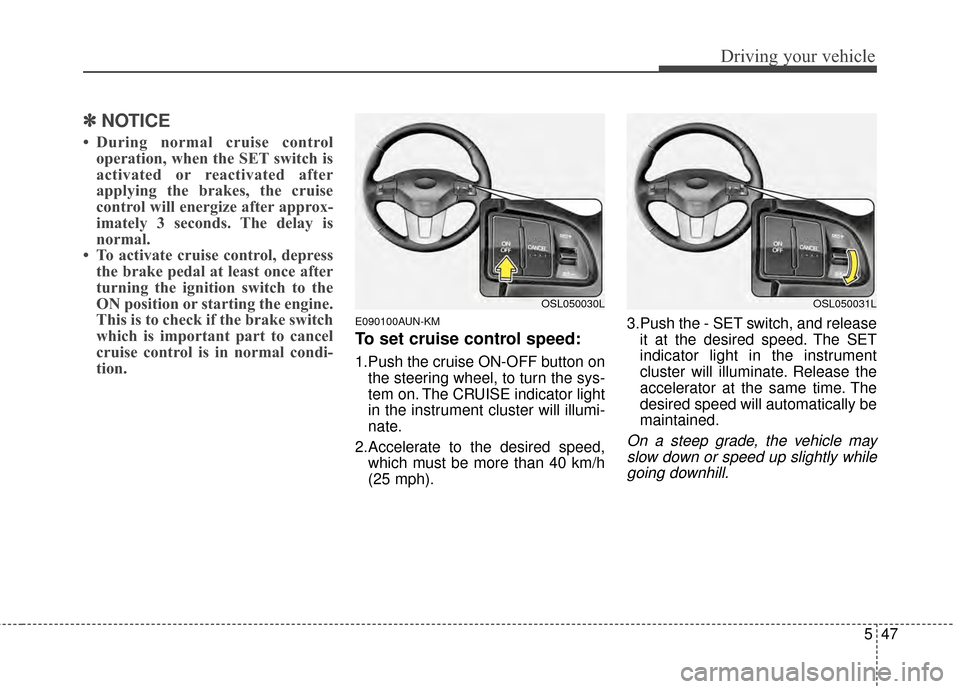
E090100AUN-KM
To set cruise control speed:
1.Push the cruise ON-OFF button on
the steering wheel, to turn the sys-
tem on. The CRUISE indicator light
in the instrument cluster will illumi-
nate.
2.Accelerate to the desired speed, which must be more than 40 km/h
(25 mph). 3.Push the - SET switch, and release
it at the desired speed. The SET
indicator light in the instrument
cluster will illuminate. Release the
accelerator at the same time. The
desired speed will automatically be
maintained.
On a steep grade, the vehicle mayslow down or speed up slightly whilegoing downhill.
OSL050030LOSL050031L
Page 326 of 457
549
Driving your vehicle
E090500AAM-EU
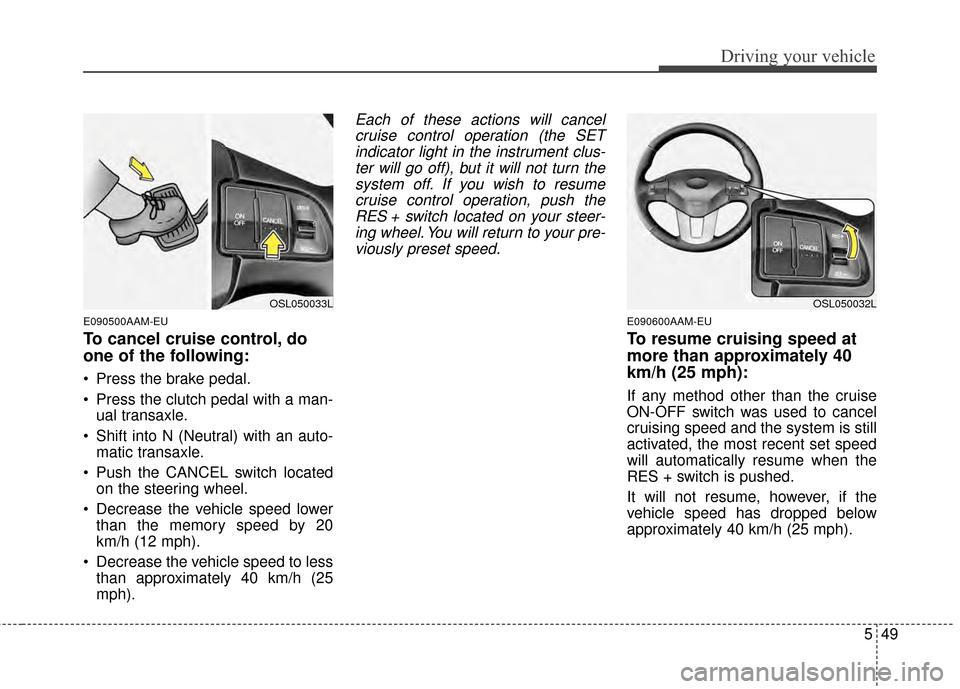
To cancel cruise control, do
one of the following:
Press the brake pedal.
Press the clutch pedal with a man-ual transaxle.
Shift into N (Neutral) with an auto- matic transaxle.
Push the CANCEL switch located on the steering wheel.
Decrease the vehicle speed lower than the memory speed by 20
km/h (12 mph).
Decrease the vehicle speed to less than approximately 40 km/h (25
mph).
Each of these actions will cancelcruise control operation (the SETindicator light in the instrument clus-ter will go off), but it will not turn thesystem off. If you wish to resumecruise control operation, push theRES + switch located on your steer-ing wheel. You will return to your pre-viously preset speed.
E090600AAM-EU
To resume cruising speed at
more than approximately 40
km/h (25 mph):
If any method other than the cruise
ON-OFF switch was used to cancel
cruising speed and the system is still
activated, the most recent set speed
will automatically resume when the
RES + switch is pushed.
It will not resume, however, if the
vehicle speed has dropped below
approximately 40 km/h (25 mph).
OSL050032LOSL050033L
Page 327 of 457
Driving your vehicle
50
5
E090700AUN-KM
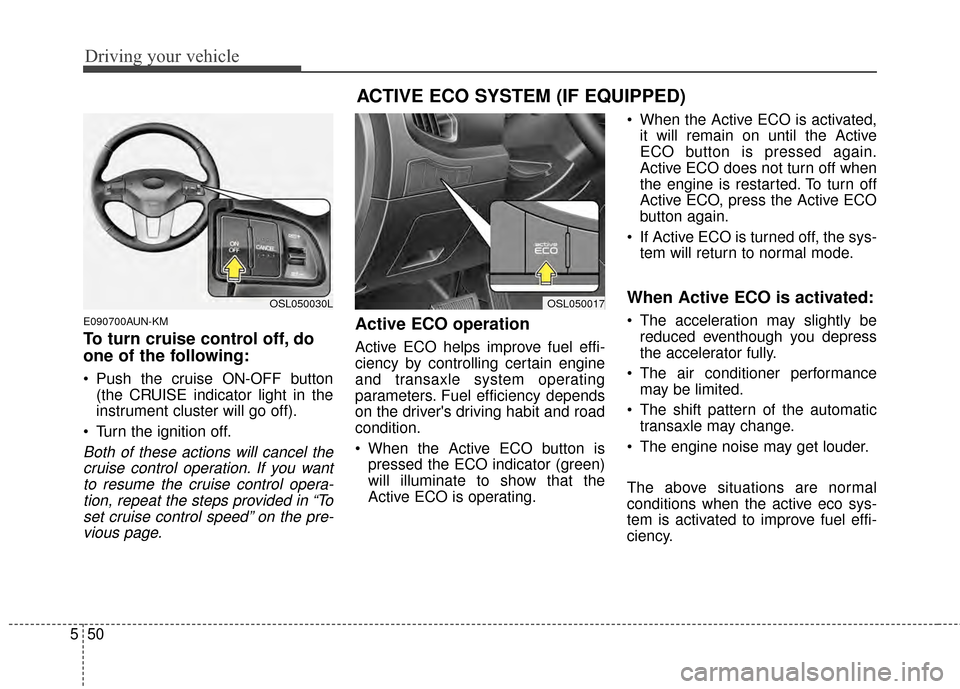
To turn cruise control off, do
one of the following:
Push the cruise ON-OFF button
(the CRUISE indicator light in the
instrument cluster will go off).
Turn the ignition off.
Both of these actions will cancel the cruise control operation. If you wantto resume the cruise control opera-tion, repeat the steps provided in “Toset cruise control speed” on the pre-vious page.
Active ECO operation
Active ECO helps improve fuel effi-
ciency by controlling certain engine
and transaxle system operating
parameters. Fuel efficiency depends
on the driver's driving habit and road
condition.
When the Active ECO button is pressed the ECO indicator (green)
will illuminate to show that the
Active ECO is operating. When the Active ECO is activated,
it will remain on until the Active
ECO button is pressed again.
Active ECO does not turn off when
the engine is restarted. To turn off
Active ECO, press the Active ECO
button again.
If Active ECO is turned off, the sys- tem will return to normal mode.
When Active ECO is activated:
The acceleration may slightly bereduced eventhough you depress
the accelerator fully.
The air conditioner performance may be limited.
The shift pattern of the automatic transaxle may change.
The engine noise may get louder.
The above situations are normal
conditions when the active eco sys-
tem is activated to improve fuel effi-
ciency.
ACTIVE ECO SYSTEM (IF EQUIPPED)
OSL050030LOSL050017
Page 342 of 457
565
Driving your vehicle
E140405AFD
Turn signals when towing a trailer
When you tow a trailer, your vehicle
has to have a different turn signal
flasher and extra wiring. The green
arrows on your instrument panel will
flash whenever you signal a turn or
lane change. Properly connected,
the trailer lights will also flash to alert
other drivers you’re about to turn,
change lanes, or stop.
When towing a trailer, the green
arrows on your instrument panel will
flash for turns even if the bulbs on
the trailer are burned out. Thus, you
may think drivers behind you are
seeing your signals when, in fact,
they are not. It’s important to check
occasionally to be sure the trailer
bulbs are still working. You must also
check the lights every time you dis-
connect and then reconnect the
wires.
Do not connect a trailer lighting sys-
tem directly to your vehicle’s lighting
system. Use only an approved trailer
wiring harness.
An authorized Kia dealer can assist
you in installing the wiring harness.
E140406AFD
Driving on grades
Reduce speed and shift to a lower
gear before you start down a long or
steep downgrade. If you don’t shift
down, you might have to use your
brakes so much that they would get
hot and no longer operate efficiently.
On a long uphill grade, shift down
and reduce your speed to around 70
km/h (45 mph) to reduce the possi-
bility of engine and transaxle over-
heating.
If your trailer weighs more than the
maximum trailer weight without trail-
er brakes and you have an automat-
ic transaxle, you should drive in D
(Drive) when towing a trailer.
Operating your vehicle in D (Drive)
when towing a trailer will minimize
heat build up and extend the life of
your transaxle.
WARNING
Failure to use an approved trail-
er wiring harness could result
in damage to the vehicle electri-
cal system and/or personal
injury.
Page 425 of 457

Maintenance
52
7
Instrument panel fuse panel
✽
✽
NOTICE
The actual fuse/relay panel label
may differ from equipped items.
OSL070026
OSL074201N
Page 428 of 457
755
Maintenance
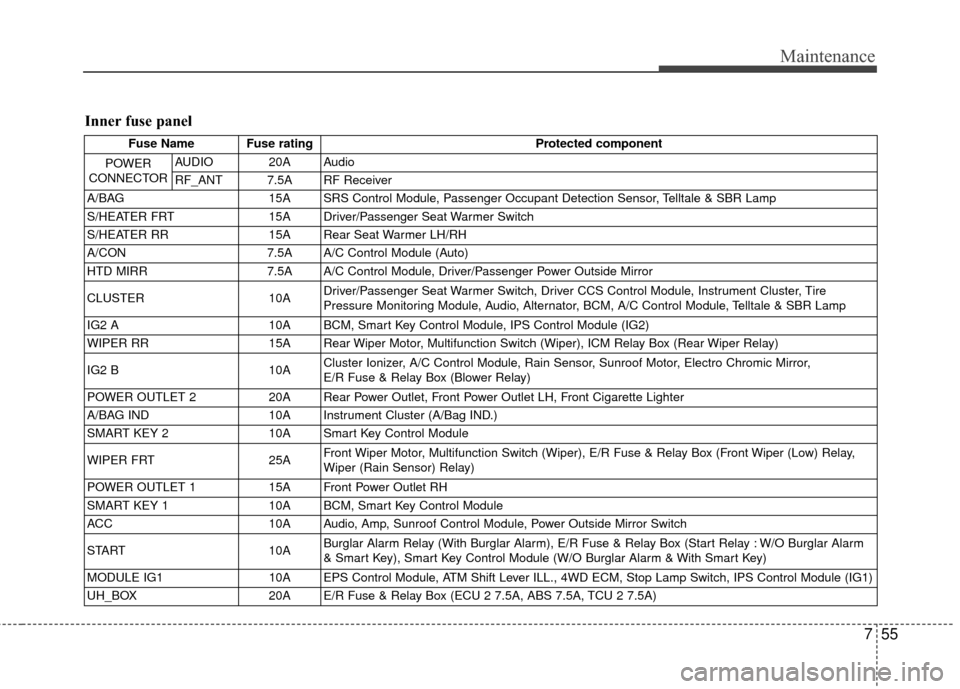
Inner fuse panel
Fuse Name Fuse ratingProtected component
POWER
CONNECTOR
AUDIO 20A Audio
RF_ANT 7.5A RF Receiver
A/BAG 15A SRS Control Module, Passenger Occupant Detection Sensor, Telltale & SBR Lamp
S/HEATER FRT 15A Driver/Passenger Seat Warmer Switch
S/HEATER RR 15A Rear Seat Warmer LH/RH
A/CON 7.5A A/C Control Module (Auto)
HTD MIRR 7.5A A/C Control Module, Driver/Passenger Power Outside Mirror
CLUSTER 10A Driver/Passenger Seat Warmer Switch, Driver CCS Control Module, Instrument Cluster, Tire
Pressure Monitoring Module, Audio, Alternator, BCM, A/C Control Module, Telltale & SBR Lamp
IG2 A 10A BCM, Smart Key Control Module, IPS Control Module (IG2)
WIPER RR 15A Rear Wiper Motor, Multifunction Switch (Wiper), ICM Relay Box (Rear Wiper Relay)
IG2 B 10A Cluster Ionizer, A/C Control Module, Rain Sensor, Sunroof Motor, Electro Chromic Mirror,
E/R Fuse & Relay Box (Blower Relay)
POWER OUTLET 2 20A Rear Power Outlet, Front Power Outlet LH, Front Cigarette Lighter
A/BAG IND 10A Instrument Cluster (A/Bag IND.)
SMART KEY 2 10A Smart Key Control Module
WIPER FRT 25A Front Wiper Motor, Multifunction Switch (Wiper), E/R Fuse & Relay Box (Front Wiper (Low) Relay,
Wiper (Rain Sensor) Relay)
POWER OUTLET 1 15A Front Power Outlet RH
SMART KEY 1 10A BCM, Smart Key Control Module
ACC 10A Audio, Amp, Sunroof Control Module, Power Outside Mirror Switch
START 10A Burglar Alarm Relay (With Burglar Alarm), E/R Fuse & Relay Box (Start Relay : W/O Burglar Alarm
& Smart Key), Smart Key Control Module (W/O Burglar Alarm & With Smart Key)
MODULE IG1 10A EPS Control Module, ATM Shift Lever ILL., 4WD ECM, Stop Lamp Switch, IPS Control Module (IG1)
UH_BOX 20A E/R Fuse & Relay Box (ECU 2 7.5A, ABS 7.5A, TCU 2 7.5A)
Page 429 of 457
Maintenance
56
7
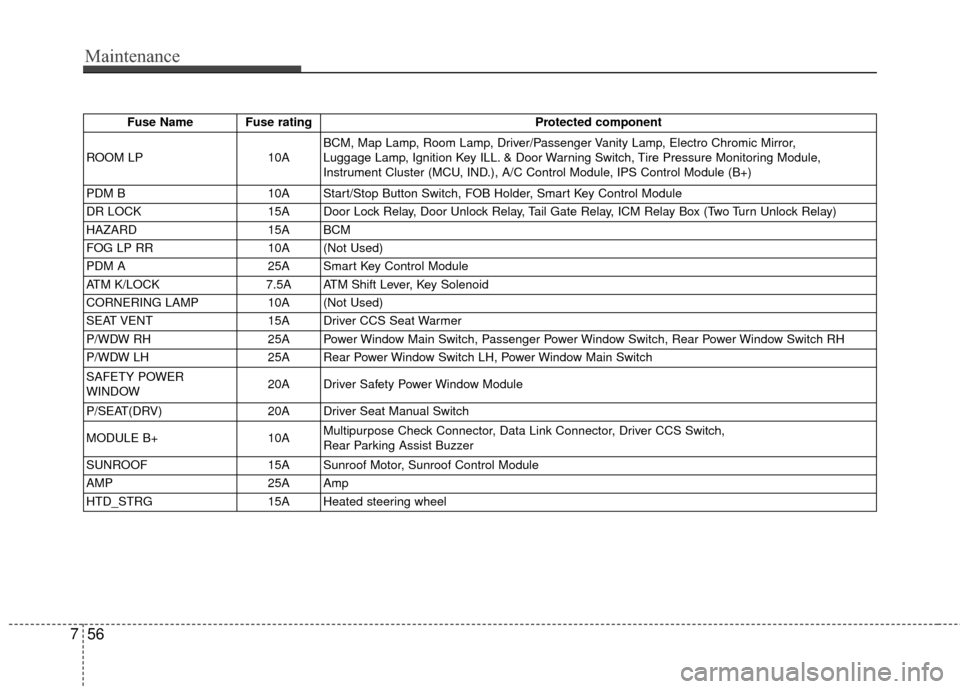
Fuse Name Fuse rating Protected component
ROOM LP 10ABCM, Map Lamp, Room Lamp, Driver/Passenger Vanity Lamp, Electro Chromic Mirror,
Luggage Lamp, Ignition Key ILL. & Door Warning Switch, Tire Pressure Monitoring Module,
Instrument Cluster (MCU, IND.), A/C Control Module, IPS Control Module (B+)
PDM B 10A Start/Stop Button Switch, FOB Holder, Smart Key Control Module
DR LOCK 15A Door Lock Relay, Door Unlock Relay, Tail Gate Relay, ICM Relay Box (Two Turn Unlock Relay)
HAZARD 15A BCM
FOG LP RR 10A (Not Used)
PDM A 25A Smart Key Control Module
ATM K/LOCK 7.5A ATM Shift Lever, Key Solenoid
CORNERING LAMP 10A (Not Used)
SEAT VENT 15A Driver CCS Seat Warmer
P/WDW RH 25A Power Window Main Switch, Passenger Power Window Switch, Rear Power Window Switch RH
P/WDW LH 25A Rear Power Window Switch LH, Power Window Main Switch
SAFETY POWER
WINDOW 20A Driver Safety Power Window Module
P/SEAT(DRV) 20A Driver Seat Manual Switch
MODULE B+ 10AMultipurpose Check Connector, Data Link Connector, Driver CCS Switch,
Rear Parking Assist Buzzer
SUNROOF 15A Sunroof Motor, Sunroof Control Module
AMP 25A Amp
HTD_STRG 15A Heated steering wheel
Page 453 of 457

I3
Index
Defroster . . . . . . . . . . . . . . . . . . . . . . . . . . . . . . . . . . . . \
4-93
Dimensions . . . . . . . . . . . . . . . . . . . . . . . . . . . . . . . . . . . 8-\
2
Door locks. . . . . . . . . . . . . . . . . . . . . . . . . . . . . . . . . . . 4-\
17Child-protector rear door lock . . . . . . . . . . . . . . . . . 4-21
Inside the vehicle . . . . . . . . . . . . . . . . . . . . . . . . . . . 4-18
Other door lock/unlock features. . . . . . . . . . . . . . . . 4-20
Outside the vehicle . . . . . . . . . . . . . . . . . . . . . . . . . . 4-17
Economical operation . . . . . . . . . . . . . . . . . . . . . . . . . . 5-51
Emergency starting . . . . . . . . . . . . . . . . . . . . . . . . . . . . . 6-4 Jump starting . . . . . . . . . . . . . . . . . . . . . . . . . . . . . . . 6-4
Push-starting . . . . . . . . . . . . . . . . . . . . . . . . . . . . . . . . 6-5
Emission control system . . . . . . . . . . . . . . . . . . . . . . . . 7-66
Engine compartment . . . . . . . . . . . . . . . . . . . . . . . . . . . . 2-6
Engine compartment . . . . . . . . . . . . . . . . . . . . . . . . . . . . 7-2
Engine coolant . . . . . . . . . . . . . . . . . . . . . . . . . . . . . . . 7-19
Engine number . . . . . . . . . . . . . . . . . . . . . . . . . . . . . . . . 8-8
Engine oil . . . . . . . . . . . . . . . . . . . . . . . . . . . . . . . . . . . 7-\
17
Engine start/stop button . . . . . . . . . . . . . . . . . . . . . . . . . 5-8 ENGINE START/STOP button position . . . . . . . . . . 5-8
Illuminated ENGINE START/STOP button . . . . . . . 5-8
Explanation of scheduled maintenance items . . . . . . . 7-14
Exterior features . . . . . . . . . . . . . . . . . . . . . . . . . . . . . 4-124 Roof rack . . . . . . . . . . . . . . . . . . . . . . . . . . . . . . . . 4-124 Exterior overview I . . . . . . . . . . . . . . . . . . . . . . . . . . . . . 2-2
Exterior overview II . . . . . . . . . . . . . . . . . . . . . . . . . . . . 2-3
Four wheel drive (4WD). . . . . . . . . . . . . . . . . . . . . . . . 5-23
Fuel filler lid . . . . . . . . . . . . . . . . . . . . . . . . . . . . . . . . . 4-32
Fuel requirements . . . . . . . . . . . . . . . . . . . . . . . . . . . . . . 1-3
Do not use methanol . . . . . . . . . . . . . . . . . . . . . . . . . 1-4
Fuel Additives . . . . . . . . . . . . . . . . . . . . . . . . . . . . . . 1-5
Gasoline containing alcohol and methanol . . . . . . . . 1-3
Operation in foreign countries . . . . . . . . . . . . . . . . . . 1-5
Fuses . . . . . . . . . . . . . . . . . . . . . . . . . . . . . . . . . . . . \
. . . 7-47 Engine compartment fuse panel . . . . . . . . . . . . . . . . 7-53
Engine compartment fuse replacement . . . . . . . . . . 7-50
Fuse/relay panel description. . . . . . . . . . . . . . . . . . . 7-51
Inner panel fuse replacement . . . . . . . . . . . . . . . . . . 7-48
Instrument panel fuse panel . . . . . . . . . . . . . . . . . . . 7-52
Hazard warning flasher . . . . . . . . . . . . . . . . . . . . . . . . . 4-80
Hood . . . . . . . . . . . . . . . . . . . . . . . . . . . . . . . . . . . . \
. . . 4-30
How to use this manual . . . . . . . . . . . . . . . . . . . . . . . . . 1-2
If the engine overheats . . . . . . . . . . . . . . . . . . . . . . . . . . 6-6
D
E
F
H
I