2014 KIA Sportage clutch
[x] Cancel search: clutchPage 326 of 457
549
Driving your vehicle
E090500AAM-EU
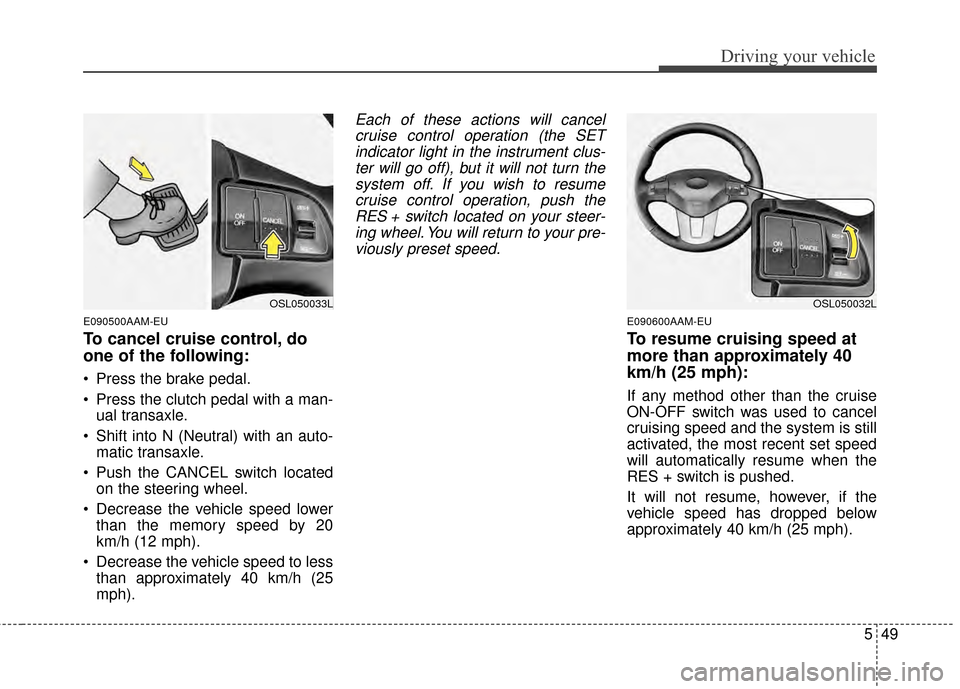
To cancel cruise control, do
one of the following:
Press the brake pedal.
Press the clutch pedal with a man-ual transaxle.
Shift into N (Neutral) with an auto- matic transaxle.
Push the CANCEL switch located on the steering wheel.
Decrease the vehicle speed lower than the memory speed by 20
km/h (12 mph).
Decrease the vehicle speed to less than approximately 40 km/h (25
mph).
Each of these actions will cancelcruise control operation (the SETindicator light in the instrument clus-ter will go off), but it will not turn thesystem off. If you wish to resumecruise control operation, push theRES + switch located on your steer-ing wheel. You will return to your pre-viously preset speed.
E090600AAM-EU
To resume cruising speed at
more than approximately 40
km/h (25 mph):
If any method other than the cruise
ON-OFF switch was used to cancel
cruising speed and the system is still
activated, the most recent set speed
will automatically resume when the
RES + switch is pushed.
It will not resume, however, if the
vehicle speed has dropped below
approximately 40 km/h (25 mph).
OSL050032LOSL050033L
Page 358 of 457
65
What to do in an emergency
F040101ASA
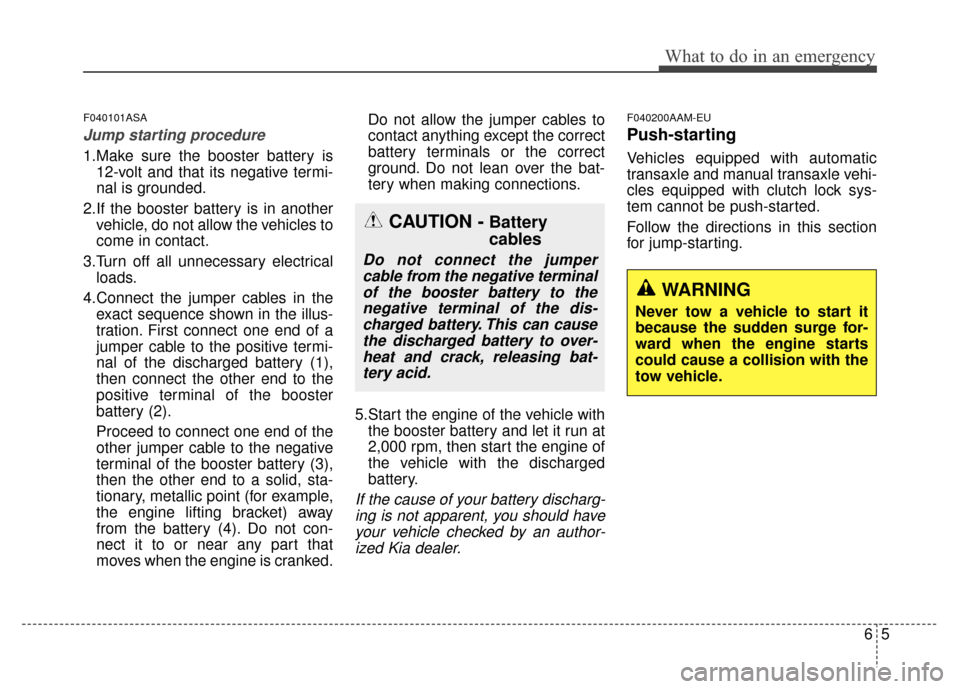
Jump starting procedure
1.Make sure the booster battery is12-volt and that its negative termi-
nal is grounded.
2.If the booster battery is in another vehicle, do not allow the vehicles to
come in contact.
3.Turn off all unnecessary electrical loads.
4.Connect the jumper cables in the exact sequence shown in the illus-
tration. First connect one end of a
jumper cable to the positive termi-
nal of the discharged battery (1),
then connect the other end to the
positive terminal of the booster
battery (2).
Proceed to connect one end of the
other jumper cable to the negative
terminal of the booster battery (3),
then the other end to a solid, sta-
tionary, metallic point (for example,
the engine lifting bracket) away
from the battery (4). Do not con-
nect it to or near any part that
moves when the engine is cranked. Do not allow the jumper cables to
contact anything except the correct
battery terminals or the correct
ground. Do not lean over the bat-
tery when making connections.
5.Start the engine of the vehicle with the booster battery and let it run at
2,000 rpm, then start the engine of
the vehicle with the discharged
battery.
If the cause of your battery discharg-ing is not apparent, you should haveyour vehicle checked by an author-ized Kia dealer.
F040200AAM-EU
Push-starting
Vehicles equipped with automatic
transaxle and manual transaxle vehi-
cles equipped with clutch lock sys-
tem cannot be push-started.
Follow the directions in this section
for jump-starting.
CAUTION -Battery
cables
Do not connect the jumpercable from the negative terminalof the booster battery to thenegative terminal of the dis-charged battery. This can causethe discharged battery to over-heat and crack, releasing bat-tery acid.
WARNING
Never tow a vehicle to start it
because the sudden surge for-
ward when the engine starts
could cause a collision with the
tow vehicle.
Page 374 of 457
Maintenance
Engine compartment . . . . . . . . . . . . . . . . . . . . . . . . 7-2
Maintenance services . . . . . . . . . . . . . . . . . . . . . . . . 7-3
• Owner’s responsibility . . . . . . . . . . . . . . . . . . . . . . . . . 7-3
. . . . . . . . . . . . . . . . 7-4
Owner maintenance . . . . . . . . . . . . . . . . . . . . . . . . . 7-5
. . . . . . . . . . . . . . . . . . . 7-5
Normal maintenance schedule . . . . . . . . . . . . . . . . 7-7
Maintenance under severe usage conditions . . . . . 7-12
Explanation of scheduled maintenance items . . . . 7-14
Engine oil . . . . . . . . . . . . . . . . . . . . . . . . . . . . . . . . . 7-17
Engine coolant . . . . . . . . . . . . . . . . . . . . . . . . . . . . . 7-19
Brake/clutch fluid . . . . . . . . . . . . . . . . . . . . . . . . . . 7-22
Washer fluid . . . . . . . . . . . . . . . . . . . . . . . . . . . . . . . 7-24
Parking brake . . . . . . . . . . . . . . . . . . . . . . . . . . . . . . 7-24
Air cleaner . . . . . . . . . . . . . . . . . . . . . . . . . . . . . . . . 7-25
Climate control air filter . . . . . . . . . . . . . . . . . . . . . 7-26
Wiper blades . . . . . . . . . . . . . . . . . . . . . . . . . . . . . . . 7-27
Battery. . . . . . . . . . . . . . . . . . . . . . . . . . . . . . . . . . . . \
7-30
Tires and wheels . . . . . . . . . . . . . . . . . . . . . . . . . . . . 7-33
. . . . . . . . . . . . . . . . . 7-34
. . . . . . . . . . . . . . . . . . . . . . . . . . . . . . . . . 7-35 . . . . . . . . . . . . . . . . . 7-36
. . . . . . . . . . . . . . . . . . . . . . . . . . . . . . 7-37
. . . . . . . . . . . . . . . . . . . . . . . . . . . . 7-38
. . . . . . . . . . . . . . . . . . . . . . . . . . . . . . . . . 7-38
. . . . . . . . . . . . . . . . . . . . . . . . . . . . . 7-38
. . . . . . . . . . . . . . . . . . . . . . . . . . 7-39
. . . . . . . . . . . . . . . . . . . . . . . . . . . . . . . 7-44
. . . . . . . . . . . . . . . . . . . . . . . . . . . . . . . . . 7-45
. . . . . . . . . . . . . . . . . . . . . . . . . . . . . . . . . . . 7-\
45
. . . . . . . . . . . . . . . . . . . . . . . . . . . . . . . 7-45
. . . . . . . . . . . . . . . . . . . . . . . . . . 7-46
Fuses . . . . . . . . . . . . . . . . . . . . . . . . . . . . . . . . . . . . \
. 7-47
. . . . . . . . . . . . . . . . . . . 7-48
. . . . . . . . . . . 7-50
. . . . . . . . . . . . . . . . . . . . 7-51
. . . . . . . . . . . . . . . . . . . . 7-52
. . . . . . . . . . . . . . . . . 7-53
Appearance care. . . . . . . . . . . . . . . . . . . . . . . . . . . . 7-59
. . . . . . . . . . . . . . . . . . . . . . . . . . . . . . . . . 7-59
. . . . . . . . . . . . . . . . . . . . . . . . . . . . . . . . . 7-64
Emission control system . . . . . . . . . . . . . . . . . . . . . 7-66
7
Page 375 of 457
Maintenance
27
ENGINE COMPARTMENT
G010000AAM-EU
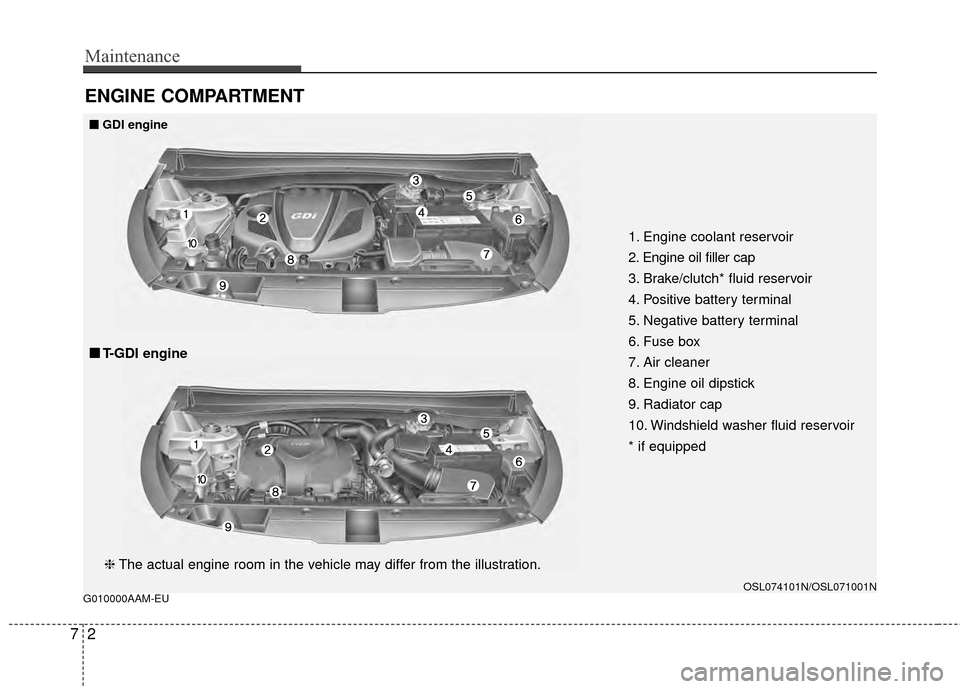
1. Engine coolant reservoir
2. Engine oil filler cap
3. Brake/clutch* fluid reservoir
4. Positive battery terminal
5. Negative battery terminal
6. Fuse box
7. Air cleaner
8. Engine oil dipstick
9. Radiator cap
10. Windshield washer fluid reservoir
* if equipped
OSL074101N/OSL071001N
❈The actual engine room in the vehicle may differ from the illustration.
■
■
GDI engine
■
■T-GDI engine
Page 379 of 457
Maintenance
67
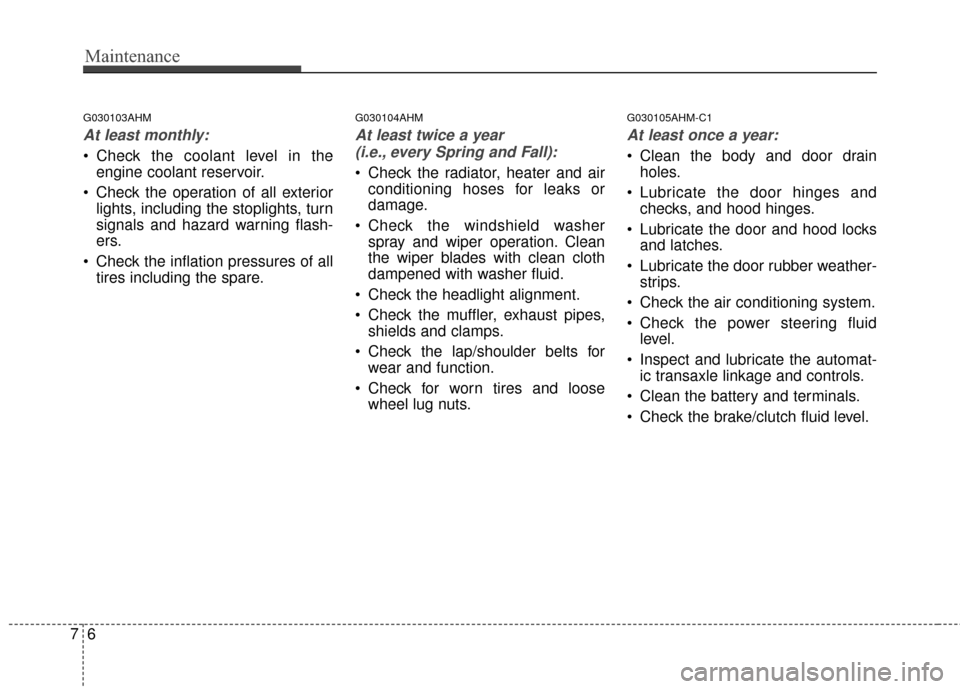
G030103AHM
At least monthly:
Check the coolant level in theengine coolant reservoir.
Check the operation of all exterior lights, including the stoplights, turn
signals and hazard warning flash-
ers.
Check the inflation pressures of all tires including the spare.
G030104AHM
At least twice a year
(i.e., every Spring and Fall):
Check the radiator, heater and air conditioning hoses for leaks or
damage.
Check the windshield washer spray and wiper operation. Clean
the wiper blades with clean cloth
dampened with washer fluid.
Check the headlight alignment.
Check the muffler, exhaust pipes, shields and clamps.
Check the lap/shoulder belts for wear and function.
Check for worn tires and loose wheel lug nuts.
G030105AHM-C1
At least once a year:
Clean the body and door drainholes.
Lubricate the door hinges and checks, and hood hinges.
Lubricate the door and hood locks and latches.
Lubricate the door rubber weather- strips.
Check the air conditioning system.
Check the power steering fluid level.
Inspect and lubricate the automat- ic transaxle linkage and controls.
Clean the battery and terminals.
Check the brake/clutch fluid level.
Page 382 of 457
79
Maintenance
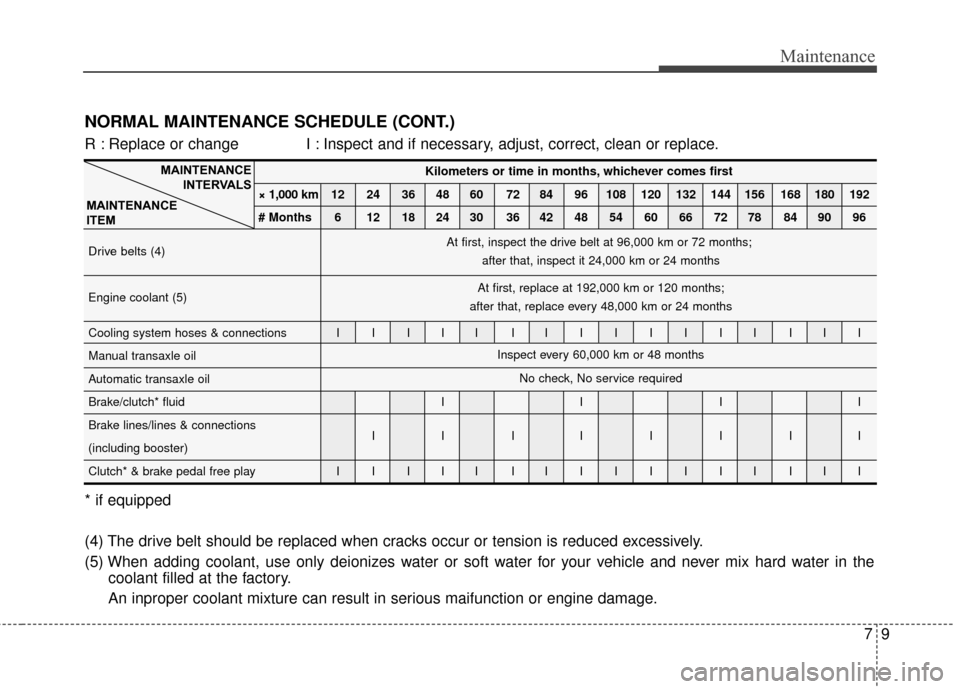
NORMAL MAINTENANCE SCHEDULE (CONT.)
MAINTENANCEINTERVALS
MAINTENANCE
ITEM
R : Replace or change I : Inspect and if necessary, adjust, correct, clean or replace.
* if equipped
(4) The drive belt should be replaced when cracks occur or tension is reduced excessively.
(5) When adding coolant, use only deionizes water or soft water for your vehicle and never mix hard water in the coolant filled at the factory.
An inproper coolant mixture can result in serious maifunction or engine damage.
Kilometers or time in months, whichever comes first
× 1,000 km 12 24 36 48 60 72 84 96 108 120 132 144 156 168 180 192
# Months 6 12 18 24 30 36 42 48 54 60 66 72 78 84 90 96
Drive belts (4)
Engine coolant (5)
Cooling system hoses & connections I I I I I I IIIIIII III
Manual transaxle oil
Automatic transaxle oil
Brake/clutch* fluid I I I I
Brake lines/lines & connections IIIIIIII
(including booster)
Clutch* & brake pedal free play I I I I I I IIIIIII III
At first, inspect the drive belt at 96,000 km or 72 months;
after that, inspect it 24,000 km or 24 months
At first, replace at 192,000 km or 120 months;
after that, replace every 48,000 km or 24 months
Inspect every 60,000 km or 48 monthsNo check, No service required
Page 389 of 457
Maintenance
16
7
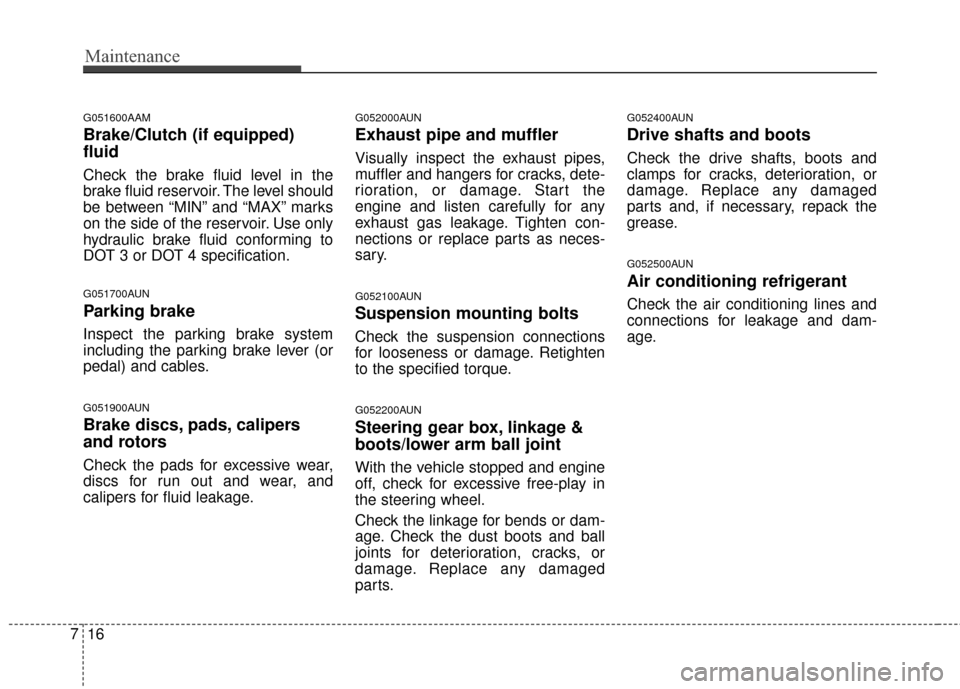
G051600AAM
Brake/Clutch (if equipped)
fluid
Check the brake fluid level in the
brake fluid reservoir. The level should
be between “MIN” and “MAX” marks
on the side of the reservoir. Use only
hydraulic brake fluid conforming to
DOT 3 or DOT 4 specification.
G051700AUN
Parking brake
Inspect the parking brake system
including the parking brake lever (or
pedal) and cables.
G051900AUN
Brake discs, pads, calipers
and rotors
Check the pads for excessive wear,
discs for run out and wear, and
calipers for fluid leakage.
G052000AUN
Exhaust pipe and muffler
Visually inspect the exhaust pipes,
muffler and hangers for cracks, dete-
rioration, or damage. Start the
engine and listen carefully for any
exhaust gas leakage. Tighten con-
nections or replace parts as neces-
sary.
G052100AUN
Suspension mounting bolts
Check the suspension connections
for looseness or damage. Retighten
to the specified torque.
G052200AUN
Steering gear box, linkage &
boots/lower arm ball joint
With the vehicle stopped and engine
off, check for excessive free-play in
the steering wheel.
Check the linkage for bends or dam-
age. Check the dust boots and ball
joints for deterioration, cracks, or
damage. Replace any damaged
parts.
G052400AUN
Drive shafts and boots
Check the drive shafts, boots and
clamps for cracks, deterioration, or
damage. Replace any damaged
parts and, if necessary, repack the
grease.
G052500AUN
Air conditioning refrigerant
Check the air conditioning lines and
connections for leakage and dam-
age.
Page 395 of 457
Maintenance
22
7
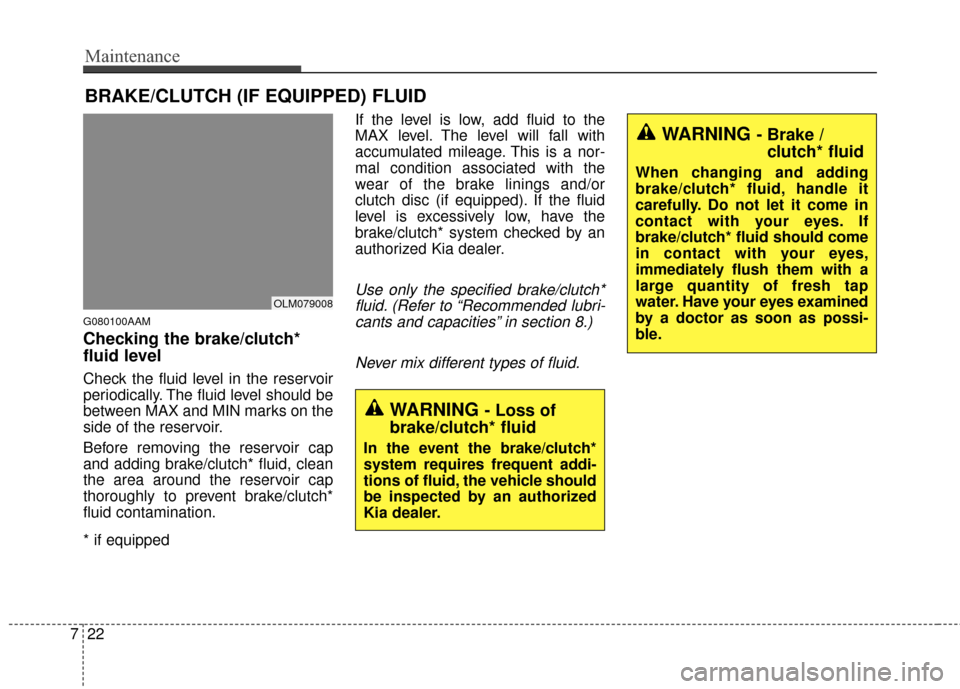
BRAKE/CLUTCH (IF EQUIPPED) FLUID
G080100AAM
Checking the brake/clutch*
fluid level
Check the fluid level in the reservoir
periodically. The fluid level should be
between MAX and MIN marks on the
side of the reservoir.
Before removing the reservoir cap
and adding brake/clutch* fluid, clean
the area around the reservoir cap
thoroughly to prevent brake/clutch*
fluid contamination.
* if equipped If the level is low, add fluid to the
MAX level. The level will fall with
accumulated mileage. This is a nor-
mal condition associated with the
wear of the brake linings and/or
clutch disc (if equipped). If the fluid
level is excessively low, have the
brake/clutch* system checked by an
authorized Kia dealer.
Use only the specified brake/clutch*
fluid. (Refer to “Recommended lubri-cants and capacities” in section 8.)
Never mix different types of fluid.
WARNING - Loss of
brake/clutch* fluid
In the event the brake/clutch*
system requires frequent addi-
tions of fluid, the vehicle should
be inspected by an authorized
Kia dealer.
OLM079008
WARNING - Brake / clutch* fluid
When changing and adding
brake/clutch* fluid, handle it
carefully. Do not let it come in
contact with your eyes. If
brake/clutch* fluid should come
in contact with your eyes,
immediately flush them with a
large quantity of fresh tap
water. Have your eyes examined
by a doctor as soon as possi-
ble.