Page 17 of 42

15
ALWAYS CHECK THE OWNER’S MANUAL FOR COMPLETE OPERATING INFORMATION AND SAFET Y WARNINGS. *IF EQUIPPED
Voice Recognition and Phone
Contact Tips
The Kia Voice Recognition System
may have difficulty understanding
some accents or uncommon names.
When using Voice Recognition to
place a call, speak in a moderate
tone, with clear pronunciation.
Help your Bluetooth® Wireless
Technology Voice Recognition
performance by making a few
simple changes to your phone
contacts:
���OUse full names vs. short or single
syllable names (“John Smith”
vs. “Dad”, “Smith Residence” vs.
“Home”)
���OAvoid using special characters or
hyphens (@, &, #, /, -, *, +, etc.)
���OAvoid using acronyms (“In Case
Emergency” vs. “ICE”)
���OSpell words completely, no abbreviations (“Doctor
Goodman” vs. “Dr. Goodman”) Contacts Sync Tips
���OIf Contact Sync is set to ON, contacts store in your phone will
download each time your phone is connected. There may be a delay
before the system is available to place a call
���OIf Contact Sync is set to OFF, your phone contacts will download only
at the initial pairing. This allows you to make calls without waiting for
your phone contact list to download
QUICK TIPS
Bluetooth
® Wireless Technology
Pairing a Phone
For instructions on how to pair a phone, refer to the audio
system’s user’s guide or your vehicle’s Quick Start Guide.
During the pairing process, be sure to accept the
connection requests on the phone for phonebook
download and to allow acceptance of all future
Bluetooth
® connection requests.
QUICK TIPS
Voice Recognition
Tips Video
To view a video on your
mobile device, SNAP this
QR code or visit the listed
website.
Refer to page 2 for more
information.
QR CODE
www.KuTechVideos.com/ps13/2014
How to Place a Call
When using the voice command feature, wait for the
system BEEP before speaking the command.
There are two options for placing a call:
Standard Audio System
���OOption 1: Press the Receive/Place Call button
C
(system will prompt you through call process)
���OOption 2: Press the Talk button
B (system will BEEP
to indicate it is ready for call placement). Then say
the command “Call {name}” or “Dial {number}”
UVO System
���OOption 1: Press the Receive/Place Call button
C
(displays the phone screen with number keypad)
���OOption 2: Press the Talk button
B. Then say the
command “Call {name}” or “Dial {number}”
Navigation System
���OOption 1: Press the Receive/Place Call button
C
(displays the phone screen with number keypad)
���OOption 2: Press the Talk button
B. Then say the
command “Call {name}” or “Dial {number}”
STEERING WHEEL CONTROLS
Page 18 of 42
*
RADIOMEDIAPHONESETUPCLOCK")
SOUL
FEATURES & FUNCTIONS GUIDE
16
*IF EQUIPPED
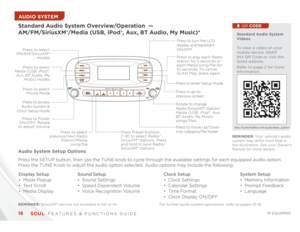
AUDIO SYSTEM Standard Audio System Overview/Operation —
AM/FM/SiriusXM®/Media (USB, iPod®, Aux, BT Audio, My Music)*
RADIOMEDIAPHONESETUPCLOCK
DISPSCANMENUBACK
12 34
5
6RPT
RDM
SEEKTRACK
CATFOLDER
VOL
POWERPUSH
PUSHENTER
TUNEFILE
Bluetooth
®
Press to select
FM/AM/SiriusXM®
modes
Press to Power
ON/OFF. Rotate
to adjust Volume
Press Preset buttons
(1- 6) to select Radio/
SiriusXM® stations. Press
and hold to save Radio/
SiriusXM® stations Press to select
Media (USB , iPod® ,
Aux, BT Audio, My
Music) modesPress to play each Radio
station for 5 seconds or
each Media song/file for
10 seconds. To cancel
SCAN Play, press again
Press to select
Phone Mode
Press to access
Audio System &
Clock Setup mode
Press to select
previous/next Radio
Station/Media
song/filePress to enter Setup Mode
Press to go to
previous screen
Rotate to change
Radio/SiriusXM® Station/
Media (USB , iPod® , Aux,
BT Audio, My Music)
songs/filesPress to turn the LCD
display and backlight
ON/OFF
Press to move Up/Down
one category/file folder
REMINDER: SiriusXM ® service not available in AK or HI. For further audio system operations, refer to pages 13-19.Audio System Setup Options
Press the SETUP button, then use the TUNE knob to cycle through the available settings for each equipped audio option.
Press the TUNE Knob to adjust the audio option selected. Audio options may include the following:
Display Setup
���OMode Popup
���OTe x t S c r o l l
���OMedia Display
Standard Audio System
Videos
To view a video on your
mobile device, SNAP
this QR Code or visit the
listed website.
Refer to page 2 for more
information.
QR CODE
http://kutechvideos.com/audio/base_ systemREMINDER: Your vehicle’s audio
system may differ from that in
the illustration. See your Owner’s
Manual for more details.
Sound Setup
���OSound Settings
���OSpeed Dependent Volume
���OVoice Recognition VolumeClock Setup
���OClock Settings
���OCalendar Settings
���OTime Format
���OClock Display ON/OFFSystem Setup
���OMemory Information
���OPrompt Feedback
���OLanguage
Page 19 of 42

17
ALWAYS CHECK THE OWNER’S MANUAL FOR COMPLETE OPERATING INFORMATION AND SAFET Y WARNINGS. *IF EQUIPPED AUDIO SYSTEM
RADIOMEDIAPHONESETUPCLOCK
DISPSCANMENUBACK
12 34
5
6RPT
RDM
SEEKTRACK
CATFOLDER
VOL
POWERPUSH
PUSHENTER
TUNEFILE
Bluetooth
®
Press button to select
Random playback. Press
and hold button to select
Random playback of all
songs in Media (USB ,
iPod® , Aux, BT Audio, My
Music) songs/files
Standard Audio System Operation — Media (USB, iPod®, Aux, BT Audio, My Music)*
Press to display Media (USB ,
iPod® , Aux, BT Audio, My
Music) songs/files
Press to access Audio System
Setup Menus
Press to go to previous screen
Press to Power ON/OFF.
Rotate to adjust Volume
Press to select previous/
next Radio/SiriusXM®
stations/Media (USB , iPod® ,
Aux, BT Audio, My Music)
files. Press and hold to
move quickly through
stations/tracks/files Press to select Media
(USB , iPod® , Aux, BT
Audio, My Music) modes
Press to play each song
in the MP3 file for 10
seconds. To cancel SCAN
Play, press again
Press to access Audio System
& Clock Setup mode
Press to move Up/Down
one category/file folder Rotate to change Media
(USB , iPod® , Aux, BT Audio,
My Music) songs/files
Press to select Repeat
playback. Press and
hold button to select
Repeat playback of all
songs in Media (USB ,
iPod® , Aux, BT Audio,
My Music) songs/files
REMINDER: SiriusXM ® service not available in AK or HI. For further audio system operations, refer to pages 13-19. REMINDER: Your vehicle’s audio system may differ from that
in the illustration. See your Owner’s Manual for more details.
Page 20 of 42

SOUL
FEATURES & FUNCTIONS GUIDE
18
*IF EQUIPPED
AUDIO SYSTEM
eServicesHOMESETUP
SEEKTRACKCLOCK
CATEGORY
VOL
POWERPUSH
PUSHENTER
TUNEFILE
Bluetooth
®
FM/AMSATMEDIA
���O
���OOnly MP3 or WMA files may be played or copied to
Jukebox—commercial CDs or CDs with a CDDA audio format
(compact disc digital audio) cannot be copied to Jukebox
���OAt any time you can interrupt UVO System Command
Feedback by pressing the TALK button
QUICK TIPS
���O
���OWhen using the voice command feature, wait for the system
BEEP before speaking the command
���OProlonged use of the UVO system in ACC mode may drain
the vehicle’s battery.
QUICK TIPS
Press to display
PHONE mode
Press to display
SETUP mode Press to enter UVO
eServices mode
In SiriusXM®
mode, press
to move to the
previous/next
category Press to select next/previous station/
track/channel/song/file. Press
and hold to move quickly through
stations/tracks/songs/filesPress to enter
CLOCK setup
Press knob to turn
POWER On/Off.
Rotate knob to adjust
Volume Up/Down
Press to select
MEDIA mode. Then
press again to toggle
through the Media
modes Press to select
SiriusXM® modePress to select
FM/AM modes
In Radio/SiriusXM®/
MEDIA/JUKEBOX
modes, rotate knob
to search for stations/
channels/tracks/
songs/files. Press knob
to receive the selected
station/channel/track/
song/file
UVO System*
UVO System Videos
To view a video on your
mobile device, SNAP
this QR Code or visit the
listed website.
Refer to page 2 for more
information.
QR CODE
http://kutechvideos.com/audio/UVO_eServices
REMINDER: SiriusXM ® service not available in AK or HI.
For further navigation system operation, refer to the UVO
System User’s Manual.
For further audio system operations, refer to pages 13-19.REMINDER: Your vehicle’s audio system may differ from that in the
illustration. See your Owner’s Manual for more details.
Page 21 of 42

19
ALWAYS CHECK THE OWNER’S MANUAL FOR COMPLETE OPERATING INFORMATION AND SAFET Y WARNINGS. *IF EQUIPPED AUDIO SYSTEM Navigation System with AM/FM/SiriusXM®/CD/Aux/USB/iPod®/
BT Audio/My Music*
MAP
UVORADIO
NAVINFOSETUP
POWER
VOLTUNE
FILEPUSH
Press to Power ON/OFF.
Rotate to adjust VolumePress to enter UVO
eServices/setup/info mode Press to select FM/AM
SiriusXM® Modes
Press to select
CD/Aux/
USB/iPod®/BT Audio, My
Music modes
Rotate to change Radio/
SiriusXM ® Stations/CD/Aux/USB/iPod®/
BT Audio, My Music
tracks/files Press to display the
Map screen for the
current position
Press to display the
Navigation menu screen
Press to enter
PHONE mode
Press to display the
Setup menu screen Press to display Radio
Station/
CD/Aux/USB/
iPod®/BT Audio, My
Music track/files Press to select previous/
next Radio/SiriusXM®
stations/
CD/Aux/USB/
iPod®/BT Audio, My Music
songs/files. Press and hold
to move quickly through
stations/tracks/files
Navigation Audio
System Videos
To view a video on your
mobile device, SNAP this
QR code or visit the listed
website.
Refer to page 2 for more
information.
QR CODE
http://www.kutechvideos.com/audio/avn4
REMINDER: SiriusXM ® service not available in AK or HI.
For further navigation system operation, refer to the Digital Navigation
System User's Manual.
For further audio system operations, refer to pages 13-19.
���O
Prolonged use of the Navigation system in ACC mode may drain
the vehicle’s battery. A warning screen may appear periodically
to remind users that the Navigation System should be operated
with the engine running to prevent battery discharge.
QUICK TIPS
When using the voice command feature, wait for the system
BEEP before speaking the command.
QUICK TIPS
REMINDER: Your vehicle’s audio system may differ from that in the
illustration. See your Owner’s Manual for more details.
Page 22 of 42
 Lighting Speaker that lights
around the front speaker is controlled by turning the
knob and pressing the buttons (located to th")
SOUL
FEATURES & FUNCTIONS GUIDE
20
*IF EQUIPPED
The Advanced (Mood) Lighting Speaker that lights
around the front speaker is controlled by turning the
knob and pressing the buttons (located to the left of the
steering wheel).
MOOD : Light intensity and color
changes automatically at regular
intervals.
MUSIC: Speaker light pulses and
changes intensity according to the
audio sound (audio must be on for
this feature to work).
OFF: Speaker light turns OFF.
+/– : When light is ON, press illumination buttons to adjust
light intensity.
12V
120W
12V
180W
AUX USB
Aux/USB/iPod® Port* &
Power Outlets*
Digital Clock*
The power outlets are inactive
when ignition is in the OFF
position
QUICK TIPS
���O
���ODoor must be closed for this feature to work.
���OProlonged use of lighting speaker in ACC mode may drain
the vehicle’s battery.
QUICK TIPS
Standard Audio System Clock Setup:
1. Press the SETUP button
2. Rotate knob to select Clock mode, then press to enter
3. Rotate knob to adjust Hour, then press to enter
4. Rotate knob to adjust Minute, then press to enterAdvanced (Mood) Lighting Speaker*
OFF MOODMUSIC
REMINDER: For the Tire Mobility Kit,
only use the 12V/15A/180W Power
Outlet, located on the right side of the
outlet/aux. port area.
www.KuTechVideos.com/ps13/2014
Kia USB Port Video
To view a video on your
mobile device, SNAP this
QR code or visit the listed
website.
Refer to page 2 for more
information.
QR CODE
www.KuTechVideos.com/ps13/2014
UVO System Clock Setup:
Press the CLOCK button to display the Clock setting screen.
Then use the on-screen buttons to navigate through setup.
Navigation System Clock Setup:
Press the SETUP key, then the CLOCK button to display the
Clock setting screen. Then use the on-screen buttons to
navigate through setup.
AUDIO SYSTEM / CENTER PANEL
Page 23 of 42

���O
���OKeep inside glass as clean as possible
to reduce")
21
ALWAYS CHECK THE OWNER’S MANUAL FOR COMPLETE OPERATING INFORMATION AND SAFET Y WARNINGS. *IF EQUIPPED Automatic Climate Control*(Type B)
���O
���OKeep inside glass as clean as possible
to reduce window fogging
���ODefrost
Mode activates A/C and
opens Fresh Air Vent
���ODuring Auto Operation the A/C
indicator will NOT illuminate. The
fan speed, air intake, air flow and
air conditioning may automatically
engage at any time to reach desired
temperature and reduce humidity
QUICK TIPS
Air Flow Modes
To select Air Flow Modes, press
the Mode selection buttons:
Face-Level
Climate Control Auto Function:
1. Press AUTO to select Full Auto Operation
2. Press MODE buttons to control which vents
air flows through
Defrost Outside Windshield:
1. Set Fan Speed to the highest position
2. Set Te m p e r a t u r e to Hot
3. Press the Defrost button Defog Inside Windshield:
1. Set desired fan Fan Speed
2. Set desired Te m p e r a t u r e
3. Press the Defrost button
AUTO
OFF
FRONTREAR
A/CMODE
CLIMATE
Fan Spe e d
Control buttonsMode Selection
button
Display
CLIMATE control
information
Rear Windshield
Defroster buttonAutomatic
Climate Control
button Recirculated Air button Front Windshield
Defroster buttonAir Conditioning
ON/OFF button Temperature
Control knob
System OFF
button
REMINDER: Warm air may flow in through vents
if Recirculated Air button is not pressed ON
(LED lit).
REMINDER: Your Manual Climate Control
system may differ from those in the illustrations.
See your Owner’s Manual for more details.
Bi-Level
Floor-Level
Floor/Defrost-Level
CENTER PANEL
Page 24 of 42

���O
���OKeep inside glass as clean as possible
to reduce window fogging
���ODefrost
Mode activates A/C and
ope")
SOUL
FEATURES & FUNCTIONS GUIDE
22
*IF EQUIPPED
Automatic Climate Control*(Type A)
���O
���OKeep inside glass as clean as possible
to reduce window fogging
���ODefrost
Mode activates A/C and
opens Fresh Air Vent
���ODuring Auto Operation the A/C
indicator will NOT illuminate. The
fan speed, air intake, air flow and
air conditioning may automatically
engage at any time to reach desired
temperature and reduce humidity
QUICK TIPS
Air Flow Modes
To select Air Flow Modes, press
the Mode selection buttons:
Face-Level
Climate Control Auto Function:
1. Press AUTO to select Full Auto Operation
2. Press MODE buttons to control which vents
air flows through
Defrost Outside Windshield:
1. Set Fan Speed to the highest position
2. Set Te m p e r a t u r e to Hot
3. Press the Defrost button Defog Inside Windshield:
1. Set desired fan Fan Speed
2. Set desired Te m p e r a t u r e
3. Press the Defrost button
REAR
A/C
MODE OFF AUTO
FRONT
A/C
AUTO
Temperature
Control buttonsFan speed control
buttons
Automatic Climate
Control button OFF
buttonMode selection button Front Windshield
Defroster buttonRecirculated
Air button Rear Windshield
Defroster buttonAir Conditioning button
(if equipped)
Climate Control
Display
REMINDER: Warm air may flow in through vents
if Recirculated Air button is not pressed ON
(LED lit).
REMINDER: Your Manual Climate Control
system may differ from those in the illustrations.
See your Owner’s Manual for more details.
Bi-Level
Floor-Level
Floor/Defrost-Level
CENTER PANEL