Page 17 of 42
15ALWAYS CHECK THE OWNER’S MANUAL FOR COMPLETE OPERATING INFORMATION AND SAFET Y WARNINGS *IF EQUIPPED
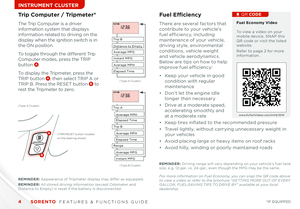
STEERING WHEEL CONTROLS
15ALWAYS CHECK THE OWNER’S MANUAL FOR COMPLETE OPERATING INFORMATION AND SAFET Y WARNINGS *IF EQUIPPED
Select the desired steering mode by toggling
through the steering modes
• Press the FlexSteer™ Steering Wheel Mode
button A to display the steering mode on the
LCD display (Type B instrument cluster)
• Then press the button again A within 4 seconds
to switch modes
FlexSteer™ Steering Wheel Mode*
REMINDER: Your vehicle’s steering wheel buttons may differ from those in the illustrations See your Owner’s Manual for more details
Steering ModeSteering ModeSteering Mode
NORMAL
SPORTCOMFORT
CANCELCRUISE
RES
SET
VOL
VOL
MUTEMODE
CANCELCRUISE
RES
SET
VOL
VOL
MUTEMODE
CANCELCRUISERES
SET
VOL
VOL
MUTEMODE
CANCELCRUISE
RES
SET
VOL
VOL
MUTEMODE
CANCELCRUISE
RES
SET
VOL
VOL
MUTEMODE
CANCELCRUISERES
SETVOLVOL
MUTEMODE
A
A
Page 18 of 42

SORENTO FEATURES & FUNCTIONS GUIDE16*IF EQUIPPED
AUDIO SYSTEM
Audio System Setup Options
Press the SETUP button, then use the TUNE knob to cycle through the available settings for each equipped audio option
Press the TUNE Knob to adjust the audio option selected Audio options may include the following:
SCAN
SETUP
MENU
MEDIA
RADIO
PHONE
VOL
POWER
PUSH
DISP
SEEK
TRACK1 2 3
4 5 6
TUNE
FILE
ENTER
RPT RDM
CAT
FOLDER
VOL
POWER
PUSHTUNE
FILE
MEDIA
FM/AM
PHONE SAT
SEEK
TRACK MAP
VOICE DEST
ROUTE
CD-IN
Loading...
Smart ITself
• Display Settings
• Mode Pop-up
• Te x t S c r o l l
• Media Display
• Sound Settings
• System Settings
Standard Audio System Overview —
AM/FM/CD/MP3/Sirius Satellite Radio*
REMINDER: Sirius service not available in AK or HI For further audio system operations, refer to pages 14 , 16 – 21.
Press to Power ON/OFF. Rotate to adjust Volume
Press Preset buttons (1- 6) to select Radio - Sirius stations. Press and hold to save Radio/Sirius stations
Press to select CD/USB/AUX/My Music/BT Audio Modes (Bluetooth®)
Press to Operate Phone Screen
Press to select FM/AM/Sirius ModesPress to play each song in the CD/MP3 file for 10 seconds. To cancel S C A N Play, press again
Press to turns screen ON/OFF
Press to enter the system setup options (s e e b e l ow)
Press to display menus for the current modes
Rotate to change Radio/Sirius Station/CD/USB/iPod®/My Music songs. Press to select Audio Mode to adjust settings. Rotate to change Audio Modes
Press to select previous/next for Radio/CD/USB/iPod®/My Music/BT Audio(Bluetooth®)
Standard Audio System Videos To view a video on your mobile device, SNAP this QR code or visit the listed website
Refer to page 2 for more information
QR CODE
http://kutechvideos.com/audio/base_system
REMINDER: Your vehicle’s audio system may differ from that in the illustration See your Owner’s Manual for more details
Page 19 of 42

17ALWAYS CHECK THE OWNER’S MANUAL FOR COMPLETE OPERATING INFORMATION AND SAFET Y WARNINGS *IF EQUIPPED
AUDIO SYSTEM
SCAN
SETUP
MENU
MEDIA
RADIO
PHONE
VOL
POWER
PUSH
DISP
SEEK
TRACK1 2 3
4 5 6
TUNE
FILE
ENTER
RPT RDM
CAT
FOLDER
VOL
POWER
PUSHTUNE
FILE
MEDIA
FM/AM
PHONE SAT
SEEK
TRACK MAP
VOICE DEST
ROUTE
CD-IN
Loading...
Smart ITself
Insert CD
Press to select CD/MP3/AUX/USB/iPod®/My Music TrackPress to move Up/Downone Category/File/Folder
Press button to selectRandom playback. Pressand hold button to selectRandom playback of allsongs in CD/file/folder
Press to Power ON/OFF. Rotate to adjust Volume
Press to select CD/USB/AUX/MyMusic/BT Audio Modes(Bluetooth®)
Press to Operate Phone Screen
Press to select Repeatplayback. Press and holdbutton to select Repeatplayback of all songs inCD/file/folder
Standard Audio System Operation — CD/AUX/USB/iPod®/My Music*
Press to eject CDCD-IN indicator LED (indicates that a CD has been inserted)
Press to display menus of current mode
Rotate to change Radio/Sirius Station/CD/AUX /iPod®/My Music
Press to play each song in the Media file for 10 seconds. To cancel SCAN Play, press again
REMINDER: Sirius service not available in AK or HI
REMINDER: Your vehicle’s audio system may differ from that in the illustration See your Owner’s Manual for more details
• Sound Settings
• System Settings
For further audio system operations, refer to pages 14 , 16 – 21.
Page 20 of 42
SORENTO FEATURES & FUNCTIONS GUIDE18*IF EQUIPPED
AUDIO SYSTEM
SCAN
SETUP
MENU
MEDIA
RADIO
PHONE
VOL
POWER
PUSH
DISP
SEEK
TRACK1 2 3
4 5 6
TUNE
FILE
ENTER
RPT RDM
CAT
FOLDER
VOL
POWER
PUSHTUNE
FILE
MEDIA
FM/AM
PHONE SAT
SEEK
TRACK MAP
VOICE DEST
ROUTE
CD-IN
Loading...
Smart ITself
Press to select Sirius/FM/AM modesPress to SCAN Radio Stations. Then press to select song. Press again to stop
Press to select Previous/Next Channel. Press and hold to cycle through Channels
Press Preset buttons (1- 6) to select Radio/Sirius stations. Press and hold to save Radio/Sirius stations
Rotate to scroll Channels or Categories. Press to select
Press to move Up/Downone Category/File folder
REMINDER: Sirius service not available in AK or HI
Standard Audio System Operation — Sirius Satellite Radio*
REMINDER: Your vehicle’s audio system may differ from that in the illustration See your Owner’s Manual for more details
For further audio system operations, refer to pages 14 , 16 – 21.
Page 21 of 42

19ALWAYS CHECK THE OWNER’S MANUAL FOR COMPLETE OPERATING INFORMATION AND SAFET Y WARNINGS *IF EQUIPPED
AUDIO SYSTEM
SCAN
SETUP
MENU
MEDIA
RADIO
PHONE
VOL
POWER
PUSH
DISP
SEEK
TRACK 1
2 3
4 5 6
TUNE
FILE
ENTER
RPT RDM
CAT
FOLDER
SETUP
eServices
MEDIA SAT
FM/AM
PHONE
VOL
POWER
PUSH
DISP
TUNE
FILE
ENTER
SEEK
TRACK CATEGORY
VOL
POWER
PUSHTUNE
FILE
MEDIA
FM/AM
PHONE SAT
SEEK
TRACK MAP
VOICE DEST
ROUTE
CD-IN
Loading...
Smart ITself
UVO System*
REMINDER: SiriusXM service not available in AK or HI For further UVO System information, refer to the UVO System User’s Manual.
Press to eject CDIndicates that a disc is inserted
Press to display PHONE mode
Press to display SETUP mode
Press to display eServices mode
In Sirius mode, press to move to the previous/next category
Press to select next /previous station/track/channel/song/file. Press and hold to move quickly through the stations/tracks/channels/songs/files
Press knob to turn Power On/Off.Rotate knob to adjust Volume Up/Down
Press to select MEDIA mode. Then press FM /A M button to toggle through the Media modes
Press to select Sirius mode
Press to select FM /A M mode
In Radio/Sirius/MEDIA/J U K E B OX modes, rotate knob to search for stations/ channels/tracks/songs/files. Press knob to receive the selected station/channel/track/song/file
Insert CD
UVO System Videos To view a video on your mobile device, SNAP this QR code or visit the listed website
Refer to page 2 for more information
QR CODE
http://kutechvideos.com/audio/UVO _eServices
REMINDER: Your vehicle’s audio system may differ from that in the illustration See your Owner’s Manual for more details
•
• When using the voice command feature, wait for the system BEEP before speaking the command
• Only MP3 or WMA files may be played or copied to Jukebox Commercial CDs or CDs with a CDDA audio format (compact disc digital audio) cannot be copied to Jukebox
• At any time you can interrupt UVO System Command Feedback by pressing the TALK button
• Prolonged use of the UVO system in ACC mode may drain the vehicle’s battery
QUICK TIPS
Page 22 of 42

SCAN
SETUP
MENU
MEDIA
RADIO
PHONE
VOL
POWER
PUSH
DISP
SEEK
TRACK 1
2 3
4 5 6
TUNE
FILE
ENTER
RPT RDM
CAT
FOLDER
SETUP
eServices
MEDIA SAT
FM/AM
PHONE
VOL
POWER
PUSH
DISP
TUNE
FILE
ENTERSEEK
TRACK CATEGORY
VOL
POWER
PUSHTUNE
FILE
MEDIA
FM/AM
PHONE SAT
SEEK
TRACK MAP
VOICE DEST
ROUTE
CD-IN
Loading...
Smart ITself
SORENTO FEATURES & FUNCTIONS GUIDE20*IF EQUIPPED
AUDIO SYSTEM
Press to display MAP VOICE
Press to display DESTINATION
Press to display Info/UVO eServices/Setup Mode
Press to display ROUTE
Press to display PHONE
Press to Power ON/OFF. Rotate to adjust Volume
Press to select previous/next Radio/Sirius stations /CD tracks/MP3/USB/iPod® files. Press and hold to move quickly through stations/tracks/files
Press to select FM/AM Modes
Press to select Sirius Modes
Press to select CD/MP3/USB/iPod®/AUX Mode
Press to eject CD
Rotate to change Radio/Sirius Stations/CD/MP3/USB/iPod® files
Navigation System with AM/FM/CD/MP3/Sirius* Navigation Audio System Videos To view a video on your mobile device, SNAP this QR code or visit the listed website
Refer to page 2 for more information
QR CODE
http://kutechvideos.com/audio/nav_eServices
REMINDER: Your vehicle’s audio system may differ from that in the illustration See your Owner’s Manual for more details
Prolonged use of the Navigation System in ACC mode may drain the vehicle’s battery A warning screen may appear periodically to remind users that the Navigation System should be operated with the engine running to prevent battery discharge
QUICK TIPS
When using the voice command feature, wait for the system BEEP before speaking the command
QUICK TIPS
REMINDER: Sirius service not available in AK or HI For further navigation system operation, refer to the Digital Navigation System User’s Manual.
Page 23 of 42

21ALWAYS CHECK THE OWNER’S MANUAL FOR COMPLETE OPERATING INFORMATION AND SAFET Y WARNINGS
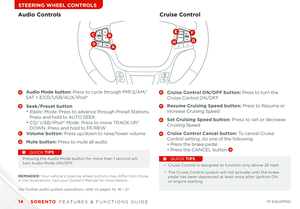
CENTER PANEL
Center Panel Clock Setup*:
Press the H button A to advance the time by one hour
Press the M button B to advance the time by one minute
Navigation System Clock Setup*:
Press the Info/Settings key on the Audio Control Unit Then
press the on-screen Setup button and select the Clock icon
Then use the on-screen buttons to navigate through setup
Press button A to disable 2nd Row Power Outlet
Press and hold both for more than 5 seconds to switch from 12 to 24 hour formats
QUICK TIPS
Digital Clock
A
B12VMAX
120W12VMAX
120WAUX USB
AUX/USB/iPod® Port
& Power Outlets
• Media Device Power Cable — Standard Audio, UVO and Navigation Systems The iPod® connector cable provided with your iPod® unit is used to normally support operation of an iPod®, detecting the device and recharging the battery with the UVO system
• The power outlets are inactive when ignition is in the OFF position
QUICK TIPS
Kia USB Port To view a video on your mobile device, SNAP this QR code or visit the listed website
Refer to page 2 for more information
QR CODE
www.KuTechVideos.com/xm14/2014
REMINDER: The Center Panel Digital Clock and Navigation System Clock are not synchronized and may differ slightly
Press the DONE button* on the Navigation screen to ensure changes are saved
QUICK TIPS
*IF EQUIPPED
P
R
N
D
P R
N
DP
R
N
D
SHIFTLOCK RELEASE
activeECOAC
115VPOFF
AC 115V
MAX 150W
(Driver/Front Passenger)
(2nd Row AC Power Outlet and ON/O FF b ut to n)
A
Page 24 of 42

SORENTO FEATURES & FUNCTIONS GUIDE22*IF EQUIPPED
CENTER PANEL
REMINDER: Your Automatic Climate Control system may differ from those in the illustrations See your Owner’s Manual for more details
Automatic Climate Control*
Climate Control Auto Function:
1 Press AUTO to select Full Auto Operation
2 Press MODE buttons to control which vents air flows through
3 Press DUAL to select Dual Temperature Control Operation
Defrost Outside Windshield:
1 Set Fan Speed to the highest position 2 Set Temperature to Hot
3 Press the Front Defrost button
Defog Inside Windshield:
1 Set desired Fan Speed
2 Set desired Temperature
3 Press the Front Defrost button
Air Flow Modes
To select Air Flow Modes, rotate the Mode selection knob:
Face-Level
Bi-Level
Floor-Level
Floor/Defrost-Level
Defrost-Level
• The A /C Rear button indicator will not illuminate unless the 3rd Row Air Conditioning Fan Speed switch is turned ON (see page 23, 3rd Row Air Conditioning Control)
• Keep inside glass as clean as possible to reduce window fogging
• Defrost Mode activates A /C and opens Fresh Air Vent
• During Auto Operation the A /C indicator will NOT illuminate The fan speed, air intake, air flow and air conditioning may automatically engage at any time to reach desired temperature and reduce humidity
QUICK TIPS
LCD display
Driver’s temperature control
Automatic Climate Control Mode
Air conditioning ON/OFF
Front windshield defroster button
Recirculated air button
Rear window defroster button
3rd row air conditioning ON/OFF* button
Front blower OFF
Fan speed buttons
Mode selection buttons
Passenger’s temperature control
Dual temperature control mode
A /CA /CR EA R
0 1
2
3
4
A/C
A /C
O
FF
M O
DE D
UAL
REA R
AUTOP
U SH P
U SHFR O NTREA R
AUTOA UTOD UAL