2014 KIA Sedona clock
[x] Cancel search: clockPage 9 of 382

23
Your vehicle at a glance
INSTRUMENT PANEL OVERVIEW
1. Driver’s airbag ................................3-93
2. Light control / Turnsignals ...............................3-137, 3-139
3. Instrument cluster.........................3-116
4. Wiper/Washer ...............................3-141
5. Auto cruise control* ........................4-11
6. Audio controls* .............................3-197
7. Steering wheel .............................3-106
8. Ignition switch ...................................4-3
9. Digital clock ..................................3-193
10. Climate control system* ..3-147, 3-159
11. Hazard warning flasher switch ...3-146
12. Seat warmer* ...............................3-45
13. Shift lever .......................................4-5
14. Cigar lighter or Power outlet* .....3-189
15. Power outlet................................3-193
16. Ashtray* ......................................3-189
17. Passenger’s airbag .......................3-94
18. Vent controls ...................3-151, 3-166
19. Glove box ...................................3-187
20. Sunglass holder* ........................3-187
21. Sunvisor .....................................3-192
22. Power sliding door and power tailgate controls* ...........................3-17
23. Sunroof* .......................................3-33
24. Conversation mirror ....................3-115
25. Trip computer* ............................3-121
26. Day/night rearview mirror ...........3-110
* : if equipped
OVQ029002N
Page 39 of 382
Features of your vehicle
30
3
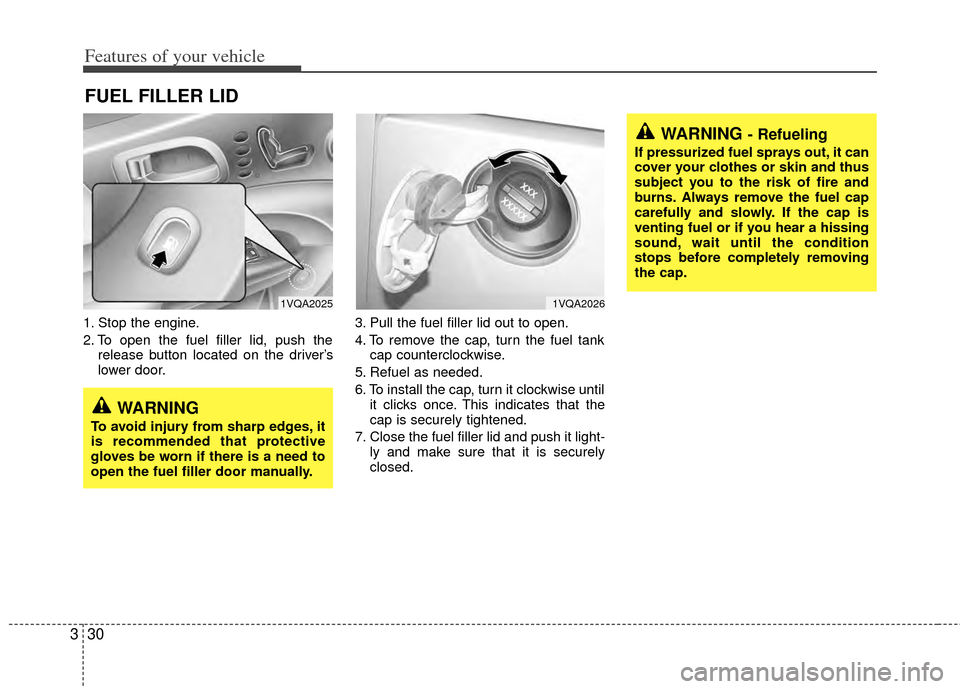
1. Stop the engine.
2. To open the fuel filler lid, push the
release button located on the driver’s
lower door. 3. Pull the fuel filler lid out to open.
4. To remove the cap, turn the fuel tank
cap counterclockwise.
5. Refuel as needed.
6. To install the cap, turn it clockwise until it clicks once. This indicates that the
cap is securely tightened.
7. Close the fuel filler lid and push it light- ly and make sure that it is securely
closed.
FUEL FILLER LID
1VQA2026
WARNING
To avoid injury from sharp edges, it
is recommended that protective
gloves be worn if there is a need to
open the fuel filler door manually.
WARNING - Refueling
If pressurized fuel sprays out, it can
cover your clothes or skin and thus
subject you to the risk of fire and
burns. Always remove the fuel cap
carefully and slowly. If the cap is
venting fuel or if you hear a hissing
sound, wait until the condition
stops before completely removing
the cap.
1VQA2025
Page 131 of 382
Features of your vehicle
122
3
Calibration procedure
The compass may not indicate the cor-
rect compass direction when you are dri-
ving in certain areas (tunnel, parking
garage, underground parking lot, near
transformer substation, etc.), and the fol-
lowing may occur:
The compass headings become inac-
curate.
The compass heading doesn't change when the vehicle changes direction.
Some compass headings are not dis- played.
The compass headings are inaccurate in long distance driving.
If the vehicle's compass headings
become inaccurate continuously, the
compass should be manually calibrated
as follows: 1. Move the vehicle away from any large
steel structures or power generating
cables or equipment.
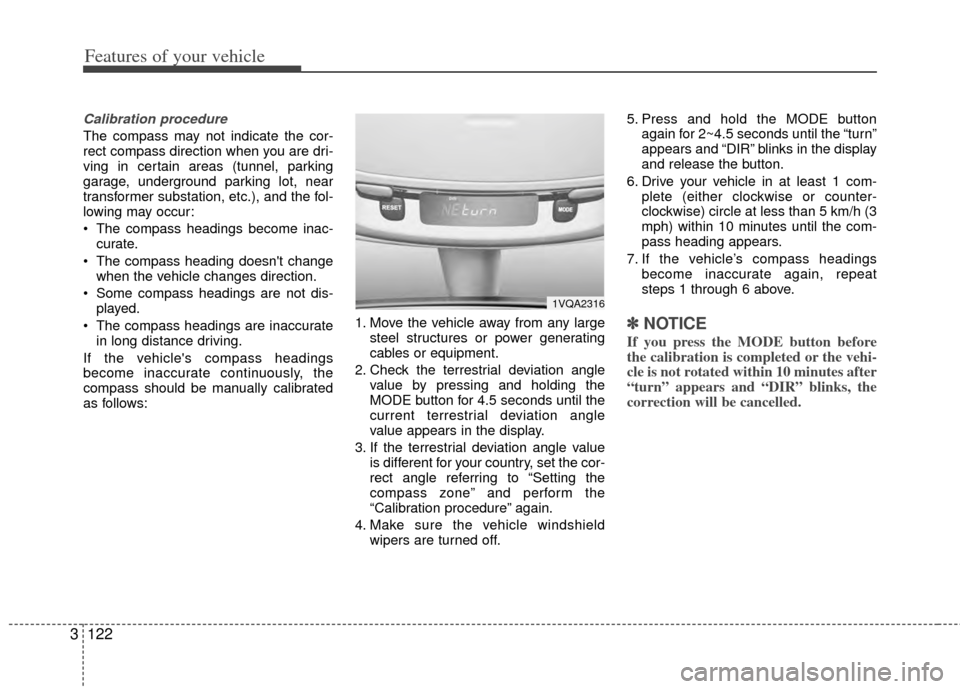
2. Check the terrestrial deviation angle value by pressing and holding the
MODE button for 4.5 seconds until the
current terrestrial deviation angle
value appears in the display.
3. If the terrestrial deviation angle value is different for your country, set the cor-
rect angle referring to “Setting the
compass zone” and perform the
“Calibration procedure” again.
4. Make sure the vehicle windshield wipers are turned off. 5. Press and hold the MODE button
again for 2~4.5 seconds until the “turn”
appears and “DIR” blinks in the display
and release the button.
6. Drive your vehicle in at least 1 com- plete (either clockwise or counter-
clockwise) circle at less than 5 km/h (3
mph) within 10 minutes until the com-
pass heading appears.
7. If the vehicle’s compass headings become inaccurate again, repeat
steps 1 through 6 above.
✽ ✽NOTICE
If you press the MODE button before
the calibration is completed or the vehi-
cle is not rotated within 10 minutes after
“turn” appears and “DIR” blinks, the
correction will be cancelled.
1VQA2316
Page 202 of 382
3193
Features of your vehicle
(1) : It can be used when the ignitionswitch is in ACC or ON position.
(2), (3) : It can be used regardless of the ignition switch position.
Power outlet
The power outlets are designed to pro-
vide power for mobile telephones or
other devices designed to operate with
vehicle electrical systems. The devices
should draw less than 10 amps with the
engine running.
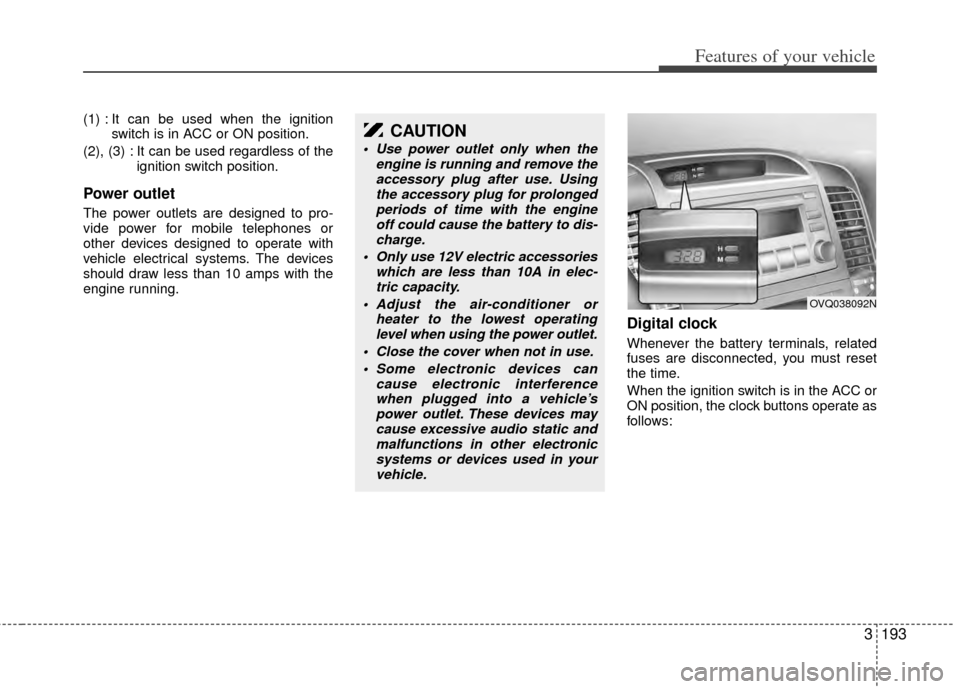
Digital clock
Whenever the battery terminals, related
fuses are disconnected, you must reset
the time.
When the ignition switch is in the ACC or
ON position, the clock buttons operate as
follows:
CAUTION
Use power outlet only when theengine is running and remove theaccessory plug after use. Usingthe accessory plug for prolonged periods of time with the engineoff could cause the battery to dis- charge.
Only use 12V electric accessories which are less than 10A in elec-tric capacity.
Adjust the air-conditioner or heater to the lowest operatinglevel when using the power outlet.
Close the cover when not in use. Some electronic devices can cause electronic interferencewhen plugged into a vehicle’spower outlet. These devices may cause excessive audio static andmalfunctions in other electronicsystems or devices used in your vehicle.
OVQ038092N
Page 204 of 382
3195
Features of your vehicle
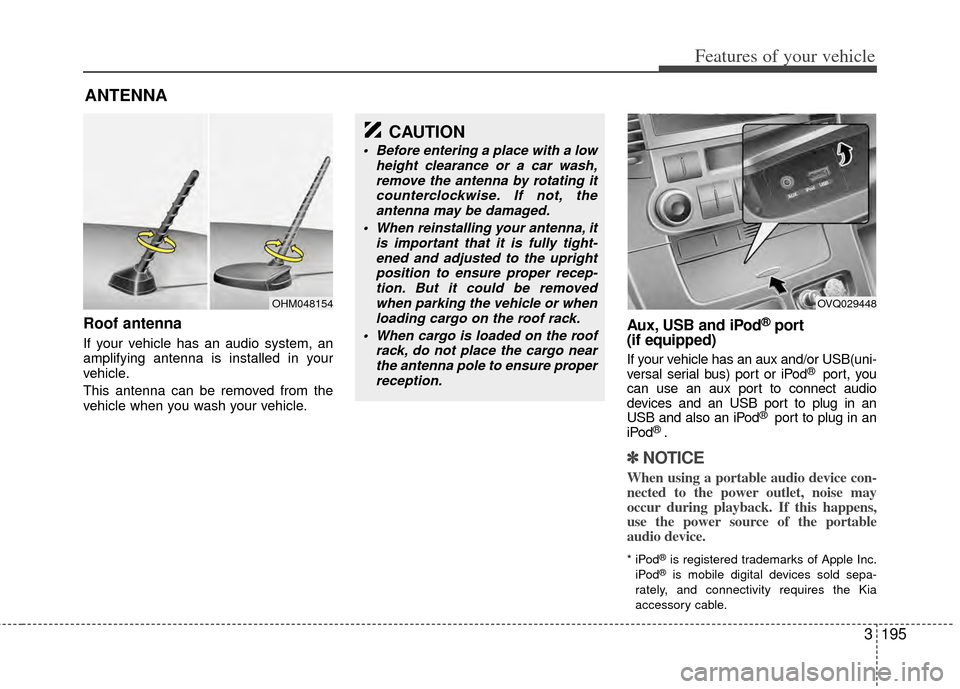
Roof antenna
If your vehicle has an audio system, an
amplifying antenna is installed in your
vehicle.
This antenna can be removed from the
vehicle when you wash your vehicle.
Aux, USB and iPod®port
(if equipped)
If your vehicle has an aux and/or USB(uni-
versal serial bus) port or iPod® port, you
can use an aux port to connect audio
devices and an USB port to plug in an
USB and also an iPod
® port to plug in an
iPod® .
✽ ✽ NOTICE
When using a portable audio device con-
nected to the power outlet, noise may
occur during playback. If this happens,
use the power source of the portable
audio device.
* iPod®is registered trademarks of Apple Inc.
iPod®is mobile digital devices sold sepa-
rately, and connectivity requires the Kia
accessory cable.
ANTENNA
OHM048154
CAUTION
Before entering a place with a low height clearance or a car wash,remove the antenna by rotating itcounterclockwise. If not, theantenna may be damaged.
When reinstalling your antenna, it is important that it is fully tight-ened and adjusted to the uprightposition to ensure proper recep-tion. But it could be removedwhen parking the vehicle or whenloading cargo on the roof rack.
When cargo is loaded on the roof rack, do not place the cargo nearthe antenna pole to ensure properreception.
OVQ029448
Page 211 of 382
Features of your vehicle
202
3
Using RADIO, SETUP, VOLUME
and AUDIO CONTROL
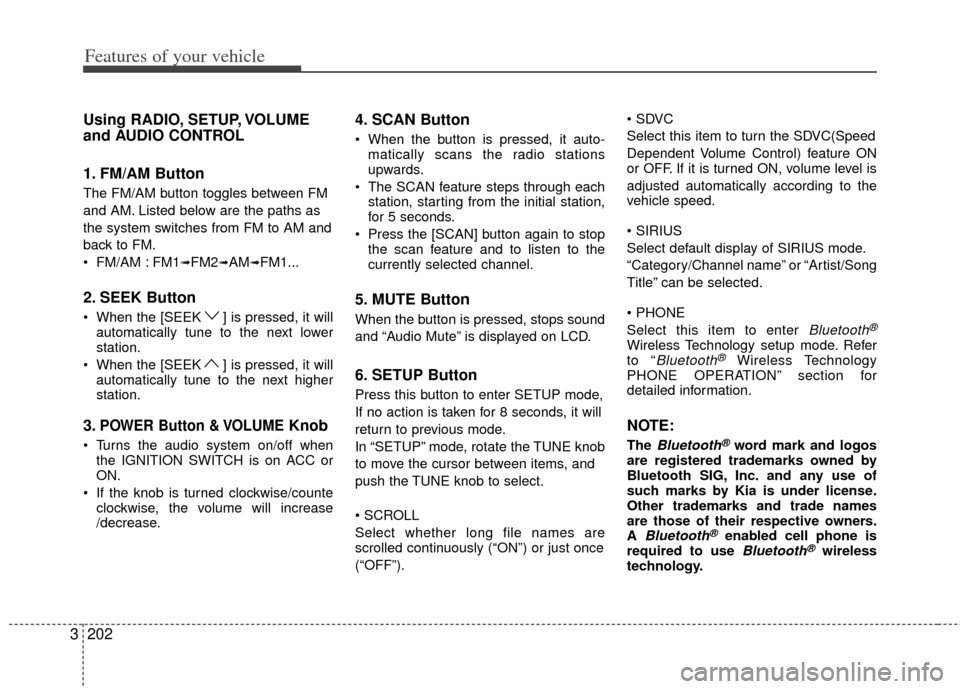
1. FM/AM Button
The FM/AM button toggles between FM
and AM. Listed below are the paths as
the system switches from FM to AM and
back to FM.
FM/AM : FM1
➟FM2➟AM➟FM1...
2. SEEK Button
When the [SEEK ] is pressed, it will
automatically tune to the next lower
station.
When the [SEEK ] is pressed, it will automatically tune to the next higher
station.
3.POWER Button & VOLUMEKnob
Turns the audio system on/off whenthe IGNITION SWITCH is on ACC or
ON.
If the knob is turned clockwise/counte clockwise, the volume will increase
/decrease.
4. SCAN Button
When the button is pressed, it auto-matically scans the radio stations
upwards.
The SCAN feature steps through each station, starting from the initial station,
for 5 seconds.
Press the [SCAN] button again to stop the scan feature and to listen to the
currently selected channel.
5. MUTE Button
When the button is pressed, stops sound
and “Audio Mute” is displayed on LCD.
6. SETUP Button
Press this button to enter SETUP mode,
If no action is taken for 8 seconds, it will
return to previous mode.
In “SETUP” mode, rotate the TUNE knob
to move the cursor between items, and
push the TUNE knob to select.
Select whether long file names are
scrolled continuously (“ON”) or just once
(“OFF”).
Select this item to turn the SDVC(Speed
Dependent Volume Control) feature ON
or OFF. If it is turned ON, volume level is
adjusted automatically according to the
vehicle speed.
Select default display of SIRIUS mode.
“Category/Channel name” or “Artist/Song
Title” can be selected.
Select this item to enter
Bluetooth®
Wireless Technology setup mode. Refer
to “Bluetooth®Wireless Technology
PHONE OPERATION” section for
detailed information.
NOTE:
The Bluetooth®word mark and logos
are registered trademarks owned by
Bluetooth SIG, Inc. and any use of
such marks by Kia is under license.
Other trademarks and trade names
are those of their respective owners.
A
Bluetooth®enabled cell phone is
required to use Bluetooth®wireless
technology.
Page 212 of 382
3203
Features of your vehicle
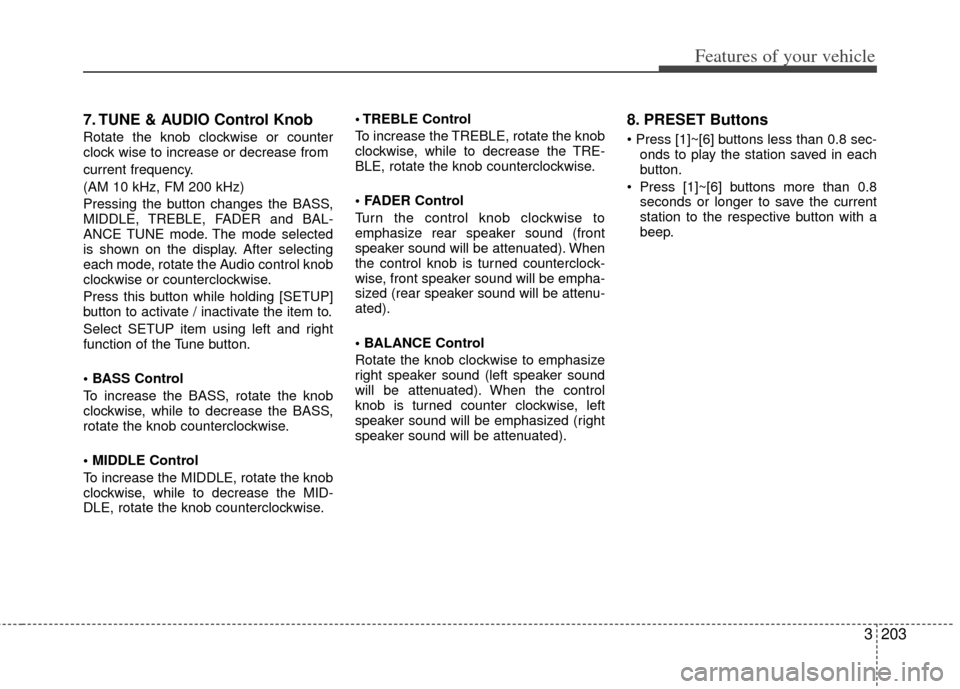
7. TUNE & AUDIO Control Knob
Rotate the knob clockwise or counter
clock wise to increase or decrease from
current frequency.
(AM 10 kHz, FM 200 kHz)
Pressing the button changes the BASS,
MIDDLE, TREBLE, FADER and BAL-
ANCE TUNE mode. The mode selected
is shown on the display. After selecting
each mode, rotate the Audio control knob
clockwise or counterclockwise.
Press this button while holding [SETUP]
button to activate / inactivate the item to.
Select SETUP item using left and right
function of the Tune button.
To increase the BASS, rotate the knob
clockwise, while to decrease the BASS,
rotate the knob counterclockwise.
To increase the MIDDLE, rotate the knob
clockwise, while to decrease the MID-
DLE, rotate the knob counterclockwise. Control
To increase the TREBLE, rotate the knob
clockwise, while to decrease the TRE-
BLE, rotate the knob counterclockwise.
Turn the control knob clockwise to
emphasize rear speaker sound (front
speaker sound will be attenuated). When
the control knob is turned counterclock-
wise, front speaker sound will be empha-
sized (rear speaker sound will be attenu-
ated).
Rotate the knob clockwise to emphasize
right speaker sound (left speaker sound
will be attenuated). When the control
knob is turned counter clockwise, left
speaker sound will be emphasized (right
speaker sound will be attenuated).
8. PRESET Buttons
onds to play the station saved in each
button.
seconds or longer to save the current
station to the respective button with a
beep.
Page 215 of 382
Features of your vehicle
206
3
To load more than one disc but less
than six, complete Steps 1 and 2.
When you have finished loading discs,
press LOAD button to cancel the loading
function or wait for 10 seconds. The CD
player will begin to play the last CD
loaded. As each CD starts to play, the
DISC number will appear on the display.
✽ ✽ NOTICE
The disc player takes up to six discs. Do
not try to load more than six.
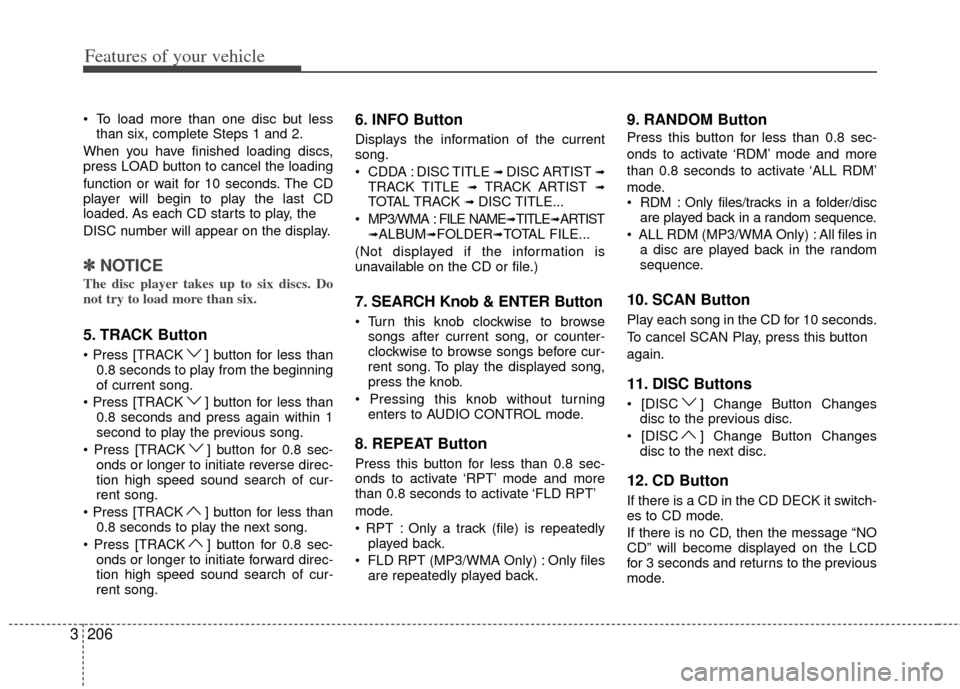
5. TRACK Button
] button for less than
0.8 seconds to play from the beginning
of current song.
] button for less than 0.8 seconds and press again within 1
second to play the previous song.
] button for 0.8 sec- onds or longer to initiate reverse direc-
tion high speed sound search of cur-
rent song.
] button for less than 0.8 seconds to play the next song.
] button for 0.8 sec- onds or longer to initiate forward direc-
tion high speed sound search of cur-
rent song.
6. INFO Button
Displays the information of the current
song.
CDDA : DISC TITLE
➟ DISC ARTIST ➟TRACK TITLE ➟ TRACK ARTIST ➟TOTAL TRACK ➟ DISC TITLE...
MP3/WMA : FILE NAME
➟TITLE➟ARTIST➟ALBUM➟FOLDER➟TOTAL FILE...
(Not displayed if the information is
unavailable on the CD or file.)
7. SEARCH Knob & ENTER Button
songs after current song, or counter-
clockwise to browse songs before cur-
rent song. To play the displayed song,
press the knob.
enters to AUDIO CONTROL mode.
8. REPEAT Button
Press this button for less than 0.8 sec-
onds to activate ‘RPT’ mode and more
than 0.8 seconds to activate ‘FLD RPT’
mode.
Only a track (file) is repeatedlyplayed back.
Only files are repeatedly played back.
9. RANDOM Button
Press this button for less than 0.8 sec-
onds to activate ‘RDM’ mode and more
than 0.8 seconds to activate ‘ALL RDM’
mode.
Only files/tracks in a folder/disc are played back in a random sequence.
All files in a disc are played back in the random
sequence.
10. SCAN Button
Play each song in the CD for 10 seconds.
To cancel SCAN Play, press this button
again.
11. DISC Buttons
] Change Button Changesdisc to the previous disc.
] Change Button Changes disc to the next disc.
12. CD Button
If there is a CD in the CD DECK it switch-
es to CD mode.
If there is no CD, then the message “NO
CD” will become displayed on the LCD
for 3 seconds and returns to the previous
mode.