2014 KIA Sedona ECU
[x] Cancel search: ECUPage 235 of 382

Features of your vehicle
226
3
Incoming Volume (Bluetooth®Wireless
Technology call volume adjustments)
While in ADVANCED menu, press “In. Vol”
Use the knob key to set the desired vol-
ume and select the button.
Contacts Sync (Automatic Phonebook
download setting)
While in ADVANCED menu, select
“Contacts” To automatically save the
contacts and call history in your mobile
phone each time you connect a mobile
device, select ON. If you do not wish for
automatic download, select OFF.
It’s not available to make a phone call by
Bluetooth®Wireless Technology audio
system while the phonebook is being
downloaded.
Language of Bluetooth®Wireless
Technology voice recognition
While in ADVANCED menu, select
“Language”. To change the language,
select the desired language and press
the button.
Bluetooth®Wireless Technology sys-
tem off
While in ADVANCED menu, select
“BT Off ” to turn off the
Bluetooth®
Wireless Technology System.
■Voice Recognition Activation
in the Bluetooth®Wireless Technology
System can be activated in the follow-
ing conditions:
- Button Activation
The voice recognition system will be
active when the button is pressed
and after the sound of a Beep.
- Active Listening The voice recognition system will be
active for a period of time when the
Voice Recognition system has asked
for a customer response.
from zero to nine while number greater
than ten will not be recognized.
tion mode in following cases : When
pressing the button and saying
“cancel” following the beep. When not
making a call and pressing the
button. When voice recognition has
failed 3 consecutive times. At any time if you say “help”, the system
will announce what commands are
available.
■Menu tree
The menu tree identifies available voice
recognition Bluetooth®Wireless
Technology functions.
ENTER
ENTER
Call [Name]Ex) Call John (at Home)
Ex) Dial 911
Dial [Number]
Redial
Call Back
Add entryPhonebook
Change name
Delete name
By phone
By voice
CallBy name
By number
Page 266 of 382
Driving your vehicle
84
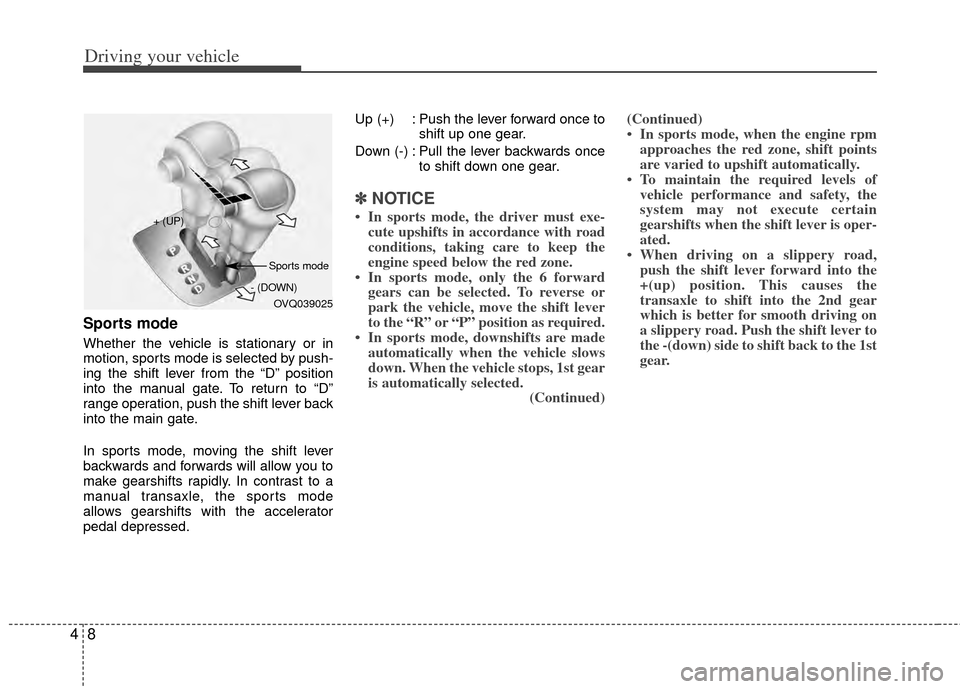
Sports mode
Whether the vehicle is stationary or in
motion, sports mode is selected by push-
ing the shift lever from the “D” position
into the manual gate. To return to “D”
range operation, push the shift lever back
into the main gate.
In sports mode, moving the shift lever
backwards and forwards will allow you to
make gearshifts rapidly. In contrast to a
manual transaxle, the sports mode
allows gearshifts with the accelerator
pedal depressed.Up (+) : Push the lever forward once to
shift up one gear.
Down (-) : Pull the lever backwards once to shift down one gear.
✽ ✽NOTICE
• In sports mode, the driver must exe-
cute upshifts in accordance with road
conditions, taking care to keep the
engine speed below the red zone.
• In sports mode, only the 6 forward gears can be selected. To reverse or
park the vehicle, move the shift lever
to the “R” or “P” position as required.
• In sports mode, downshifts are made automatically when the vehicle slows
down. When the vehicle stops, 1st gear
is automatically selected. (Continued)(Continued)
• In sports mode, when the engine rpm
approaches the red zone, shift points
are varied to upshift automatically.
• To maintain the required levels of vehicle performance and safety, the
system may not execute certain
gearshifts when the shift lever is oper-
ated.
• When driving on a slippery road, push the shift lever forward into the
+(up) position. This causes the
transaxle to shift into the 2nd gear
which is better for smooth driving on
a slippery road. Push the shift lever to
the -(down) side to shift back to the 1st
gear.
OVQ039025
+ (UP)
- (DOWN)
Sports mode
Page 274 of 382
Driving your vehicle
16
4
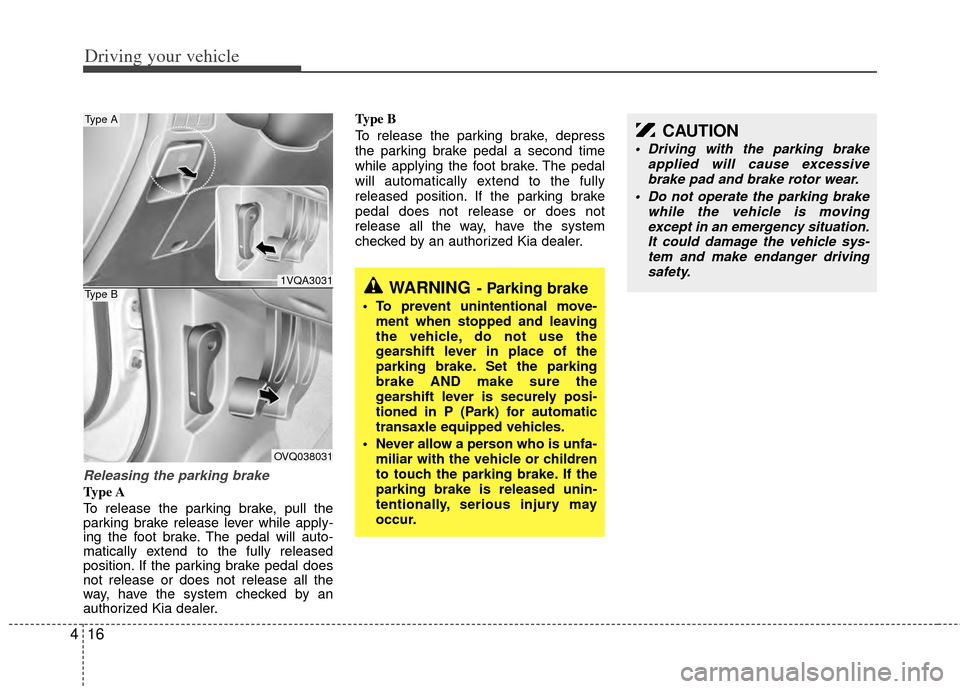
Releasing the parking brake
Type A
To release the parking brake, pull the
parking brake release lever while apply-
ing the foot brake. The pedal will auto-
matically extend to the fully released
position. If the parking brake pedal does
not release or does not release all the
way, have the system checked by an
authorized Kia dealer. Type B
To release the parking brake, depress
the parking brake pedal a second time
while applying the foot brake. The pedal
will automatically extend to the fully
released position. If the parking brake
pedal does not release or does not
release all the way, have the system
checked by an authorized Kia dealer.
CAUTION
Driving with the parking brake
applied will cause excessivebrake pad and brake rotor wear.
Do not operate the parking brake while the vehicle is movingexcept in an emergency situation. It could damage the vehicle sys-tem and make endanger driving safety.
WARNING- Parking brake
To prevent unintentional move- ment when stopped and leaving
the vehicle, do not use the
gearshift lever in place of the
parking brake. Set the parking
brake AND make sure the
gearshift lever is securely posi-
tioned in P (Park) for automatic
transaxle equipped vehicles.
Never allow a person who is unfa- miliar with the vehicle or children
to touch the parking brake. If the
parking brake is released unin-
tentionally, serious injury may
occur.
1VQA3031
OVQ038031
Type A
Type B
Page 290 of 382
Driving your vehicle
32
4
WARNING
Failure to use an approved trailer
wiring harness could result in dam-
age to the vehicle electrical system
and/or personal injury.
Driving with a trailer
Towing a trailer requires a certain
amount of experience. Before setting out
for the open road, you must get to know
your trailer. Acquaint yourself with the
feel of handling and braking with the
added weight of the trailer. And always
keep in mind that the vehicle you are
driving is now a good deal longer and not
nearly so responsive as your vehicle is
by itself.
Before you start, check the trailer hitch
and platform, safety chains, electrical
connector(s), lights, tires and mirror
adjustment. If the trailer has electric
brakes, start your vehicle and trailer mov-
ing and then apply the trailer brake con-
troller by hand to be sure the brakes are
working. This lets you check your electri-
cal connection at the same time.
During your trip, check occasionally to be
sure that the load is secure, and that the
lights and any trailer brakes are still work-
ing.
Following distance
Stay at least twice as far behind the vehi-
cle ahead as you would when driving
your vehicle without a trailer. This can
help you avoid situations that require
heavy braking and sudden turns.
Passing
You’ll need more passing distance up
ahead when you’re towing a trailer. And,
because of the increased vehicle length,
you’ll need to go much farther beyond the
passed vehicle before you can return to
your lane.
Backing up
Hold the bottom of the steering wheel
with one hand. Then, to move the trailer
to the left, just move your hand to the left.
To move the trailer to the right, move your
hand to the right. Always back up slowly
and, if possible, have someone guide
you.
Making turns
When you’re turning with a trailer, make
wider turns than normal. Do this so your
trailer won’t strike soft shoulders, curbs,
road signs, trees, or other objects. Avoid
jerky or sudden maneuvers. Signal well
in advance.
Turn signals when towing a trailer
When you tow a trailer, your vehicle has
to have a different turn signal flasher and
extra wiring. The green arrows on your
instrument panel will flash whenever you
signal a turn or lane change. Properly
connected, the trailer lights will also flash
to alert other drivers you’re about to turn,
change lanes, or stop.
When towing a trailer, the green arrows
on your instrument panel will flash for
turns even if the bulbs on the trailer are
burned out. Thus, you may think drivers
behind you are seeing your signals
when, in fact, they are not. It’s important
to check occasionally to be sure the trail-
er bulbs are still working. You must also
check the lights every time you discon-
nect and then reconnect the wires.
Do not connect a trailer lighting system
directly to your vehicle’s lighting system.
Use only an approved trailer wiring har-
ness.
Your Authorized Kia Dealer can assist
you in installing the wiring harness.
Page 307 of 382
511
What to do in an emergency
Do not take this vehicle through anautomatic car wash while the com-
pact spare tire is installed.
Do not use tire chains on the com- pact spare tire. Because of the
smaller size, a tire chain will not fit
properly. This could damage the
vehicle and result in loss of the
chain.
The compact spare tire should not be installed on the front axle if the
vehicle must be driven in snow or
on ice.
Do not use the compact spare tire on any other vehicle because this
tire has been designed especially
for your vehicle.
The compact spare tire’s tread life is shorter than a regular tire.
Inspect your compact spare tire
regularly and replace worn com-
pact spare tires with the same size
and design, mounted on the same
wheel. Changing tires
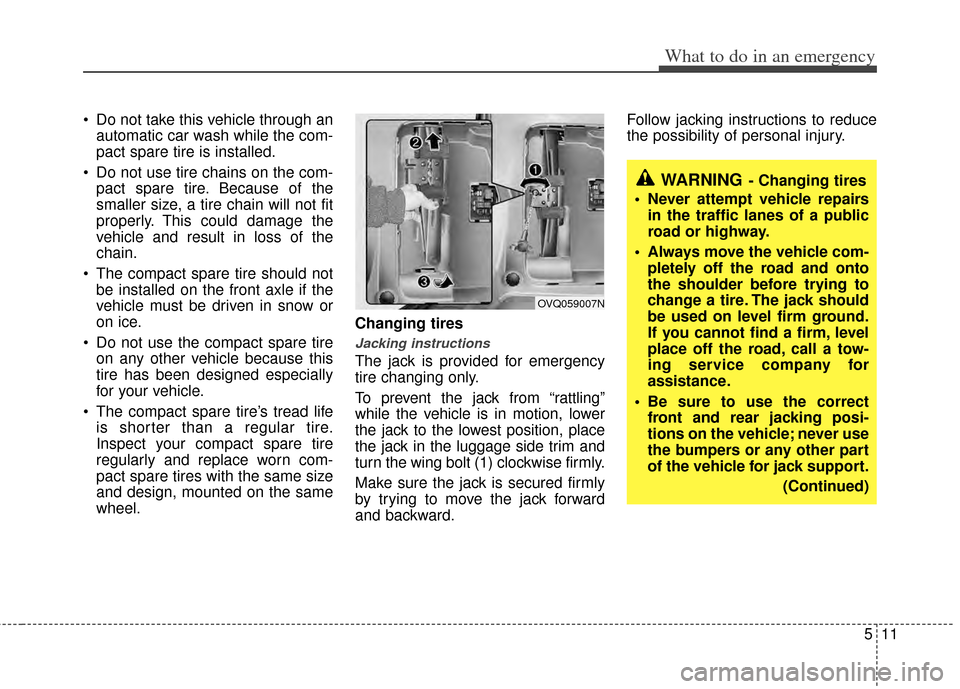
Jacking instructions
The jack is provided for emergency
tire changing only.
To prevent the jack from “rattling”
while the vehicle is in motion, lower
the jack to the lowest position, place
the jack in the luggage side trim and
turn the wing bolt (1) clockwise firmly.
Make sure the jack is secured firmly
by trying to move the jack forward
and backward. Follow jacking instructions to reduce
the possibility of personal injury.
WARNING- Changing tires
Never attempt vehicle repairs in the traffic lanes of a public
road or highway.
Always move the vehicle com- pletely off the road and onto
the shoulder before trying to
change a tire. The jack should
be used on level firm ground.
If you cannot find a firm, level
place off the road, call a tow-
ing service company for
assistance.
Be sure to use the correct front and rear jacking posi-
tions on the vehicle; never use
the bumpers or any other part
of the vehicle for jack support.
(Continued)
OVQ059007N
Page 308 of 382
What to do in an emergency
12
5
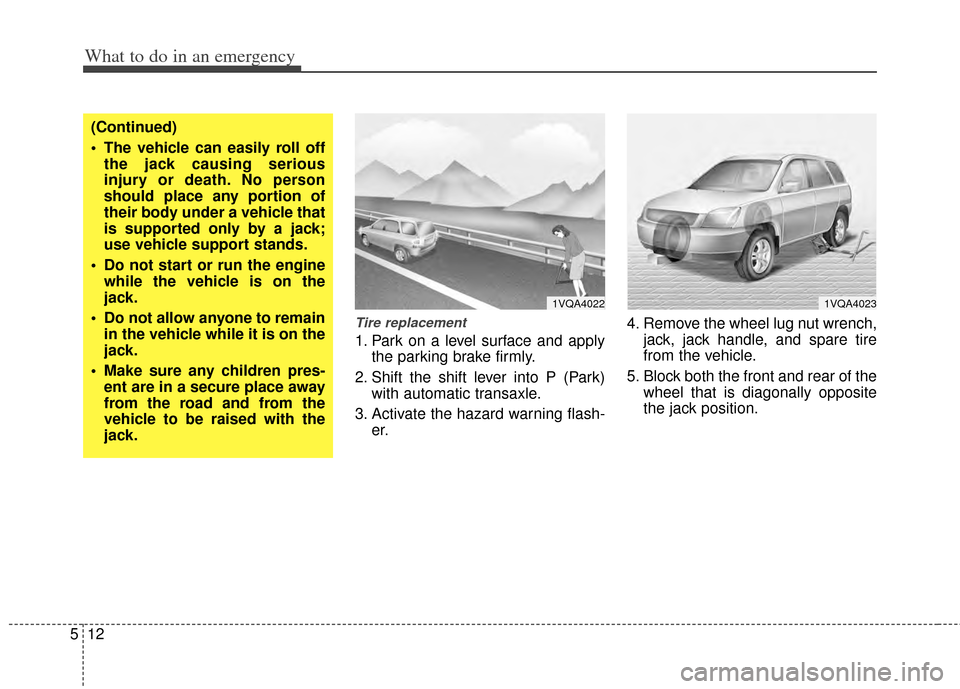
Tire replacement
1. Park on a level surface and apply
the parking brake firmly.
2. Shift the shift lever into P (Park) with automatic transaxle.
3. Activate the hazard warning flash- er. 4. Remove the wheel lug nut wrench,
jack, jack handle, and spare tire
from the vehicle.
5. Block both the front and rear of the wheel that is diagonally opposite
the jack position.
1VQA40221VQA4023
(Continued)
The vehicle can easily roll offthe jack causing serious
injury or death. No person
should place any portion of
their body under a vehicle that
is supported only by a jack;
use vehicle support stands.
Do not start or run the engine while the vehicle is on the
jack.
Do not allow anyone to remain in the vehicle while it is on the
jack.
Make sure any children pres- ent are in a secure place away
from the road and from the
vehicle to be raised with the
jack.
Page 310 of 382
What to do in an emergency
14
5
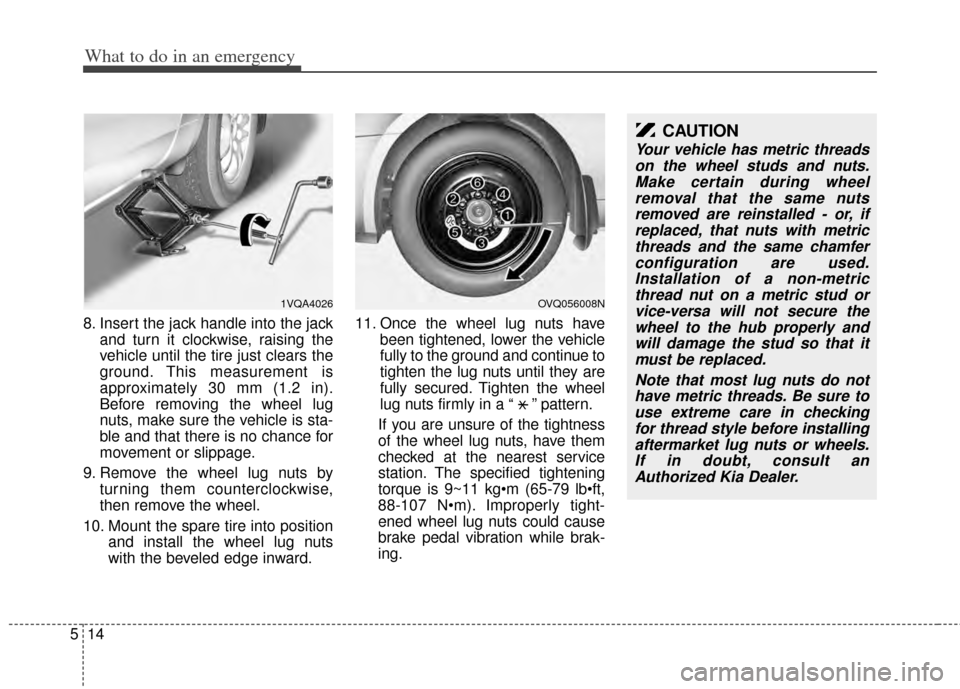
8. Insert the jack handle into the jack
and turn it clockwise, raising the
vehicle until the tire just clears the
ground. This measurement is
approximately 30 mm (1.2 in).
Before removing the wheel lug
nuts, make sure the vehicle is sta-
ble and that there is no chance for
movement or slippage.
9. Remove the wheel lug nuts by turning them counterclockwise,
then remove the wheel.
10. Mount the spare tire into position and install the wheel lug nuts
with the beveled edge inward. 11. Once the wheel lug nuts have
been tightened, lower the vehicle
fully to the ground and continue to
tighten the lug nuts until they are
fully secured. Tighten the wheel
lug nuts firmly in a “ ” pattern.
If you are unsure of the tightness
of the wheel lug nuts, have them
checked at the nearest service
station. The specified tightening
torque is 9~11 kg
88-107 N Improperly tight-
ened wheel lug nuts could cause
brake pedal vibration while brak-
ing.
CAUTION
Your vehicle has metric threads on the wheel studs and nuts.Make certain during wheelremoval that the same nutsremoved are reinstalled - or, ifreplaced, that nuts with metricthreads and the same chamferconfiguration are used.Installation of a non-metricthread nut on a metric stud orvice-versa will not secure thewheel to the hub properly andwill damage the stud so that itmust be replaced.
Note that most lug nuts do nothave metric threads. Be sure touse extreme care in checkingfor thread style before installingaftermarket lug nuts or wheels.If in doubt, consult anAuthorized Kia Dealer.
OVQ056008N1VQA4026
X
Page 312 of 382
What to do in an emergency
16
5
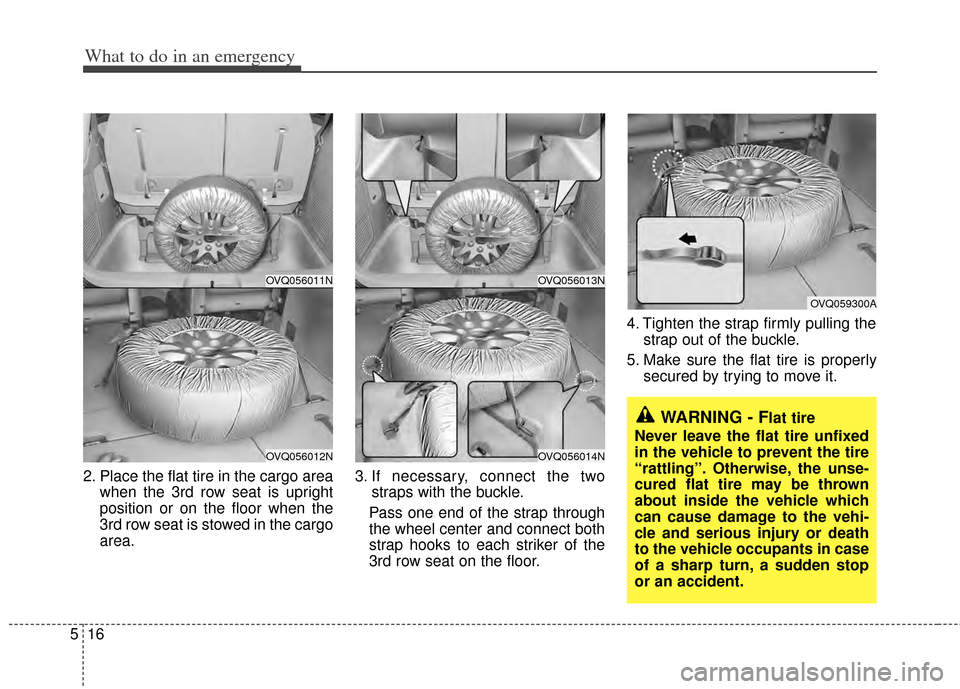
2. Place the flat tire in the cargo area
when the 3rd row seat is upright
position or on the floor when the
3rd row seat is stowed in the cargo
area. 3. If necessary, connect the two
straps with the buckle.
Pass one end of the strap through
the wheel center and connect both
strap hooks to each striker of the
3rd row seat on the floor. 4. Tighten the strap firmly pulling the
strap out of the buckle.
5. Make sure the flat tire is properly secured by trying to move it.
OVQ056013N
OVQ056014N
OVQ056011N
OVQ056012N
OVQ059300A
WARNING - Flat tire
Never leave the flat tire unfixed
in the vehicle to prevent the tire
“rattling”. Otherwise, the unse-
cured flat tire may be thrown
about inside the vehicle which
can cause damage to the vehi-
cle and serious injury or death
to the vehicle occupants in case
of a sharp turn, a sudden stop
or an accident.