2014 KIA Sedona display
[x] Cancel search: displayPage 191 of 382

Features of your vehicle
182
3
Your new mirror comes with an integrat-
ed HomeLink®Universal Transceiver,
which allows you to program the mirror to
activate your garage door(s), estate gate,
home lighting, etc. The mirror actually
learns the codes from your various exist-
ing transmitters.
* HomeLink®is a registered trademark of
Johnson Controls, Inc
Programming
Your vehicle may require the ignition
switch to be turned to the ACC position
for programming and/or operation of
HomeLink
®. It is also recommended that
a new battery be replaced in the hand-
held transmitter of the device being pro-
grammed to HomeLink
®for quicker train-
ing and accurate transmission of the
radio-frequency.
Follow these steps to train your
HomeLink
®mirror:
HOMELINK® WIRELESS CONTROL SYSTEM WITH REARVIEW DISPLAY (IF EQUIPPED)
WARNING
When programming the HomeLink®Wireless Control
System, you may be operating a
garage door or gate operator.
Make sure that people and objects
are out of the way of the moving
door or gate to prevent potential
harm or damage.
Do not use HomeLink
®with any
garage door opener that lacks the
safety stop and reverse feature as
required by federal safety stan-
dards. (This includes any garage
door opener model manufactured
before April 1, 1982.) A garage
door opener which cannot detect
an object, signaling the door to
stop and reverse, does not meet
current federal safety standards.
Using a garage door opener with-
out these features increases risk
of serious injury or death. For
more information, call 1-800-355-
3515 or on the internet at
www.homelink.com.
(Continued)
(Continued)
Retain the original transmitter forfuture programming procedures
(i.e., new vehicle purchase). It is
also suggested that upon the sale
of the vehicle, the programmed
HomeLink
®buttons be erased for
security purposes (follow step 1
in the “Programming” portion of
this text).
OVQ032360N
OVQ032305N
Glare detection sensor
Indicator light
Rearview display
Homelink®buttons
Compass display
Page 203 of 382
Features of your vehicle
194
3
HOUR:
Pressing the “H” button with your fin-
ger, a pencil or similar object will
advance the time displayed by one
hour.
MINUTE:
Pressing the “M” button with your fin-
ger, a pencil or similar object will
advance the time displayed by one
minute.
To change the 12 hour format to the 24
hour format, press the “H” and “M” but-
tons for more than 3 seconds.
For example, if the “H” and “M” buttons is
pressed for more than 3 seconds while
the time is 10:15 p.m., the display will be
changed to 22:15.
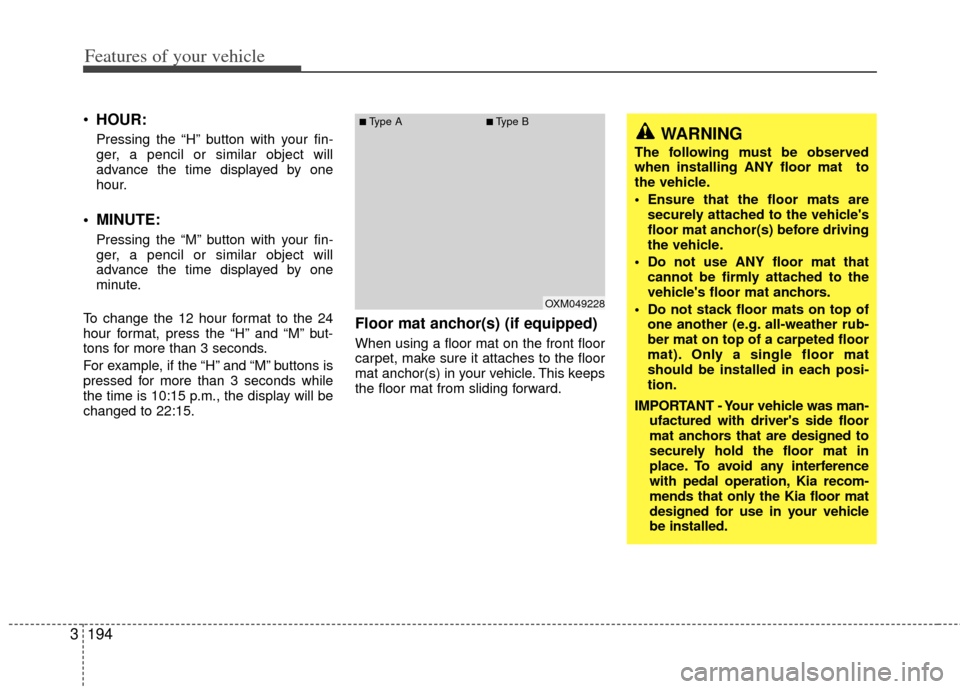
Floor mat anchor(s) (if equipped)
When using a floor mat on the front floor
carpet, make sure it attaches to the floor
mat anchor(s) in your vehicle. This keeps
the floor mat from sliding forward.
OXM049228
■Type A■Type BWARNING
The following must be observed
when installing ANY floor mat to
the vehicle.
Ensure that the floor mats are securely attached to the vehicle's
floor mat anchor(s) before driving
the vehicle.
Do not use ANY floor mat that cannot be firmly attached to the
vehicle's floor mat anchors.
Do not stack floor mats on top of one another (e.g. all-weather rub-
ber mat on top of a carpeted floor
mat). Only a single floor mat
should be installed in each posi-
tion.
IMPORTANT - Your vehicle was man- ufactured with driver's side floor
mat anchors that are designed to
securely hold the floor mat in
place. To avoid any interference
with pedal operation, Kia recom-
mends that only the Kia floor mat
designed for use in your vehicle
be installed.
Page 211 of 382
Features of your vehicle
202
3
Using RADIO, SETUP, VOLUME
and AUDIO CONTROL
1. FM/AM Button
The FM/AM button toggles between FM
and AM. Listed below are the paths as
the system switches from FM to AM and
back to FM.
FM/AM : FM1
➟FM2➟AM➟FM1...
2. SEEK Button
When the [SEEK ] is pressed, it will
automatically tune to the next lower
station.
When the [SEEK ] is pressed, it will automatically tune to the next higher
station.
3.POWER Button & VOLUMEKnob
Turns the audio system on/off whenthe IGNITION SWITCH is on ACC or
ON.
If the knob is turned clockwise/counte clockwise, the volume will increase
/decrease.
4. SCAN Button
When the button is pressed, it auto-matically scans the radio stations
upwards.
The SCAN feature steps through each station, starting from the initial station,
for 5 seconds.
Press the [SCAN] button again to stop the scan feature and to listen to the
currently selected channel.
5. MUTE Button
When the button is pressed, stops sound
and “Audio Mute” is displayed on LCD.
6. SETUP Button
Press this button to enter SETUP mode,
If no action is taken for 8 seconds, it will
return to previous mode.
In “SETUP” mode, rotate the TUNE knob
to move the cursor between items, and
push the TUNE knob to select.
Select whether long file names are
scrolled continuously (“ON”) or just once
(“OFF”).
Select this item to turn the SDVC(Speed
Dependent Volume Control) feature ON
or OFF. If it is turned ON, volume level is
adjusted automatically according to the
vehicle speed.
Select default display of SIRIUS mode.
“Category/Channel name” or “Artist/Song
Title” can be selected.
Select this item to enter
Bluetooth®
Wireless Technology setup mode. Refer
to “Bluetooth®Wireless Technology
PHONE OPERATION” section for
detailed information.
NOTE:
The Bluetooth®word mark and logos
are registered trademarks owned by
Bluetooth SIG, Inc. and any use of
such marks by Kia is under license.
Other trademarks and trade names
are those of their respective owners.
A
Bluetooth®enabled cell phone is
required to use Bluetooth®wireless
technology.
Page 212 of 382
3203
Features of your vehicle
7. TUNE & AUDIO Control Knob
Rotate the knob clockwise or counter
clock wise to increase or decrease from
current frequency.
(AM 10 kHz, FM 200 kHz)
Pressing the button changes the BASS,
MIDDLE, TREBLE, FADER and BAL-
ANCE TUNE mode. The mode selected
is shown on the display. After selecting
each mode, rotate the Audio control knob
clockwise or counterclockwise.
Press this button while holding [SETUP]
button to activate / inactivate the item to.
Select SETUP item using left and right
function of the Tune button.
To increase the BASS, rotate the knob
clockwise, while to decrease the BASS,
rotate the knob counterclockwise.
To increase the MIDDLE, rotate the knob
clockwise, while to decrease the MID-
DLE, rotate the knob counterclockwise. Control
To increase the TREBLE, rotate the knob
clockwise, while to decrease the TRE-
BLE, rotate the knob counterclockwise.
Turn the control knob clockwise to
emphasize rear speaker sound (front
speaker sound will be attenuated). When
the control knob is turned counterclock-
wise, front speaker sound will be empha-
sized (rear speaker sound will be attenu-
ated).
Rotate the knob clockwise to emphasize
right speaker sound (left speaker sound
will be attenuated). When the control
knob is turned counter clockwise, left
speaker sound will be emphasized (right
speaker sound will be attenuated).
8. PRESET Buttons
onds to play the station saved in each
button.
seconds or longer to save the current
station to the respective button with a
beep.
Page 214 of 382
3205
Features of your vehicle
Using CD Player
1. CD Slot
Insert a CD label side up and gently push
in while ignition switch is on ACC or ON.
The audio automatically switches to CD
mode and begins to play the CD. If the
audio was turned off, audio power will
automatically turned on as the CD is
inserted.
This audio only recognizes 12cm-size,CD-DA (Audio CD) or ISO data-CD
(MP3 CD).
If UDF data-CD or non-CD (e.g. DVD) is inserted, "Reading Error" message
will be displayed and the disc will be
ejected.
2. CD Indicator(CD Player :PA710S)
When car ignition switch is ACC or ON
and if the CD is loaded, this indicator is lit.
If the CD is ejected the Icon is off.
3. CD Eject Button
Press button to to eject the CD. This
button works regardless of ignition
switch status.
ALL EJECT(CD Changer :PA760S)
Press this button for more than 0.8
seconds to eject all discs inside the
deck in respective order.
4. CD LOAD Button
This compact disc player will accommo-
date up to six compact discs.To insert
discs into the player, perform the follow-
ing:
Press and release the [LOAD] Button.
Green light on the slot will be illuminat-ed and the lowest number of empty
slot will blink on the display. After “Wait”
is displayed on the LCD, the slot will
open with “Insert CD” displayed on the
LCD.
Insert a disc partway into the slot, label side up. The player will pull the disc in.
When the disc is inserted, the disc will
begin to play automatically.
✽ ✽ NOTICE
• The disc can be only inserted while the
green light is blinking on the slot.
• This CD player is suitable only for 12cm discs, do not use irregular
shaped CDs.
To insert multiple discs:
Press and hold the [LOAD] button for
one second or more. You will then hear
a beep sound and the green light on
the slot will be illuminated, and the
numbers of empty disc will blink on the
display.
After “Wait” is displayed on the LCD with the lowest number of empty slot
blinking, the slot will open with “Insert
CD” displayed on the LCD.
Insert a disc partway into the slot, label side up. The player will pull the disc in.
Once the disc is loaded, the numbers
of the empty disc will blink on the dis-
play continuously.
If the next “Insert CD” is displayed
when the slot is illuminated, you can
then load another disc.
Load the remaining disc by following procedures 1 and 2. When you finished
loading 6 discs, the CD player will
begin to play the last CD loaded.
CAUTION
Do not insert a CD if CD indicator
is lit.
Page 215 of 382
Features of your vehicle
206
3
To load more than one disc but less
than six, complete Steps 1 and 2.
When you have finished loading discs,
press LOAD button to cancel the loading
function or wait for 10 seconds. The CD
player will begin to play the last CD
loaded. As each CD starts to play, the
DISC number will appear on the display.
✽ ✽ NOTICE
The disc player takes up to six discs. Do
not try to load more than six.
5. TRACK Button
] button for less than
0.8 seconds to play from the beginning
of current song.
] button for less than 0.8 seconds and press again within 1
second to play the previous song.
] button for 0.8 sec- onds or longer to initiate reverse direc-
tion high speed sound search of cur-
rent song.
] button for less than 0.8 seconds to play the next song.
] button for 0.8 sec- onds or longer to initiate forward direc-
tion high speed sound search of cur-
rent song.
6. INFO Button
Displays the information of the current
song.
CDDA : DISC TITLE
➟ DISC ARTIST ➟TRACK TITLE ➟ TRACK ARTIST ➟TOTAL TRACK ➟ DISC TITLE...
MP3/WMA : FILE NAME
➟TITLE➟ARTIST➟ALBUM➟FOLDER➟TOTAL FILE...
(Not displayed if the information is
unavailable on the CD or file.)
7. SEARCH Knob & ENTER Button
songs after current song, or counter-
clockwise to browse songs before cur-
rent song. To play the displayed song,
press the knob.
enters to AUDIO CONTROL mode.
8. REPEAT Button
Press this button for less than 0.8 sec-
onds to activate ‘RPT’ mode and more
than 0.8 seconds to activate ‘FLD RPT’
mode.
Only a track (file) is repeatedlyplayed back.
Only files are repeatedly played back.
9. RANDOM Button
Press this button for less than 0.8 sec-
onds to activate ‘RDM’ mode and more
than 0.8 seconds to activate ‘ALL RDM’
mode.
Only files/tracks in a folder/disc are played back in a random sequence.
All files in a disc are played back in the random
sequence.
10. SCAN Button
Play each song in the CD for 10 seconds.
To cancel SCAN Play, press this button
again.
11. DISC Buttons
] Change Button Changesdisc to the previous disc.
] Change Button Changes disc to the next disc.
12. CD Button
If there is a CD in the CD DECK it switch-
es to CD mode.
If there is no CD, then the message “NO
CD” will become displayed on the LCD
for 3 seconds and returns to the previous
mode.
Page 216 of 382
![KIA Sedona 2014 3.G Owners Manual 3207
Features of your vehicle
13. FOLDER Button
Press [FOLDER ] button to move tochild folder of the current folder and
display the first song in the folder.
Press TUNE/ ENTER knob to move to
the fol KIA Sedona 2014 3.G Owners Manual 3207
Features of your vehicle
13. FOLDER Button
Press [FOLDER ] button to move tochild folder of the current folder and
display the first song in the folder.
Press TUNE/ ENTER knob to move to
the fol](/manual-img/2/2956/w960_2956-215.png)
3207
Features of your vehicle
13. FOLDER Button
Press [FOLDER ] button to move tochild folder of the current folder and
display the first song in the folder.
Press TUNE/ ENTER knob to move to
the folder displayed. It will play the first
song in the folder.
Press [FOLDER ] button to move to parent folder of the current folder and
display the first song in the folder.
Press TUNE/ENTER knob to move to
the folder displayed.
NOTE:
Order of playing files(folders):
1. Song playing order : to sequentially. 2. Folder playing order:
✽If no song file is contained in the
folder, that folder is not displayed.
Page 220 of 382
3211
Features of your vehicle
Using USB device
Using a USB that is connected to the
multiple terminal inside the console on
the right hand side of the driver’s seat.
When USB is connected, the ‘USB’ icon
will be displayed on the top right corner
of the display screen.
1. AUX/USB Button
If the auxiliary device is connected, it
switches to AUX or USB mode to play the
sound from the auxiliary player.
If there is no auxiliary device, then the
message “No Media” will become dis-
played on the LCD for 3 seconds and
returns to previous mode.
2. TRACK Button
Press the [TRACK ] button for lessthan 0.8 seconds to play from the
beginning of the current song.
Press the button for less than 0.8 sec-
onds and press it again within 1 sec-
ond to move to and play the previous
song.
Press the button for 0.8 seconds or
longer to play the song in reverse
direction in fast speed.
Press the [TRACK ] button for less
than 0.8 seconds to move to the next song. Press the button for 0.8 seconds
or longer to play the song in forward
direction in fast speed.
3. INFO Button
Displays the information of the file current-
ly played in the order of FILE NAME➟TITLE➟ARTIST➟ALBUM➟FOLDER➟TO
TAL FILE➟PLAY SCREEN➟FILE NAME
… (Displays no information if the file has
no song information.)
4. FOLDER Button
Press [FOLDER ] button to move to
child folder of the current folder and
display the first song in the folder.
Press TUNE/ ENTER knob to move to
the folder displayed. It will play the first
song in the folder.
Press [FOLDER ] button to move to parent folder display the first song in
the folder.
Press TUNE/ENTER knob to move to
the folder displayed.
5. SEARCH Knob & ENTER Button
songs after current song, or counter
clockwise to browse songs before cur- rent song. To play the displayed song,
press the knob.
enters to AUDIO CONTROL mode.
6. RANDOM Button
Press this button for less than 0.8 sec-
onds to play songs randomly in current
folder.
Press this button for 0.8 seconds or longer to play songs randomly in entire
USB device.
To cancel RANDOM play, press this button again.
7. REPEAT Button
onds to repeat current song.
longer to repeat all songs in current
folder.
again.
8. SCAN Button
Plays each song in the USB device for
10 seconds.
To cancel SCAN Play, press this button
again.