Page 329 of 446

What to do in an emergency
30
6
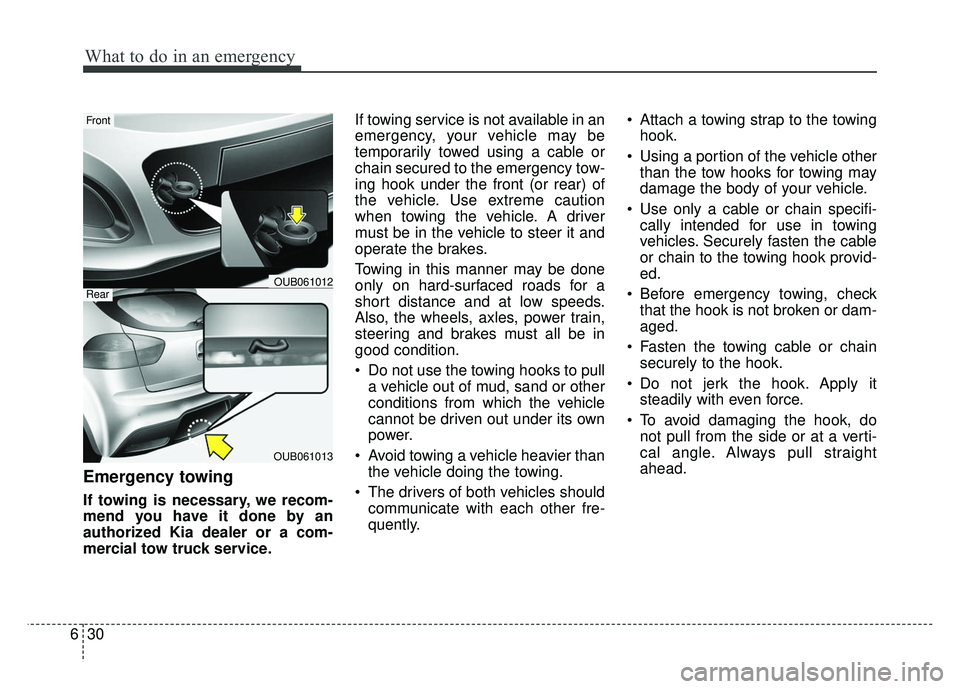
Emergency towing
If towing is necessary, we recom-
mend you have it done by an
authorized Kia dealer or a com-
mercial tow truck service. If towing service is not available in an
emergency, your vehicle may be
temporarily towed using a cable or
chain secured to the emergency tow-
ing hook under the front (or rear) of
the vehicle. Use extreme caution
when towing the vehicle. A driver
must be in the vehicle to steer it and
operate the brakes.
Towing in this manner may be done
only on hard-surfaced roads for a
short distance and at low speeds.
Also, the wheels, axles, power train,
steering and brakes must all be in
good condition.
Do not use the towing hooks to pull
a vehicle out of mud, sand or other
conditions from which the vehicle
cannot be driven out under its own
power.
Avoid towing a vehicle heavier than the vehicle doing the towing.
The drivers of both vehicles should communicate with each other fre-
quently. Attach a towing strap to the towing
hook.
Using a portion of the vehicle other than the tow hooks for towing may
damage the body of your vehicle.
Use only a cable or chain specifi- cally intended for use in towing
vehicles. Securely fasten the cable
or chain to the towing hook provid-
ed.
Before emergency towing, check that the hook is not broken or dam-
aged.
Fasten the towing cable or chain securely to the hook.
Do not jerk the hook. Apply it steadily with even force.
To avoid damaging the hook, do not pull from the side or at a verti-
cal angle. Always pull straight
ahead.
OUB061013
Front
RearOUB061012
Page 353 of 446

723
Maintenance
EXPLANATION OF SCHEDULED MAINTENANCE ITEMS
Engine oil and filter
The engine oil and filter should be
changed at the intervals specified in
the maintenance schedule. If the
vehicle is being driven in severe con-
ditions, more frequent oil and filter
changes are required.
Drive belts
Inspect all drive belts for evidence of
cuts, cracks, excessive wear or oil
saturation and replace if necessary.
Drive belts should be checked peri-
odically for proper tension and
adjusted as necessary.
Fuel filter
A clogged filter can limit the speed at
which the vehicle may be driven,
damage the emission system and
cause multiple issues such as hard
starting. If an excessive amount of
foreign matter accumulates in the
fuel tank, the filter may require
replacement more frequently.After installing a new filter, run the
engine for several minutes, and
check for leaks at the connections.
Fuel filters should be installed by an
authorized Kia dealer.
Fuel lines, fuel hoses and con-
nections
Check the fuel lines, fuel hoses and
connections for leakage and dam-
age. Have an authorized Kia dealer
replace any damaged or leaking
parts immediately.
Vapor hose and fuel filler cap
The vapor hose and fuel filler cap
should be inspected at those inter-
vals specified in the maintenance
schedule. Make sure that a new
vapor hose or fuel filler cap is cor-
rectly replaced.
Vacuum crankcase ventilation
hoses (if equipped)
Inspect the surface of hoses for evi-
dence of heat and/or mechanical
damage. Hard and brittle rubber,
cracking, tears, cuts, abrasions, and
excessive swelling indicate deterio-
ration. Particular attention should be
paid to examine those hose surfaces
nearest to high heat sources, such
as the exhaust manifold.
Inspect the hose routing to assure
that the hoses do not come in con-
tact with any heat source, sharp
edges or moving component which
might cause heat damage or
mechanical wear. Inspect all hose
connections, such as clamps and
couplings, to make sure they are
secure, and that no leaks are pres-
ent. Hoses should be replaced
immediately if there is any evidence
of deterioration or damage.
Page 362 of 446
Maintenance
32
7
PARKING BRAKE
Checking the parking brake
Check the stroke of the parking
brake by counting the number of
“clicks’’ heard while fully applying it
from the released position. Also, the
parking brake alone should securely
hold the vehicle on a fairly steep
grade. If the stroke is more or less
than specified, have the parking
brake adjusted by an authorized Kia
dealer.
Stroke : 6~8 “clicks’’ at a force of 44
lbs (20 kg, 196 N).
Filter replacement
It must be replaced when necessary,
and should not be washed.
You can clean the filter when inspect-
ing the air cleaner element.
Clean the filter by using compressed
air. 1. Loosen the air cleaner cover
attaching clips and open the cover.
AIR CLEANER
OUB051016OUB071010OUB071011
Page 369 of 446

739
Maintenance
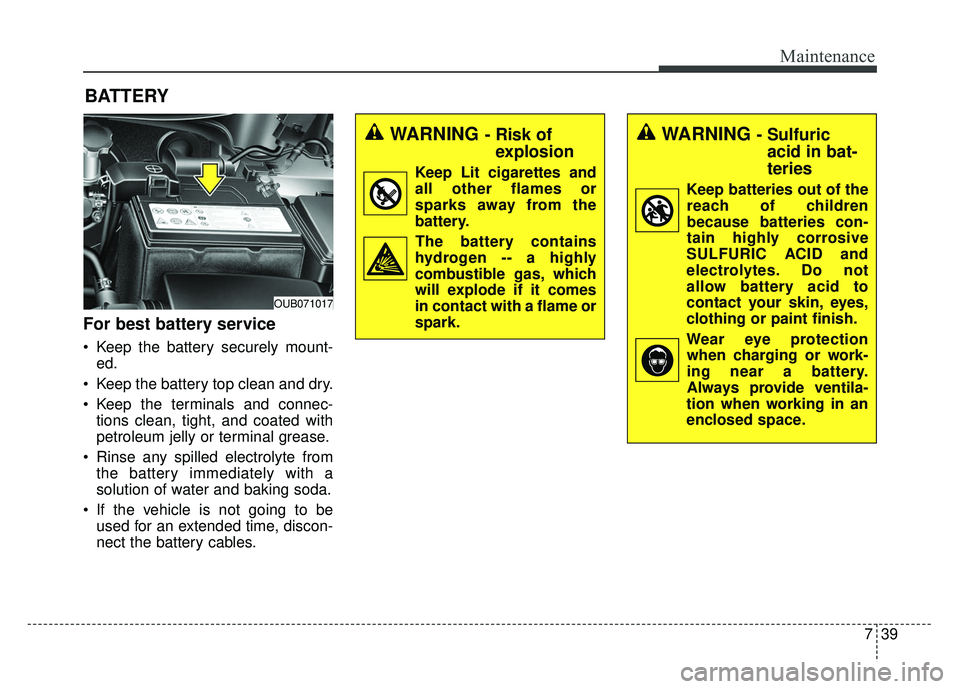
BATTERY
For best battery service
Keep the battery securely mount-ed.
Keep the battery top clean and dry.
Keep the terminals and connec- tions clean, tight, and coated with
petroleum jelly or terminal grease.
Rinse any spilled electrolyte from the battery immediately with a
solution of water and baking soda.
If the vehicle is not going to be used for an extended time, discon-
nect the battery cables.
WARNING - Risk of explosion
Keep Lit cigarettes and
all other flames or
sparks away from the
battery.
The battery contains
hydrogen -- a highly
combustible gas, which
will explode if it comes
in contact with a flame or
spark.
WARNING - Sulfuric acid in bat-
teries
Keep batteries out of the
reach of children
because batteries con-
tain highly corrosive
SULFURIC ACID and
electrolytes. Do not
allow battery acid to
contact your skin, eyes,
clothing or paint finish.
Wear eye protection when charging or work-
ing near a battery.
Always provide ventila-
tion when working in an
enclosed space.
OUB071017
Page 389 of 446
759
Maintenance
Multi fuse
If the multi fuse is blown, consult an
authorized Kia dealer.
Fuse/relay panel description
Inside the fuse/relay panel covers,
you can find the fuse/relay label
describing fuse/relay name and
capacity.
✽ ✽NOTICE
Not all fuse panel descriptions in
this manual may be applicable to
your vehicle. It is accurate at the
time of printing. When you inspect
the fuse panel in your vehicle, refer
to the fuse panel label.
OUB071023N
CAUTION - Fuse panel
covers
After checking the fuse panel in
the engine compartment,securely install the fuse panelcover to prevent electrical fail-ures which may occur fromwater leaking in.
Page 393 of 446

763
Maintenance
Fuse Name Fuse ratingCircuit Protected
IG1 2 10AVehicle Speed Sensor, Stop Lamp Switch, Inverter
A/C Control Module
HAZARD 15A Hazard Switch, BCM
PDM 1 25A Smart Key Control Module
SUNROOF 15A Sunroof Motor
PDM 2 10AImmobilizer Module, Start/Stop Button Switch,
Smart Key Control Module
ECU 15ASmart Key Control Module, Immobilizer Module,
ECM/PCM, Transaxle Range Switch
IGN COIL 15A Ignition Coil #1/#2/#3/#4, Condenser
IG2 10ABCM, Smart Key Control Module, Driver CCS Seat Warmer Module
Cluster Ionizer, Rain Sensor, A/C Control Module, Sunroof Motor
PCB Fuse & Relay Box (Blower Relay, Head Lamp (HI) Relay,
Fuel Pump #1 Relay)
WIPER FRT 25AMultifunction Switch, Front Wiper Motor
PCB Fuse & Relay Box (Rain Sensor Relay, Front Wiper Relay)
DOOR LOCK 20ADoor Lock/Unlock Relay, Tail Gate Unlock Relay,
Two Turn Unlock Relay
SAFETY POWER
WINDOW 25A Driver Safety Power Window Module
S/HEATER 15ASeat Warmer Switch, Driver CCS Seat Warmer Module,
Passenger Seat Warmer Module
FOLD'G MIRR 10A Power Outside Mirror Switch
ROOM LAMP 10ABCM, Door Warning Switch, Tire Pressure Monitoring Module
Instrument Cluster, Digital Clock, A/C Control Module
Luggage Lamp
Page 395 of 446
765
Maintenance
Engine compartment fuse panel
Fuse NameFuse rating Circuit Protected
MULTI FUSE MDPS
80A EPS Control Module
ALT 125A Alternator
FUSE B+1
50AI/P Junction Box (Power Connector Fuse : ROOM LP 10A / AUDIO 20A,
Fuse : FOG LP FRT 15A / MODULE 1 10A / STOP LP 15A, Tail Lamp Relay)
INVERTER 40A Inverter
B+2 50AI/P Junction Box (Fuse : HAZARD 15A / PDM 1 25A / PDM 2 10A / SUNROOF 15A /
DR LOCK 20A / SAFETY POWER WINDOW 25A / S/HEATER 2 15A,
FOLD'G MIRR 10A / Power Window Relay)
IG1 40AWith Smart Key - PDM Relay Box (ESCL (ACC) Relay, ESCL (IG1) Relay)
W/O Smart Key - Ignition Switch
ABS1 40A ESC Module, Multipurpose Check Connector
ABS2 40A ESC Module
RR HTD 40A I/P Junction Box (Rear Defogger Relay)
ECU 5 10A PCM
H/LP HI IND 10A Instrument Cluster
Page 396 of 446

Maintenance
66
7
Engine compartment main fuse panel
Fuse Name Fuse rating Circuit Protected
IG2 40APCB Fuse & Relay Box (Start Relay), W/O Smart Key - Ignition Switch,
With Smart Key - PDM Relay Box (ESCL (IG2) Relay)
ECU1 30A PCB Fuse & Relay Box (Engine Control Relay, ECU2 10A)
ECU3 10A Not Used
BLOWER 40A PCB Fuse & Relay Box (Blower Relay)
C/FAN 40A PCB Fuse & Relay Box (Cooling Fan (Low) Relay, Cooling Fan (Hi) Relay)
F/PUMP 20A PCB Fuse & Relay Box (Fuel Pump #1 Relay)
H/LAMP HI 20A PCB Fuse & Relay Box (Head Lamp (HI) Relay)
H/LAMP 20A PCB Fuse & Relay Box (Head Lamp (LO) Relay)
HORN 10A PCB Fuse & Relay Box (Horn Relay, Burglar Alarm Horn Relay)
ECU2 10A M/T - ECM, A/T - E/R Junction Box (ECU_VM 10A)
B/UP LAMP 10A A/T - PCM, Transaxle Range Switch
WIPER 10A ECM/PCM, Rain Sensor
ECU4 20A ECM/PCM
INJECTOR 15A ECM/PCM, PCB Fuse & Relay Box (Fuel Pump #1 Relay)
H/LAMP LH 10A Head Lamp LH
SENSOR1 10APurge Control Solenoid Valve, Variable Intake Solenoid Valve, Canister Close Valve,
PCB Fuse & Relay Box (Cooling Fan (Low) Relay, Cooling Fan (Hi) Relay)
SENSOR2 10A Oil Control Valve #1/#2, Oxygen Sensor (Up/Down)
H/LAMP RH 10A Head Lamp RH